Forward SM-8800 User manual

FULLHDSatelliteFinderMeter
SM-8800
HDDVB-S2/S+Spectrum
Meter
Usermanual

SM8800
2 |ENG SAT-Meter
Table of Contents
Description....................................................................................................... 3
Safety instructions........................................................................................... 3
Safety of persons............................................................................................... 3
General information.......................................................................................... 4
Appropriate Usage.......................................................................................... 4
Delivery range................................................................................................. 4
Device overview............................................................................................... 5
Start of operation.............................................................................................7
Battery.............................................................................................................. 7
Switch-on the Device........................................................................................ 7
Lithium-ions-battery....................................................................................... 8
Charging the battery.......................................................................................... 8
Storing of the batteries...................................................................................... 8
System setting.................................................................................................. 9
Language Setup.................................................................................................9
Factory Default.................................................................................................10
Factory reset................................................................................................. ...10
Factory reset.................................................................................................. 10
Satellite finding ............................................................................................. 11
Finding channels manual ................................................................................ 11
Lining satellite aerial up.................................................................................. 12
Satellite setting .............................................................................................. 12
Dish Setup .... ..............................................................................................13
Satellite setup ....................................... ..........................................................14
Channel Setup--------------------------------------------------------------------------14
DisEqc1.2-------------------------------------------------------------------------------14
USB--------------------------------------------------------------------------------------15
File Viewer----------------------------------------------------------------------------------16
Updating-------------------------------------------------------------------------------------17
Backup Data---------------------------------------------------------------------------------17

SM8800
3 |ENG SAT-Meter
Angle calculation........................................................................................... 17
Spectrum........................................................................................................ 17
Av Setup......................................................................................................... 17
Disposal.............................................................................................. ............20
Technical specifications...................................................................... ..........22
Warrenty........................................................................................... ........... .23
Description
The Satellite meter is a handy digital antenna measuring device for an quick
and easy alignment of satellite antennas. If a satellite is found, the meter
shows it on the display and emits a audible signal. Signal strength and quality
are displayed as numerical values and bar graphs. Another measurement
value is the forward error correction (FEC) and the bit error rate (BER),
Modulation error rate(MER),In addition, the picture quality can be revised on the
high-resoluted 4.3-inch TFT LCD screen. Many satellites are pre-programmed in
order to an quick antenna adjustment.
The scope of supply contains, among the charger, an USB connector which allows
you to update software.
A carrying case serves as protection and for the transport. It cares for better
readability of the display at sunshine.
Safety instructions
Attention!
Please read the safety instructions carefully before operating
the device.
Please follow all warnings and instructions on the equipment and
in the operating manual.
Safety of persons
Ensure that nobody can be hurt by falling tools or parts of the satellite
antenna during the adjustment and installation of the antenna. For your own

SM8800
4 |ENG SAT-Meter
security use a rope on sloping roofs.
General information
Attention!
The devise should only be operated with the supplied AC
adapter at the mains.
Do not open the meter or the included AC adapter. There is
danger of life through electric shock!
Wrong usage of the ports can lead to the destruction of the
measuring device.
Proceed carefully with the measuring device:
Avoid low temperatures (below 0 °C) or to high humidity.
The TFT display can be damaged by mechanical impacts.
Avoid excessive input voltages.
Do not operate with the device:
if it has visible damage,
if there are loose parts in the device,
if the device was located outdoors or in damp rooms a extended period of time.
Appropriate Usage
The measuring device meter was developed to measure signals of
digital satellite antennas and satellite systems. It is exclusively for this purpose
and should only be used for this purpose. Use the equipment only for the
purpose, which is described in this manual.
Follow all information in this manual, particularly the safety instructions on
page 4
Any other usage is rated as not properly and can result in damage or even injury.
There will be no liability for damages caused by a non-intended use.
Delivery range
Please check if the delivery is complete.
Included in delivery:
Tool case

SM8800
5 |ENG SAT-Meter
device meter
a carrying bag
an extern charger
an power cable
AV cable
F connnector
an user manual CD
If the delivery should be incomplete, contact your specialist dealer
Device overview
LNB IN : Connect this port to the satellite atn cable
RF IN: Not connect
DC 14V: Power supply port
AV OUT: Connect this port to TV’S CVBS via AV cable
HDMI: Connect this port to TV HDMI port via HDMI cable
AV IN: Connect the port to other’s CVBS Cable

SM8800
6 |ENG SAT-Meter
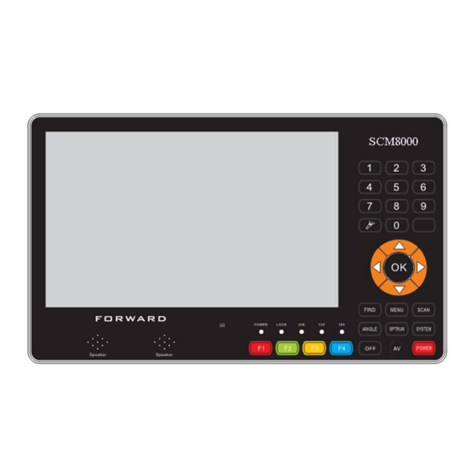
Figure: Front of the meter
No. Description
1 LNB1-IN
LNB2-IN
Digital satellite signal input
2 LC-Display Display of the TV picture, the menu and the
measured values
3 POWER-LED
Display of the energy state:
Operation:
red: the measuring devise is switched on.
Off: the measuring devise is swi
tched off.
In charge:
Green: The battery is charged
Red: The battery is full charged
4 LOCK-LED LED lights when a signal is received.
5 FUNCTION keys
F1: shortcut key
F2: shortcut key
F3: shortcut key
F4: shortcut key

SM8800
7 |ENG SAT-Meter
5.1 22K/13V/18V-L
EDs
Lights if 22K/13V/18V signals are received
6
6.1
Navigation-cross
OK
Navigation through menus,
switching programs ▲, ▼
volume control ◄, ►
OK button: confirmation of a selection
7 Numeric keys Direct enter of numbers
8 FIND FIND menu: for a quick and easy alignment of
a satellite antenna
9 Menu Display the main menu
10 AV Switch AV input or out put setup
11 ANGLE Display the calculation menu
12 SYSTEM Configuration of all system parameter.
Display current AV setup.
13 POWER Switch on the power on at 2-3 second
14 SCAN Display the auto scan menu
15 OFF Switch off the power
16 T/R Switch the TV or Radio program display
17 SPTRUM Display the menu of spectrum (for spectrum
meter only)
Start of operation
Battery
Before the first operation with the measuring device charge the battery completely. (see also
chapter “Lithium-Ion battery” on page 10).
Load the accumulator during the first loading procedure at least 5
hours.
The maximum battery charging time is approximately 12 hours.
Switch-on the Device
ðPress 2-3 seconds the red power button on the meter.

SM8800
8 |ENG SAT-Meter
Lithium-ions-battery
Explosion danger!
Never the two poles (+ and -) connect with each other!
Attention!
Storing or operating accumulator no more than 40° C.
Not burning or damaging accumulator.
Not taking accumulator to contact with water.
Charging the battery
The maximum battery charging time is approximately 12 hours.
A charging circuit in the measuring device provides an optimal charge of the
battery. The device is charged if it is switched off.
èTurn the device off, if it is not already off.
èConnect the Euro-main cable with the external AC adapter.
èConnect the external AC adapter to the power grid.
èConnect the AC adapter to the low-voltage port at the bottom.
èThe battery is charged as soon as you connect theAC adapter to the
meter
The Power-LED shows the battery status:
Red: the battery is charged
Green: the battery is completely loaded
Storing of the batteries
Storing the batteries between 0° Celsius and 40° Celsius.
Loading the accumulator at a longer storage every two weeks to
avoid a depth discharge.

SM8800
9 |ENG SAT-Meter
System setting
èPress the MENU button.
èSelect the point system setting.
èConfirm your selection using the OK button.
Figure 2: System setting
language Setup
Press the SYSTEM button to change the menu language.
_Select the point Language setup.
_Choose your desired language using the ◄- or ►- button.
_After your selection press the EXIT button and follow the instructions on.

SM8800
10 |ENG SAT-Meter
INFO
Factory Default
Press the SYSTEM button to change the menu language.
_Select the point Factory Default.
_Press OK to make the factory setting
Factory reset
Attention!
All programs and settings, configured by you, will be reset to
delivery status.

SM8800
11 |ENG SAT-Meter
Satellite finding
In this menu you have the option to search for single channels or using the display for lining a
satellite dish up.
ðPress the FIND button to display the Satellite Finding menu.
Figure 4: Satellite Finding
Finding channels manual
ðPress the FIND button to display the menu satellite finding.
ðPress the ◄- or ►- button to select a satellite..
ðPress the ◄- or ►- button to select a LNB type..
ðInput the Frequency using the NUMERIC buttons.(press◄- or ► first, then input the
number you want)
ðInput the symbol rate using the NUMERIC buttons.(press◄- or ► first, then input the
number you want)
ðPress the ◄- or ►- button to select the polarisation.
ðF1 button to enter the Dish Setup menu
ðF2 button to add new TP
ðF3 button to Remove TP
ðScan button to enter the channel scan menu

SM8800
12 |ENG SAT-Meter
Lining satellite aerial up
-> Press the FIND button to display the menu satellite finding.
ðChoose a satellite.
ðTurn the receiving dish as long as the LOCK- LED lights, or the joists of the signal level
and signal quality are green.
Once a signal is found, the bar graph shows the signal strength and quality. In addition C/N,
FEC and a.BER ,MER) are displayed. In addition an acoustic signal is represented.
Notice!
The satellite call sign (see Figure 4) registers which satellite you
receive at the moment. At some satellites, as for example "Türksat",
a wrong satellite call sign is cosent on single transponders, hence,
the announcement can be falsified. Therefore, we recommend to
leave the setting on the preset first transponder with the search of a
satellite. Therefore the right satellite call sign is indicated in general
always.
ðSet up the satellite antenna exactly to receive the best signal.
Notice!
The C/N value should amount 6dB at least. Values of 10dB and more
are urgently if you liked to have a certain bad weather reserve. Or in
the case if the signal about a multicounter should be distributed to
several buyers.
The higher the C/N value, the better.
The BER value behind “10E” is important. The higher, the better.
The value should be minimal 10E-4. The optimum is > 10E-6.
Installation
Satellite setting
_Press the MENU button to display the main menu.
_Press the ▲- or ▼- button to move the cursor.

SM8800
13 |ENG SAT-Meter
_Select the point INSTALLATION and press the OK button
Figure 5: Satellite setup
_Select the point Dish Setup and press the OK button.
Figure 9: Dish set-up settings
_ Press the ▲- or ▼- button to move to the desired item
_ Press the ◄- or ►- button to modify the value of the selected item. Use the NUMERIC
buttons if necessary.
_Select Satellite: Satellite selection
_LNB-Type: Univ-LNB1(9750-10600),Univ-LNB2(9750-10750),UNICABLE, 5150, 9750,
10750, 11300, 10700,
_22K: AUTO, ON, OFF
_LNB power (LNB-Tension): Off, Auto, 13V, 18V
_DiSEqC-Level: - / DiSEqC 1.0
_DiSEqC 1.0: Switch Input: 1, 2, 3, 4

SM8800
14 |ENG SAT-Meter
_DiSEqC 1.2: To enter the DisEqc1.2 Menu
_SCAN: you can scan the channels at this menu by press SCAN key
_Finder:To enter the finder menu
_ANGLE:To enter the Angle menu
_Press F2 to enter the DiSEqC1.2 menu
_Select Satellite:Press the ◄- or ►button to choose the Satellite name
_Edit/Select ref Transponder:Press ◄- or ►button to choose the TP
_Motor Position:Press ◄- or ►button to choose the Motor positon at the off/1-64
_Movement style:Press ◄- or ►button to choose he movement style at the
_Step/Continuous/1 second
_Move left/Right:Press ◄- or ►button to choose move left or right
_F1:To store sat positon
_F2:To Expert motor settings
_Select the point Satellites Setup and press the OK button.
Figure 6: Satellites Setup
_Select Satellite: Satellite select

SM8800
15 |ENG SAT-Meter
_Name: Satellite name
_Orb.pos[Deg]:Satellite Degree
_West/East:控制天线转到方向 West or East
_F1: press F1 to enter the Dish setup menu
_F2: Add the new satellite
_F3:Remove this satellite
_Finder: To enter the Finder menu
_ANGLE: Calculation the satellite Degree
_Scan: Scan this satellite program
_Press the Channel Scan button to enter the channel scan menu.
_In Select satellite button ,press the ◄- or ►- button choose the Satellite name
_In the Scan method button ,press the ◄- or ►- button choose the scan method mode at the
Atuo/Blind/Manal
_In the NIT Search button ,press the ◄- or ►- button choose the NIT search at the ON/OFF
_In the Kind of service button ,press the ◄- or ►- button choose the Kind of service mode at
the All services/Only free services/Only encrypted services
_In the TV/Radio button ,press the ◄- or ►- button choose TV/Radio mode at the TV
Only/Radio Only/TV+Radio
USB
_Press the USB button to display the Updating and Backup Data menu.

SM8800
16 |ENG SAT-Meter
Figure 11: USB
_Press the File viewer to play usb file
_Press the Updating- button or use the updating the sw
_Press the Backup Data to backup data

SM8800
17 |ENG SAT-Meter
Figure 12: SW updating
Figure 13: Backup Data
Angle calculation
_Press the ANGLE button to display the Calculation menu.
_ Press the ◄- or ►- button or use the NUMERIC keys to change the configuration of the
selected menu point.

SM8800
18 |ENG SAT-Meter
Figure 11: Angle Calculation
_ Press the ▲- or ▼- button to select the following points:
Satellite ·Longitude ·Location ·Latitude
Hemisphere ·Angle
calculation
_Satellite: Select the desired satellite
_Longtitude: Input your local longtitude
_Location: Input the direction
_Latitude: Input your local latitude
_Longitude: Input your local longtude
_After the completion of all values select Angle Calculation and press the OK button.
_Azimuth: shows the azimuth of the chosen satellite
_Elevation: shows the angle of elevation of the chosen satellite
_Polarity: shows the polarity angle of the chosen satellite
Spectrum Analyzer
In this menu you can control the transponders over the whole spectrum.
èPress the finder menu to enter the S/S2 Menu

SM8800
19 |ENG SAT-Meter
èchoosing SPTRUM
Figure 13: Spectrum analyzer
Adjustment
èF1 Span FULL:Changes the sampling –frequency between 50MHz/100MHz/200MHz
èF2 LNB setting:To enter the LNB setting menu
èF3 POLVER:To display the Power lever
èOK Search:To enter the program search
■ AV Setup
_Press the SYSTEM BUTTON to enter the AV Setup

SM8800
20 |ENG SAT-Meter
_Display format: Press ◄- or ►button to choose the display format at 4:3/16:9
_Scaling method: Press ◄- or ►button to choose the Scaling method at
Pillar-Letterbox/Fullscreen(zoom)/Fullscreen(CCO)/Let TV scale
_HDMI signal : Press ◄- or ►button to choose the HDMI signal at 1808i/720p/480/576i
480/576p
_SDTV standardt: Press ◄- or ►button to choose theSDTV standard at
PAL/NTSC/SECAM/PAL-M/PAL-N/PAL-N Argent/
_Screen capture: Press ◄- or ►button to choose the Screen capture at Video only/Video+OSD
_Save screen capture to: Press ◄- or ►button to choose the Save screen capture to usb
_Digital audio output : Press ◄- or ►button to choose the Digital audio out put at
PCM/Original
_Lip sync mode: Press ◄- or ►button to choose the Lip sync mode at Auto/Manual
_Audio delay:Press ◄- or ►button to choose the Audio delay at 0ms/20ms/40ms/…
Disposal
Attention!
Never throw the receiver and the batteries in normal household
waste. They may contain toxic agents that are hazardous to
health and environment. Therefore dispose of the device and
the batteries immediately according to the prevailing
statutory regulations. Never throw the batteries in normal
Table of contents
Other Forward Measuring Instrument manuals
