FOS Technologies 192Ch DMX Console User manual

1
FOS 192Ch DMX Console

2
PRODUCT SPECIFICATIONS
TECHNICAL SPECIFICATION
Voltage: 100 / 240 Volt AC, 50 / 60 Hz, to 12V DC, 0.5A. (Supplied Power Supply.)
Control: 192 DMX Channels total: 12 fixtures with a max of 16 Channels each.
Programming abilities: 30 banks with 8 scenes each and 6 chases with capacity of 240 scenes each.
Midi: Supports midi input for scene & chase activation.
Weight: 2 Kg
SAFETY WARNING
This product must be installed by a qualified professional. All maintenance must be carried out by a
qualified electrician. Always disconnect the power before carrying out any maintenance. The earth must
always be connected to the ground. Ensure that all parts of the equipment are kept clean and free of
dust.
The product is designed for indoor use only. Keep it away from water, moisture, extensive
heat, humidity and dust. Do not install the product directly on to flammable objects.
Always connect the product to nominal voltage and frequency. Do not connect the device
to dimmers.

3
PROTECTION AGAINST SOLIDS AND
WATER
Only for IP-rated fixtures
The protection level of a housing is set by applied standards. For classification there is used the IP-Code.
It contains the declaration „IP“and two following numbers. The first number characterizes the protection
against harmful effects of solids, the second is rating the water protection. It is important to distinguish
whether encapsulation and harmful effect! There can be housing that is not capsuled completely but still
avoids harmful effect of solids or water.
PROTECTION EXAMPLES:
IP20: Protection against intruding objects >12,5mm „Finger protected “; No waterproofing. TYPICAL
PROTECTION FOR INDOOR USE FIXTURES
IP33: Protection against intruding objects >2,5mm; Falling water within an angle of 60° has no harmful
effect TYPICAL PROTECTION OF LED-LIGHTS USING RECESSED POWERCON AND DMX SOCKET. This
protection is linked to the mounting position of the fixture and always refers to typical mounting situation
like a Floor spot used standing on the ground.
IP54: complete protection against solids and low-pressure water from any side THIS TYPE OF FIXTURES
CAN BE USED UNDER NORMAL OUTDOOR CONDITIONS.
IP65: shielded against dust and pressurized water from any side. TYPICAL PROTECTION FOR OUTDOOR
RATED EVENTFIXTURES USING WATERPROOFED POWER AND SIGNAL LINK.
IP67: shielded against dust and protected for accidental briefly submerge. PROTECTION AGAINST
ACCIDENTIAL SUBMERGING ON TEMPORARY FLOODED AREA.
LIMITATIONS OF IP PROTECTION
IP-Rating doesn´t mean unlimited outdoor use and protection against any kind of environmental
influence! Especially sunlight and included UV will bring accelerated aging. Some fixtures need special
parts or processes to fit the rated IP-Protection, like mounting covers or caps or similar. Sealings and
other plastic or rubber materials are aging parts. They must be checked frequently to ensure the
protection and safety of the fixtures. Also specified torque of screws can affect protection!

4
Warning
NOTE! If the signal cable is over 60 m between the DMX512 controller and fixture or between
two fixtures, then a DMX signal amplifier is needed as well. Also, always terminate the DMX
line (s) with a 120 Ohm resistor.
Console Layout Description
1. Scanner Buttons: To control independently your fixtures, you should arrange them in to the 12
buttons, by giving them the proper address. Each button, controls the maximum number of 16
channels. In detail:
Scanner buttons
Channel control range
1
1 to 16
2
17 to 32

5
3
33 to 48
4
49 to 64
5
65 to 80
6
81 to 96
7
97 to 112
8
113 to 128
9
129 to 144
10
145 to 160
11
161 to 176
12
177 to 192
2. SCENE buttons: in these buttons, you can save and recall a scene (single step).
3. CHANNEL sliders: adjust the intensity of the DMX channels, from zero to 255. You must select one
or more fixtures, from the Scanner Button section.
4. Page Select Button: This button changes the page of the channel sliders. Page A controls the group
of 8 channels and Page B, the second group of 8 channels (total 16 channels for 12 fixtures).
5. SPEED slider: adjusts the running speed of the scenes (steps) in a range from 0,1 seconds, to 10
minutes.
6. FADE TIME slider: Adjusts the fade time between the steps, in a range from 0 to 30 seconds.
7. LCD Display: Shows information on the current mode, the steps, chases, etc. In detail:
•First digit displays the current chase.
•Second digit shows the current scenes number.
•Third and fourth digits, are showing the current bank’s number.
•The last three digits are showing also, the value of the current channel / fader, while its
adjusted.
•There are LED indicators, for showing the running mode or state of the console: Blackout,
Step, PROG (flickers when activated), Music & Auto.
8. BANK Up & Down: Scrolls in the available banks, from 1 to 30.
9. Chase: Selects or deselects the available six chases.
10. Program: Activates the program mode of the console. Press it and hold it, until the LED indicator on
the screen starts to flicker. After completing your programming, press the button and hold it down
again, until the LED indicator will go off. Then you have exit the program mode.
11. Add / Midi: Activates or deactivates the MIDI operation & adds steps in chases.
6
12. Auto / Del: Activates or deactivates the Auto run mode & deletes steps, banks & chases.
13. Music / Bank Copy: Activates or deactivates the Music mode & copies a bank in to a chase.
14. Tapsync / Display: In Auto run, sets the speed of banks / chases run (by tapping it with your desired
rhythm) and changes the channel value type on the screen (in percentage 0 to 100% or in DMX
value, 0 to 255).
15. Blackout: Sets all the channel values to zero when it’s activated.
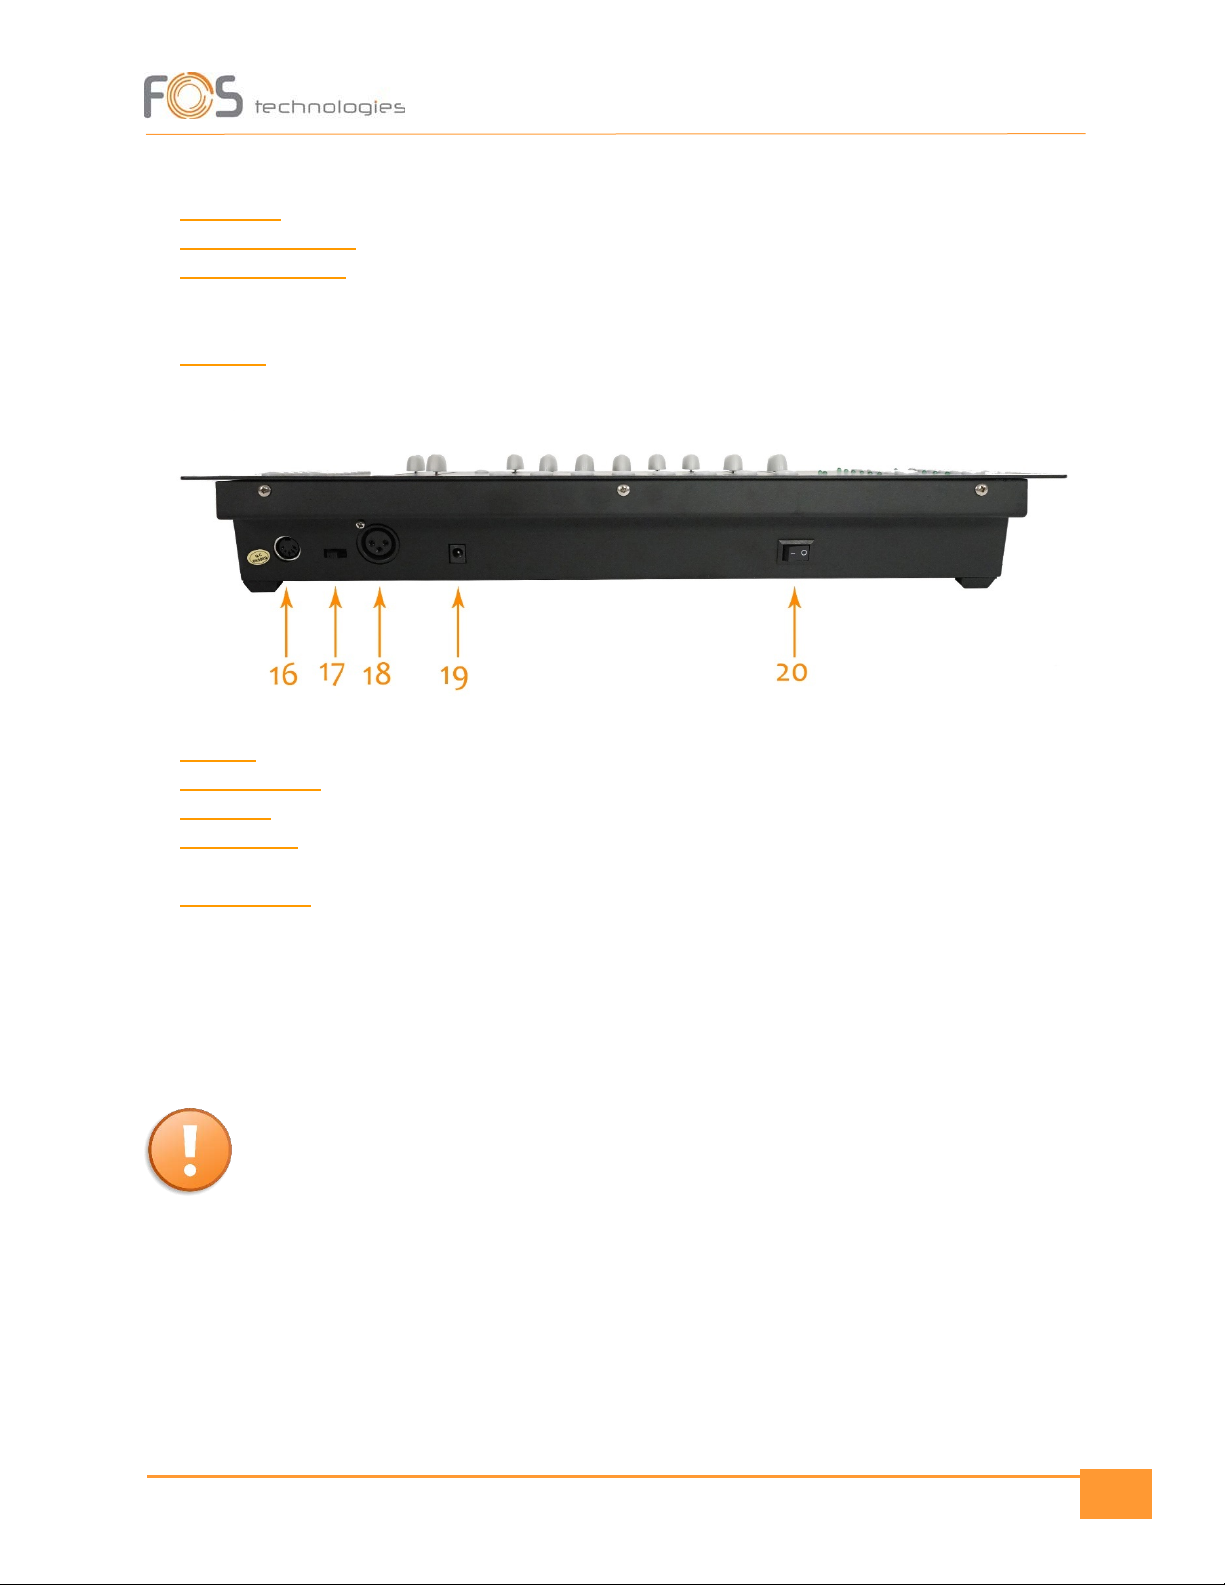
16. MIDI IN: for Midi control signal.
17. Polarity switch: Select the polarity of DMX signal output.
18. DMX Out: Connect your DMX line in this output.
19. Power input:Connect the supplied power supply. Voltage range from 9 to 12 Volts DC, 300 mA
minimum.
20. Power Switch: Activates / Deactivates the console.
Programming Mode
NOTE! To be able to save a scene, a chase, or to delete / edit, you must set the console in
Program Mode. You press and hold the Program button until the LED indicator will start
flickering.
Program a scene
•Press a desired Scanner Button to select it and create your scene, by adjusting the 8 main faders.
In case your fixtures having more than 8 channels, use the Page Selector to control the rest 8
channels of the fixtures. (Page A controls 1 to 8 and Page B controls 9 to 16 channels).
•Deselect the scanner when you complete your adjustments.

7
•Do the same with all the fixtures you want to include in the scene.
•Select the desired Bank with the Up and Down buttons.
•While holding down the Add/Midi button, press one of the Scene buttons to store your created
step. All the LEDs will flash, indicating that your scene is saved.
NOTE! If you save your scene in to a button which already includes one, then, it will be
overridden with the data of the newest scene.
Edit a scene
•Use the Bank Up & Down buttons to select the bank, in which the scene you would like to edit is
stored.
•Press the corresponding Scene button of the scene you wish to edit.
•Edit the levels you want to change.
•Then, like when programming, press and hold the Add/Midi button and then the Scene button
you wish to change. The new data will override the previous and your scene will be updated.
•Exit Program Mode by pressing and holding the Program button, until the PROG LED indicator
goes off.
Copy a scene
•Use Bank Up & Down buttons to select the bank in which the scene you want to copy is stored.
•Press the corresponding Scene button of the scene to be copied.
•Use Bank Up & Down buttons to select another bank to copy the scene in to.
•While pressing the Add / Midi button, press the Scene button of your choice. Release the
buttons and all the LEDs will flash, indicating that your scene is copied.
Delete a scene
•Use Bank Up & Down buttons to select the bank in which the scene you want to delete is stored.
•While pressing the Auto / Del button, press the corresponding Scene button, which includes the
scene you want to delete. All the LEDs will flash, indicating that scene values have been set to
zero.
Erase all scenes
•While pressing Program button and Bank Down button at the same time, turn the power off.
Then turn power on again (while keeping on pressing the buttons) and all the LEDs will flicker,
indicating that all the stored scenes have been erased.
Copy a bank

8
•Use Bank Up & Down buttons to choose the bank you wish to copy.
•Press Add / Midi button.
•Select another Bank, in which you wish to copy using the Up & Down buttons.
•Press Music / Bank Copy button. All the LEDs will flicker, indicating that your bank is copied.
Delete a bank
•Use Bank Up & Down buttons to select the bank you wish to delete.
•Press Auto / Del and Music / Bank Copy buttons at the same time. All the LEDs will flicker,
indicating that the selected bank is deleted.
Create chases
•Choose any Chase from 1 to 6 to be programmed.
•Select the desired scene from any bank.
•Press the Auto / Del button. All the LEDs will flicker, indicating that the scene is copied to the
chase.
•Repeat the same steps for all the scenes you want to include in to the chase. You can copy the
maximum number of 240 steps, in to the chase.
•Note that scenes order in the chase, is the one you used when programmed the chase.
Copy a Bank in to a chase
•Use Bank Up & Down buttons to select a bank you wish to copy.
•Select the chase you want the bank to be copied.
•Press and hold the Music / Bank – Copy & Add / Midi buttons at the same time. Then all the
LEDs will flicker, indicating that your bank is copied in to the case.
Add a step in to a chase
•Select a chase in which you wish to add the new step.
•Press Tap Sync / Display button. The LED Screen shows the current chase and step.
•Use the Bank Up & Down buttons, to navigate through the chases steps, until you find the one
in which you would like to add the extra step.
•Press the Add / Midi button. One new step will be added, after the step you have chosen in the
previous step. It will also appear on the screen, indicated with a number. For example, if you
have pressed the Add / Midi button while the console was on the #10 step, your new step will
have the number #11.
•Pres Tap Sync / Display button for once more and the screen will resume in showing the Chase,
Scene and Bank numbers.
•Then navigate with Bank Up & Down buttons and choose the Scene button which includes the
scene you want to include in your newly created step.
•Press the Add / Midi button. All the LEDs will flicker indicating that the scene has copied in to
your newly created step, in to the chase.

9
Delete a step in a chase
•Select the Chase which includes the step you wish to delete. The LED display will show up the
current chase, step and bank.
•Press Tap Sync / Display button. The LED display will show the current chase and step.
•Use the Bank Up & Down buttons, to find the step you want to delete.
•Press the Auto / Del button. All the LEDs will flicker, indicating that the selected step has been
deleted.
Delete a chase
•While pressing and holding the Auto / Del button, press the Chase button of the chase you like
to delete.
•All the LEDs will flicker, indicating that the selected chase has been deleted.
Delete all the chases (scenes excluded)
•While pressing the Band Down and Auto Del and turn the power off. Keep holding the buttons
and turn the power on again. All the LEDs will flash, indicating that all the chases are deleted.
Run Scenes
NOTE! You don’t need to enter the Program mode of the console for the following functions.
Manual Run mode
•When you turned on the power, the console enters in to Manual mode by default.
•When your console is already on, make sure that Auto & Music triggers are both off.
•Select the Bank which stores your desired scenes, using the UP & Down buttons.
•Press the Scene button to activate the desired scene.
Auto Run mode
•In this mode, you are to run a bank of programmed scenes in a sequential loop.
•Press Auto / Del once to activate the Auto Run mode.
•Use the Bank Up & Down buttons to select a bank of scenes to run.
•Use the Speed and Fade Time faders to set the running mode of the scene.
•Be aware that the Fade Time must never be higher than the Speed time, because the scenes will
never be completed with that kind of adjustment.
•You can change Banks on the fly, by pressing the Bank UP & Down buttons.

10
Music Run mode
•Press the Music / Bank Copy button, until the corresponding LED illuminates.
•Use the Bank Up & Down buttons to select the desired bank, which will start run the scenes to
the rhythm of the music.
•Pressing again the Music / Bank Copy button, will deactivate the Music mode.
Run Chases
Auto Run mode
•Press Auto / Del button once, to activate the Auto Run mode. The LED indicator will flash.
•Choose your desired Chase or chases by pressing the chase buttons.
•Adjust the Speed and Fade Time faders.
•You can use also the TapSync button to set the Speed time. The interval between the taps, is
setting the speed. TapSync is overriding the Speed fader.
Music Run mode
•Press the Music / Bank Copy button. The LED indicator starts flashing.
•Press the Chase button(s) to select the chase(s) you would like to run.
Midi Run mode
•Press and hold the Add / Midi. The third and fourth digits in LED display will blink, which means
MIDI mode is activated.
•Use the Bank Up or Down buttons to select the MIDI Channel (indicated as the third and fourth
digits).
•Press and hold the Add / MIDI button one more time till the third and fourth display digits stop
blinking, which will indicate that MIDI mode has been deactivated.
Midi Channel settings
Note Number: Receive NOTE Number signal to execute corresponding functions.
Bank
Note Number
Function
Bank 1
00
Turn On / Off Scene 1
01
Turn On / Off Scene 2
11
Bank 1
02
Turn On / Off Scene 3
03
Turn On / Off Scene 4
04
Turn On / Off Scene 5
05
Turn On / Off Scene 6
06
Turn On / Off Scene 7
07
Turn On / Off Scene 8
Bank 2
08
Turn On / Off Scene 1
09
Turn On / Off Scene 2
10
Turn On / Off Scene 3
…
…
Bank 15
112
Turn On / Off Scene 1
113
Turn On / Off Scene 2
114
Turn On / Off Scene 3
115
Turn On / Off Scene 4
116
Turn On / Off Scene 5
117
Turn On / Off Scene 6
118
Turn On / Off Scene 7
119
Turn On / Off Scene 8
Chase
120
Turn On / Off Chase 1
121
Turn On / Off Chase 2
122
Turn On / Off Chase 3
123
Turn On / Off Chase 4
124
Turn On / Off Chase 5
125
Turn On / Off Chase 6
126
Blackout
General Information
Replacing a fuse:

12
Always disconnect the fixture from main power before replacing a fuse. Use only the appropriate fuse,
with the same type and rating. A fuse with different rating, can damage the fixture in case of failure.
Risk of electric shock and / or fire:
The fixture must be earthed, supplied always with its nominal voltage and cleaned periodically from dust.
For cleaning use only, a moist cloth. Never use liquids or force water. After cleaning, let the fixture dry
before use.
Table of contents


