Fosera TV 110 User manual
fosera TV 110
digital 15.6’’ 12 V
User Manual

2
1. INTRODUCTION .....................................................................................4
1.1. CAUTION.........................................................................................4
1.2. COMMEN SHORTCUTS..........................................................................5
1.3. REMOTE CONTROL.............................................................................7
1.4. VIEWING THE CONTROL PANEL .................................................................8
1.5. EXTERNAL SCHEMATIC.........................................................................9
2. SETUP............................................................................................. 10
2.1. CONNECTING TO THE TV-SIGNAL INPUT .................................................. 10
2.2. INSTALLATION GUIDE.......................................................................... 10
3. MENU.............................................................................................. 13
3.1. INPUT SOURCE ............................................................................... 13
3.2. PICTURE........................................................................................ 13
3.2.1. PICTURE MODE............................................................................ 14
3.2.2. CONTRAST................................................................................. 14
3.2.3. BRIGHTNESS............................................................................... 14
3.2.4. COLOR ..................................................................................... 14
3.2.5. SHARPNESS................................................................................ 14
3.2.6. TINT........................................................................................ 14
3.2.7. COLOR TEMPERATURE................................................................... 14
3.2.8. ASPECT RATIO ............................................................................ 14
3.2.9. NOISE REDUCTION........................................................................ 14
3.3. SOUND MENU ................................................................................. 14
3.3.1. SOUND MODE ............................................................................. 15
3.3.2. TREBLE .................................................................................... 15
3.3.3. BASS........................................................................................ 15
3.3.4. BALANCE .................................................................................. 15
3.3.5. AUTO VOLUME (AVL)..................................................................... 15
3.3.6. SURROUND SOUND ....................................................................... 15
3.3.7. EQ.......................................................................................... 15
3.4. CHANNEL MENU............................................................................... 15
3.4.1. Channel Management.................................................................... 16
3.4.2. Favorite Management ................................................................... 16
3.4.3. Country.................................................................................... 16
3.4.4. TV connection ............................................................................ 16
3.4.5. Auto Search............................................................................... 16
3.4.6. Digital Manual Search.................................................................... 16
3.4.7. Analogue Manual Search ................................................................ 16
3.5. FEATURE MENU ............................................................................... 16
3.6. SETUP MENU .................................................................................. 17
3.6.1. OSD Timer................................................................................. 17
3.6.2. 3D Timer .................................................................................. 17
3.6.3. Auto SCART ............................................................................... 17
3.6.4. PC Setup................................................................................... 17
3.6.5. Blue Screen ............................................................................... 17
3.6.6. Home Mode ............................................................................... 17
3.6.7. Reset TV Setting ......................................................................... 17
3.6.8. Software Upgrade........................................................................ 17

3
4. USB Multimedia ................................................................................... 18
4.1. PHOTO PLAYER............................................................................... 18
4.2. MUSIC PLAYER................................................................................ 19
4.3. MOVIE PLAYER................................................................................ 19
4.4. TEXT PLAYER ................................................................................. 19
5. TROUBLESHOOTING ............................................................................. 20
6. SAFETY INFORMATION........................................................................... 21
7. RECYCLING ........................................................................................ 22
8. CONTACT .......................................................................................... 23
9. WARRANTIES ...................................................................................... 23

4
1. INTRODUCTION
Thank you for buying our TV. Please read this manual carefully.
1.1. CAUTION
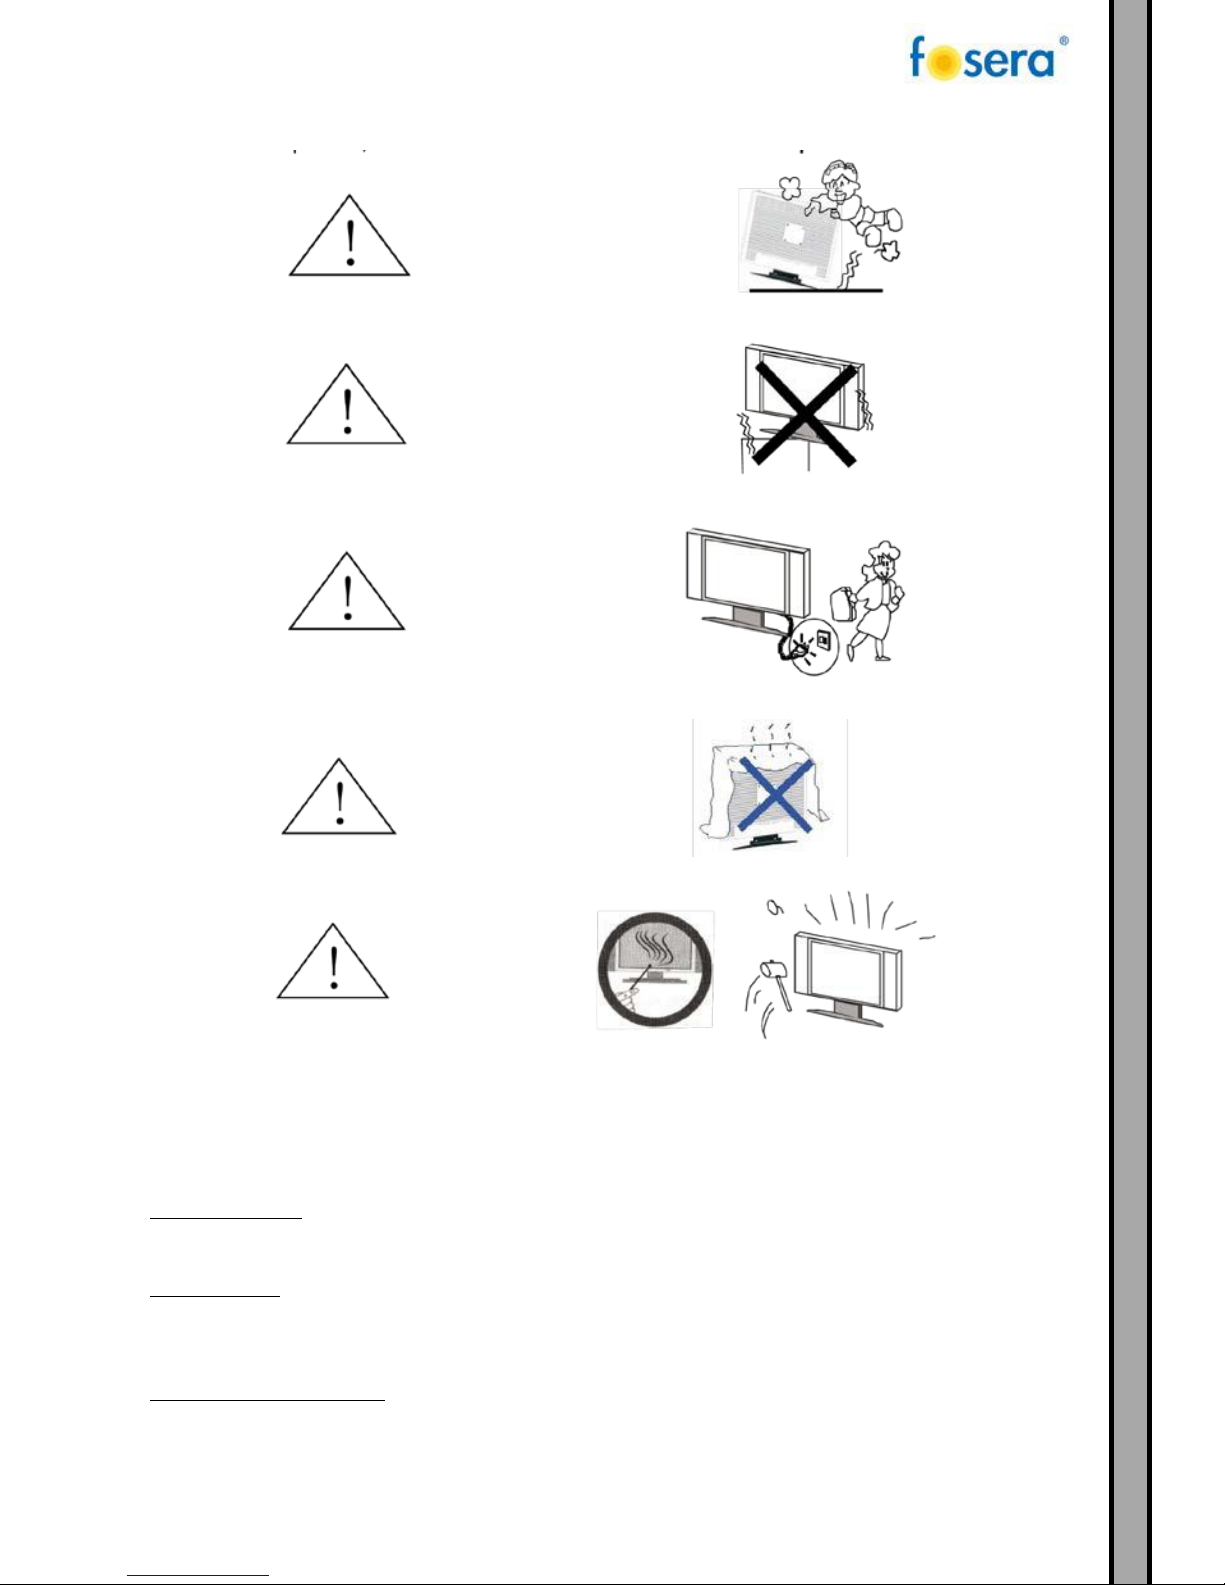
To avoid the risk of electric shock, do not remove the back cover of the TV.
To prevent fire or electrical shock, do not expose the main unit to rain or moisture.
Please also do not:
-Drop or put an object on the TV
-Spill liquid on the TV
-Put the TV on a bed, soft, rug, wool or any other similar surfaces
-Place the TV too close to curtains/ walls, inside a shelf or any other closed places which may cause poor
ventilation.
Please note that minimum distances must be maintained for ventilation.
5
The TV should be placed where children are unable to stand on or push the unit.
Put the TV set on a stable stand, strong enough to carry it.
When the product is not in use, it is advisable to unplug it from the power outlet to save energy.
Avoid direct sunshine or other heat source onto the unit.
Avoid any impact with blows on the screen.
Please clean the TV regularly with a cloth. Never use harsh or abraisive chemicals
or solvents on the equipment.
1.2. COMMEN SHORTCUTS
Standby function:
When your TV is running, press “Power”to enter standby mode. When your TV is in standby mode, press
‘’Power’’ to start it.
Sleep function:
When your TV is running, press “Sleep” to enter sleep mode. This function allows you to turn off the TV for
a period of time. The supported time periods are: Off, 10 Mins, 20 Mins,30Mins, 60Mins, 90 Mins, 120
Mins, 180 Mins, 240 Mins,
Switching the input source:
After the normal startup process, press the button “source”, then the button “up/down” to choose the
preferred source, and the button “enter” or “->”.

6
Info function:
Information of the current source will be shown when pressing down the button “info”, number, color
system, sound system, (in TV source), current frequency, bandwidth, event information, etc (in DTV source)
Mute function:
The sound will be muted when pressing the button “mute”, and unmuted with another press on it.
Resolution of picture:
Parameters of the displayed picture, like luminance, contrast, sharpness, hue, color, can be changed when
pressing “PMODE”.
Sound:
Parameters of the sound, like balance, max volume, min volume, will be changed when pressing “SMODE”.
NICAM:
Switch on/off sound effect or switch between Mono,Dual I/Dual II by pressing “MTS/DUAL” on TV or DTV
source.
Aspect ratio:
Aspect ratio will be changed when pressing “PSIZE”.
Numeric buttons:
When in TV or DTV source,it’s a shortcut to change to the preferred channel pressing the numeric buttons.
Channel Swap:
You can change the channel back to the to the last selected channel by pressing ”ChannelSwap”.
Volume:
Volume can be adjusted by pressing “Vol+/-.
Channel Switch:
Switch the channel by pressing “CH-/+”.
EPG:
In DTV source, EPG menu will pop up when pressing down the button “EPG”.

7
1.3. REMOTE CONTROL

8
1.4. VIEWING THE CONTROL PANEL
1. VOL+/VOL- BUTTON
Press to decrease or increase the volume. Also used to select items on the on-screen menu.
2. CH+/CH- BUTTON
Press to change channels or to highlight various items on the on-screen menu.
3. MENU BUTTON
Press to see an on-screen menu.
4. SOURCE BUTTON
Displays a menu of all the available input sources (TV, VIDEO, S-VIDEO, PC).
You can also use the SOURCE button on the TV’s control panel to make selections.
5. POWER BUTTON
Press to turn the TV on/off. Blinks and turns off when the power is on and lights up in standby mode. Light
Detecting sensor adjusts brightness of screen automatically by detecting brightness of the surrounding
environment. This sensor works when the Brightness sensor is on.
6. REMOTE SENSOR
Receives signals from the remote control. Power indicator: blue light when the TV is on, red light when the
TV is in standby.
9
1.5. EXTERNAL SCHEMATIC
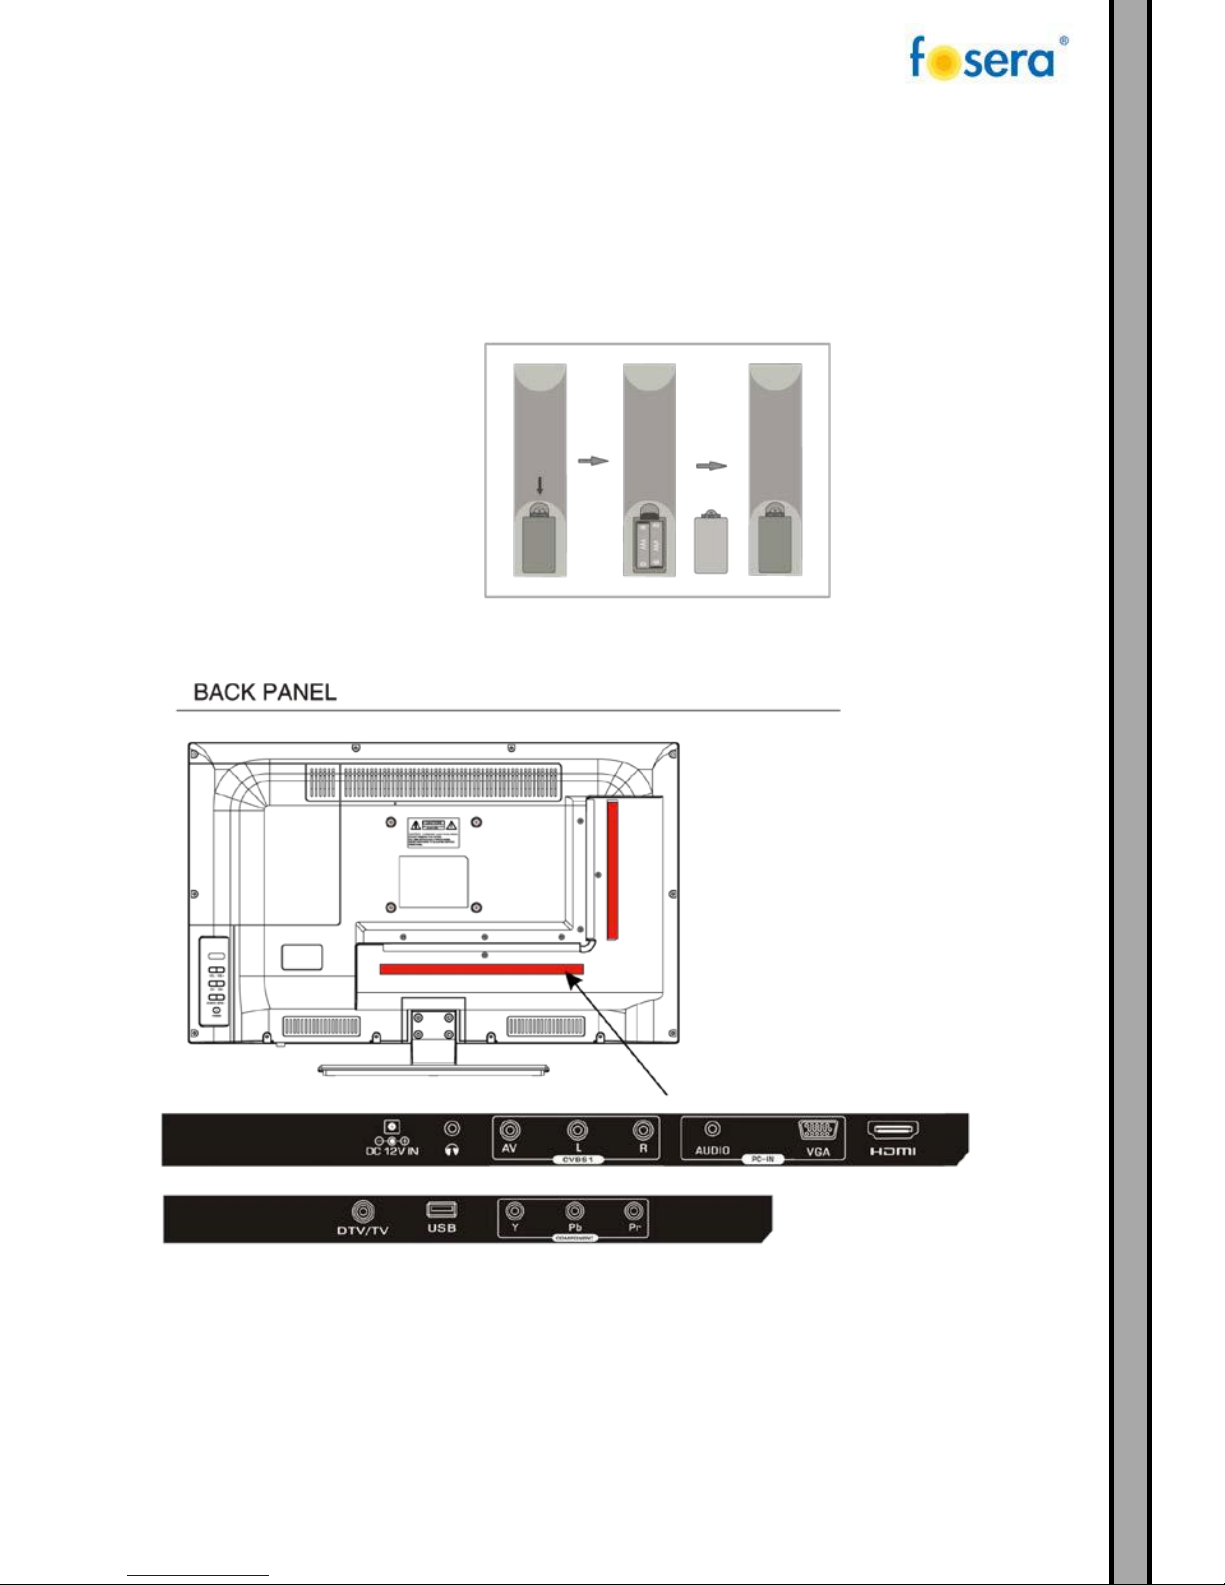
1. Insert two AAA batteries with polarities matching the mark inside the battery compartment.
2. Point the remote control towards the IR sensor on the TV. The remote control may not work if it
is being blocked by an object.
3. Replace the battery once the remote control is no longer working.
4. If the remote control is not being used, please remove the batteries.

10
2. SETUP
2.1. CONNECTING TO THE TV-SIGNAL INPUT
Connect the TV signal cable (the antenna cable for example) to the Antenna Input Jack on the back of the
unit so that you can receive television programmes.
Then, turn on the power of the unit and press the INPUT button to select TV or DTV mode and conduct
program selection.
Note:
Whether and how many DVB-T2 channels can be received by this device is strongly depending on the
operational place, and the DVB-T2 signal strength in this area.
DVB-T2 radio in particular is very limited and not available in most locations.
Please note that for the use of DVB-T2 after each larger local change a new channel search should be
done.
Programs which are signed with “internet” cannot be utilized.
2.2. INSTALLATION GUIDE
The First Time Setup screen will appear when the TV is switched for the first time or after a reset to the
factory setting.
1. Press the ▲▼ buttons to navigate the menu and the ◄► buttons to change the settings. Select your
desired Energy Mode, Home/Store Mode to be displayed on the menu. Confirm with OK.
Note:
a. Home Mode is an energy-saving mode. It is recommended for normal viewing setting.
b. Shop Mode is an option for retailers for advertising or product presentation. Shop Mode has a brighter
image than Home Mode, and can also pop up a pop menu every 30 seconds.
c. You may switch between Home or Shop Mode. If you choose Shop Mode, it will enter HDMI1 source
automatically and press EXIT key to exit POP menu.

11
2. Select with the ▲▼ buttons the desired country. Confirm with OK.
3. Select the language with the ▲▼ buttons. Confirm with OK.
4. With the ▲▼ buttons you can select the automatic TV shutdown time. Confirm with OK.

12
5. Select DVB-T or DVB-C (Cable) with the ▲▼ buttons. Confirm with OK.
6. Now Channel Tuning is running. This operation may take a little bit. With EXIT you can skip the Channel
Tuning.
In the UK, you will require the appropriate cable TV’s company’s “set top box” to be connected to the TV.
Please refer to the TV’s instructions manual for further details. If you select DVB-C, you will select Full or
Quick way to scan.
You can also select Auto Scan mode. DTV+ATV or DTV only, or ATV only.
Note: DTV Digital TV (DVB-T and DVB-T2)
ATV Analogue TV (not used in the UK)
DTV-C Digital TV via cable
Note:
The channel order which will be displayed after the channel tuning is based on the requirements of your
DVB provider. To sort channels manually, these settings must be deactivated in the CHANNEL menu.

13
3. MENU
3.1. INPUT SOURCE
a. Press the INPUT button to display the menu.
b. Press ▲▼ buttons to select the required mode.
c. Press the OK button to confirm.
This LED TV includes the following 7 modes.
1. DTV: DIGITAL TV MODE
2. ATV: ANALOG TV MODE
3. AV: VIDEO/AUDIO INPUT MODE
4. YPbPr: YPbPr INPUT MODE
5. HDMI: HDMI SIGNAL INPUT MODE
6. PC: PC MONITOR INPUT MODE
7. Media: USB MEDIA INPUT MODE
3.2. PICTURE
The first item of the MENU is the PICTURE MENU. Picture effects, like contrast or brightness can be adjusted.
a. Press ▲▼ button to select PICTURE in the main menu.
b. Press ►/ENTER(OK) button to enter sub-menu.
c. Press ▲▼ button to select the option that you want to adjust in the PICTURE menu.
d. Press ◄► button to adjust.
e. When you are satisfied with your adjustment, press the MENU on the remote or the EXIT button to
return to the previous menu.
14
3.2.1. PICTURE MODE
The picture mode can be selected with ▲▼ buttons. Available picture modes:
User/Mild/Standard/Dynamic.
3.2.2. CONTRAST
Press ▲▼ button then use ◄► button to adjust the contrast of the picture.
3.2.3. BRIGHTNESS
Press ▲▼ button then use ◄► button to adjust the brightness of the picture. After adjusting the value
you want, press MENU button to return to the preview MENU.
3.2.4. COLOR
Press ▲▼ button then use ◄► button to adjust the color saturation.
3.2.5. SHARPNESS
Press ▲▼ button then use ◄► button to adjust the sharpness of your TV. The suitable sharpness can make
the picture look more clearer.
3.2.6. TINT
Press ▲▼ button then use ◄► button to select the Tint (NTSC Optional).
3.2.7. COLOR TEMPERATURE
Press ▲▼ button then use ◄► button the adjust the optimum color temperature mode. The picture looks
brighter when the color temperature is higher.
3.2.8. ASPECT RATIO
Aspect ratio for the display.
3.2.9. NOISE REDUCTION
Noise reduction of the picture. To reduce noise and improve the appearance of the picture (only for TV
Source available).
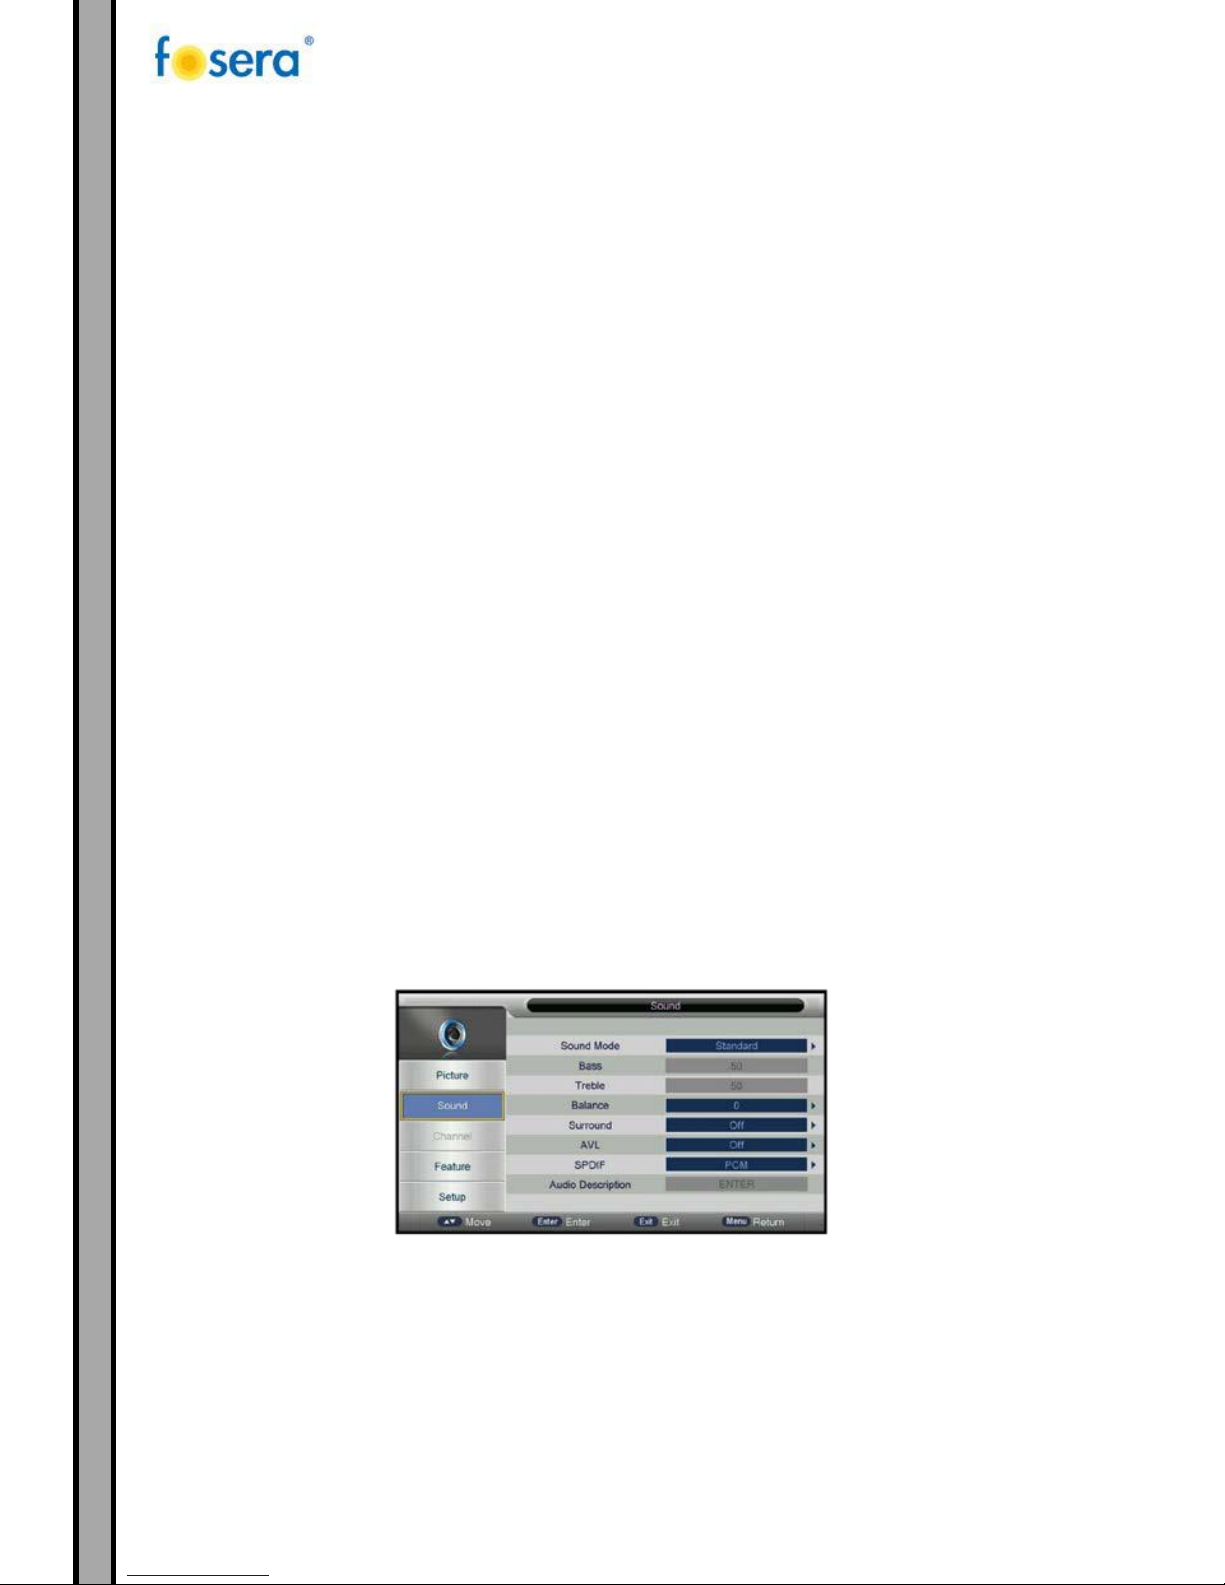
3.3. SOUND MENU
The second item of the MENU is the SOUND MENU. You can adjust the sound effect here such as bass, treble,
balance, etc.
a. Press ▲▼ button to select SOUND in the main menu.
b. Press ►/ENTER(OK) button to enter sub-menu.
c. Press ▲▼ button to select the option that you want to adjust in the SOUND menu.
d. Press ◄► button to adjust.
15
e. When you are satisfied with your adjustment, press the MENU on the remote or the EXIT button to
return to the previous menu.
3.3.1. SOUND MODE
Sound mode can be adjusted with ◄► buttons:
Sound modes available: Standard, Music, Movie, Sports, User.
Tip: You can press SMODE button repeatedly on the remote control to select the Sound Mode directly.
3.3.2. TREBLE
Press ▲▼ button then use ◄► button to increase or decrease the level of the higher-pitched sounds.
3.3.3. BASS
Press ▲▼ button then use ◄► button to increase or decrease the level of the lower-pitched sounds.
3.3.4. BALANCE
Press ▲▼ button then use ◄► button to adjust the audio output between left and right speakers.
3.3.5. AUTO VOLUME (AVL)
Press On/Off by using ◄►.
3.3.6. SURROUND SOUND
Press Off/Surround/TruSurround by using ◄►.
3.3.7. EQ
Press ◄► button, select 120 Hz/500 Hz/1.5 KHz/5 KHz/10 KHz.
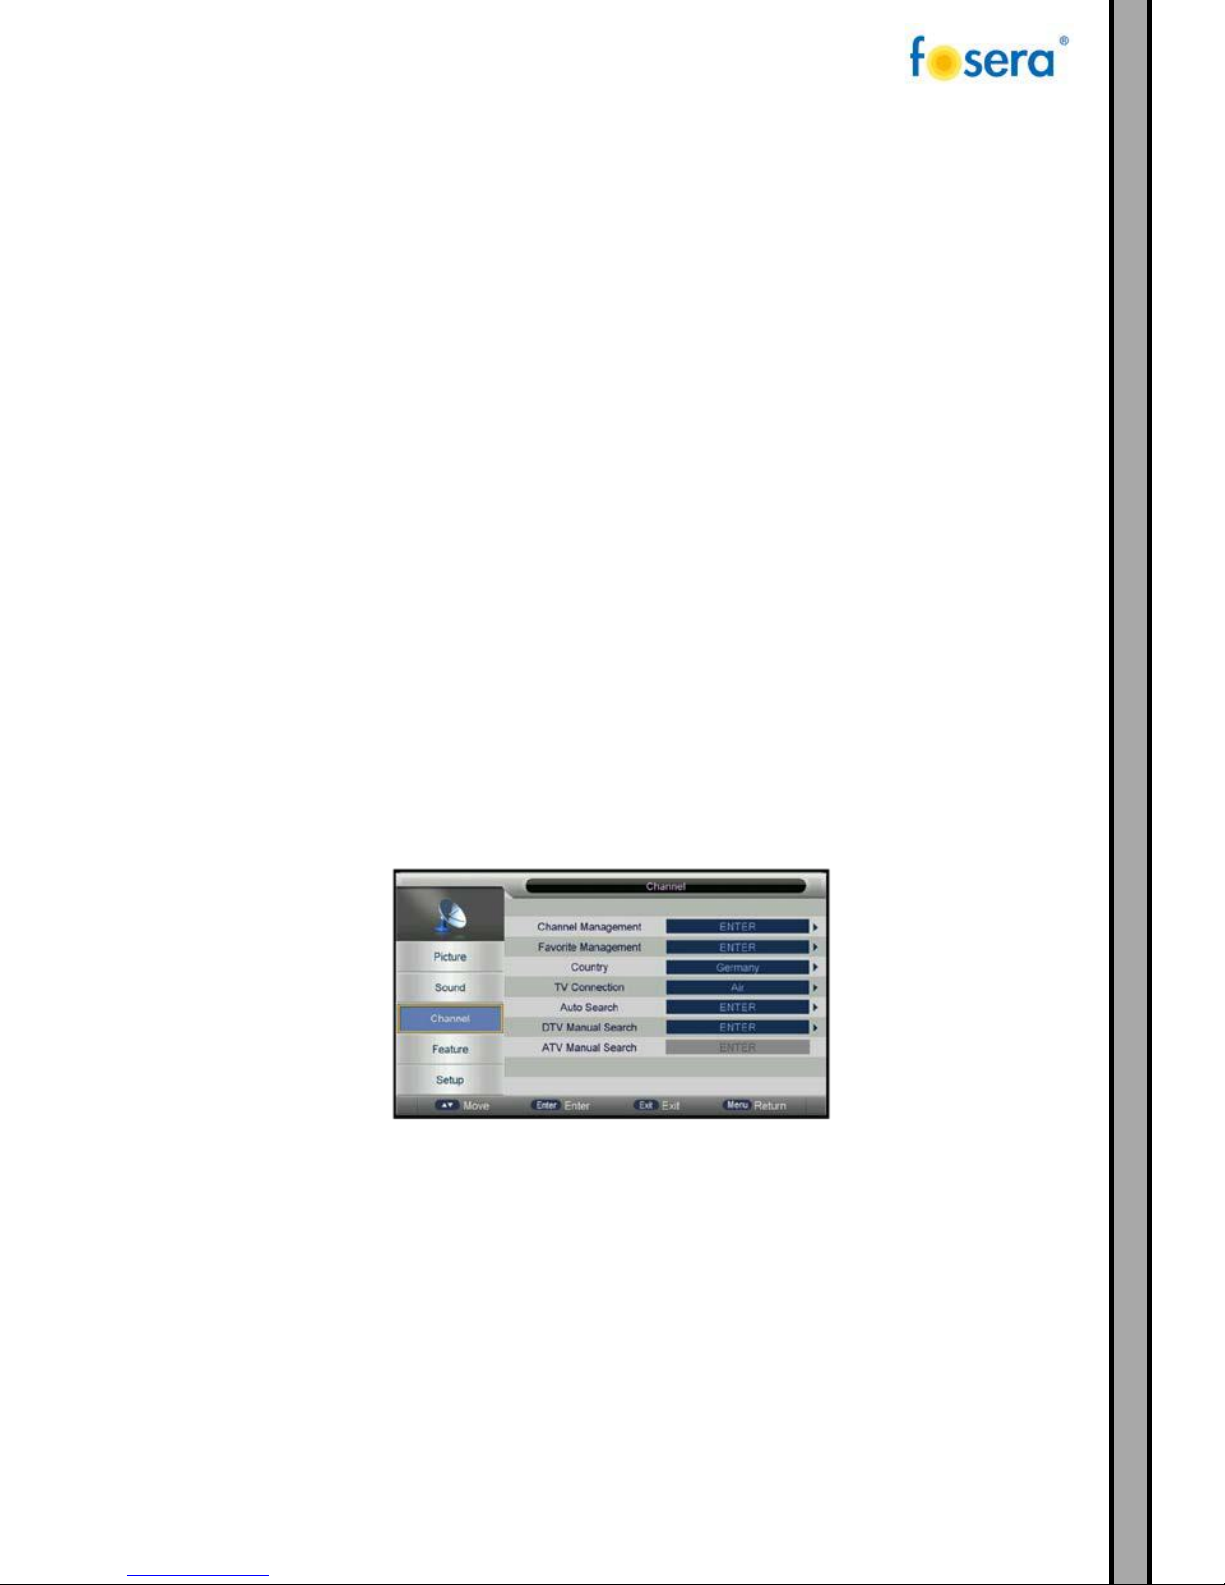
3.4. CHANNEL MENU
Press MENU button on the front panel or MENU on the remote control to display the main menu.
a. Press ▲▼ button to select CHANNEL in the main menu.
b. Press ►/ENTER(OK) button to enter sub-menu.
c. Press ▲▼ button to select the option that you want to adjust in the CHANNEL menu.
d. Press ◄► button to adjust.
e. When you are satisfied with your adjustment, press the MENU on the remote or the EXIT button to
return to the previous menu.

16
3.4.1. Channel Management:
To manage (Delete/Rename/Swap/Lock/Skip) all channels;
3.4.2. Favorite Management:
To manage (Add/Delete) Favorite channels;
3.4.3. Country:
To select country.
3.4.4. TV connection:
To select the DTV signal mode(Air/Cable)
3.4.5. Auto Search:
To select auto search mode (All/Digital/Analogue);
3.4.6. Digital Manual Search:
To search digital channel by entering parameters manually(only for Air/Cable);
3.4.7. Analogue Manual Search:
To search analogue channel by entering parameters manually(only for ATV);
3.5. FEATURE MENU
Press MENU button on the front panel or MENU on the remote control to display the main menu.
a. Press ▲▼ button to select OPTION in the main menu.
b. Press ►/ENTER(OK) button to enter sub-menu.
c. Press ▲▼ button to select the option that you want to adjust in the OPTION menu.
d. Press ◄► button to adjust.
e. When you are satisfied with your adjustment, press the MENU on the remote or the EXIT button to
return to the previous menu.
17
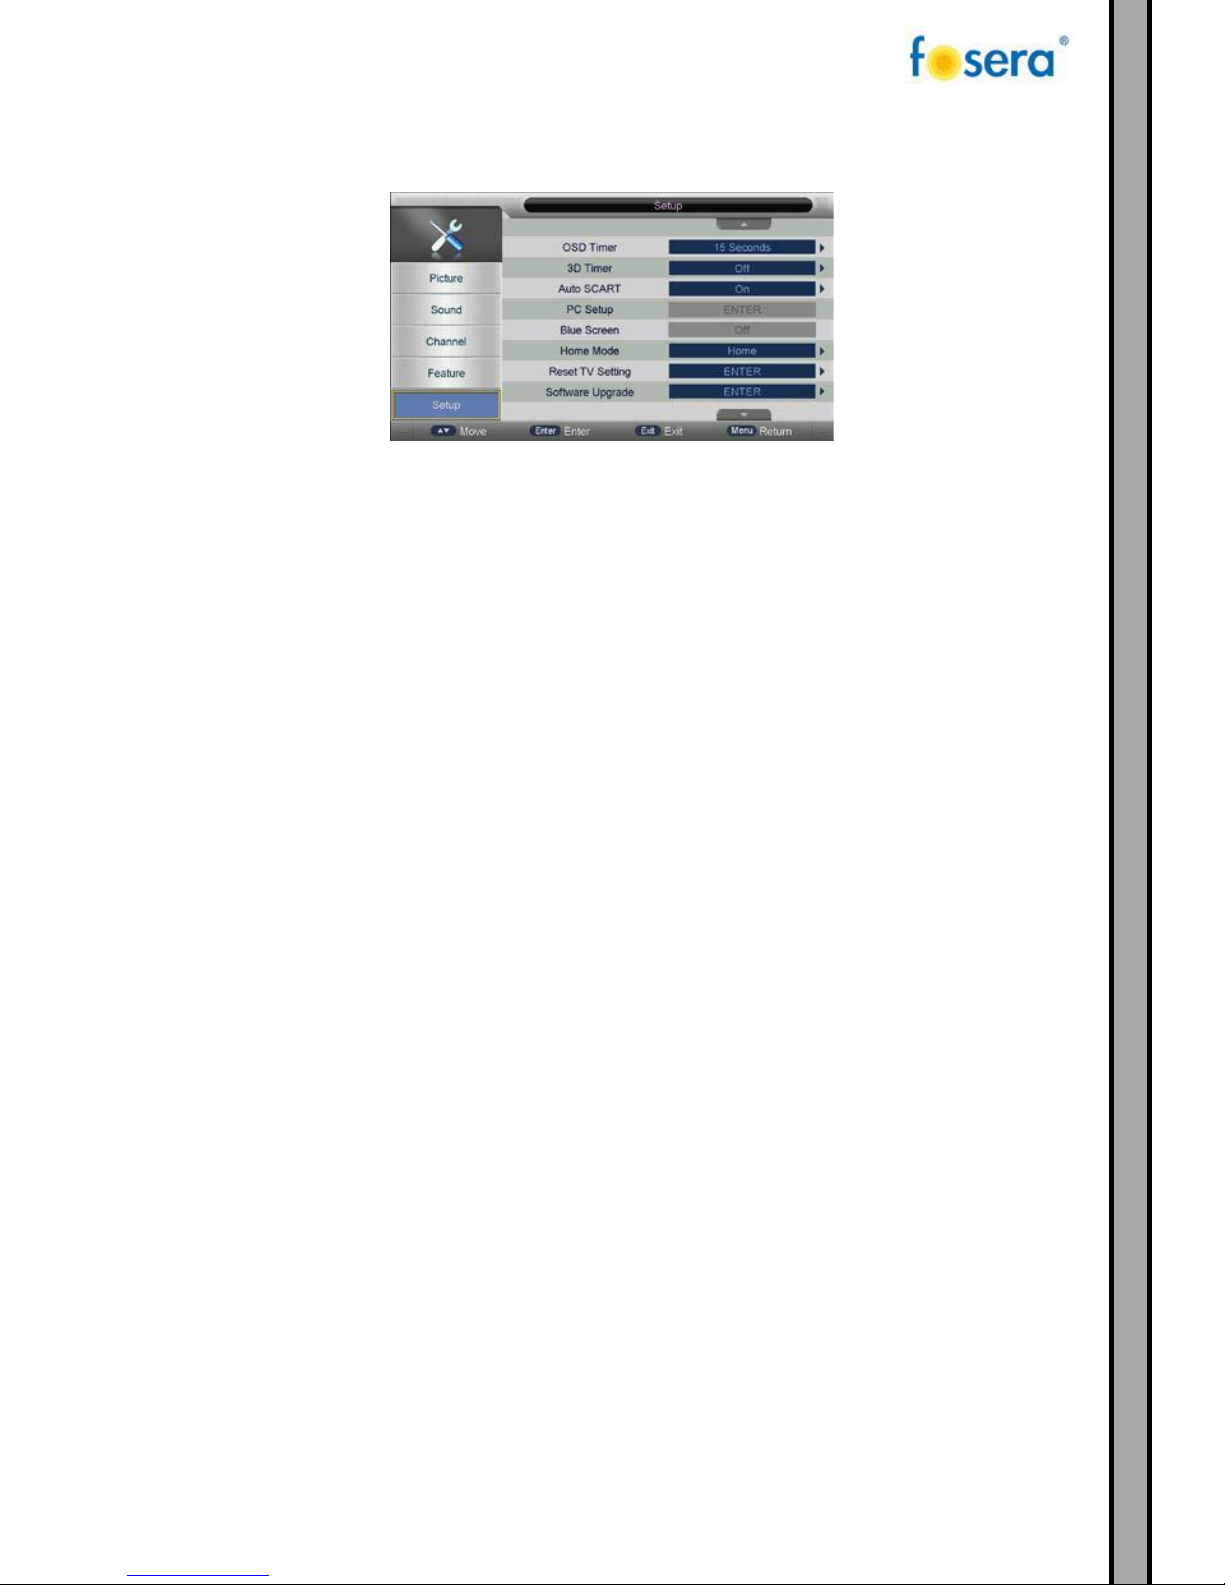
3.6. SETUP MENU
This chapter will describe the function of Setup in mainmenu. The Setup Menu is shown as follows:
Press MENU button on the front panel or MENU on the remote control to display the main menu.
a. Press ▲▼ button to select SETUP in the main menu.
b. Press ►/ENTER(OK) button to enter sub-menu.
c. Press ▲▼ button to select the option that you want to adjust in the SETUP menu.
d. Press ◄► button to adjust.
e. When you are satisfied with your adjustment, press the MENU on the remote or the EXIT button to
return to the previous menu.
3.6.1. OSD Timer
Automatic fade out of OSD menu ( 5, 10, 15, 20, 25, 30 Seconds,Never)
3.6.2. 3D Timer
( Off, 0.5, 1, 1.5, 2, Hour)
3.6.3. Auto SCART
Off/On
3.6.4. PC Setup
ENTER
3.6.5. Blue Screen
Off/On
3.6.6. Home Mode
Home/Dynamic/Standard/Mild
3.6.7. Reset TV Setting
Reset all settings.
3.6.8. Software Upgrade
This option allows you to update the software. Press ▲▼ to select Setup, confirm with OK button and
select the item Software Upgrade with ▲▼. Then press the OK button and you will start the upgrade with

18
4. USB Multimedia
MAIN MENU
You can display the input source menu by pressing the SOURCE on the remote control or TV/AV on the front
panel, press ▲▼ key to select MEDIA, press “ENTER” or “►” key to confirm.
Press ◄► key to navigate to different selections. And the relevant selection will be highlighted.
4.1. PHOTO PLAYER
During highlighting JPEG, press the ◄► key to switch to the JPEG menu.
Press ENTER or OK to navigate and preview the pictures.
Press ►II key when highlighting one picture. It will display the whole picture and start slide show.
Press EXIT key to return to the Photo clips menu.
Press SOURCE key to return to the Main menu.

19
4.2. MUSIC PLAYER
a. The user can play music files via the Music player. Press ▲▼ or ◄► to browse files and select the desired
one.
b. Press ►II key to play, then the player interface will display on the screen.
While the music is playing, you can operate as below:
c. Press ▲▼ to play the previous/next file.
d. Press VOL ◄► buttons to control the volume.
e. Press ►II button to play/pause the music.
f. Press I◄◄/►►I buttons to fast backward/forward.
4.3. MOVIE PLAYER
The user can play movie files via the Movie player. Press ▲▼◄► to select the files and press ENTER to play.
a. Press ▲▼◄► to browse files, then select the desired one.
b. Press ENTER to play, then the player interface will display on the screen.
While the movie is playing, you can operate as below:
c. Press ▲▼ to play the previous/next file.
d. Press VOL ◄► buttons to control the volume.
e. Press ►II button to play/pause the movie.
f. Press I◄◄/►►I buttons to fast backward/forward.
4.4. TEXT PLAYER
The user can play text files via the Text player. Press ▲▼◄► to select the files and press ENTER to play.
a. Press ▲▼◄► to browse files, then select the desired one.
b. Press ENTER to play, then the player interface will display on the screen.
c. Press ▲▼ to play the previous/next file.
d. Press EXIT button to return to the upper menu.
20
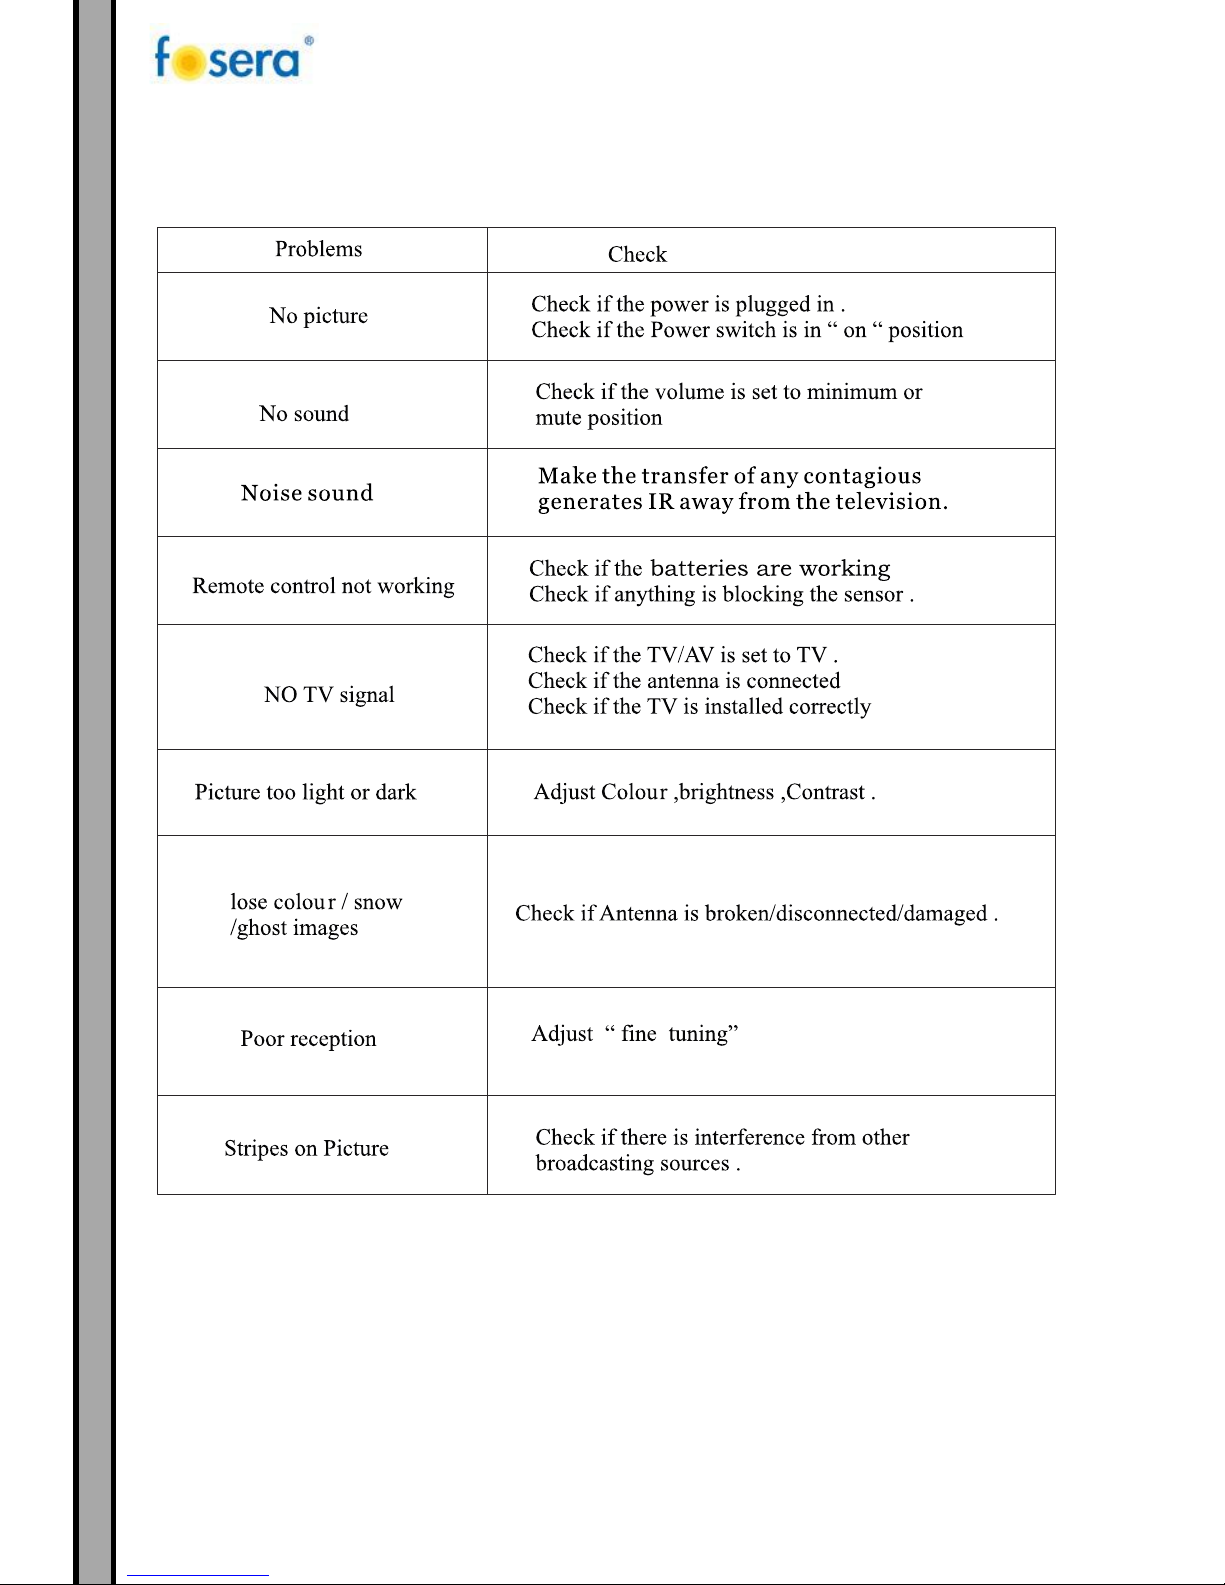
5. TROUBLESHOOTING
Table of contents
Other Fosera LCD TV manuals


