Foshan Genux Metal Products OVE G2S111S User manual

Manufacturer: Foshan Genux Metal Products Co.,Ltd.
Add: No.11 Beiwei Rd, Xihai Industrial Zone, Beijiao Town,
Shunde District, Foshan City, Guangdong, China
Figure 236, Page 1
ITM. / ART. G2S111S
Owner’s Manual
Outdoor Gas Fire Pit
IMPORTANT, RETAIN FOR FUTURE REFERENCE:
READ CAREFULLY
MADE IN CHINA
Questions, problems, missing parts?
Before returning to your retailer, call our customer service
department at
1-866-839-2888
8 a.m. - 5 p.m., EST, Monday - Friday
(Canada and United States only)
English and French speaking representatives available
HEAD OFFICE
2800, rue Étienne-Lenoir, Laval
Québec H7R 0A3 Canada
This item is intended for outdoor domestic use only. Not for commercial use.

Figure 236, Page 2
106.7 cm
42 in / po
62.5 cm
24.6 in / po
106.7 cm
42 in / po

SAFETY INFORMATION
Please read and understand this entire manual before attempting to assemble, operate or install the
product. This appliance has been tested to and complies with the ANSI Z21.97-2017, Outdoor
Decorative Gas Appliances. When connecting to a xed piping system, the installation must conform to
local codes or in the absence of local codes, to the National Fuel Gas Code. ANSI Z223.1.NFPA 54;
National Fuel Gas Code; National Gas and Propane Installation Code, CSA B149.1; or Propane
storage and Handing Code, CSA B149.2, as applicable. This manual contains important information about
the assembly, operation and maintenance of this re pit. Keep this manual for future reference and
to educate new users of this product. This manual should be read in conjunction with the labeling on the
product. Safety precautions are essential when any mechanical or propane fueled equipment is involved.
These precautions are necessary when using, storing, and servicing. Using this equipment with the
respect and caution demanded will reduce the possibilities of personal injury or property damage.
The following symbols shown below are used extensively throughout this manual. Always heed these
precautions, as they are essential when using any mechanical or fueled equipment.
DANGER
WARNING
WARNING
WARNING
DANGER
DANGER
If you smell gas:
●Shut o gas to the appliance.
●Extinguish any open ame.
●If odour continues, keep
away from the appliance and
immediately call your gas
supplier or re department.
This appliance can
produce carbon monoxide
which has no odour. Using
it in an enclosed space
can kill you.Never use this
appliance in an enclosed
space such as a camper,
tent or home.
Do not store or use gasoline, or
other flammable vapours and
liquids in the vicinity of this
or any other appliance. An LP-
cylinder not connected for use
shall not be stored in the vicinity
of this or any other appliance.
Improper installation, adjustment,
alteration, service or maintenance can
cause property damage, injury or death.
Read the installation, operation and
maintenance instructions thoroughly
before installing or servicing this
equipment.
For Outdoor Use Only.
CARBON MONOXIDE
HAZARD
Figure 236, Page 3

Figure 236, Page 4
SAFETY INFORMATION
DANGER
DANGER
WARNING
WARNING
Certain materials or items, when stored under the
re pit, will be subjected to radiant heat and could be
seriously damaged.
Alert children and adults to the hazards of high surface
temperatures. Stay away from these surfaces to avoid
burning skin or igniting clothing.
Carefully supervise young children when in the vicinity
of the re pit.
Do not hang clothing or any other ammable materials
from the re pit, or place on or near the re pit.
Replace any guard or protective device removed for
servicing the appliance prior to placing back in service.
Installation and repair should be done by a qualified
service person. The re pit should be inspected before
use and annually by a qualified service person. More
frequent cleaning may be required as necessary. It is
imperative that the control compartment, burners, and
circulating air passageway of the appliance be kept
clean.
• This product is fueled by propane gas. Propane
gas is invisible, odourless, and flammable. An
odourant is normally added to help detect leaks
and can be described as a “rotten egg” smell. The
odourant can fade over time so leaking gas is not
always detectable by smell alone.
• Propane gas is heavier than air and leaking
propane will sink to the lowest level possible. It
can ignite by ignition sources including matches,
lighters, sparks or open ames of any kind many
feet away from the original leak. Use only propane
gas set up for vapor withdrawal.
• Store or use propane gas in compliance with
local ordinances and codes or with ANSI/NFPA 58.
Turn o propane when not in use.
DANGER indicates an imminently
hazardous situation which, if not
avoided, will result in death or
serious injury.
Failure to comply with the
precautions and instructions
provided with this fire pit can
result in death, serious bodily
injury and property loss or damage
from hazards of fire, explosion,
burn, asphyxiation, and/or carbon
monoxide poisoning. Only persons
who can understand and follow the
instructions should use or service
this re pit.
• EXPLOSION - FIRE HAZARD
• Keep solid combustibles,
such as building materials, paper or
cardboard, a safe distance away from
the fire pit as recommended by the
instructions.
• Provide adequate clearances around
air openings into the combustion
chamber.
• Never use the re pit in spaces which
do or may contain volatile or airborne
combustibles, or products such as
gasoline, solvents, paint thinner, dust
particles or unknown chemicals
• During operation, this product can
be a source of ignition. Keep fire pit
area clear and free from combustible
materials, gasoline, paint thinner,
cleaning solvents and other ammable
vapours and liquids. Do not use fire
pit in areas with high dust content.
Minimum fire pit clearances from
combustible materials: 90 cm (3 ft)
from the sides and 90 cm (3 ft) from
the rear, 1.8 m (6 ft) feet from ceiling.

Figure 236, Page 5
SAFETY INFORMATION
WARNING
DANGER
WARNING
We cannot foresee every use which may be made of
our re pit.
Check with your local re safety authority if you have
questions about re pit use.
Other standards govern the use of fuel gases and
heat producing products for specic uses. Your local
authorities can advise you about these.
If no local codes exist, follow National Fuel Gas Code,
ANSI Z223.1. In Canada, installation must conform to
local codes. If no local codes exist, follow the current
National standards of CANADA CAN/CGA-B 149.2.
Do not store or use gasoline or other ammable
vapours and liquids in the vicinity of this or any other
appliance. An LP-cylinder not connected for use
shall not be stored in the vicinity of this or any other
appliance.
Never leave re pit unattended when hot or in use.
Keep out of reach of children.
Improper installation, adjustment,
alteration, service or maintenance
can cause property damage, injury or
death. Read the installation, operation
and maintenance instructions
thoroughly before installing or
servicing this equipment.
DANGER
CARBON MONOXIDE HAZARD
This re pit is a combustion appliance.
All combustion appliances produce
carbon monoxide (CO) during the
combustion process. This product
is designed to produce extremely
minute, non-hazardous amounts of CO
if used and maintained in accordance
with all warnings and instructions. Do
not block air ow into or out of the re
pit. Carbon Monoxide (CO) poisoning
produces flu-like symptoms, watery
eyes, headaches, dizziness, fatigue
and possibly death. You can't see it
and you can't smell it. It's an invisible
killer. If these symptoms are present
during operation of this product get
fresh air immediately!
For outdoor use only.
Never use inside house, or other
unventilated or enclosed areas.
This fire pit consumes air (oxygen).
Do not use in unventilated or enclosed
areas to avoid endangering your life.
WARNING
Don’t burn solid fuels in this
appliance

Figure 236, Page 6
OPERATION CHECKLIST
Operation Checklist
Before Operating:
After Operation
For a safe and pleasurable heating experience, perform this check before each use.
1. Gas control is in OFF position.
2. Gas tank valve is OFF.
3. LP/NG is disconnected.
4. After each use, cap on tank is replaced.
1. I am familiar with the entire owner’s manual and understand all precautions noted.
2. All components are properly assembled, intact and operable.
3. No alterations have been made.
4. All gas connections are secure and do not leak.
5. Wind velocity is below 16 km/h (10 mph).
6. Unit will operate at reduced eciency below 4.44°C /40°F
7. Fire pit is outdoors (outside any enclosure).
8. There is adequate fresh air ventilation.
9. Fire pit is away from gasoline or other ammable liquids or vapours.
10.Fire pit is away from windows, air intake openings, sprinklers and other water sources.
11.Fire pit is at least 90 cm (36 in) on rear and at least 90 cm (36 in) on sides from combustible materials.
12.Fire pit is on a hard and level surface.
13.There are no signs of spider or insect nests.
14.All burner passages are clear.
15.All air circulation passages are clear.
16.Children and adults should be alerted to the hazards of high surface temperatures and should keep
away to avoid burns or clothing ignition.
17.Young children should be carefully supervised when they are in the area of the re pit.
18.Clothing or other protective material should not be hung from the re pit, or placed on or near re pit.
19.Any guard or other protective device removed for servicing the fire pit must be replaced prior to
operating the re pit.
20.Installation and repair should be done by a qualified service person. The fire pit should be
inspected before use and at least annually by a qualied service person.
21.More frequent cleaning may be required as necessary. It is imperative that control burner and
circulating air passageways of the re pit be kept clean.
22.Do not use this appliance if any part has been under water. Immediately call a qualified service
technician to inspect the appliance and to replace any part of the control system and any gas control
that has been under water.

EXPLODED VIEW Figure 236, Page 7
Glass bead (4kg x 2 box)
Burner
Table top
Knob
Control panel
Ignitor
Valve assembly and LP hose
LP Reducer
NG Reducer
NG Hose
Table base
Top cover

ASSEMBLY INSTRUCTIONS FOR LP
Step 1
Step 2
Figure 236, Page 8
Hang the top cover on the side of the re table.
Put the glass beads onto the burner.
DO NOT COVER THE WINDGUARD WITH THE BEADS.
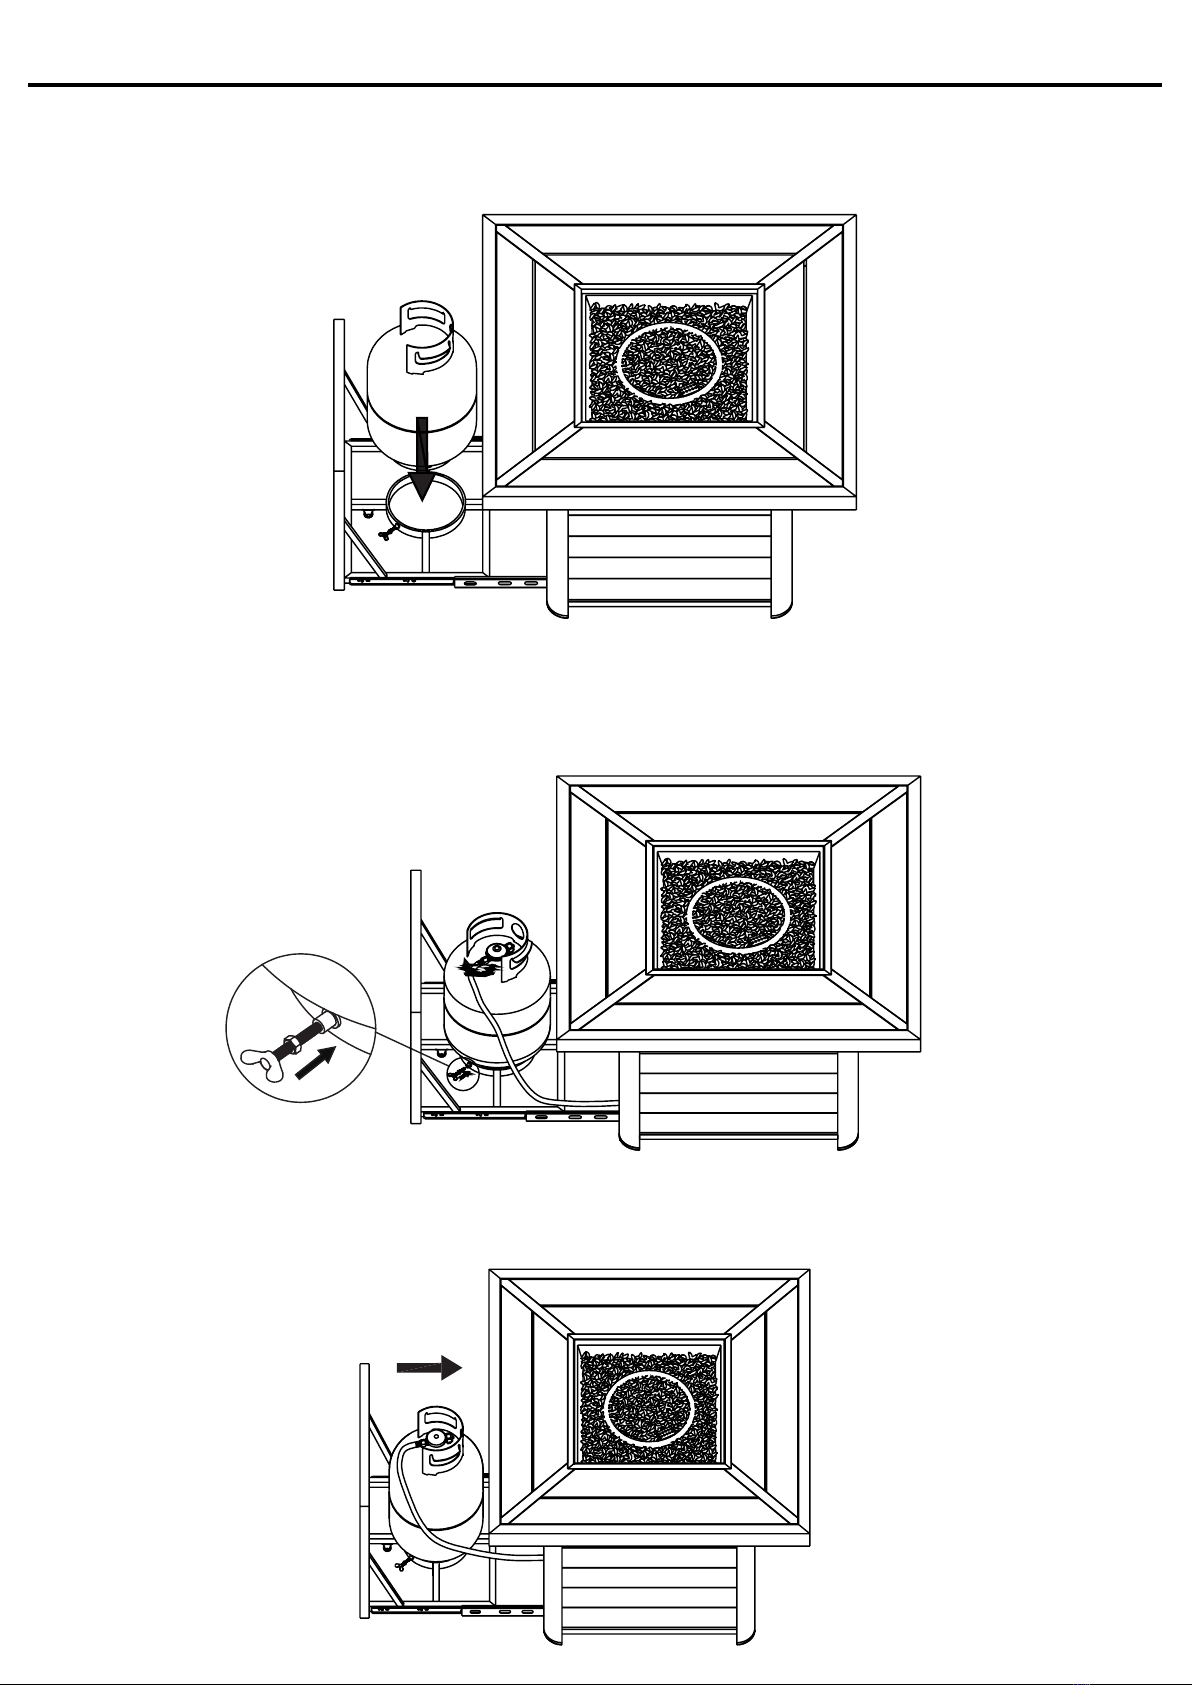
ASSEMBLY INSTRUCTIONS FOR LP
Step 3
Step 5
Figure 236, Page 9
Secure the gas tank to the re table at the bottom using the bolts.
Connect the gas to the re table using LPG regulator.
Close the re table.
Step 4
Open the re table and
install the gas tank (20 LBS) into the re table.

ASSEMBLY INSTRUCTIONS FOR NG
NG and LP conversion:
A.Change the orice
B.Connect the natural gas gray pipe
Orice size: NG=3.66mm, LPG=2.12 mm
LP TRANSFORMATION PART LIST
LP reducer with
2.12 mm orice
NG reducer with
3.66 mm orice
LP hose assembly NG hose assembly
NG TRANSFORMATION PART LIST
① ①
② ②
Step 1
Figure 236, Page 10
Turn over the re table.

ASSEMBLY INSTRUCTIONS FOR NG
Step 2
Step 3
Figure 236, Page 11
Remove the LP hose using wrench.
Keep the LPG reducer steady using a wrench and loose the pipe using another wrench.

ASSEMBLY INSTRUCTIONS FOR NG
Step 4
Step 5
Figure 236, Page 12
Disconnect the pipe and the LPG reducer.
Uninstall the LP reducer.
LP reducer
Φ 2.12

ASSEMBLY INSTRUCTIONS FOR NG
Step 6
Step 7
Figure 236, Page 13
Install the NG reducer to the pipe.
Reinstall the pipe to the reducer using wrench.
NG reducer
Φ 3.66

ASSEMBLY INSTRUCTIONS FOR NG
Step 8
Step 9
Figure 236, Page 14
Turn over the re table.
Fix the NG hose to the re table.

ASSEMBLY INSTRUCTIONS FOR NG
Step 10
Figure 236, Page 15
Install the NG hose to the NG inlet of re table using wrench.
Natural Gas Inlet

ASSEMBLY INSTRUCTIONS FOR NG
WARNING
This conversion kit shall be installed by a qualied
service agency in accordance with the manufacturer's
instructions and all applicable codes and requirements
of the Authority Having Jurisdiction. If the information
in these instructions are not followed exactly, a re,
explosion or production of carbon monoxide may result,
causing property damage, personal injury or loss of life.
The qualied service agency is responsible for the proper
installation of this kit. The installation is not proper and
complete until the operation of the converted appliance is
checked as specied in the manufacturer's instructions
supplied with the kit.
Figure 236, Page 16

• Connecting LP Gas Tank
• Disconnecting LP Gas Tank
• Connecting NG
• Disconnecting NG
This appliance can use two types of fuel/gas: LPG-Propane OR Natural Gas
Suitable LP gas tank size for this appliance is 20 lb (9.1 kg)
Do not ll the LP gas tank with more than 80% liquid gas
The inlet gas supply pressure for the purpose of input adjustment pressure:
LPG-Propane 28 cm (11 in) w.c. (2.74kPa)
Natural Gas 18 cm (7 in) w.c. (1.74kPa)
The appliance must be isolated from the gas supply piping system by closing its individual
manual shut o valve during any pressure testing of the gas supply piping system at test
pressures equal to or less than 1/2 psi (3.5kPa).
The LP-gas supply cylinder to be used must be:
• Constructed and marked in accordance with the U.S. Department of Transportation (D.O.T.)
Specications for LP-Gas Cylinders;
• Provided with a listed overlling prevention device, and provided with a cylinder connection
device compatible with the connection for the appliance.
• Provided with a cylinder connection device compatible with the connection for the appliance.
WARNING: Make sure LP gas tank valve is closed. Close by turning valve clockwise.
Place the LP gas tank upright into the tank tray and secure the tank by screw.
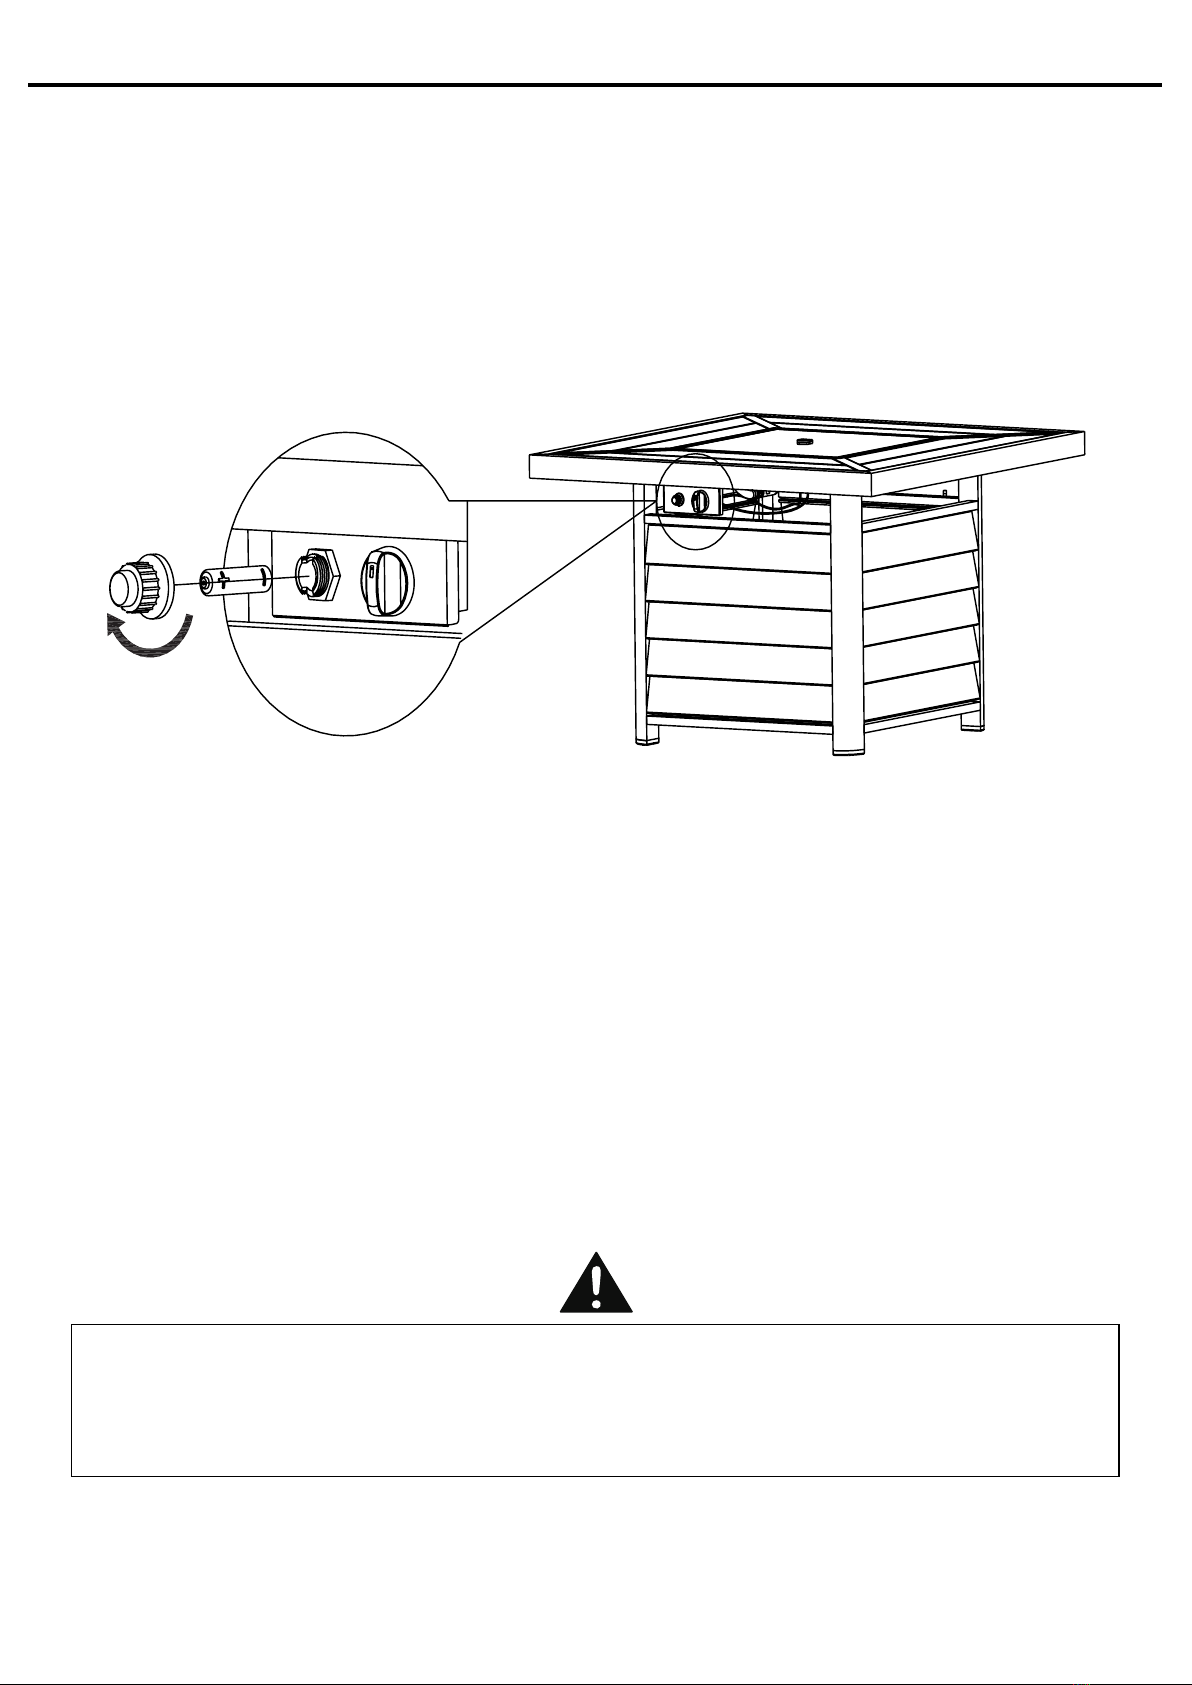
CONNECTING AND DISCONNECTING LP & NG
Before connecting, be sure that there is no debris
caught in the head of the LP gas tank, head of
the regulator valve or in the head of the burner
and burner ports.
Connect regulator/hose assembly to tank by
turning knob clockwise.
Before disconnecting make sure the LP gas tank valve
is "CLOSED."
Disconnect regulator/hose assembly from LP gas tank
by turning knob counterclockwise until it is loose.
Caution: LP gas tank must be properly disconnected
and removed prior to moving this pit.
1. A professionally-installed shut-o valve between the supply piping and the socket is
recommended, but not required, by the National Fuel Gas Code. Socket connection
must be made outdoors.
2. Coat the gas supply pipe nipple with gas-resistant pipe dope or approved teon tape. Screw socket onto gas
supply pipe (house gas source), and wrench-tighten.
3. Pull back the sleeve on the quick disconnect socket and insert the unattached end of the gas hose into the
socket. Release the sleeve and continue pushing the hose into the socket until the sleeve snaps into the
locked position.
4. When the quick disconnect socket and the gas hose are connected, a valve in the socket opens automatically
to permit full gas ow. When the gas hose is disconnected, the valve in the socket instantly and positively
shuts o the ow of gas, the grill can be disconnected from the gas source by disconnecting the gas hose
from the quick disconnect socket. The socket should be left attached to the gas source (hose piping).
With proper assembly, the gas hose cannot be removed without pushing the quick disconnect sleeve back. To
disconnect, push sleeve back and pull plug out of sleeve (this automatically shuts o gas). The appliance and its
individual shut o valve must be disconnected from the gas supply piping system during any pressure testing on
that system at test pressures in excess of 1/2 psi (3.5kPa).
The appliance must be isolated from the gas supply piping system by closing its individual manual shut o valve
during any pressure testing of the gas supply piping system at test pressures equal to or less than 1/2 psi (3.5kPa).
LP GAS
NG
Figure 236, Page 17

LEAK TESTING
WARNING: Before using this outdoor re pit, make sure you have read, understand and
are following all information provided in the Dangers and Warnings. Failure to follow
those instructions can cause death, serious injury or property damage.
WARNING
DANGER
CAUTION Strong odours, colds, sinus congestion, etc. may prevent the detection of
propane by smell. Use caution and common sense when testing for leaks.
WHEN TO PERFORM A LEAK TEST:
Never use your re pit without leak testing all gas connections, hoses and propane tank.
To prevent re or explosion hazard:
• DO NOT smoke or permit ignition sources in the area while conducting a leak test.
• Perform test OUTDOORS in a well-ventilated area that is protected from the wind.
• Never perform a leak test with a match or open ame.
• Never perform a leak test while the re pit is in use or while the re pit is still hot.
• After assembling your re pit and before lighting for the rst time, even if purchased fully-assembled.
• Every time the LP gas cylinder is relled, exchanged or if any of the gas components are disconnected
or replaced.
• Any time your re pit has been moved.
• At least once per year or if your re pit has not been used for more than 60 days.
1. Create a mixture of 50% water and 50% liquid dishwashing soap.
2. Ensure all control knobs are set to the OFF position.
3. Turn on the gas at the cylinder valve. Turn the cylinder valve knob counter-clockwise until
fully opened. If you hear a rushing sound or smell gas, turn the gas off. Tighten any leaking
connections. If the leak is detected at connection nut and tightening does not stop leak, re-inspect
propane tank rubber seal.
4. Apply the soapy water mixture to the following:
A) Supply tank (cylinder) welds B) Connection nut to tank valve
C) Back side of connection nut to brass nipple D) Brass nipple connection into regulator
E) Regulator connections to gas supply hoses F) Hose connection to gas manifold
G) The full length of gas supply hose H) Tank valve to cylinder
5. Check each place listed (A-H) for growing bubbles, which indicates a leak. Large leaks may not be
detected by bubbles but should produce a rushing sound or gas smell.
6. Turn o gas supply at cylinder valve.
7. Turn on control knobs to release gas pressure in hose.
8. Turn control knobs to OFF position.
9. Tighten any leaking connections. If leak is detected at connection nut and tightening does not stop
leak, re-inspect propane tank rubber seal.
10.Repeat soapy water test until no leaks are detected.
11. Turn o gas supply at cylinder valve until you are ready to use your re pit.
12.Wash o soapy residue with cold water and towel dry.
Note: The leak test must be performed in an area that has adequate lighting in order to see if bubbles are
developing and not in a windy or noisy area so larger leaks can be detected by smell or sound.
CAUTION Natural Gas leak testing is similar to LP Gas leak testing. The dierence is you
need to apply the soapy water mixture to the gas supply pipe nipple.
Figure 236, Page 18
BATTERY INSTALLATION
1x AAA Battery (included)
Figure 236, Page 19
Always purchase the correct size and grade of battery most suitable for the intended use.
Clean the battery contacts and also those of the device prior to battery installation.
Remove batteries from equipment which is not to be used for an extended period of time.

STORAGE FOR TABLE COVER Figure 236, Page 20
Step 1
Step 2
Step 3
Table of contents
Other Foshan Genux Metal Products Outdoor Fireplace manuals

Popular Outdoor Fireplace manuals by other brands


Sunjoy
Sunjoy HAMPTON A301004901 Assembly instructions

AMD DIrect
AMD DIrect TF-GFRC-FBWGR-30 Installation and operating instructions

Outdoor GreatRoom Company
Outdoor GreatRoom Company Cedar Bluff manual

Bond
Bond HYFP50095-92 owner's manual

Solo Stove
Solo Stove mesa instructions

Vulcan-Hart
Vulcan-Hart Talbot LPG manual


