TR8200 Thermostat User Manual
LCD Symbols
Configuration Menu
Setting the clock and day of the week
Select the required operating mode
This thermostat is fitted with a real time clock. It is essential that the clock time and day are set accurately if you require your programmed events to start on time. Follow below steps,
1) Touch time display .
Auto - Automatic mode, the thermostat executes the preprogrammed schedules. To adjust these schedules, see page 2 the program section.
In addition to Automatic mode, this thermostat has 3 extra manual modes, i.e , each of these manual modes maintains a constant set temperature set by the user.
- Comfort temperature mode, the highest temperature you want to achieve, this is the temperature that will be required when the room is in use. Default is 22 °C.
- Economy temperature mode, the lowest temperature, the temperature you want to go no lower than when the room is not in use. Default is 16 °C.
- Vacation temperature mode, this is set to stop your floor from going below the set temperature. Default is 10 °C.
To change the set temperatures, touch temperature display. Use or to adjust to the required temperature. Touch to store and exit.
See overl1eaf for further setting up information
2) Touch day display .
Use or to change the time. Press and hold
Use or to change the day. Touch to store and exit.
or to change the time faster. Touch to store and exit.
The buttons are locked
Turning on/off the thermostat
Heating is turned on
Automatic mode,
executes the programmed schedules
The sensor is not being read by the thermostat
Err
Temporary temperature override
Frost protection activated
Room temperature
RT
AUTO
Floor temperature
FT
O / RIDE
Symbols
The program number
Day of the week. Day 1= Monday, Day 2= Tuesday... etc.
Reminding the user to connect the floor sensor (AF and F model only)
Touch to view floor temperature for 5 seconds (AF model only)
Touch to switch among Auto
Touch to start programming of your thermostat
Comfort temperature mode
Economy temperature mode
Day
Program 1,2,3,4
Vacation temperature mode
Symbols Description
Description
This thermostat is a combination model allowing you to choose among 3 models.
A model: air only , with built in sensor
AF model: air & floor, with both built in and remote sensor
F model: floor only , with remote sensor
Menu #
01 Model selection
Switching differential02
Features description Features Explanation
A, AF, F
Touch or to adjust
Backlight turning-on time06 10, 20,30,40,50,60 seconds. 30 seconds by default
To set the backlight turning-on time when the screen is pressed.
Temperature format07 C / FThis allows users to select between °C or °F.
Clock format 24H / 12H 24 hour clock by default08 12 Hour or 24 Hour clock format selection
03 0 °C by default, -5°C ~ +5°CCalibrate the room temperature
To compensate for any difference between the displayed room temperature and a thermometer
04 0 °C by default, -5°C ~ +5°C
To compensate for any difference between the displayed floor temperature and a thermometer
Calibrate the floor temperature
ON = sound audible; OFF = sound off
11
Key click sound
Choose whether or not a key click sound is audible when you press the LCD screen
ON = activated; OFF = deactivated09 Frost protection This is to avoid room temperature goes below 5°C
For review only12 Software version This is to view the current software version
Set
Schedule
Heating
Mode
Done
Done
Done
Then you will see menu 01. Touch or to select the menu number. Use or adjust the settings. Touch to accept and store.
Previous Done
Next
The numbers of degree difference before switching. The default is 1°C which means
the thermostat will switch the heating on
0.5°C below the set temperature and will
turn it off 0.5°C above
the set temperature.With a 2°C differential, the heating will
switch on 1°C below the set temperature and switch off 1°C above the set temperature.
1 °C, 2 °C, ...10°C, 1
°C by default
Maximum floor temperature05 40 °C by default, setting range 20°C ~ 40°CThis is to protect the floor surface by limit the floor temp. ( AF model only)
10
5+2 /7 Day program mode
This allows you to program either 5 days at once, then the 2 days of the weekend
5 2 = 5+2 day programmable
separately, or a full 7 days at the same time or 7 days separately
7 = 7 day programmable (by default)
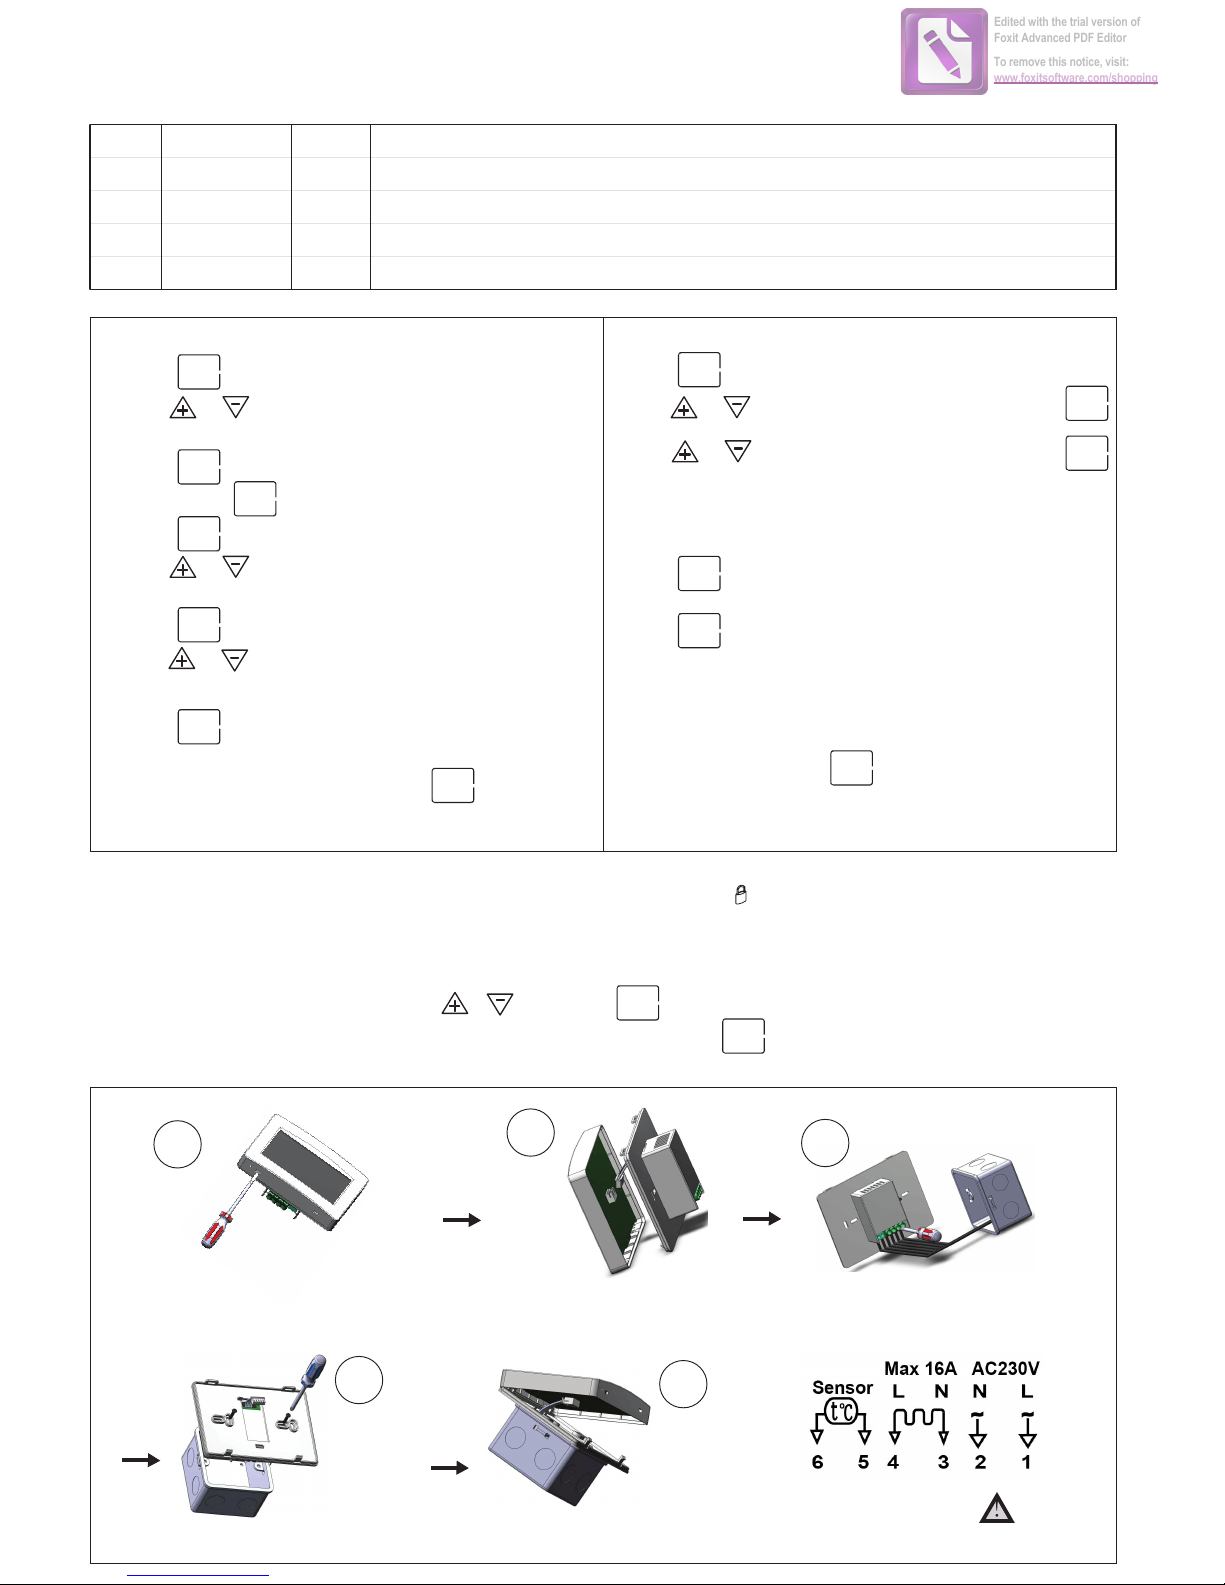
touch to turn thermostat off, and now touch
Set Menu
To enter into menu settings,
13 ,14 Hidden menu press and hold”OFF”for 5seconds in standby mode, and you can set the min. and max. room temperature