Frankia Frankia 2021 User manual

DISCOVER YOURDISCOVER YOUR
NEW FR ANKIANEW FR ANKIA
OPERATING MANUAL MODELLJAHR 2021 - Edition 1

FRANKIA OPERATING MANUAL2FRANKIA OPERATING MANUAL 3
Dear FRANKIA customer
we congratulate you on the purchase of your new FRANKIA.
With this purchase you have chosen a motorhome that is unparalleled in terms of technology,
comfort and equipment. You will soon realise just how pleasant it is to travel with a FRANKIA.
You will be independent and free, you can determine your daily objectives and stays yourself.
We thank you for the trust that you have placed in our company.
Your FRANKIA is built on a Fiat or Mercedes-Benz chassis. For more detailed insight into the
technology of your motorhome, you will receive the manufacturer‘s documentation for the
following devices separately:
Chassis, refrigerator, cooker, living room heating, chargers, radio, TV, satellite system, air con-
ditioning, etc.
Before you go on holiday with your new FRANKIA, we request that you read these operating
instructions. They are intended to help you get to know your motorhome. In addition to the
operating instructions, you will also find tips on maintenance and the practical use of your
new vehicle. We have used the following symbols to make orientation easier:
Here you will find safety regulations, that protect against personal injury.
Here you will find safety regulations, that protect against material damage.
Here you will find general notes and cross-references.
The commissioning by the FRANKIA dealer with you as a customer ensures that you unders-
tand the operating and maintenance instructions. Contact your FRANKIA dealer if you are un-
able to understand parts of these operating instructions. It is important that these instructions
are understood and followed.
The instructions do not contain all safety instructions and operating instructions for the bu-
ilt-in components and accessories, which are fitted on delivery of the motorhome or can be
retrofitted later. It is imperative that the driver understand and use the operating instructions
for the motorhome and the accessories.
We strive for continuous development and improvement.
FRANKIA expressly reserves the right to make changes that are intended for technical progress
or that take changed regulations into account. These operating instructions have been put
together with great care. However, we cannot guarantee the correctness of the content.
On behalf of all FRANKIA employees we wish you a safe trip and relaxing journeys.
Your FRANKIA Team

FRANKIA OPERATING MANUAL4FRANKIA OPERATING MANUAL 5
CONTENTS
1. DEPARTURE AND DRIVING Page
1.1 Payload
6
1.2 Before driving 7
1.3 Driving
8
1.4 Parking
11
1.5 Staying overnight in the motorhome 12
1.6 Sleeping
13
2. VENTILATION
2.1 Roof hatches 18
2.2 Midi-Heki, Heki III 19
2.3 Windows 19
2.4 Body door 20
3. GAS SYSTEM
3.1 General information 21
3.2 Gas bottles 21
3.3 Gas stove 23
3.4 Heating – Hot water 23
3.5 Gas supply 24
3.6 Refrigerators 26
4. ELECTRICAL SYSTEM
4.1 General information 28
4.2 Electrical supply - control panel 36
4.3 Fuses 12 Volt 38
4.4 Central locking 39
4.5 Inverter 40
4.6 Generator 41
4.7 Titan equipment package 41
4.8 Platin equipment package 51
4.9 EZA Lithium energy system 64
4.10 Radio map or software update 68
4.11 DSP amplifier with subwoofer - Source selection (Platin) 68
5. SANITARY SYSTEM
5.1 Central supply system 69
5.2 Fresh water and waste water 71
5.3 Washroom 73
5.4 Thetford toilet 73
5.5 Kitchen area 74
5.6 Waste holding tank 74
6. DIVERSE SYSTEMS
6.1 Electric step 76
6.2 Exterior mirrors 76
6.3 Heater 77
6.4 Tables
80
6.5 TV compartment 82
6.6 Blinds
83
6.7 Opening angle of rear storage compartment flaps 85
6.8 Neo washroom 85
6.9 1 person harness system 86
6.10 Reverse alarms 88
6.11 Miscellaneous 89
7. MAINTENANCE AND CARE 91
8. WINTER
8.1 Winter holidays 95
8.2 Living in winter 96
8.3 Decommissioning 97
8.4 Anti-freeze 98
9. INCIDENTS
9.1 Electrical system 99
9.2 Gas system 100
9.3 Fresh water system 100
9.4 Waste water 101
9.5 WC tank 101
9.6 Heating system 102
9.7 Kitchen appliances 103
9.8 Electric drop-down bed 104
9.9 Vehicle 105
10. WHAT YOU SHOULD KNOW 109
11. SPARE PARTS AND EMERGENCY NUMBERS 110
12. FRANKIA-PARTNER
12.1 Germany 111
12.2 Abroad 113
12.3 Service partners 115
12.4 Commercial rentals 117

FRANKIA OPERATING MANUAL6FRANKIA OPERATING MANUAL 7
1.1 Payload
Your motorhome contains numerous storage spaces. Pay special attention to distributing things well so that your motor-
home has the best possible road holding.
The double floor that characterises the FRANKIA motorhomes offers additional storage space. Some of these storage
spaces are accessible from the inside and outside.
Loading the motorhome Please note the following points:
•Heavy objects should be near the ground and directly next to or better between one of the vehicle
axles. In the case of heavy loads, make sure that the motorhome is loaded equally on the left and right
as far as is possible. With a uniform, low-lying load, you achieve stable handling; the load close to the
axle reduces the tendency of the body to rock and pitch
•Only light objects may be packed in the roof storage boxes
•A heavy roof load causes unfavourable driving characteristics due to the high centre of gravity. Secure
the roof load safely with lashing straps
•The luggage must be well wedged and stored in a non-slip manner. Loose objects can damage the
structure. The cupboards must be loaded in such a way that nothing can rattle and slide
•Cupboards that are opened in or against the direction of travel must not be loaded with heavy objects.
The cupboard doors must be locked while driving. Make sure that everything fits into cupboards, dra-
wers and other storage space
•In the motorhome, unsecured objects can turn into “bullets” in the event of hard braking or an accident
and seriously injure the occupants
•When loading the motorhome, the max. permissible total weight when loaded and the permissible axle
load weights (= weight on the front and rear axles) must not be exceeded
•Additional installations of the special equipment package reduce the standard load capacity
•Before using for the first time, we recommend a personal weighing on a calibrated vehicle scale with
full tanks, so that the very personal payload for the luggage can be determined, tailored to the type of
motorhome and equipment package
The maximum permissible total weight when loaded and the permissible axle load weights can be found on the vehicle
documents or on the type plate.
If overloaded, there is a risk of fines, and this can also lead to axle and tyre damage.
1. DEPARTURE AND DRIVING
Note when loading:
•Stow and secure everything inside the motorhome so that a sudden braking manoeuvre does not cause
problems.
•The following should be taken into consideration: Sliding doors, Contents of cupboards, Cutting boards,
Loose objects on tabletops and shelves, Travel utensils in the washroom, Table/ tabletop, Television cabinet
•Secure loose items e.g. with towels. This also reduces rattling noises
1.2 Before driving
•adjust the exterior mirrors correctly
•open the darkening blinds of the front and side windows completely
•check whether the outside flaps, especially the tailgate, are actually locked and not just ajar.
•lock the body door
•retract the step manually if it is not automatically retracted and therefore the warning light on the dash-
board lights up
•disconnect and roll up the 230V electrical cable
•close all doors, flaps and drawers
•Turn off all “open points of fire” that run on gas, such as gas stoves, refrigerators and hot water boilers,
and turn off the gas bottles.
•Close the TV cabinet
•Lock the table/tabletop
•Crank up the rear supports
•Stow the toothbrush beaker and soap dispenser in the cupboard
Before setting off, we advise you to check that you have not forgotten anything and that nothing is hindering your departure.

FRANKIA OPERATING MANUAL8FRANKIA OPERATING MANUAL 9
1.3 Driving
A motorhome is driven like any other car: with care and at a suitable speed. However, the unusual size of the vehicle
should be taken into consideration.
ALWAYS PAY ATTENTION TO THE DIMENSIONS (LENGTH - WIDTH HEIGHT) AND THE WEIGHT OF YOUR MOTORHOME !!
Please note: Pay attention to petrol station roofs, rock overhangs, branches, etc.
Please pay particular attention to the special regulations abroad. A fully loaded motorhome has different handling to
an empty one.
The following should be taken into consideration:
•longer braking distance
•different handling on inclines and descents
•Influence on the speed with headwind
•higher cross wind sensitivity on bridges or when leaving a tunnel, when overtaking trucks
•different handling in bends due to height and weight
•larger vehicle dimensions: Length, width, height
•small bridges, narrow streets, low passages, low petrol station roofs etc.
•limited view when reversing
•correct mirror setting
Please note:
The driver is responsible for ensuring that the passengers remain in their seats and use the seat
belts provided.All seats that are not equipped with seat belts must not be used while driving. No people may
be in the alcove while driving. When using the seat belts in the L-shaped seating area, the seat and backrest
must be locked in the position “1” before starting the journey. The locking lever is located below the seat.
•The driver seats can be turned towards the living area. Seat rotation is only permitted when the vehicle
is stationary and secured against vehicle movement! In the driving position, the seat must be lowered
(at least to the first locking position)
•Shut off all “open points of fire” that run on gas at petrol stations
•Drive on bad roads at an appropriate speed
•Your vehicle has a long rear overhang compared to a car (= distance between rear axle and the tail-
gate), which swerves in tight bends and can hit on the road if the road surface is unfavourable (e.g.
deep bumps). Therefore, you should drive carefully in tight bends (for example when parking and exi-
ting) as well as with larger bumps
•Due to the high body of a motorhome, this provides cross winds with a large surface. Therefore, drive
with particular care in cross winds
•Tyre pressure that is too low causes excessive tyre wear or can cause the tyre to burst when the motor-
home is fully loaded. Therefore, check the tyre pressure regularly.The information on the correct tyre
pressure can be found in this table
Model tyre size front middle rear front NM rear NM
X 290 Fiat Ducato Light /Alko 2-axle 215/70 R15 5,0 bar * __ 5,0 bar* 160 Nm 160 Nm
X 290 Fiat Ducato Heavy/Alko 2-axle 225/75 R16 5,5 bar* __ 5,5 bar* 160 Nm 160 Nm
X 290 Fiat Ducato Heavy - Alko 3-axle 225/75 R16 5,5 bar* 3,5 bar* 3,5 bar* 160 Nm 160 Nm
MB Sprinter 314 / Alko 2-axle 235/65 R16 C 3,7 bar* __ 5,3 bar* 240 Nm 240 Nm
MB Eurosprinter 319 235/65 R16 C 3,7 bar* __ 5,3 bar* 240 Nm 240 Nm
MB Eurosprinter 516 205/75 R16 C 4,4 bar* __ 4,0 bar* 240 Nm 180 Nm
MB Eurosprinter 519 205/75 R16 C 4,4 bar* __ 4,0 bar* 240 Nm 180 Nm
* = pressure with fully loaded vehicle
tyre pressure table Mod. 2021

FRANKIA OPERATING MANUAL10 FRANKIA OPERATING MANUAL 11
tons tons
Top speed
inside city limits
outside city limits
Motorway
50 km/h
100 km/h; with trailer 80 km/h
Recommended speed
130 km/h
50 km/h
80 km/h; with trailer 60 km/h
100 km/h
No overtaking for motor vehicles
over 3.5 tons (including trailer)
not affected applicable
Traffic prohibition for motor vehicles
over 3.5 tons
not affected applicable
Prohibition of driving without a mini-
mum distance
not affected applicable if vehicle in front is
heavier than 3.5 tons
Parking on pavements Parking not permitted Parking not permitted
Additional sign:
only cars
not affected not affected
Additional sign:
only motorhomes
applicable applicable
Additional sign: only Motor vehicles
with more than 3.5 tons authorised
total weight
not applicable applicable
Stopping vehicles in the dark
inside city limits
not affected own light source or warning
board
outside city limits
own light source:
(Side light)
own light source:
(Side light)
Parking and stopping of vehicles in
the public traffic area
as before. Not on pavements
with parking space marking
as before. Not on pavements
with parking space marking
This has to be carried along First aid kit, Warning triangle,
High-visibility vest
First aid kit, Warning triangle,
Warning light, High-visibility
vest
TÜV inspection after months 24 months
(first at 36)
24 months
(after 6 years 12 months)
Emissions test after months 24 months 24 months (after 6 y. 12
mon.)
Testing the LPG system
according to G 607 after months
24 months 24 months
Below are a few pointers regarding street signs in Germany. We do not guarantee the completeness
and content here.
Source: ADAC, Last updated: 08/2019
1.4 Parking
Shift into gear (put the gearbox in position“P” for the automatic transmission) and apply the handbrake ,or for electrical
handbrakes pull the lever. It is necessary that the motorhome is as level as possible to ensure the unimpeded drainage
of dirty water from the shower and sink. Levelling wedges are practical for this.
If your motorhome is equipped with an awning, always secure it with additional tension to the ground when in use.
Awnings raised by gusts of wind often cause costly damage to the vehicle. If the electric drive fails, the awning must be
operated manually (the crank is located in the rear storage compartment).
The awning must be fully retracted before starting the engine (driving)!
Your motorhome is equipped with rear supports, never use them for a possible wheel change.
For motorhomes with rear axle air suspension:
The motorhome must be lowered completely using the rear axle air suspension before the rear supports
are used. If this procedure is not followed, the supports and the motorhome floor can be damaged.
For more detailed information on operating the air suspension, please refer to the manufacturer‘s opera-
ting instructions.
Here are some practical tips:
•When you have lowered the rear supports, place the hand crank on the steering wheel as a reminder in
the cab. In this way you will avoid an erroneous start with the supports lowered.
•In midsummer, if possible, park the motorhome in such a way that the ventilation slots of the refrigera-
tor are not exposed to the blazing sun, so that your refrigerator will work better.
•When parking on public roads within closed towns, red/white “night parking signs” must be attached
to the motorhome in the dark (for vehicles over 3.5 t).
•When leaving a stopover place, make sure that you do not leave any damage or rubbish: Discretion and
environmental awareness are the most important characteristics of motorhome users.

FRANKIA OPERATING MANUAL12 FRANKIA OPERATING MANUAL 13
1.5 Staying overnight in the motorhome
The following table shows the regulations of some European countries: (subject to correction)
Belgium Campsites in all parts of the country, especially near the coast, few parking spaces, outside of campsi-
tes and parking spaces only overnight stay at motorway service areas (maximum one night).
Denmark Very dense network of campsites, no parking spaces, quick-stop spaces in front of many campsites,
overnight stays outside of campsites prohibited.
Germany Very dense network of campsites, dense network of parking spaces, an overnight stay outside of cam-
ping and parking spaces allowed to restore roadworthiness, some regional prohibitions.
France Very dense network of campsites, dense network of parking spaces, overnight stays outside of camping
and parking spaces regulated by local regulations.
Greece Numerous campsites, especially on the coasts, very few parking spaces. No overnight stay outside of
campsites.
Great Britain Very dense network of campsites, no parking spaces, overnight stays outside of campsites regulated by
local regulations.
Italy
Very dense network of campsites, dense network of parking spaces, especially in northern and central Italy,
overnight stays outside of camping and parking spaces allowed for one night, observe local regulations.
Croatia Very dense network of campsites on the coast, few parking spaces, overnight stays outside of camping
and parking spaces also prohibited on private property.
Luxembourg Dense network of campsites, no parking spaces, overnight stays outside of camping and parking spaces
prohibited.
The
Netherlands
Very dense network of campsites, many camping offers at farms, few parking spaces, overnight stays
outside of camping and parking spaces prohibited.
Norway Dense network of campsites, especially in the south of the country, very few parking spaces, observe
local prohibitions when staying outside of campsites and parking spaces.
Austria Dense network of campsites, no parking spaces, overnight stays outside of camping and parking spaces
prohibited.
Sweden Dense network of campsites in the south and centre of the country, very few parking spaces, observe
local prohibitions when staying outside of campsites and parking spaces.
Switzerland Dense network of campsites, no parking spaces, overnight stays outside of camping and parking spaces
prohibited.
Spain Very dense network of campsites, few parking spaces, observe local prohibitions when staying outside
of campsites and parking spaces.
The vehicle may only be set up on private property with the permission of the property owner.
Source: Promobil Last updated: May 2012
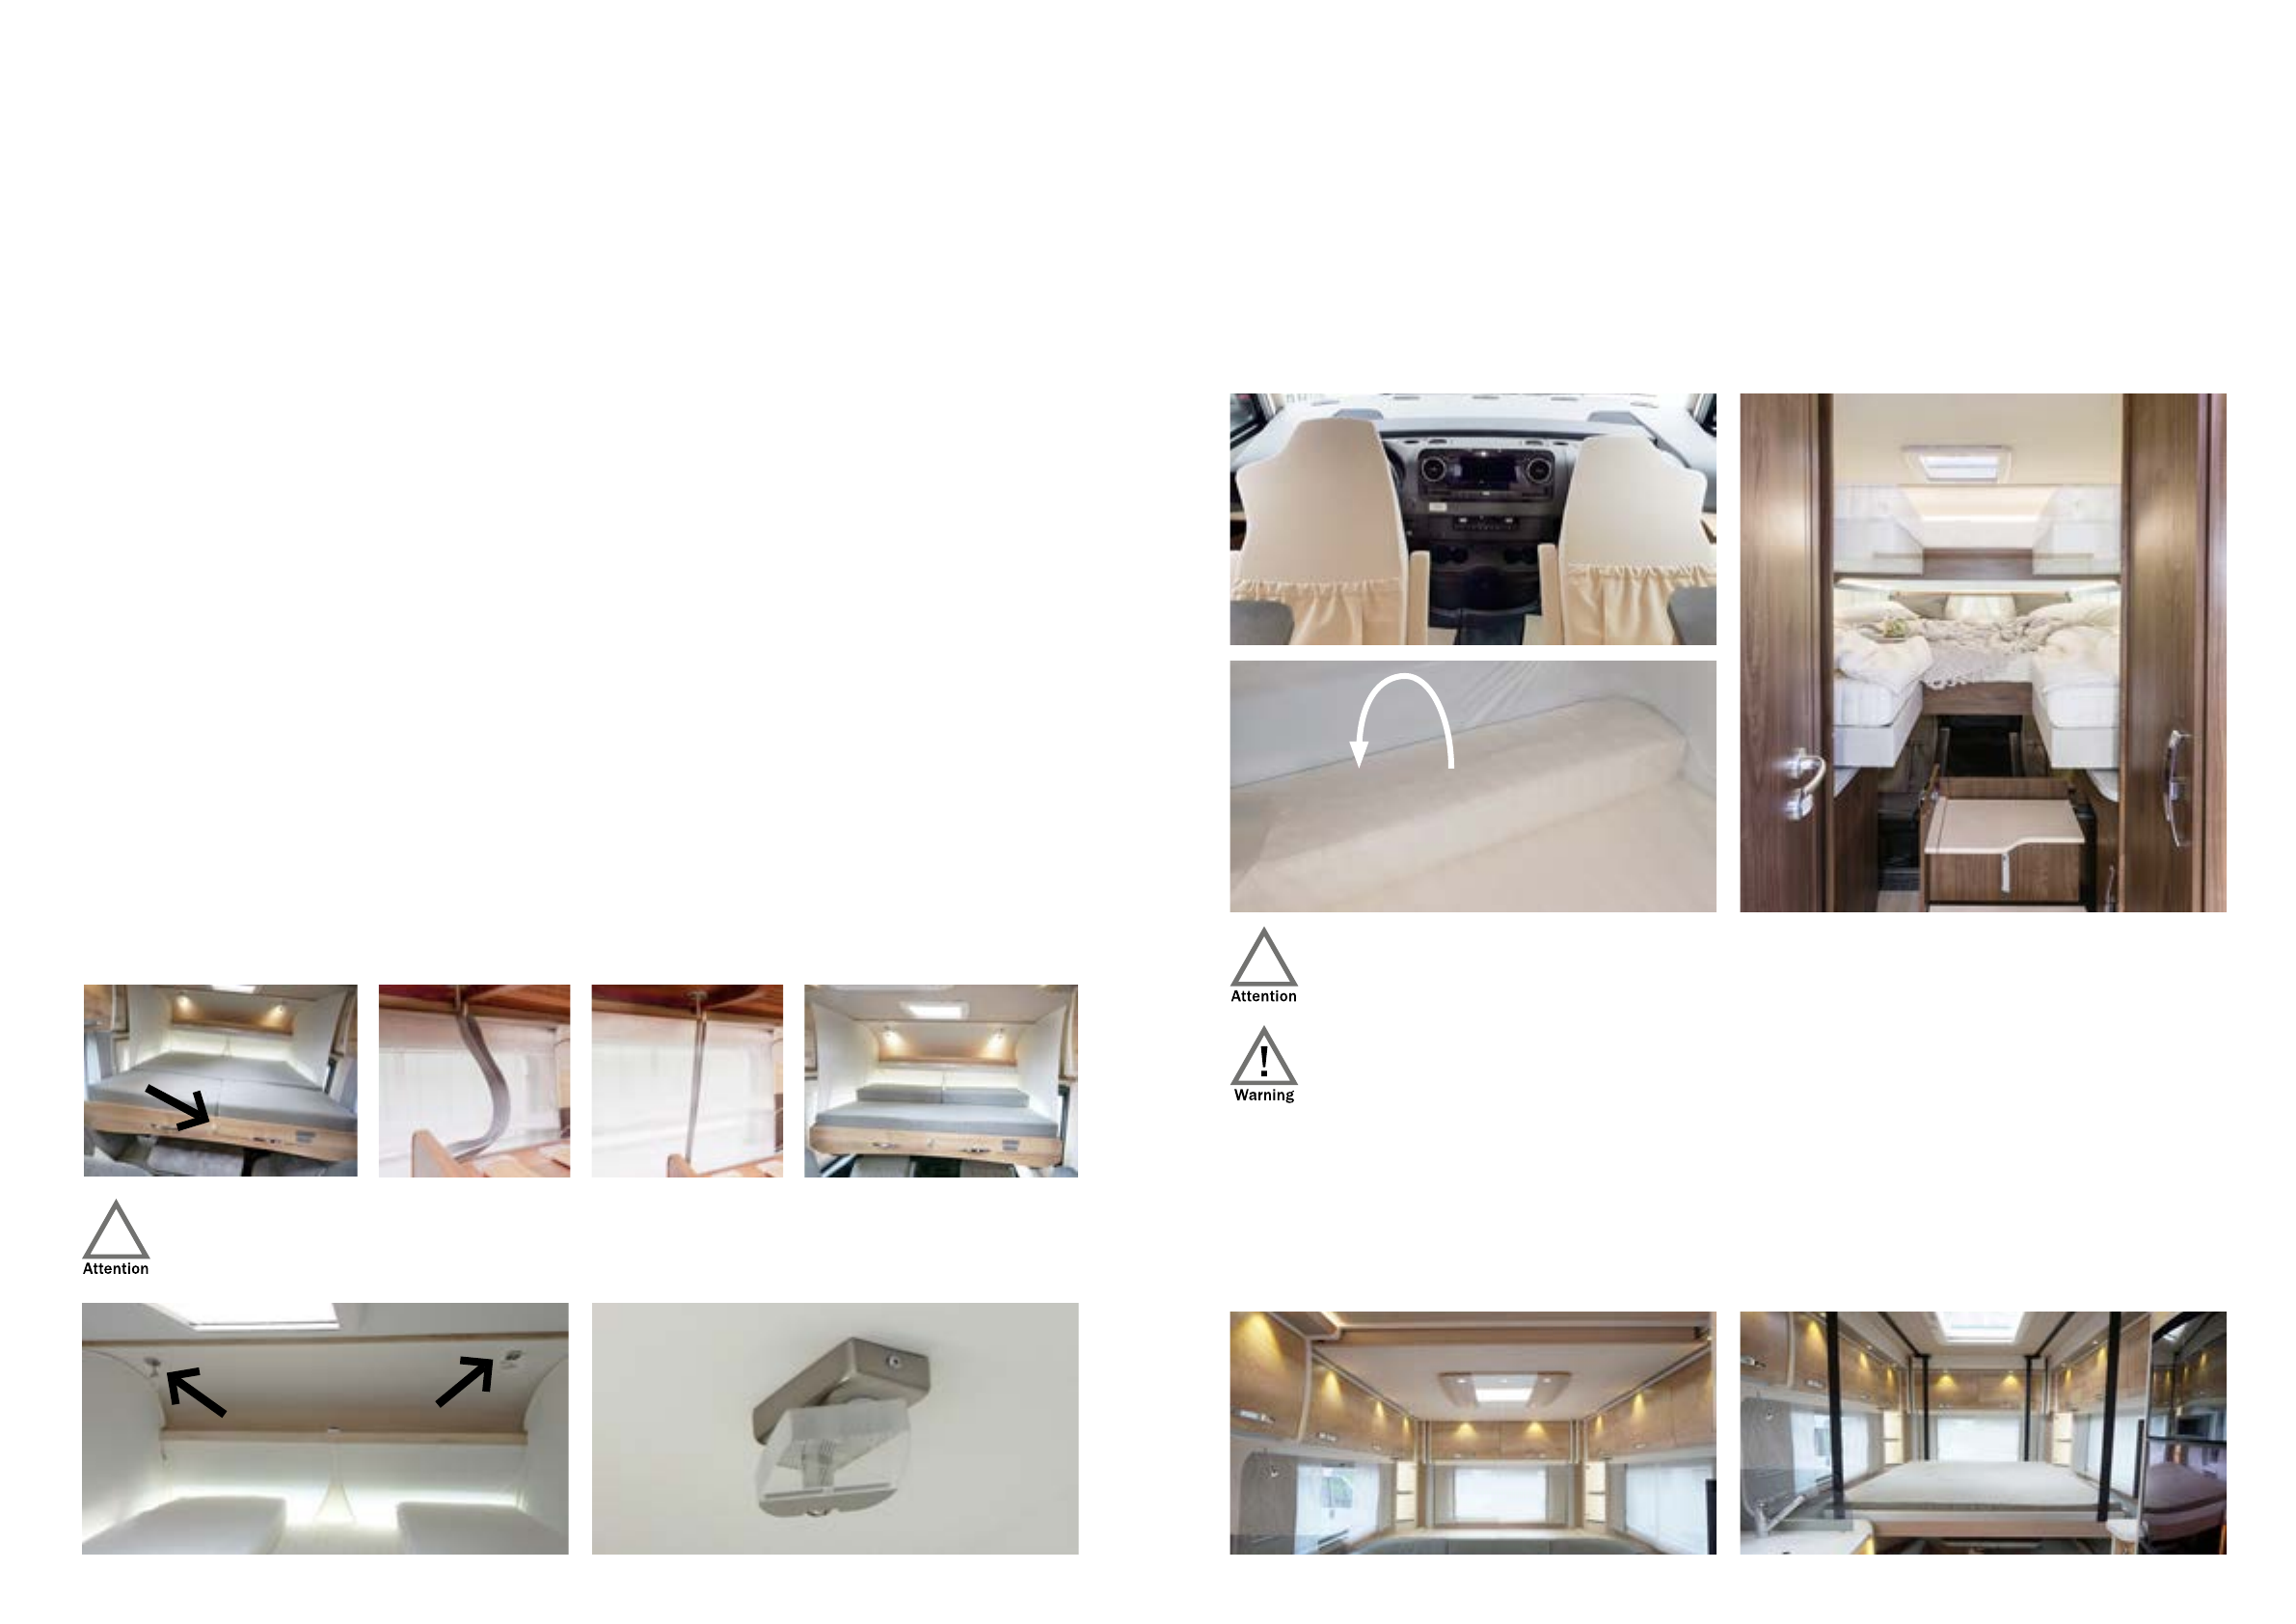
1.6 Sleeping
The alcove beds can be used immediately. In order to facilitate access to the driver‘s cab, in the case of Plus floor plans,
the extendable central slatted frame should be inserted and locked. For all other floor plans, you can fold the bed up.
You can keep the alcove bed folded up while driving.
Before the drop-down bed in Coachbuilt motorhomes is swivelled down, the steering wheel must be pushed in comple-
tely and brought to the lowest position, the backrests of the front seats must be moved forward, and the seat height all
the way down. Swing the driver‘s seat slightly outwards so that the backrest swings past the steering wheel.
•Press the rocker switch down to lower the electric drop-down bed
•When the lower position is reached, the motors switch off automati-
cally
•To raise the electric drop-down bed, press the rocker switch upwards
•If there is a mattress or bedding on the vehicle roof, stop the process.
It is not absolutely necessary to raise the bed as far as it will go
The raised drop-down bed must not be used as a luggage rack. Only the bedding for two people may
remain on the bed. The bed may only be loaded in the lower end position.
During the adjustment process, the bed lowers and rises on both sides at different speeds due to
the design, so there is no synchronisation and the bed may be pulled into a slight incline on the way
between the upper and lower position. This has no influence on the operational safety of the bed.
Therefore, when adjusting, keep the switch pressed until both motors have moved to the lower end
position and switch off automatically. An integrated overload protection switches the drop-down bed
off automatically in the event of a collision. The system can be operated again after about 20 seconds.
Emergency operation in the event of a defect in the linear drives is described from Section 9.8.

FRANKIA OPERATING MANUAL14 FRANKIA OPERATING MANUAL 15
The Duo bed (= option):
The Duo bed in Coachbuilt motorhomes can be used in two different ways. Either as a double bed in the transverse direc-
tion of the motorhome, or extended in the longitudinal direction as a large double bed with approx. 2m x 2m lying area.
•Rotate the table (option) in the driver’s cab (see chapter “Tables”)
•Due to the layout, the seat cushions must be folded up to hang the ladder (option)
•Put the front back cushions on
•Unlock the bed drawer by turning knob A
•First, lower the drop-down bed electrically to below the fitted cupboards. The switch is located next to
the display panel above the body door
•Pull the bed by the handles at the foot end as far as it will go and lock it by turning knob A
•Hang the belts on the side next to the female connectors in the hooks under the front fitted cupboards
•Then lower the bed completely
•Place the additional mattresses on the slatted frame
•Hook the ladder (option) into the two slots on the cover
•For dismantling, proceed in the reverse order
•Place the additional mattresses on the bed and push them as far forward as possible. If you also leave
the bedding on the mattress, it is not absolutely necessary to raise the bed as far as it will go. After the
bed has been lifted up, the bed extension must be locked again.
Before the Duo bed is raised, the LED FRANKIA reading lights must be folded in to avoid damage
A
The drop-down bed in the Plus floor plan:
Before the drop-down bed is lowered in Plus floor plans, the steering wheel must be pushed in completely and brought
to the lowest position, the front seats pushed all the way back and their backrests folded forward to create enough
space for the drop-down bed. Press the button until the bed is down and the headboard is fully extended.Tilt the mat-
tress headboard forward. For dismantling the bed, proceed in the reverse order.
Only use the bed in the lowest position. Otherwise damage to the bed construction and other furniture
can be caused. The rollers of the step extension can leave marks in the ground if they are left in the
extended position for too long.
While driving, the raised drop-down bed must not be used as a luggage rack. The bedding should not
remain on the bed either.
The drop-down bed above the round seating group (=option):
The I 790 Plus is optionally available with a drop-down bed above the round seating group. To lower the bed, press and
hold the switch above the body door until the bed has reached the lowest position and rests on the rear shelf. Press the
switch marked with the up arrow to raise the bed again.We recommend folding the back cushions of the round seating
group before using the bed.

FRANKIA OPERATING MANUAL16 FRANKIA OPERATING MANUAL 17
Only use the bed in the lowest position. Otherwise damage to the bed construction and other furniture
can be caused.
The raised drop-down bed must not be used as a luggage rack. The bedding should not remain on the
bed either.
Headboard adjustment for QD beds:
There is a switch on the chest of drawers and on the rear fitted cupboard, which can be used to adjust the headboard
of the bed electrically. With the headboard up, you get a larger passage at the foot of the bed. The bed can only be
adjusted as intended. No persons may be on the bed during the adjustment process.
Conversion of the round seating group in the plus floor plan to a supplementary bed (option) (not for 790 Plus with
height-adjustable rear bed):
By hanging the table feet, lowering the table and placing the upholstery as in the photo, you can obtain a large lying area
over almost the entire width of the motorhome. (See also “Conversion of the seating group to a supplementary bed”)
The supplementary bed table feet can leave marks on the floor.
Conversion of the seating group to a supplementary bed (option):
To lower the table, first raise the table slightly and push it down as far as it will go. Pull up to return to its position.
To convert the seating group into a supplementary bed (depending on the floor plan), two additional foot units must be
attached to the table top before it is lowered and provided with additional upholstery.
The supplementary bed table feet can leave marks on the floor.

FRANKIA OPERATING MANUAL18 FRANKIA OPERATING MANUAL 19
2.1 Roof hatches
Your motorhome is equipped with roof hatches that allow both ventilation and darkening. To open the roof hatch, press
the release button and push the bracket up.The roof hatch can be set in various positions using the locking positions.
The darkening blinds or pleated blinds of the roof hatches must not be closed while driving, and a maximum of 2/3
closed in strong sunlight.The pane must be in the “permanent ventilation” position to prevent damage from overheating.
•Depending on the situation, you can open the roof
hatch completely or partially
•The roof hatches are equipped with legally required
forced ventilation
•The roof hatches must be closed while driving
•The roof hatch in the kitchen area provides optimum
ventilation in connection with the slightly opened
kitchen window
•The opening of the roof hatch in the washroom
prevents the mirrors from misting up
Roof hatches with fan:
“Omnivent” roof hatches equipped with a fan can be opened by turning handle “A” in the direction shown. The fan can
be switched on/off via the control panel “B” and you can choose whether the air is blown in or out. Red LEDs indicate
the current mode.
The “Fiamma” roof hatches with fan are also opened by operating the rotary handle. The toggle switch controls the
direction of rotation of the fan.
2. VENTILATION
A
B
2.2 Midi-Heki, Heki III
The operating instructions of the company Seitz contain all the necessary information.
Heki III roof window:
The Heki 3 can be opened with the hand crank up to an opening angle of
approximately 70°. To lock it completely, continue cranking 2-3 turns after
the pane is fully supported.
The Heki III must remain closed while driving. Before operating the satellite antenna, the surrounding
roof hatches must be closed.
For more detailed information about the Heki III, please refer to the operating instructions from Seitz that are supplied.
2.3 Windows
FRANKIA motorhomes are equipped with combination roller blinds.These allow optimum darkening during the night and
full or partial ventilation, with or without a mosquito net.
Do not keep the darkening blinds closed for a long period of time in strong sunlight, otherwise material fatigue can be
expected.
To open the window, press the safety button and turn the locks to the side. You can connect the mosquito blind to the
darkening blind and move the whole unit up or down.
Do not drive with the hinged windows open!

FRANKIA OPERATING MANUAL20 FRANKIA OPERATING MANUAL 21
2.4 Body door
To open the body door manually, turn the key to the right as far as it will go or press the central locking button (remote
control). The door is opened by pulling the handle. Before removing the key, turn the lock cylinder to vertical again. To
lock the door from the inside, turn the locking lever to the horizontal position.
For your safety, we recommend that you only drive with the lock locked when travelling with people in the living area.
During your stay and especially during the night, make sure that access to the door is not blocked.
(Escape route)
Some advice regarding ventilation:
There are only a few cubic metres of air in a motorhome, which are cut off from the “outside world” by
the insulated walls of the motorhome and rubber seals on the windows. Air exchange through the for-
ced ventilation must be ensured. If the stove is also in operation, the oxygen quickly becomes scarce
and there is a risk of suffocation!
Inadequate ventilation also creates other problems: high humidity and condensation.These are formed by body perspi-
ration, wet clothing and condensation from showering and cooking. Therefore here are a few tips for ventilation:
•As long as the motorhome is inhabited at pleasant outside temperatures, the following applies: Ensure
a permanent air exchange by cleverly dosed ventilation (open windows and/or roof vent).
•In winter, occupied motorhome should be thoroughly ventilated several times a day.
•Keep the ventilation slots in the storage compartments clear.
•Ensure adequate air exchange even during the night (e.g. open a roof hatch). The more people stay in
the motorhome, the more ventilation is required.
•Even a motorhome out of use must be ventilated from time to time so that no condensation can form.
The excess moisture in the indoor air is first reflected in the colder areas in the motorhome. Therefore, observe and re-
move any condensation on the window panes and, in the case of A-class models, on the front and corners of the alcove.
3. GAS SYSTEM
3.1 Allgemeines
The gas system of your motorhome supplies the refrigerator, and the heating with the boiler and the cooker. These 3
devices are connected to the gas bottles, which are located in the storage box provided.The system should be operated
with propane gas.When operating with butane gas, the proper functioning of the system cannot be guaranteed due to
the widely differing gas quality.Therefore maintenance work due to contamination, e.g. cleaning burner nozzles, is not
included in the scope of the guarantee. The operating pressure is 30 mbar.
Before you go abroad, make sure that gas supply is possible there. In some countries, the gas bottles are not exchan-
ged, rather they are filled up again.You need an adapter for this. In some countries you can drive with open gas bottles.
Inquire before your departure.
The gas system must be checked every two years by a certified expert.The test certificate must be carried in the motorhome.
A gas tank is optionally installed in your motorhome. Please note the manufacturer‘s instructions, which are issued
separately.
It is recommended to operate the gas system exclusively with propane gas.
3.2 Gas bottles
In the stowage box, the gas bottles are lashed against twisting with two straps.
If you change the bottles:
•1. Switch off gas appliances
•2. Close the bottle valve
•3. Loosen the union nut of the pressure reducing valve CAUTION ==> left-hand thread
•4. Replace the empty bottle with a full one
•5. Reconnect the bottle to the system
•6. Tighten the union nut of the pressure regulator vigorously by hand without tools.
If gas cylinders are not connected, the valve must always be secured with the protective cap.
To ensure that the hoses run in an optimum way and to avoid damage to the hoses, connect the right
hose to the left and the left hose to the right bottle.

FRANKIA OPERATING MANUAL22 FRANKIA OPERATING MANUAL 23
Using a new gas bottle for the first time:
•1. Open the bottle valve (1).
•2. Firmly press the hose rupture protection (3)
(green button) on the high-pressure hose for ap-
prox. 5 seconds.
•3. After a false trigger, press the yellow reset button
(7) and turn it slightly clockwise and hold it for 5
seconds.
•(See also the Truma operating manual)
Opening and closing the system:
Opening the system:
•1. Open the connected bottle
•2.
Open the shut-off valve in the display cabinet or kitchen (depending on the floor plan) next to the entrance
•3. Switch on the device
We advise against opening the shut-off valve of a device when you are not using it.
If a device does not work, repeat this process in the order mentioned above.
Closing the system:
Close devices, stopcocks and gas bottles.
•The space in the gas bottle box is only reserved for gas bottles. Do not use it as additional storage
space
•The forced ventilation in the bottom of the gas box must not be closed!
Commissioning of the gas tank (option):
•1. Open the tank valve.
•2. Press the Crash sensor firmly (green button).
•3. After an accident or a false trigger, press the
green reset button on the MonoControl CS (reset
the crash sensor trigger element).
If the gas tank is installed with gas bottles in addition to the
gas box, select the gas source on the 3-way valve.
The 3-way valve is mounted near the gas distributor.
3.3 Gas stove
Turn the gas tap to the left while pressing. Keep the button pressed until the gas ignites. Release after 10 seconds.
The roof hatch in the kitchen area provides optimum ventilation in connection with the slightly opened kitchen window.
The gas stove must not be used as a heater. If you use pots or pans with a long handle, make sure that
they do not protrude into the passage. The piezo ignition only works when the power supply is switched
on in the control panel.
Be sure to use pots of a suitable size. If the pots are too small, the flames can blow out over the rim of
the pot. With the lowered hob, pots or pans should never protrude beyond the work surface. The kitchen
worktop is damaged by heat transfer.
3.4 Heating – Hot water
The liquid gas heating in your motorhome is equipped with an electronically controlled fan and an integrated hot water
boiler.The same device therefore allows you to distribute warm air throughout the entire main body and to have 12 l of
hot water at all times. So you only have one device for heating and hot water. For more information on heating and hot
water, please refer to Chapter 6. Before use and maintenance, please study the enclosed operating instructions from
TRUMA.
Distributor
Gas bottles Gas tank

FRANKIA OPERATING MANUAL24 FRANKIA OPERATING MANUAL 25
3.5 Gas supply
The following table provides information on gas supply in some European countries: (subject to correction)
State Propane BP Gas light Autogas
Belgium Belg. Bottles are structurally identical to
German products. Filling and bottle ex-
change are possible. No adapter required.
Bottle exchange at BP
petrol stations.
Comprehensive network
with 397 LPG filling stations
at petrol stations, Europe
adapter (bayonet) required.
Denmark German gas bottles with 5 and 11 kg
filling are offered in exchange on many
campsites. Refill possible at Kosan Gas As
in Norresundborg near Alborg, Koge and
Nekso. German bottles are also available
from BP Gas.
Bottle exchange at
BP petrol stations,
adapter required.
13 LPG filling stations
at petrol stations, Eu-
rope adapter (Italian
system) req.
France
Only French bottles are filled and exchan-
ged. You can rent domestic bottles (usually
13 kg) from petrol stations and campsites
for a deposit (approx. € 35) and connect
them using a Euro Set adapter. Gold-colou-
red bottles should fit without an adapter.
Comprehensive network with
1800 LPG filling stations
at petrol stations, Europe
adapter (Italian system)
required.
Greece Exchanging and refilling bottles mostly only
in big cities like Athens, Thessaloniki, Pat-
ras and Monernvassia. It is recommended
to take the Euro filling set with you. Info in
Greece via ADAC hotline (01) 960 1266.
No filling of gas tanks of
tourist vehicles at the 34
LPG gas filling stations,
connection: ital. system.
Great Britain Brit. Calorgas bottles can be connected
using an adapter (Europe tapping set). For
German bottles there are filling stations
in Bury St. Edmunds/Suffolk, Ellesmere
Port/Cheshire, Grangemouth/Stirlingshire,
Ivybridge/Devon, Liverpool/Merseyside,
Middlesbrough/Cleveland, Neath/West
Glamorgan, Southampton/Hamsphire,
Stanford-le-Hope/Essex, Stoney Stanton/
Leicestershire. Scotland: Gleaner Oils in
Milnfield, Elgin.
Comprehensive network with
LPG filling stations at over
1000 petrol stations, espe-
cially in metropolitan areas,
adapter (bayonet) required.
Italy Exchange of German bottles possible on
some northern Italy camping sites accor-
ding to ACE. Refilling German bottles with
adapters possible nationwide, exchange
and filling stations nationwide.
Comprehensive network with
GPL/LPG filling stations at
350 petrol stations, espe-
cially in the north, adapters
(Italian system) required.
Luxembourg Luxembourg bottles are structurally
identical to German products. Filling and
bottle exchange are possible. No adapter
required.
5 LPG filling stations at
petrol stations in southern
Luxembourg.
The
Netherlands
Netherlands bottles are structurally iden-
tical to German products, exchange and
filling possible nationwide.
Bottle exchange at BP
petrol stations.
Comprehensive network with
LPG filling stations at petrol
stations, adapter (Spanish
system) required.
Norway No filling of foreign gas bottles Deposit
bottles (5 and 11 kg) available from AGA
at 900 branches (compatible with Swedish
and Finnish gas bottles); Return within 6
months. AGA adapter required. Info: www.
aga.no.
Bottle exchange at
BP petrol stations,
adapter required.
Comprehensive network with
LPG filling stations at 39
petrol stations, especially in
the south, adapter (Italian
system) required.
Austria Filling and exchange without problems,
since German and Austrian bottles are
identical.
Bottle exchange at BP
petrol stations.
10 LPG filling stations
at petrol stations on the
motorways, adapter (Italian
system) required.
Sweden No filling of foreign gas bottles Deposit
bottles (5 and 11 kg) available from AGA
(compatible with Norwegian and Finnish
gas bottles).AGA-Adapter required, Info:
www.aga.se.
Bottle exchange at
BP petrol stations,
adapter required.
10 LPG filling stations at pe-
trol stations, adapter (Italian
System) required.
Switzerland No exchange possible, filling German
bottles in exceptional cases by adapter
Swiss bottles with pressure regulator can
be rented. Info: Shell Gas, Telephone:
0041/327/587555.
7 LPG filling stations at pet-
rol stations, partially adapter
(Italian system) required.
Spain Dispensing of LPG only in gas tanks, no
filling of gas bottles.There are deposit
bottles of 6 and 12.5 kg available at
Repsol. A list of gas stations is available at
www.cepsa.es.
Network under construction
with 33 LPG filling stations
at petrol stations, especially
in the west. Adapter (Spa-
nish. system) required.

FRANKIA OPERATING MANUAL26 FRANKIA OPERATING MANUAL 27
3.6 Refrigerators
General information:
The FRANKIA motorhomes come with a Dometic refrigerator (depending on the floor plan at Selection: Thetford) which
can be operated with gas, 230 V or 12 V battery. The refrigerator can only be supplied with 12 volts while driving. Use
230 volts or gas preferably when the vehicle is parked. AES refrigerators have an automatic energy source selection.
After a long period of non-use or after changing the gas bottle, there is often air in the gas line. To ensure that the re-
frigerator ignites without a long delay, vent the line by briefly starting up the gas cooker and set the thermostat to the
highest level.
The device has all the classic functions of a refrigerator:
•Preserve food, Production of ice cubes, Preserve frozen foods
The operating instructions from DOMETIC or THETFORD contain all information and recommendations concerning this
device.We therefore advise you to read them carefully and observe them.
Some tips for the optimum use of your refrigerator:
•Ice cubes: The best time to make ice cubes is at night.The allows you to have ice cubes during the day,
even with 12 V operation.
•Defrosting: If the cooling elements freeze up, it will reduce the performance of your refrigerator. We
therefore advise you to defrost the refrigerator regularly.
Safety instructions:
•Changes and repairs to the gas system may only be carried out by authorised specialists! If changes are
made to the gas system, the gas test certificate becomes invalid!
•The gas devices are only designed for operation with propane, butane or a mixture of both gases.
•When handling gas (filling the tank, changing the gas bottles), there must be no fire or open light near
the motorhome! There is a risk of explosion!
•If the motorhome is parked in a garage, there must be no fire nor open light near the motorhome,
since escaping gas can accumulate in the closed space to form an ignitable mixture!
•The operating pressure of the gas system is 30 mbar. If gas regulators with a higher operating pressure
are used, the ball valves will be damaged.
•Each gas device has its own shut-off valve (quick-closing valve).This valve must always be closed when
the device is not in use.
•If all gas devices are out of operation, all device shut-off valves, the gas remote switch and, if not
used for a long time, the gas bottle valves must be closed.
•The gas cooker must not be used for heating purposes!
•Read the operating instructions of the device manufacturers and follow the instructions. Leave these
instructions in the motorhome so that you can refer to them in case of doubt.
•Regularly check whether the supply air and exhaust gas openings of the installed gas devices (heating,
refrigerator) are free of dirt, leaves and snow.
Gas socket (option):
If your motorhome has a gas socket, it is advisable to close the associated shut-off valve in the event of a long absence.
Otherwise gas could be withdrawn without being noticed.
Properties of the gases used:
•They are heavier than air: leaked gas collects on the floor
•They are relatively easy to liquefy under pressure, which can increase the amount of energy stored. One
litre of liquefied gas produces more than 200 litres of “fuel” in gaseous form
•Gas-air mixtures are explosive with a gas content of approx. 2-10%
•Escaped gas has an intense odorant
•If liquid gas contacts the skin, the cooling effect can cause frostbite
•They have different boiling points: Propane - 42° Celsius; Butane + 1° Celsius
•The boiling point indicates the temperature up to which the liquid “gas” changes to the gaseous state
If the ambient temperature is lower, there is no more evaporation
•This means: In cold weather, propane must be used, as it can be evaporated down to approx. -42° C
What to do if you smell gas?
•1. No fire, do not smoke
•2. Do not operate any electrical switches
•3. Close the bottle valves
•4. Ventilate the motorhome well
•5. Have the system checked by a specialist

FRANKIA OPERATING MANUAL28 FRANKIA OPERATING MANUAL 29
4. ELECTRICAL SYSTEM
4.1 General information
Your FRANKIA motorhome is equipped with a 230 V AC and a 12 V DC system. The connection to the 230 V mains is
established in the case of Selection floor plans using the plug located in the central supply compartment, or in all other
motorhomes using the cable reel located in the central supply compartment and the associated plug with the vehicle
connection cable.
The 230 V circuit breaker and the residual current circuit breaker are located in the electrical board. Vehicles with an
inverter have two 230V automatic circuit breakers installed (for inverters and shore power).
The 12 volt supply is provided by 2 batteries: the vehicle battery and the body batteries. All electrical parts that are
assigned to the chassis are supplied by the vehicle battery.The body battery supplies the electrical system in the living
area and the radio. (Exception Mercedes-Benz original radio)
If the 230 V supply is not possible when parking, we advise you not to use the vehicle battery to be sure that it remains
charged enough and that the motorhome is always ready to start.
For your own safety, it is recommended to have the 230/12V system checked regularly by an electrician.
No connection to the 230V electrical system may be established on ferries because the voltage fluctuati-
ons on ships can damage the electrical system due to overvoltage.
Shore power connection (230V/50Hz) Power supply flap:
The cable reel with automatic reel is located under a sepa-
rate flap next to the central supply compartment. Unplug the
power cord. After gently pulling the cable again, it automati-
cally rolls up again.
•Connect the cable of the cable reel to a 230V/50Hz
socket.
•The control symbol for the 230V charge must light
up on the control panel above the entrance door.
To minimise the risk of overheating, always unroll the cable
reel completely.
Should the overload protection still trigger,
reduce the number of consumers below the permissible value
and then press the red button on the cable reel. (Access de-
pending on the floor plan either directly via the central supply
compartment or to an adjacent storage compartment or rear
storage compartment with an access hole in the side wall)
The maximum connected load of the electrical system when connected to the mains via a cable reel is
3500 watts when rolled out, and only 1000 watts when rolled up.
•Always unroll the cable reel completely - risk of overheating!
•Please start by disconnecting the mains connection at the mains socket in order to avoid unnecessary
handling of the live parts (cables)
•The load capacity of the 230V system is limited by the fuse of the power column at the place of stay
(e.g. campsite):
With 230V, 6A power column: Max. load capacity 1250W
With 230V, 10A power column: Max. load capacity 2070W
With 230V, 13A power column: Max. load capacity 2690W
With 230V, 16A power column: Max. load capacity 3300W
Power consumption above this value can lead to a technical defect (triggering the 230V fuses on the power column or
in the vehicle or overheating the system - risk of fire).
In order to prevent possible overloading, it is advisable not to operate the ALDE heating in 230V operation at the
maximum level if you intend to operate additional consumers (e.g. coffee machine, vacuum cleaner, hair dryer with a
combined total of 2kW). Especially for this case, ALDE offers a load monitor (ALDE No. 301015) as an accessory.
The sum of the consumers in operation must not exceed the connected load of the power column for error-free operation!
The following table provides an indication, average values of electrical consumers:
Consumers: Note: Power consumption (watt):
Battery charger (1 on-board battery) 320W
Battery charger (2 on-board batteries) 640W
Heating TRUMA Combi 6 E Level 1 900W
Level 2 1800W
Heating ALDE Compact3020HE Level 1 1050W
Level 2 2100W
Level 3 3150W
Coffee machine (device dependent) approx. 1000W
Fully automatic coffee machine (device dependent) approx. 1800W
Capsule / pad machine (device dependent) approx. 1500W
Hair dryer (device dependent) 1200-2300W
Kettle (device dependent) 1000-3000W
Vacuum cleaner (device dependent) 700-1200W
Notebook charger (device dependent) 60-100W

FRANKIA OPERATING MANUAL30 FRANKIA OPERATING MANUAL 31
Electrical board:
The electrical board is located in the rear storage compartment (depending on the floor plan). All body-specific circuits
are protected here.
A) Additional distribution chassis (Mirror heater,
window regulator, rear view camera, etc.)
B) 12V-distribution DS 470
C) Solar charge controller PRS 300 Bus (option)
(For Power Package and Platin Edition see chapter
4.6 or 4.7)
D) 230V distribution with automatic circuit breaker
and residual current circuit breaker (2 x present
with optional inverter)
E) CB 522 charger (2 x present for 2 main body
batteries)
Vehicle electrical system 230V:
For the electrical installation, an initial commissioning test is carried out by a qualified electrician in accordance with
DIN VDE 0100-600 when assembling every FRANKIA motorhome. If the system is expanded or changed, this test must
be repeated.The test report is enclosed with the vehicle documents including a circuit diagram for the 230V installation.
Automatic circuit breaker:
This device protects the 230V connection against overload and short circuit.
Residual current circuit breaker (RCD):
The residual current circuit breaker protects against impermissibly high contact voltages and also serves to prevent fire
in the event of a technical defect.The residual current circuit breaker must be tested monthly to ensure the operational
function and when changing location (pressing the test button simulates a fault to ensure proper functioning - see page
35,36).
A
C
B
D
E
Vehicles with an optional inverter are equipped with two circuit breakers and two residual current circuit breakers.
•By means of the first unit (F1) large consumers such as the refrigerator, heating etc. as well as the in-
put side of the inverter are protected. These are only active with a shore power connection.
•The second unit (F01) is located on the output side of the inverter. All 230V sockets are protected by
this. This unit is active with both shore power and inverter supply.
Operation of the circuit breaker:
Switch off the circuit breaker
• Set the toggle switch to “0”
Switch on the circuit breaker
• Set the toggle switch to “1”
•The circuit breaker is mostly triggered by a defective electrical device. If necessary, have the device
checked and repaired by a specialist.
•The toggle switch must never be held in position “1” by force!
Checking the residual current circuit breaker (RCD):
Test residual current circuit breaker
• Press the test button
• Toggle switch must jump to “0”
Switch on the residual current circuit breaker
• Set the toggle switch to “1”

FRANKIA OPERATING MANUAL32 FRANKIA OPERATING MANUAL 33
•The triggering of the residual current circuit breaker is usually caused by faulty insulation or a device
defect. If necessary, have the system or device checked and repaired by a specialist.
•The toggle switch must never be held in position “1” by force!
Vehicle electrical system 12V:
If your motorhome is disconnected from the 230V mains, at least one body battery provides the energy supply for the
electrical consumers in the living area.Your basic vehicle has its own starter battery that is NOT discharged by the living
space consumer.
Both batteries are charged automatically:
1. when connected to the 230 volt mains via the integrated charger (The control panel must be switched on)
2. with the engine running via the alternator (for Titan and Platin packages additionally via (combined) charge boos-
ter, see chapter 4.6 or 4.7)
3. by the solar module if there is sufficient sun exposure (option) (the starter battery is also charged if: 1. The living
area battery is fully charged and 2. The control panel is switched on)
Charger for starter battery (option for M-Line, except Platin):
An additional charger for the starter battery is optionally available. This charges the starter battery as soon as the ve-
hicle is connected to shore power. Under normal circumstances, no intervention or settings are required on the device.
The charger is located in the passenger seat box.
Protection of vehicle electrical system:
The main fuses (MIDI fuses) for the consumers are located on the batteries.The position and function of the additional
fuses can be found under 4.3. In addition, the individual consumers are protected by fuses on the charger.
A battery from the MOLL GEL series is used as the living area battery in FRANKIA motorhomes. This is an accumulator
with GEL technology, which is specially designed for use in the hobby and leisure sector (see MOLL technical data
sheet).
(Titan and Platin packages have LiFePo technology batteries, see sections 4.6 and 4.7, respectively)
The essential handling instructions can be found in this, as well as in the operating instructions for the 12V distribution
and the control panel. (For Power Package and Platin Edition see chapter 4.6 or 4.7 as well as the relevant instructions
from Büttner Elektronik)
Additional information for the correct care and maintenance of the MOLL GEL battery: (For the LiFePo battery of the
Titan and Platin package, see chapter 4.6 or 4.7)
State of charge of the battery:
The easiest way to determine the state of charge of a battery is via the so-called open circuit voltage. The open circuit
voltage is the battery voltage in the state of rest. The measurement should take place at the earliest 5 hours after the
last charge. In the meantime, the battery must not have been significantly loaded. The open circuit voltage can either
be measured via the control panel or via a separate volt meter.
Open circuit voltage State of charge Measure
12.80 V and higher fully charged O.K.
12.65 V 75% Charging required
12.35 V 50%
Charge immediately!
12.00 V 25%
11.80 V 0%
Less than 11.80V deeply discharged
How long can a certain current flow - and how can you calculate it?
First some basics of physics: An electrical current is measured in A(amperes). The voltage in V(volts).
The mathematical product of both is the electrical power W(Watt) = V x A
The nominal voltage of our battery is 12V. The capacity is indicated on the battery in so-called ampere hours (Ah). In
the case of MOLL GEL, it is the so-called 100-hour capacity.
Example: If a 100 Ah battery is discharged with 1A current, the current can flow for 100 hours.Therefore 100 Ah would
be removed from the battery.With higher load currents, however, the removable capacity decreases. So in our example
the 100Ah battery with a discharge of 20A, only approx. 75 Ah can be removed. This corresponds to a time of 3.75
hours. If we now connect a lamp with a nominal power of 12W, the discharge current is calculated as follows: 12W /
12V = 1A. A current of approx. 1 A flows. A fully charged battery would last for approx. 100 hours.
What damages a battery?
• Extreme deep discharges down to a voltage below 11.8V
• Long down-times or partially discharged conditions
• Longer operating times at very high temperatures
• Opening of the maintenance-free battery
During operation, the battery should be recharged as quickly as possible after a discharge. The battery should be fully
charged regularly so that the open circuit voltage is 12.6V and higher.
Care and maintenance of the batteries:
1. Check the charge status of the batteries regularly; recharge the batteries if necessary. Check the pole terminals:
They should sit securely and have clean, greased contacts.
2. If the motorhome is going to be out of use for a long period of time, you should disconnect the batteries from
the earth connection (remove the negative pole cable). It is important to ensure that the solar modules do not
supply electricity so that the solar controller is not damaged. Regular condition monitoring is also important
then. The best frost protection for a battery is a good state of charge.
3. Use every opportunity during the journey to recharge the batteries via the 230V external connection.

FRANKIA OPERATING MANUAL34 FRANKIA OPERATING MANUAL 35
Self-discharge of the batteries:
Every battery loses its stored energy over time without a consumer being connected.This self-discharge is a measure of
the age of the battery, old or frequently charged and discharged batteries discharge faster than new ones.
Shutting down the battery:
If the motorhome is not going to be used for a long time, the following measures should be carried out:
1. Fully charge the battery via the electro block (open-circuit voltage after 5 hours at least 12.6V).
2. Disconnect the battery from the circuit - either via the control panel or better by disconnecting the negative pole
3. For the Solar option: Remove fuse No. 5 “DIR2” from the 12V distribution board. (For the Platin and Titan pa-
ckages, the corresponding fuse on the fuse holder in the technical centre or on the solar controller must be removed)
4. Keep the surface of the battery clean and dry
5. Store the battery as cool as possible
When commissioning please repeat the above mentioned measure. For longer downtimes, repeat the above mentioned
measures every 6 months.
Deeply discharged batteries:
If the open circuit voltage drops below 11.8V, we refer to a deeply discharged battery. If the operating mode is correct,
this condition should not actually occur, since the control panel issues a visual and acoustic warning when the battery
is discharged. (See operating instructions from the company CBE). In some cases, deeply discharged batteries can no
longer be charged using the built-in charger.
If the battery is still deeply discharged, proceed as follows:
1. Charge the battery using the electro block
If this does not succeed:
2. Disconnect and remove the battery on both sides
3. Charge with a suitable external charger
a. Either an hour with about 2A
b. Or charge an hour with about 16V
4. Reinstall the battery and connect it
5. Then fully charge the battery using the electro block
If this measure does not work, there is likely to be permanent damage and the battery needs to be replaced.
•Avoid discharging voltages of less than 11 volts. Such deep discharges shorten the life of the batteries
considerably. Due to insufficient charge, sulphate formation can also occur, which is difficult to remove.
•A fully charged battery is less sensitive to cold than an empty battery. It is therefore a good idea to
keep the battery charged to prevent freezing.
•The batteries should be charged for at least 12 hours before and after each trip.
•All devices and lights must be switched off before connecting or disconnecting the additional battery.
•The replacement battery must be replaced by the same type with the same specification as the origi-
nally installed auxiliary battery or as specified by the manufacturer.
Solar module (option):
The solar panel is located on the vehicle roof and converts light into electrical energy. These are solar cells with a high
degree of efficiency.The energy obtained in this way is fed directly into the 12-volt electrical system, and the living area
battery is charged when there is an excess.The solar controller takes over the distribution of the solar power. When the
living area battery is charged and the control panel is switched on, the starter battery is also charged.
Maintenance and care:
•The solar cells are located behind a hardened glass plate; the panel is waterproof and weatherproof.
Solar cells must be clean in order to maintain their performance. Therefore, you should clean the glass
plate of the module with a damp cloth and a little washing-up liquid every 4 weeks.
•In dusty environments, the solar panel needs to be cleaned more often
•In winter, the panel must be kept free of snow, as hidden solar cells cannot supply electricity
Instructions for the electrical power supply according to DIN VDE 0100-721:2010-02
When connecting:
a) Check the following points before connecting the motorhome system to the electrical power supply:
1) The power supply available at the parking space must be suitable for the electrical system and
the devices of the motorhome with regard to the dimensioning for voltage, frequency and current.
2) The cables and connections must be suitable.
3) The main disconnect switch of the motorhome must be in the off position.
The flexible supply line of the motorhome should be completely unwound to prevent damage from
overheating.

FRANKIA OPERATING MANUAL36 FRANKIA OPERATING MANUAL 37
b) Check the cables/wires, plugs and connections for damage
c) Insert the plug of the flexible cable into the socket provided on the power supply unit at the parking space
d) Turn on the main disconnect switch on the motorhome
e) Check the function of the residual current device (RCD) installed in the motorhome by pressing the test button
and switch it on again
In case of doubt or if the supply is not available or faulty after performing the above procedure, contact
the parking space operator.
When ending the connection:
Switch off the main disconnector of the motorhome and remove the cable; at the power supply facility at the parking
space.
Recurring Inspection:
The electrical system of the motorhome should preferably be inspected and checked annually by a competent electri-
cian who should issue a report on the condition if the motorhome is used frequently.
Source: DIN VDE 0100-721 Annex A (standard)
4.2 Electrical supply - control panel
This control centre is a real on-board control.You can use the control panel to read off the fresh water and waste water
level, the state of charge of the main body and starter battery, the power consumption in the main body and the status
of the solar panels (option).
The CBE PC380 control panel with 12V main switch (button 5) is installed in all motorhomes.
Button 1 activates the light functions
Button 2 activates the water pump
Button 3 activates the heating of the gas pressure regulator (option)
Button 4 activates the optional multimedia functions (radio, TV, subwoofer)
Button 6 activates the programming mode
Button 7 displays the tank levels
Button 8 shows the charge status of the batteries
The flashing of the display indicates that the body battery must be recharged.
Multimedia functions:
these can be activated either by pressing Button 4 or automatically by switching on the ignition or starting the engine.
For more detailed information on the control panel, please refer to the operating instructions from the company CBE
which are supplied. (For operation of the two additional control panels for the Titan package and Platin package, see
Chapter 4.6 or 4.7)
Water pump:
The water pump should only be switched on when the motorhome is occupied and the water supply
is full. This can prevent the pump from running dry or your storage space or double floor filling up with
water due to a small leak.
You have switched on the water pump, but have no water consumption means that all taps are closed. If the pump turns
on from time to time, it can be an indication that you have a leak in the water pipe. Immediately switch off the pump
and examine the pipes, thus preventing “flooding” in the storage compartments. To do so, it is also possible to provide
the water pump with an electronic timeout. Here the water pump is then automatically deactivated after the set time
(see CBE operating instructions, chapter “Customer programming”) if a water flow is measured beyond the set time.The
internal meter is reset here simply by closing and opening the tap used again.The timeout could also be used to reduce
your own water consumption. (e.g. showering too long)
The water distribution (usually located directly next to the fresh water tank) is a direct connection between the pump
and the tapping point (water tap). In the event of a leak, you can isolate the damaged pipe from the water supply with a
blanking plug, so you can continue to use the other taps. We recommend that you check the hot water supply for leaks
or tighten the hose clips every 6 months.
Fresh and waste water display:
The CBE PC380 control panel shows the fill level of the fresh water tank in 1% steps and that of the waste water tank in 10% steps.
The display shows, for example:
Tank display Fresh water tank Tank capacity (l) Waste water tank Tank capacity (l)
100 % approx. 150 approx. 120
50% approx. 75 approx. 60
0% 0 0
The tank volumes can vary depending on the layout. For more detailed information on the control panel, please refer to
the operating instructions from the company CBE which are supplied.

FRANKIA OPERATING MANUAL38 FRANKIA OPERATING MANUAL 39
4.3 Fuses 12 Volt | 12 volt fuses from the vehicle battery (additional distribution chassis)
The following fuses are located in the 6-way fuse holder
in the electrical board (see also position A in the photo in
Chapter 4.1):
A) 20A wing mirror (Coachbuilt only)
B) 15A trailer coupling (option)
C) __A (Reserve)
D) 5A reversing camera (option)
E) 5A daytime running lights (Coachbuilt only)
F) 2A outside flap (option)
In all vehicles, fuses for the additional chassis distribution
(40A MaxiVal) for line protection are located in the battery
compartment under the floor of the driver‘s cab.
The protection of the supply line for the 12V distribution is
also housed here.
For vehicles without an inverter:
FIAT 50A
Mercedes-Benz 60A
For vehicles with an inverter:
FIAT 125A
Mercedes-Benz 125A
Fuses 12 Volt (Battery):
The main fuse for the 12 volt power supply in the body is located directly next to the body battery.
For vehicles without an inverter: For vehicles with an inverter:
50A 125A
Installation of the fuse circuits on the 12V electrical distribution DS 470:
The fuses for the interior lighting are located on the 12V distribution. If a fuse is defective here, this is signalled by a red
LED under the fuse. The safety circuits 1 to 18 are set up according to the following scheme:
A B C D E F
Fuse assignment:
Nr.: Value: Description Function
1 20A Multimedia 1 Radio, Subwoofer
2 3A Truma Ice-Ex Heating cartridge on the gas pressure regulator
3 25A Drop-down bed Drop-down bed, awning
4 SOS See instruction manual CBE In an emergency, a fuse (any value) can be inserted to
activate basic functions
5 20A/25A DIR2 Fuse SOLAR
65 A switched lights Reserve
7 20A Multimedia 2 TV
8 15A Lighting group A Circuit 1
9 15A Lighting group A Circuit 2, Circuit 5
10 5 A Awning lights Awning lights / motion detector
11 10A Water pump Fresh water pump
12 10A Heater Supply heating Alde/Truma
13 20A RH1 Reserve 1
14 20A RH2 Front blind
15 7.5A Sidemarker Sidemarker lights
16 15A DIR1 Circuit 4, satellite system, radio
17 30A Refrigerators Supply fridge
18 25A Step Supply step
Circuit 1 Consumers in the passenger compartment on the passenger side
Circuit 2 Consumers in the passenger compartment on the driver side
Circuit 3 Not used or options
Circuit 4 Ceiling lighting complete
Circuit 5 Indirect lighting or options
The supplied consumers and their fuses can also be found in the operating instructions of the company CBE.
Defective fuses indicate a fault in the circuit.
Please have the relevant devices checked.
4.4 Central locking
The vehicle has a central locking system for controlling the cab and body door.
•FIAT A-class and Low-Profile: Driver, front passenger and body door via ignition key
•FIAT Coachbuilt: Driver and body door via ignition key
•Mercedes-Benz Low-Profile: Driver and front passenger door via ignition key, body door via separate remote control
•Mercedes-Benz Coachbuilt: Driver and body door via ignition key
Table of contents
Other Frankia Motorhome manuals