Franklin Chef pFR1730 User manual

Automatic Drip Coffee Maker
Cafetière automatique
HOUSEHOLD USE ONLY Model FR1730
POUR USAGE DOMESTIQUE UNIQUEMENT Modèle FR1730
Use & Care Guide (pages 1 - 11)
Mode d’emploi (pages 12 à 25)

Congratulations! You’ve just purchased a Franklin Chef™
10-Cup Automatic Drip Coffee Maker, manufactured to the highest
standards of Franklin Industries, L.L.C. To obtain the most
satisfaction from your new purchase, be sure to read through this
Use & Care Guide, being especially mindful of the safety
instructions and recommended operating procedures.
Table of Contents
Important Safeguards···················1 - 3
Technical Information ····················3
Before Your First Use ····················4
Know the Parts of Your Coffee Maker ··········4 - 5
Features ·························5 - 7
Control Panel ···················6 - 7
Operation ·························7 - 9
How to Set the Clock ·················7
How to Delay the Brew Cycle ·············7
How to Brew Coffee ················8 - 9
Coffee Measurement Chart ··············9
Tips for Great Tasting Coffee ················10
Cleaning Your Coffee Maker ················11
Limited Warranty ······················12

IMPORTANT SAFEGUARDS
When using electrical appliances, basic safety precautions should
always be followed, including the following:
1.Read all instructions carefully.
2.Do not touch hot surfaces. Use handles or knobs.
3.To protect against electric shock, do not place cord, plug or
coffee maker in water or other liquid.
4. Close supervision is necessary when any appliance is used by
or near children.
5. Unplug from outlet when not in use and before cleaning. Allow
to cool before putting on or taking off parts, and before cleaning
the appliance.
6. Do not operate any appliance with a damaged cord or plug or
after the appliance malfunctions or has been damaged in any
manner. Return appliance to authorized service facility for
examination, repair or adjustment.
7.The use of accessory attachments not recommended by the
manufacturer may cause injuries.
8.Do not use outdoors.
9.Do not let cord hang over edge of table or counter, or touch hot
surfaces.
10.Do not place on or near hot gas or electric burner, or in a heated
oven.
11. Always plug cord into the wall outlet before turning on any
controls. To disconnect turn power control to OFF, then remove
plug from wall outlet.
12.Always use cold water to make coffee. Warm water or other
liquids could cause damage to the coffee maker.
1

13.Scalding may occur if the cover is lifted or removed during the
brewing cycle.
14.Do not use this appliance for other than intended use.
15.This appliance is for HOUSEHOLD USE ONLY.
CAUTION: To avoid damage to carafe, follow these
precautions:
•Never use the carafe on a range top or in a microwave oven.
•Do not allow liquid to evaporate from carafe. Do not heat carafe.
•Discard carafe if damaged in any manner, or if carafe has a loose
or weakened handle. A chip or crack could result in breakage or
contaminate liquid contents with particles.
•Do not clean carafe with scouring powders, steel wool pads or
other abrasive materials.
•This carafe is designed for use with this coffee maker only.
SAVE THESE INSTRUCTIONS
SAFETY FEATURES
Power Cord
A short power supply cord is provided to reduce the hazards
resulting from entanglement or tripping over a longer cord. An
extension cord may be used with care. Be sure the marked
electrical rating of the extension cord is at least as great as the
electrical rating of this appliance. The extension cord should be
positioned so that it does not drape over the counter or table where
it can be pulled on by children or tripped over accidentally. The
electrical rating of the coffee maker is listed on the bottom panel of
the unit.
2

Polarized Plug
This appliance has a polarized plug (one blade is wider than the
other). As a safety feature, this plug will fit in a polarized outlet only
one way. If the plug does not fit fully in the outlet, reverse the plug. If
it still fails to fit, contact a qualified electrician to replace the obsolete
outlet. Do not attempt to defeat this safety feature.
Technical Information
Model: FR1730
Capacity 10 cups
Electrical Input: 120V AC ~ 60 Hz
Power Consumption: 900W
3

Before Your First Use
•Carefully unpack the coffee maker and remove all packaging
materials.
•Before making coffee in your coffee maker, thoroughly clean the
carafe, carafe lid, filter basket and permanent filter with warm,
soapy water. Rinse and dry. Do not use harsh or abrasive cleansers.
•You may wipe the carafe plate with a clean, damp cloth. However,
do not immerse the coffee maker in water or other liquid.
•Prior to brewing your first pot of coffee, operate the coffee maker
once or twice with water but without ground coffee or a filter. This
will remove any dust that may have settled inside the coffee
maker that could affect the flavor of the coffee.
Use cold water for best results.
Know the Parts of Your Coffee Maker
4
Swing-Away
Filter Basket
Holder
Water Reservoir
Pause & Serve
Activator Water Window
Carafe Plate
Control Panel
(see next page)
Reservoir Cover
Stainless
Steel
Thermal
Carafe
Removable
Cone Filter
Basket
and
Permanent
Filter
Cord Storage
(at back)

Features
•Automatic Shut-Off
For safety, this coffee maker has been designed with an automatic
shut-off feature. The coffee maker shuts off automatically when
the brewing cycle is completed, in both the regular and auto-start
modes. Coffee will stay warm for up to 4 hours.
•Pause & Serve Activator
Allows you to interrupt the brewing cycle and pour a cup of coffee
before the entire carafe is finished brewing. To restart the brewing
process, return carafe to plate and coffee will automatically begin
flowing through filter basket. Make sure the thermal carafe lid is
secured on the carafe, and that the carafe is positioned firmly
against the back of the coffee maker.
CAUTION: Do not remove carafe for longer than 30 seconds
or the filter basket may overflow.
•Clock/Timer Digital Display
The 24-hour digital clock built into the face of the coffee maker will
keep the correct time, even after the unit has been shut off. The
timer can be programmed up to 24 hours in advance to start
brewing fresh, hot coffee automatically.
•Water Window
Large, easy-to-read numbers indicate how many cups of water
have been poured into the coffee maker.
5
Clock/Timer Digital Display
Control Panel
Hour Advance
Button
Minute Advance
Button Brew Preset
Button
“On” Light
Power Select
(Start/Stop)
Button
Auto Start Light

•“On” Light
The “On” Light lets you know when the coffee maker is On for
safe operation.
•Stainless Steel Thermal Carafe
Uniquely designed carafe seals in heat and flavor but allows for
easy pouring with its thumb-activated lever on lid. Easy-to-grip
handle for added comfort.
•Cord Storage
Hidden cord storage allows you to conceal excess cord for a neat
appearance.
•Swing-Away Filter Basket Holder
Filter basket holder swings out for convenient filling.
•Black-Lined Cone Filter Basket
Cone-shaped filter basket enriches flavor and prevents bitter taste.
Black lining helps to hide stains. Use either theincluded washable
permanent filter or a standard #4 cone-shaped paper filter.
Control Panel
•Clock/Timer Digital Display - Clock with AM/PM indicator is also
used for programming your coffee maker in advance.
•Hour Advance Button - This button advances the hour display
for the clock and timer. See the section on “How to Set the Clock”
for proper use.
•Minute Advance Button - This button advances the minute
display for the clock and timer. See the section on “How to Set the
Clock” for proper use.
•Brew Preset Button - This button allows you to program the
coffee maker up to 24 hours before the desired brewing time. See
the section on “How to Delay the Brew Cycle” for proper use.
•“On” Light - This LED indicates that the coffee maker is
receiving electrical power and is in its normal operating mode.
6

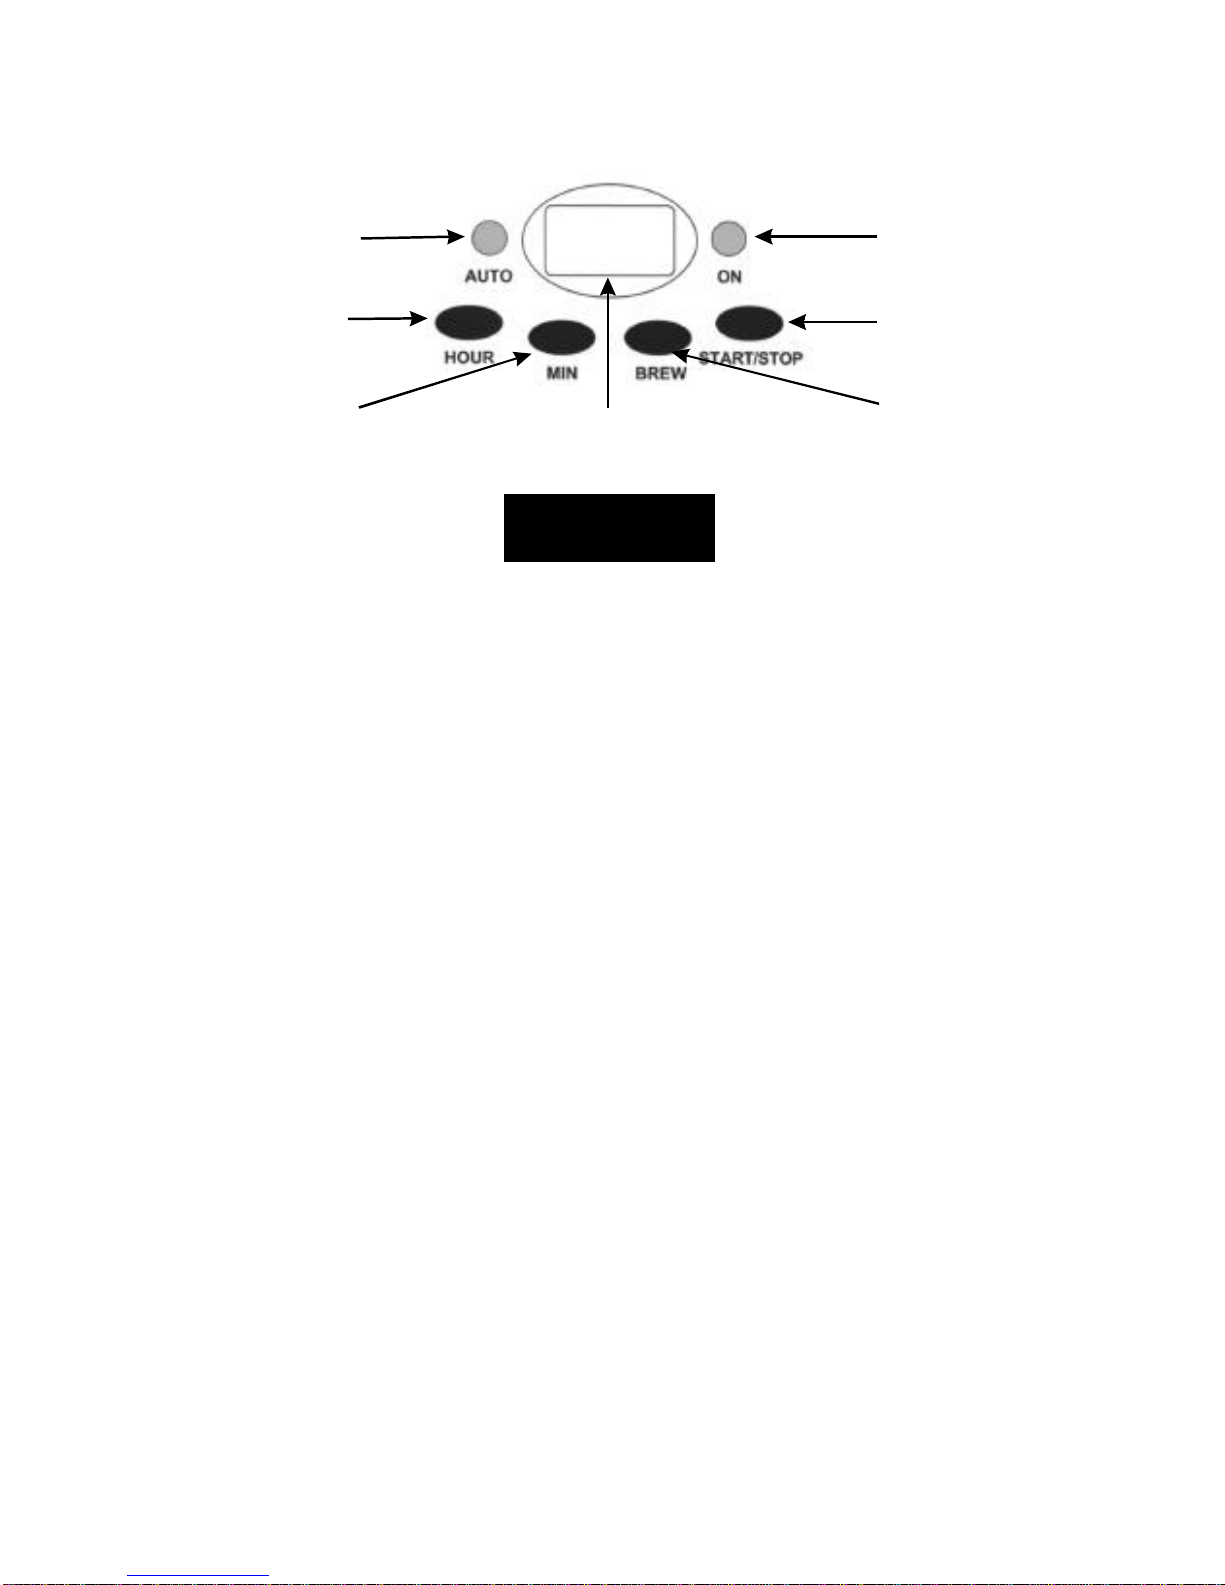
•Auto Start Light - This LED indicates the coffee maker is in a
delayed brewing cycle mode, awaiting preset brew time.
•Power Select (Start/Stop) Button - This button controls three
power modes: ON/OFF/AUTO. The OFF mode does not have a
light indicator.
Operation
How to Set the Clock
To set the correct time of day, first press the Hour Advance Button
until the correct hour has been reached. Then, press the Minute
Advance Button until the correct minutes have been reached. Use
the AM/PM indicator on the left side of the digital read-out when
setting the time.
Note: Disconnecting the AC line cord from the wall outlet causes
the time setting to be lost. The unit resets the clock to a flashing
12:00 when it is plugged in again after having been disconnected.
How to Delay the Brew Cycle
To preset your coffee maker to brew at a later time, first verify that the
clock is set to the correct time. See section on “How to Set the Clock”.
Press and hold the Brew Preset Button. While continuing to hold the
Brew Preset Button, press the Hour Advance Button until the
desired delayed brew time hour is reached. Then press the Minute
Advance Button until the desired minute has been reached. The AM
and PM indicators are on the left side of the digital clock readout.
Release the Brew Preset Button.
Press the Power Select Button once. The Auto Start Light will
illuminate, indicating that the coffee maker is waiting for the preset
brew time to be reached before beginning the brewing cycle.
Note: lf the Power Select Button is pressed before the Brew Preset
Button, the brewing cycle delay feature will not activate.
7

How to Brew Coffee
•Place your coffee maker on a flat, level surface away from any
edge.
•Plug the unit into a 120 volt 60 Hz AC-only outlet.
•The lid of the carafe must be fitted properly during the brewing
process and the carafe must be set squarely on the carafe plate.
•The filter basket holder must be completely closed during the
brewing process. You should hear and feel it snap into place.
CAUTION: If the filter basket holder is not completely
closed, the Pause & Serve Activator will not function
properly. It could cause hot water or hot coffee to overflow.
Adding water
•Open the hinged water reservoir cover located at the top of the
coffee maker. Fill the carafe with the desired amount of cold
water. Empty the water from the carafe into the water reservoir.
The water window indicates how much water is in the container.
Close the hinged lid. Place the carafe with the lid in place on the
carafe plate.
Note: The amount of brewed coffee after the brewing process
is complete will always be slightly less than the amount of
water placed into the coffee maker, since some water is
absorbed by the coffee grounds and filter. Add a little extra
water at the beginning so that you have the exact number of
cups desired.
Putting in the coffee
•Swing the filter basket holder outward to your left. The removable
filter basket should be in place inside the basket holder. Insert
either a #4 cone-shaped paper filter or the included washable
permanent filter into the filter basket before filling with coffee.
•Place the desired amount of ground coffee into the filter. (See
Coffee Measurements chart on page 9.) After using your coffee
maker several times, the amount of coffee may be adjusted to suit
8

your particular taste by decreasing or increasing the amount of
coffee used.
NOTE: Be sure to use coffee grounds prepared specifically
for automatic drip coffee makers. DO NOT USE VERY FINE
GRINDS, AS FOR ESPRESSO.
•Seat the filter basket properly in the basket holder. Swing the
holder closed and snap it into place.
CAUTION: Do not operate your coffee maker if the basket
holder does not close completely. If this happens, check to
see that the filter basket is properly seated, then snap basket
holder into place.
•Press the Power Select Button twice. The “On” Light will go on,
indicating that the coffee maker has begun the brewing cycle.
•In a few minutes the coffee maker will complete the brewing cycle
and then shut off. The thermal carafe will keep the coffee hot for
up to 4 hours.
•After the brewing cycle, empty the grounds and filter, and rinse
basket thoroughly with water.
Coffee Measurement Chart
For best results, use the grind of coffee specifically recommended
for automatic drip coffee makers.
To Brew Use This Amount of Ground Coffee
10 cups
8 cups
6 cups
4 cups
2 cups
8 tablespoons or 4 scoops
7 tablespoons or 3½ scoops
6 tablespoons or 3 scoops
5 tablespoons or 2½ scoops
3 tablespoons or 1½ scoops
2 level tablespoons = one level scoop
9

Tips for Great Tasting Coffee
•A clean coffee maker is essential for making great tasting coffee.
Regular cleaning, as specified below in “Cleaning Your Coffee
Maker”, is highly recommended.
•Always use fresh, cold water in your coffee maker.
•Fine grind coffee promotes fuller extraction and provides rich,
full-tasting coffee. Regular grind will require slightly more coffee
grounds per cup to provide the strength of a finer grind.
•Store coffee in a cool, dry place. Once coffee has been opened,
keep it tightly sealed in the refrigerator to maintain freshness.
•For optimum coffee, buy whole beans and grind them just before
brewing.
•Do not re-use coffee grounds since this will lessen coffee flavor.
•Reheating coffee is not recommended. Coffee is at its peak flavor
immediately after brewing.
•Small oil droplets on the surface of brewed black coffee are due
to the extraction of oil from the coffee grounds. Oiliness may
occur more frequently if heavily roasted coffees are used. Over-
extraction may also cause oiliness, indicating a need to clean
your coffee maker.
10

Cleaning Your Coffee Maker
CAUTION: Always make sure coffee maker is unplugged
before attempting to clean it. To protect against electric shock,
do not immerse cord, plug or unit in water or other liquid.
•The outside of your coffee maker can be cleaned by wiping the
surface with a damp, soft cloth.
CAUTION: Never immerse the coffee maker in water or other
liquid.
•Clean inside of carafe with a soft cloth and mild detergent
solution. Do not use harsh abrasives or scouring pads on carafe.
•Carafe lid and removable filter basket may be washed with warm,
soapy water or placed in the top rack of the dishwasher. Do not
place any other parts of the coffee maker (including the
permanent filter) in the dishwasher.
•Do not clean the inside of the water reservoir with a cloth as the
cloth may have a lint residue that could clog the coffee maker.
•For stubborn stains, use a nylon or plastic pad with a
non-abrasive cleaner. Do not use metal scouring pads or abrasive
cleansers.
•Calcium deposits may build up in the coffee maker as a result of
minerals commonly found in drinking water. The build-up is
normal and may result in a slowdown of the brewing time. The
slowdown can be eliminated by periodically decalcifying the
coffee maker.
•To decalcify, fill the carafe with cold water and 1/4 cup of white
vinegar. Pour the solution into the water reservoir, then close the
lid. Place the carafe on the carafe plate and allow the coffee
maker to brew the vinegar solution. While decalcifying, do not use
a filter in the filter basket. When the vinegar solution has finished
brewing, empty the carafe and rinse it out with cold water. Refill
the water reservoir with cold water only and run another brew
cycle to remove any remaining vinegar solution. Repeat if
necessary.
11

Limited Warranty
Franklin Industries, L.L.C., warrants this product to be free from defects in materials
and workmanship for a period of one year from the date of original purchase or
delivery. Any parts that are determined to be defective will be replaced or repaired
by Franklin at no charge as long as the unit was operated in accordance with the
instructions furnished with the product. If the unit proves to be defective, your first
course of action should be to follow the retailer’s return policy.
This warranty covers units only in the continental United States and does not cover
the following:•Damage from improper voltage or installation
•Damage in shipping
•Defects other than manufacturing defects
•Glass, trim or light bulbs
•Labor or repairs after the first 12 months
•Damage from abuse, misuse, accident, alteration or lack of proper
care or routine maintenance
•Improper or incorrectly performed maintenance or repairs
•Damage due to acts of God.
This limited warranty is given in lieu of all other warranties expressed or implied.
This warranty does not cover incidental or consequential damages. Some states
do not allow the exclusion or limitation of incidental or consequential damages, so
the above limitation may not apply to you.
This warranty provides you with specific legal rights and you may have other rights
that vary from state to state. Consult the written materials accompanying your
product for safe and proper operation.
This warranty may not be assigned.
For warranty service, contact:
Franklin Industries, L.L.C.
4100 First Avenue
Brooklyn, NY 11232-3321
Tel.: 1-800-480-2610
Website: www.franklinchef.com
When service is required, have on hand the Model and Serial Numbers found on
the rating label on the back of the unit, as well as proof of purchase such as sales
or gift receipt.
12

Félicitations! Vous avez acheté une cafetière automatique de
Franklin Chef™, fabriquée selon les normes de qualité les plus
sévères de Franklin Industries, L.L.C. Pour obtenir le plus de
satisfaction de votre nouvel achat, lisez attentivement ce mode
d'emploi, en particulier les instructions de sûreté et les procédures
recommandées pour le fonctionnement.
Table des matières
Precautions de sécurité ················14 - 16
Informations techniques···················16
Avant le premier usage ···················17
Emplacement des pièces ···············17 - 18
Tableau de commande ···············18
Fonctions························18 - 20
Utilisation des commandes de la cafetière ···19 - 20
Utilisation de la cafetière ················20 - 22
Réglage de l’horloge·················20
Retardement du cycle de brassage ·········20
Préparation de la cafetière pour le brassage ··21 - 22
Tableau Dosage du café···············22
Conseils pour une saveur excellente ············23
Nettoyage de la cafetière ··················24
Garantie limitée ·······················25
13

PRECAUTIONS DE SÉCURITÉ
Lors de l’utilisation des appareils électromécaniques, pour réduire le
risque d’incendie, de choc électrique et/ou d’accidents, conformez-
vous toujours aux précautions de sécurité de base, y compris les
suivantes :
1.Lisez attentivement toutes les instructions.
2.Ne touchez pas les surfaces chaudes. Utilisez le manche ou les
boutons.
3.Afin d’éviter tout risque de choc électrique, ne plongez pas la
cafetière, le cordon électrique ni la fiche dans l’eau ou autre liquide.
4.Une surveillance de près est nécessaire en cas d’utilisation de la
part ou à proximité des enfants.
5.Débranchez l’appareil si vous ne l’utilisez pas et avant de
procéder au nettoyage. Laissez refroidir avant d’installer ou de
désinstaller des pièces et avant de procéder au nettoyage de
l’appareil.
6.Ne mettez pas en marche l’appareil si le cordon électrique ou la
fiche sont endommagés, après un dysfonctionnement ou tout
dommage. Retournez l’appareil à un centre d’assistance
autorisé pour un examen, une réparation ou un réglage.
7.L’utilisation d’accessoires non recommandés par le fabricant
peut entraîner des accidents.
8.N’utilisez pas en extérieur.
9.Le cordon électrique ne doit pas traîner sous la table ou le
comptoir ni rentrer en contact avec des surfaces chaudes.
10.Ne mettez pas l’appareil sur ou à proximité d’un brûleur à gaz ou
électrique ni dans un four chaud.
11.Branchez toujours l’appareil sur une prise murale avant de
toucher aux commandes. Pour débrancher l’appareil, éteignez-
le, saisissez la fiche et tirez.
14

12.Utilisez toujours de l’eau froide pour faire le café. L’eau chaude
ou tout autre liquide chaud peut endommager la cafetière.
13.L’échaudage peut se produire si le couvercle est soulevé ou
enlevé pendant le cycle de brassage.
14.N’utilisez pas cet appareil pour des fins autres que celles pour
lesquelles il est conçu.
AVERTISSEMENT – Afin d’éviter d’endommager la carafe ou
tout accident, suivez les précautions suivantes :
•N’utilisez jamais la carafe sur une table de cuisson ni dans un
four à micro-ondes.
•Ne laissez pas le liquide évaporer de la carafe. Ne chauffez pas
la carafe.
•Remplacez la carafe si elle est endommagée ou si son manche
est en mauvais état. Une fente peut comporter une cassure ou la
contamination du liquide par des particules.
•Ne nettoyez pas la carafe avec des poudres de lavage, des
pailles de fer ni d’autres matériaux abrasifs.
•Cette carafe n’est conçue que pour une utilisation avec la
cafetière.
CONSERVEZ CES INSTRUCTIONS
USAGE MENAGER SEULEMENT
Cordon d’alimentation
Cet appareil est fourni avec un cordon d’alimentation court afin
d’éviter tout enchevêtrement ou trébuchement pouvant être causé
par un cordon plus long. Une rallonge peut être utilisée avec soin.
Si vous utilisez une rallonge, assurez-vous que ses
caractéristiques électriques sont égales ou supérieures à
celles de l’appareil. Ne laissez pas traîner la rallonge sous le
comptoir ou sous la table afin d’éviter tout enchevêtrement ou
trébuchement. Les caractéristiques électriques de la cafetière sont
indiquées sur le panneau inférieur de l’appareil.
15

Fiche électrique polarisée
Cet appareil a une fiche polarisée CA (un contact est plus grand
que l’autre). Pour éviter tout risque de secousse électrique, cette
fiche se branche de façon univoque sur une prise polarisée. Si la
fiche ne s’insère pas complètement dans la prise, retournez-la. Si
vous ne parvenez toujours pas à l’insérer, appelez un électricien
qualifié pour le remplacement de la prise. Ne tentez pas de
modifier pas ce dispositif de sécurité.
Informations techniques
Modèle: FR1730
Capacité: 10 tasses
Alimentation électrique: 120V CA ~ 60Hz
Consommation électrique: 900W
16

Avant le premier usage
•Déballer soigneusement la cafetière et enlever tout le matériel
d'emballage.
•Avant de faire le café dans votre cafetière, nettoyer à fond la
carafe, le couvercle de la carafe, le panier du filtre et le filtre
permanent avec l'eau chaude et savonneuse. Rincer et sécher.
Ne pas utiliser des produits d'entretien rauques ou abrasifs.
•Vous pouvez essuyer l’assiette de la carafe avec un chiffon
propre et humide. Cependant, ne pas immerger la cafetière dans
l'eau ou l'autre liquide.
•Avant de préparer votre premier pot de café, opérer la cafetière
une ou deux fois avec l'eau mais sans le café moulu ou un filtre.
Ceci enlèvera la poussière qui se peut avoir déposé dans la
cafetière qui pourrait affecter le goût du café.
Utiliser de l'eau froide pour les meilleurs résultats.
Emplacement des pièces
17
Support du
panier-filtre
Couvercle du
réservoir d’eau
Fenêtre
de l’eau
Carafe
thermique
en acier
inoxydable
avec paroi
double
Assiette de
la carafe
Stockage
du cordon
électrique
(à l’arrière)
Tableau de
commande
(Voir la page
prochaine)
Réservoir
d’eau
Panier-filtre
amovible
et filtre
permanent
Activateur
de Pause
& Service

Fonctions
•Arrêt automatique
Pour des raisons de sécurité, cette cafetière est conçue avec une
fonction d’arrêt automatique. La cafetière s’arrête automatique-
ment à la fin du cycle de brassage, en mode normal et démarrage
automatique. Le café restera chaud jusqu'à 4 heures.
•Pause & Service
Cette fonction permet d’interrompre le cycle de brassage et de
verser une tasse de café avant la fin du brassage de la carafe
entière. Pour redémarrer le processus de brassage, remettez la
carafe sur l’assiette et le café passera automatiquement dans le
panier-filtre. Assurer que le couvercle de la carafe thermique est
bien fixé sur la carafe, et que la carafe est fermement située
contre l'arrière de la cafetière.
PRECAUTION: N’enlevez pas la carafe pendant plus de 30
secondes sinon le panier-filtre déborde.
•Écran numérique Heure/Minuteur
L‘horloge numérique 24 heures intégré dans la partie antérieure
de la cafetière indique l’heure exacte, même si la cafetière a été
éteinte. Le minuteur peut être programmé avec 24 heures
d’avance pour le brassage automatique du café chaud et frais.
•Fenêtre de l’eau
Les chiffres, grands et faciles à lire, indiquent le nombre de
tasses d’eau versées dans la cafetière.
18
Tableau de commande
Avancement
de l’heure
Avancement
des minutes
Bouton de
préréglage du
brassage
Voyant de
marche
Bouton
d’alimentation
Voyant de
démarrage
automatique
Écran numérique
Heure/Minuteur
This manual suits for next models
1
Table of contents
Languages: