Fransgard S-220-1 User manual

Fransgård User Manual
GB
Snow Blower S-220-1
S-220-3

1
Table of Contents Page
Introduction............................................................................ 2
General information about the machine................................. 3
Tractor requirements .............................................................. 4
Transport ................................................................................ 5
Assembly................................................................................ 6
Hitching up the machine......................................................... 5
Fitting additional equipment .................................................. 7
Starting up the machine.......................................................... 9
Unhitching............................................................................ 10
Maintenance ......................................................................... 10
Lubrication ........................................................................... 11
Storage.................................................................................. 11
Safety.................................................................................... 12
Operating hazards................................................................. 13
Dismantling.......................................................................... 13
Ordering spare parts ............................................................. 13
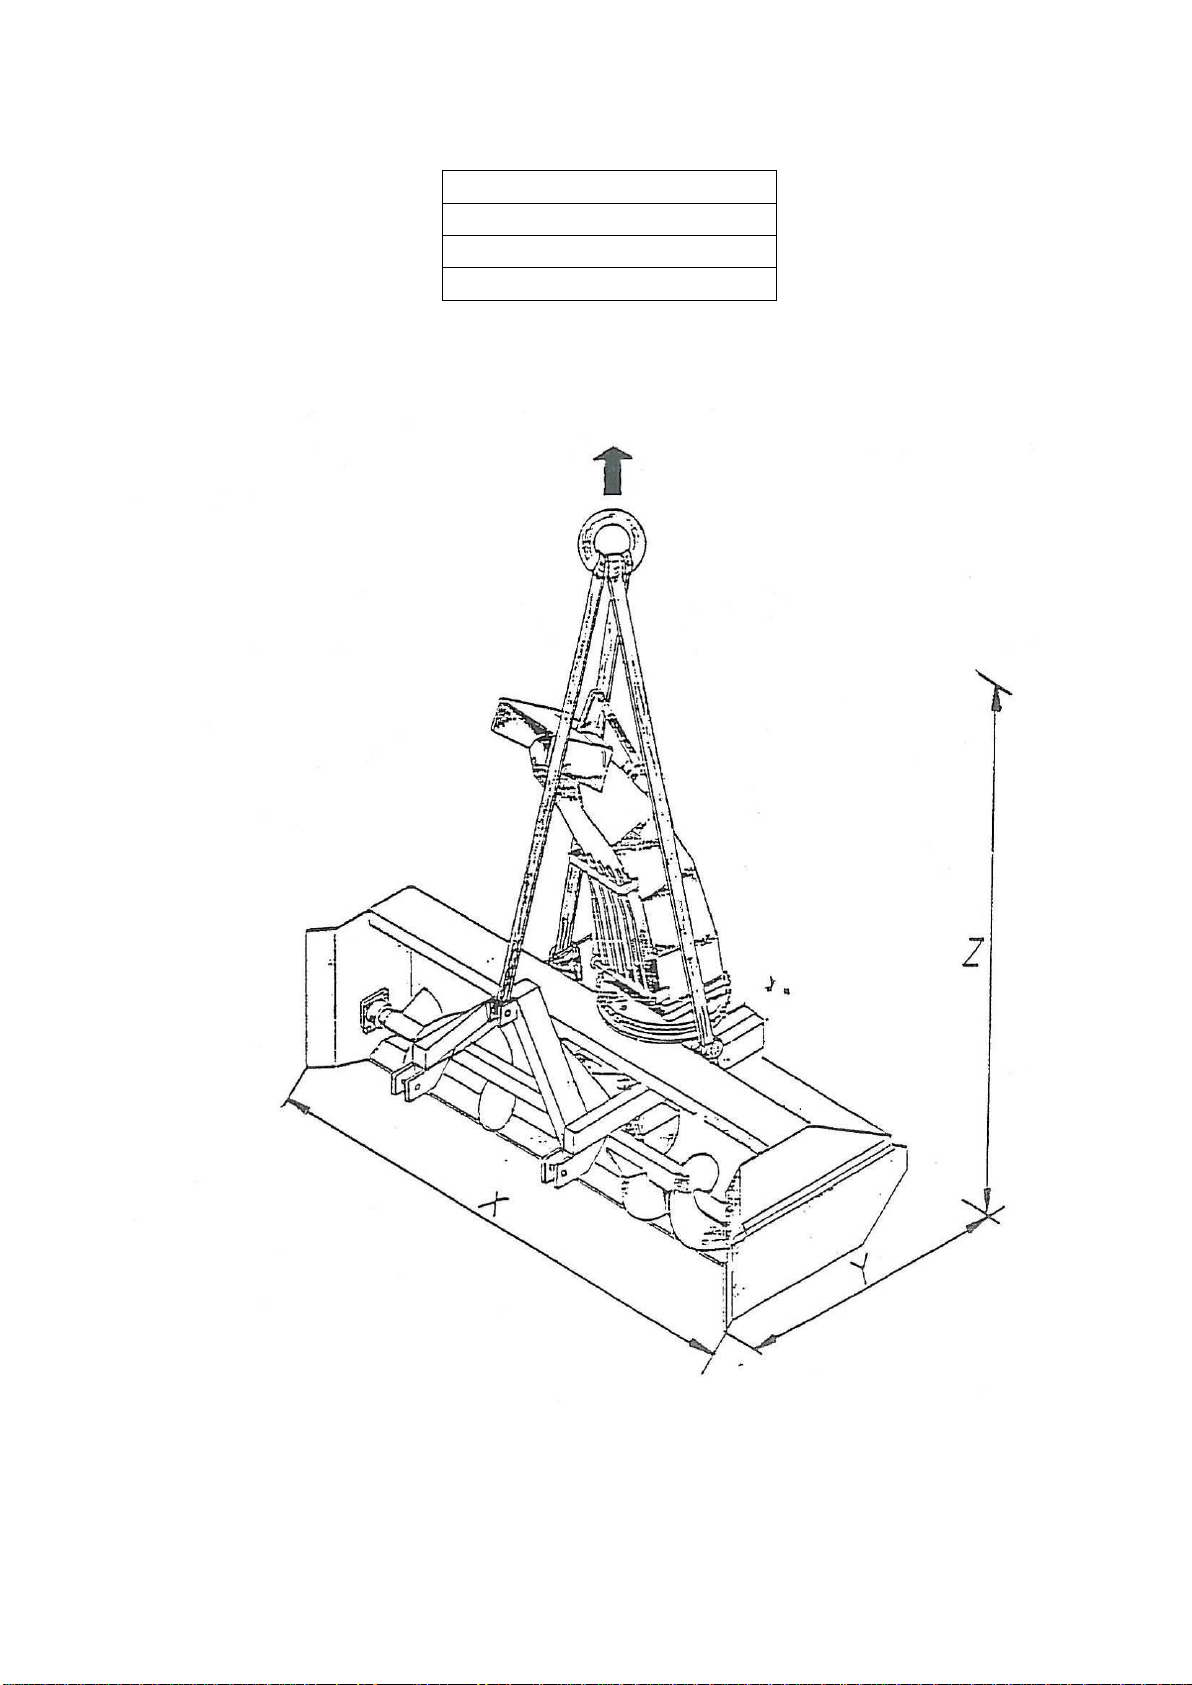
Technical data
Width...........................................................approx. 2200 mm.
Length..........................................................approx. 1250 mm.
Impeller diameter .......................................................650 mm.
Number of blades on impeller................................................ 4
Auger diameter...........................................................350 mm.
Throw length...................................................... 10-30 metres.
Angle of rotation for chute................................... 360 degrees.
Weight............................................................. approx. 560 kg.
Power requirement ...........................................approx. 50 HP.
Capacity.................................................................8/10 m/min.
PTO revolutions ................................................max. 540 rpm.
Three-point hitch............................................................Cat. 2.

2
Introduction
Fransgård machines have been developed for the
professional user who values high capacity and reliability
and wants to perform the task easily and efficiently.
Fransgård snow blowers are only intended for use as
follows:
The removal of snow from roads and public spaces –
they must therefore only be used for this purpose. If
the user is interested in using them for other
purposes, they should contact
Fransgård Maskinfabrik A/S.
It is assumed that the work will be performed under
suitable conditions, including that the roads have been
cleared of foreign objects etc., to an appropriate degree.
Proper use of the machine also entails that you comply
with the factory’s preparation, operation and maintenance
instructions and that you contact an approved workshop
where necessary.

3
General information about the machine
Shut down the tractor engine and remove the ignition key
before touching the machine.
Always remember to shut down the tractor engine before
lubricating, adjusting, maintaining or repairing the
machine. You should also remove the ignition key so that
you can be sure no one will restart the tractor before you
have finished.
Remember:
Never let anyone go underneath the machine once it has
been hitched to the tractor.
Children:
Never let children near the machine while working. Small
children in particular have a habit of doing the
unexpected.
Under no circumstances allow anyone to approach
the machine or stand in its vicinity while in operation.
Risk of crushing on hitch-up:
No one should be permitted to stand between the tractor
and machine once the latter has been hitched to the
tractor. An uncontrolled manoeuvre can lead to the person
in question being crushed. An operating error can also
result in serious personal injury.
Maximum of 175 bar:
Make sure the hydraulic components are not subject to
pressures in excess of 175 bar, as they otherwise risk
terminal damage from explosive pressure build-up. You
would then be subjecting both yourself and others to a
serious risk of being hit by metal parts travelling at high
speeds, or by hot oil being expelled under high pressure.

4
Tractor requirements
The tractor driver should use ear defenders if full closure
of the cab is not possible.
In order to retain full control of the tractor in all conditions,
at least 20% of the tractor’s total weight must be
distributed over the front axle.
Tractor specifications vary greatly between individual
tractor makes and, for this reason, in the worst case
scenario it may prove necessary to adjust the weight
distribution using a couple of weights on the tractor’s front-
end.
The power take-off of the tractor must turn at 540 rpm and
the hitch linkage must be of Category 2.
The tractor must be equipped with at least one double-
acting hydraulic valve with a 1/2" female union, max. 175
bar.

5
Transport
When moving the machine, this must only be performed
as indicated in the drawing.
X : 2200 mm
Y : 2010 mm
Z : 1250 mm
Weight : 560 kg

6
Assembly
Fit the rotating collar to the frame.
Fit the oil pump.
Adjust the oil pump so that it is as near to the rotating
collar as possible. Then check that the rotating collar can
be rotated by hand through 360 degrees unhindered.
Fit the chute to the rotating collar.
It is important that these bolts are fully tightened and that
they are routinely retightened at regular intervals.
Hitching up the machine
During hitching and unhitching, the tractor engine must be
switched off. You should always make sure that there is
no one between the tractor and machine during hitching or
unhitching. An uncontrolled manoeuvre involving the
tractor could lead to anyone in that area being crushed.
Slowly reverse the tractor up to the snow blower, shut
down the tractor engine, and fit the tractor hitch linkage in
the three-point frame and the top link in the three-point
frame’s top link fastening.

7
Set the top link so that the machine stands on its skid
shoes and the points of the wear strips are approx. 10 mm
from the ground.
Fit the hydraulic hoses in the tractor’s hydraulic flow and
return unions.
Before activating the hydraulic system, you should check
that all hydraulic connections are tight and all hoses and
fittings are undamaged. Once the tractor’s engine has
been shut down, you should also activate the hydraulic
system to ensure no pressure remains in the hydraulic
hoses.
Hydraulic oil under pressure can penetrate under the skin
and cause serious inflammation. You should protect your
skin and eyes at all times against oil spray. If an accident
does occur, and you are exposed to hydraulic oil under
pressure, you should consult a doctor immediately.
Fit the tractor’s power take-off. Secure the safety chain to
the snow blower.
NB! There must always be a shear bolt connection on the
power take-off shaft, max. 3500 Nm. Use of a power take-
off shaft that is not approved by Fransgård Maskinfabrik
A/S will invalidate any claims under warranty.
No one should be near the machine during start-up, as
there may be air in the hydraulic system resulting in
possible sudden movements.
Remember: The protective guard on the power take-off
shaft must not be fractured if work is being performed with
the machine. If necessary, replace the protective guard.
When fitting the power take-off shaft, you must ensure the
following has been attended to before using the machine:

8
- The shaft must be of a size and quality that will
meet the approval requirements of Fransgård
Maskinfabrik A/S; if necessary, contact your
dealer/importer.
- Make sure the shaft’s protective guard is intact and
that the two shaft halves can slide together.
- The length of the power take-off shaft must be
properly adjusted; a shaft that is too long will inflict
terminal damage on the blower’s gearbox. If you
have cut the shaft, you must file down the ends of
the steel tubes so that they can slide easily
together without scraping. Remember the need for
lubrication; for other tasks see the power take-off
shaft instruction manual.
- Check that the power take-off shaft can be rotated
by hand to ensure that it does not catch at any
point.
- Check that the power take-off shaft does not
become tensioned when the machine is moved to
its maximum and minimum height settings. If the
blower is mounted at the rear, make sure there is
clearance between the ground and the snow blower
when the tractor is being driven. Note that where
the shaft is very short, the angle on the shaft may
be too large. Contact your dealer/importer if this is
the case.
Unhitching is the hitching sequence in reverse.
Fitting additional equipment
Fitting side cutter:
- Fit as indicated on the spare parts pages.
Fitting hydraulic chute deflector control:
- Fit as indicated on the spare parts pages.
- 1 double-acting valve set needed, fitted using a 1/2"
female union.
- Remember to retighten the hydraulic components to
prevent oil spills.

9
Fitting electric chute flap control:
- Fit as indicated on the spare parts pages.
- Secure the mounting plates to the tractor cab in a
central location and fit the control box to the plates.
- Insert the cable with its plug into the cigarette lighter
or the fuse box, max. 12 V –6 A. Run the cable to
the electric cylinder from the tractor cab to the chute.
Remember to make sure the chute can be freely
rotated without trapping the cable.
Fitting long loading chute:
- Fit as indicated on the spare parts pages.
- When fitting a long loading chute it is very important
that the bolts are fully tightened. This must be
checked regularly.
- It is important that you are fully aware of the actual
height of the chute.
Fitting centre deflector:
- Fit as indicated on the spare parts pages.
- A centre deflector can be fitted to all chutes allowing
them to distribute the snow at the side of the blower.
- Chutes that have a centre deflector fitted can also be
fitted with either electrical or hydraulic control of the
chute deflector.
Fitting an oil pump:
- Fit as indicated on the spare parts pages.
- Before the oil pump kit is fitted to your snow blower,
it is important that you make sure that the technical
specifications are in accordance with those required
by Fransgård Maskinfabrik A/S. This applies for
instance to oil flow rates (l/min) and oil pressures
(bar); see technical data. Please note that power is
slightly reduced when an oil pump is used.
- When fitting the bracket for the oil pump, it is
important to ensure the coupling and the oil pump
are both fully aligned with the gearbox shaft before
drilling the holes. This is to avoid unnecessary wear.

10
Starting up the machine
The snow blower is supplied ready for use from the
factory, in other words fully lubricated and with the
appropriate quantity of oil in the gearbox:
S-220-1: 2.2 litres
S-220-3: 3.2 litres
Type: TEXACO MEROPA 320 or
MOBIL GEAR 632.
It is however important to check the tractor or implement
carrier power take-off to ensure the power take-off rpm is
in accordance with the snow blower specifications.
In addition, check that the snow blower’s power take-off
shaft is of the right length in relation to the tractor in
question.
The rotational speed of the power take-off shaft on the
tractor must be a maximum of 540 rpm.
The angle of the power take-off shaft must not exceed 15
on constant load.
Set the deflector on the chute manually to the desired
setting.
Set the chute to the desired side using the control valve
on the tractor.
Connect the tractor power take-off and set to 540 rpm.
The operating speed must be adjusted to the various
conditions in terms of snow volume and/or type.

11
Unhitching
After using the machine, unhitch it as follows:
REMEMBER:
The tractor power take-off must always be disconnected
when working near the machine and on the power take-off
shaft.
- Position the machine on a level surface.
- Disconnect the hydraulic hoses.
- Disconnect the power take-off shaft and hang it on the
hook.
- Pull out the hitch linkage.
- The machine is now unhitched and the tractor can be
driven off.
Maintenance
Warning: In any repair, maintenance or cleaning
operations, your own personal safety is paramount at all
times. You must therefore always park the tractor (if
hitched) and the machine in accordance with the relevant
safety regulations.
Important: Screws, nuts, nipples and bolts on your new
machine must be retightened after two hours of operation.
In addition, all moving parts must be lubricated with
grease.
Change the oil in the gearbox after the first 50 hours of
operation, and subsequently every 500 operating hours, at
least once a year and prior to storage, as condensate can
ruin the gearbox. If there is insufficient oil, this must be
topped up with TEXACO MEROPA 320 or
MOBIL GEAR 632, but care must be taken not to overfill,
as this may ruin the gearbox.
When lubricating or carrying out maintenance, make sure
the machine is in contact with the ground or supported on
jacks.
Lubricate the grease nipples of the machine at regular
intervals. Prior to connection, clean the hydraulic unions
on both the tractor and snow blower using a clean cloth.
You should never try to clean, lubricate or adjust the
machine before the tractor engine has been shut down
and the parking brake engaged.

12
Frequent and thorough cleaning of the implements is
recommended to extend machine service life.
After use, clean the machine of snow, as any frozen snow
may otherwise cause problems on subsequent start-up.
Remember: Do not spray water directly on the bearings
or bearing housings. If the machine is stored for longer
periods, it should be sprayed with acid-free oil.
At the end of the season, clean the machine and spray
it with acid-free oil.
Lubrication
Grease: Before starting up the machine, you should
always ensure it is well lubricated.
Grease type: High grade universal grease.
Lubricate moving mechanical linkages and joints with
grease or oil, as required.
Storage
Make sure the following tasks are attended to prior to
storage:
Thoroughly clean the machine and apply acid-free oil
throughout.
Lubricate all grease nipples.
Repair any paint damage.
Park the machine in a horizontal position; the
implements should not be on an incline.
Park the machine somewhere dry; shelter it from the
elements and wind.

13
Safety
As stated, the machine requires skilled operation; in other
words, you should read this user manual before hitching
the machine to the tractor. Even if you have had a similar
machine before, you must still read the manual, as it
covers a number of aspects, including your own safety.
A snow blower is a machine operated by one person. The
driver must ensure that no one is in the working area of
the machine, particularly children. You must not let others
use the machine until you have made sure they have the
necessary knowledge to operate the machine safely.
This section contains precautionary rules which should
usually be known to the operator prior to using the
machine.
- Engage the tractor parking brake and shut down
the tractor engine before performing any of the
following:
- Lubricating the machine
- Cleaning the machine
- Removing any part from the machine
- Adjusting, repairing or maintaining the machine.
- Always lower the machine to the ground or fit the
transport safety device whenever you have to park
it.
- Never work under a unit raised off the ground
unless it is secured using chocks or some other
form of mechanical securing device.
- Do not start the tractor until anyone in the vicinity is
at a safe distance from the machine.
- Before starting the tractor, check to ensure any
tools have been removed from the machine.
- Make sure all covers have been correctly re-fitted.
- Do not work in loosely fitting clothes, as these can
get caught in moving parts on the machine.
- Always use the lighting and safety markings
required by law when transporting the machine on
public highways and when driving in the dark.
- Do not stand near the machine when it is running.
- You should use ear defenders if the noise from the
machine causes discomfort.

14
- Before raising or lowering the machine, you should
check that no one is near the machine.
- Do not use the machine for work other than that for
which it is designed.
- Do not stand between the tractor and machine
while hitching or unhitching.
- Only use original spare parts.
- No one may sit on the machine while it is running.
- During repairs or lubrication, the power take-off
shaft and/or hydraulic hoses must be disconnected.
All safety and other statutory regulations of the user
country in question must be complied with. You must also
adhere to the tractor operating instructions.
The machine may only be used to remove snow. If you
wish to use the machine for other purposes, please
contact Fransgård Maskinfabrik A/S in Denmark on + 45
98 63 21 22.
Operating hazards
It is the responsibility of the user to ensure operation of
the snow blower does not represent a hazard to others.
Consideration must be given to people and animals in the
vicinity of the machine, as the snow may contain stones or
other objects. The machine chute must therefore be set
so that snow which is thrown from the machine does not
represent a hazard for other road users.
Dismantling
Once the machine has come to the end of its useful life, it
must be handed over to a nationally approved breaker’s
yard.
If there are oil products in the machine, these must be
removed in accordance with the relevant national
legislation.
Ordering spare parts
When ordering spare parts, please state the type
designation, serial number and year of manufacture. You
will find these details on the rating plate. You are urged to
note down these details immediately on receipt of the
machine on the first page of the spare parts catalogue
supplied with it. In this way, they will be readily to hand
when you need to order parts.


This manual suits for next models
1
Table of contents