Freecom DVB-T USB Stick User manual

Rev. 535
FREECOM DVB-T USB STICK
MANUAL
2
Freecom DVB-T USB Stick
GB Dear customer,
The Freecom DVB-T Stick is fully compatible with DVB-T protocol for your
desktop PC or laptop use. Its tiny size design with high speed USB2.0 interface
let you enjoy digital TV programs anywhere!
It is also a Digital Video Recorder that you may record your favorite TV programs
on your hard disk either real time or scheduling. Quick setup makes it easy to use.
It provides you an immediate personal access with lots useful functions such as
Channel Auto Scan, Teletext, Electronic Program Guide, Favorite List etc. Yet,
there is no need for an extra power supply.
Freecom Technologies • Germany
www.freecom.com
Warning !
All rights reserved. The products named in this manual are only used for
identification purposes and may be trademarks or registered trademarks of the
respective companies. This device was designed for home or office use.
This device is equipment complying with EN55022 class B.
Freecom Technologies is not liable for any damages that may occur from the use
of a Freecom system. All rights reserved. We reserve the right to upgrade our
products in keeping with technological advances.
© 2005 Freecom Technologies

3
GB
Table of Contents
Users manual
General Information ........................................................................... page 4
Warnings and Safety Instructions ...................................................... page 5
How to Install
Installation Steps ................................................................................ page 6
Chapter 1:
Connect Freecom DVB-T Stick ............................................................ page 7
Chapter 2:
Install Driver and Application ............................................................ page 8
Install Driver .................................................................................. page 8
Install Application ........................................................................ page 12
Chapter 3:
DTV Software / System Introduction ................................................. page 17
Chapter 5:
DTV Software Introduction ................................................................ page 25
Chapter 6:
Trouble Shooting / Frequently Asked Questions (FAQ) ................... page 31

4
Freecom DVB-T USB Stick
GB Package Contents
• Freecom DVB-T Stick
• IR Remote Control
• Quick Installation Guide
• Terrestrial Antenna
• MCX-IEC Connector
• Manual & Application CD
System Requirements
The following hard- and software requirements must be fulfilled to ensure
trouble-free operation.
Hardware Requirements
• IBM or IBM compatible computer
• CPU : 1 GHz or above
• Memory : 128MB or more
• Sound card
Software Requirements
• OS : Windows 2000(SP4)/ XP(SP1) or higher
• Microsoft DirectX9.0 or above
• Microsoft Media Player7.0 or above
Important Notice: “All channels are subject to coverage and may
be changed from time to time. Reception may depend on the type
and condition of your existing aerial. Aerial upgrade may be
required. Please confirm coverage in your area.” We strongly
recommend that you install an outdoors antenna when you use
the DTV receiver indoors.

5
GB
General Information
Warnings and Safety Instructions
Please read and follow the below mentioned instructions. They should be
observed in order to prevent injury to the user, damage to the device and
damage to property, as well as to ensure safe use of the product. Not following
these instructions may cause the unit to malfunction.
Note:
1. Terrestrial digital wireless broadcast signal may be affected
by topography, objects and weather. This would cause a poor
signal quality. Therefore, we strongly suggest you to use a
rooftop antenna when received indoors.
2. This product is moveable but not be suitable of using in a high
speed moving environment. Please check other associated
products for these requirements.
3. When you use the function of pre-recording, real time recor-
ding, or time shifting, please make sure you have enough hard
disk space to save huge recording data.
4. In order to operate properly, please follow the user manual
and suggestive setup. Improper operations may cause the
system unstable or crash. Before you remove hard disk de-
vices, please check other related application has been closed.
We reserves the right to add or delete the application and its
functions; all new release drivers and application will be men-
tioned in our website. We are not responsible for fürther notice.

6
Freecom DVB-T USB Stick
GB How to Install
Installation Steps
• Connect the Freecom DVB-T Stick to your computer.
• Install Driver
• Install DTV application
• Install DirectX 9.0 and reboot your system. (If DirectX 9.0 is already installed,
you may skip to next step)
• Restart Computer

7
GB
1
Connect Freecom DVB-T Stick
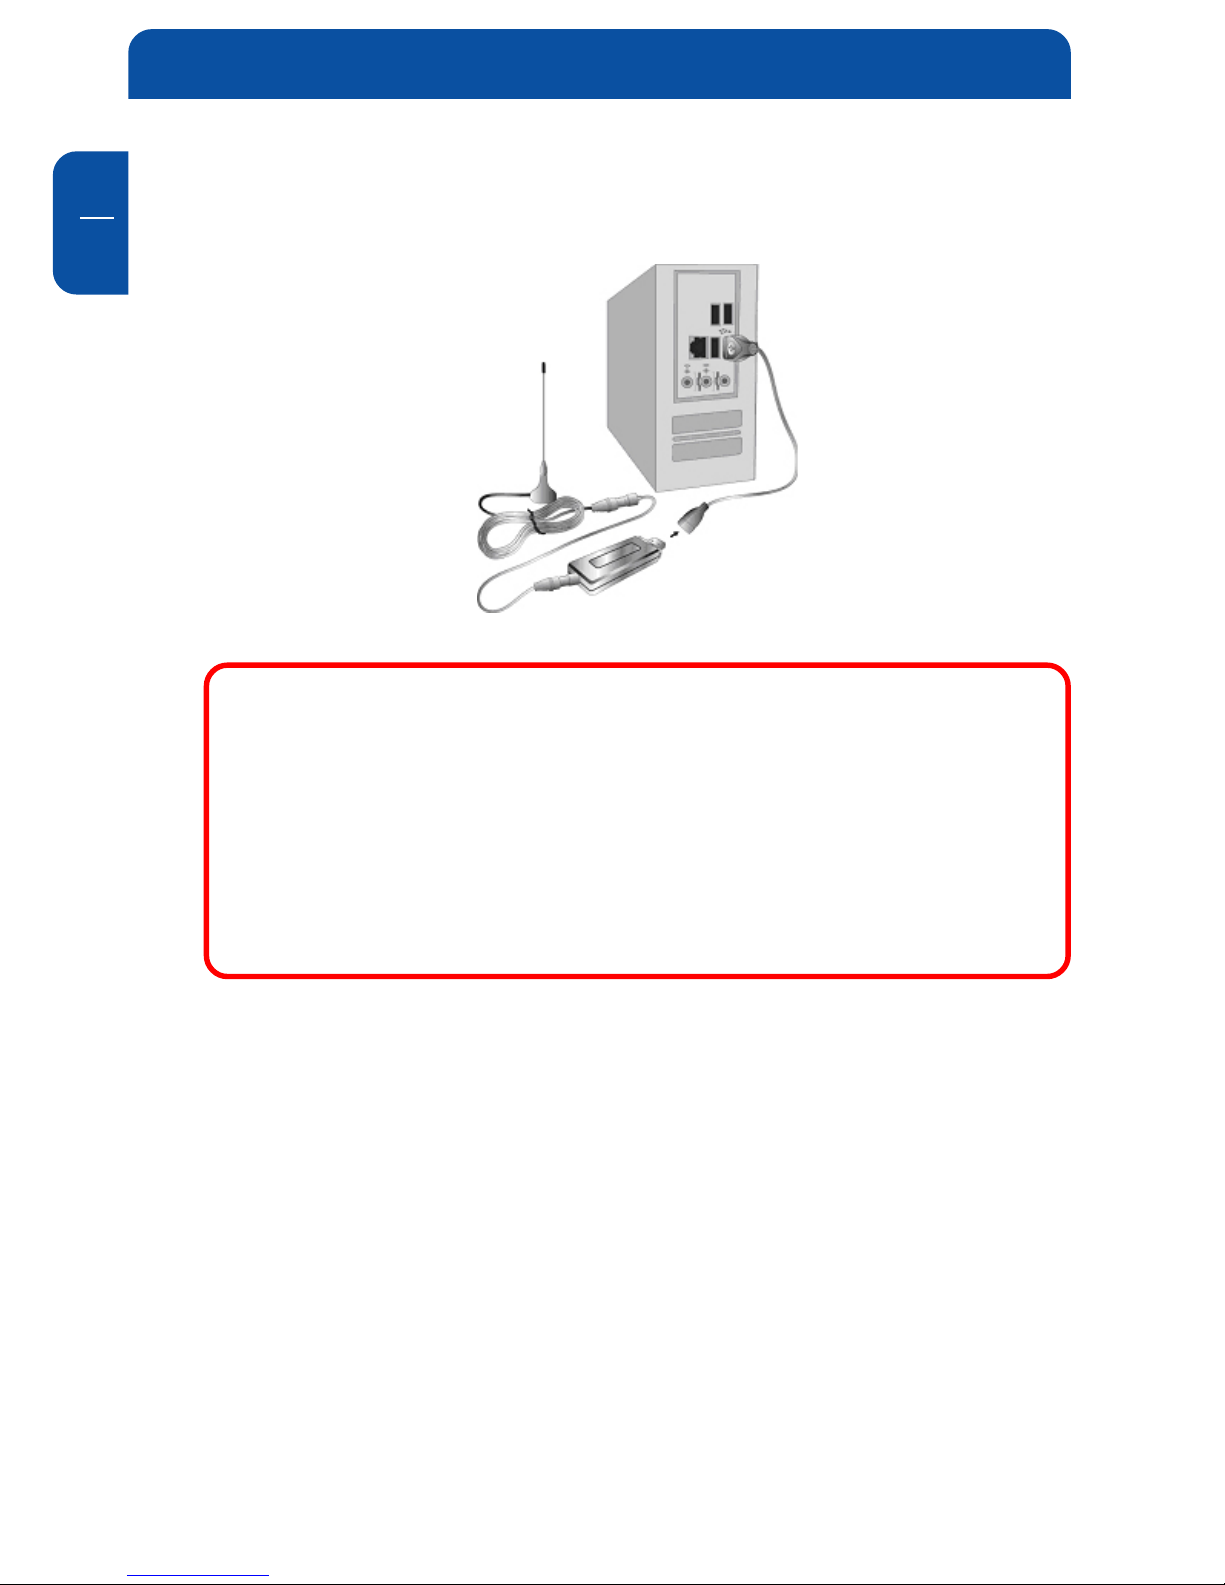
Chapter 1: Connect Freecom DVB-T Stick
Receiver to your computer
1. Connecting IEC connector to antenna.
2. Connecting antenna to PenType Receiver
3. Connecting PenType Receiver to USB interface on your computer.
8
Freecom DVB-T USB Stick
GB
2
4. (Option:) You may need longer USB cable for the connection between
PenType Receiver and USB interface on your computer.
Note: When connecting the Freecom DVB-T USB Stick to a note-
book, make sure the energy saving function is deactivated. The
energy saving function reduces CPU performance and might
influence the operation of the DVB-T USB stick.
Note: The antenna and the DVB-T USB receiver must be placed in
an appropriate position for best reception each time the DTV is
used.
Chapter 2: Install Driver and Application
2.1 Install Driver
Please connect the Freecom DVB-T Stick to your computer to start the driver
installation.
1. Insert the included CD in your CD-ROM drive.
2. Computer will detect the new hardware and Found New Hardware Wizard
window will be popped up. Please select “Install from a list or specificInstall from a list or specific
Install from a list or specificInstall from a list or specific
Install from a list or specific
location (Advanced)location (Advanced)
location (Advanced)location (Advanced)
location (Advanced)”.

9
GB
2
Install Driver and Application
3. Please select “Search for the best driver in these locationsSearch for the best driver in these locations
Search for the best driver in these locationsSearch for the best driver in these locations
Search for the best driver in these locations”. You may click
“BrowseBrowse
BrowseBrowse
Browse” to find the driver location on CD-ROM directory. Choose “\DVB-T\DVB-T
\DVB-T\DVB-T
\DVB-T
USB 2.0\DTV_DriverUSB 2.0\DTV_Driver
USB 2.0\DTV_DriverUSB 2.0\DTV_Driver
USB 2.0\DTV_Driver”.
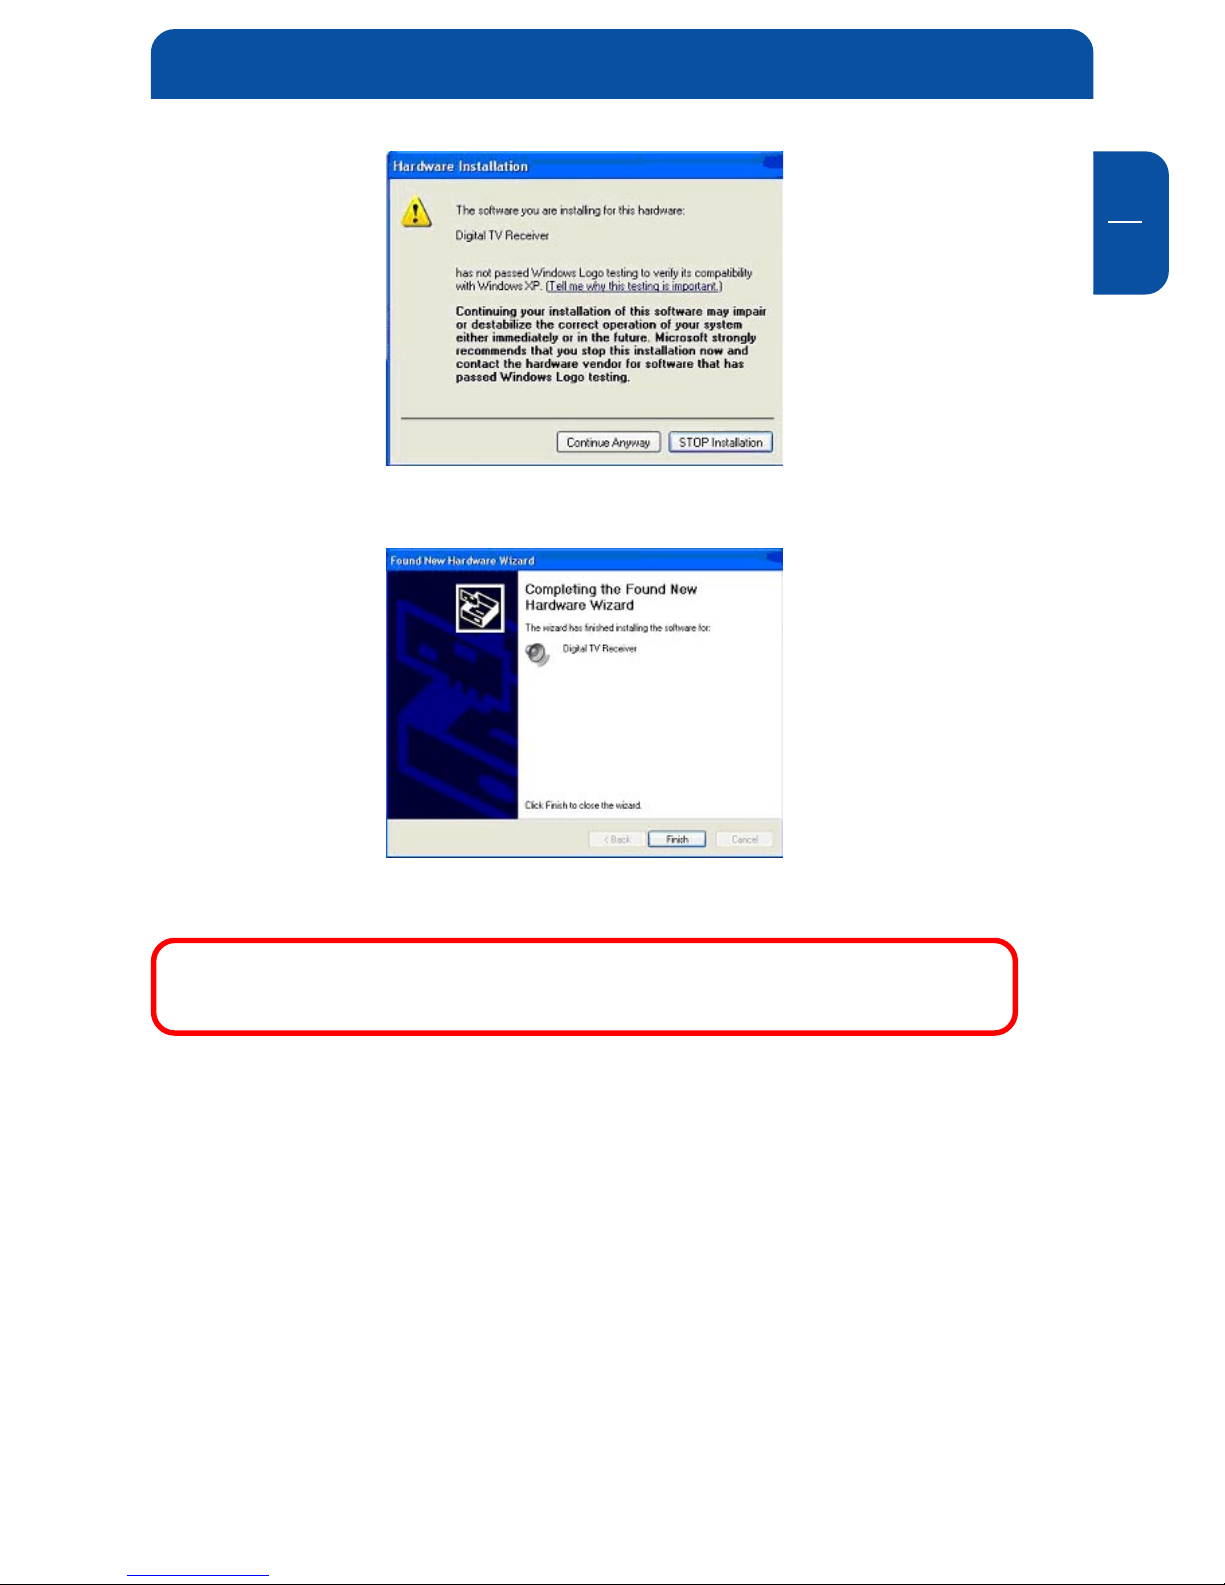
4. Click “Continue AnywayContinue Anyway
Continue AnywayContinue Anyway
Continue Anyway” to continue
5. Click “FinishFinish
FinishFinish
Finish” to continue.

10
Freecom DVB-T USB Stick
GB
2
6. Please select “Install from a list or specific location (Advanced)Install from a list or specific location (Advanced)
Install from a list or specific location (Advanced)Install from a list or specific location (Advanced)
Install from a list or specific location (Advanced)” then click
“NextNext
NextNext
Next” to continue.
7. Please select “Search for the best driver in these locationsSearch for the best driver in these locations
Search for the best driver in these locationsSearch for the best driver in these locations
Search for the best driver in these locations”. You may click
“BrowseBrowse
BrowseBrowse
Browse” to find the driver location on CD-ROM directory. Choose ““\DVB-\DVB-
\DVB-\DVB-
\DVB-
T USB 2.0\DTV_DriverT USB 2.0\DTV_Driver
T USB 2.0\DTV_DriverT USB 2.0\DTV_Driver
T USB 2.0\DTV_Driver””.
8. Please click “Continue AnywayContinue Anyway
Continue AnywayContinue Anyway
Continue Anyway” to continue.
11
GB
2
Install Driver and Application
9. Click “FinishFinish
FinishFinish
Finish” to exit.
10. Installation of the application software will now start automatically.
Remark: Run the setup from the “DVB-T USB 2.0” folder on the
included CD if the installation does not start automatically.
12
Freecom DVB-T USB Stick
GB
2
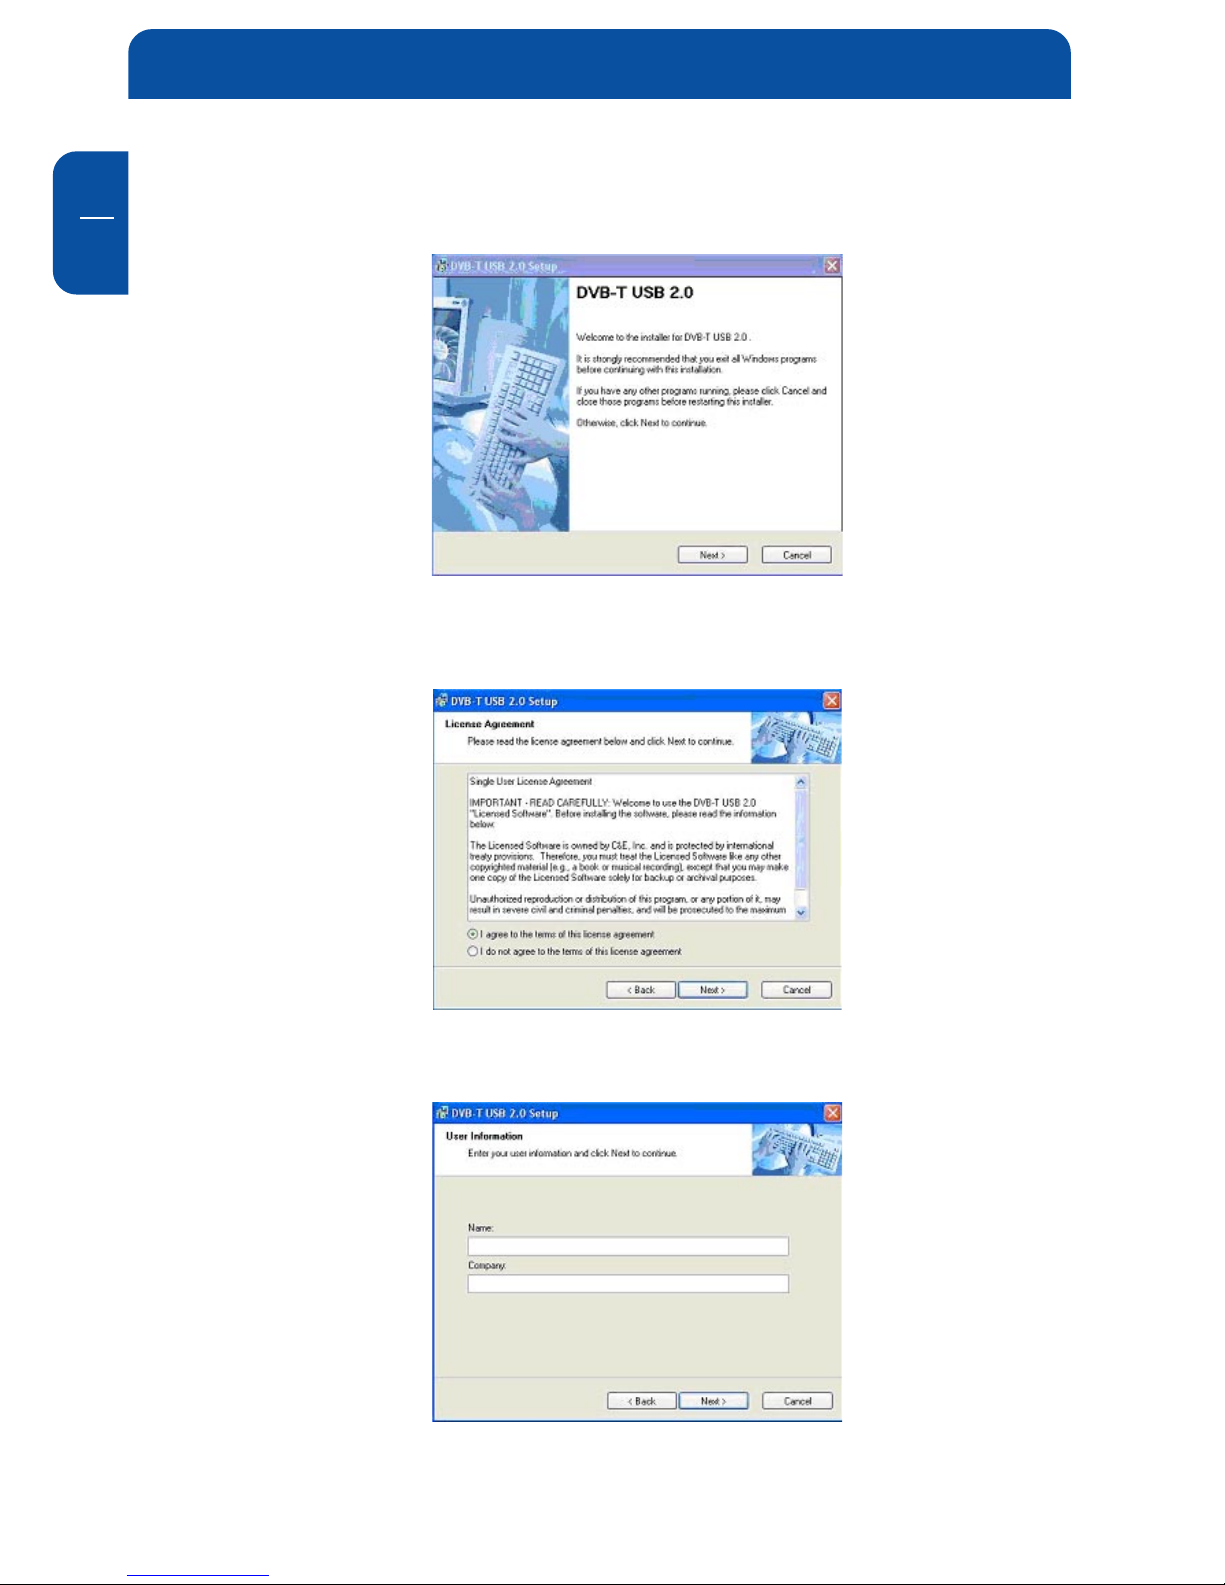
2.2 Install Application
1. Click “NextNext
NextNext
Next” to continue.
2. Please read the license agreement carefully then select “I agree to the termsagree to the terms
agree to the termsagree to the terms
agree to the terms
of this license agreementof this license agreement
of this license agreementof this license agreement
of this license agreement”. Click “NextNext
NextNext
Next” to continue.
3. Fill in user’s information in the column. Click “NextNext
NextNext
Next” to continue.

13
GB
2
Install Driver and Application
4. Enter product’s serial number and click “NextNext
NextNext
Next” to continue.
5. Select a language edition. Choose EnglishEnglish
EnglishEnglish
English and click “NextNext
NextNext
Next” to continue.
6. This window is the original setting path and folder name. You may change
it according to personal reference. Click “NextNext
NextNext
Next” to continue.
14
Freecom DVB-T USB Stick
GB
2
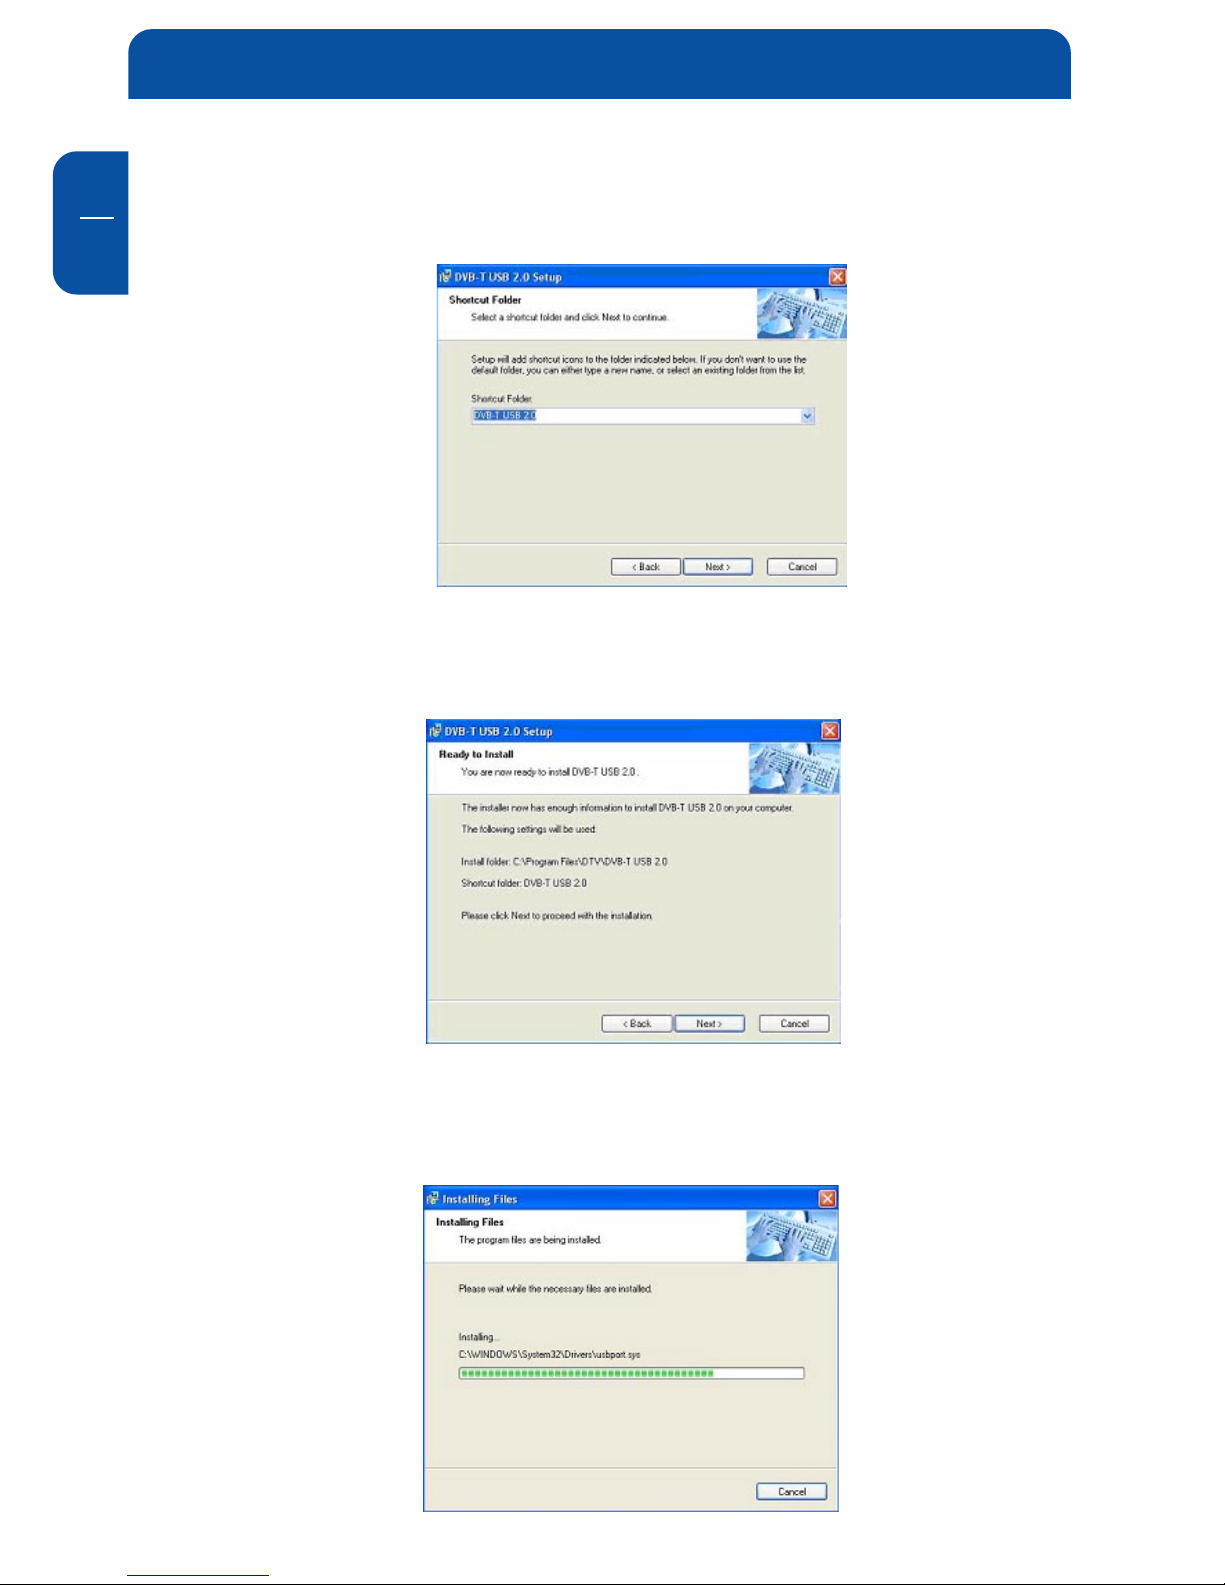
7. This window is the original shortcut icon and pre-setting shortcut folder. You
may change the folder name or appoint to an existing folder. Click “NextNext
NextNext
Next”
to continue.
8. Please make sure the path and folder name is correct. Click “NextNext
NextNext
Next” to
continue.
9. The following window indicates that the installation of DTV application is
proceeding.

15
GB
2
10. Please check “Yes, restart my computer nowYes, restart my computer now
Yes, restart my computer nowYes, restart my computer now
Yes, restart my computer now.” Click “FinishFinish
FinishFinish
Finish” to continue.
11. Click “FinishFinish
FinishFinish
Finish” and computer will be restarted automatically. The application
installation is done successfully.
Note: You MUST restart your computer to complete application
installation.
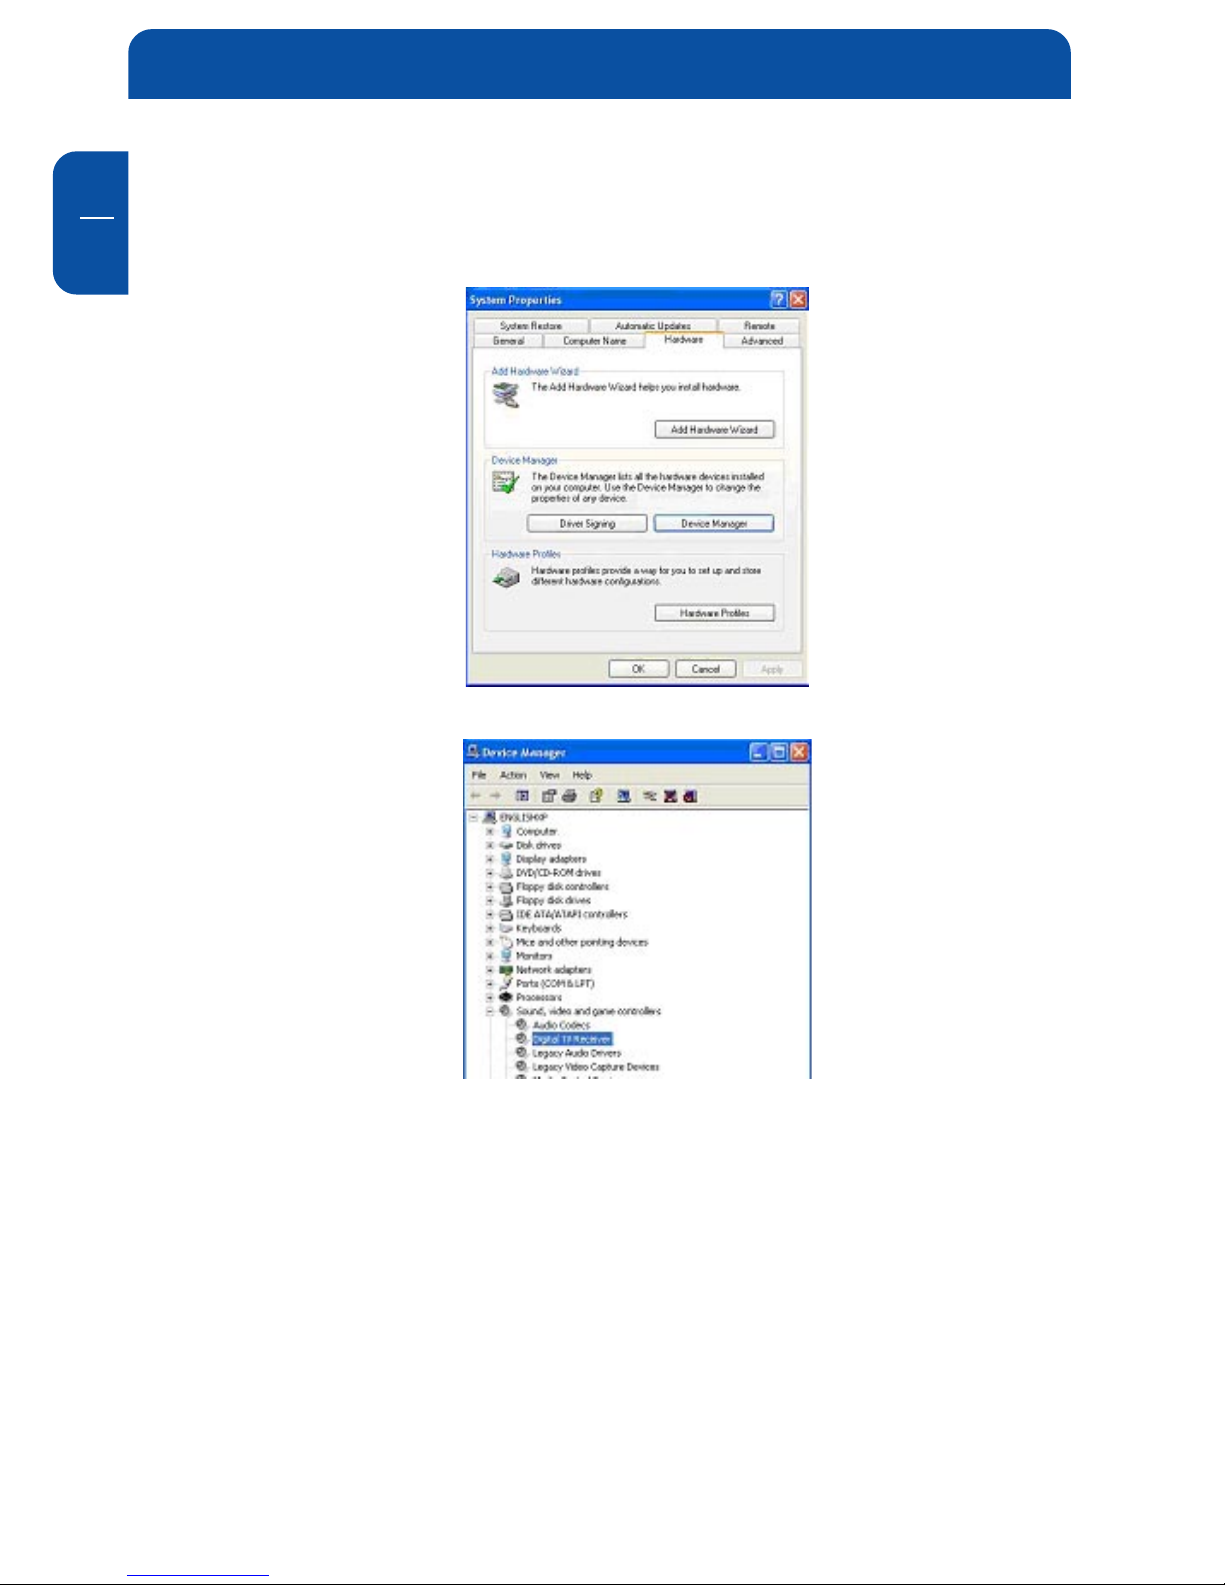
12. You may double check if the product drivers are installed properly. Please
press StartStart
StartStart
Start then right click My ComputerMy Computer
My ComputerMy Computer
My Computer. Click “PropertiesProperties
PropertiesProperties
Properties”.
Install Driver and Application
16
Freecom DVB-T USB Stick
GB
2
13. Click “Device ManagerDevice Manager
Device ManagerDevice Manager
Device Manager” from HardwareHardware
HardwareHardware
Hardware tab. Find “Sound, video and gameSound, video and game
Sound, video and gameSound, video and game
Sound, video and game
controllerscontrollers
controllerscontrollers
controllers” category and you may see “Digital TV ReceiverDigital TV Receiver
Digital TV ReceiverDigital TV Receiver
Digital TV Receiver” on the list. If you
do not see it. Please go back and install the drivers again.
14. If one of the drivers wasn’t installed correctly, the device will be shown with
a yellow exclamation mark in the device manager. To reinstall the driver,
right-click on the device and select “Update driver”. Install the driver again
as described in chapter 2.1.
Later installation of the DVB-T application
If you uninstalled the software or cancelled the software installation, you can
run the software installation again any time by running the “Setup.exe” from
the “DVB-T USB 2.0” folder on the CD.

17
GB
3
Chapter 3: DTV Software / System Introduction
DVB-T player Software is very powerful. You can easily enjoy the high quality
digital sound and visual effect. Not only it provides the TV program, you can also
use it to do the instant digital video recording (DVR) and Scheduling Recording.
With the help of the operation of Time Shift, you won’t miss any best moment.
After you finish the installation of the software, you will find an icon “DVB-
TPlayer”. Just move the cursor and double click it to run the program.
After you run the DTV software, you can use the control panel as following.
3.1 Setup of the Digital Broadcasting program
Due to different country or region, digital TV program has its own choice of
operating frequency channel, frequency width, transmitting parameter and
frequency. The following instructions will show you environment setup.
DTV Software / System Introduction

18
Freecom DVB-T USB Stick
GB
3
Scan Frequency:Scan Frequency:
Scan Frequency:Scan Frequency:
Scan Frequency:
1. Click
the operating panel then choose Scan ChannelScan Channel
Scan ChannelScan Channel
Scan Channel tab.
2.Choose RF Frequency. You may select one of the following.
3. Click "StartStart
StartStart
Start" to scan frequency based on the option of RF Frequency you
select.
4. You may save all scanned channels by Click "Save asSave as
Save asSave as
Save as".
5. Click "OKOK
OKOK
OK" to exit the operating panel.
Note: Channel list will be saved as TBL file.
1.1.
1.1.
1. Country/ Area:Country/ Area:
Country/ Area:Country/ Area:
Country/ Area: You may choose the location where
you are.
2.2.
2.2.
2. AllAll
AllAll
All: If you can not find your location list in Country/
Area list, you may select this option.
3.3.
3.3.
3. RangeRange
RangeRange
Range: You may define your own frequency range.
Choose VHF or UHF then enter its frequency range.
4. Single4. Single
4. Single4. Single
4. Single: If you know exact frequency of a digital pro-
gram, you may enter its frequency here.

19
GB
3
Channel/ Frequency Sorting
You may use channel/ frequency sorting option after scan.
1. Click on “ProgramProgram
ProgramProgram
Program” and it will be shown by channel sorting.
2. Click on “FreqFreq
FreqFreq
Freq” and it will be shown by frequency sorting.
In addition, you may prioritize the channel list. Simply click on a channel and
drag it to where you want (move up or down).
DTV Software / System Introduction

20
Freecom DVB-T USB Stick
GB
3
3.2 Recording Setting
There are two ways of recording: one is real time recording and another is
scheduling recording.
1. Real timeReal time
Real timeReal time
Real time recordingrecording
recordingrecording
recording: when you record the program under the real time
mode, the recorded file will be saved to the default destination folder at
C:\Program Files\DTV\DVB-T USB 2.0\Capture\Video.mpg. If you want to save
the program file to a different destination, you may set up the path based
on your preference.
After the above setting finished, you can click the " ” on the control panel
when you watch digital programs. If you start recording, the clock on the left
of the control panel will turn red. If you wish stop the recording, please press
the button “ ”.
Table of contents
Other Freecom TV Receiver manuals


