Conrad Skyter 3D HD User manual


1
1. Contents
1. Contents................................................................................................................................................................1
2. Important safety instructions ................................................................................................................................2
3. General Information..............................................................................................................................................3
4. Delivery contents..................................................................................................................................................3
5. Description............................................................................................................................................................3
5.1. Front panel ..................................................................................................................................................3
5.2. Rear panel...................................................................................................................................................3
5.3. Card reader .................................................................................................................................................4
5.4. CI interface..................................................................................................................................................4
5.5. Remote control............................................................................................................................................5
6. Installation (Getting started) .................................................................................................................................6
6.1. Connecting receiver to Antenna, TV Set, Multichannel Audio System ......................................................6
6.1.1. Connecting to satellite and terrestrial antenna..................................................................................6
6.1.2. Satellite setup ....................................................................................................................................8
6.1.3. Terrestrial antenna setup...................................................................................................................9
6.1.4. Connecting to TV-set and Multichannel Audio System.....................................................................9
6.1.5. Connecting to the Network ..............................................................................................................11
7. Receiver setting up.............................................................................................................................................13
7.1. Switching on..............................................................................................................................................13
7.2. Main menu.................................................................................................................................................13
7.3. Channel search.........................................................................................................................................13
7.4. Channel editor...........................................................................................................................................16
7.5. Favorite manager......................................................................................................................................17
7.6. Electronic program guide ..........................................................................................................................18
7.7. Media player..............................................................................................................................................20
7.8. Recordings ................................................................................................................................................20
7.8.1. Schedule..........................................................................................................................................20
7.8.2. Records............................................................................................................................................21
7.9. System settings.........................................................................................................................................22
7.9.1. Language.........................................................................................................................................22
7.9.2. Record options.................................................................................................................................23
7.9.3. CI & CAS..........................................................................................................................................23
7.9.4. Parent menu ....................................................................................................................................23
7.9.5. System functions..............................................................................................................................24
8. Receiver Control.................................................................................................................................................25
8.1. Channel switching.....................................................................................................................................26
8.2. Volume control ..........................................................................................................................................27
8.3. Time shift...................................................................................................................................................27
8.4. Selection of audio track and subtitles .......................................................................................................27
8.5. Television, radio ........................................................................................................................................27
8.6. Recordings ................................................................................................................................................27
8.7. Channel list................................................................................................................................................27
8.8. Playback window.......................................................................................................................................29
9. Technical Specifications.....................................................................................................................................31

2
2. Important safety instructions
Please read this manual carefully before using this product.
Before connecting the AC power cord to the outlet, make sure the voltage designation of the digital
receiver corresponds to the local electrical supply. If you are unsure of your power supply, ask your local
power company.
Never insert metal parts into the cabinet openings of the digital receiver as it may cause the electric shock
danger.
To avoid electric shock, never touch the inside of the digital receiver. Only a qualified service personnel
should remove the case of the receiver.
Never use your digital receiver if the power cord is damaged. Do not leave any things on the power cord,
and keep the cord away from the place where people can trip over it.
Be sure to hold the plug, not the cord, when disconnecting the receiver from an electric socket.
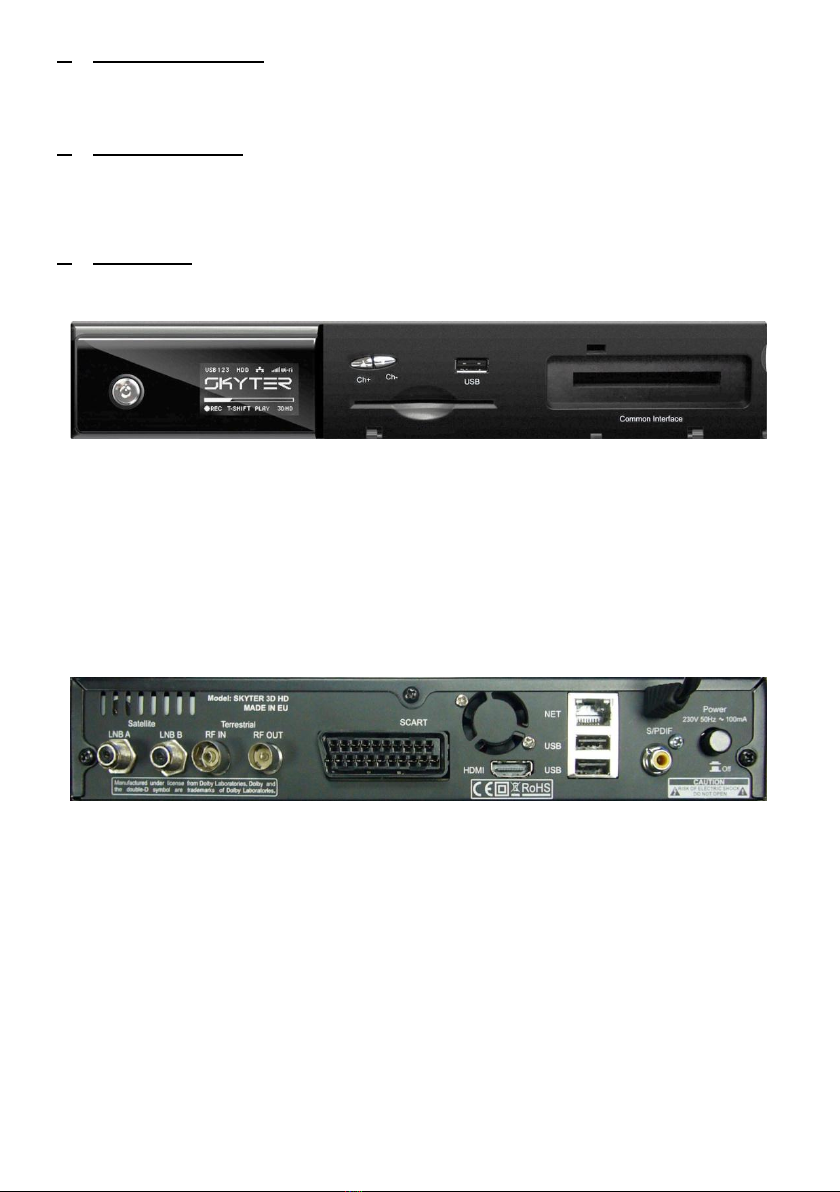
Two position bi-stabile ON-OFF push-push power network switch turns the receiver on and off. Its function
is described in Installation, chapter 6. Power network switch does not turn off the receiver from power
network totally. There remain, however, some parts with voltage. It is power network plug that completely
disconnects receiver from power network. Power network outlet must be easily reached for this reason.
Batteries shall not be exposed to excessive heat such as sunshine, fire etc.
For sufficient ventilation, leave a space of at least 10cm all around the receiver.
Do not cover the ventilation openings of the receiver with newspapers or curtains etc.
Do not place naked flame sources on the apparatus (e.g. lighted candles).
Take attention to the environmental aspects of the battery disposal. Do not throw away batteries together
with the domestic waist. Use only special gathering points.
Use the apparatus only in moderate climates (not in tropical climates).
Ventilation openings are made in the digital receiver cabinet. To prevent overheating, these openings
should not be blocked or covered. Also, avoid using the receiver on a bed, sofa, rug, or other soft
surface.This can block the ventilation openings in the bottom of the cabinet. If you put the receiver in a
bookcase or some other enclosed space, be sure an adequate ventilation is provided.
Do not expose the digital receiver to extreme temperature conditions or to extreme humidity conditions.
Avoid drips and splashes. Be sure no objects filled with liquid are placed on the top of the apparatus
(e.g.vases).
Do not place the digital receiver on an unstable cart, stand, tripod, bracket, table, or floor where it can fall
down. A falling product, drops and scratches can cause serious damage to the appliance.
Do not clean the front with keton-type materials (e.g. acetone), ethyl alcohol, toluene, ethyl acid, methyl, or
chloride - these may damage the panel.
In case your digital receiver does not operate normally or there are any unusual sounds or smells coming
from it, unplug it immediately and contact an authorized dealer or service centre.
High temperature can cause problems. Don`t use your digital receiver in direct sunlight, and keep it away
from heaters, stoves, fireplaces, and other sources of heat.
Unplug the power network plug when the apparatus is left unused for an extended period of time. It is
recommended to disconnect the receiver from power network in case of a thunderstorm.
To reduce the risk of fire, electric shock or annoying interference, use the accessories recommended in
chapter 4.
If the receiver is broken, do not try to service it yourself. Contact qualified service personnel.
Unplug power cable from the AC outlet before any service.
Be sure the service technician uses authorized replacement parts or their equivalents. Unauthorized parts
may cause fire, electric shock or other hazard.
Following any service or repair, be sure that the service personnel performs a safety tests to certify that
your digital receiver is in safe operating order.
This symbol indicates important instructions accompanying the product.
This symbol indicates dangerous voltage inside the product that presents
a risk of electric shock or personal injury.

3
3. General Information
Skyter 3D HD receiver enables receiving television and radio programs in satellite DVB-S/S2 and terrestrial DVB-T
standards. The device can be used together with an analogue or digital TV-set, audio amplifiers, home network
routers and other home devices. Skyter 3D HD is able to receive “DVCrypt” system encoded channels.
4. Delivery contents
- DVB-S/S2 and DVB-T digital receiver Skyter 3D HD 1 pc
- Remote control 1 pc
- HDMI cable 1 pc
- User’s setup Guide 1 pc
5. Description
5.1. Front panel
Fig. 1 Front panel
1. Power button
2. Remote control sensor
3. Standby indicator - green is ”on”; red is “off”(standby)
4. 1,54” graphic OLED display
5. Channels up/down buttons
6. “DVCrypt”card reader
7. USB 2.0 connection „max 0,5Amp”
8. CI interface slot
5.2. Rear panel
Fig. 2 Rear panel
1. Satellite LNB A & LNB B (satellite dish A & B input signals).
It is used to connect satellite dish / dishes to the receiver. (RF cable/cables are used). In case twin LNB
configuration is used, pls use two RF cables to connect A & B inputs with the satellite dish. In case single
LNB configuration is required, pls use one RF cable connected to LNB A input. LNB A input signal is
provided for both A & B inputs. Fully protected 14/18v LNB supply and DISEq commands are provided
separately for LNB A & LNB B inputs.
2. Terrestrial RF IN (Terrestrial RF antenna input). It is used to receive RF signal from terrestrial antenna. 5v
of antenna supply is fully protected (0,1Amp current limit) and can be switched on in menu.
3. Terrestrial RF OUT (Terrestrial RF output). It is used to connect RF terrestrial antenna to other devices:
analogue TV, etc.
4. SCART. It is used to connect a receiver to a TV-set with a SCART cable.
5. HDMI. It is used to connect a receiver to a TV-set or to a multichannel sound decoder with HDMI cable.
6. NET, RJ45 Ethernet port. It is used to connect a receiver to a LAN router with RJ45 Ethernet cable.
7. USB ports. The receiver has 2 USB 2.0 interface ports „max power 1,0Amp each”. They are used for
various USB external devices connection (keyboards, HDD, etc.).
8. S/PDIF, coaxial output. It is used to connect a receiver to a multichannel sound decoder.

4
9. Power button
10. Power cable
5.3. Card reader
1. A card reader is integrated into the receiver and enables to decode the channels encoded by the
“DWCrypt”system.
2. The channel cards are to be inserted into the card reader with the contact chip placed down.
5.4. CI interface
1. CI interface slot is integrated into the receiver and enables to decode the channels using external CI
module.
2. The CI module is to be inserted into CI slot.

5
5.5. Remote control
Fig. 3 Remote control
1. MUTE
Press to turn the volume off
2. STANDBY
Press to switch the receiver on / off (standby mode) .
3. 0-9
Number buttons. Press to select TV channels, radio
channels or menu options
4. Freeze/Pause
Press to stop / play the picture in time shift mode.
5. ASPECT RATIO
Press to change aspect ratio for 4:3 video.
6. Guide
Press to show electronic program guide.
7. Text
Press to switch the teletext on / off.
8. HELP
Press to enter a help window.
9. OPTION
Context options menu. Direct access to system
settings menu.
10. RETURN
Press to switch back to the previous channel.
11. OK
Press to display the channel list or confirm the choice
in the menu list.
12. /
Press to change the displayed options and channels
to be selected.
13. /
Press to enter / navigate on time shift mode.
When “menu” function is active – press for left / right
line movement .
14. MENU
Press to open / one step back the menu tree.
15. EXIT
Press to exit from the menu. Changes are not saved.
16. info
Press to display relevant information about the current
channel or program on the TV screen.
17. VOL + / -
Press to increase / decrease the volume.
18. Channel + / -
Press to switch the channels.
19. Page up/down
Press to page up/down on various menu list.
20. Coloured (hot buttons)
Red, green, yellow, blue buttons can be programmed
to control the most frequently used functions. Context-
dependent buttons.
21. TV/Radio
Press to switch from DVB television, IP television or
radio channel mode and back.
22. Subtitle
Press to turn the subtitles on/off.
23. Timer
Press to enter a schedule recording menu.
24. Language
Press to select an audio track.
25. Media player keys
Press for media player control.

6
6. Installation (Getting started)
Please read this manual before installing the receiver
Place the receiver close to a TV-set or any other home devices to connect them together using the cables available
in the set. The following important rules must be followed:
- Do not place the receiver close to heat sources.
- Do not place the receiver close to radio waves emitting devices (e.g. mobile phones)
- Place the receiver in the direct access of the remote control
- All plug connection must be done before receiver plugged in to mains power outlet
6.1. Connecting receiver to Antenna, TV Set, Multichannel Audio System
6.1.1. Connecting to satellite and terrestrial antenna
Fig. 4 Connecting to antennas, network and TV
Skyter 3D HD is equipped with two independent DVB-S/S2 inputs LNB A and LNB B accordingly. Depending on your
satellite dish installation, you can use single, dual/twin LNB & cable or Unicable (TM) configuration. In case you have
twin LNB and cable installation or Unicable (TM), each tuner can select any satellite signal independently. In case of
single cable LNB connection to LNB A input, signal for both tuners loops internally. The type of satellite dish
installation is selected in MENU>Settings>System settings>Antenna setup>Satellite LNB configuration>LNB
connected. See Fig. 5.

7
Fig. 5 Satellite LNB configuration
During satellite dish LNB and cables installation you can easily check the signal and the list of the channels available
on the selected frequency by entering test transponder parameters into the Test transponder section in the
Satellite LNB configuration window. Then move the cursor on the “check signal” line and the STB starts tuning on
the test transponder parameters.
Fig. 6 Satellite LNB configuration, check signal
In case the signal was successfully locked, you can quickly scan the programs on the selected frequency by
pressing the blue button. It helps to identify the satellite (See Fig 6). The programs list is seen on the screen and is
not saved. As soon as you finish LNB configuration, press yellow button to confirm and save your configuration. Pls
note, that test transponder parameters are not saved.

8
Fig. 7 Satellite LNB configuration, programs quick scan
6.1.2. Satellite setup
Before start the program search, add you dish system installation satellite, you plan to search programs on.
MENU>Settings>System setting>Antenna setup>Satellite setup. Press green button to select a satellite from the
list. Then insert the satellite dish installation parameters (LNB frequency type, Diseq port or none, frequency control).
During the satellite installation you can easily check the signal and the list of channels available on the selected
frequency by using menu’s Test transponder section. If a signal is successfully locked, you can quickly scan
programs from the selected transponder by pressing blue button. It helps to identify the satellite. See Fig 8 and Fig
9. No information is saved this time. When the Satellite configuration is finished, press yellow button to confirm and
save you satellite configuration. When a screen keyboard opens, please type or confirm the satellite’s name and
press “ok”. A new satellite is now added to the list. You can edit or delete it from this menu using a yellow button.
Fig. 8 Satellite list

9
Fig. 9 Adding a new satellite
6.1.3. Terrestrial antenna setup
Terrestrial antenna is connected to RF IN input. If your antenna is equipped with an amplifier (active antenna),
Skyter 3D HD can supply voltage to power it. It is selected by MENU>Settings>System setting>Antenna
Setup>Terrestrial antenna setup>Antenna power. The supply voltage is 5volt and 100mAmp current. You can
easily install your terrestrial antenna by setting your region transmitter frequency and tune position of antenna by
looking on the signal bar. Press yellow button to confirm and save you configuration.
6.1.4. Connecting to TV-set and Multichannel Audio System
Two ways are possible for connecting a receiver to a TV-set - with HDMI or with SCART cable.
HDMI is more preferable as it gives you a possibility to get HD quality on a TV screen. By default, Skyter 3D HD
reads EDID table of the supported formats from the connected TV-set and install a TV mode accordingly. You also
can adjust the modes manually, but be careful –some modes can not be supported by your TV-set and no picture is
available. In this case connect a TV-set with SCART cable (SCART signal is always available), choose HDMI video
menu and set AUTO EDID mode ON. AUTO EDID set ON means that the receiver reads EDID table from the
connected TV-set and set up a resolution. If a frame rate is the same as video content being played, the picture
quality is the best possible. If a video content resolution and frame rate is not supported by the connected TV-set
(no equivalent mode is available on the EDID table read) Skyter 3D HD selects the nearest possible mode,
supported by the connected TV-set.

10
Fig. 12 Connecting to a TV-set and Multichannel Audio System
If a user does any changes in MENU>Settings>System setting>TV out settings>HDMI video, he needs to press
APPLY button to get the immediate effect. If AUTO EDID option is selected ON, a resolution and a frame rate
selected are used by the receiver as the initial setting mode only. If AUTO EDID option is selected OFF, a resolution
and a frame rate selected are used by receiver permanently. In some cases (eg TV-projector) EDID connected
monitor has 1080p format but doesn’t have 1080i. In most cases if a TV-set supports 1080p, it usually supports
1080i as well. If Forced to 1080i for interlaced is selected ON, the system sets HDMI for 1080i even if EDID has
1080p (not 1080i) .
Fig. 13 TV settings and HDMI video configuration

11
You can also select the type of audio signal to HDMI and S/PDIF output. PASS THROUGH means that the receiver
delivers selected audio track in compressed mode on the selected output. Decoded stereo PCM means that the
receiver delivers selected audio track in decoded stereo mode on selected output. Due to limited number of audio
codecs integrated, not all audio signals have audio signal in Decoded stereo PCM mode. You can select HDMI
Audio out on MENU>Settings>System setting>TV out settings>HDMI audio and S/PDIF out
MENU>Settings>System setting>TV out settings>S/PDIF separately.
Fig. 14 TV settings and HDMI audio configuration
You can also control the equipment connected via HDMI cable. TV or AV receiver supports CEC. If CEC is selected
ON, the receiver switches ON TV and AV receiver, connected via HDMI. If an option Force TV stand-by is
selected, the receiver switches off all connected equipment as well. Pls note that Control TV volume option is not
mandatory for most TV-sets, and is usually supported only by AV receiver.
Option Convert 4:3 SD video works only for SD video with 4:3 aspect ratio. If NO is selected, no conversion
happens. If ON is selected, the system converts 4:3 video material in to 16:9 screen to keep to right geometry. If
scale is selected, the system fits video material as is.
6.1.5. Connecting to the Network
Skyter 3D HD is equipped with 10/100Mbit LAN and 150Mbit WLAN interfaces. In MENU>Settings>System
settings>Network you can see the available network and connection.

12
Fig. 15 Network list
If a LAN cable is plugged into the network, you can see actual link speed. By selecting a corresponded network
connection, you can connect to the selected WLAN Access Point (AP). Press OK to see or adjust network setting.
The receiver requests AP for connection. If it is a password protected network, the screen keyboard opens for
password input. The receiver remembers the passwords for the few last successfully connected AP and next time
connects to it automatically. To delete a stored password of the selected Access from the database of the receiver,
select “Forget Access point” option. Press blue button and enter the name of the hidden WLAN to connect it.
Fig. 16 Network connection menu
In case 3G modem is attached to USB port, the PPP (modem) line appears on the network list. Pls note, that a
modem can be connected only to rear USB ports due to power requirement. Both rear USB ports can supply 1Amp
current and Front USB port can supply only 0.5Amp. By selecting PPP connection you can also scan, connect and
change the available option for 3G/GSM connection. Pls note, that not all types of modems are supported by the
system software. The supported modems are listed on the website. Press red button to select default connection
internet route. In case the default connection is available, the receiver links to internet via this connection. If the
default connection is not available, the receiver tries to link internet via any other available network connection. LAN
is always preferable in this case. Press yellow button to switch OFF WLAN adapter completely. Press green button
to check if an internet connection is available and to see the actual network internet route.

13
7. Receiver setting up
7.1. Switching on
Plug the receiver into a power outlet. After the advertising screensaver, the installation guide is displayed on the TV
screen. Select menu, language, time zone and the receiver starts terrestrial channels auto scanning. You can press
EXIT button to stop this dialog. All selections saved during the dialog can be changed later in the main menu.
7.2. Main menu
The main menu includes a lot of settings for the receiver configuration. Press MENU button on the remote control to
enter the main menu. Press / buttons for Menu lines selection. The selected line is highlighted. Press OK to
enter the selected menu line window. Press MENU to return back to the previous menu window. Press EXIT to exit
from the main menu. To enter the settings and recordings sub menu , select relevant line and press right button.
Fig. 17 Main menu
7.3. Channel search
After a new satellite is added, you can search programs on it.
For automatic satellite search MENU>Settings>Channel search>Satellite Auto search, the receiver requires the
list of transponders on the selected satellite. Thus, during automatic satellite search the receiver searches channels
according to the transponder list only. You can add new transponder data, save them, edit them or delete them on
MENU>Settings>Chanel search>Satellite transponders.See Fig 18.

14
Fig. 18 Satellite transponder
MENU>Settings>Channel search>Satellite auto search you can select a satellite from the list of previously added
ones and scan channels either on the selected transponder only or on all transponders available. Press blue button
to check the list of channels available on the selected transponder. (no information is saved). You can also select
network scan ON. In this case, when channels search is finished on the selected transponder, the receiver checks
NIT table. In case NIT table is available, the receiver takes the transponders table from NIT and search channels on
these transponders as well. If you select search style = update, the system adds new found channels. Alternatively,
if you select complete search, the system deletes all channels from the selected satellite and replace them with the
newly scanned. If you select style = full, the system updates all channels only from the scanned transponders. You
can also set up various filters. Filters help to mark scanned channels for their future storage in the database of the
receiver. Press red button to start the search.
Fig. 19 Satellite auto search
MENU>Settings>Channel search>Satellite Manual search searches the channels on the selected transponder by
entering it manually See Fig 20. The tuner is loaded by all tune parameters when you move the cursor to the Level
position. The search options are the same as for the auto search.

15
Fig. 20 Manual search
For Terrestrial channels search the Terrestrial antenna is needed to be plugged in first. By Terrestrial search menu
MENU>Settings>Chanel search>Terrestrial search you can select the programs manually (by channel frequency)
or automatically (by all terrestrial band) search.
Fig. 21 Terrestrial search
As soon as channels search is finished, the list of the programs is displayed in the programs extract window. See
Fig 22.
Filters, set up in the search window, make the system sort the channels in the list. Press OK to select programs in
the list.( See check box on this screen.) Only selected programs are saved into the system database.

16
Fig. 22 Channels search
When search is finished, press red button to save search results or changes, or press EXIT button to exit
from the search window without saving search results or changes. In the latter case, pop up window
“Waiting…” is displayed on the TV screen. Please wait for a few seconds for the system to save the search
result into the channel database.
Fig. 23 IPTV provider setup
For IPTV setup a new IPTV provider is needed to be added. Select MENU>Settings>Chanel search>IPTV setup,
add a new provider and set it up. You can select various types of IPTV Meddleware or just load a play list from the
file. The list of created IPTV operators is available in the menu. You can temporary activate or desactivate any of
them.
7.4. Channel editor
Select the MENU>Settings>Channel editor. You may move, sort, rename or lock the channels you consider as
inappropriate for your children in this manager window.
The channel list and the colored buttons which have the same function as those on the remote control are displayed
in the Channel editor window. Press buttons 0...9 on the remote control to select the desired channel. Press /

17
buttons to move from one channel to another and back. Press / buttons to jump every twelve channels.
Press EXIT button to exit from the channel manager window.
As soon as the programs search is finished, the channels are displayed in the sequence they are transmitted by a
broadcaster. Press red button Sort on the remote control to sort the channels according to the offered criteria. The
sorting criteria query will be displayed on the screen. Press /buttons to select the desired option. Press OK
button to confirm your choice.
If you want to lock the selected channel, press green button Lock on the remote control. The request Enter
password appears on the screen. Default password is 0000. Enter the password and press Apply. The lock icon
appears next to the selected channel. To unlock a channel, press green button and enter a password. When you
exit from channel manager window, the receiver always requires to enter a password when turning on the locked
channel. There is no possibility to bypass this feature, because having locked at least one channel, the programs
search and defaults are automatically locked and may be unlocked only after entering a password. For more
information regarding locking the receiver and changing the password refer to chapter 7.9.4 Parent menu.
There is the option to rename programs. As soon as programs search is finished, the programs are presented in the
channel list under the names transmitted by a broadcaster. If you want to give your own name for a selected
program, press the yellow button Rename. Keyboard window and the line for entering the desired name of a
program are displayed at the TV screen. Press /and < / > buttons on the remote control to select letters and
functions, and press OK to enter the selected ones. Press Enter key on the keyboard to save a new program name
and then press OK.
If you want to change the order of the channel in a channel list, choose a channel and press OK button. Icon with
arrows appears next to the selected channel. Press /buttons to move the channel up or down in the list. Select
a new place for the channel and press OK to confirm. To exit from the channel manager the system will ask you to
confirm the changes made. Then, the system saves the changes into the database.
Fig. 24 Channel editor. Move
7.5. Favorite manager
Select the line MENU>Settings>Favorite editor from menu and press OK button. This editor allows to add
channels into four default channel lists: News, Movie, Sport, Other. Alternativel, you can also add new lists (max 16
in total ) or edit the name of any. You can also delete any newly added list except four defalt ones.

18
Fig. 25 Favorite editor
Favorite editor window shows the channel list and colored buttons duplicating the functions on the remote control.
The background image is the channel played at the moment To select the desired channel, press buttons 0...9 on
the remote control or press /buttons to move from one channel to another and back or press /
buttons to jump every twelve channels and press OK.
E.g. You‘d like to add ProSiben HD and SAT.1 HD channels to the News list. Select ProSiben HD channel, then
select SAT.1 HD(both will be marked by blue dots), press green button on the remote control, pop-up window opens,
select News list and press OK.
Favorite editor on the right side shows the avalible lists and indicates the current one. If you like to delete ProSiben
HD from the News list, press right button to move the cursor to the right of the window. Then select News list and
press OK. Now the News list is selected as the current one and is displayed on the left side of the window. You
can move to the left of the window, select ProSiben HD, press OK to switch to this channel, then press red Delete
button. ProSiben HD channel is now deleted from the News list only.
Pls note that if you delete any channel from All Channel list, this means you delete this channel completly. The
channel is deleted from all lists and STB memory. To get it back you need to search the channel on the transponder
again.
You can also use yellow/blue button to select the channels in the current list. Then you can delete or add them into
other lists.
If you move focus to the right of the window you can delete, add or edit names to the lists. Pls note, that first four lists
are default ones and can‘t be deleted. If you press green or yellow button, the keyboard appear for you to move the
cursor on the keyboard and press OK on the selected letters. As soon as you are ready, move the cursor on Enter
button and press OK.
7.6. Electronic program guide
Press OK button to select GUIDE line.

19
Fig. 26 Electronic program guide
The background image of the channel watched at the moment and the channel list is displayed in the Electronic
Program Guide (EPG) window. Programs schedule Information on the current channel is displayed on the right of
the window, the channel list is on the left of the window. Press /buttons on the remote control to select the
desired channel.
Press > / < buttons to switch to right/left part of the window. Press /buttons to navigate inside the programs
schedule. Press REC button to select the program scheduled for recording (see section 8.2.1).
Press TIMER button to select the program scheduled as reminder. Receiver switches to the selected channel at the
time when the program starts.
Press Info button to see the Information about the program selected.
Fig. 27 Electronic program guide. Info
To go back from EPG window, press MENU; to exit from menu window, press EXIT.
Note
EPG information is visible only if a broadcaster provides it. Otherwise, the word “Unavailable” appears
This manual suits for next models
1
Table of contents