frisby eXtreme User manual

ACTION CAM ULTRA HD 4K
2” LCD
Display
Extreme
Sports
Up to 30m
Waterproof
4K

Power On/Mode
Lens
Select/Shutter
Microphone
Micro USB
Micro SD Slot
BASICS
Up/WiFi
Speaker
LCD Screen
Operation indicator
Charging indicator
Micro HDMI Port
Down/Menu

BASICS
1 - Waterproof Housing
2 - Adapter Mount
3 - Switch Support
4 - Helmet Mount
5 - Bicycle Mount
6 - Secure Mounting Clip
7 - Straps

USING A MICRO SD CARD
INSTALLING AND REMOVING BATTERIES
CHARGING
To ensure that the included battery is fully charged, connect
the micro USB cable to a compatible USB port on a computer or
a compatible charger.
Note: The camera does not contain any built-in memory.
Insert a Micro SD card into the camera.
To remove the card press the end of the memory card gently, then
it will be ejected.
Remove the battery door by pressing the clip (located on the
bottom of the camera.)
Pull the tab to remove the battery.
Correctly install the battery as indicated by the +/- symbole
and direction of arrows marked on the battery until it’s in place.
Secure the battery panel.
Before using your Micro SD card, it will need to be formatted.
When turned on for the first time it will give you the option to
format the card. Press the ‘Down’ button to select the desired
option and the press the ‘OK’ button.
To format your card, press ‘Mode’ button four time to access
the settings screen. From here press ‘OK’ and the ‘Mode’ to
access the ‘Cog’ icon. Now you can press the ‘Down’ button to
select the ‘Format. Press ’OK’ and then press ‘Down’ to confirm and
‘OK’ to format your card.
OPERATIONS

The charging indicator light remains on while the battery is
being charged.
When the battery is fully charged, the charging indicator light
will turn off. The approx. charging time is up to 3.5 hours.
To power on, press and hold the ‘Power’ button for 3 seconds.
The camera will now show the startup screen as it powers on.
To shut down, press the ‘Power’ button for 3 seconds and the
camera will begin to power off.
The camera has 5 modes: Recording mode, Photo mode, Slow
Motion mode, Playback mode and Settings. To switch, press the
‘Power/Mode’ button to cycle through after starting up.
The default mode once the camera is powered on is Video
recording with the preview being visible on the screen.
To start recording, press the ‘OK’ button.
To stop recording, press the ‘OK’ button once more.
To change the Video mode, enter settings by pressing the mode
button 4 times, then press ‘OK’ to enter.
POWERING ON AND OFF
SWITCHING MODES
HOW TO USE
VIDEO RECORDING MODE

PHOTO MODE & SETTINGS
SLOW MOTION MODE
FILE STORAGE & PLAYBACK
Switch the camera on and press ‘Mode’ to select Photo mode
there will be a camera icon in the upper left corner of the display
screen. The camera will now be in Photo mode. Press ‘OK’ to
take photos.
To change the photo settings, enter Settings by pressing the
‘Mode’ button 3 times.
Switch the camera on and press ‘Mode’ twice to select Slow
Motion recording, a running man icon will be visible on the
screen.
To start recording, press the ‘OK’ button.
To stop recording, press ‘OK’ button once more.
To change the Video mode, enter Settings by pressing the ‘Mode’
button 2 times. The slow motion settings are a part of the Video
settings option.
Switch the camera on and press ‘Mode’ 3 times to select
Playback mode. To review your videos and images, use the ‘Up’
and ‘Down’ buttons. To playback your video, press ‘OK’
button tostart and to stop the playback. To return to your files
press ‘Mode’.
You can also access your files using a Micro HDMI cable to
connect to a television. You can take the Micro SD card out and
access the image data with a card reader.

WIFI CONTROL
TOOLS AND SETTINGS
VIDEO SETTINGS
This camera can be controlled wirelessly via a smartphone and
several third party applications. To begin, download your chosen
app i.e ‘XDV’ , ‘SportCAM’ or ‘SportLook’ available for the Apple
and Android phones from your respective app store.
To access the WiFi mode press the ‘Up’ button with the WiFi
logo, this will then enter WiFi mode, which contains the SSID
and password.
Open the app on your phone. Once connected, the sreen on
your camera will go blank. You will now be able to control the
camera and access the settings directly from your Smartphone.
Frisby eXtreme do not currently produce any applications and do
not gurantee the compatibility between the camera, applications
and smartphones.
To change the camera’s settings, press the ‘Mode’ button 4
times. Press ‘OK’ to enter Settings mode, press, ‘Mode’ to cycle
through Video, Photo, General and System settings the press
‘OK’ to select the options. To access the options, press ‘Down’
to select the chosen setting then press ‘OK’ and then ‘Mode’ to
select and return to the menu. To leave the Settings mode select
the X and press OK.
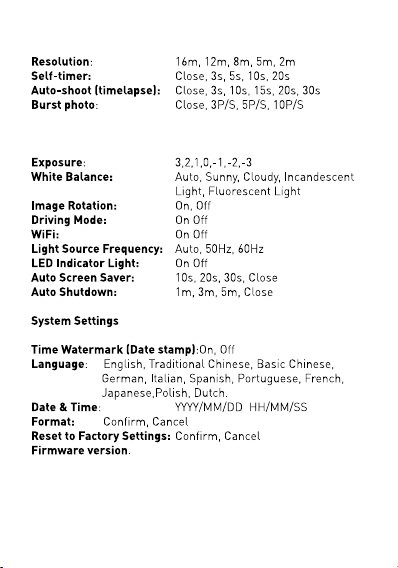
PHOTO SETTINGS
GENERAL SETTINGS

SPECIFICATIONS
This product is covered under warranty for 1 year starting from
the date of purchase. You can register you warranty today with
the registry card that is included in your packaging. Within the
warranty period, repair or component replacement will be
provided for manufacturer defects or shipping damages.
Warranty does not apply to the following circumstances:
1. Product is purchased from an unauthorized dealer that is
not authorized to sell.
2. Failure to provide regular and proper maintenance to this
product.
3. Product failure due to improper usage, misuse, abuse,
alteration, faulty installation, power line surge or
modification.

WARNINGS
4. Product failure due to acts of nature such as natural disaster,
fire or flood.
5. Accidental damage, physical shocks and any long exposure to
the sun or rain.
6. Keep this device in a clean/dry environment. or 32F - 104F in
temperature. The ambient humidity of the device should not
exceed 75% to avoid corrosion damage. Do no leave the device
near a hear source such as a fire.
7. Never dispose of any electrical or electronic waste in
general circulation. Collect and dispose of any waste safely
and separately. Failure to follow these safety instructions may
result in unexpected damage of this device. The company is
not reponsible for any result caused by violation of safety
instructions above.
Do not drop the camera.
Keep the camera out of reach of children while on charge.
Keep the camera in a cool, dry and dust proof place.
Do not use any power supplies with more than 1A output
current in case of over heating.
Do not expose the camera to strong magnetic objects.
Never leave the camera exposed to high temperatures and
direct sunlight.
Note: The product design specification is made based on
updated information when compiling this product manual. The
specification is subject to change without further notice.
Table of contents


