FujiFilm Fujicascope M3 User manual

OWNER'S MANUAL
FOR BOTH THE NEW
INSTANT LOAD
SUPER SIZE
sa5giEEeE-a
L*AND SUPER8
AND REGULAR
SIVIM MOVIES

FUJICASCOPE M3
Dual Purpose 8mm
Movie Projector
Your new Fujicascope M3 Projector is the
ultimate in versatility, construction and
design. It can be used to project any and all
8mm movie lm available today. All the
regular format movies you have shot over
the years can be projected with the M3 for
bright, beautiful images on the screen. The
footage you have shot with your new Single-
8camera or other super size lm format
camera can also be projected with the M3.
And what’s more, the two lms can even be
spliced together or intermixed and shown
with the Fujicascope Dual Projector.
In addition to this important dual feature of
the M3, it also offers automatic threading
right up onto the take-up reel; simple
controls; continuous running speeds from
slower motion to standard action, quick
rewind mechanism which makes the lm
changing time much shorter than before;
solid, cast aluminum construction; nylon
gears and chain drive for years of mainten-
ance-free operation.
Spend afew moments reading this manual
before operating your new Fujicascope M3
Projector. The step-by-step instructions will
assure your getting the most pleasure from
this newest member of the now world-famous
Fujica Single-8 family of precision movie
making and projecting equipment.
1966 Entire contents copyrighted Fuji Photo
Film Co.. Ltd.

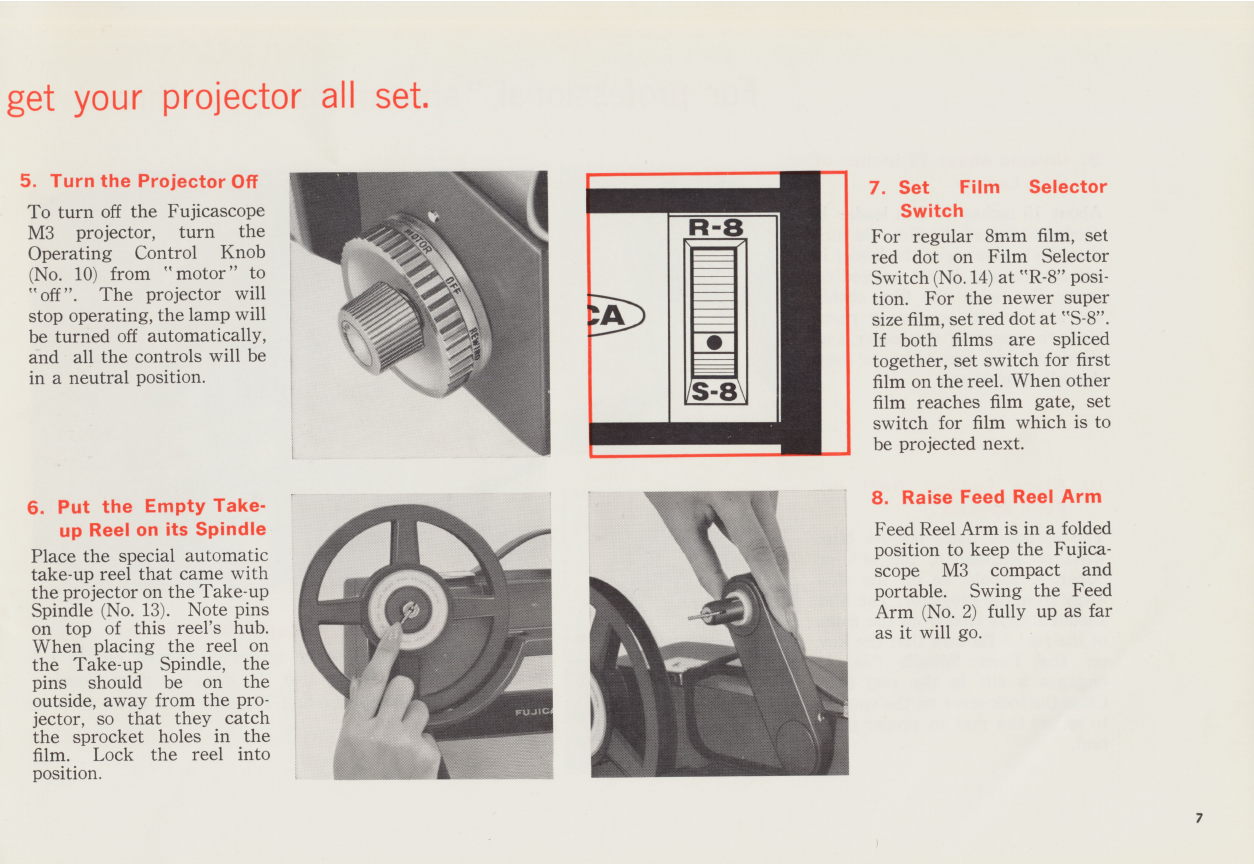
For Projecting For Projecting For Projecting
Regular New Super Size Both the Regular and the
8mm Movies Instant Load Movies New Super Size Movies
Single-8 or Super 8On the Same Reel
Your library of the older format, regular
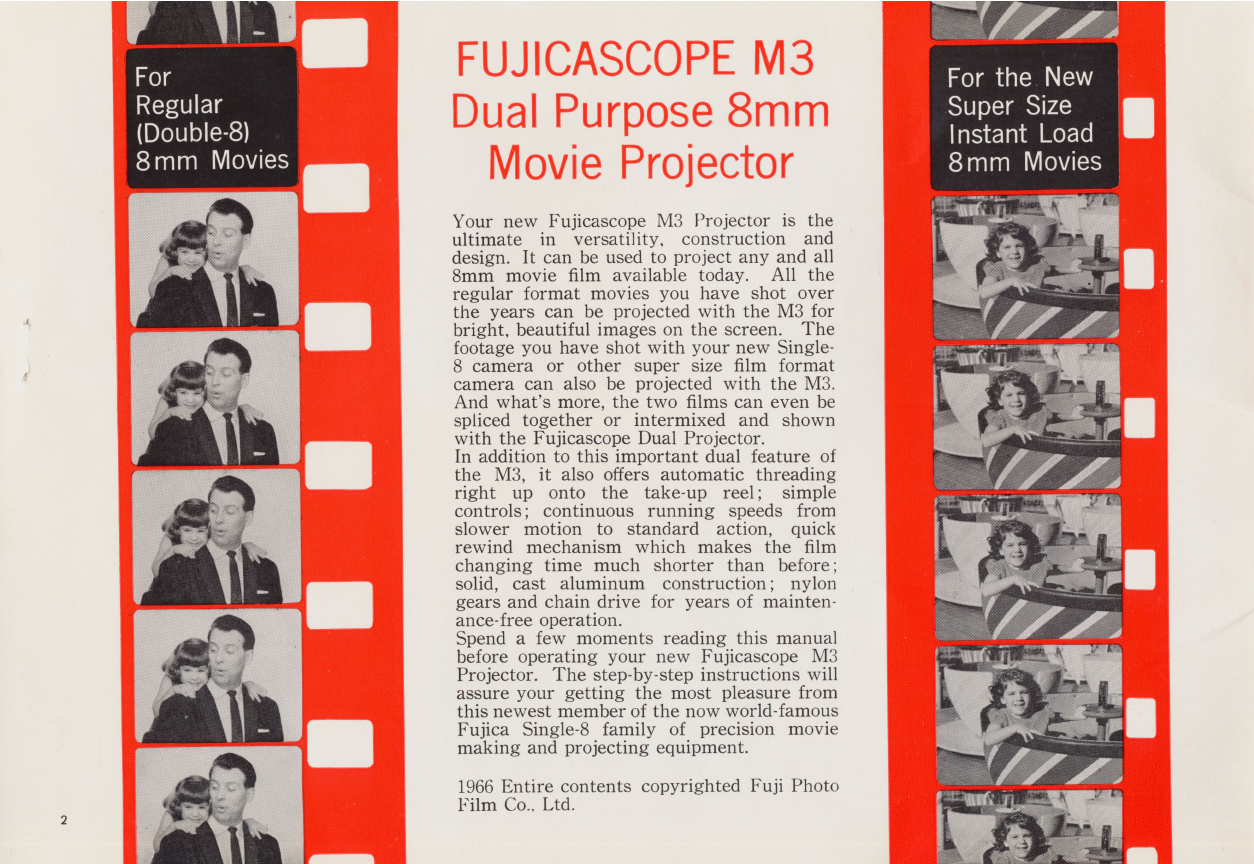
FUJICASCOPE M3 PI‘O]6CtOI‘ First, When p1‘O]6Ct1I1g the new, big picture The extremely versatile Fu]1ca '1
8mm movies can be shown with the
44 77 'I-1
remove the collar on the feed reel movies shot with the new instant load, scope M3 Projector can show both
spindle. Put it in aconvenient place 8mm cameras, the “collar” is rs the regular and the new super size
so that it is handy when you need it slipped onto the feed reel spindle. movies even if they are spliced
for projecting super size movies. Load Then load your reel onto the feed reel together end to end or intermixed
reel onto the feed reel spindle. spindle right over the “collar”. on the same reel.
owever, as soon as the lm slows
down orstopsat thesplicedportion,
But if this does not immediately
resume the run, turn the take-up
reel slithtly to give astart.
When the splicing different types
of lm, attach about 2in. (5 cm) of
B“’l°"e turning °“ Bel“ turning the White leeder lm ef the eeme Wee
the l31”9leCt01' m0t013 P1'0leCt01‘ m0t01' 011, as the lm which follows. The
d°t °“ the F111“ On the Fm 5e1“’°t°1' dlegrem at ght-
---ergazau -iw
11luetrat1en> 1e at <51ns1e-8 er Super-8% _
...-.- .6:-:.-.».-'-1<>-:¢.~:-:~.-v.-\' ;-3.1-m. 1.-=-1-:-:~;-:‘-:-=-;- -1-Y. ,.,.-;.;.;:;.,¢.,@.;.;,;.;:¢. 1- -11
7; ;===.=" 7:3'3'-51'-:-‘$231'5;5‘75I~13?:' *- 1;%:iz%z%zis%;iz%-5:555‘ '%;'=i‘ .~=»..»..~.¢¢==-===1===¢==<=~<-=» e~
‘‘ ~'i= -'..-====£=3=5' =5z§=&2'f='-->er-1€=E=E=E=9».'- eY;==;=;=;=;¢;:z=5=Er£==:€--<51?-V >’=zage->5=;§=;;;=;=;=;:;;: 9-»; ._ .,
'-’*'==:‘i=E=E= -1»-.55:1:3.5:E:E:5:5=5:';5§i='Z1511. »--'
.,,.=.,.;.=.;.. .,_. .=_=>=.=<-=-.-=,=,.-_. .-1., ,..
..;‘;f' ::::' .:":;r.’\s~a€:,’.f:::?/. ..~_ _.:_;_ 59;,-4-_M;+_
“=~I ‘,2 '¢'5i‘z=z'5‘§'§§“‘="~ '*"Ei:'5E§ii%EEii§i§iii§%i'32513-' .'-1:
_' -.;I ';:=.-=I- 11:15‘ ";-1:1-',.;.1-} "513:5‘ -5:5-5:"-/‘:5-5:1:-:'45.3:=:5=5: ;. -;=;;;:;;;:;:=;5:=:_;'51.3 v._1" Q§;&j§"* '
VI9»
._; __.;=;?;E;i=,=zI1‘;E=. -=5-va';‘2i;Ia%.I:i.";‘ -.1» 1.=;;; 5;" .i»=‘e*§% '
7‘
4-§.¢=
2....-.-:- __ ._.;;§_:_;_._, V. ,. _. 6__.,<_.;:1.<;.,._._._¢§;,;:,,:_:_9»._:;;.\=,,5€a¢._,;.,__;__;;§<,,,;_.?_,¢;_:_
'1 =E=EeI=E='= "‘~.-.'°'-=:=:=:="'--'£.=E=~':=:€=' .. "»'1'§=E"*:=E==5‘;’!E=£=.e.*'.=>'1;>.=sye"-1:1-.-ii=s:?5;14=:¢=:23§;:=;$==$;;( ,. ;
V~’1.._;.-g -==...
work the Film Selector Switch. U
otoovv
e-8F'm
-@-
5'ng'
QIFTm
-I
2nch5cmong
toovr__€>S
U7
VVheoderob.'
<;_~‘ii?€nrgjfih
-0-
8
‘J
-4- "-
be Sure that le red be Sure the red d°t methed ef evlieing ie ehewn in H
m
tron
LE
n8
Regu
~(FFn1n

13. Take-Up Spindle --»~-
l4. Film Selector Switch
_
5555555555555E5E;55E;55E55555555 ;5I¢55§ 15' Y:;E555§5;E52=‘ »55; 553,15 5; j:- 5555*
15. Lamp Housing Cover
5:5=5:51:5;5=5=;;5=5:5;5:5=;5g5=-51,555; 5
555525EE§E%i§1§%§ii%§i§iiE§Eii§%51' 5- if
=2=2=z;z:z=a:::z=z:z:z=z:z=z:::z= 12::-5 ==-=-==.===.+ , ,
w"---
35: -' »=;====5====-515:;-5-;=5:5é=;5=1
--'-
é'.
if:?:‘1 -'.=-.==?r-51'
W! 5/A.,,{f',
»»
..-.' .-'- /VI-vi‘-. >-.
-:-=->5 "".'==-- .- -=
#51555555 1555555555 555555 _. _I-"55Z'55.'_' '-
/‘if-2-£5 $55551 ‘--"=55? 7
-
l4.
$35
/'
The precision parts of your FUJICASCOPE M3
5"l. Feed Spindle with Removable Collar
"Feed Reel Arm
53, Single Frame Projection Button
-4. Self-Threader
-“M 5. Film Tension Spring
-*5 5. Framing Knob
'"" 7. Feed Roller
t8. Focusing Knob
CD
Fujinon 19mm f‘l.3 Projection Lens
Operating Control Knob
‘'(Lamp, Motor, Off, Rewind)
>5,-5 .5. -- 5;
~11. Projection Speed Control
"~-- '-""12. Elevation Knob

Dual Purpose Movie Projector
... . U
r,.
l.
=i
il
l
El
4.?
10.
E
l i
l
_,| l
l
2
i
l
Lem.
I
l
.15. Rear Cover Release Stud
—~~~~~-~~---1 7, Turbine Fan Cooling Vent
1- ~~—~~-18_ AC Power Socket
AC Voltage Selector Window
lW“19' (Selector in inside cover)
(No Voltage Selector in this
machine as it is specially set
to AC 115V for use in U.S.A.
and Canada.)
NOTE: This projector can be loaded
with400 feet of the new thinner,
stronger Fujichrome Single-8
color lm or 300 feet of other
movie lms.
g5

1. Check for Proper Vol-
tage
(For U.S.A. and Canada the
projector has been set at
115VAC and has no voltage
selector.) If the voltage
supply in your area is other
than that shown in the
Voltage Selector Window
(No. 19), loosen the Rear
Cover Release Stud (No. 16)
and turn the Voltage
Selector Knob inside the
cover until the correct
voltage is uppermost. Now
simply replace the cover,
and tighten the stud.
2. Plug in the AC Power
Cord
One end of the power cord
goes snugly into the AC
Power Socket (No. 18), and
the other into an electrical
outlet on the wall. Make
certain that the power cord
is plugged in rmly at both
ends.
-=4-=-..=-=-1-=
-==a§?f%2=a==:s=e=a===%=a===a=:===:=-=~=-=-=‘=
...,%::_ -.
Before it’s time for the shovv...
3. Turn Projector On
Turn Operating Control
Knob (No. 10) to “Motor”
and then to “Lamp”. Place
your screen in aposition
where it can be easily seen
by your audience.
4. Center the Light Beam
Before loading lm into your
projector, center the light
beam on the screen. The
beam is centered vertically
by turning the Elevation
Knob (No. 12). To make the
image larger or smaller,
move the projector away
from or closer to the screen.
Aprofessional show should
ll the screen.
.1

get your projector all set
5. Turn the Projector Off
To turn off the Fujicascope
M3 projector, turn the
Operating Control Knob
(No. 10) from “motor” to
“off”. The projector will
stop operating, the lamp will
be turned off automatically, S
and all the controls will be
in aneutral position.
6. Put the Empty Take-
up Reel on its Spindle
Place the special automatic
take-up reel that came with
the projector on the Take-up
Spindle (No. 13). Note pins
on top of this reel’s hub.
When placing the reel on
the Take-up Spindle, the
pins should be on the
outside, away from the pro- .
jector, so that they catch S
the sprocket holes in the
lm. Lock the reel into
position.
\S
7. Set Film Selector
Switch
For regular 8mm lm, set
red dot on Film Selector
Switch (No. 14) at “R-8” posi-
tion. For the newer super
size lm, set red dot at “S-8”.
If both lms are spliced
together, set switch for rst
lm on the reel. When other
lm reaches lm gate, set
switch for lm which is to
be projected next.
8. Raise Feed Reel Arm
Feed Reel Arm is in afolded
position to keep the Fujica-
scope M3 compact and
portable. Swing the Feed
Arm (No. 2) fully up as far
as it will go.

9. Unwind about 15 ineiies of
Film Leader
About 15 inches oi lm leader is
needed to thread the lm. Be sure
that the beginning of the leader is
cut square and is not ragged or
bent. Cut with the lm cutter
provided or with scissors or razor
blade to square off the leader, and
eliminate the possibility of any
threading problems.
10. Place Loaded Reel an
Feed Spindle
The sprocket holes onfthe lm,
Whether Regular 8, Single-8 or
Super 8, should be on the side
away from the projector. The lm
should always feed from the front
of the reel. Be sure that the key
on the Feed Spindle (No. 1)
engages aslit in the reel hub.
Close the lock-lever on the spindle
to secure the reel in proper posi-
tion.
For professional “showmanship”...thread the
11. Feed Film Leader Through Film Channel
The lm leader, alter being properly squared off, is fed
through the Feed Roller (No. 7), over the Film Tension
Spring (No. 5) and into the Self-Threader (No. 4), as deep as
3.2 in. (8 cm).

projector before your audience arrives
12. Turn Motor and %..amp
With lm in position at the
Self-Threader (No. 4) turn
the Operating Control Knob
(No. 10) to “motor” and
then to “lamp”. Film Will .
be automatically taken up T
by the Self-Threader. If the
lm does not start to thread
itself, simply feed more lm
into the Self-Threader.
13. Threading is Auto-
matic
At this point, the projector
takes over and guides the
lm into proper position in
the lm gate. The lm is
also carried onto the take-
up reel. The pins on the
hub of the take-up reel
engage the perforations, and
the lm is secured and ready
for projection.
~>w»a§<.us<»:>z-=
14. Focus the Lens
As the rst images appear
on the screen, adjust the
Focusing Knob (No. 8) until
the picture is as sharp and
clear as possible.
15. Adjust Framing Knob
When the image is on the
screen, part of the frame
line or the top or bottom ot
another frame may some-
times appear. This simple
problem can be eliminated
by slowly turning the
Framing Knob (No. 6).

19. To Enjoy Zooming Pro-
jection
Zooming gives the pleasure of
making the projected picture
grow bigger or smaller at will.
For this purpose, attach the
zoom converter (sold separate-
ly) to the projection lens.
IHow to Attach Zoom
Converter:
(1) Take off the lens hood at
front of projection lens by
16. Dialthedesired Projec- 17. Single Frame Projec- 18. Heat Shield Protects turning it to the 1eft_
The Fujicascope M3 has pro- If you want to stop the movie When you project asingle
jection speeds from slower at any point to see any one frame on the screen, it is
motion to standard action. particular frame on the screen, exposed to agreat deal of heat
Adjust the Projection Speed simply press the Single Frame from the projection lamp. In
Control (No. 11) to the point Projection Button (No. 3). The order to protect the frame from
where the speed of the action lm will stop immediately, and being scorched, aheat shield
pleases you most. You can you can look at that frame for in the projector descends auto-
readjust the projection speed as long as you care to. In matically between the frame
at any point while the projector order to keep the frame on the and the lamp. When you take
is operating. If you want to screen,your nger must remain your nger off the Single Frame
slow up the action in aportion on the button. As soon as you Projection Button, the heat
of the movie (or all of it), remove your nger, the lm shield automatically returns to
simply turn the Projection continues at its regular speed. its normal, out-of-the-way posi-
tion Speed tion Your Film
Speed Control counter-clock- tion.
wise.
l0

.~_. -r .
-'1-: -1 .. -.1711:
'-=55 »=l'-.I.1.. I‘1E=i
.;.:: _-;;-
-E1: -.':::I:=- V-:+
-41;, 1-=-1.;--. .-=11; ,=-
-4.;._- .-:-:-:-: -_.,;.
"*>iIE5:;';- I.gI;E;E5:j.;;-
21. To Rewind the Complete Reel
When your show is completed, and all your lm is now on the
take-up reel, switch the Operating Control Knob to “off”. The
t2) Screw the mom Converter ~lm should now be rewound back onto the original reel so that
tt .t. 1it is all set for the next time you wish to project this show. To
Correc Yon pmlec Km 6115' 20. To Rewind Film While rewind the lm, bring the end out from under the take-up reel
his 1-hreaded as shown above and attach it to the hub of the empty feed reel.
t3) To adjust the Size of the Turn the feed reel afew times to secure the lm end. Now turn
with Fujicascope M3 it is the Operating Control Knob to “rewind” When the lm is
PiCtu1‘e, turn the mined Ting nOt necessary t0 Wait uhtil the completely rewound onto the feed reel, turn the projector off.
at fmnt 0f Z901“ lens t0 the entire reel of lm has been
left or right. shown in order to rewind it.
ii motor to "Off ”and tho“ to ooo ooo oooooh oo ooowo oolow
5%
\%
,W’
-155:5.
\§\ °='\§2I
-.<
3:3:I:I:I:I:I:-:I:I:I:3:3:3I3:‘:I:I:I:I:?9R<
E2525252;2525z§z§zE1§:§:;:§:§:§z§zE5§§%€1°é
M
WW-%i‘E‘?E‘E=1=E1iiE25%§;ii§i§%i?§%§%§E§EiE§§
111813’ SWi'E¢h the Qpefating Attach to the end of lm about 1ft. (30 cm) ot additional lm
@011t1”01 K110]? (Nil 10) f1‘O1T1 (such as the white leader or developed waste lm) as trailer and
rewind -Stop for asecond
.-.,_.=_._<=5=,=1.=.,=;=;=;:;=,=;=;:1:;:1;1,=,;,;,1,;,;,;,=.=;;,;.- _;3,3;5,5,5,5,5,;,55,;$3,;3;3,3,5,;,;;5,;,5;;;;,;;;,;5,;_;o3,;,;,;,;,;,;,;,;,;, 5,5;3,5;5,3;3;5,5;3;;;;5=;;;;;,;;;,;,;;;;;; Qt’
’i’/<=z==55£555555%EiiEi5i§i§§:§=i=§i§i§i§§5§5l
-:-1-'47:-:-:-:-Q;5:I:!:3:3:3.3:3'»:5:'t5:5'-
om.» J
:;:;:;:;:;:;f;'¢f/”_
'-1:-1-I‘i’51E13IE1515IE15IE12-E1§iEiE1EiE!EIEI§IE=ZiZ1?E- Ii
-;-:I.-:-:-:
:-:-:-:-1-2-:~:-:-:3
’=‘=‘=‘=F=‘=‘=‘1‘=‘=§%§éiiaE§Ea=z?>iii???
/=:==::=:=:=:=;1; -- ‘
.... ...ii
===1; =;=;,=,=;=;;=¢=1¢=¢=;¢,:,;;;=5- .,
11.,‘-"f5_.;:§:l:i'$""<b,.
.-:;_-,;.;.¢.;:;:-.-:--;-"1:-_.‘A
v"=31=I=21I=Y1E1E=5:5=2i=i=Egi£=5=5=i;£=5=E=3=
:;:-:;:;:;:5;2;:;:;:;:;:;:;.;:;:;:;:-:-:-::3:
v.-z=:===:=:?§==Ez=55--- -,
‘tit.. .
==1:=1=;=i1===11====1====1===1=;===:===:1r =;=15=;=1;;=11;=;1g==<=:>==:=;==1;1=;=;=5=
;=-==1===;1==-=1===11===@:==1=;==1:===:1:=. =51==;=5=;=115:;13===1:===:=;===1;;==;=g=;
iiiiiiiiiiiiéié
o--<<-<~\~=ww=m<=~‘i‘§‘§i§“""'5
;wm='I'f"""ijij:
IE =:?.=:=:§:§:§:§:§:§ 55?}E13111515‘11511iiiiligiiiiiiiiiiiliiii I153iiiiiii53115533155?}igiiiiiiiiiiiiiiiiiii.
'1:11;:i:i1-:i:~:-:i:;:;:;:;:;:;:;:;.;1;:;:; :5;1;:;:;:1:;;;:;1;:;1;:;:;:;:;:;;;:;:;:;1;1
-.1.=:=:Z1:-:55-:~:-:-:i1-:1:1:1111l:=:1:-:\1-:-»:-:i:i:-:~:-:»,1;1;;;:;1;:;:;:-1‘;-:-1‘:-1‘:-:;:;:;:\:;:;:;;
>:;.;:;-- .;:;-;:;:- ;:;:;.;:;:;:-:;,
at the off position before ~A-t4i"~ ~—l.3ft.(4Ocm) or longer
going to “rewind”. _Once you DD=1 =1 =. W“) mi: =. =. =, Z.= Q=,= Emu
get back to the section of lm ~-~2in. (5Cm)-~~->51 TRA| |_ER
which you want to see again,
Swltch to SOff”, ,,then “m-Otorn This notch makes the lm stop automatically when it reaches its
and then lamp -end, although the machine remains running. Then, turn the
Operating Control Knob to “rewind”, whereupon the lm starts
rewinding immediately.
ll
I
__...>-'

Tips for better showmanship.
Preparation is lntpariagii power cord out of the Way so that no one trips over it,
A_few minutes of planning before your audience arrives ans zvheindigu Cognect thlet projector g_)t§n1e1eCtfri,§f‘1
will help make your show asuccess. The lms should Ou e’Wm -gC‘-)1’ Severa urns amun 6- eg Oe
be ready, the screen set up, the projector in good Working §)Ehe()t%§7h11,ghe1(;Et£ alggétdelf 3323115,Oigetshérglsger the
order, and even things like chairs and ashtrays arranged ’pJp'
for their maximum comfort. Keep 3spare Lamp on Hand
Spligg Films gave -time am Egiwt There’s nothing worse than getting your lms, projector
-daudience all set and having your projection lamp
The best shows require the least number of reel changes. an - -
Slice as man reels to ether as Our YO-ector can take burn out. Actually, there is one thing Worse, and that
21,? one time_ liahis Sa egg alot gt-mp llqdf His not having areplacement lamp. Keep aspare lamp
vo1eauss ave
the reels arranged in Sequence SO that they go on the fOnV€1’11€11%Y avaiglable. For how to replace aburned-out
screen in alogical order, and have them near at hand. amp’ See age
You_ don’t Want to be fumbling around in the dark And NW, the prgjegr
lggkllingnaa1;qe§1Z)f?nd you don’t Want t0 keep turning Checking your projector before the show to make sure
g'it is in good Working order. Aquick dusting is usually
set; tip ihg ,S§*“e@[‘| gefmehand enough to keep it clean, and some lens tissue or alens
Find agood sot for our screen Where it is rotected hm-Sh is Very helpful when used with Care‘ Set your
DYp
from stray light._ Adark corner of aroom is best. Make ?rO3eCt9r (in aStkltlfdy Stlllqrface for age ShOW’ nd Spind a
sure the screen is clean. Set up the screen so that it is ¢V1;tm1nL11q es e1-ng enscrien Opmc (if lhalnc-6
-- - - tat tepicture stescreen even y. is is
parallel with the front of the projector. This will assure mg S-O
you of undistorted images good time to focus your rst lm.
Rewind Films After the Show
Seating Arrangement Should ePlanned
Your audience is going to be sitting on those chairs for F111-18.3 ShfOu1dhnOt be revliounghwhllg gug agdlenci ls
wai ing or tenext ree is sou eone ater
:(€n;§1t1;g21eB§SS%{gSgh% el[1ifeC(é1g111f;)er1Pa2%e,?1i1ed geseetzg they leave. When you nish areel, simply transfer the
- - tlhtk-dl th ht
possible. Of course the seating has to be arranged so enijtg {hree to E16 aSup E-pm e’-th lgiad 6pmlec or
1.
that no heads are in the projection beam. Keep the Wenew man C011 mue WeSOW

How to replace aburned-out projection lamp.
099" the LamPh°U59 Remove the Burned-Out Replace with aNew Lamp Rep|a¢e the Lamphguge
Lamp Cover
1Your Fujicascope M3 Projector is
lequipped with an 8V 50W lamp with c
To replace aburned-out The projection lamp is held built-in _ree_ction mirror that gives After you have replaced the
projection lamp, the rst in position by three keys C01’1‘6<3'E 111L1m1nali1011 quallty and @566" projection lamp, tthe Lamp
step is to disconnect the AC that engaged three slots in ve brightness for C0101” lm P1'OjeCtiOn- Housing Cover (No. 15) back
power cord. Then open the the base of the lamp. Be W1g§1?aSteh§n1éa£11P1u§§§%S. ri?_1§lg€.I%%1%; into place.
hinged lamphouse cover sure that the lamp 1s cool, inp Or equiVa1ent]1frOn,11n%Our Camera
(No. 15) by pulling the top and turn 1t counter-clock- Shep pjaee the lamp base en the three
towards you. wise until it comes loose. keys, with the Clear glass Opening
pointing inwards toward the front
inside corner of the lamphouse. Press
down slightly and rotate the lamp
clockwise until it clicks into position,
with the clear glass opening pointing
straight forward.
jiggle the lamp to be sure it is securely
seated.
l3

How to
Cleaning the Lens
Q.) "T('0
for your Fujicascope M3 Projector.
Use the long soft lens brush supplied with the rectly.
projector to gently clean dust off of the lens. This Cleaning the Aperture Plate and Presure Plate
should be done before every lm show. It takes Open the lamp housing cover by swinging it down
only asecond, and will markedly improve the from the top. It is hinged at the bottom. Just
clarity of the pictures on the screen. The lens on behind the lens is the projector’s aperture plate and
the M3 is very deep-set, but if it does get asmudge pressure plate. With the projector disconnected
or ngerprint on it, carefully use alens tissue from your power source, turn the control knob to
moistened with lens cleaning uid to clean the “Rewind” and you will see the pressure plate move
surface. Never use afacial tissueior handkerchief, away from the aperture plate. Place the rm brush
or pointed instrument of any kind. between the two and gently rotate. This will
remove any lm or dust particles that may accu-
IHowto Detach and Attach the Projection Lens: mulat Twist the bYu5h Several tim@5 in P031
TO detach pun out the directions to remove dirt which has built up in the
lens gently While puH_ aperture corners. Be careful not to scratch the
mg the feeusing kneb nely polished metal surfaces. Turn the control
towards you. To at knob to “Off” and the pressure plate will move
tech face the key back to contact the aperture plate.
gfOQVe Of 13115 Straight Cleaning U18 Channel
down in the same way The lm channel cover comes away from the
as detaching until the projector by pulling up the handle provided for
focusing konb’s pin clicks into the slit around the detaching. Clean the channel behind the channel
lens barrel. If the picture is out of focus it indicates cover by passing the rm brush through it several
faulty insertion, therefore, re-insert the lens cor- times.

No other maintenance should be attempted
Any attempt to adjust, service or repair the Fujica-
scope M3 projector beyond the routine maintenance
described above may void your guarantee. If
malfunction occurs, or further service is needed,
return the projector to your dealer, or to your
nearest Fujica Service Center.
Aperture Plate
Pressure Plate
-—~~----~~ Film Channel Cover Release Lever
~"Film Channel Cover
Hinged Lamp Housing Cover

Quick operating checklist.
projector Fans to Qpet-ate; Lamp Fans to Light Picture is Blurred and Will Not Focus Sharply
First, check the AC power cord. Be sure it is Lens is dirty. See page 14 on how to clean it.
rmly Plugged int0 the DT0j€Ct0Y and in-'50 the “Trees” and Dust Blobs in the Projected 3how
electrical Wall outlet. If the plugs are properly Clean the aperture plate and pressure plate
Set’ replaee the lamp (See page 13 for preee‘ With rm brush. (See page 14.) Do not blow
dure).
Film Fails to Thread Properly
With motor on, simply press the lm down
over the lm tension spring several times. If
this fails to start the lm threading automa-
tically, check the following:
1. Be sure you have fed enough lm into the
self-threading lm channel.
2. Check lm end to be sure it has been cut
square and that there are no torn sprocket
holes at the beginning of the lm.
3. Check to see that the Film Selector Guide
has been properly set for the lm in the
projector——“ S-8 ”for Single-8 or Super 8
and “R ”for Regular 8lm.
dust away.
?
op -‘Q10
~
E’'®l
EvV5'@—___,“
,\\\\
\\\i\\\\\
\\‘\\\\\\\\\
\1'\/"Q\
-i
\\

me?
~~um Self-Threading
Film Tension Spring
Film Selector Guide
Film Channel with Cover
Removed
Operating Control
Lamp-Motor-Off-Rewind

3wonderfulFUJl(II\instant load Single-8 8mm
FUJICA
instant load
Single-8
P1
This slim, trim compact 8mm
movie camera slips into your
pocket or purse. It’s fully
automatic so that you can just
aim and shoot. No settings or
adjustments needed. Visible
warning signals overexposure
or underexposure. The P1
uses the new Fujichrome
Single-8 color lm in the instant
load cartridge. You can shoot
afull 50feet of beautiful movies
with no mid-lm ipover.
Other features: universal focus,
ne Fujinon f/1.8 lens, ultra-
sensitive CdS electric eye.
FUJICA
instant load
Single-8
All the plus features of the
Single-8 System: instant load
cartridge, packed with 50 con-
tinuous feet of the new thinner,
stronger, color lm. Projected
show is twice as big as regular
movie lm. Extra fast f/1.6
zoom lens with arange from
9.5mm wide angle to 29mm
telephoto. Plus an automatic
electric eye that can be
switched off to full manual
control, ground-glass focusing,
battery drive, reex viewing
and three operating speeds:
18, 24 and single frame.
all give you the brightest, sharpest color movies

FUJICA
instant load
Single-B
Z2
The next step up the ladder
in the Fujica line of ne Single-
8cameras is the new Z2.
Designed to give you achoice
...simply aim and shoot or
create professional effects. The
Z2 offers backwind and varia-
ble shutter control for all the
conveniences of professional
fade-ins, fade-outs and lap
dissolves. Other plus features
include the Fujinon f/1.8 zoom
lens With a4to 1range from
8.5 to 34mm. Precision focusing
with athrough-the-lens, split-
image rangender. Provision
for remote control operation,
18, 24 FPS and single frame
exposure.
you've ever seen!
...all have abuilt-in pressure plate for profes-
lTlOVl€ cameras TO ChOOS€ ll’OlTl .sionally sharp movies and simple cartridge
loading.
Every Fujica Instant Load
Single-8 camera has a
built-in pressure plate,
the same important
feature found in every
professional movie cam-
era. It keeps your lm
at and in perfect align-
ment With the lens. The
result is the sharpest
movies you have ever
seen.
...all take Fujica’s Instant Load Single-8 Car-
tridge prepacked with the new, thinner, tougher
Fujichrome color lm
The thinner base of Fuji-
chrome lm permits more
light to be transmitted...
result—abrighter, sharper
show. The tougher base
practically eliminates an-
noying breaks during
projection. Just drop in
the cartridge and shoot
50 continuous feet with
no mid-lm ipover.
-;1;~;\-.21

L
1%
FUJI PHOTO FILM CO., LTD.
No. 3, 2-chome, Ginzo-Nishi, Chuo-ku, Tokyo, Jopon
IN U.S.A.
FUJI PHOTO FILM U.S.A., INC.
350 Fifth Avenue, New York, I\I.Y. IOOOI, U.S.A.
IN EUROPE
FUJI PHOTO FILM (Europe) G.m.b.H.
Berliner AIIee 8, Diisseldorf, West Germony
IN BRAZIL
FUJI PHOTO FILM DO BRASIL LTDA.
Ruo Moior Diogo I28, S60 Paulo, Brosil
IN ASIA
FUJI PHOTO FILM CO., LTD. HONG KONG OFFICE
2209 Internotionol BIdg.,
I41 Des Voeux Rood, Centrol, Hong Kong
Printed in Japan ETIE69-1 CO.3-10, (D
Table of contents
Other FujiFilm Projector manuals