Fujitsu AIRSTAGE Remo Set User manual

INSTRUCTION MANUAL
AIRSTAGE Remo Set
PART No. 9373329954-03

Introduction
To CONTENTS
01
Introduction
This application is intended for use by installers and maintenance specialists of
air conditioners.
Using this application allows you to change the settings of remote controllers
and the field settings of indoor units connected to remote controllers.
In addition, logo images to be displayed on the remote controllers can be sent.
Enables editing in advance, sending remote
controller settings to the remote controller,
and loading the current settings of the
remote controller.
Enables importing a logo image from the
smartphone to send it to the remote controller.
Enables sending the air conditioner’s
field settings edited in advance to the
remote controller, or loading the current
settings of the air conditioner.
NOTE:
●Before using, make sure that the remote controller and this application can be
connected. For connection, refer to the installation manual of the remote controller.
●To use this application, permission to use the positional information of the
smartphone is required.
●This application is available only in English. Even if another language is set on the
smartphone’s language setting, English is displayed.
What this application can do

Contents
Preparation ...................................................................... 03
Usage Precautions .......................................................... 04
Data Setting ..................................................................... 06
zData Setting Screen.................................................................06
Menu ................................................................................. 07
zEnvironmental setting / Help ..................................................07
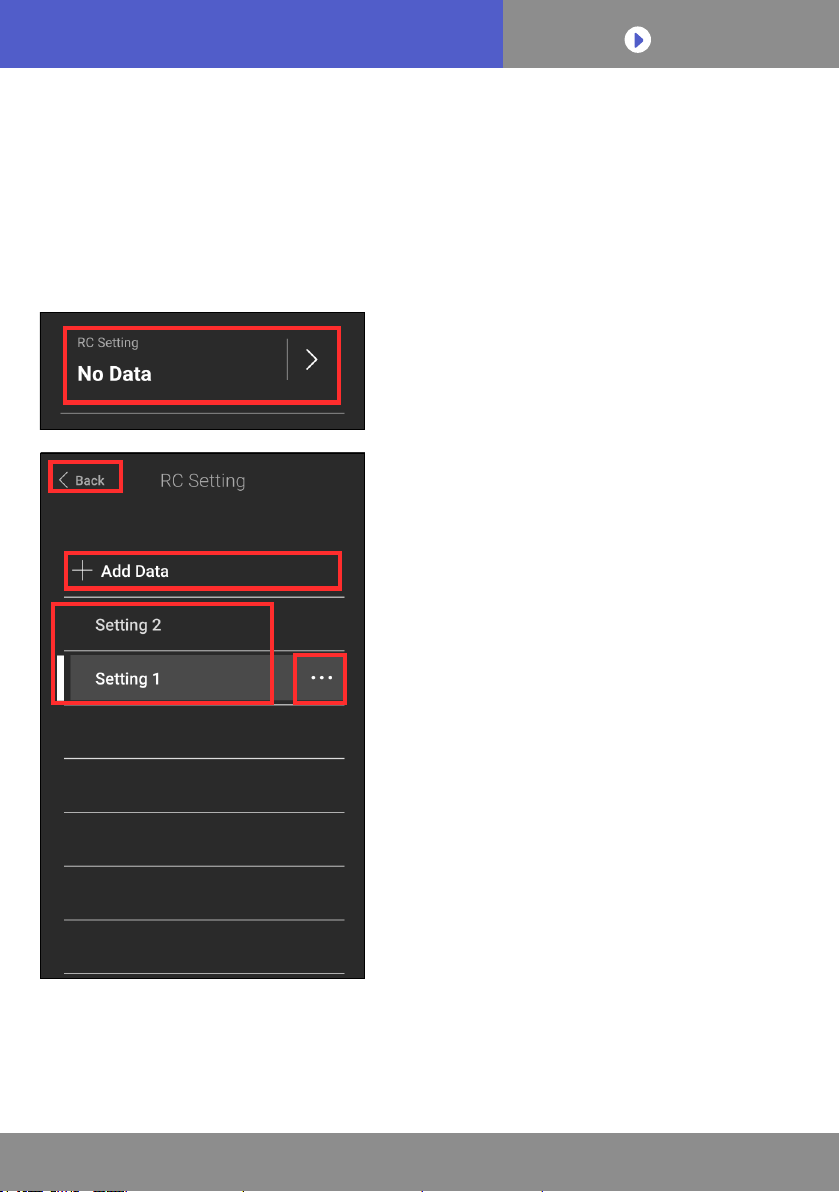
RC Setting ........................................................................ 08
zRC Setting Screen ...................................................................08
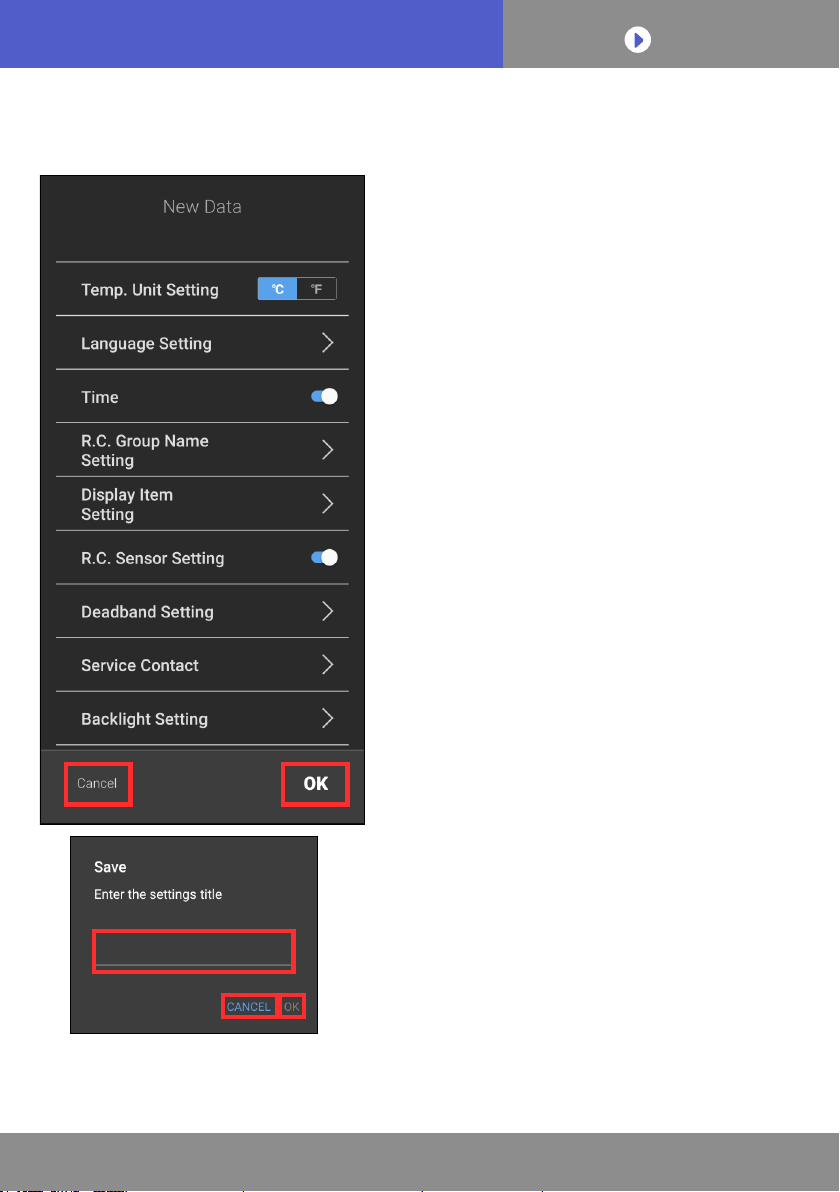
zCreating a new setting file .....................................................09
zLoading or copying the current setting values.....................25
zEditing the created setting file ...............................................26
Logo Data......................................................................... 27
zLogo Data Screen ....................................................................27
zImporting an image from the smartphone.............................28
zDeleting the imported image ..................................................29
Function Setting .............................................................. 30
zFunction Setting Screen .........................................................30
zCreating a new setting file ......................................................31
zLoading or copying the current setting values.....................32
zEditing the created setting file ...............................................33
Connect to RC ................................................................. 34
zConnecting the smartphone to the remote controller..........34
Send Data......................................................................... 35
zSend Data Screen ....................................................................35
zSend to RC ...............................................................................36
Disconnect from RC........................................................ 37
Troubleshooting .............................................................. 38
To CONTENTS
02
Contents

To CONTENTS
03
Preparation
Remote controller Fujitsu General wired remote controller UTY-RVRU
Air conditioner Fujitsu General air conditioner connected to UTY-RVRU
Smartphone
Supported OS
yAndroid
yiOS
*Check the latest version of OS supported on GooglePlay
or AppStore.
RAM
4 GB or more (recommended)
*If the RAM capacity is insufficient, the screen transition
may take time.
Recommended
resolution
1334×750 pixels or more
*If the resolution is less than the above, texts may not be
completely displayed.
Bluetooth®Bluetooth 4.2 or more
Manual yUTY-RVRU Operation Manual
yUTY-RVRU installation Manual
Android and Google Play are trademarks or registered trademarks of
Google LLC.
App Store is a service mark of Apple Inc.
iOS is a trademark or registered trademark of Cisco in the United States
of America and other countries and is used under license.
The Bluetooth®word mark and logos are registered trademarks owned by
Bluetooth SIG, Inc. and any use of such marks by FUJITSU GENERAL
LIMITED is under license. Other trademarks and trade names are those
of their respective owners.
NOTE: When this application is updated, a notification is sent from Google
Play or App Store. Always keep the application in the latest state
to enhance security, improve performance, correct failures, etc.
Preparation before using

Usage Precautions
To CONTENTS
04
Usage Precautions
Usage precautions for this application
zIf a communication problem occurs due to radio wave interference
caused by an obstacle or microwave oven, operation contents may
not be reflected. Make sure that the operation contents have been
reflected.
zThe radio wave receivable distance is approx. 10 m. If the radio
waves are shielded by an obstacle, the receivable distance will be-
come shorter. In this case, remove the obstacle or bring the smart-
phone closer to the remote controller.
zIf multiple Bluetooth®devices are present around the remote control-
ler or smartphone, the communication between the remote controller
and the smartphone may not be performed properly.
zThis application is intended for use indoors. Use it indoors.
zThe application screen may differ depending on the OS version,
smartphone screen size, etc.
zWhen the application screen shows transmission is in progress, do
not exit this application or turn off the smartphone. Doing so may
cause an error.
zSetting an Installer Password (→P.21) is recommended to prevent
an operational mistake by the smartphone.
zBefore using this application, confirm that the air conditioner and the
remote controller are turned on.

To CONTENTS
05
Usage Precautions
Precautions on Bluetooth®
zDo not use around wireless LAN and other wireless devices, around
equipment such as a microwave that emits radio waves, at places
with many obstacles, and in other environments under a poor radio
wave condition. Connection may be frequently interrupted, communi-
cation speed may become extremely slow, or an error may occur.
zWhen using near equipment that use 2.4 GHz band or similar zones,
such as wireless LAN devices with IEEE802.11b/g, radio wave in-
terference may occur mutually, communication speed may become
slower, or connection may fail. In this case, turn off devices that are
not used.
About this manual
zThis manual describes how to operate the application. For operation
and setting details of the remote controller, refer to the operation man-
ual of the remote controller.

Starting up the application
Data Setting
To CONTENTS
06
Data Setting
Data Setting Screen
Starting up the application dis-
plays the Data Setting screen
(a) Tap here to display the menu
bar. (→P.07)
(b) The setting file being selected
is displayed. *
Tap here to display the RC
Setting screen. (→P.08)
(c) The logo image being selected
is displayed. *
Tap here to display the Logo
Data screen. (→P.27)
(d) The setting file being selected
is displayed. *
Tap here to display the
Function Setting screen.
(→P.30)
(e) Button to connect to the remote
controller.
Tap here to display the Connect
to RC screen. (→P.34)
*If there is no file that can be
selected, “No Data” is displayed.
(b)
(c)
(d)
(e)
(a)

Menubar
Menu
To CONTENTS
07
Menu
Environmental setting / Help
Tap (a) to display the menu bar.
Menu
(b) Tap here to display the
Environmental setting screen.
(c) Tap here to display this
manual.
Environmental setting
(d) Tap here to return to the Data
Setting screen (→P.06)
or the Send Data screen
(→P.35).
(e) Tap [°C] or [°F] to change the
temperature unit displayed on
this application.
(The unit with the background
coloured in blue is selected.)
(f) The version of this application
is displayed.
(g) Tap here to display Licensing.
(h) Tap here to display Terms of
use.
(b)
(c)
(a)
(e)
(f)
(g)
(h)
(d)

File creation
To CONTENTS
08
RC Setting
RC Setting Screen
This screen allows you to create and select a setting file to
change the remote controller settings collectively such as
a temperature unit and language.
Tap [RC Setting] on the Data
Setting screen (→P.06) to
display the RC Setting screen.
Tap [Back] to finish RC Setting,
and return to the Data Setting
screen.
Tap [Add Data] (a) to create a
new setting file. (→P.09)
Tap a setting file (b) to select
a file to send to the remote
controller.
(The white line is displayed on
the left side of the file being
selected.)
Tap […] (c) to edit a created
file. (→P.26)
NOTE: Up to 20 setting files can be saved. When creating a new setting
file after the upper limit is reached, remove unnecessary setting
files, and then create the new file.
(a)
(b) (c)

To CONTENTS
09
RC Setting
Creating a new setting le
Items that can be set are as follows.
• Temp. Unit Setting(→P.10)
• Language Setting(→P.11)
• Time(→P.12)
•
R.C. Group Name Setting
(→P.13)
• Display Item Setting(→P.14)
• R.C. Sensor Setting(→P.15)
• Deadband Setting(→P.16)
• Service Contact(→P.17)
• Backlight setting(→P.18)
•
Summer Time Setting
(→P.19)
• Admin Password(→P.20)
• Installer Password(→P.21)
• Date Format(→P.22)
• Time Format(→P.23)
• Set Temp. Range(→P.24)
Tap [Cancel] (a) to cancel the
setting, and return to the RC
Setting screen (→P.08).
Tap [OK] (b) to display the Save
window.
Tap the entry field (c), and enter
the name of the setting file within
20 characters.
Tap [CANCEL] (d) to close the window.
Tap [OK] (e) to create the setting file.
(b)
(a)
(c)
(
e
e)(d)

To CONTENTS
11
RC Setting
Creating a new setting le
Language Setting
The language displayed on
the remote controller can be
changed.
Tap [ > ] to display the Language
Setting window.
Tap the check box to change the
language to be set.
(The language with a check mark
is selected.)
Tap [CANCEL] to cancel the
setting and close the window.
Tap [OK] to apply the change and
close the window.

To CONTENTS
12
RC Setting
Creating a new setting le
Time
The setting to synchronize the
time of smartphone with that
of remote controller can be
changed.
Tap (a) to switch between ON
and OFF.
ON
OFF
Select ON when sending
the clock information of the
smartphone to the remote
controller. Select OFF when not
sending it.
(a)

To CONTENTS
13
RC Setting
Creating a new setting le
R.C. Group Name Setting
The group name of the remote
controller displayed on the
remote controller can be set.
Tap [ > ] to display the R.C.
Group Name Setting window.
Tap the entry field in the centre
to display the keyboard. Enter
the group name of the remote
controller within 12 characters.
Tap [CANCEL] to cancel the
setting and close the window.
Tap [OK] to apply the change and
close the window.
NOTE: Since only ASCII 256 characters are supported, some symbols
cannot be entered.

To CONTENTS
14
RC Setting
Creating a new setting le
Display Item Setting
Items to be displayed on the
remote controller can be set.
Tap [ > ] to display the Display
Item Setting window.
Tap (a) to switch between ON
and OFF.
ON
OFF
Select ON for items to be displayed on the remote controller. Select
OFF for items that are not to be displayed
Tap [CANCEL] to cancel the setting and close the window.
Tap [OK] to apply the changes and close the window.
(a)

To CONTENTS
16
RC Setting
Creating a new setting le
Deadband Setting
The deadband value can be set.
Tap [ > ] to display the Deadband
Setting window.
Tap the number in the centre to
display the list of values that can
be set. Tap and select a value.
Tap [CANCEL] to cancel the
setting and close the window.
Tap [OK] to apply the change and
close the window.

To CONTENTS
17
RC Setting
Creating a new setting le
Service Contact
The service contact information
can be entered.
Tap [ > ] to display the Service
Contact window.
Tap the entry field to display
the keyboard. Enter necessary
information.
Name: Up to 50 characters
Phone: Up to 20 characters
Email: Up to 50 characters
Tap [CANCEL] to cancel the
setting and close the window.
Tap [OK] to apply the changes
and close the window.
NOTE: Since only ASCII 256 characters are supported, some symbols
cannot be entered.

To CONTENTS
18
RC Setting
Creating a new setting le
Backlight Setting
The backlight settings of remote
controller can be changed.
Tap [ > ] to display the Backlight
Setting window.
Tap (a), (c) or (d) to display the
list of values that can be set.Tap
and select a value.
Tap (b) to switch between ON
and OFF.
ON
OFF
Tap [CANCEL] to cancel the
setting and close the window.
Tap [OK] to apply the changes
and close the window.
(a)
(b)
(c)
(d)
Table of contents
Other Fujitsu Thermostat manuals
Popular Thermostat manuals by other brands

Geti
Geti GRT02 operating instructions

Honeywell
Honeywell FocusPRO TH6110D installation guide

Lux Products
Lux Products TX100E Installation and operating instructions

SF
SF Premier Series SFTHRP742WFC Owner's manual and installation instructions

BECA
BECA BAC002 Series user guide

Stelpro
Stelpro Maestro SMC402 user guide