Fusion MS-IP700 User manual

700 SERIES Manual
MARINE ENTERTAINMENT SYSTEM
MS-IP700
True Marine Entertainment System for iPod
MS-AV700
True Marine DVD Entertainment System

1
Version 1.1
WARNINGS AND CAUTIONS
Do not attempt to open the unit’s chassis.
There are no user-serviceable parts or adjustments inside.
USING iPod
This unit has been tested with compatible authentic iPod models under normal
expected operating conditions, free from any pre-existing defects in either the unit
or the iPod.
No responsibility can be taken for use of the unit other than under normally
expected operating conditions in conjunction with fully functional and undamaged
iPod units which have been manufactured and authorized by Apple Inc.
USB Flash Drives
•Drive format: All USB flash drives used with this unit must be formatted to
either FAT32 or NTFS format. These are the most commonly used format for
USB flash drives.
• Audio track format: Audio tracks stored on USB flash drive must be in MP3
format to play on this unit.
Handling CD or DVD disc’s (MS-AV700 model only)
• Avoidtouchingthesurfaceofthedisc.
• Avoidexposingthedisctodirectsunlight.
• Ensurethediscisclean.Ifnecessary,cleanthediscwithaclean,dry,soft,lint-
free cloth.
• Ensurethediscisnotscratchedordamaged.
• Ensurethediscisdrywheninsertedintotheunit.
Care and Maintenance
As with all products with a chrome finish exposed to the harsh marine
environment, a little care will help preserve the finish and prevent
corrosion. FUSION recommends that you clean any salt water and/ or salt
residue from the stereo with a damp cloth soaked in fresh water.

2
REGISTER YOUR PRODUCT ONLINE:
For your own peace of mind, register your product purchase online at
www.fusionelectronics.com
We’ll keep you up to date with any news related to your product, any
software upgrades or new accessories to help you get the most from
your product.
All FUSION True Marine Products are backed by a 3 Year Limited
Consumer Warranty and by registering your product you can be assured
that if the unexpected occurs we’ll have your details and be ready to help.
RECORD YOUR PRODUCT DETAILS HERE:
MODELNUMBER DATEOFPURCHASE
AFFIXRECEIPTHERE

3
CONTENTS
USERINTERFACEANDCONTROLS .......................................... 5
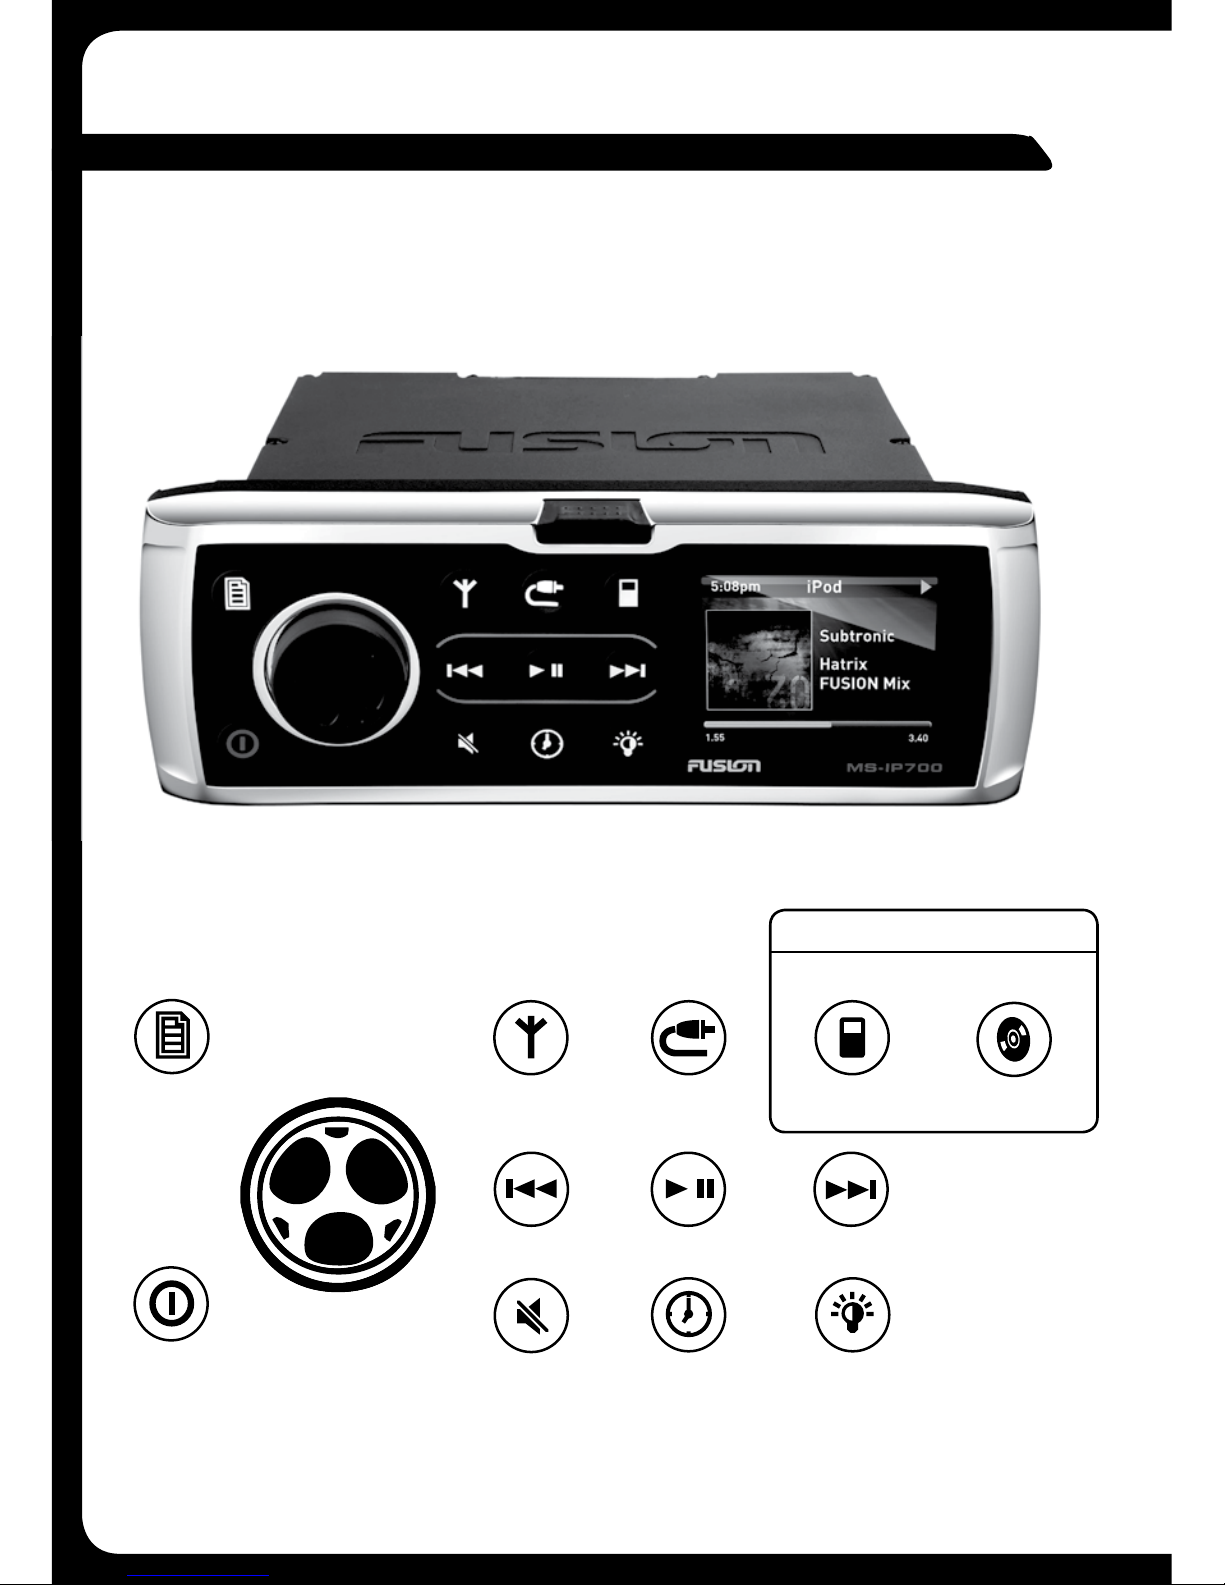
Control Panel Layout . . . . . . . . . . . . . . . . . . . . . . . . . . . . . . . . . . . . . . . . . . . . . . . . . . . . . . . 5
Button Description . . . . . . . . . . . . . . . . . . . . . . . . . . . . . . . . . . . . . . . . . . . . . . . . . . . . . . . . . 5
ROTARYENCODERANDMENUKEY......................................... 6
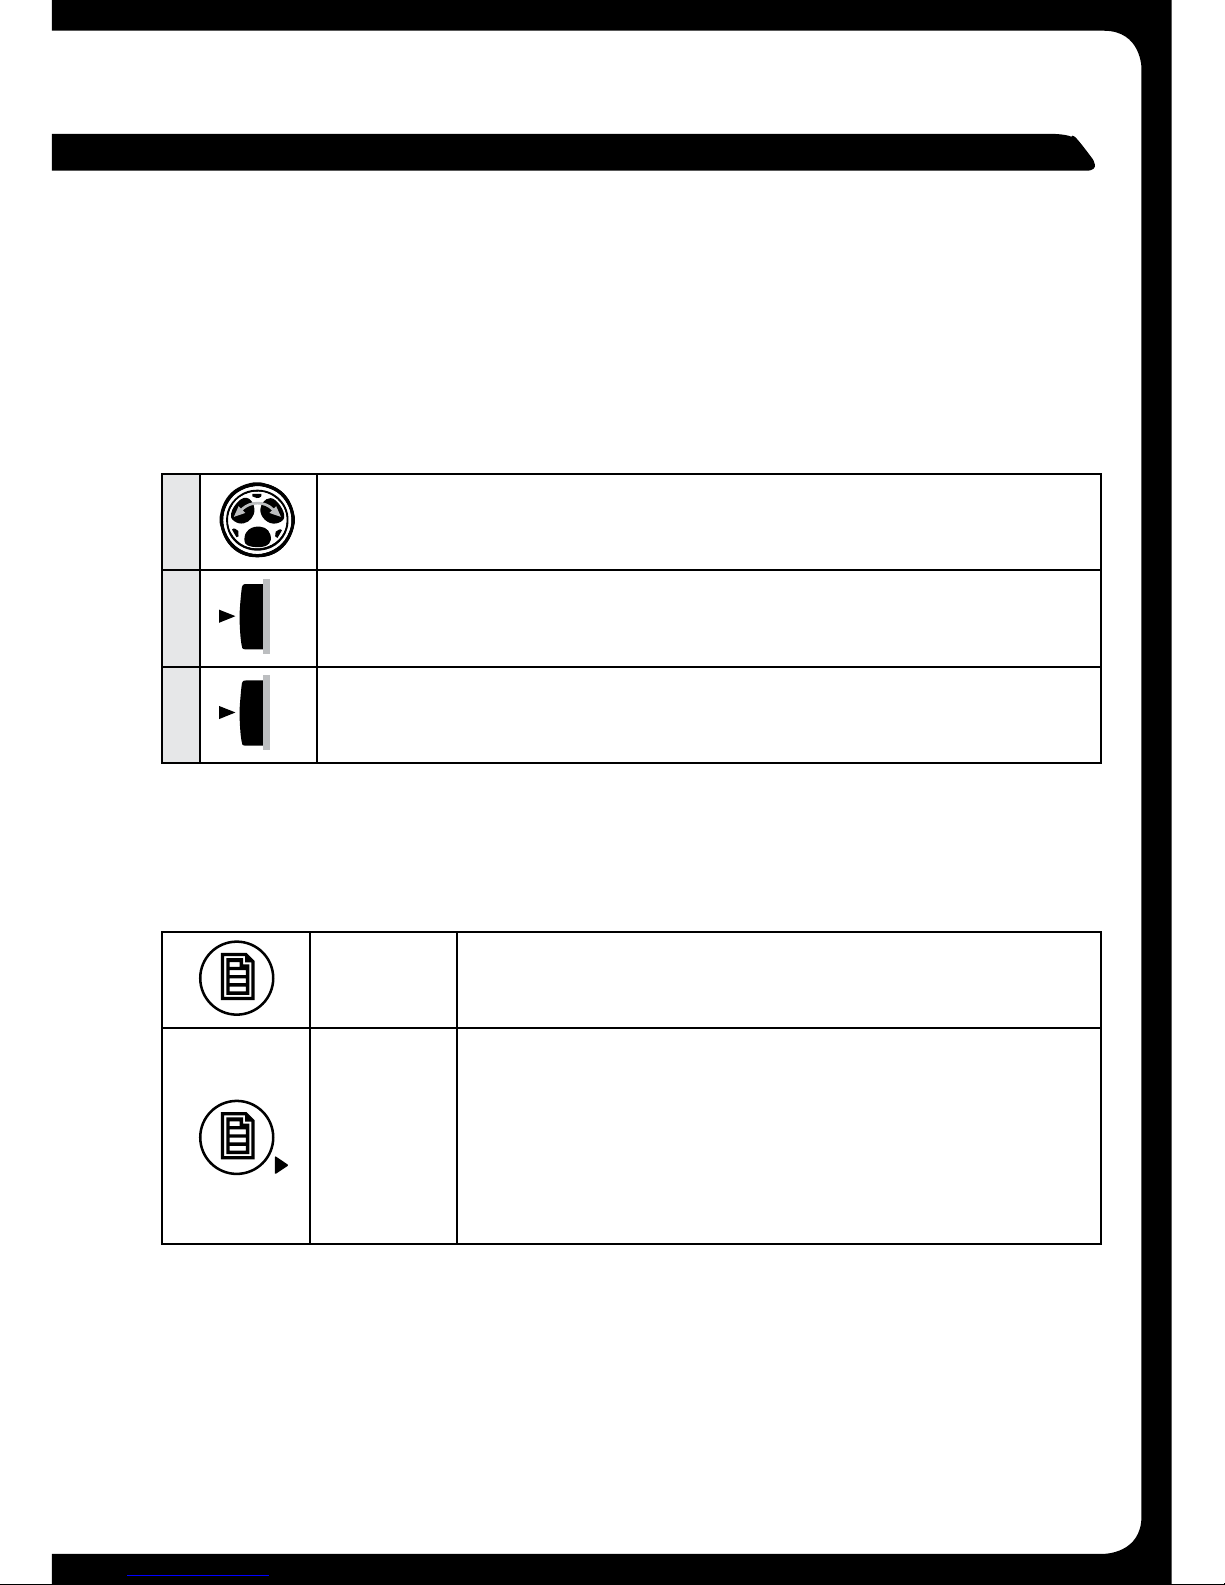
EncoderOperation . . . . . . . . . . . . . . . . . . . . . . . . . . . . . . . . . . . . . . . . . . . . . . . . . . . . . . . . . 6
MenuKeyOperation ........................................................ 6
UsingtheEncoderandMenuKey . . . . . . . . . . . . . . . . . . . . . . . . . . . . . . . . . . . . . . . . . . . . 7
GETTINGSTARTED ......................................................... 8
Powering the Unit On or Off . . . . . . . . . . . . . . . . . . . . . . . . . . . . . . . . . . . . . . . . . . . . . . . . . 8
Input Source Screens....................................................... 8
Adjusting Volume Level...................................................... 9
Muting Output ............................................................10
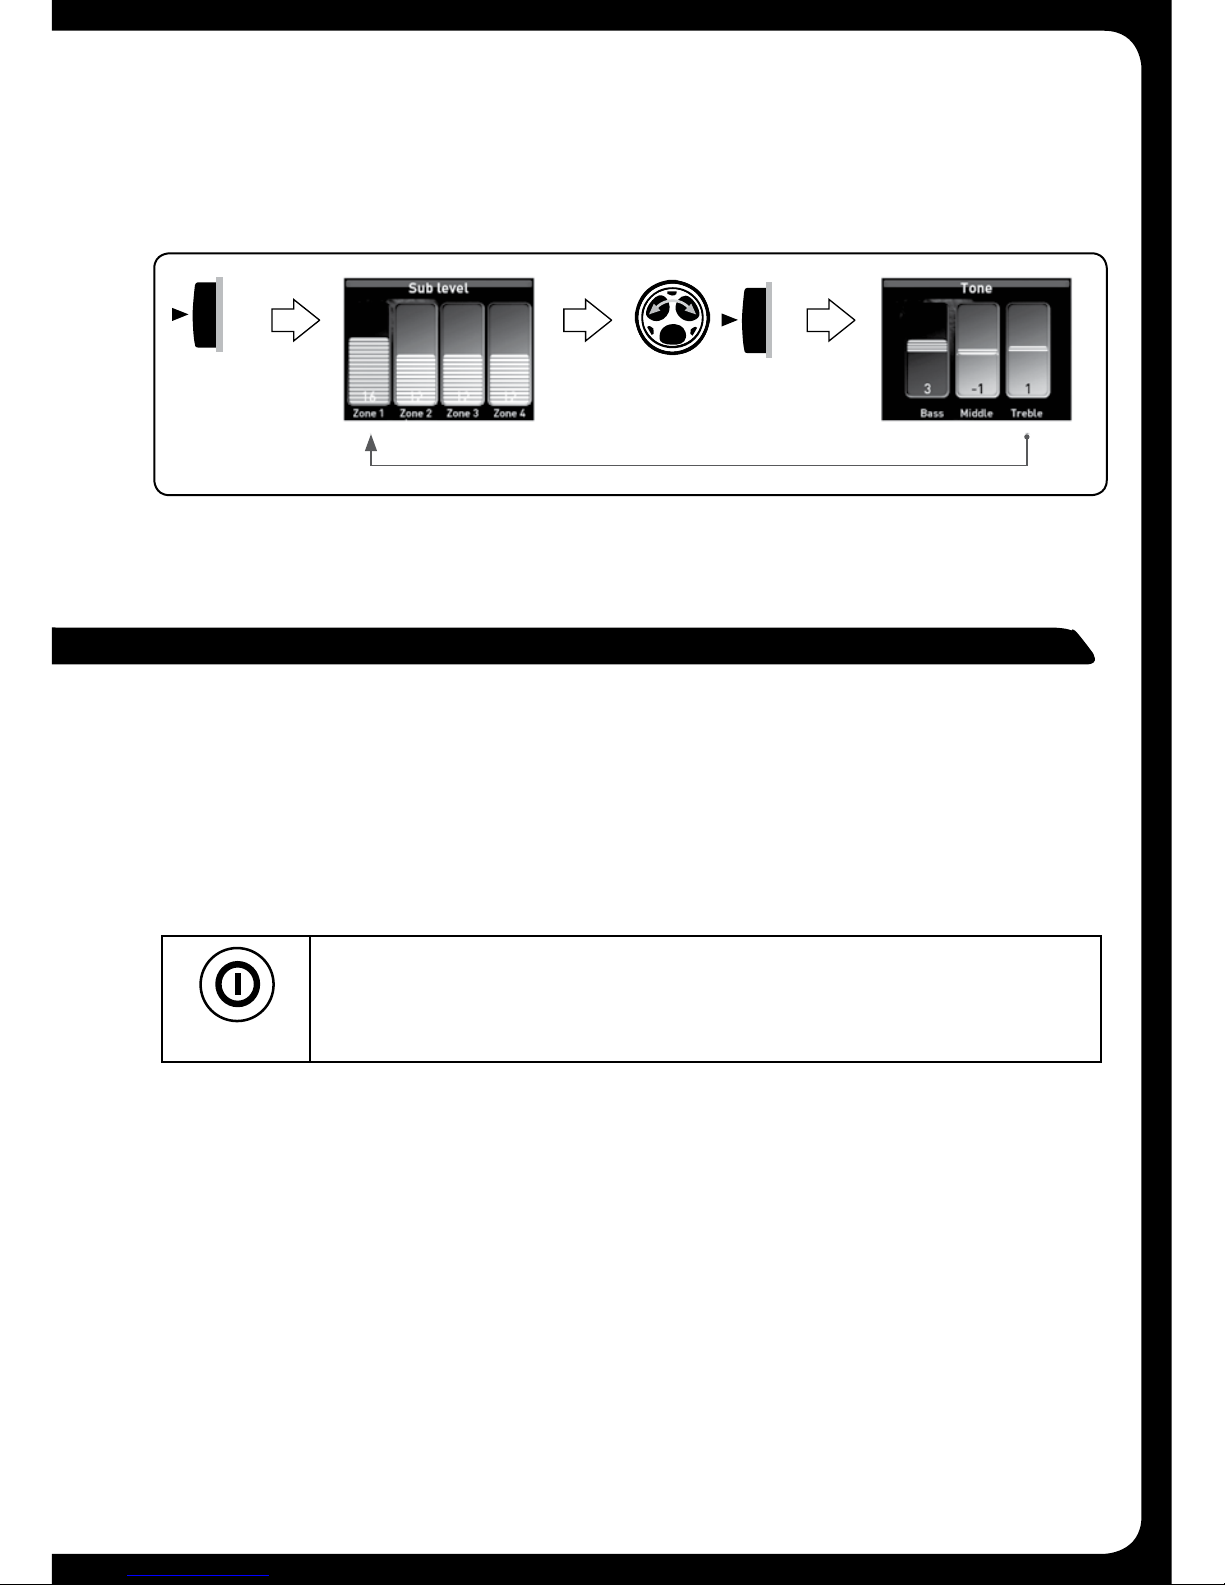
Adjusting Sub Level and Tone ...............................................11
Displaying the Clock . . . . . . . . . . . . . . . . . . . . . . . . . . . . . . . . . . . . . . . . . . . . . . . . . . . . . . . 12
Setting and Clearing the Alarm .............................................13
Adjusting Screen Brightness................................................14
TUNER...................................................................15
Listening to the Tuner......................................................15
Tuner Source Screens .....................................................15
Tuning Methods ...........................................................16
AddingandRemovingPresets . . . . . . . . . . . . . . . . . . . . . . . . . . . . . . . . . . . . . . . . . . . . . . 18
SettingupVHF............................................................19
iPod. . . . . .................................................................20
Playing Content . . . . . . . . . . . . . . . . . . . . . . . . . . . . . . . . . . . . . . . . . . . . . . . . . . . . . . . . . . . 20
iPod Source Screen . . . . . . . . . . . . . . . . . . . . . . . . . . . . . . . . . . . . . . . . . . . . . . . . . . . . . . 20
Controlling iPod Playback...................................................21
Changing iPod Settings . . . . . . . . . . . . . . . . . . . . . . . . . . . . . . . . . . . . . . . . . . . . . . . . . . . . 23
USBFLASHDRIVE ........................................................24
Listening to Your Music ....................................................24
USB Source Screen . . . . . . . . . . . . . . . . . . . . . . . . . . . . . . . . . . . . . . . . . . . . . . . . . . . . . . . 25
Controlling USB Flash Drive Playback ........................................25
Changing USB Flash Drive Settings .........................................27
AUXILIARYINPUT.........................................................28
Listening to Auxiliary Input .................................................28
Auxiliary Source Screen ................................................... 28

4
ADDITIONALFEATURES ..............................................29
FUSION-Link.........................................................29
TotalAudioControlviaNMEA2000 ....................................29
EthernetSupport ....................................................30
WiredRemote .......................................................30
Infrared(IR)Remote ..................................................31
INSTALLINGTHE700SERIES .........................................33
CONNECTIONS ......................................................35
700SereisConnectionExample . . . . . . . . . . . . . . . . . . . . . . . . . . . . . . . . . . . . . . .39
SETTINGUPTHE700SERIES.........................................40
Zones . . . . . . . . . . . . . . . . . . . . . . . . . . . . . . . . . . . . . . . . . . . . . . . . . . . . . . . . . . . . .40
Preparing for iPod or USB Input . . . . . . . . . . . . . . . . . . . . . . . . . . . . . . . . . . . . . . .43
Preparing for Auxiliary Input ...........................................47
Clock Setting ........................................................48
SiriusXMSatelliteRadio . . . . . . . . . . . . . . . . . . . . . . . . . . . . . . . . . . . . . . . . . . . . . .49
Advanced Settings . . . . . . . . . . . . . . . . . . . . . . . . . . . . . . . . . . . . . . . . . . . . . . . . . . .54
APPENDICES........................................................58
Troubleshooting ......................................................58
Support, Sales and Service ............................................62
Specifications ........................................................61
Licensing ............................................................62
Index ..............................................................63

5
USER INTERFACE AND CONTROLS
BUTTON DESCRIPTION
PRIMARY SOURCE
MS-IP700 MS-AV700
CONTROL PANEL LAYOUT
Menu
Power
Tuner
source
Rewind
Mute
Auxiliary DVD
Play/Pause
Clock
iPod
Forward
Brightness

6
ROTARY ENCODER AND MENU KEY
Although the controls of the 700 Series are designed to be intuitive to use, we
recommendthatyoufamiliarizeyourselfwiththeoperationoftheEncoderand
Menu key before using the unit.
ROTARY ENCODER OPERATION
TheEncodercanbeusedinthreewaystocontroltheoperationofthe700
Series:
MENU KEY OPERATION
You can use the Menu key to open or to exit from menus:
1
RotaryEncoderturn
2
Encoderpress
3
+1
Encoderpressandholddownforatleastonesecond
Menu key
Press the Menu key to open a menu.
Menu exit
In an open menu you can use the Menu key at any time to save
changes and exit:
• PresstheMenutoexitfromthecurrentmenulevelorcontrol
screen.
• PressandholddowntheMenukeytoexitfromthemenu
completely. Or press any other key.
Time out feature: After 10 seconds of inactivity, the menu exits
and any changes are saved automatically.

7
USING THE ROTARY ENCODER AND MENU KEY
YoucanusetheRotaryEncoderandMenukeytoadjustlevels,accessmenus
and open control screens.
Adjusting levels
UsetheEncoderandMenukeytoadjustlevelsonthe700Series.
For example, to adjust the volume level:
Accessing Menus
UsetheMenukeyandEncodertoaccessmenustochangesettings.
For example, to access the Settings menu:
Turn Encoder
to open the
Volume screen
Press Menu key
Highlight
Turn Encoder to
adjust the level.
Press Encoder to
move highlight.
Turn Encoder to
scroll the highlight.
Press Encoder to
select Settings menu.
Menu exit. See “Menu
Key Operation” on
page 6.
Menu exit. See “Menu
Key Operation” on
page 6.

8
Opening Control Screens
UsetheEncodertoopentheSubLevelandTonecontrolscreenstoadjust
levels:
Press and
hold Encoder
for at least 1
second
Turn Encoder to adjust
level. Press Encoder to
move highlight.
+1
GETTING STARTED
POWERING THE UNIT ON OR OFF
When you power on the 700 Series it will automatically start playing music
from the most recently selected input source.
To power the unit on or off.
INPUT SOURCE SCREENS
The 700 Series supports a wide range of input source types,
depending on model:
• MS-IP700.AM/FM/VHF/SiriusXM;USBandiPod/iPhoneviainternal
dock;auxiliary
• MS-AV700.AM/FM/VHF/SiriusXM;CD/DVD;USBandiPod/iPhonevia
externaldockorcable;auxiliary.
Power
• MomentarilypressthePowerkeytopowerontheunit.Astheunitstarts
up, a splash screen is displayed for several seconds, followed by the current
input source.
• Whentheunitison,momentarilypressthePowerkeytopowerofftheunit.

9
BothmodelsarealsoSiriusXM-Ready(USAonly)requiresoptionalSiriusXM
Connect Vehicle Tuner. For further details of setting up SiriusXM options see
“SiriusXMSatelliteRadio”onpage49.
When you select one of these sources, the 700 Series displays a source
screen, similar to the AM source screen shown in Figure 1 below. The title bar
always shows the current time and source name. Other information varies
depending on the source type you have selected.
ADJUSTING VOLUME LEVEL
The 700 Series allows you to control speaker output volume level in up to four
namedareascalledZones.Note:Zone3and4requireadditionalamplication.
If you wish, you can customize the settings for each Zone by defining a volume
limit, a balance setting, a sub-woofer level and a personalized name (such as
“Saloon”or“Galley”).Forfurtherdetailssee“Zones”onpage40.

10
Mute
• PresstheMutekeytomutetheaudiooutput.TheMuteiconisdisplayed
over the top of the current input source screen.
• PresstheMutekeyagaintounmutetheaudiooutput.Thevolumecontinues
at the previously set level.
To adjust the volume level:
1. TurntheEncoder.
• TheVolumescreenisdisplayedwiththeCurrentZoneSelection
Highlighted(rememberedfromprevioususe).
• ThevolumeisadjustedinthehighlightedZone(orZones)only.
2. Ifrequired,presstheEncodertohighlightthenextZonetoadjustits
volume level.
WhiletheVolumescreenisdisplayed,eachpressoftheEncoderwill
highlight available Zones in the following order:
3. Whennished,presstheMenukey(orleavetotimeout)tosavethe
current volume level and exit.
MUTING OUTPUT
To mute and unmute the volume:
Zone 1 Zone 4Zone 2 All ZonesZone 3

11
ADJUSTING SUB-WOOFER LEVEL AND TONE
Use the Sub level and Tone screens to set the sub-woofer levels and tone.
Sub-woofer level can be adjusted for each Zone individually, but tone
adjustments affect all Zones.
Menu key Encoder
To set sub-woofer levels or tone:
1. PressandholddowntheEncoderforatleastonesecond.TheSublevel
screen is displayed.
2. TurntheEncodertoadjustthesub-wooferlevelforthehighlightedZone,as
required.
3. PresstheEncodertohighlightthenextZone,andadjustasrequired.When
you presstheEncoderinthelastZone,theTonescreenisdisplayed.

12
DISPLAYING THE CLOCK
Use the Clock key to display the current time. If the time is incorrect, see
“Clock Setting”onpage48.
Note: The current time is also displayed in the title bar of each
input source screen.
Clock
• PresstheClockkeytodisplaythecurrenttime
4. TurntheEncodertoleftorrighttoadjusttheBasslevel,ifrequired.
5. PresstheEncodertohighlighteachtonecontrol,andadjustasrequired.
When youpresstheEncoderontheTrebletonecontrol,theSublevel
screen is displayed again.
6. Press any key to exit

13
SETTING AND CLEARING THE ALARM
Use alarm mode to turn on the 700 Series at a pre-defined time.
When the alarm is activated, your 700 Series will play the last selected input
source at the volume level in use when the unit was turned off.
Menu key Encoder
To set the alarm:
1. Press the Menu key.
2. TurnandthenpresstheRotaryEncodertoselectSettings > Clock > Set
alarm.
3. Do one or both of the following:
• TurntheRotaryEncodertochangethehoursetting.
• PresstheRotaryEncodertomovetotheminuteseld.Adjusttheminutes
settingasrequired.
• PresstheRotaryEncodertomovetotheAM/PMeld(ifenabled).Turn
encoder to select AM or PM.
4. Press the Menu key to save the time settings and exit (the time out feature does
notoperatehere).
5. HighlighttheAlarm enabledcheckboxandpresstheEncodertoenableit().
6. Press any key to exit
To clear the alarm:
1. Press the Menu key.
2. TurnandthenpresstheRotaryEncodertoselectSettings>Clock.
3. HighlighttheAlarmenabledcheckboxandpresstheRotaryEncodertodisable
it().
4. Press any key to exit

14
Brightness
To adjust the brightness of the display screen:
1. Press the Brightness key. The Brightness screen is displayed.
2. TurntheRotaryEncodertoadjustthebrightnesssetting.
3. Press any key to exit
ADJUSTING SCREEN BRIGHTNESS
Note: LCD and button backlight brightness can be linked to the
ambient lighting level. For further details, see “Installing the 700
Series” on page 33.

15
Tuner
• PresstheTunerkeytoselectinputfromeachofthefollowing
in turn: AM, FM, VHF or SiriusXM-Ready (USA only) requires
optional SiriusXM Connect Vehicle Tuner. The applicable input
source screen is displayed for each band.
Figure 2 – Example AM band input source screen
TUNER
LISTENING TO THE TUNER
To select one of the available tuner bands:
TUNER SOURCE SCREENS
AM/FM/VHF
An example of a typical tuner input source screen is shown in Figure 2 below.

16
Figure 3 – Example SiriusXM input source screen
SiriusXM
An example of the SiriusXM input source screen is shown in Figure 3 below.
TUNING METHODS
You can use three methods to tune the 700 Series: manual, automatic and
preset.
To tune to a required frequency, channel or preset:
Press the Play / Pause key to step through the available tuning methods for
each band:
Note: Preset function only available if 2 or more presets are saved
Encoder Menu key
Play /
Pause
Rewind Fast
Forward

17
Tuning
Method
Applies
to…
When tuning with this method…
Manual All bands • PresstheForwardorBackwardkeytostepthrough
therangeoffrequenciesorchannelsoneatatime.
• Pressandholddownthekeyforrapidscanningof
frequenciesorchannels.
Manual SiriusXM • PresstheForwardorBackwardkeytostepthrough
all channels one at a time.
Category SiriusXM • PressthePlay/Pause,ForwardorBackwardkeyto
step through the channels in the selected category.
• Onlyavailablewhenacategoryisselectedinthe
Category menu item. For further details see
“Category”onpage51.
Auto AM/FM • PresstheForwardorBackwardkeytostart
searching for available stations.
• PressthePlay/Pause,ForwardorBackwardkeyto
stop the search.
Scan VHF • Scansthroughpresetchannels,pausingona
channel while it is transmitting.
• Onlyavailableiftherearetwoormorepresets
saved.
• Ifthereisanybackgroundnoise,thescanwillstop.
For further details see “Minimizing background
noise”onpage19.
• PressthePlay/Pause,ForwardorBackwardkeyto
turn scan mode off. For further details see “Turning
scanmodeon”onpage19.
NOTE: The Scan function is activated from the
settings menu, see ‘Setting up VHF’
Preset All bands • PresstheForwardorBackwardkeytostepthrough
available presets.
• Onlyavailableiftherearetwoormorepresets
saved.
• Totunetoaspecicpreset:
a. Press the Menu key, and then press the
EncodertoselectPresets.
b.TurntheEncodertohighlighttherequired
preset.
c.PresstheEncodertotunetothehighlighted
preset.
Forfurtherdetails,see“AddingandRemovingPresets”
on page 18.

18
ADDING AND REMOVING PRESETS
The700SeriesallowsyoutosetupyourfavoriteAM/FMstations,VHFor
SiriusXM channels as presets for easy recall.
Note: Up to 15 presets can be stored for each radio band.
To add a new preset:
Do one of the following.
1. Tunethe700Seriestotherequiredfrequencyorchannel.
2. PressandholddownthePlay/Pausekey.Themessage:“Presetsaved”is
displayed briefly.
or
1. Press the Menu key.
2. TurnandthenpresstheEncodertoselectPresets > Save current. The
message:“Presetsaved”isdisplayedbriey.
To remove one or more presets:
1. Press the Menu key.
2. TurnandthenpresstheEncodertoselectPresets > Remove presets.
3. Do one of the following (there is no warning or confirmation prompt before
deletion):
• SelectRemove all presetsandpresstheEncodertoremoveall
current presets.
• SelectapresetandpresstheEncodertoremovetheselectedpreset.
4. Press any key to exit
Encoder Menu key
Play /
Pause
Rewind Fast
Forward
Tuner

19
SETTING UP VHF
Note:AmarineFMantennaisrequiredforVHFreception,DONOTconnect
toaVHFsplitter.
Minimizing background noise
UsetheSquelchfeaturetoreducebackgroundnoiseonVHFinput.Selecta
VHFchannel,andthenadjustthesquelchcontrolwhilethereisnothingbeing
transmitted on the channel.
To set the squelch level:
1. Press the Menu key.
2. TurnandthenpresstheEncodertoselectSquelch.
3. TurntheEncodertoadjustthesquelchlevel:
• Increasethesquelchleveluntilthebackgroundnoiseismuted.
• Reducethesquelchleveliftheaudiotransmissionisnotheard.
4. Press any key to exit
Turning scan mode on
Scanmodeallowsthe700SeriestoscanthroughpresetVHFchannels,
looking for active channels.
Note: If the Squelch level is adjusted so that you can hear a constant
hissing sound, the unit will not scan correctly. To correct this, see
“Minimizing background noise”, above.
To turn scan mode on:
1. Press the Menu key.
2.TurntheEncodertohighlighttheScan menu item.
3.PresstheEncodertoselectthecheckbox().Scanmodeisturnedon
and the menu exits automatically.
Note: Pressing the Play / Pause, Forward or Rewind key turns scan
mode off.
Other manuals for MS-IP700
1
This manual suits for next models
1
Table of contents
Other Fusion Entertainment System manuals