FUST NOVAMATIC NM 2830 User manual

NOVAMATIC NM 2830
FREIARM-NUTZSTICH-NÄHMASCHINE
BEDIENUNGSANLEITUNG
Vor Inbetriebnahme der Nähmaschine bitte diese Anleitung vollständig lesen!
MACHINE A COUDRE AVEC BRAS LIBRE
MODE D'EMPLOI
Veuillez lire attentivement les présentes instructions avant de mettre cette machine à coudre en service!
MACCHINA PER CUCIRE A BRACCIO LIBERO
ISTRUZIONI PER L'USO
Prima di utilizzare la macchina per cucire, leggere attentamente le presenti avvertenze!
SEWING MACHINE WITH FREE ARM
INSTRUCTION MANUAL
Please read the complete instruction manual bevor using the sewing machine!
NM2830d 29/3/07 12:03 PM Page 1

IMPORTANT SAFETY INSTRUCTIONS
The following safety instructions should always be observed, whenever an electric sewing machine is used.
Read the instruction manual before using the sewing machine for the first time. This sewing machine is intended
only for household use.
Danger
–reduce the risk of electric shocks.
Never leave the sewing machine unattended while it is plugged in. Always unplug the appliance immediately after
use and before cleaning.
WARNING: reduce the risk of burns, fire, electric shocks or injuries.
1. Never use the sewing machine as a toy. Close attention is necessary when the appliance is used near
children. Always pull the plug before leaving the sewing machine unattended, or a child might switch it on and
hurt itself.
2. Use the sewing machine only for its inteded use as described in this manual and only use accessories that
are explicitly recommended by the manufacturer.
3. Never operate this appliance with a damaged cord or plug, if it is not working properly, if it has been dropped
on the floor or into water. In theses cases bring the sewing machine to the nearest authorized dealer for
repair.
4. Always check that the ventilation openings of the sewing machine are not blocked. Keep the ventilation
openings of the sewing machine and the foot controller free from accumulation of lint and dust.
5. Never insert any object whatsoever into one of the openings of the appliance.
6. Do not use this sewing machine outdoors.
7. Do not use this sewing machine in places where volatile or easily inflammable substances are used.
8. Do not unplug the appliance by pulling the cable. Always hold the plug itself and pull.
9. Keep fingers away from movable parts. Special care is required around the sewing needle.
10. Always use the correct needle plate. The wrong needle plate can cause the needle to break.
11. Do not use bent or blunt needles.
12. Never pull or push the fabric while sewing, the needle could be bent or broken and might even hurt you.
13. Always unplug the sewing machine when making any adjustments in the needle area, such as threading the
needle, changing the needle, threading the bobbin or changing the presser foot.
14. Always unplug the sewing machine before replacing the bulb and cleaning the sewing machine. Also unplug
the appliance before replacing any parts of the machine such as the needle, the presser foot, the presser foot
holder, the needle plate, etc. This way you can avoid painful injuries. Only turn the hand wheel during the
mentioned adjustments when absolutely necessary to avoid injuries.
15. Keep the electric cord away from the needle. Should the needle prick the cord you could suffer a dangerous
electric shock.
16. Never repair the appliance yourself, always take it to the nearest repair service et have it examined. No
liability will be assumed for damages that are caused by unappropriate treatment.
Caution: Unappropriate treatment can cause grave dangers for the user.
KEEP THIS INSTRUCTION MANUAL!
NM 2830 e - 2 -
NM2830e 29/3/07 12:05 PM Page 2

NM 2830 e - 3 -
INDEX
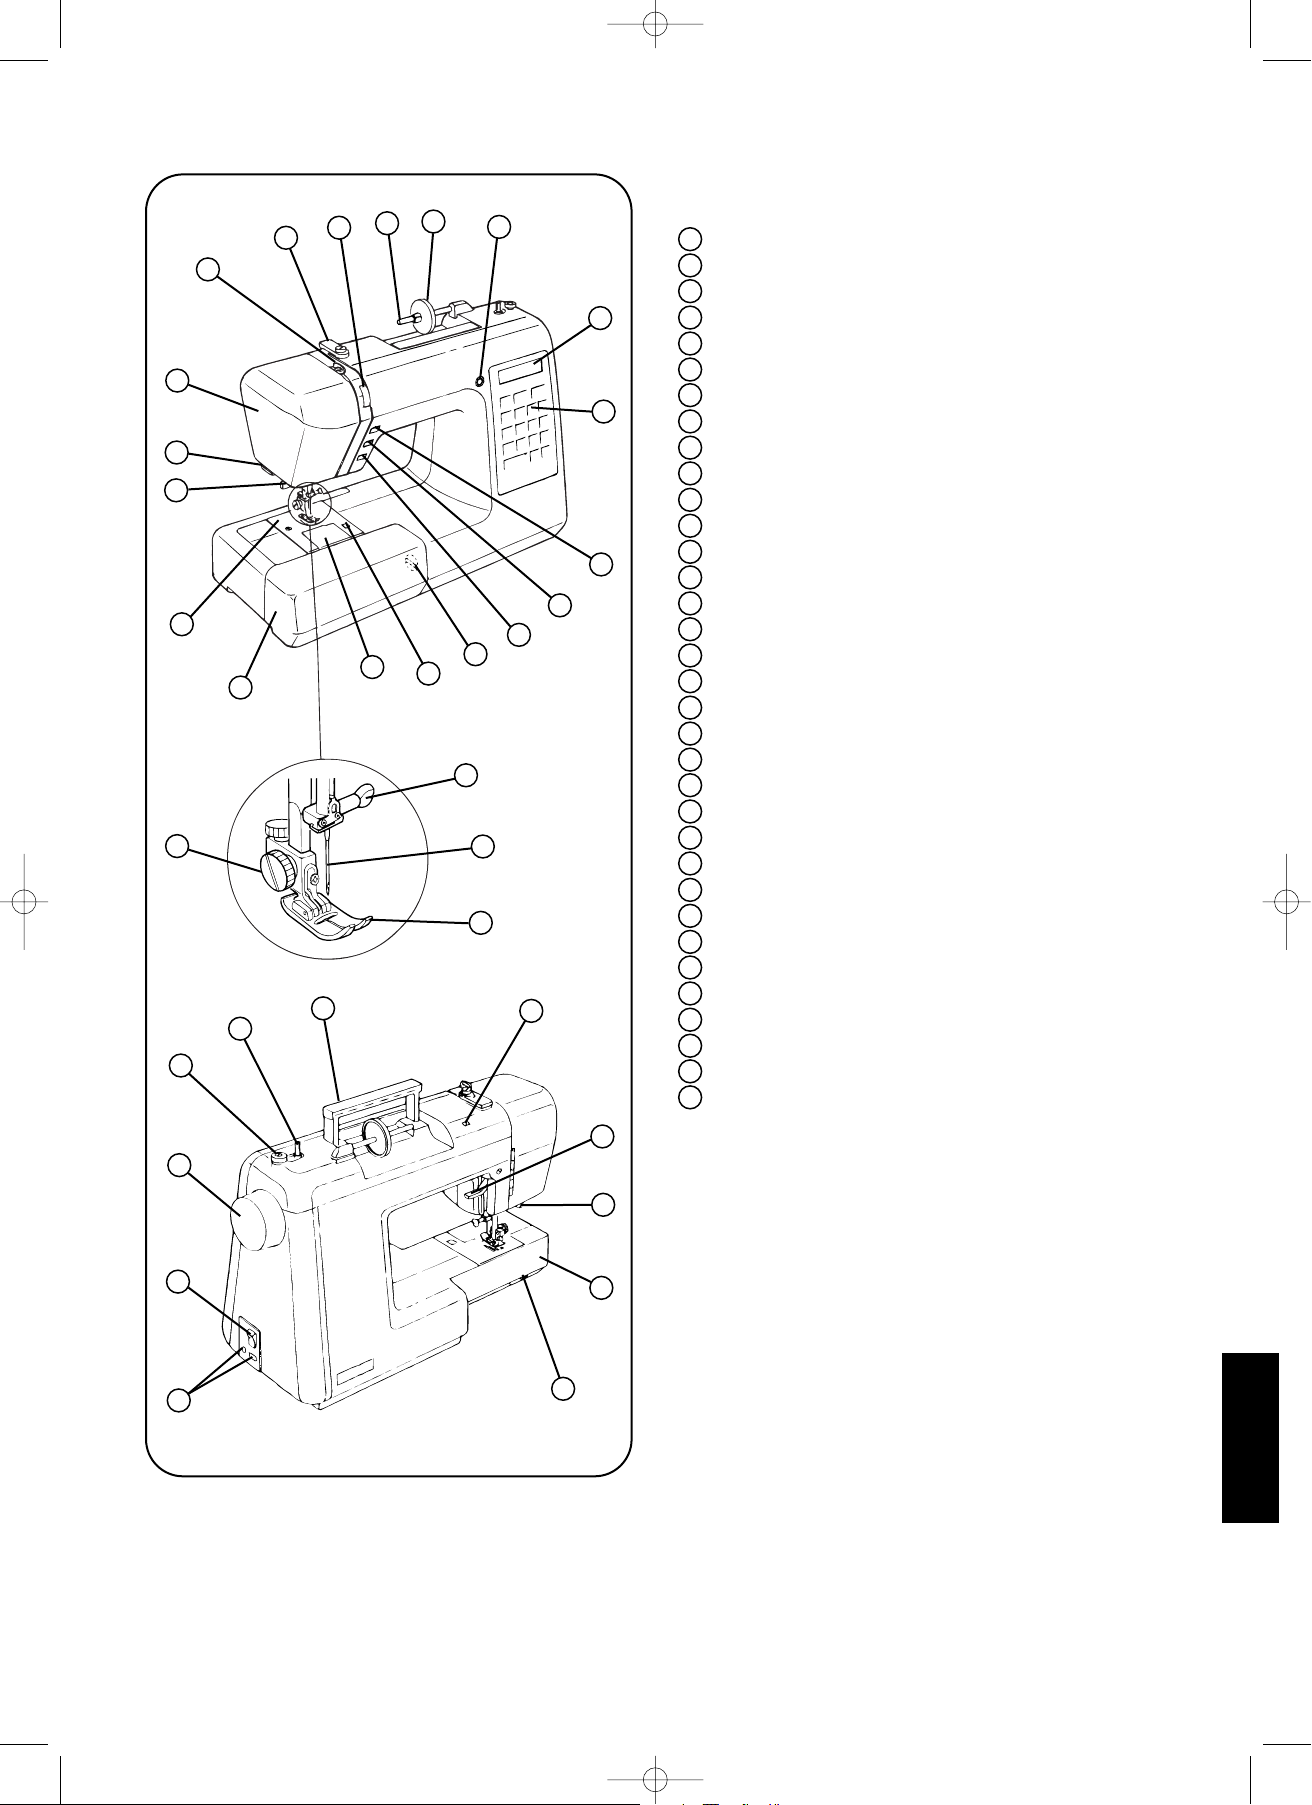
Names of parts..................................................................................................................................................... 5
Accessories........................................................................................................................................................... 6
Extension table with accessory box...................................................................................................................... 7
Electric connection................................................................................................................................................ 8
Foot controller....................................................................................................................................................... 8
Sewing light.......................................................................................................................................................... 9
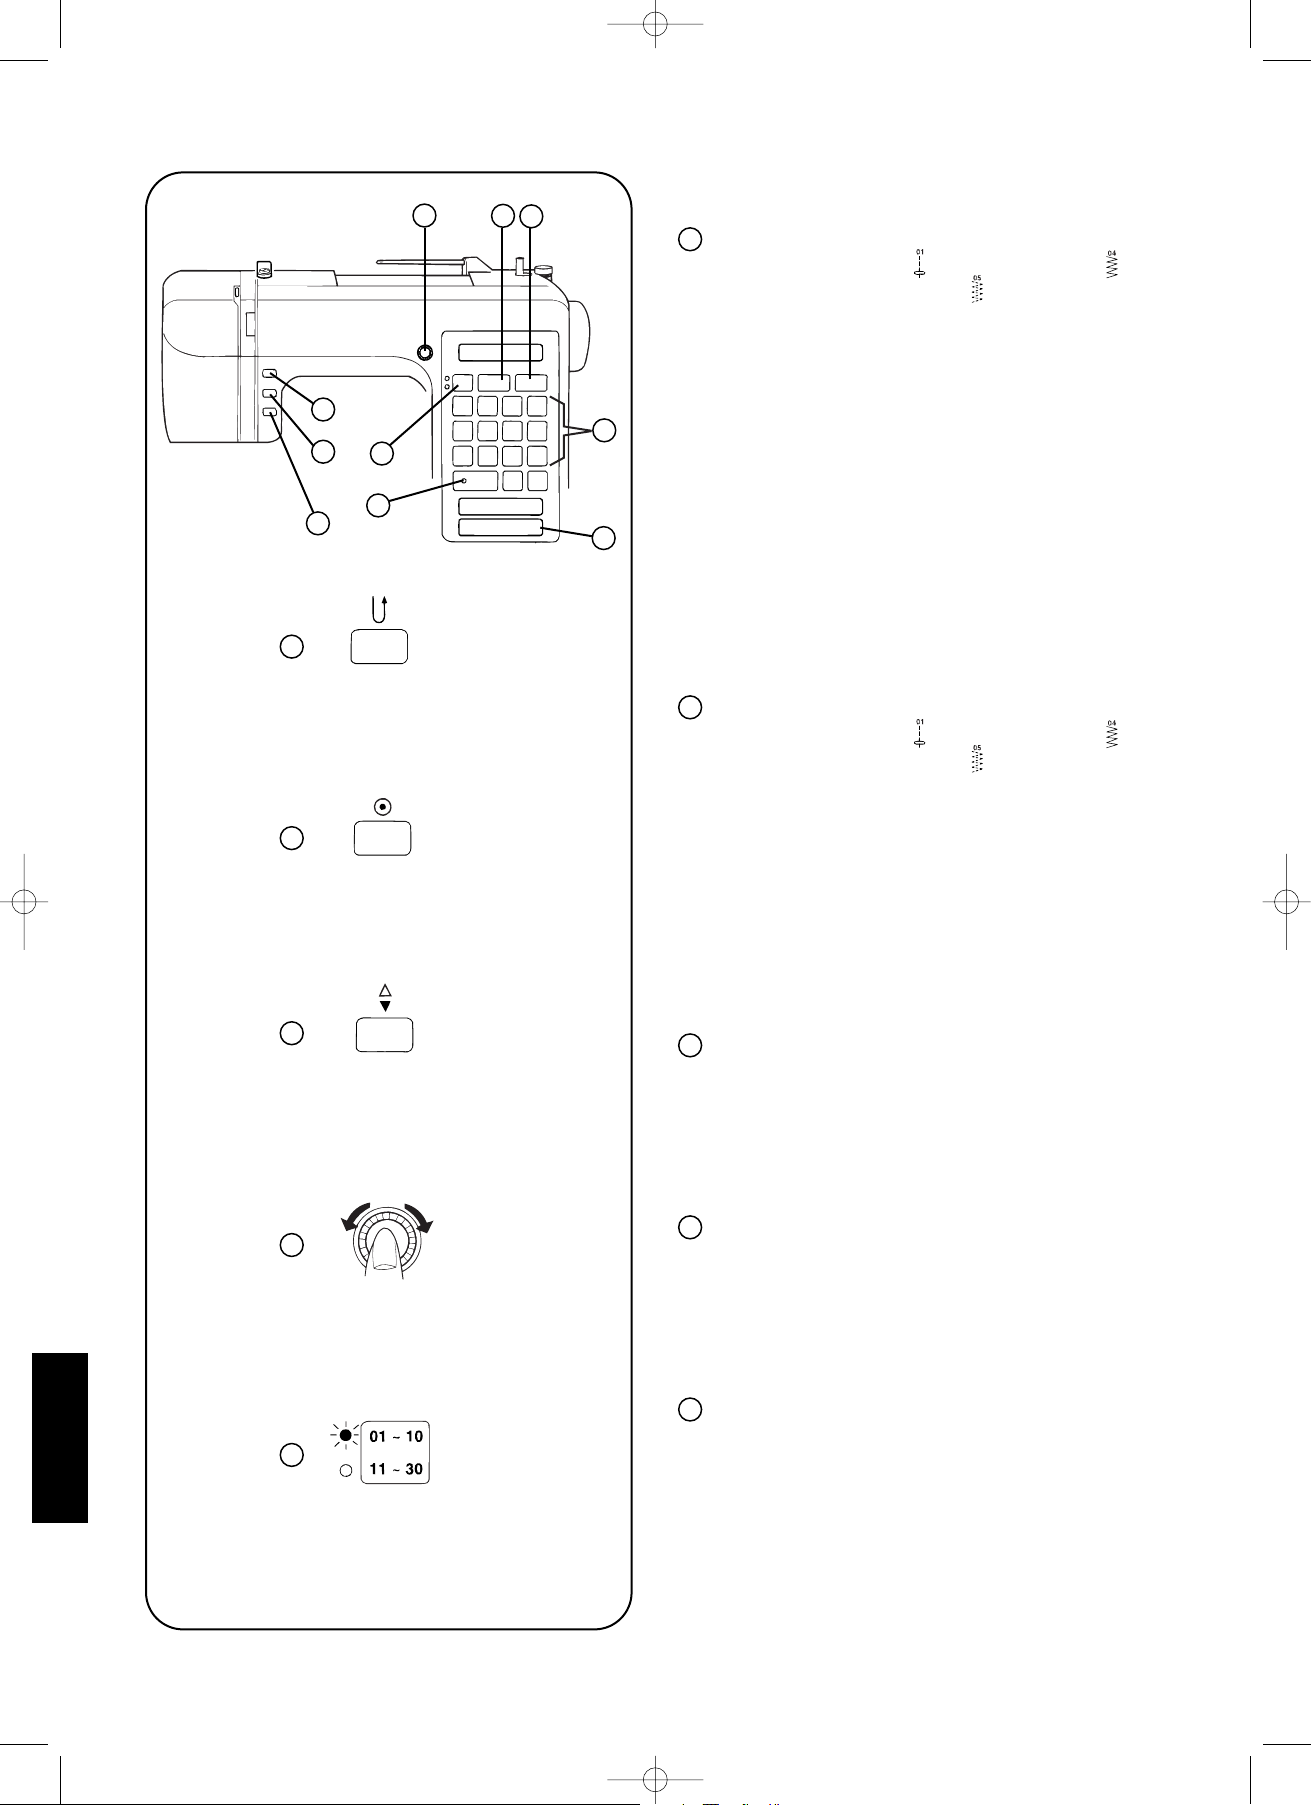
Function keys........................................................................................................................................................ 10
Selection of the stitch pattern and indication........................................................................................................ 12
Presser foot lever.................................................................................................................................................. 13
Adjusting the pressure of the presser foot........................................................................................................... 13
Raise and drop the feed dogs.............................................................................................................................. 13
Replacing the needle............................................................................................................................................ 14
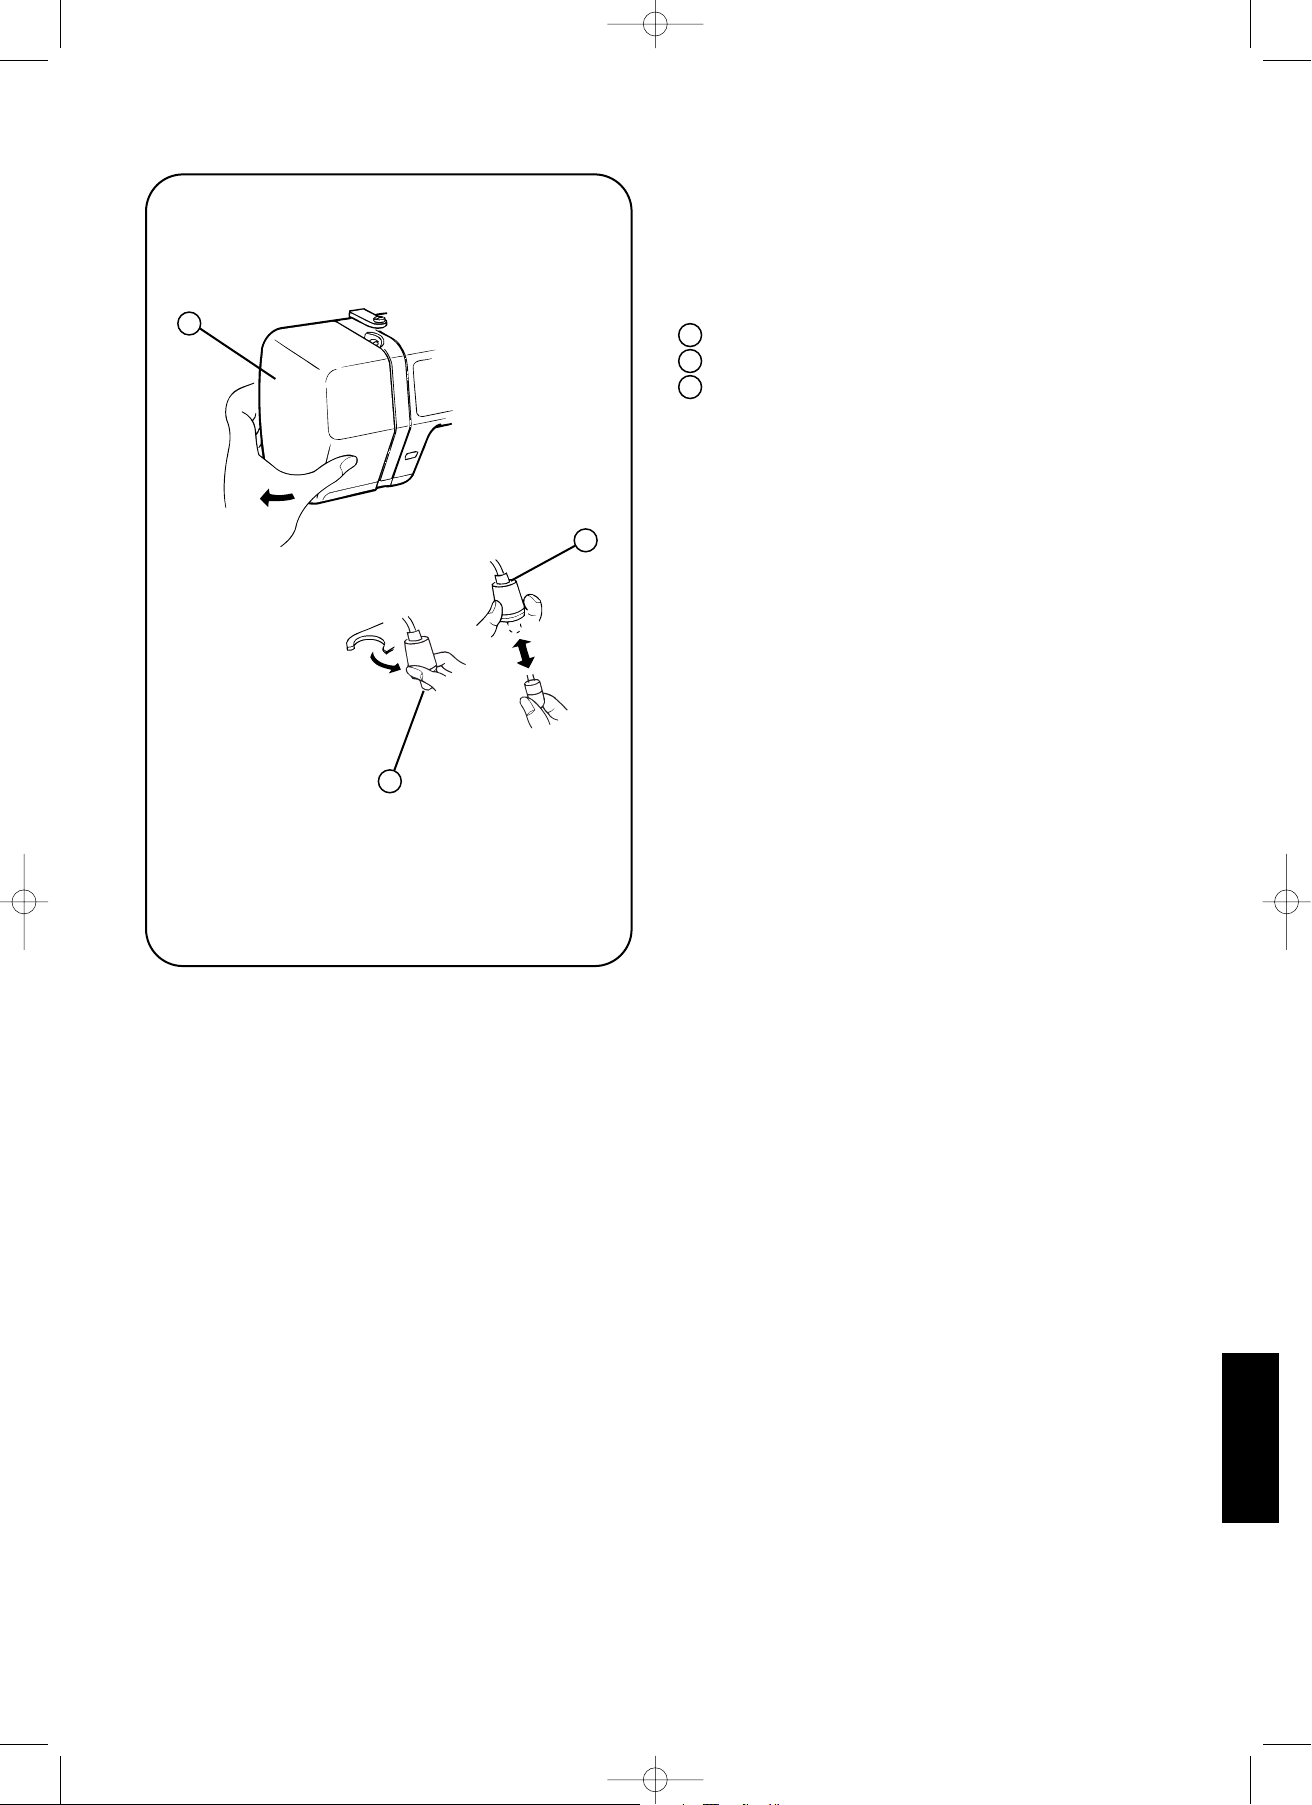
Replacing the presser foot.................................................................................................................................... 14
Attaching and removing the presser foot holder................................................................................................... 15
Thread and needle chart...................................................................................................................................... 16
Winding the bobbin............................................................................................................................................... 17
Removing and inserting the bobbin...................................................................................................................... 18
Threading the sewing machine............................................................................................................................. 19
Needle threader.................................................................................................................................................... 20
Drawing up the bobbin thread.............................................................................................................................. 21
Basic sewing and utility stitches
Starting to sew...................................................................................................................................................... 22
Finishing and locking a seam............................................................................................................................... 22
Changing sewing direction................................................................................................................................... 23
Seam allowance lines........................................................................................................................................... 23
Adjusting the stitch length manually..................................................................................................................... 24
Variable needle positions...................................................................................................................................... 24
Adjusting the top thread tension........................................................................................................................... 25
Adjusting the feed balance for stretch stitch patterns.......................................................................................... 26
Variations of straight stitching
Straight stitch........................................................................................................................................................ 27
Locked straight stitch............................................................................................................................................ 27
Triple stretch stitch................................................................................................................................................ 27
Simple stretch stitch............................................................................................................................................. 27
Saddle stitch......................................................................................................................................................... 27
Zigzag stitch.......................................................................................................................................................... 28
Securing the fabric edges
Zigzag stitch.......................................................................................................................................................... 29
Elastic zigzag stitch.............................................................................................................................................. 29
Overcast stitch...................................................................................................................................................... 29
Elastic pine leaf stitch........................................................................................................................................... 29
NM2830e 29/3/07 12:05 PM Page 3

NM 2830 e - 4 -
INDEX
Buttonholes
Automatic buttonholes.......................................................................................................................................... 30
Rounded buttonholes and keyhole buttonholes................................................................................................... 33
Corded buttonholes.............................................................................................................................................. 34
Attaching buttons.................................................................................................................................................. 35
Sewing a covered zipper...................................................................................................................................... 36
Blind hem............................................................................................................................................................. 38
Rolled hem........................................................................................................................................................... 39
Shell stitch............................................................................................................................................................ 40
Smocking stitch.................................................................................................................................................... 40
Satin stitches........................................................................................................................................................ 41
Sewing decorative hems...................................................................................................................................... 41
Appliqué................................................................................................................................................................ 42
Patchwork............................................................................................................................................................. 42
Fagoting stitch...................................................................................................................................................... 43
Drawn work........................................................................................................................................................... 43
Cross stitch embroidery........................................................................................................................................ 44
Quilting.................................................................................................................................................................. 44
Attaching an elastic band..................................................................................................................................... 45
Cording................................................................................................................................................................. 45
Memorizing stitch patterns.................................................................................................................................... 46
Patching................................................................................................................................................................ 47
Messages on the LCD screen.............................................................................................................................. 47
Maintenance of the machine and problems
Cleaning the hook race........................................................................................................................................ 48
Trouble-shooting................................................................................................................................................... 49
NM2830e 29/3/07 12:05 PM Page 4

NM 2830 e - 5 -
NAMES OF PARTS
1LCD screen
2Function keys
3Needle position key
4Auto-lock key
5Reverse key
6Feed balancing dial
7Hook cover plate release button
8Hook cover plate
9Extension table with accessory box
10 Needle plate
11 Needle threader
12 Thread cutter
13 Face cover plate
14 Thread lever
15 Upper thread guide
16 Top thread tension dial
17 Thread spool pin
18 Spool holder
19 Screen sharpness adjusting knob
20 Needle clamp screw
21 Needle
22 Presser foot
23 Presser foot holder
24 Opening for additional spool pin
25 Presser foot lever
26 Buttonhole lever
27 Free arm
28 Feed dog position button
29 Machine sockets
30 Power switch
31 Hand wheel
32 Bobbin winder stopper
33 Bobbin winder
34 Carrying handle
1
2
3
4
5
6
7
8
9
10
11
12
13
14
15 16 17 18 19
20
21
22
23
24
25
26
27
28
29
30
31
32
33
34
NM2830e 29/3/07 12:05 PM Page 5

NM 2830 e - 6 -
ACCESSORIES
1A: zigzag foot
2C: overedge foot
3D: hemmer foot
4E: zipper foot
5F: satin stitch foot
6G: blind hemmer foot
7H: cording foot
8R: buttonhole foot
94bobbins
10 Screwdriver
11 Lint brush
12 Set of needles
13 Seam ripper
14 Spool holder (large)
15 Spool holder (small)
16 Spool stand
17 Additional spool pin
18 Quilter
19 Spool pin felt
1 2 3 4
5 6 7
8 9
10 11
12 13
14 15 16
17 18 19
NM2830e 29/3/07 12:05 PM Page 6

NM 2830 e - 7 -
EXTENSION TABLE WITH
ACCESSORY BOX
This sewing machine has an extension table which
enlarges the sewing surface.
1extension table
2pin
3opening
FREE ARM SEWING
Remove the extension table by holding the extension
table and pulling it away from the sewing machine.
Advantages of free arm sewing:
-Prevents the fabric from getting entangled in the
needle when reinforcing pockets or waistbands.
-Simplifies sewing sleeves, waistbands,
trouser-legs and all other tubular garments.
-Toreinforce the seats of trousers and children's
clothes.
REINSERT THE EXTENSION TABLE
Insert the extension table by pushing the table on to
the free arm until it engages.
1
2
3
NM2830e 29/3/07 12:05 PM Page 7

NM 2830 e - 8 -
ELECTRIC CONNECTION
1power switch
2machine plugs
3power supply plug
4machine sockets
Before connecting the sewing machine to a socket,
please verify that the tension of the sewing machine
corresponds to your power supply.
(220-240 V / 50 Hz)
Switch the sewing machine off using the power switch
1.
Put the machine plugs 2into the machine sockets
4.
Plug the power supply plug 3into a suitable power
supply socket.
Use the power switch to switch on the sewing
machine. The light is switched on as soon as the
sewing machine is switched on and a beep is emitted.
FOR YOUR SAFETY
Always keep an eye on the sewing area while the
sewing machine is switched on and do not touch any
moving parts, e.g. the thread lever, the hand wheel or
the needle.
Always switch offand unplug the sewing machine
when leaving the machine unattended, to attach or
remove parts and for cleaning.
FOOT CONTROLLER
Sewing speed can be controlled by the foot controller.
The further you push the foot controller downwards
the faster the sewing machine will sew.
1
2
3
4
NM2830e 29/3/07 12:05 PM Page 8

NM 2830 e - 9 -
SEWING LIGHT
The sewing light is located behind the face cover
plate and is switched on when the sewing machine is
switched on.
1face cover plate
2light bulb
3bulb holder
REPLACING THE LIGHT BULB
Replace the light bulb when necessary. Always switch
off and unplug the sewing machine before replacing
the light bulb. New light bulbs are obtainable at your
dealers.
Pull the plug out of the socket and open the face
cover plate.
Remove the light bulb by pulling it carefully
downwards.
The used light bulbs are disposable with the houshold
litter.
Insert the new light bulb into the holder and push it up
as far as possible.
3
2
1
NM2830e 29/3/07 12:05 PM Page 9

FUNCTION KEYS
1Reverse key
For the straight stitch , the zigzag stitch
and the elastic zigzag stitch :
The machine sews backwards until you release
the reverse key.
For utility and decorative stiches:
Press the reverse key once and the machine will
automatically sew a few stitches in reverse.
2Auto-Lock key
For the straight stitch , the zigzag stitch
and the elastic zigzag stitch :
The machine sews a few stitches in place and
stop automatically.
For utility and decorative stitches:
Press this key during sewing and the sewing
machine will finish the pattern and then sew a few
stitches in place and stop automatically.
3Needle position key
Press this key to raise or lower the needle. The
needle will go up or down according to its initial
position and a beep is emitted.
4Screen sharpness adjusting dial
Turn this dial to adjust the sharpness of the LCD
screen, e.g. if the screen stays dark after
switching on the sewing machine.
5Mode key
Press this key to select one of the stitches 1-10 or
one of the stitches 11-30. The corresponding light
indicates which group of stitches is selected.
The buttonhole stitches BH1, BH2 and BH3 can
be selected directly in both modes.
NM 2830 e - 10 -
9
10
47
3
2
1
5
8
6
1
2
3
4
5
NM2830e 29/3/07 12:05 PM Page 10

NM 2830 e - 11 -
FUNCTION KEYS (CONTINUED)
6Stitch width key
The selected stitch width and stitch length are
indicated on the screen when the stitch width key
or the stitch length key are pressed.
Press the "+"-side of the key to increase the stitch
width and the "-"-side of the key to reduce the
stitch width.
For the stitches , , and it is possible
to change the needle position using this key. (See
page 24)
7Stitch length key
The selected stitch width and stitch length are
indicated on the screen when the stitch width key
or the stitch length key are pressed.
Press the "+"-side of the key to increase the stitch
length and the "-"-side of the key to reduce the
stitch length.
8Memory key
Use this key to memorize a sequence of stitch
patterns. Select the desired stitch pattern and
then press the memory key as many times as you
want to repeat the selected stitch pattern.
Example: Sequence of stitch patterns 27, 27, 29,
29
select the stitch pattern 27 and press the memory
key twice. Then select the stitch pattern 29 and
press the memory key twice.
This sequence of stitch patterns will be repeated
until you stop sewing.
It is possible to memorize up to 50 stitches.
Note:
• The stitch and the buttonhole stitches
cannot be memorized.
• It is not possible to memorize further stitch
patterns after memorizing the lock stitch .
9Clear key
Press this key to erase the memorized stitch
patterns one after the other. Press this key once
after sewing to delete all the memorized stitch
patterns at once.
6
7
8
9
NM2830e 29/3/07 12:05 PM Page 11

NM 2830 e - 12 -
SELECTION OF THE STITCH PATTERN
AND INDICATION
1. Display when the sewing machine is switched on.
The stitch pattern 1 is selected automatically.
Example: Selection of the stitch pattern 4
2. Press the pattern selection key 4.
3. The LCD screen dispays the stitch pattern 4 and
the recommended presser foot and the
recommended top thread tension.
1selected stitch pattern
2recommended presser foot
3recommended top thread tension
Example: Selection of the stitch pattern 27
1. Press the mode key to select one of the stitch
patterns 11-30.
2. Press the pattern selection keys 2 and 7.
3. The LCD screen dispays the stitch pattern 27 and
the recommended presser foot and the
recommended top thread tension.
FUNCTION KEYS (CONTINUED)
10 Pattern selection keys
Select the desired stitch pattern by pressing these
keys. For the stitch patterns 1-10 press the
corresponding key once.
For the stitch patterns 11-30 press the keys of
both digits. There is a stitch pattern table under
the pattern selection keys.
11 Stitch pattern table
10
11
3.
1 2 3
3.
1.
2.
1.
2.
NM2830e 29/3/07 12:05 PM Page 12

NM 2830 e - 13 -
PRESSER FOOT LEVER
1presser foot in the position to sew
2position to place fabric under the needle
3position to place heavy fabric under the needle
Change the position of the presser foot by moving the
presser foot lever.
You can put the presser foot lever into three different
positions:
into position 1for sewing, into position 2toplace
the fabric under the needle, to replace the presser
foot or the needle, etc. and you can raise the presser
foot lever to position 3to place heavy fabric under
the needle.
ADJUSTING THE PRESSURE OF
THE PRESSER FOOT
1pressure adjusting lever
The pressure of the presser foot is usually set at "3".
Put the pressure adjusting lever to "2" for fabrics like
chiffon, other light fabrics and for lace. Select a
pressure of "1" for elastic fabrics like cotton jersey
and organdy.
1
2
3
2
3
1
RAISE AND DROP THE FEED DOGS
Drop the feed dogs for attaching buttons,
embroidering and for mending. Push the feed dog
position button to the desired position to raise or drop
the feed dogs.
1"lowered" position of feed dogs
2"raised" position of feed dogs
Note:
•The feed dogs will not become visible when you
push the position button into the position 2.The
feed dogs will only become visible during sewing or
when the hand wheel is turned.
• The feed dogs have to be raised for all normal
sewing.
1
2
1
2
NM2830e 29/3/07 12:05 PM Page 13

NM 2830 e - 14 -
REPLACING THE NEEDLE
1needle clamp screw
2pin
1. Press the needle position key to raise the needle
and unplug the sewing machine.
2.Loosen the needle clamp screw by turning it
towards you and remove the needle.
3. Hold the needle with the flat side to the rear and
insert it into the needle clamp. Push the needle up
to the pin.
4. Tighten the needle clamp screw.
Note:
• Take care to insert the needle correctly because an
incorrectly inserted needle can cause the thread to
get tangled.
• Check frequently if the needle is blunt or the point
is bent, this can dammage the fabric.
For this purpose put the needle on top of a flat
surface and check if the distance between the
needle and the surface is regular.
REPLACING THE PRESSER FOOT
1red button
2groove of the presser foot holder
3pin
REMOVING THE PRESSER FOOT
Unplug the sewing machine. Raise the needle by
turning the hand wheel and raise the presser foot by
raising the presser foot lever. Press the red button on
the back of the presser foot holder and the presser
foot will drop.
Note:
Do not use violence to remove the presser foot.
ATTACHING THE PRESSER FOOT
Position the presser foot under the presser foot holder
laying the pin of the presser foot directly under the
groove of the presser foot holder and lower the
presser foot lever to attach the presser foot.
2
1
3
2
3
1
NM2830e 29/3/07 12:05 PM Page 14

NM 2830 e - 15 -
ATTACHING AND REMOVING
THE PRESSER FOOT HOLDER
1screw
2presser foot holder
3presser foot bar
Attention:
Always unplug the sewing machine before removing
orreplacing parts!
REMOVING
To loosen the screw turn the screw counterclockwise
using the screwdriver.
ATTACHING
Insert the screw into the two openings and tighten the
screw by turning it clockwise using the screwdriver.
3
12
NM2830e 29/3/07 12:05 PM Page 15

NM 2830 e - 16 -
THREAD AND NEEDLE CHART
- In general fine threads and needles are used for sewing light fabric and thicker threads and needles are used
for sewing heavy fabrics. Alwayse test the thread and needle size on a small piece of the fabric which will be
used for the actual sewing.
-Always use the same thread for the top thread and the bobbin thread.
-When sewing elastic, very fine or synthetic fabrics always use a blue tipped needle (stretch needle). The blue
tipped needle effectively prevents skipped stitches.
-When sewing very fine fabrics, sew over a piece of paper to prevent fabric distortion.
-To sew denim, use the strong denim needle.
Crepe de Chine, voile, batiste,
organdy, georgette, tricot
Fine silk
Fine cotton
Fine synthetic
Fine coton covered
with polyester
75
LIGHT
FABRIC
MATERIAL GARN NADELSTÄRKE
Linen, coton, pique, serge,
double knit, percale
50 silk
50-80 cotton
50-60 synthetic
50-60 cotton covered
with polyester
80
MEDIUM
FABRIC
Drill, tweed, gabardine,
coating, drapery and
upholstery fabric
50 silk
40-50 cotton
40-50 synthetic
50-60 cotton covered
with polyester
90
HEAVY
FABRIC
NM2830e 29/3/07 12:05 PM Page 16

NM 2830 e - 17 -
WINDING THE BOBBIN
POSITIONING THE BOBBIN
1thread spool pin 5thread guide
2large spool holder 7opening for the
3thread spool additional thread spool
4bobbin winder pin
5bobbin winder stopper
1. Lift the thread spool pin 1and place the thread
spool 3on it, the thread leaving the spool as
shown. Attach the correct spool holder.
Use the large spool holder 2for large and
medium thread spools and the small spool holder
8for small thread spools.
2. It is possible to wind the bobbin with a different
thread without unthreading the machine. In this
case use the additional thread spool pin 10 .
Place the additional spool pin on the spool stand
11 and insert it into the opening 7.Slip the
spool pin felt 9and the thread spool on to the
additional spool pin.
8small spool holder 10 additional spool pin
9spool pin felt 11 spool stand
3. Pass the thread around the thread-guide 6.
Thread the thread through one of the holes in the
bobbin from the inside to the outside. Slip the
bobbin onto the bobbin winder 4until it engages.
4. Should the thread get entangled in the thread
spool pin 1,place the spool stand onto the
thread spool pin.
5. Push the bobbin winder to the right until it
engages. The LCD screen displays "BOBBIN
WINDING".
6. Now start winding the bobbin by depressing the
foot controller while holding the free end of the
thread with one hand. Stop the machine after a
few turns and cut off the thread next to the hole of
the bobbin.
7. Depress the foot controller again. The machine
will stop automatically when the bobbin is fully
wound. Push the winding spindle back into its
initial position and cut off the thread.
Note:
The sewing machine will not sew as long as the
bobbin winder is in the position to wind the bobbin
and the LCD screen displays "BOBBIN WINDING".
Always push the bobbin winder back into the neutral
position to continue sewing.
6
5
712
3
4
8
1
11
4
5
1.
3.
4.
5.
7.
3
9
10
11
7
2.
NM2830e 29/3/07 12:05 PM Page 17

NM 2830 e - 18 -
5. Insert the hook cover plate and check that the
threading is correct and corresponds to the
illustration on the hook cover plate
6illustration
4. Continue pulling the thread to the left until it slides
into the notch (B). Pull out around 15 cm of the
thread.
5notch (B)
3. Guide the thread into the notch (A) and then pull
the thread to the left to slide it between the
tension springs.
4notch (A)
INSERTING THE BOBBIN
2. Place the bobbin in the opening with the thread
running off the bobbin counterclockwise.
3end of the thread
REMOVING AND INSERTING
THE BOBBIN
1hook cover plate release button
2hook cover plate
1. Push the hook cover plate release button to the
right and lift the hook cover plate. Remove the
hook cover plate.
1
2
3
4
5
6
1.
2.
3.
4.
5.
NM2830e 29/3/07 12:05 PM Page 18

2. Hold the thread spool with the right hand and
pass the thread with the left hand around the
thread-guide 3.
3Thread-guide
3
NM 2830 e - 19 -
THREADING THE SEWING MACHINE
Raise the needle and the presser foot. Place a thread
spool on the thread spool pin, the thread turning the
thread spool counterclockwise.
1. Press the needle position key 1at least twice to
raise the needle and the thread lever 2.
1needle position key
2thread lever
2
3
1
4
5
6
4
2
5
6
2.
3.
4.
5.
3. Pull the thread down through the slit and guide it
around the check spring holder 4.Then pull the
thread up again.
4check spring holder
4. Guide the thread around the thread lever 2.The
thread glides automatically into the opening of the
thread lever.
2thread lever
5. Pull the thread down and pass it through the
thread-guide 5and behind the thread-guide at
the needle bar 6.
5thread-guide
6thread-guide at the needle bar
6. Thread the needle with the needle threader as
described on the next page.
NM2830e 29/3/07 12:05 PM Page 19

NM 2830 e - 20 -
NEEDLE THREADER
1. Pull out 15 cm of the thread, lower the presser
foot and raise the needle. Hold the needle
threader by the knob and pull it down.
2. Turn the knob and the hook 1will glide into the
eye of the needle. Pass the thread around the
thread guide 2and under the hook.
1hook
2thread guide
3. Turn the knob carefully as shown in the illustration
to pull the thread loop through the eye of the
needle.
4. Let go of the knob and the needle threader
disappears again. Then pull the thread loop
backwards until the end of the thread passes the
eye of the needle.
Note:
The needle threader is designed to thread needles of
the sizes 11, 14, 16 and for denim needles. Should
you have difficulties threading a needle of the
mentioned types, replace the needle threader.
1.
2.
3.
1
2
NM2830e 29/3/07 12:05 PM Page 20
Table of contents