future.retro 512 User manual


Written by Jered Flickinger
Copyright 2016
Future Retro
www.future-retro.com

TABLE OF CONTENTS
1 INTRODUCTION
2 THE ART OF TOUCH
3 CONNECTIONS
4 QUICK START
DISPLAY LED’S
MAKING SELECTIONS
5 KEYBOARD
- NOTE INFORMATION
6 - OCTAVE
- HOLD
- TRANSPOSE
7 SCALES
- SELECTING SCALES
- SAVING THE PREFERRED SCALE
8 - SCALE KEY MAPPING
9 - SCALE INVERSION
10 - SCALAR TRANSPOSITION
12 - PROGRAMMING SCALES
13 - CAPTURING MIDI SCALE NOTES
14 CHORDS
- SELECTING CHORDS
15 - CHORD INVERSION
17 - PROGRAMMING CHORDS
18 CLOCKS
TIME SIGNATURES
19 TEMPO
SWING
GLIDE
20 MIDI
- CHANNEL
- AFTERTOUCH
21 - VELOCITY CURVES
22 - AFTERTOUCH CURVES
23 - PITCH BEND RESPONSE
- MOD WHEEL RESPONSE
24 - BEND RANGE
- KEY CV OCTAVE OFFSET
- SAVING MIDI PREFERRENCES
25 MIDI MODES
- NORMAL
- SYNC
- CV
26 - SYNC/CV
- POLY
27 - POLY/SYNC
- POLY/CV
- POLY/SYNC/CV
28 RANGE
29 DIRECTION
30 ARPEGGIATOR
- PLAYING THE ARPEGGIATOR
31 - SELECTING RHYTHM PATTERNS
32 - PROGRAMMING PATTERNS
- VELOCITY
33 - NOTE DURATION
- RESTS
- GLIDES
34 SEQUENCER
- PLAYING THE SEQUENCER
35 - SELECTING SEQUENCES
36 - PROGRAMMING SEQUENCES
- LOOP POINTS
37 - VELOCITY
- NOTE DURATION
38 - SUSTAIN
- REST
- GLIDES
- PITCH
39 TROUBLESHOOTING
40 MEMORY
INITIALIZATION
KEY TEST
CALIBRATION
41 SPECIFICATIONS

INTRODUCTION
Thank you for choosing the 512 Touch Keyboard. Please take the time to read through this manual for a full
understanding of the features, tips, and precautions.
OVERVIEW
The 512 is many things… a keyboard, arpeggiator, sequencer, MIDI to CV converter, MIDI to MIDI
converter, and polyphonic MIDI router. It is a tool for learning, producing, and performing music.
I hope you will enjoy it as much as I enjoyed creating it.
PRECAUTIONS
The 512 is powered by a (center positive) +15V DC output power supply. Never use AC output power
supplies with this unit. Should your power supply become lost or damaged, replacements can be purchased
directly from Future Retro.
Never open the unit. There are no user-serviceable parts inside. Should your unit ever need repairs, please
contact Future Retro for all servicing.
Never expose this device to rain or moisture. If liquids are spilled into the unit, unplug the power supply
immediately, and let the unit sit in a dry warm environment until all moisture has evaporated.
Avoid exposing the unit to smoke, or extreme hot and cold environments, as these may cause premature
component failure. Avoid leaving the unit exposed to direct sunlight as this may discolor the unit’s clear
finish.
Clean the exterior with a soft dry cloth. Never use abrasive cleaners that may harm the surface and finish of
the unit.
DISCLAIMER
All information represented in this manual is believed to be accurate at the time of publication. Any
addendums to the manual and further product support may be found on our web site:
www.future-retro.com
Product specifications may be subject to change at any time.
Future Retro assumes no responsibility for inaccuracies, errors, omissions, or liability for any loss or damage
resulting directly or indirectly from the use, misuse, or abuse of this product.
Information in this manual may not be copied, reproduced, or distributed in any form without permission from
Future Retro.
WARRANTY
All of our products are hand-built in Austin TX using only the finest quality components. We take pride in
designing, assembling, inspecting, and testing each unit in-house to meet our high-quality standards and
provide trouble-free use.
This product comes with a 1-year warranty covering all parts and labor. Warranty does not cover damage due
to tampering, modifications, or any other misuse or abuse.
You must register your product at www.future-retro.com within 30 days of purchasing the unit new for your
warranty to be valid.
1

THE ART OF TOUCH
UNDERSTANDING CAPCITIVE TOUCH
The 512 uses capacitive touch keys instead of traditional mechanical switches. One advantage of doing so is
the 512’s keys will never wear out or require maintenance like traditional keyboards do. The other advantage
is the 512 can produce controller information based on how your finger interacts with the surface area of the
key, making for a very interactive experience.
Please understand that you do NOT need to hit a key hard to create velocity, or press hard on the keyboards
surface to alter touch or aftertouch information. Instead these capacitive touch keys measure how fast your
finger approaches a key as well as how much surface area of your finger makes contact with a key when a key
is played to determine velocity. Touch or aftertouch is altered by varying the amount of surface area of your
finger making contact with a key.
With capacitive touch keys your body acts as a capacitor that is used to detect touches. Therefore you get to
become part of the circuit. However, there is one drawback to capacitive touch and that is, as you come in
contact with more keys or more surface area of a key, your body becomes less capacitive. In other words if
you are playing a single note on the keyboard, and then pitch bend that note you will notice the BEND key
has more sensitivity than if you were to instead play a 3-note chord and pitch bend those notes. While we have
designed our keyboard to have full response under most circumstances, if you ever find that you need just a
little more response from a touch, you can touch the front of the metal chassis with one of your fingers or
palm of your hand. The chassis acts as an antenna which helps boost your body’s capacitance.
You might also work on developing new playing techniques to use these side effects to your advantage, such
as holding a specific modulation amount then interacting with touching the chassis to vary the modulation
amount.
One thing you might notice when playing chords, you will have less aftertouch sensitivity than when single
notes are played. The aftertouch control the 512 generates is global aftertouch, meaning it only sends one
value no matter how many keys are being played. The value it sends will be the largest detected touch on any
key. So as you are playing a chord realize that you can get more aftertouch response by applying more touch
to one key, while minimizing the surface area touching other keys playing in the chord.
Developing your touch technique will really bring out the expressiveness of the instrument and allow you to
play it in various ways.
For instance you can generally get softer touches by touching a key with your finger tip, and larger touches by
touching a key with the pad of your finger. Various techniques include rolling your finger from tip to pad, or
sliding your finger across a key to make more or less contact.
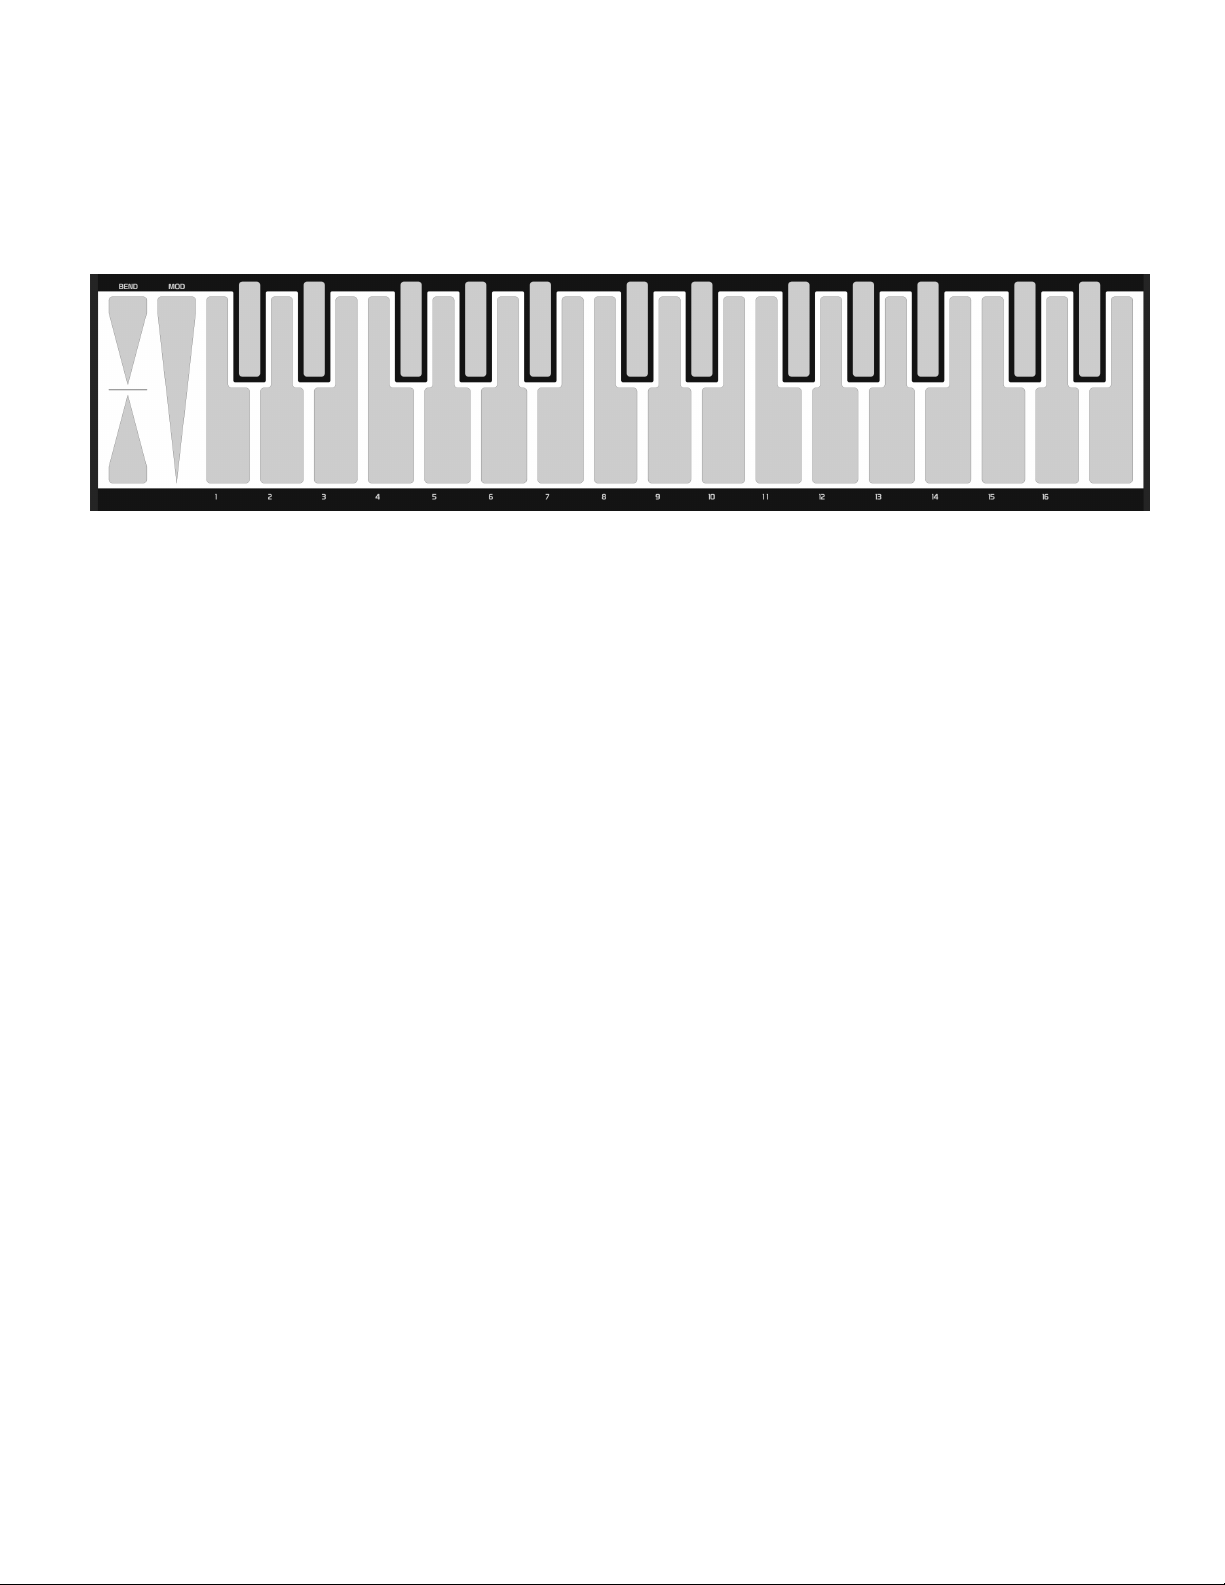
With the pitch bender pads for instance, you can drag your finger tip up or down to create a bend sensation
similar to a pitch bend wheel on a traditional synthesizer. Or instead you can vary the pressure of your finger
on the pad to create a proportional pitch control response. You can also rest your finger slightly off the pad,
and roll your finger onto the pad to create variations.
It will be well worth your time to develop a technique that works for you. In the MIDI section of the manual
we will discuss other parameters you can setup to alter the response of things like velocity, pitch bend, and
mod wheel touches to better suit your playing style.
2

CONNECTIONS
MIDI IN
The MIDI IN jack on the front panel can be connected to the MIDI Out of your DAW, MIDI controller, or
sequencer.
MIDI THRU
The MIDI THRU jack on the front panel will transmit all data that is received at the MIDI IN jack without
latency. Use this when you need to daisy-chain multiple devices together.
MIDI OUT
The MIDI OUT jack on the front panel can be connected to the MIDI IN of your DAW, sound module, or
other sequencers.
CLOCK
The CLOCK output provides a 0 to +10v analog clock signal that can be used to clock external analog
modules, sequencers, or trigger envelopes. This clock will vary its timing based on whatever time signature is
selected in the 512. This clock will also shuffle its timing based on settings of the SWING control.
GATE
The GATE output provides a 0 to +10v positive polarity gate signal, and is typically used for triggering
envelopes in an analog synthesizer.
KEY CV
The KEY CV output provides an analog voltage in the range of 0 to +9.5v (approximately), and follows the
1v/Oct CV standard. You will typically connect this output to the CV control input of an analog synthesizer’s
oscillators.
VELOCITY
The VELOCITY output provides an analog voltage in the range of 0 to +10v based on how quickly your
finger approaches a key, and how much surface area of your finger makes contact when a key is first struck.
This control voltage can be used to alter various aspects of an analog synthesizer.
TOUCH
The TOUCH output provides an analog voltage in the range of 0 to +10v based on how much surface area of
your finger is in contact with a key at any time. This control voltage can be used to alter various aspects of an
analog synthesizer.
MOD
The MOD output provides an analog voltage in the range of 0 to +10v based on how much surface area of
your finger is in contact with the MOD pad. This works similar to a mod wheel found on traditional
instruments, and can be used to alter various aspects of an analog synthesizer.
POWER
The 512 comes with a universal (center positive) +15V DC output power supply capable of being used with
power mains ranging from 100-240V AC, this allows the unit to be used anywhere in the world simply by
using the correct power plug type with the adapter.
The power jack is located on the front panel. Connect the power adapter to the Power jack and the AC outlet.
Set the Power switch to the ON position to turn the unit on, and to OFF to turn the unit off.
3

QUICK START
CONNECT IT
If you would like to play a MIDI sound module, go ahead and connect the MIDI OUT of the 512 to the MIDI
IN of your sound module. Be sure to set the MIDI sound module to receive on MIDI channel 1, as this is what
the 512 will default to the first time it is used.
If you would like to play an analog synthesizer, you will need to route the GATE output of the 512 to the
GATE input of your envelopes, and the KEY CV output of the 512 to the oscillator CV input on your
synthesizer. Connect the VELOCITY, TOUCH, and MOD outputs to various CV inputs on your synthesizer,
to add additional control.
POWER UP
When the power is first turned on, the LED’s will light while initial parameters are loaded from memory.
Once these LED’s turn off, the unit is ready to play.
KEYBOARD
The 512 will default to Keyboard mode each time the power is turned on. As you can see the keyboard
provides 29 keys you can play. The keyboard will produce Velocity values based on how quickly your finger
approaches a key and how much surfaces area of your finger makes contact with a key when a key is first
played. Once a sound is playing you can vary the TOUCH amount by altering the amount of contact your
finger has with the key. This will also affect the amount of After Touch sent via MIDI.
You can bend a note’s pitch up or down using several techniques touching the Up or Down BEND pads.
You may wish to slide your finger up and down as though you were using a traditional pitch bend wheel.
You can also vary a touch’s pressure, similar to proportional pitch control. Alternatively you can make the
initial touch with your finger tip, then roll your finger onto the pad so more area of your finger is in contact
with the pad.
You can change the octave the keyboard plays in by pressing the -/+ keys.
ARPEGGIATOR
Want to get a taste of the arpeggiator? Press the ARPEGGIATOR key, it’s LED will light to indicate the
Arpeggiator mode is selected. Press the PLAY key to start the arpeggiator, then press and hold various notes
to on the keyboard. Vary the GLIDE, SWING, and TEMPO controls to get a feel for what they do.
To stop the arpeggiator, simply press the PLAY key again.
To return to the Keyboard mode, press the ARPEGGIATOR key turning it’s LED off.
DISPLAY LEDS
From here on, the manual will refer to the 9 LED’s above the -/+ keys as the “display LED’s”, as these LED’s
are used to show various values and selections for parameters being edited.
MAKING SELECTIONS
It is important that you learn to follow the correct order of making parameter selections as sometimes the
same key will perform various functions depending on if that key was pressed by itself or while holding
another key or combination of keys. Therefore you should not randomly make keys selections until you fully
understand the operations of this unit, or you may end up performing an action you did not intend to.
4

KEYBOARD
The Keyboard mode is automatically selected each time the unit is turned on. The keyboard defaults to the
middle octave range selected so you always know where you are starting from. In Keyboard mode you can
play notes on the keyboard and generate MIDI and CV/Gate control signals simultaneously for playing MIDI
and analog synthesizers.
While the keyboard is only 29 notes, there are 9 octave ranges to play these 29 notes, giving you full access to
the entire range of MIDI notes 0-127. If you select the lowest octave range, and play low C on the keyboard
you will produce MIDI note 0. As you play higher notes or select higher octaves, the MIDI note value will
increase.
In addition the 512’s CV out has a range greater than 9 octaves. The 0-volt reference for the DAC generating
the Key CV is user definable over a 5 octave range. This allows you to better align CV pitches to MIDI notes
so two instruments are playing within the same range, or any desired octave spread.
As you learn more about scales later in the manual, you’ll realize that having only 29 keys is not really a
limitation at all, as you can easily have access to note ranges much greater than a typical 29-key keyboard.
The touch response of the keyboard makes it one of the fastest you will find for playing very quick melodies.
In addition you have new playing methods at your disposal such as to play and drag chords, strum keys, or use
scales to create melodies across the keyboard, allowing you to quickly play through any portion of a melody,
forwards, backwards, jumping around, and… oh, there’s so much to discover!
NOTE INFORMATION
The keyboard will generate note on/off, pitch, velocity, aftertouch, pitch bend, and mod wheel messages.
This information is available simultaneously at the MIDI and analog outputs, allowing you to play both types
of devices at the same time.
Play keys on the keyboard just as you would a traditional keyboard.
The keyboard will produce Velocity values based on how quickly your finger approaches a key and how
much surfaces area of your finger makes contact with a key when a key is first touched. Once a sound is
playing you can vary the TOUCH amount by altering the amount of contact your finger has with the key. This
will also affect the amount of aftertouch sent via MIDI.
You can bend a note’s pitch up or down applying several techniques of touching the Up or Down BEND pads.
You may wish to slide your finger up and down as though you were using a traditional pitch bend wheel.
You can also vary a touch’s pressure, similar to proportional pitch control. Alternatively you can make the
initial touch with your finger tip, then roll your finger onto the pad so more surface area of your finger is in
contact with the pad.
5

OCTAVE
You can change the octave the keyboard is currently
playing by pressing the Octave -/+ keys. There are 9
octaves to select, and the 0 octave range is always
selected when the unit is first powered on. The display
LED’s above the Octave keys will light to show what
octave is currently selected. If the Octave value is
changed while notes are playing, only new notes played
will be in the new octave range, while held notes
remain in the octave they were played.
HOLD
If you would like to latch or sustain notes so they continuously drone on, play and hold
one or more notes on the keyboard, then activate Hold by pressing and releasing the
HOLD key. The HOLD key LED will light indicating Hold is active. Once Hold has
latched a note or multiple notes, other notes can be played and they too will continue to
sustain or drone. To stop these notes from sustaining, simply press and release the
HOLD key. The HOLD key LED will turn off indicating Hold is no longer active.
NOTE: Hold does not sustain notes if you simply activate Hold and play notes. You may activate Hold without
holding notes, and this is useful when you learn more about the arpeggiator, as this technique allows you to
exit Arpeggiator mode, play some notes on the keyboard, and then re-enter Arpeggiator mode, and have Hold
still active with less button pressing.
NOTE: Do not hold the HOLD key before playing notes on the keyboard thinking this will sustain the notes.
Doing so will select one of 29 different chords that you can play on the keyboard, arpeggiator, or sequencer.
SEMITONE TRANSPOSE
You can transpose the keyboard in semitone steps by pressing and releasing the
TRANSPOSE key. It’s LED will light when Transpose is active. The keys on the
keyboard can now be used to make a selection of the transpose value. Middle C key is
the reference and provides no transposition to the keyboard. Selecting keys lower than
middle C will transpose the keyboard down by up to -12 semitones. Selecting keys
higher than middle C will transpose the keyboard up to +16 semitones. Press and
release the TRANSPOSE key again to exit the Transpose mode. If the transpose value was change to any
value other than 0, the TRANPOSE key LED will blink to indicate a transpose offset is taking place. If the
transpose value is 0, the TRANSPOSE key LED will simply turn off indicating Transpose mode is no longer
active, and that no transpose offset is being applied.
6

SCALES
SELECTING SCALES
There are 29 scales in all that you can assign to the keyboard or apply to arpeggiations, sequences, or MIDI to
CV and MIDI to MIDI conversions. The first 28 scales are all user definable, while the 29th scale is the
Chromatic scale. Different scales can be selected on the fly, allowing you to quickly alter what notes are being
produced at any time.
To select a scale, hold the SCALE key, then press and release one of the 29 keyboard
keys to make a selection. Release the SCALE key once you are satisfied with the selected
scale.
The factory scales programmed into the unit are shown below.
SAVING YOUR PREFERRED SCALE
It is possible to select any scale of your choice to be the default
scale selected every time the power is turned on. To store a
scale as your preferred default, first select the scale. Press and
hold the SCALE key, then press and release the PLAY key.
Release the SCALE key, and then press the PLAY key once
more.
This procedure is very similar to how scales are recorded. The main difference is when storing your preferred
scale you will not press any keyboard keys while the unit is in Scale Record mode. Doing so would alter the
selected scale, and not store it as your preferred scale.
7

SCALE KEY MAPPING
The notes of a selected scale can be assigned to either the major scale keys (traditionally the white keys of a
keyboard) or to all keys on the keyboard. We call these two different mappings of the scale notes Partial Key
Scale and Full Key Scale respectively. Scale mapping can be changed on the fly.
Shown below is an example of the Major scale using the Partial Key Scale mapping. Although the notes of the
scale are assigned to the major keys, the # keys will still play notes, they simply play the note of the scale that
exists prior to their location.
Shown below is an example of the Major scale using the Full Key Scale mapping. Notice how each note of
the keyboard uses a different pitch of the scale, and how the pitch range has now increased over the Partial
Key Scale mapping.
To change the Key Scale mapping, press and hold the SCALE key, then press the –key to
select Partial Key Scale mapping, or press the +key to select Full Key Scale mapping.
The display LED’s will show a major key pattern when Partial Key Scale mapping is
selected, and will show all display LED’s on when Full Key Scale mapping is selected.
LED display pattern for Partial Key Scale mapping
LED display pattern for Full Key Scale mapping
8

SCALE INVERSION
The 512 can invert the entire keyboard scale. This is like flipping the keys of the keyboard from left to right.
Notice the symmetry of the 512’s keyboard layout allows inverted scales to have a true mirror-like response to
a non-inverted scale.
Scale inversion can be made at any time on the fly, making for some interesting changes to notes playing by
the arpeggiator or sequencer. You may also want to flip the scale inversion if you are playing the keyboard
upside down, or happen to be dyslexic.
The chromatic scale (non-inverted), is shown below.
The Chromatic scale inverted is shown below.
To change the scale inversion, hold the SCALE key,
press and hold the DIRECTION key, and press the
- key to invert the scale, or the +key to have the scale play
non-inverted. Release the DIRECTION key, then SCALE
key once you have selected the desired Scale Inversion.
Display LED’s will show the above
pattern when scales are inverted.
Display LED’s will show the above
pattern when scales are non-inverted.
9

SCALAR TRANSPOSITION
The 512 can transpose the selected scale by up to 28 scale notes. Unlike a traditional transpose feature where
notes are simply offset by a certain amount of semitones, Scalar Transposition is much more musical by
shifting notes up and down the scale while confining them to play only notes within the scale.
The Major scale using the Full Key Scale mapping on the keyboard is shown below.
The same Major scale after a Scalar Transposition of +4 steps has been applied, is shown below.
To change the Scalar Transposition, hold the TRANSPOSE key, then press and release one
of the 29 keyboard keys to make your selection. Release the TRANSPOSE key when you
are done making a selection.
Shown below are the different Scalar Transposition values when using the Full Key Scale mapping.
10

Since Partial Key Scale mapping assigns the notes of the scale to the keyboard differently than Full Key Scale
mapping, instead of having 28 Scalar Transposition possibilities, there are now only 16 due to the fact that
Partial Key Scale mapping only assigns new scale pitches to the major keys of the keyboard.
The Major scale using the Partial Key Scale mapping on the keyboard is shown below.
The same Major scale after a Scalar Transposition of +4 steps has been applied, is shown below.
To change the Scalar Transposition, hold the TRANSPOSE key, then press and release one
of the 17 major keyboard keys to make your selection. Release the TRANSPOSE key when
you are done making a selection.
The different Scalar Transposition values when using the Partial Scale mapping is shown below.
Note, when new scale selections are made, Scalar Transposition will reset to a value of 0.
11

PROGRAMMING SCALES
It is possible to program your own music scales, to scale memory locations 1-28. However, you can not
reprogram the Chromatic scale, scale 29.
Each scale allows you to record up to 29 keys, and each note of the scale can be any of the 29 Chromatic
intervals on the keyboard. You may be asking yourself why? The Chromatic scale takes 12 intervals to define
its scale, a Major scale takes 7 intervals to define the scale, and a Pentatonic scale takes only 5 intervals to
define the scale. While there are a few scales that use more than 12 intervals, the primary reason the 512
offers 29 intervals for a scale is so you can create custom key maps of 29 pitch intervals in any order. You can
even repeat the same pitch/interval if you like.
Before programming a scale, first make sure you have selected the scale location you want to write to, as
described in the Selecting Scales section of the manual. Note that you can not enter Scale Record mode while
the arppegiator or sequencer are playing.
To enter Scale Record mode, hold the SCALE key and press
and release the PLAY key. The SCALE, PLAY, and
RECORD LED’s will all light to show Recording is active,
and the unit is ready for you to play notes to define the scale.
Let’s say you want to write the Blues Major Pentatonic scale.
Enter the notes shown below in order.
After the last interval of the scale has been entered, press the PLAY key to exit Scale Record mode.
When entering scale intervals, the first key selected will be considered the root of the scale. When you are
done entering intervals of the scale, the first note (or root) entered will be transposed to low C on the
keyboard, while the interval of all other notes get calculated (in the order they were entered) based on their
relationship to the first note entered for the scale. This allows all scales entered to automatically conform to
the key of C, which makes life a lot easier when you want to play or transpose them to another key.
The pitches generated for the Blues Major Pentatonic scale (with Full Scale mapping), is shown below.

When creating traditional scales it is important that you play or enter all notes within an octave defining the
scale from low to high. If you play the notes of the scale from high to low, or out of order, the scale generated
reflects the order you entered. You can experiment with the results that various entry methods produce.
Once all intervals for one octave of a scale are entered, the unit will automatically generate all the higher
octave intervals to fill the remaining keys of the keyboard.
You can also look at user writable scales as a way to program any order of intervals, whether it is simply the
order notes are to be used for a particular melody or other part of the song. For fun, try entering a 16 step
melody into a scale. Select Partial Key Scale mapping so the melody now plays as you drag your finger across
the major keys labeled 1-16. Interesting! You can now strum your melody, or control the direction, and rate of
playback just by moving your finger across these keys. Or try selecting different portions of the melody notes
to play in new ways. Remember that you can repeat pitch/intervals too. You don’t have to play them just
once. You got it! Now keep experimenting with the possibilities.
CAPTURING MIDI SCALE NOTES
If the 512 is in any MIDI mode that uses CV conversion, (IE, where the 512 is looking at MIDI notes it
receives to convert to CV and MIDI information), you can enter the Scale Record mode as previously
mentioned, and now the 512 will create a scale based on all the MIDI notes it receives.
This can be very useful if you have a melody sequenced in another device and don’t remember what scale it
was written in, or are too lazy to figure it out. Simply capture the scale and then you can do other fun stuff
later like, apply Scalar Transpositions, play along with your sequence on the 512 using the same scale, or
perhaps you want to force notes of sequences written in various other scales to the same scale.
Before entering Scale Record mode, make sure you have stopped playback on your external sequencer, or are
not currently playing notes on external MIDI keyboard. Activate scale record, then begin playing a music part
from your sequencer, or playing keys on your MIDI keyboard. You will not enter notes on the 512’s keyboard.
Once you feel all notes you would like the scale to contain have been entered, stop playback on the external
sequencer or stop playing notes on your MIDI keyboard, and then exit the Scale Record mode. A new scale
will be generated based on the notes that were received. However unlike entering scales from the 512’s
keyboard, when entering notes via MIDI only 12 chromatic pitch intervals can be perceived. In other words, if
the 512 receives C1 and C2 it does not care that C was played in different octaves, the pitch C will now be
included in all octaves of the scale. The same applies for any other pitches received in any octave.
If for instance the 512 receives the following notes: C1, D4, E2, F1, F3, G5, A3, B2, B7
…the Major Scale shown below would be generated. Notice MIDI Scale key mapping is similar to Partial
Key Scale mapping, in that if a pitch is not used for the scale, its note will play the next lowest pitch that is
included in the scale. Full Key Scale mapping is never used when doing MIDI to MIDI or MIDI to CV
conversion.

CHORDS
SELECTING CHORDS
There are 29 Chords in all that can be transmitted via MIDI when individual notes are played by the keyboard,
arpeggiator, sequencer, or any external MIDI notes received while doing MIDI to MIDI conversions. This is
similar to chord hold modes found on synthesizers of the past, where you can latch a chord into memory then
play that chord up and down the keyboard range by playing individual keys. The 512 provides several new
benefits to this method such as, you can now play up to 16 transpositions of this chord simultaneously, select
different chords on the fly, and even apply +/- chord inversions to the chords notes.
The first chord in memory is not a chord at all, but is instead a single note. This memory location can not be
overwritten, and should be selected any time you want the keyboard, arpeggiator, or sequencer to simply play
what you entered instead of a chord. The other 28 chords can all be user defined, but are preprogrammed from
the factory as shown below.
To select a chord while in the Keyboard or Arpeggiator modes, hold the HOLD key, then
press and release one of the 29 keyboard keys to make your selection. Release the HOLD
key after your selection has been made. Chord selections can be changed on the fly at any
time.
Note, if you are selecting chords while in the Sequencer mode, or any of the MIDI to CV or MIDI to MIDI
modes, you can simply press and release the HOLD key to turn Chord Selection off/on, since these modes do
not allow you to use the HOLD key for other holding purposes. HOLD key LED will light when this mode is
active.
14

CHORD INVERSION
Chord inversion is the process of taking individual notes of a chord and transposing them up or down an
octave. The 512 allows you to invert chords +/- 4 steps. Let’s assume you have a Major chord selected to play,
and you play middle C on the keyboard. The MIDI notes transmitted would be as though you were playing the
individual notes on a keyboard, shown below. At this point the chord inversion is a value of 0.
If you were to invert this chord by +1 step and play middle C on the keyboard, it would be as though you were
playing the following MIDI notes.
Should you invert the chord +2 steps and play middle C on the keyboard, it would be as though you were
playing the following MIDI notes.
Since a 3-note chord is playing, should you select a chord inversion of + 3 steps, it would be as though you
had transposed all the notes in our Major chord up to the next higher octave than the key you were actually
playing.
Note, when new chords are selected the Chord Inversion value will reset to a 0 value.
15

If you were to instead invert this chord by -1 step and play middle C on the keyboard, it would be as though
you were playing the following MIDI notes.
Should you invert the chord -2 steps and play middle C on the keyboard, it would be as though you were
playing the following MIDI notes.
Should you invert the chord -3 steps and play middle C on the keyboard, it would be as though you were
playing the following MIDI notes.
You can see that chord inversion places the chord notes in other octave ranges while maintaining the notes
used to build that chord. This can be useful for taking unpleasant chords and spreading their intervals further
apart to become more pleasing. It can also be thought of as a way of transposing the chord notes.
In the Major Chord example, C is considered our root note, while E is the 3rd, and G is the 5th . The 512
recognizes their order as the first note entered (or root) being the first note of the chord, while E would be the
second note of the chord, and G is the third note of the chord.
Therefore, when you learn to enter your own chord notes you will understand the importance of entering
chord notes from low to high, if you want to achieve the same chord inversion results just described. If instead
when writing a chord, you entered the notes of the chord in an order other than C, E, and G… for one, your
chord could have a different root note, and if you apply Chord Inversion the order notes are transposed
reflects the order they were entered for that chord when it was recorded. Experiment as this can lead to other
possibilities, and is why the 512 behaves in this way.
16

PROGRAMMING CHORDS
The first chord in memory is not a chord at all, but instead is a single note. This memory location can not be
overwritten, and should be selected any time you want the keyboard, arpeggiator, or sequencer to simply play
what you entered instead of a chord. The other 28 chords can all be rewritten, and each can contain up to six
chord notes.
Before writing a chord, you must first enter the Keyboard mode, and select the chord location you want to
write to, as outlined in the Selecting Chords section.
To enter Chord Record mode, hold the HOLD key and press the PLAY key. You may then release the PLAY
key followed by the HOLD key. The HOLD key, PLAY key, and RECORD LED’s will light showing Chord
Record mode is active and ready for you to play notes of the chord.
At this point chord notes may be entered one at a time using the 29 keyboard keys. You may continue to hold
notes or play them in one at a time if you like, but it is not recommended that you try to play all notes of the
chord simultaneously. This is because the order the notes are entered is very important to constructing the
chord.
Note, it is not possible to use external MIDI notes the 512 receives to program chords.
The first note entered will be the root note of the chord, while all other chord notes entered will have an
interval based on their relationship to the note you first played as the root. You can play a chord in any key
you like, so choose whatever is easiest.
If you enter six chord notes, Chord Record mode will automatically exit since there are no more chord notes
to enter. If the chord you are entering is less than six notes, simply press the PLAY key to exit Chord Record
mode. The HOLD key, PLAY key, and RECORD LED’s will turn off when Chord Record has been exited.
Go ahead and try out the new chord by playing notes on the keyboard. Realize that you can play up to 16
transpositions of this chord simultaneously, simply by playing up to 16 keys on the keyboard.
Notice how the root note of the chord plays at the pitch you would expect for the current scale selected. If you
entered the chord notes from low to high in pitch, all additional chord note pitch intervals will play higher
than the root note.
However, if you entered your chord notes from high to low in pitch, the high note becomes the root note, and
the additional chord intervals are now playing lower than the root note.
Play with this and try writing the same chord to different chord locations, each using a different order for
entering the chord notes.
Keep in mind that the order chord notes are entered will affect the order notes are transposed when you begin
to apply Chord Inversion to the chords.
17
Table of contents