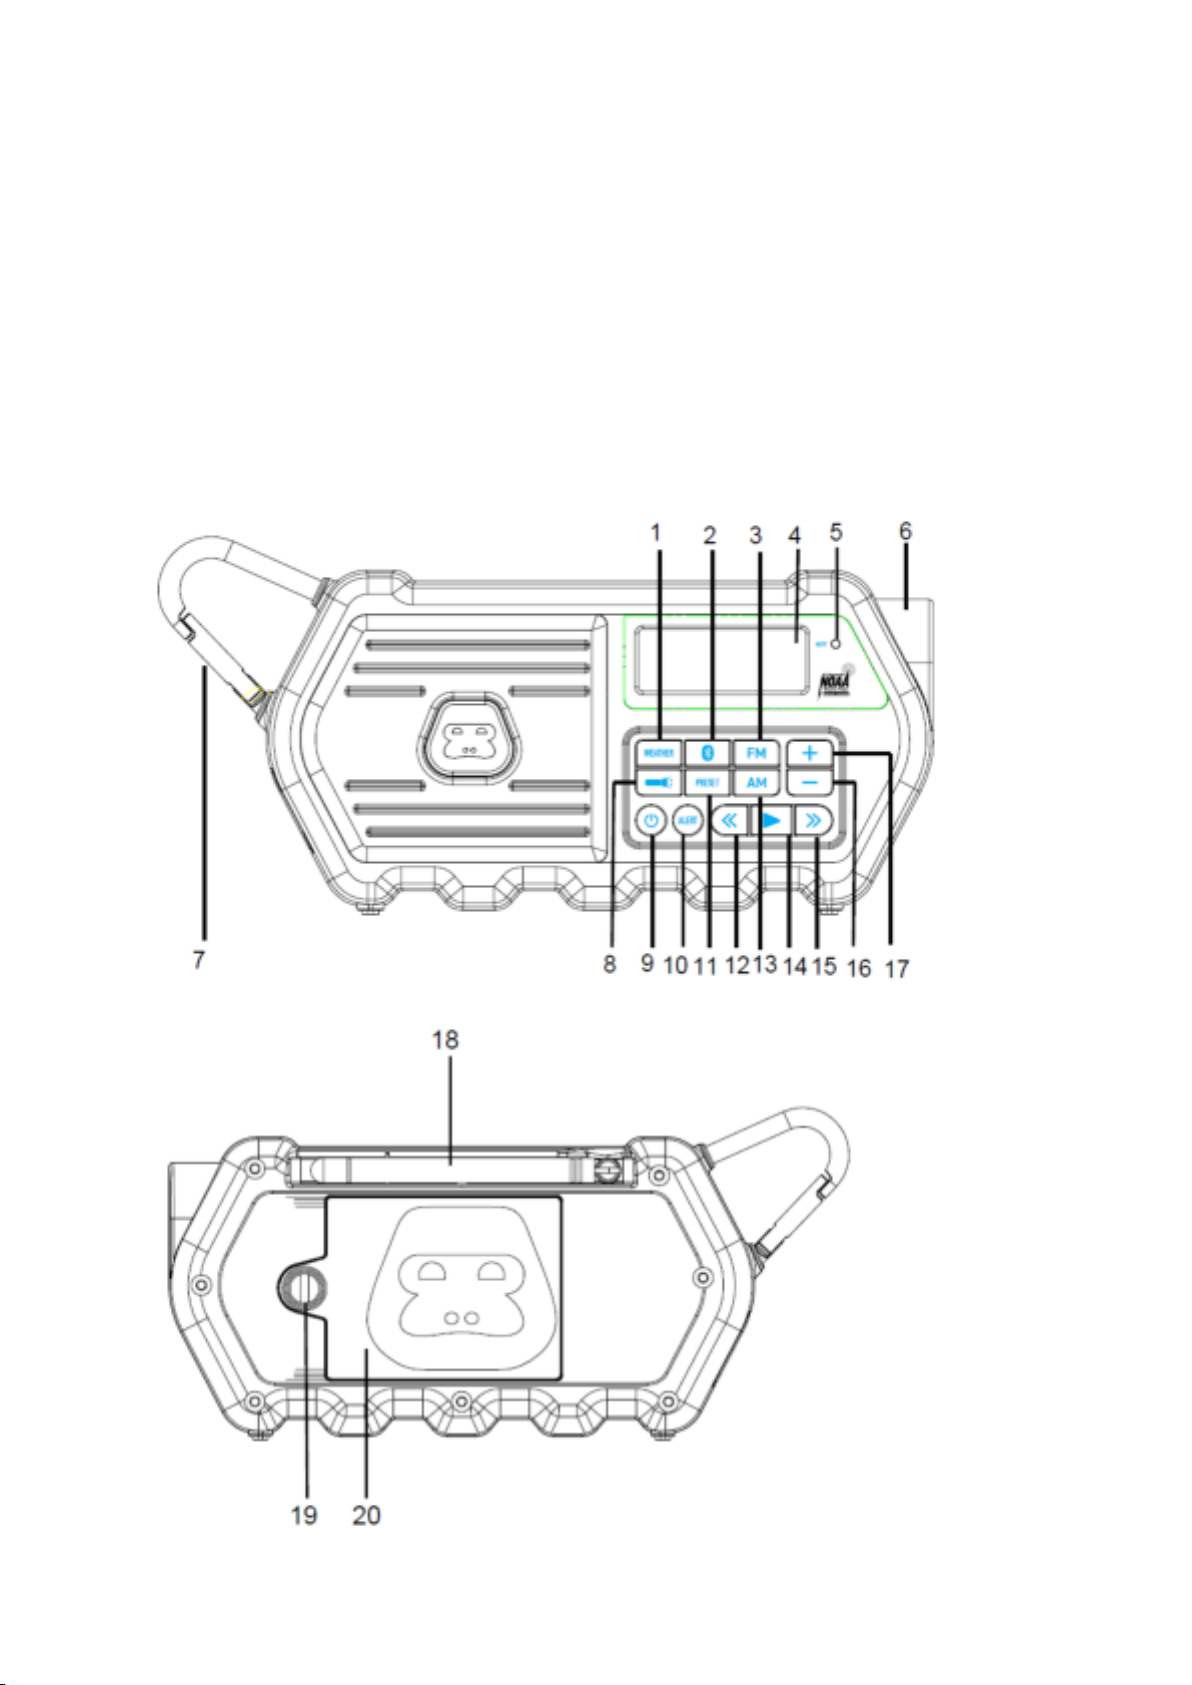
G-project G-70W User manual

User Guide
Bluetooth Speaker with Weather Radio
G-70W
PACKAGE CONTENTS
• G-70W Bluetooth Speaker with Weather Radio
• Type-C USB Charging Cable
• User Guide
LOCATION OF CONTROLS
1. WEATHER Button
2. BLUETOOTH PAIR Button
3. FM Button
4. LCD Display
5. Red ALERT LED
6. Flashlight
7. Carabiner Clip
8. FLASHLIGHT Button
9. POWER ON/STAND BY Button
10. ALERT Button
11. PRESET Button
12. TUNE DOWN Button
13. AM Button
14. PLAY/PAUSE Button
15. TUNE UP Button
16. VOLUME –Button
17. VOLUNE + Button

18. Telescopic Antenna
19. Battery Door Lock
20. Battery Door
21. USB Port
22. Type-C USB Jack
23. RESET Button

POWER SOURCE
The G-70W is designed to operate using the built-in rechargeable battery or using
3 x AA batteries (not included).
To recharge the built-in battery: Connect G-70W with a USB charging adapter or any
other USB charging device through the supplied Type-C USB charging cable.
The battery icon on the display will appear and the battery level bars will be moving to

indicate charging process. When the battery is fully charged, the battery level bars
will change to be full .
To operate using batteries:
1. Unlock the battery door on the back of G-70W by rotating anticlockwise the lock
Insert three (3) “AA” batteries following the correct polarity indicated in the battery
compartment.
2. Close the battery door and rotate clockwise the lock until it is tightened firmly.
Alkaline batteries are recommended for the longest playing time.
1. Warning –Danger of explosion if batteries are incorrectly replaced. Replace only with the same or
equivalent type.
2. Use only the size and type of batteries specified.
3 .Be sure to follow the correct polarity when installing the batteries as indicated in the Battery
Compartment. A reversed battery may cause damage to the device.
4. If the device is not to be used for a long period of time, remove the batteries to prevent damage or
injury from possible battery leakage.
5. Do not try to recharge a battery not intended to be recharged - it can overheat and rupture (Follow
battery manufacturer’s directions.)
6. Do not mix different types of batteries together (e.g. Alkaline, Rechargeable and Carbon-zinc) or old
batteries with fresh ones.
WHEN TO RECHARGE BUILT-IN BATTERY
Please refer to the battery level bar of the battery level indicator on the display for the
battery percentage.
Notes:
• The battery is internal and cannot be replaced
• Actual battery life varies with use, settings, and environmental conditions
• Rechargeable batteries have a limited number of charge cycles
• Charge the rechargeable battery at least biannually

VOLUME CONTROL
Press the VOLUME + or VOLUME –buttons to increase or decrease the volume.
PLAYING THE RADIO
1. Press and hold the POWER ON/STAND BY button to turn on the unit, the LCD
backlight turns on.
2. Press AM or FM button to select AM or FM band, the radio mode indicator displays.
3. For manual tuning, repeatedly press the TUNE UP or TUNE DOWN button to
manually adjust the tuning on the LCD display until the desired station appears.
4. For auto tuning, press and hold the TUNE UP or TUNE DOWN button until the
display starts to scan, then release the button. The tuner will search and stop on the
next strongest station signal it finds. Repeat this process until the desired station
appears on the LCD display.
Notes:
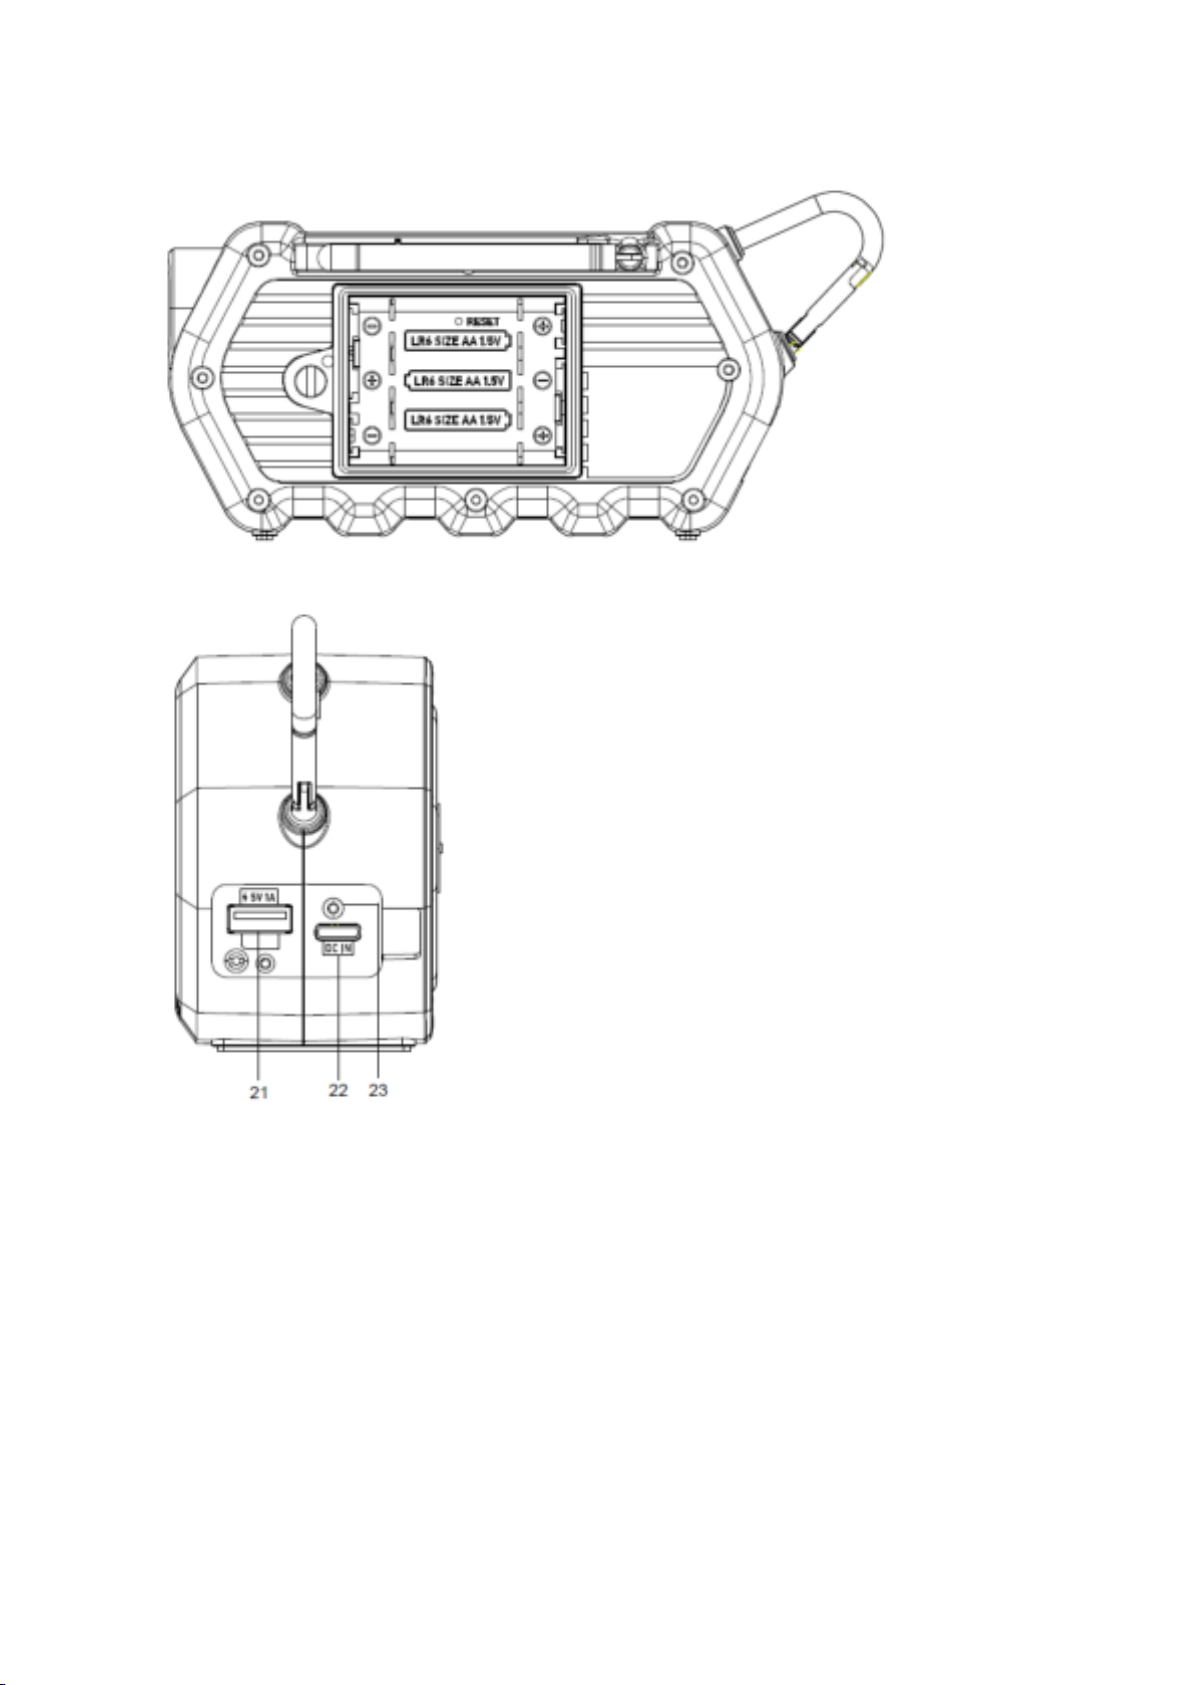
The AM antenna is located inside the cabinet of the unit. If AM reception is weak,
change the position of the unit until the internal antenna picks up the strongest signal.
To increase FM reception sensitivity, fully extend the Telescopic Antenna and rotate to
obtain the best reception of possible station.
SETTING RADIO PRESETS
Manual presetting radio station:
1. To preset a radio station to memory, first follow the previous steps to select AM or
FM radio mode and tune in the desired station.
2. Press and hold the PRESET button to create a preset for the current station. “P”
will appear and “##” (the preset number) will blink on the LCD display.
3. Press the TUNE UP or TUNE DOWN button to select a preset number (01- 20).
Press the PRESET button again to confirm the setting and the station will be saved
into memory.
4. Repeat these steps for up to 20 presets, as desired.
5. There has two ways to recall a preset station. First select AM or FM radio mode,
then press the PRESET button and the “P##”will show on the LCD display. Then
press TUNE UP or TUNE DOWN button to select the desired preset number. Or,

repeatedly press the PRESET button until the desired preset number appears in the
display and the station tunes in.
Automatic presetting radio station:
1. To select AM or FM radio.
2. Press and hold the PLAY/PAUSE button, then it will start automatic presetting and
saving radio station. Tuning begins from the lowest frequency and save it in
ascending order.
Notes: Saving a new station preset in the same position as a previously saved station
will replace the previously stored station for that preset number.
BLUETOOTH OPERATION
You can stream audio wirelessly to G-70W from up to 33’ away using your iPhone, iPad,
iPod, Android, laptop, or other A2DP Bluetooth enabled device.
1. Press and hold the POWER ON/STAND BY button to turn on G-70W.
2. Then press the BLUETOOTH PAIR button. “bt” will flash on the LCD display.
3. Turn on your compatible A2DP Bluetooth device and enable Bluetooth.
4. Search for Bluetooth devices and select “G-STORM”.
5. “bt”on the LCD display will change from flashing to solid, indicating that your
Bluetooth device is connected to G-70W.
Notes:
• Press and hold the BLUETOOTH PAIR button for 3 seconds to disconnect the current
Bluetooth connection.
• The unit will return to pairing mode and “bt” on the LCD display will flash.
• If asked for a password, enter “0000”.
RECONNECTING YOUR BLUETOOTH DEVICES
Once your Bluetooth device has been paired with G-70W, it is simple to reconnect
them.
1. Make sure that G-70W is powered on and within range.
2. Select “G-STORM” from the list on your Bluetooth device.
3. “bt”on the LCD display will change from flashing to solid, indicating that your
Bluetooth device is reconnected to G-70W.

Notes:
For best audio performance, turn the volume on your Bluetooth source device all the
way up.
LISTENING TO A WEATHER CHANNEL
1. Press and hold the POWER ON/STANDBY button to turn on the unit.
2. Press the WEATHER button to select weather band. The “WB” icon appears on
the display.
3. Press the TUNE UP or TUNE DOWN button to select your local weather
broadcasting.
4. Press VOLUME + or VOLUME –button to obtain the desired sound level.
Weather Band Channel Frequency Table
CHANNEL
FREQUENCY (MHz)
CH1
162.400
CH2
162.425
CH3
162.450
CH4
162.475
CH5
162.500
CH6
162.525
CH7
162.550
Notes:
With regard to the NOAA Weather Band, you need to identify which channel/frequency
receives your local weather band report. When you change locations either to
another city or state, you may need to choose a different band to get the local report in
that location. Visit weather.gov/NWR/counties for your location specific channel.
To increase weather band reception sensitivity, fully extend the Telescopic Antenna and
rotate to obtain the best reception of possible station. If reception is not good, try a
different location. If indoors, placement near a window usually improves reception.
To activate the weather alert function:
1. Press the POWER ON/STANDBY button to turn on the unit.
2. Press the ALERT button to activate the weather alert function. The red ALERT LED
will be on and “ALERT”icon appears on the LCD display.
Receiving weather alert:
1. When an alert is received, the G-70W will sound an audible siren, and the LCD
display, red ALERT LED and the flashlight will all flash. The G-70W will then switch

to the current tuned weather radio station.
2. Press any button to turn off the audible siren, flashing of LCD display, red ALERT
LED and flashlight, to listen the information of alert.
To disable the weather alert function:
1. Press the ALERT button to disable weather alert. When the weather alert is
disabled, the red ALERT LED will be off and “ALERT”icon disappears on the LCD
display.
Notes:
• Highly recommend to keep connecting USB charging adapter to power the G-70W
when you activate the weather alert function.
•Ensure that you have tuned to your local weather station before weather alert is
activated.
• In standby mode, pressing the ALERT button can activate or disable the Weather
alerts function.
•The G-70W can receive weather alert when it is in standby mode, tuned to a local
weather station and the alert is activated.
USB CHARGING PORT
G-70W includes a USB charging port (DC 5V, 1A) for charging most devices, including
iPhone, iPod, Android devices and other compatible USB devices (USB cable sold
separately).
Note: To avoid affecting AM radio reception, the G-70W won’t charge external device
when playing AM radio.
FLASHLIGHT
To use the flashlight, press FLASHLIGHT button. The flashlight will be in high level
brightness. Press FLASHLIGHT button to cycle through and select the desired
setting:
High Level Low Level Flash Off

SPECIFICATIONS
Power Source……………………………………3.7V, 2500mAh, Rechargeable Li-ion
Power Source ………………………………………………3 x 1.5V “AA” size batteries
USB Jack DC Power Output ………………………………………………………5V 1A
Output Power....................................................................................1 x 3W 10% THD
Battery Recharging Time………………………………………………… around 3 hours
Battery Playback Time..... Up to 12 hours (varies by volume level and audio content)
Water Resistance Level ……………………………………………………………..IPX4
BLUETOOTH:
Bluetooth specification ………………………………………………………………v5.1
Supported Bluetooth Profile………………………………………………………..A2DP
Range……………………………………………………………. 33ft (10m) line of sight
RADIO:
Frequency range (AM) ………………………………………..............520 ~ 1710 KHz
Frequency range (FM) ………………………………………..............87.5 ~ 108 MHz
Frequency range (Weather Band) ……………………………..162.400 ~ 162.550 MHz
Specifications are subject to change without notice.
IMPORTANT SAFETY NOTIFICATIONS
CAUTION: TO REDUCE THE RISK OF ELECTRIC SHOCK,
DO NOT REMOVE COVER (OR BACK). NO
USER-SERVICEABLE PARTS INSIDE. REFER SERVICING
TO QUALIFIED SERVICE PERSONNEL.
DANGEROUS VOLTAGE: The lightning flash with arrowhead
symbol, within an equilateral triangle is intended to alert the user to
the presence of uninsulated dangerous voltage within the product’s
enclosure that may be of sufficient magnitude to constitute a risk of
electric shock to persons.

ATTENTION:P
Compliance information: This device complies with Part 15 of the FCC Rules.
Operation is subject to the following two conditions: (1) this device may not cause
harmful interference, and (2) this device must accept any interference received,
including interference that may cause undesired operation.
ATTENTION: The exclamation point within an equilateral triangle is
intended to alert the user to the presence of important operating and
maintenance (servicing) instructions in the literature accompanying
the appliance.
WARNING: Changes or modifications to this unit not expressly approved by the
party responsible for compliance could void the user’s authority to operate the
equipment.
ATTENTION: POUR ÉVITER LES CHOC ÉLECTRIQUES, INTRODUIRE LA
LAME LA PLUS LARGE DE LA FICHE DANS LA BORNE CORRESPONDANTE
DE LA PRISES ET POUSSER JUSQU’AU FOND.
NOTE: This equipment has been tested and found to comply with the limits for
a Class B digital device, pursuant to Part 15 of the FCC Rules. These limits
are designed to provide reasonable protection against harmful interference in
a residential installation. This equipment generates, uses and can radiate
radio frequency energy and, if not installed and used in accordance with the
instructions, may cause harmful interference to radio communications.
However, there is no guarantee that interference will not occur in a particular
installation. If this equipment does cause harmful interference to radio or
television reception, which can be determined by turning the equipment off
and on, the user is encouraged to try to correct the interference by one or
more of the following measures:
• Reorient or relocate the receiving antenna.
• Increase the separation between the equipment and receiver.
• Connect the equipment into an outlet on a circuit different from that to
which the receiver is connected.
• Consult the dealer or an experienced radio/TV technician for help.

WARNING: The batteries shall not be exposed to excessive heat such as sunshine,
fire or the like.
WARNING: The mains plug is used as a disconnect device, the disconnect device
shall remain readily operable.
IMPORTANT SAFETY INSTRUCTIONS
Some of the following information may not apply to your particular product; however, as
with any electronic product, precautions should be observed during handling and use.
1. Read these instructions.
2. Keep these instructions.
3. Heed all warnings.
4. Follow all instructions.
5. Do not use this apparatus near water.
6. Clean only with a dry cloth.
7. Do not block any of the ventilation openings. Install in accordance with the
manufacturer’s instructions.
8. Do not install near any heat sources such as radiators, heat registers, stoves, or
other apparatus (including amplifiers) that produce heat.
9. Do not defeat the safety purpose of the polarized or ground-type plug. A polarized
plug has two blades with one wider than the other. A grounding-type plug has two
blades and a third grounding prong. The wide blade or the third prong are provided
for your safety. When the provided plug does not fit into your outlet, consult an
electrician for replacement of the obsolete outlet.
10. Protect the power cord from being walked on or pinched particularly at plugs,
convenience receptacles, and the point where they exit from the apparatus.
11. Only use attachments/accessories specified by the manufacturer.
12. Use only with the cart, stand, tripod, bracket, or table specified by the
manufacturer, or sold with the apparatus. When a cart is used, use caution when
moving the cart/apparatus combination to avoid injury from tip-over.
13. Unplug this apparatus during lightning storms or when unused for long periods of
time.
14. Refer all servicing to qualified service personnel. Servicing is required when the
apparatus has been damaged in any way, such as power-supply cord or plug is
WARNING: TO PREVENT FIRE OR SHOCK HAZARD, DO NOT EXPOSE THIS
UNIT TO RAIN OR MOISTURE.
SURGE PROTECTORS:
It is recommended to use a surge protector for AC connection. Lightning and
power surges ARE NOT covered under warranty for this product.

damaged, liquid has been spilled or objects have fallen into the apparatus, the
apparatus has been exposed to rain or moisture, does not operate normally, or
has been dropped.
ADDITIONAL SAFETY PRECAUTIONS
a. Do not expose this unit or the AC/DC adaptor to dripping or splashing water. Keep
liquid-filled objects, such as vases, away from this unit and AC/DC adaptor.
b. To ensure that this unit is completely disconnected, unplug it from the wall.
c. Ensure that the AC/DC adaptor is easily accessible.
d. Please note the information printed underneath the unit.
e. Batteries should not be exposed to excessive heat such as direct sunshine, fire,
etc.
f. Do not impede the ventilation of this unit by covering the ventilation openings with
items such as newspapers, table-cloths, curtains, etc.
g. Keep open flames, such as lighted candles, away from this unit.
h. Do not place this unit in closed bookcases, racks, or other spaces without proper
ventilation.
i. Use only the same or equivalent type batteries as there is a danger of explosion if
the incorrect batteries are used or they are installed incorrectly.
j. Dispose of batteries properly according to environmental regulations.
G-PROJECT is a registered trademark of Goodhatch, LLC.
G-70W is distributed by Life Lab International LLC
3471 North Union Drive, Olney, IL 62450
(855) 896-1795
The Bluetooth ® word mark and logos are registered trademarks owned by Bluetooth SIG, Inc.
and any use of such marks by Life Lab International LTD. is under license.
Other trademarks and trade names are those of their respective owners.
Table of contents
Other G-project Speakers manuals