Sonos Beam User manual

Sonos
Sonos
User Guide
T

SONOS USER GUIDE
Beam
The smart, compact soundbar for your TV—
• Play anything—music, TV, movies, podcasts, radio, audiobooks, and video games.
• Perfect size to wall-mount above or below your TV, or place on a credenza.
• Great for small to medium-sized rooms.
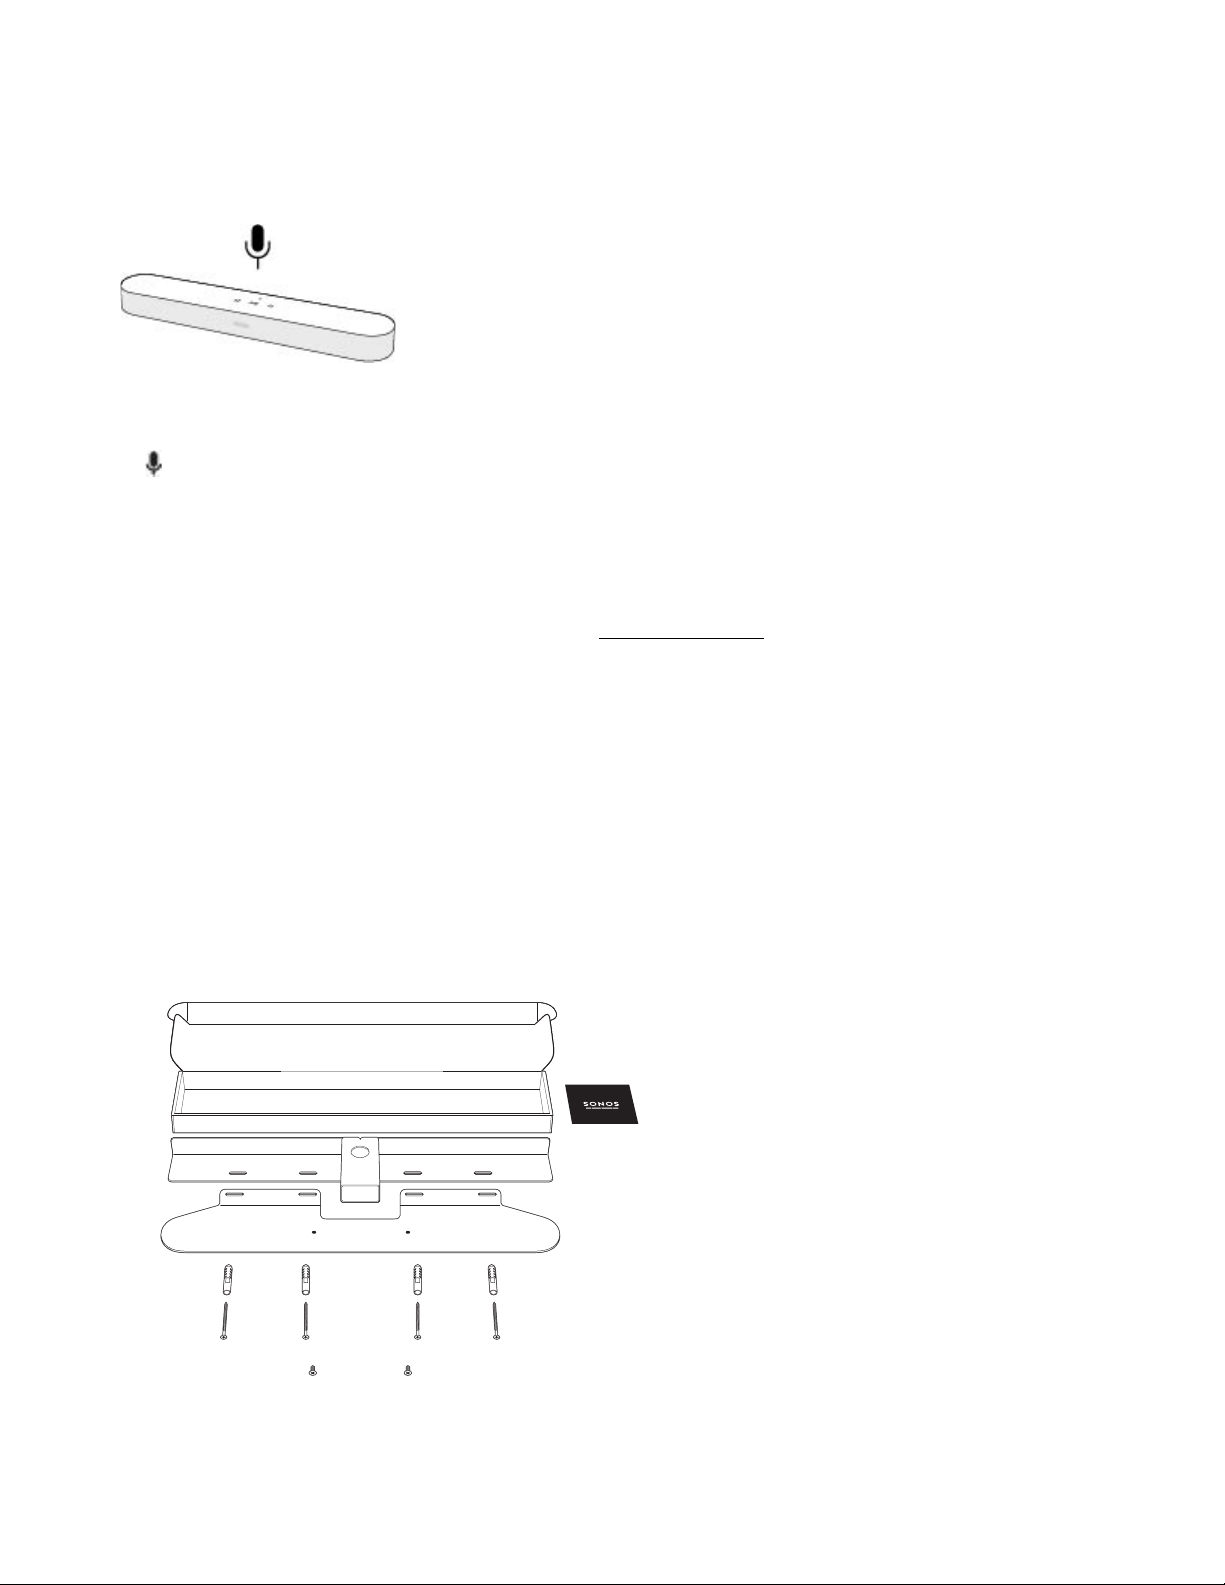
•Microphone on/off so you can use it hands-free.
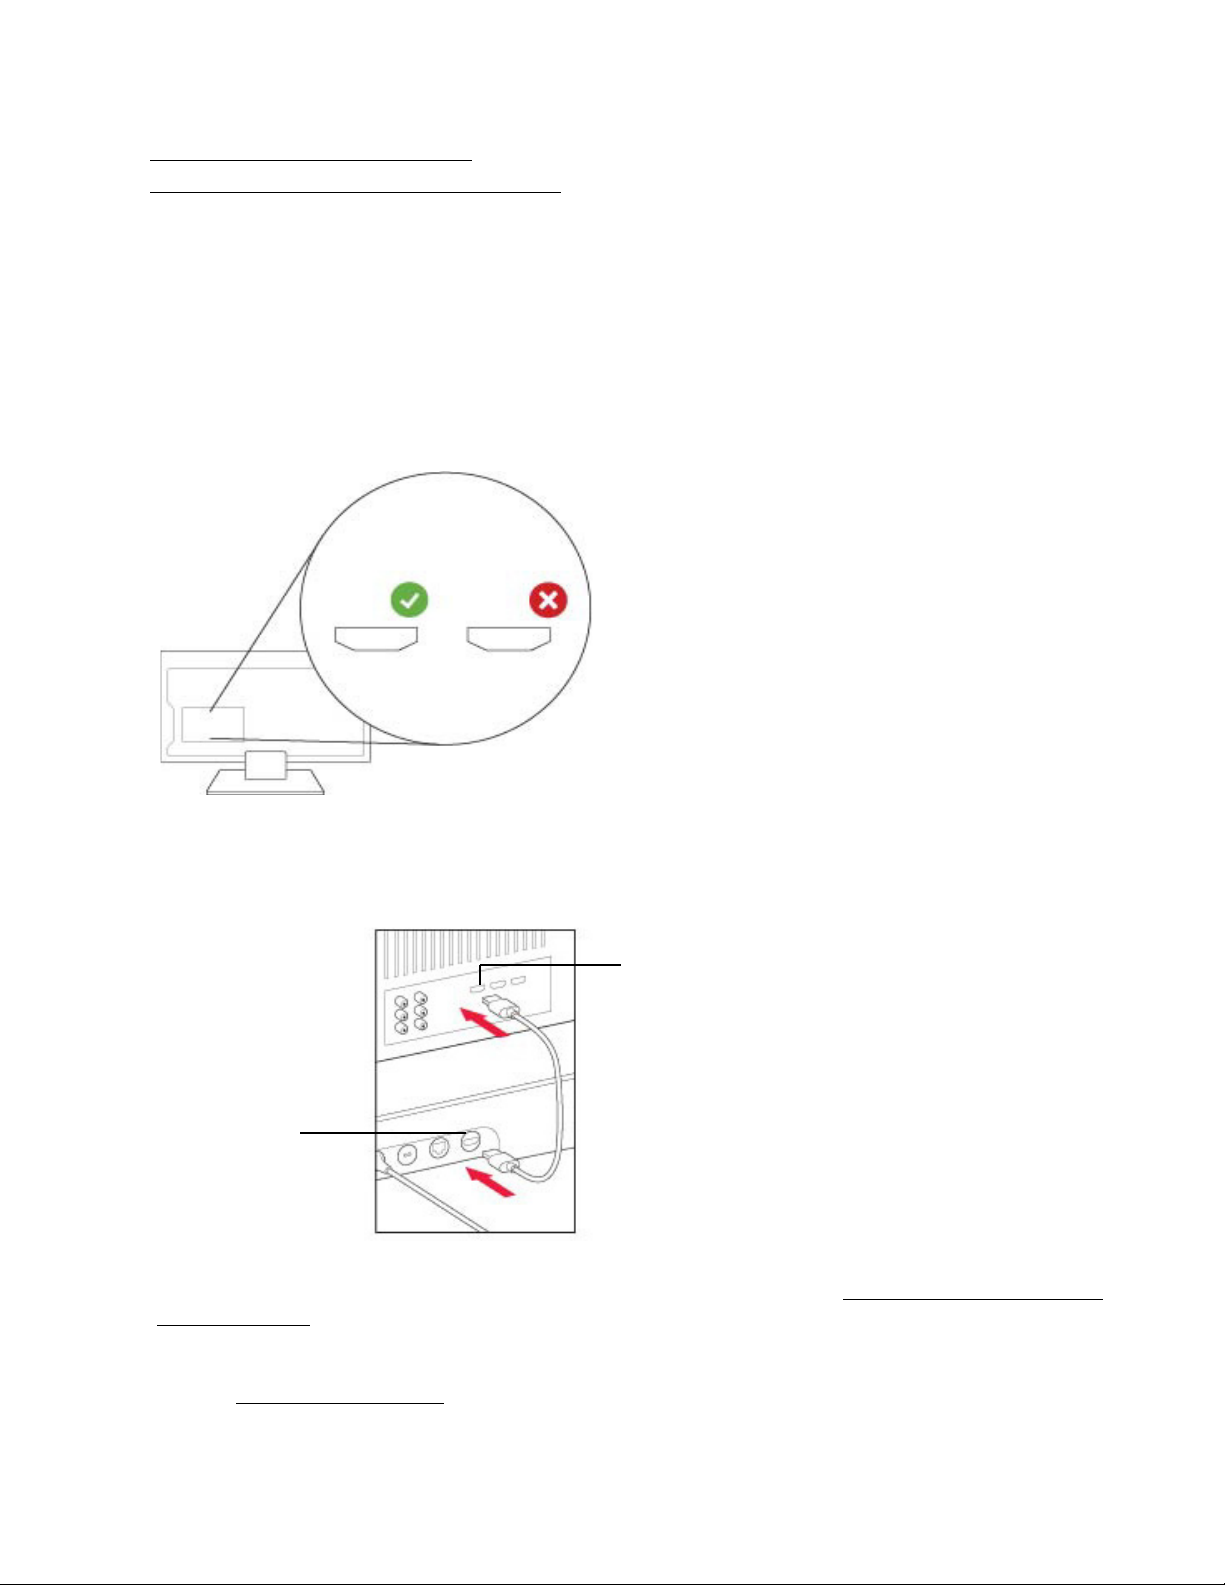
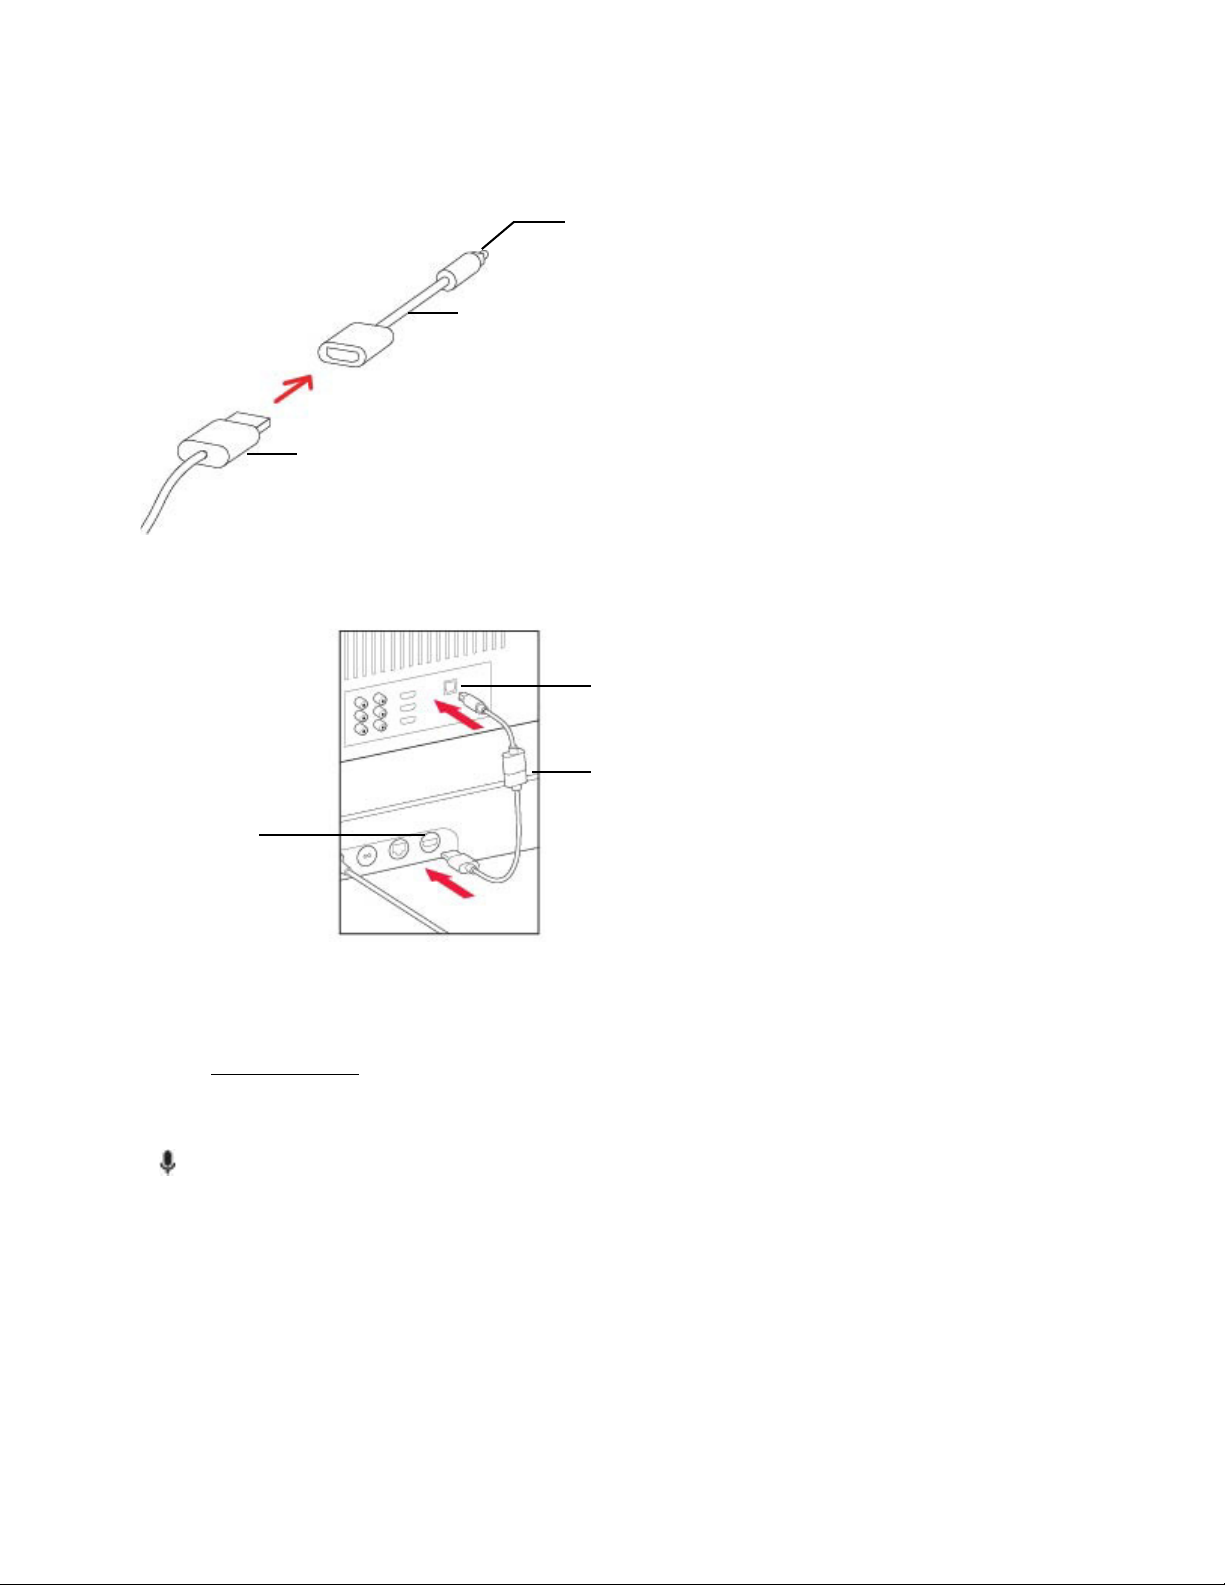
• Quick and easy setup, with only one cable to connect to your TV.
• Expandable. Add a Sub and two Sonos speakers, like Play:1s, for 5.1 surround sound. For more
information, see Sonos home theater.
• Works with either or .
•SeeGetting started when you’re ready to add a Beam to your Sonos system.
Controls and lights
Swipe, touch, tap, or ask—with Beam you’ve got choices on how to control sound.
• Use the touch controls—touch or swipe across the controls.
• Voice control—set it up and use your voice to turn the TV on or off, adjust the volume, or play music.
• Use the app.
• Use your TV remote control.
Volume control Touch for small adjustments or touch and hold to
quickly change the volume:
• Volume up (right)
• Volume down (left)
Note: You can also use the app, Alexa, or remote
control.
Play/Pause Touch to play or pause sound.
Microphone indicator
Volume down Volume up
Status light Play/Pause

SONOS USER GUIDE
Note: If you don’t want anyone (like a child) to control playback or change the volume using the speaker
touch controls, you can disable them in the room’s settings.
Connector panel
Next/Previous
(Music only)
• Swipe right across the touch controls to skip to the
next song.
• Swipe left to go to the previous song.
Note: You can’t skip forward or go back when listening
to a radio station.
Microphone
indicator
• Tap the microphone light to turn the microphone on
or off.
• When the light is on, voice control is on and you can
use voice commands.
• When the light is off, voice control is off.
Note: If the light is off, press and hold the Microphone
indicator to talk to Alexa. Release the button to
turn voice control off again.
Status light Indicates the status. Learn more
If the light is distracting, you can turn it off in your room’s
settings.
AC power (mains) input Use only the supplied power cord (using a third-party
power cord will void your warranty).
Note: Insert the power cord firmly until it is flush with
the speaker.
Join button Press to connect during setup.
Ethernet port Use an Ethernet cable if you want to connect to a router,
computer, or network-attached storage (NAS) device
(optional).
HDMI port Use to connect the soundbar to your TV.
HDMI port
Ethernet port
AC power (mains) input
Join button

SONOS USER GUIDE
Select a location
You can mount Beam to a wall above or below your TV or place it on a credenza.
Place on a credenza
• Place horizontally on a stable and level surface at least 2" (50mm) from the TV.
• Don’t place vertically or on its side.
• Don’t block the TV’s IR sensor.
• If put on a shelf, place at the front and keep 2" (minimum) clearance on both sides for best sound quality.
• Keep 1" (25mm) space (minimum) above Beam so you can reach the touch controls.
• For best sound quality, keep both ends of Beam at least 1' (30cm) from a wall or other obstruction.
Wall mount
To put Beam on a wall, see Wall mount.
Connect the cables
Before you start
1. Disconnect existing home theater or surround sound equipment from your TV.
2. Connect any external devices, like a cable box or DVD player, directly to your TV.
Connect the power cord
1. Insert the power cord firmly into Beam’s AC (mains) power port until it is fully connected.
2. Plug the other end of the power cord into an AC (mains) power source.
Caution: Use only the supplied power cord (using a third-party power cord will void your warranty).
Connect Beam to your TV
Use the HDMI cable to connect the soundbar to your TV. You may need the optical adapter too (the app lets
you know).
1. Fully insert the HDMI cable into Beam’s HDMI port.
2. Connect the HDMI cable to your TV. You have two choices:
Power cord
Power port
HDMI port
HDMI cable

SONOS USER GUIDE
•If your TV has an HDMI ARC port, connect the HDMI cable directly to the TV’s HDMI ARC port.
•If your TV doesn’t have an HDMI ARC port, attach the optical adapter to the HDMI cable and connect
it to the TV’s optical digital OUT port.
If your TV has an HDMI ARC port
HDMI ARC is a special port that looks like a standard HDMI port. Although they look the same, if you connect
to a standard HDMI port, you won’t hear sound.
1. On your TV’s audio OUT panel, look for an HDMI ARC port.
It may be on the back or side of your TV.
You’ll know it’s an ARC port if you see the word “ARC” on the label.
2. Connect the HDMI cable to the TV’s HDMI ARC port.
Note: If you can’t find the word “ARC” on the label, it isn’t the correct port. See If your TV doesn’t have an
HDMI ARC port.
If your TV doesn’t have an HDMI ARC port
You’ll need the optical audio adapter.
ARC HDMI
TV’s HDMI ARC port
Beam’s HDMI port

SONOS USER GUIDE
1. Remove the protective cap from the optical adapter.
2. Attach the optical adapter to the HDMI cable.
3. Connect the optical adapter to the TV’s optical digital OUT port.
Note: The optical adapter’s port is “D-shaped”—make sure the connector aligns correctly into the port.
Inserting the adapter incorrectly may damage the cable.
If you don’t have the app, download it from the app store. You’ll use it to set up and control your Sonos
system. See Getting started.
Microphone on/off
Touch to turn the microphone on and off. (If you don’t have a voice service installed, the microphone is
inactive.)
Optical adapter
HDMI cable
Remove the protective cap
TV’s optical digital OUT port
Beam’s HDMI port
Optical adapter attached to HDMI cable

SONOS USER GUIDE
When the microphone light is on, voice control is on and Alexa is ready to respond. When the microphone
light is off, voice control is off.
If you’ve installed a voice service and the microphone is off, you can still use voice commands. Just press and
hold while talking to Alexa—no need to start with a wake word. When you release the mic button, voice
control turns off again.
Wall mount
Guidelines
• Use the Beam wall mount kit. You can buy it on www.sonos.com. Follow the instructions in the kit.
• Keep 1" (25mm) space (minimum) above Beam so you can reach the touch controls.
• If you’re mounting above the TV, make sure you can reach the touch controls.
• For best sound quality, keep both ends of Beam at least 1' (30cm) from a wall or other obstruction.
Mount kit contents
• Wall mount bracket
• 4 wall anchors
• 4 wall screws
•2screws
Note: Don’t discard the template. It may look like packing material.

SONOS USER GUIDE
1. Tape the cardboard template to the wall above or below your TV. Use a level. Keep 1"(25mm) space
(minimum) for access to Beam’s touch controls. (Don’t install Beam vertically.)
2. Mark the center of the mounting holes and remove the template.
3. Use a 5/16" drill bit to drill pilot holes (see Wall mounting information)
4. Insert and secure the wall anchors (don’t use the anchors if drilling into wood).

SONOS USER GUIDE
5. Place the bracket on the wall and loosely tighten the wall screws to secure the bracket. Check with a level
and then tighten the screws.
6. Connect the power and HDMI cables to Beam.

SONOS USER GUIDE
7. Place Beam on the bracket.
8. Insert and tighten Beam to the bracket using the mounting screws.

SONOS USER GUIDE
Wall mounting information
Specifications
Wall Material Pre Drill Use Wall Anchors Use Screws
Wood Stud 1/8" / 3 mm bit No Yes
Drywall (no stud) 5/16" / 8 mm bit Yes Yes
Hard wallboard or double board 5/16" / 8 mm bit Yes Yes
Plaster 5/16" / 8 mm bit No, requires toggle bolt Yes
Concrete or Brick 5/16" / 8 mm bit Yes Yes
Feature Description
Audio
Amplifier Five Class-D digital amplifiers.
Elliptical Woofer Four full-range woofers ensures you’ll hear the faithful playback of mid-
range vocal frequencies plus deep, rich bass.
Tweete r One tweeter creates a crisp and clear high-frequency response.
Microphones • Five far-field microphone array uses for advanced beam forming and
multichannel echo cancellation.
• LED hard-wired to voice microphones for privacy control so you know
when the microphone is active.

SONOS USER GUIDE
* Specifications subject to change without notice.
Voice Control Integrated voice control.
System Requirements TV with HDMI ARC or optical digital audio output, broadband internet, and
the Sonos app.
Networking*
Wireless Connectivity See Setup options.
Ethernet Port One 10/100 Mbps Ethernet port. You can plug a Sonos product directly into
your router if your WiFi is unstable.
General
Power Supply Auto-switching 100-240 V, 50-60 Hz 2.5A AC universal input.
Dimensions (H x W x D) 2.68 x 25.63 x 3.94 in. (68 x 651 x 100 mm)
Weight 6.2 lb (2.8 kg)
Operating Temperature 32°F to 104° F (0° C to 40° C)
Storage Temperature -4°F to 122° F (-20° C to 50° C)
Control Use your remote control, voice, touch controls or the Sonos app.
Supported Devices Connects to TV with HDMI cable (with or without an attached optical
adapter). Plays sources connected to the TV, including cable boxes and
game consoles.
Package Contents Beam, AC power cord, HDMI cable, optical adapter, Quickstart Guide.
Feature Description

SONOS USER GUIDE
Important Safety Information
1.Read these instructions.
2.Keep these instructions.
3.Heed all warnings.
4.Follow all instructions.
5.If your product is wallmounted:
• Improper or inadequate wallmount installation could cause your device to fall, resulting in personal injury.
• Never hang from the Sonos product or the wall bracket.
• Once wall-mounted, periodically check to ensure screws remain securely tightened.
6.Do not use this apparatus near water.
7.Clean only with dry soft cloth. Household cleaners or solvents can damage the finish on your Sonos components.
8.Do not block any ventilation openings. Install in accordance with the manufacturer’s instructions.
9.Do not install near any heat sources such as radiators, heat registers, stoves, or other apparatus that produce heat.
10.Protect the power cable from being walked on or pinched, particularly at plugs, convenience receptacles, and the
point where they exit from the apparatus.
11.Only use attachments/accessories specified by the manufacturer.
12.Unplug this apparatus during lightning storms or when unused for long periods of time.
13.Refer all servicing to Sonos qualified service personnel. Servicing is required when the apparatus has been
damaged in any way, such as power-supply cable or plug is damaged, liquid has been spilled or objects have fallen
into the apparatus, the apparatus has been exposed to rain or moisture, does not operate normally, or has been
dropped.
14.The Mains plug should be readily available to disconnect the equipment.
15.Warning: To reduce the risk of fire or electric shock, do not expose this apparatus to rain or moisture.
16.Do not expose apparatus to dripping or splashing and do not place objects filled with liquids, such as vases, on the
apparatus.
Other manuals for Beam
4
Table of contents
Other Sonos Speakers manuals