G-Tek GT-U1M Instruction Manual

Global-Tek (Singapore) Pte Ltd
Page 1
FULLRACK UNDER-COUNTER
GLASS / DISHWASHER
Model : GT-U1M
INSTALLATION / USER MANUAL

Global-Tek (Singapore) Pte Ltd
Page 2
Contents
OVERVIEW ................................................................................. 3
INSTALLATION ........................................................................ 4
CONVERT 3 PHASE TO 1 PHASE CONNECTION .................. 5-6
SIGNALTERMINALS FOR DETERGENT DISPENSER ...... 6
WATER & DRAINAGE CONNECTIONS ............................. 7
OPERATION .............................................................................. 8
WASHING PROCEDURES ...................................................... 9
MAINTENANCE ..................................................................... 10
TROUBLING SHOOTING ..................................................... 11-12
WIRING DIAGRAGMS ............................................................ 13-16

Global-Tek (Singapore) Pte Ltd
Page 3
G-TEK GLASS-WASHER
Model U-1M
Installation,operation & maintenance
OVERVIEW
GT-U1M Under-counter glasswasher is a rack loading semi-automatic dishwashing machine.
When the wash tank is filled up to the required water level, once the door is closed & START
button pressed, the machine will run wash and rinse .
The machine is built with a 2.8Kw wash tank heater & a built-in booster heater with 4.5Kw
heating element.

Global-Tek (Singapore) Pte Ltd
Page 4
INSTALLATION
Before installation, please see the specification tag placed on the right hand side of the machine,
make sure to verify the electrical power supply. Right after the packing is opened, please examine
the machine immediately for any damage caused during transportation. If any, please keep all the
packing materials, and inform the supplier within 3 days.
Select the right place for installation
It is important to put the dishwasher at the right place for installation. Before to decide a proper
position, please consider the connection of power supply, water supply, drainage, gas heater (if
needed), S.S. working tables and detergent dispenser (to be provided), as long as the required space
for daily maintenance and ceiling height for opening machine door. (See diagram 1)
Diagram 1
The machine must be horizontally placed for all electrical and water connections. To reach the
desired height level and maintain balance, turn the adjustable foot accordingly.
Power connection
aWarning: All connection of electricity and grounding must comply with any applicable
ordinance of the national or local electrical law.
aWarning: Shut off power supply, hoist caution sign nearby, to alert anyone NOT to power on.
Please read carefully the electrical wiring diagram as shown on the machine case,
properly connect power cables with the designated terminals.

Global-Tek (Singapore) Pte Ltd
Page 5
Converting from 3 phase 380V ( 15Amp) to Single phase 220V (25Amp)
A/ In main power supply
1/ Remove wires L2 & L3 from in-coming power cable side,
2/ Joint terminals L1, L2 & L3 together,
3/ Remove L2 from outgoing wires side, isolated it with a wire cap (not provide).
4/ Remove L3 from outgoing wires side then connect it to the empty N terminal provided.
5/ Becomes Diaphragm 2B
In-coming power cable In-coming power cable
Out-going wires Out-going wires
3Ph 380V 1Ph 220V
Diagram 2A Diagram 2B

Global-Tek (Singapore) Pte Ltd
Page 6
B/ In booster heating element
1/ Remove wire V1 from heating element (diagram 3B),
2/ connect three points together, make it becomes like Diagram 3A,
3/ connect U1 & W1 to each side of the terminals.
Diagram 3A Diagram 3B
C/ In booster heater contactor
Remove wires L2 & V2 from booster heater contactor
Signal terminals for connecting detergent dispenser
In the electrical control box, 1FU provides 220v, 5A constant supplies for dispensing
equipment. Connect 2FU & N terminals with the detergent signal power of the dispenser, connect
3FU & N terminals with the rinse signal power of the dispenser (see diagram 4), each power
loading must not exceed 3A. During wash cycle, 2FU provides 220V output; during rinse cycle,
3FU provides 220V output. Please refer to the electrical wiring diagram on the machine case.
zAttention: The pull out distance of the electrical box should be put into consideration for
all the wire connections, to prevent wires from loosening.
zAttention: Please use 600V or above sealed electrical wire, never try telephone wire.
Diagram 4

Global-Tek (Singapore) Pte Ltd
Page 7
Water connection
Caution: check water inlet pressure after connection, if flowing pressure below 1 kg/cm2,a
water pressure pump (to be provided by other supplier) is needed, if static pressure is higher than 3
kg/cm2, a water pressure reducer (to be provided by other supplier) is needed.
aWarning: Water pipe connection must comply with relative local hygiene safety ordnances
and plumbing code.
Water supply
Connect the water inlet hose (3/4”thread) with water supply valve.
Relative heating power Water inlet temp. Water flow pressure
oCoF Bar kg/cm2
4.5 Kw rinse heating 30~50 86~122 1~3 1~3
Drainage
Connection the drain pipe (11/2”) under the wash tank with an appropriate drainage (drain
capacity should be at least 95.5 L/min.)

Global-Tek (Singapore) Pte Ltd
Page 8
OPERATION
Control panel
Diagram 5
Power Press the power switch , power light on, indicates power connected; Press
again, power light off, indicates power shut down. (See diagram 5)
Power light Power light is on, means the machine is ready to use.
Cycle light Cycle light , is on, means dishwashing processes is in progress; cycle light off
means programs finished.
Temp. light Indication at the bottom shows wash temp., indication on top shows rinse temp.,
green lights on indicate present working temp.
Recommended operating temperature
Main wash temp. 50 oC-60 oC(122 oF-140oF)
Final rinse temp. 82 oC-90 oC(180 oF-194 oF)
Start Close the door, press “ START "button, the machine will automatically proceed
wash and rinse programs.
Drain To drain tank water, lift up the overflow pipe.

Global-Tek (Singapore) Pte Ltd
Page 9
Preparation works
Properly place the scrape trays into the machine, and plug-in the overflow pipe.
Close the door and turn on power, press START button, wash tank will be filled.
Once water is full, open door and check water level. Turn on the detergent dispenser
(follow supplier’s instruction).
Wait until wash temperature reaches proper range before start to wash.
Close the door, press START button for each wash.
Washing procedures
Scrape off food residues from dishes.
Property load tableware into racks, by the manner that all the surfaces of every piece
of tableware should have adequate exposure for water flushing. Dishes are to be
vertically inserted, and bowls should be inversely put into plate rack; cutlery,
chopsticks have to be dispersed loaded in open rack; and glasses must be inserted into
compartment rack. Wash cycle time is pre-set at 60 second, it can be adjusted up to
max. 120 second by changing the setting of the wash cycle timer which located inside
the electrical box.
When a rack is loaded, open the door, put in the machine and close the door.
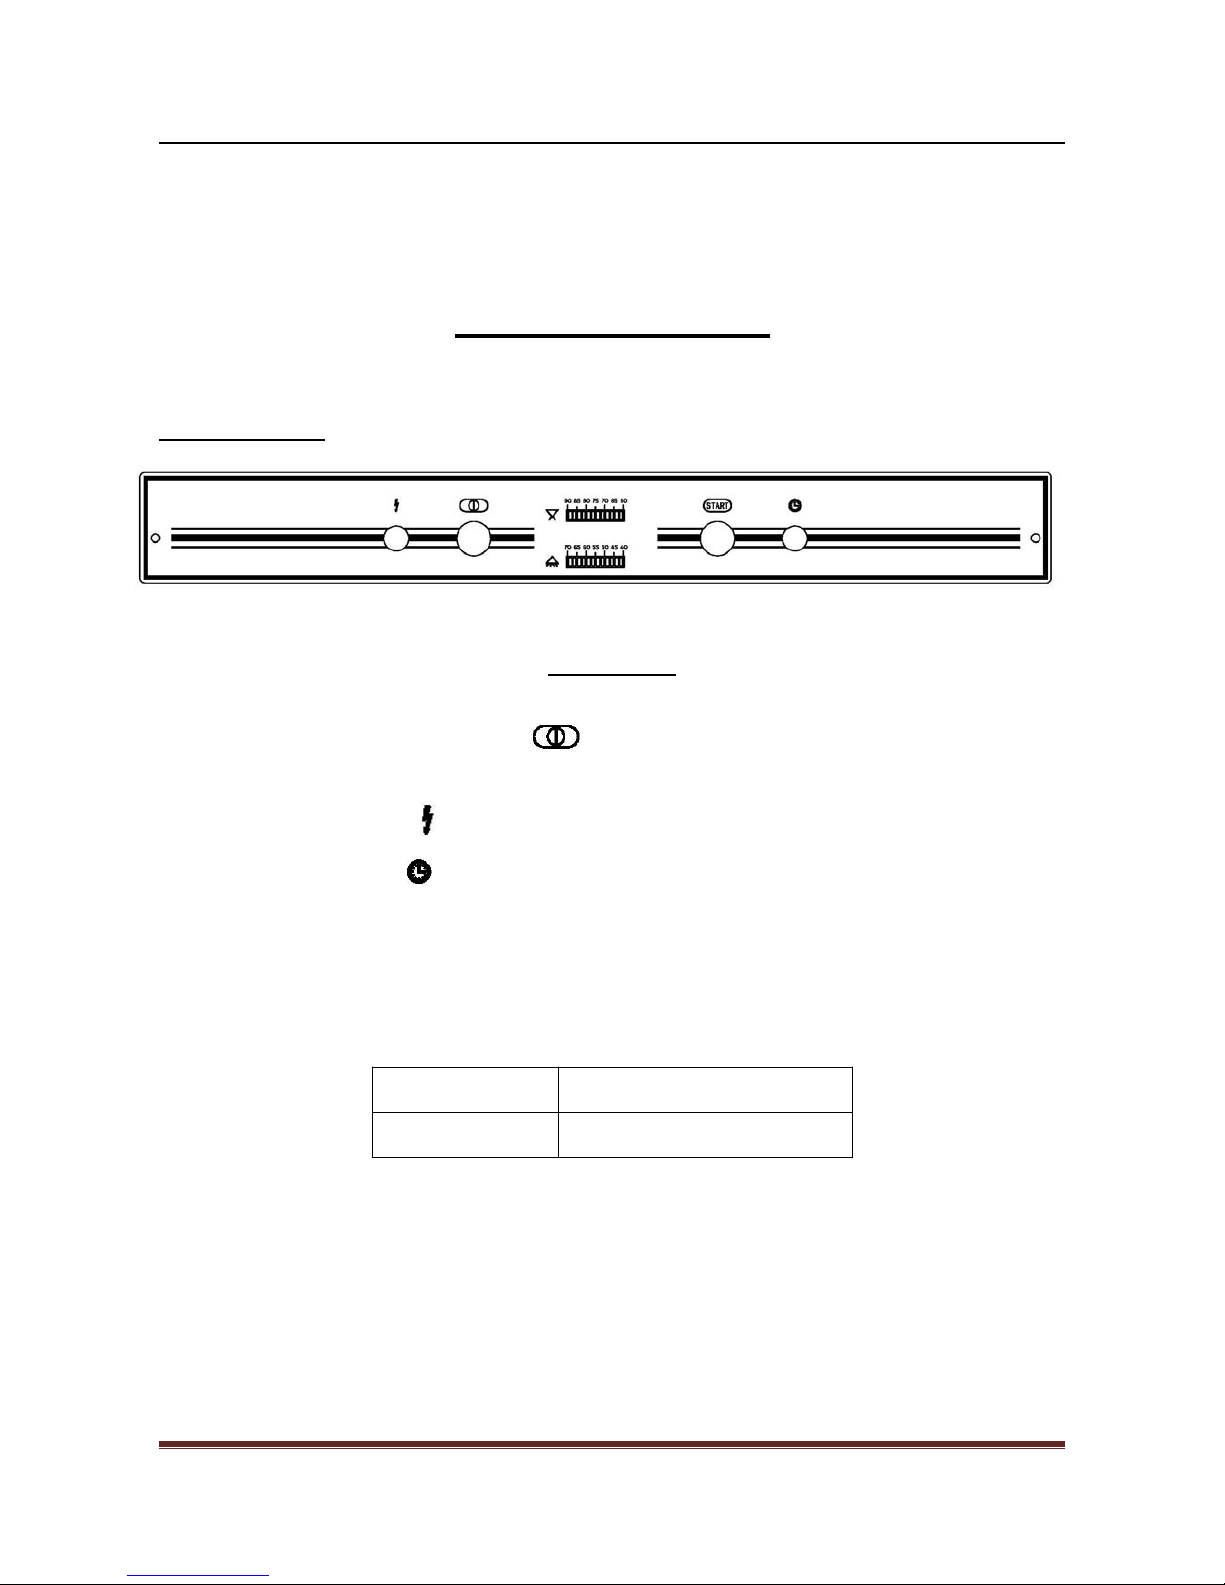
Press , button, wash and rinse will proceed automatically. Main wash program
starts as the door is closed, and final rinse program will follow right after wash
finished.
When wash & rinse programs ended, open the door when cycle light off, pull out the
washed rack, then send in another rack, close the door and press START button
continue for next wash.
Whenever cycle starts, door should not be opened; it’s a danger of hot water splashing.
After each cycle, wait until cycle light off, so as to open safely.
Cleaning the machine
Recommended to clean thoroughly all interior parts of the machine after each use (every
meal or at least once a day)

Global-Tek (Singapore) Pte Ltd
Page 10
Cleaning procedures:
1. Shut off power.
2. Open the door.
3. Clean working tables, and scrape off wasted water into machine.
4. Lift up overflow pipe to drain tank water.
5. Remove scrape trays and pump intake screen, dump the residues (but not to crash,
otherwise, change in shape may result in poor straining effect) and clean the
equipment.
6. Flush to clean the interior of the machine, thoroughly wash away all the dirt inside.
7. Put all the straining equipment back to place.
8. Check every upper and lower spray jets for clogging, if there is any, use a narrow pin
to clear obstruction or remove the spray arms to clean.
9. Keep the door open to let air dry, in order to prevent mould from growing.
MAINTENANCE
aWarning: Shut off power supply, hoist caution sign nearby, to alert anyone NOT to
power on.
Wash and rinse arms
Both upper and lower wash and rinse arms could be rotated freely for a few seconds
by gently swinging. Turn off the machine before testing, and remove obstruction if exists.
If the straining equipment is not in place, then the wash arms and jets may be clogged.
If happened, unload the wash arms for cleaning.
To unload the wash and rinse arms, just unlock the thumb screws, between the
bearings of both arms.
Attention: the O-ring seat of the lower wash arm should not be removed.
When unloading the upper arms, hold the arm tightly during unlocking the thumb
screw, to avoid falling down.
Both sets of upper and lower arms can be exchanged for installation.

Global-Tek (Singapore) Pte Ltd
Page 11
TROUBLE SHOOTING
This chapter only provides some general methods for problem solving. If problem
persists, please contact the supplier.
Common problems Possible reasons and easy solutions
Machine cannot be
started 1. Open the door and shut down again after 2 seconds.
2. Fuse blown or jumper disconnected.
3. Check the fuse of the control circuit.
Long Wash. 1. Wash Timer may be faulty.
Rinse remains at low
temp. 1. Rinse temp. setting is too low.
2. Water fill pressure or flow volume is too low, cause low
water level in booster heater.
3. Check water inlet strainer and solenoid valve.
Poor wash results 1. Incorrect pump direction.
2. Wash spray is too weak due to pump intake is clogged.
Power off and drain tank water, check wash pump intake
for any obstruction.
3. Wash temp. is too low. Inadequate pre-heating time, or
check the thermostat and heating elements.
4. Improper detergent dosage, please contact the supplier.
5. Excessive lime build-up, needs to de-lime.
Streaks found on ware
washed
1. Improper racking.
2. Rinse temp. is high or too low.
3. Clogged pump intake.
4. Abnormal water hardness.
5. Wash detergent does not suit local water quality.
6. Rinse drying agent not suit local water quality.
7. Improper dosage of the cleaning chemicals.
Inadequate rinse
pressure
1. Clogged water inlet strainer, causes slow water flow.
Close the water supply, remove the strainer between inlet
hose and solenoid valve, clean the strainer screen and then
fix up.
2. Water supply pressure is too low.
3. Rinse jets clogged.

Global-Tek (Singapore) Pte Ltd
Page 12
Leaking on solenoid
valve 1. Solenoid valve obstructed. Attention: It is of high
importance to check the machine after installation as lime
scale or debris may be able to fall into the valve during
installation. Shut off the water supply and take out the valve.
Clean the valve and put it back to its position.
Continue fill or cannot
fill water
1. Tiny obstruction entered the fill solenoid valve, resulting
in abnormal functioning. Caution: detail checking right
after installation is very important, small chips may go
inside into the piping and being stuck inside valve. Power
off, open the solenoid valve and clean all the interior
parts, then fix up.
2. Inlet water flow too low.

Global-Tek (Singapore) Pte Ltd
Page 13

Global-Tek (Singapore) Pte Ltd
Page 14

Global-Tek (Singapore) Pte Ltd
Page 15

Global-Tek (Singapore) Pte Ltd
Page 16
Table of contents