Galeria Selection 4017805510593 User manual

OPERATION MANUAL
RADIO ALARM CLOCK
EAN 4017805510593
1
RADIO ALARM CLOCK
Thank you for purchasing this radio alarm clock. This device features a radio clock, a calendar,
an alarm function, and a thermometer for measuring room temperature.
Please read this user manual carefully before using the device in order to get familiar with its
properties and features. Keep the instructions safe for future reference.
Operating this device requires 2 x 1,5V. “AAA” LR03 batteries.
Safety instruction
The device has been designed and manufactured to provide you with many years of satisfactory
operation when used correctly. To guarantee this, please follow the safety instructions listed
hereinafter.
1. Do not expose the device to extreme stress such as impacts, extremely high
temperatures or extremely high humidity. This could cause damage to electronic
components or other single parts.
2. Never let the device drop into water as this could result in a complete malfunctioning of
the product.
3. Never use sharp, abrasive cleaning agents or corrosive substances, as those could
damage the device permanently, scratch plastic parts, or cause corrosion of circuits.
4. Never open the housing, this voids the warranty.
5. Always use new batteries and according to the instructions in this manual; never mix old
and new batteries. Old batteries could leak and damage the device.
6. The device must only be used as intended.
7. Have repairs done by authorized personnel only.

OPERATION MANUAL
RADIO ALARM CLOCK
EAN 4017805510593
2
8. Only use the device after you have carefully read this user manual. Keep the manual
safe for future reference. When giving away or selling the device, make sure to also
hand over this user manual.
Product overview
LCD display
A1: Room temperature
A2: Weekday
A3: Alarm time 2
A4: Month
A5: Day
A6: Time
A7: Alarm time 1
A8: Snooze icon
A9: Radio clock reception
A10: Battery indicator
A11: Daylight saving time

OPERATION MANUAL
RADIO ALARM CLOCK
EAN 4017805510593
3
Controls
B1: ALM-1 button
B2: ALM-2 button
B3: MODE/SET button
B4: button
B5: button
B6: Battery compartment
B7: SNOOZE/LIGHT button
Starting operation
First open the battery compartment cover of the device and insert 2 x 1.5 V. AAA LR03 batteries
at the correct polarity into the battery compartment (the correct polarity is shown in the battery
compartment). Close the battery compartment cover of the device.
After inserting the batteries, the display light and all display indicators light up briefly. An
acoustic signal sounds. Shortly after that the display will show the measured indoor room
temperature and then returns to standard value.
The clock will automatically search for the radio signal. After approx. 3-5 minutes this process is
completed. The radio clock reception icon (A9) flashes in the LCD during that procedure. The

OPERATION MANUAL
RADIO ALARM CLOCK
EAN 4017805510593
4
clock automatically sets to the correct time and date when the device receives the radio clock
signal. The radio clock reception icon (A9) lights up steadily. The clock connects to the radio
clock signal once daily.
Press and hold the button (B4) for approx. seconds in order to manually search for a radio
clock signal. The radio clock reception icon (A9) flashes in the display during that procedure.
Please note:
While the system is searching the radio clock signal and the radio clock reception icon (A9) is
flashing, only the SNOOZE/LIGHT button (B7) is available. All other buttons are not active at
that moment.
Press the button (B4) at any time to cancel the search for the radio clock signal. The search
for the radio clock signal will automatically stop, once an alarm gets activated.
Information on synchronizing the radio clock signal
Time and date are radio-controlled. The current time is synchronized with the radio signal from
Frankfurt, Germany (DCF77). DCF77 is a time signal and is normally emitted at the normal
frequency 77.5 kHz as time information in coded form. The transmitting power is approx.. 50 kW
with a broadcasted power of approx. 30 kW and coverage of approx.. 1500 km in the vicinity of
Frankfurt/Main (Mainflingen).
Daylight saving time
In summer the clock automatically switches to daylight saving time and in winter returns to
standard time. If the daylight saving time has been set, the daylight saving time icon (A11) lights
up in the display.
Please observe the following operating instructions:
1. The device synchronizes automatically every day.
2. Do not install the device near interfering sources such as TVs, computers or similar.
3. Avoid placing the device next to or on metal surfaces.
4. It is not recommended to use the device in locations such as airports, basements,
factories and rooms that incorporate reinforced concrete in their walls.
5. Do not start radio reception while in a moving vehicle such as a car or train.

OPERATION MANUAL
RADIO ALARM CLOCK
EAN 4017805510593
5
Manually setting the time
If you are out of range of the radio transmitter or if reception is not possible, you can manually
set the time. Nevertheless, the radio clock continues searching for radio signals every single
hour. When the radio signal can again be received, the time will adjust automatically.
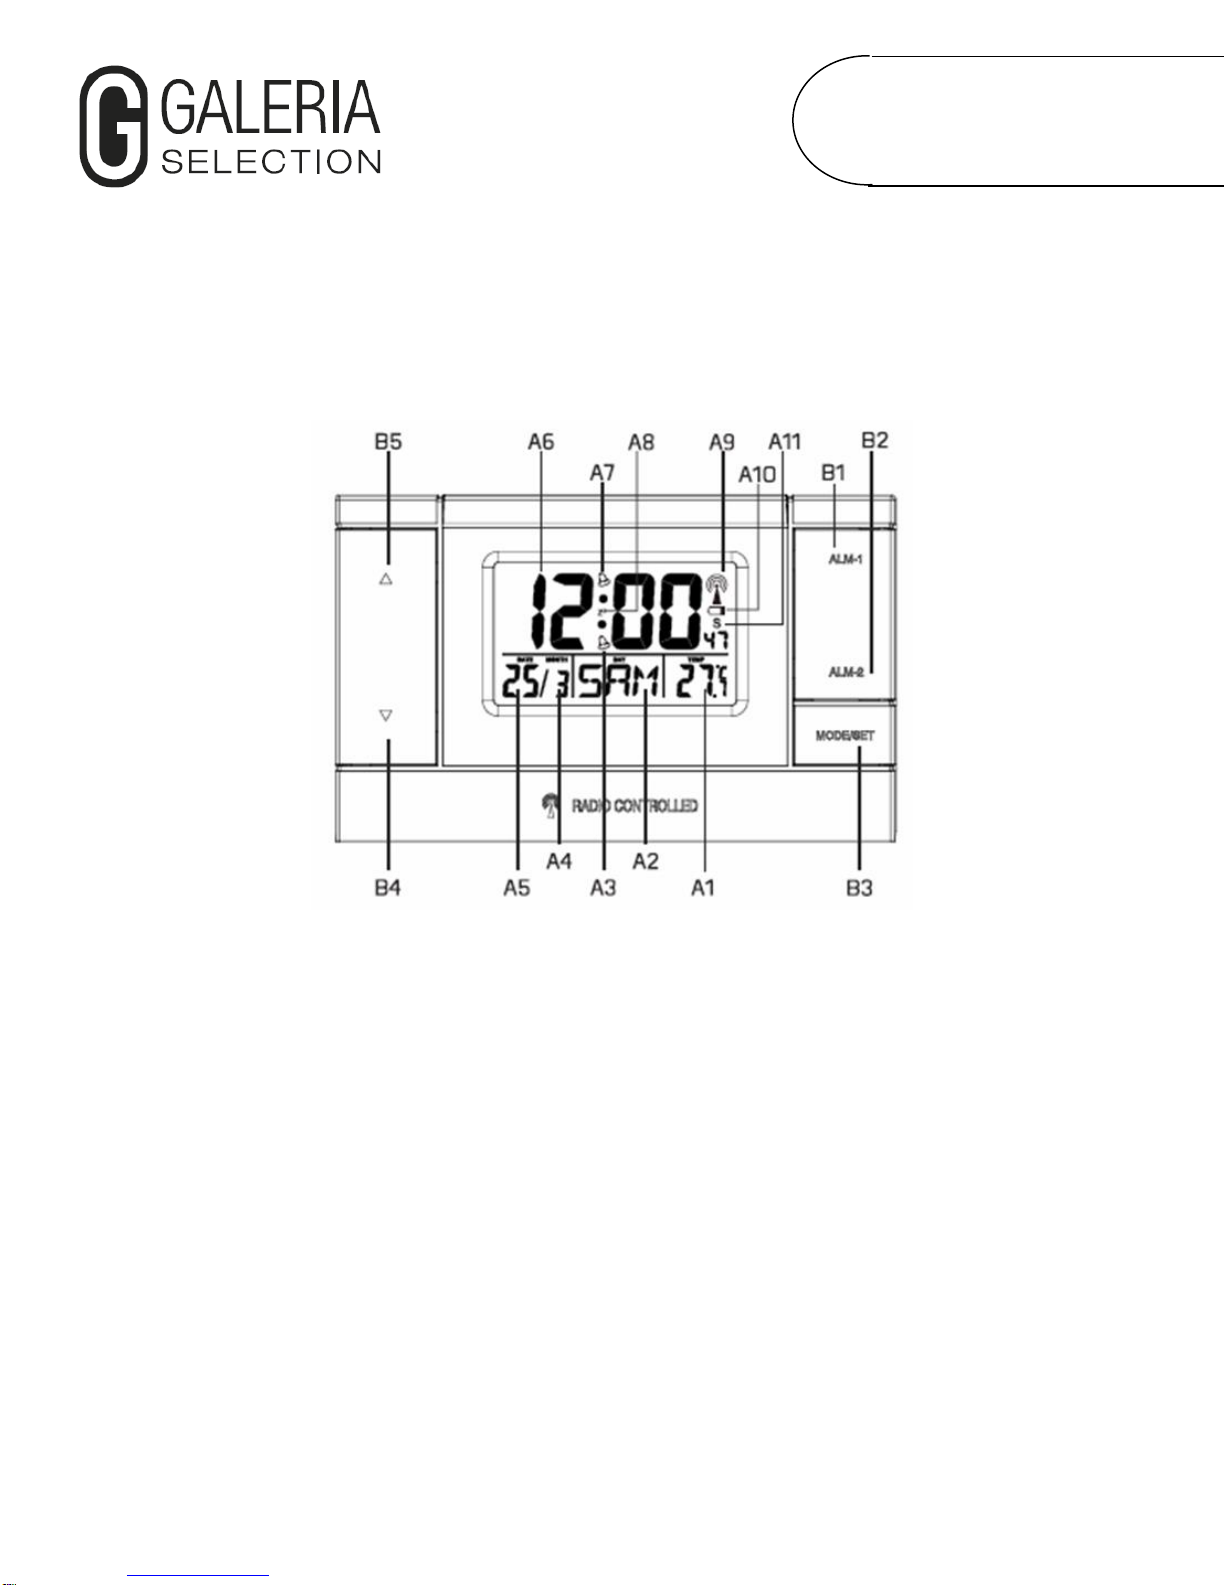
1. When in normal time display mode, press and hold the MODE/SET button (B3) for
several seconds, until “00” starts flashing in the display. You may the set the time zone
by pressing the (B5) or (B4) buttons. For use in Germany, leave the setting at “00”.
2. Press the MODE/SET button (B3) again to save your settings and to navigate to the next
value.
3. Set the additional value in the following sequence as described above: Hours, minutes,
year, month, day, and language.
The hour starts flashing and can be adjusted using the (B5) or (B4) button.
4. Press the MODE/SET (B3) button again. The minutes start flashing and can be set using
the (B5) or (B4) buttons.
5. Press the MODE/SET (B3) button again. The year starts flashing and can be set usin
(B5) or (B4) buttons.
6. Press the MODE/SET (B3) button again. The month starts flashing and can be adjusted
using the (B5) or (B4) button.
7. Press the MODE/SET (B3) button again. The day starts flashing and can be set using
the (B5) or (B4) buttons.
8. Press the MODE/SET (B3) button again. The language of the weekday display starts
flashing and can be set using the (B5) or (B4) buttons.
There following languages available to display the weekday:
German (GER)/English (ENG)/Danish (DAN)/Spanish (ESP)/ Dutch (NET)/ Italian (ITA)/French
(FRA).
Note: If there is no input for more than 30 seconds, the system returns to normal time display
mode. All settings changed that far will be saved.
Press and hold the (B5) or (B4) buttons for approx. 2 seconds to adjust the values in
quick mode.

OPERATION MANUAL
RADIO ALARM CLOCK
EAN 4017805510593
6
Please note:
The German time signal can also be received all over Europe e.g. in England and Portugal. To
compensate for the time difference, you may open the settings and adjust the existing difference
by selecting the corresponding time zone of the respective country. Manual setup of the clock is
now complete.
Alarm settings
Setting alarm time “Alarm 1” and “Alarm 2”
Your radio alarm clock supports up to two different alarm times
1. Press and hold the ALM-1 (B1) button, until the hours of alarm time 1 start flashing in
the display. “A1” appears in the display.
2. Press the (B5) or (B4) buttons to adjust the hours.
3. Press the MODE/SET button (B3) to confirm the setting. The minutes start flashing.
4. Press the (B5) or (B4) buttons to adjust the minutes. Press MODE/SET (B3) again
to confirm. The alarm time 1 will be saved but not activated.
5. In order to set alarm time 2, press and hold the ALM-2 (B2) button, until the hours of
alarm time 2 start flashing in the display “A2” appears in the display.
6. Repeat the above steps for setting alarm time 2. Setting the alarm.
Switching the alarm on and off.
1. Press the ALM-1 (B1) button when in normal time display mode, in order to activate
alarm time 1. The symbol for alarm time 1 (A7) appears in the display.
2. Press ALM-1 (B1) again to deactivate alarm time 1. The symbol for alarm time 1 (A7)
disappears.
3. Press the ALM-2 button (B2) to activate alarm time 2. The symbol for alarm time 2 (A3)
appears in the display.
4. Press ALM-2 (B2) again to deactivate alarm time 2. The symbol for alarm time 2 (A3)
disappears.
Displaying the set alarm time
1. To snow the stored alarm times when in normal time display mode, press the
MODE/SET button (B3).
Alarm time 1 appears briefly in the display.

OPERATION MANUAL
RADIO ALARM CLOCK
EAN 4017805510593
7
2. Press the MODE/SET (B3) button again. Alarm time 2 appears briefly in the display.
3. Press the MODE/SET (B3) button again to return to normal time display mode.
Interrupting the alarm (SNOOZE), switching off the alarm clock for the current day.
You can interrupt the alarm by pressing the SNOOZE/LIGHT button (B7). The “zZ” indicator
(A8) and the symbol for alarm time (A3) / (A7) start flashing in the display. By default, the repeat
alarm function has been set with 5 minutes. The alarm sounds again after 5 minutes.
Pressing any other button will turn off the alarm for the current day. The alarm will sound again
at the set time of the next programmed day. The symbol for alarm time (A3) / (A7) lights up
steadily in the display.
Other functions
Celsius (°C) / Fahrenheit (°F)
To switch between °Celsius and °Fahrenheit, press the (B4) button when in normal time
display mode.
24-hour or 12-hour time display mode
When in normal time display mode, press the button (B5) to select 24-hour or 12-hour time
display mode.
Backlight
Press the SNOOZE/LIGHT button (B1) to turn on the display backlight for approx. 4 seconds.

OPERATION MANUAL
RADIO ALARM CLOCK
EAN 4017805510593
8
DISPOSAL INFORMATION 7 INFORMATION ON ENVIRONMENTAL PROTECTION
Battery information
1. Caution! There is a risk of explosion if the batteries are replaced in an improper
way.Only replace batteries by the same or an equivalent type of battery.
2. Always change the whole set of batteries. Do not mix old and new batteries, or batteries
with different state of charge.
3. Ensure that you use the batteries correctly. Respect the (+) plus/(-) minus polarity on the
battery and on the housing. Batteries which are used incorrectly may leak, or may cause
a fire or an explosion in extreme cases.
4. Never expose batteries to heat (for example blazing sun, fire) and never throw them into
a fire. The batteries may explode.
5. The connections should not be short-circuited.
6. Remove used batteries from the product immediately. Remove the batteries if you know
that the device will not be used for a long period. Otherwise the batteries may leak and
cause damage.
7. Keep all batteries out of the reach of children. Seek medical attention immediately
8. If batteries are swallowed.
9. Do not attempt to charge non-rechargeable batteries.
10. Rechargeable batteries must be removed from the device before charging.
11. If batteries leak, remove them from the battery compartment using a cloth and dispose of
them in accordance with regulations. Avoid skin and eye contact with the battery acid. If
your eyes come into contact with the battery acid, rinse them with lots of water and
contact a doctor immediately. If battery acid comes into contact with skin, wash the site
with lots of water and soap.
12. Remove the batteries from the product before disposing of the product.

OPERATION MANUAL
RADIO ALARM CLOCK
EAN 4017805510593
9
Labelling of waste electrical and electronic equipment according to directive 2012/19/EU Article
14 (2) e) in conjunction with Annex IX:
Environment Protection
Discarded electric appliances are recyclable and should not be discarded in the domestic waste!
Please actively support us in conserving resources and protecting the environment by returning
this appliance to the collection centres.
Labelling of the disposal of waste batteries according to directive 2006/66/EG Article 20 (1) e) in
conjunction with
Annex II
Used batteries must not be disposed of through household garbage, since they might contain
toxic elements and heavy metals that can be harmful to the environment and human health.
consumers are there for obligated to return batteries to retail or local collection facilities free of
charge. used batteries will be recycled.
they contain important raw materials such as iron, zinc, manganese or nickel.
the crossed-out wheelie bin symbol indicates. batteries and rechargeable batteries must not be
disposed of through household garbage.
the symbols below the wheelie bin indicate:
Pb: battery contains lead
Cd: battery contains cadmium
HG: battery contains mercury
Hereby, Weinberger GmbH & Co. KG, declares that the radio equipment type [EAN at the end
of the construction manual] is in compliance with Directive 2014/53/EU.is in compliance with
Directive 2014/53/EU.
The full text of the EU declaration of conformity is available at the following internet address:
Weinberger GmbH & Co.KG
Bergische Str.11
Industriegebiet Ost
42781 Haan
info@weinberger-group.de

OPERATION MANUAL
RADIO ALARM CLOCK
EAN 4017805510593
10
WARRANTY
The statutory warranty is valid for this product.
Damage which is caused by improper handling or operation, by incorrect set up or storage, by
improper connection or installation, as well as by force majeure or other external influences, is
not under guarantee. If product specific information is enclosed then we recommend that you
promptly read and comply with this.
Information:
If this product no longer functions correctly, then check whether this is due to a reason such as,
for example, an interrupted electrical supply (in so far as this concerns an electrical device) or
incorrect use in general.
Ensure that you attach, or have ready, the following documents or information for your product if
possible:
Sales receipt
Device name/type/brand
Description of the fault that has occurred with information on the fault which is as specific
as possible
Please contact your retailer for warranty claims or faults.
GWL 8/14 DE
Table of contents