Setup Guide
Congratulations on the purchase of your new Camera kit!
The DISCOVERY range of nest box camera systems is, in our
opinion, the best available on the market today!
We’ve taken our award winning kits and made them even better
with the introduction of a number of key features.
The nest box itself follows the classic design for a nest box and will
attract the widest range of garden birds. We use high quality
Western Red Cedar (from renewable sources) so the box requires
no treatment with preservatives or chemicals as the natural oils in
the wood will protect it against the harshest weather conditions.
The roof fits into a slot in the rear panel preventing rain from
entering the box and is easily removed for cleaning out at the end
of the nesting season.
The camera position offers fantastic wide angle views of the inside
of the nest box. The whole of the base of the nest box can be seen
along with the entrance hole so you won’t miss any of the action.
Getting Started….
Follow the guide below to help ensure the best possible chance of
attracting any number of different birds in front of your
GARDENATURE WILDLIFE CAMERA.
STEP1. Before venturing outside….
It is advisable to connect up and check that the camera is
functioning correctly (has not been damaged in transit).
You can unscrew the two top screws on the front of the nest box to
remove the top front section and roof if you want to see the mini
video camera mounted on the quick release bracket, note the
cables are tucked neatly behind the plastic panel.
The camera is pre-focused to approx 50mm from the base of the
nest box to allow for the height of the nest, so when you look at the
empty nest box on screen for the first time it may appear very
slightly out of focus. THIS IS FINE! Do not be tempted to adjust the
focus to get a crisp image of the base of the nest box. If you do it is
highly probable that the images of the nesting birds will be out of
focus. However, if you think you have adjusted the focus by
mistake (when taking the lens cap off for example) simply place a
small item inside the nest box (approx 50-70mm from the base)
and readjust the focus manually by gently turning the camera lens
left or right.
The angle of the camera can be slightly adjusted to ensure view is
centralised.
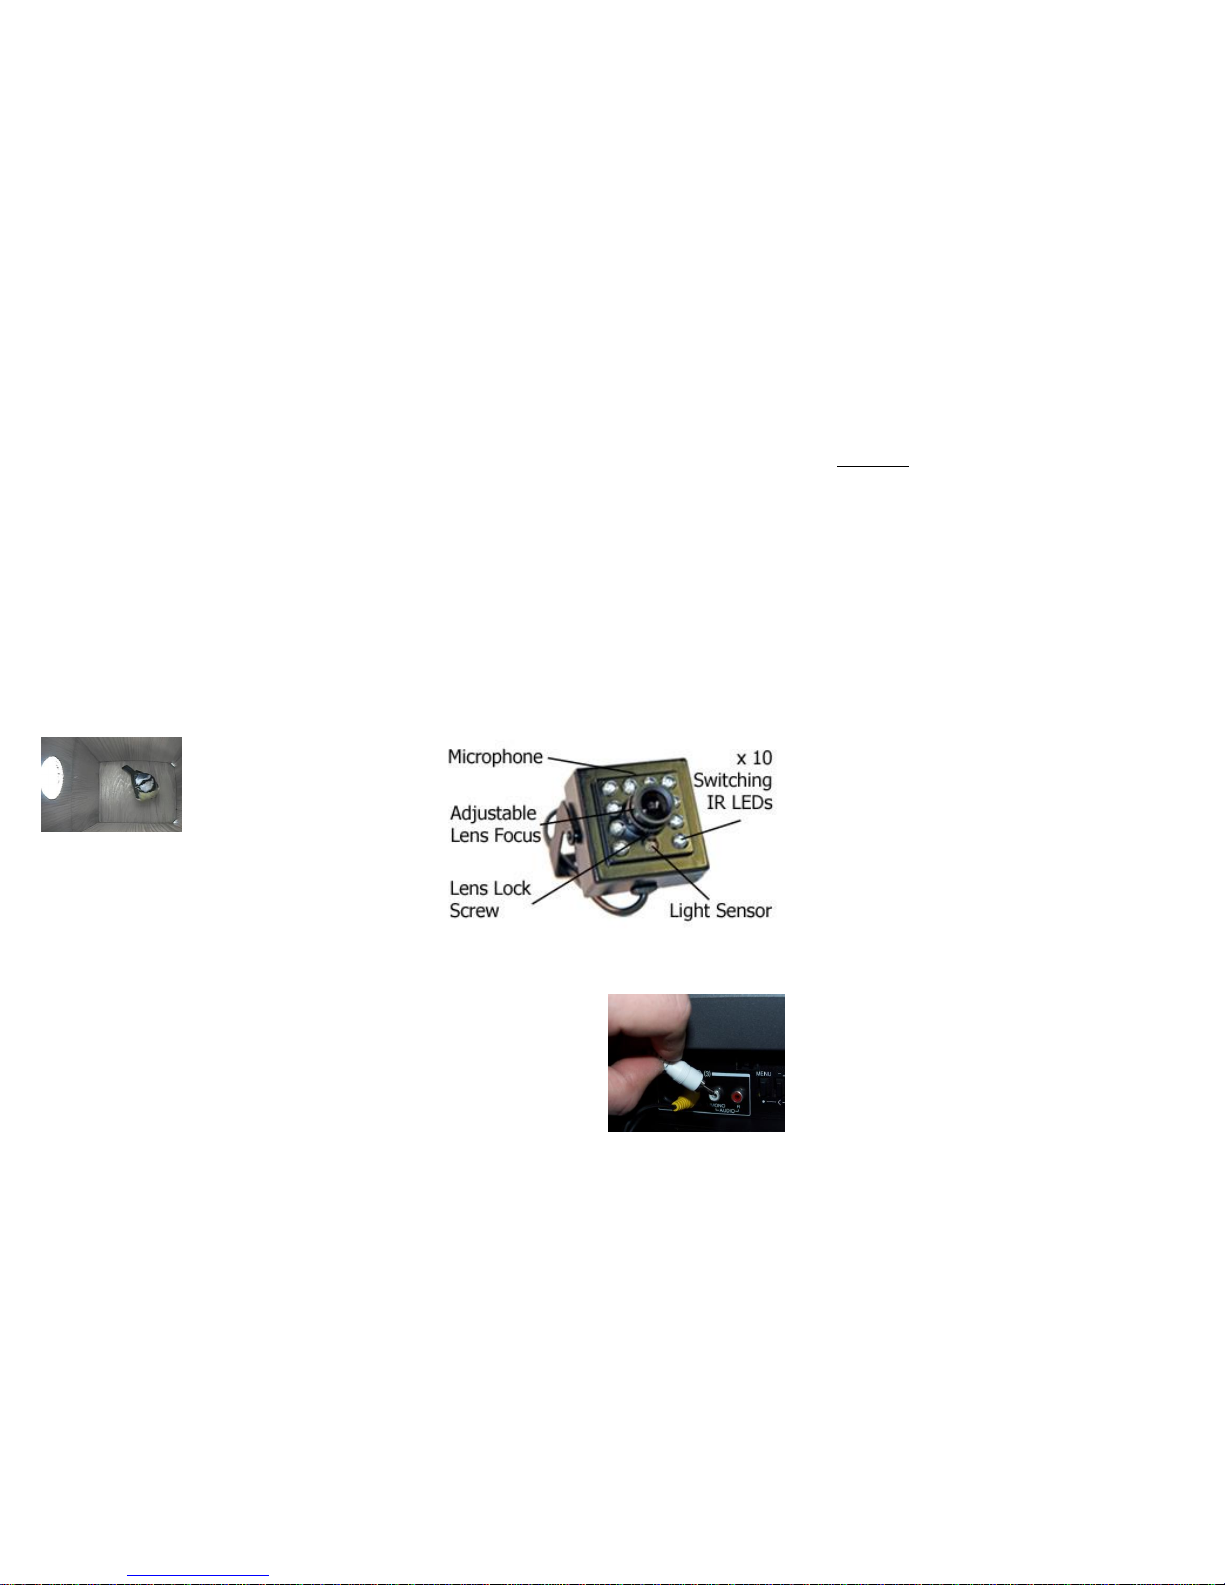
Looking either side of the lens you will find a row of IR LEDs (Infra
Red Light Emitting Diodes). These are used to illuminate the inside
of the nest box at night with invisible infra red light. These will be
present even if your camera DOES NOT have IR nightvision
activated (they will not work as the electronics inside the camera
are not installed). If you find that the IR LEDs bleach out the colour
slightly try covering one or more of the LEDs with a small piece of
black insulating tape.
The camera also has a built in microphone so you can hear as well
as see what’s going on!
Place the camera back onto the quick release bracket in the nest
box.
Now connect the colour coded connectors on the end of the cable
(yellow = video, white = Audio) to a spare AV socket on your TV or
video/DVD recorder (use
supplied scart adaptor if
required) and the red/black
socket to the supplied 12v
mains adaptor. Select the
appropriate AV channel using
your remote control. You will
normally find a button on your
remote that is labelled AV,
INPUT or AUX. Each time
you press this button the TV
will cycle through the
available AV channels. Keep pressing the button until images from
inside the nest box appear on screen. If you are planning to record
images via your video/DVD Recorder then make sure you select
the correct channel on the video/DVD recorder too.
.
Please Note: Make sure the yellow, white and black camera
/cable connections are placed behind the plastic panel at the
rear of the nest box as these are not waterproof connections.
Always switch off power at the mains before swapping
cameras between boxes to eliminate any potential electrical
shock hazard!
Colour camera kits are designed to use ambient daylight to
illuminate the inside of the box to minimise disturbance to the
birds. Colour images will be obtained in bright daylight. If
your colour camera has built in infra red illumination (option
at additional cost) B&W images will be obtained when
insufficient light enters the nest box such as on very dull days
and at night.
Experiment with positioning of the nest box to obtain best
results.
This camera system can be connected to a PC, laptop or
interactive whiteboard using an appropriate capture/TV card or one
of our VIDEO TO USB ADAPTORS. Once connected your
Gardenature camera will appear as any other live video source
(just like a webcam for example) and as such can be used with
most webcam software or any other software that can accept a live
video input. If you wish to have motion detection capabilities we
recommend icatcher wildife available on our website
www.gardenature.co.uk.
STEP 2. Where to site the nest box
It doesn’t really matter in which direction you position the entrance
to your nest box. What is important is that you do not face the hole
towards the prevailing wind as this will almost certainly mean that
rain will get into the box during wet and windy weather.
Traditionally, this means boxes are positioned facing between
north and east. Try and avoid direct or prolonged exposure to
sunlight on your box since overheating inside the box can
sometimes result in heat stress to the young birds inside. Nest
boxes fitted with a colour camera have a small plastic window in
the roof. This is allow just enough light inside the box to give you
good colour images. Experiment with the position of the nest box
to give you the best results. Remember to allow for excessive leaf
cover later if you are erecting the nest box during the winter.
Placing a nest box in close proximity to a feeding device or feeding
station may well put off birds from nesting in the box. Remember
that most nesting birds are highly territorial and do not like
intruders in their territory. Either remove feeders just before and
during the breeding season or place the nest box well away from
the feeding station.