GE TURBOCOOL 23 Safety guide

.170.COrn
°e..q
oq
°e..q
oq
Safety Instructions ........... 2-4
Operating Instructions
Automatic Icemaker ........... 14
Care and Cleaning .......... 16, 17
ClimateKeeper2 ''_ . .............. 6
Crispers and Pans ............. 13
CustomCool _'_................ 7, 8
Ice and Water Dispenser ..... 15-16
Q uickFreeze r'' . ................ 9
Quick Ice .................... 15
Refligerator Doors ............ 12
Replacing the Light Bulbs ....... 18
Shelves and Bins ........... 10, 11
Temperature Controls ........... 5
TurboCooF* . .................. 6
_'ater Filter . .................. 9
Installation Instructions
Installing the Refrigerator . . . .28-31
Moving the Refligerator . .... 24-27
Preparing to Install
the Reflig_ramr . .............. 23
Trim Kits and Panels ........ 19-22
VCater Line Installation ...... 32-34
Troubleshooting Tips ....... 36-38
Normal Operating Sounds ...... 35
Consumer Support
Consumer Support ..... Back Cover
Performance Data Sheet ........ 41
Product Regisuafion ........ 43, 44
¼'arranty (Canadian) ........... 39
VVarranty (U.S.) ............... 40
Models23,25,26,27and29
ProfileC6te fiC6te
Rdfrigdrateurs
La sectionfrangaisecommencea la page 46
Profile Lado a Lado
Refrigeradores
La seccionen espa#olempieza en la pagina88
Write the model and serial numbers here:
Model #
Serial #
Find these numbers on a label inside
the refrigerator compartment at the
top on the right side. 200DSO74P011 49-60482 1!-06 Jfl

IMPORTANTSAFETYINFORMATION.
READALLINSTRUCTIONSBEFOREUSING.
WARNING!
Use this appliance only for its intended purpose as described in this Owner's Manual
SAFETYPRECAUTIONS
When using electrical appliances, basic safety precautions should be followed, including the following:
i)::This refi'igerator must be properly installed
and located in accordance with tile Installation
Instructions before it is used.
i)::Do not allow children to climb, st;rod or hang
on the shelves in the reli-igerato_: They could
damage the reti_igerator and seriously injure
themselves.
::_ Do not touch tile cold surlilces in tile fl'eezer
compartment when hands are damp or wet. Skin
may stick to these extremely cold smthces,
}/<Do not store or use gasoline or other flammable
\_q)o_ and liquids in tile vicini_,' of this or any
other appliance.
i)_:In refl'igerato_ with automatic icemake_,
avoid contact with the moving parts of the
ejector mechanism, or with tile heating element
locamd on tile bottom of tile icemake_: Do not
place finge_ or hands on tile automatic
icemaking mechanism while tile reti_igerator
is plugged in.
i)::Kee I) finge_ out (ff tile "pinch point" areas;
clearances between the doo_5 and between
the (loo_ and cabinet are necessarily small.
Be caretul closing (loo_ when children are
in the area.
i)::Uni)lug tile refrigerator befiwe cleaning and
making repai_.
NOTE"We stronglyrecommendthat anyservicingbe
performedby aqualified individual
i)::Non-LCD models:Setting either or both controls to
0 (off)does not remove power to tile light circuit.
::_LCD models: Turning tile cooling system off does
not remove power to tile light circuit.
N Do not refl'eeze ti'ozen foods which have
thawed compleml>
i)::Mwa):s clean tile CustomCooF_Tray after thawing
food.
2

ge.com .....
ADANGER! RISK OFCHILD ENTRAPMENT
PROPERDISPOSALOFTHEREFRIGERATOR
(_hild entrapn_ent and ,alff cation are not i)x'oblems Refrigerants
of the past.Junked or abandoned reti_igerato_ are
still danoerous exert if they will sit for "'ust a few _M1 refl_igeration products contain refrigerants,
days." ]f)ou are getting x_id of)our old refl_igeratox; which under federal law must be removed prior
please fi_llow the instructions below to help pre_ent to product disposal. If you are getting _id of an ,
accidents, old refrigeration product, check with the
compare handling the disposal about what _'D
Before YouThrowAway YourOldRefrigerator to do.
or Freezer: _"
iJi::Take off the (loo_.
!i_:I,eaxe the shelxes in place so that children ma_
not easilx climb inside.
USEOFEXTENSIONCORDS
Because of potential safety hazards under certain conditions, we strongly recommend against the use
of an extension cord.
However, if_ou must use an extension cord, it is absolutely necessary that it be a UlAisted (in the United _"
States) or a (:SA-listed (in Canada), 3-wire grounding D'pe appliance extension cord ha_ing a grounding
g] )e I)lu_*_and outlet and that the electt_ical rating, of the cord be 15 amperes (minimum) and 120 xolts. g
g
g
3

IMPORTANTSAFETYINFORMATION.
READALLINSTRUCTIONSBEFOREUSING.
WARNING!
HOWTOCONNECTELECTRICITY
Do not, under any circumstances, cut or remove the third (ground) prong from the power cord. For
personal safe_ this appflance must be properly grounded.
The power cord of this appliance is equipped
with a 3-prong (grounding) plug which mates
with a standard 3-prong (grounding) wall outlet
to minimize the possibili Vof electric shock hazard
fi'om this appliance,
Have the wall outlet and circuit checked by a
qualflied electridan to make sure the outlet is
propedy grounded.
If the outlet is a standard 2-prong outlet, it is _mr
personal responsibili b, and obligation to have it
replaced with a properly grounded %prong wall
outlet.
The refl_igerator should ahvays be plugged into its
own indixidual electrical outlet which has a xoltage
rating that matches the rating plate.
This provides the best pe_timnance and also
I)rexents oxerloading, house wiring circuits which
could cause a fire hazard fl'om oxerheated wires.
Never unI )lu,*,,,xour refl_igerator, bx, i)tilling, on the
power cord. _Mways ,II,gri) )lug firefly, and pull ,straioht.,
out fl'om the outlet.
Repair or replace immediately all power cords that
have become fl'aved or otherwise damaged. Do not
use a cord that shows cracks or abrasion damage
along its length or at either end.
\_]_en moving the refiigerator away from the
wall, be careflfl not to roll over or damage the
power cord.
READANDFOLLOWTHISSAFETYINFORMAtiONCAREFULLY.
SAVETHESEINSTRUCTIONS
4

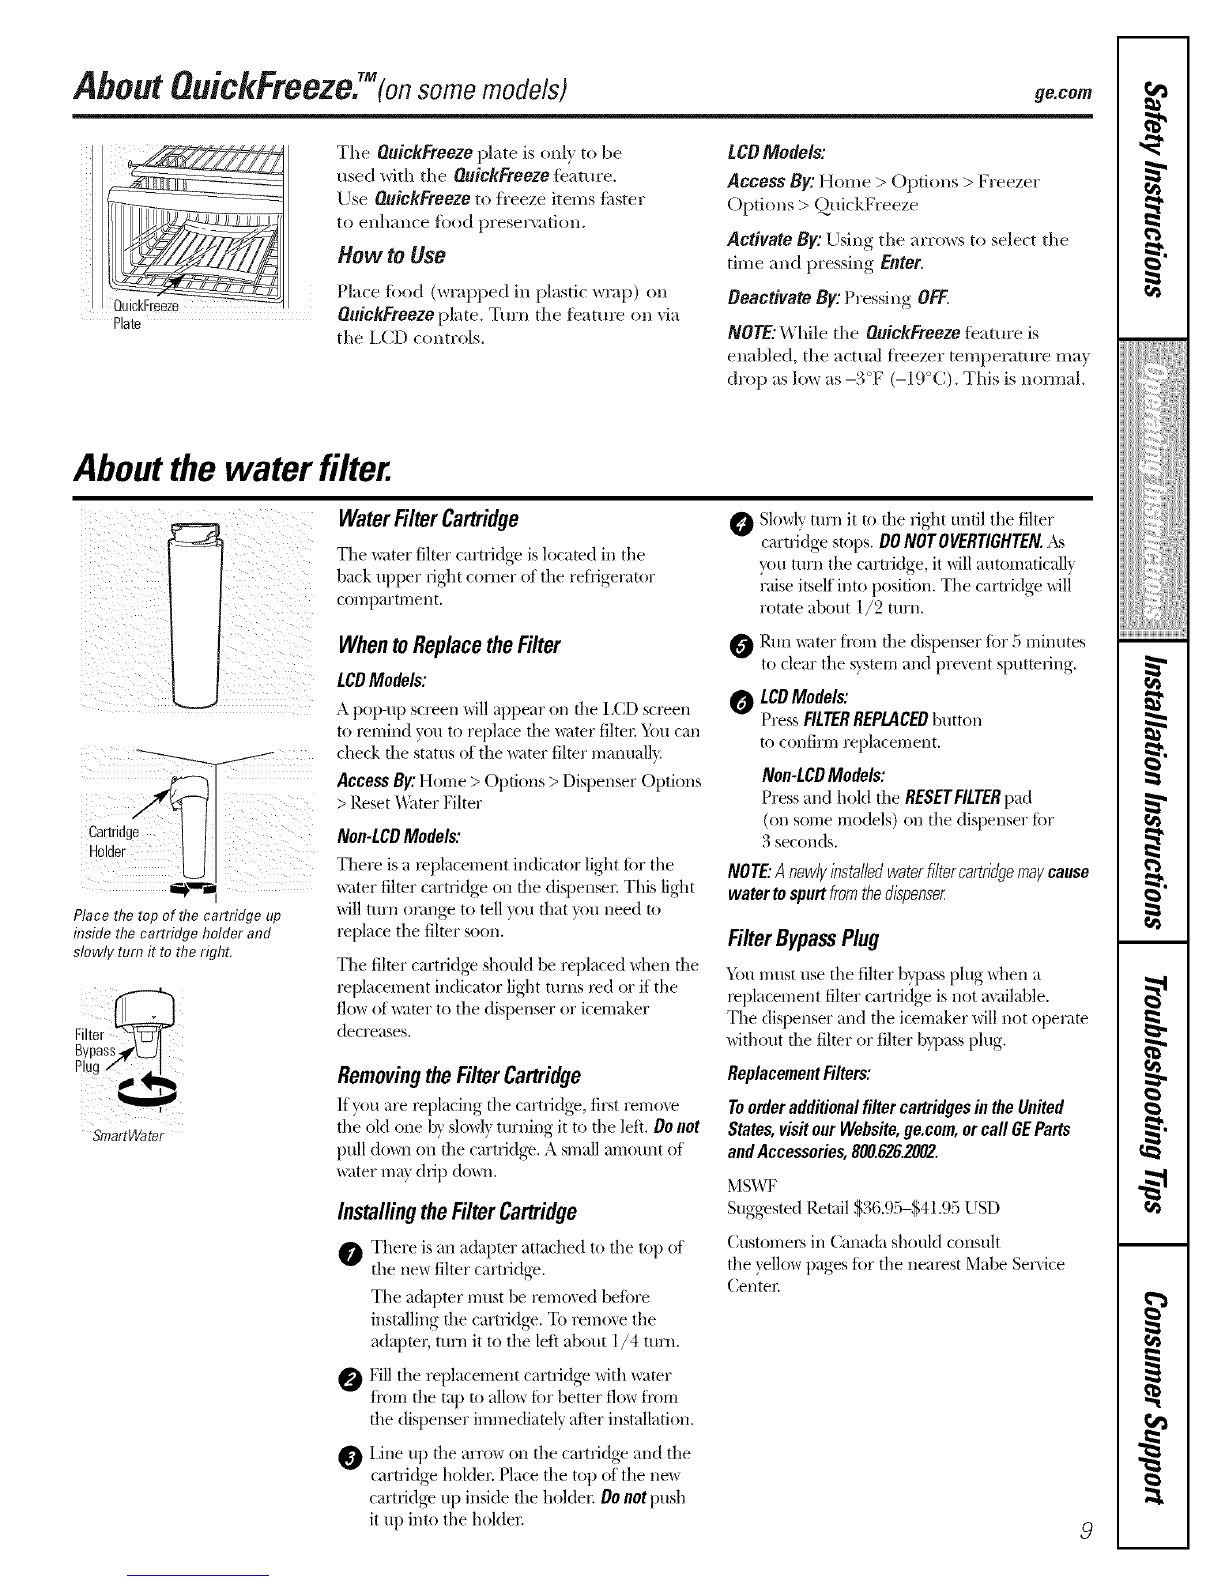
Aboutthe temperaturecontrols.
Not aft features are on all models. Your controls will look like one of the foflowing:
Non-LCD models LCDmodels
NOTE:Therefrigerator is shippedwith protective film coveringthe temperature controls,If this film was not
removedduring installation,removeit now,
ge.com
Thetemperaturecontrolsarepresetinthefactoryat37°F(3°¢)forthe
refrigeratorcompartmentand0_ (-18°C)forthefreezercompartment
Allow24hoursforthetemperaturetostabilizetothepreset
recommendedsettings,
Refrigeratortemperaturescanbeadjustedbetween34°Fand44°F
(I°Cto7°C),andthefreezertemperaturescanbeadjustedbetween
-6°Fand+6°F(-21°Cto-14°C).
Tochange the Refrigerator temperature:
LCDModels:
Access By: Horn e > RefiJgerator
Activate By:Using tile arrows to select tile desired
temi)eramre. _4_u must press ENTERto set tile new
temperature.
Tochange the Freezer temperature:
Access By: Home > Freezer
Activate By: Using tile arrows to select tile desired
temperature. Y)u must press ENTERto set tile new
temi)erature.
Once tile desired temperature has been set, tile display will
return to tile NOMEscreen and show tile set temperatures
tmderneath the actual temperature display for several
seconds. Several ac!iusnnents may be required. Each time
you a(!iust tile controls, allow 24 hom_ fin" tile refl_igerator
to reach tile temperature you have set.
Non-LCD Models:
To change tile temperature, press and release tile WARMER
or COLDERpad. Tile SETlight will come on and tile display
will show tile set temperature. To change tile temperature,
tap either tile WARMER or COLDER pad until tile desired
temperature is displayed.
Once the desired temperature has been set, tile
temperature display will return to tile actual refl'igerator
and fl'eezer temperatures alter 5 seconds. Several
a(!justinents ma)' be required. Each time you a(!iust tile
controls, allow 24 hom_ tot tile reli_igerator to reach tile
temperature you have set.
Thetemperature controlscan displayboth the SETtemperatureas weft
asthe actual temperaturein the refrigerator andfreezer,Theactual
temperaturemay varyslightly fromthe SETtemperature basedon
usageand operatingenvironment
Turningthecoolingsystemoff."
LCDmodels:TurningthecoolingsystemOFFstopscoolingin boththe
freezerandrefrigeratorcompartments,butdoesnotshutoffelectrical
powertotherefrigerator,
Non-LCDmodels:Settingeitheror bothcontrolstoOFFstopscoolingin
boththefreezerandrefrigeratorcompartments,butdoesnotshutoff
electricalpowertotherefrigerator,
LCDModels:
AccessBy:Home > Options > ]nfimnation and Settings >
Cooling System Ott
To ttlrn tile cooling s}:steln back on, press tile to/ich screen
and press the ON button.
ActivateBy:Pressing ENTER.
Non-LCD Models:
%q) tile WARMER pad fin" either tile refligerator or tile
fl'eezer tmtil tile display shows OFF. To turn the unit back on,
press tile COLDERpad fin" either tile refl_igerator or fl'eezex:
Tile SETlight will ilhmfinate on tile side you selected. Then
press tile COLDERpad again (on tile side'where tile SET
light is ilhmfinated) and it will go to the preset points of 0°F
(-18°C) for tile ti'eezer and 37°F (3°C) fin" tile reli_igerator.
When tile unit is turned back on, it will take up to 94 horns
to stabilize.
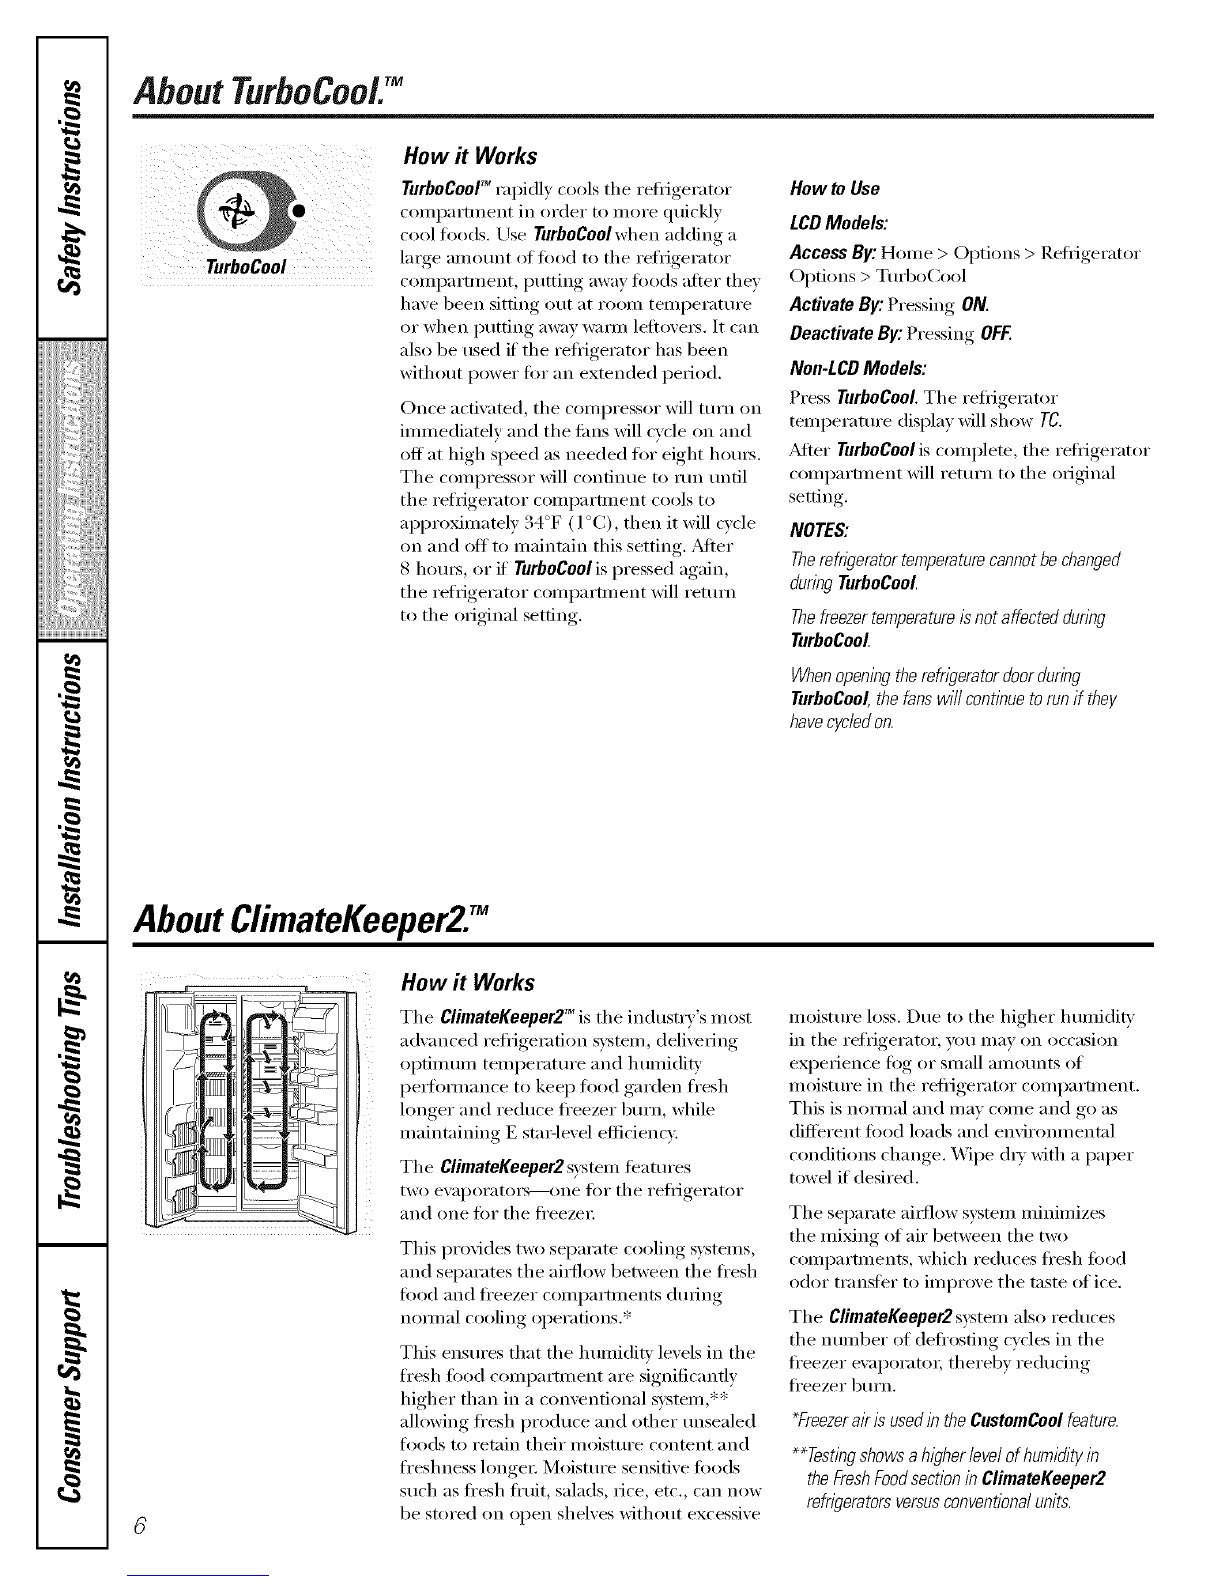
PerformanceAir FlowSystem
Tile Perfommnce M>lqow System is designed to maximize
temperature control in tile reti_igerator and fl'eezer
compartments. This unique spedal feature consists of tile
Air Tower along tile back wall of tile refligerator and tile
Air Tunnel on tile bottom portion of tile ti'eezer rear wall.
Placing todd in ti'ont of tile lou\'e_s on these components
will not afti_ct i)erfimnance. Although tile Air Tower and
tile Air Tunnel can be removed, doing so will attect
temperature perfommnce. (l_%r remowfl instructions,
on-line, 24 horns a da_; contact us at ge.com or call
800.GE.CARES. In Canada, contact usat geappliances.ca
or call 1.800.361.3400.)
I
,,,><,,,,,,,,,,,,,,,,,,
ii!iiiiii_i_ii{iiii{iiiii
i
w
7,
N"
i
H

About TurboCool/M
TurboCool
How it Works
TurboCooF_rapidly cools the refl-igerator
coml)artn_ent in order to more quickly
cool foods. Use TurboCool when adding a
large amount of fi)od to the i'efriget'ator
comlmmnent, putting away fi)o(ls after they
have been sitting out at room temperature
or when putting away w:mn leflovex_. It can
also be used if the refl-igerator has been
without power fin" an extended period.
Once acfiw_te(1, the compressor will tm'n on
immediately and the tiros will cycle on and
off at high speed as needed fi)r eight hems.
The compressor will continue to run tmfil
the refrigerator compartment cools to
approximately 34°F (l °C), then it will cvcle
on and off to maintain this setting. _Mter
8 hom_, or if TurboCool is pressed again,
the refrigerator compartment will return
to the original setting.
How to Use
LCDModels:
Access By: Home > Options > Refligerator
Options > Turbo(:ool
Activate By:Pressing ON.
Deactivate By: Pressing OFF,
Non-LCD Models:
Press TurboCooLThe retiigerat(>r
temperature display will show TO.
_Mter TurboCoolis complete, the reli'igerator
compartment will retm'n to the original
setting.
NOTES:
Therefngerator temperaturecannotbe changed
during TurboCool.
Thefreezertemperaturei} not affected during
TurboCool.
Whenopeningthe refrigerator doorduring
TurboCool,the fans will continue to runif they
havecycledon.
AboutClimateKeeper2/
How it Works
The ClimateKeeper2 TM is the indust_T'S most
advanced refl_gemtion system, delivering
optimum temperatm'e and humidity
performance to kee I) fi)od garden fl'esh
hmger and reduce fl'eezer bm'n, while
maintaining E sta_qevel efficiency.
The ClimateKeeper2 system fi_atm'es
two evaporators_(me for the reliigerator
and one fin" the fl'eeze_;
This provides two separate cooling s)'stenls,
and separates the ai_{low between the fi'esh
food and fl'eezer compartments dining
noIII/al cooling ol)ei'a[ions.'::
This ensures that the humidilv levels in the
fi'esh fi)()(l compartment are significantly
higher than in a conventional system,'::'::
allowing fl'esh produce and other tmsealed
foods to retain their moisture content and
fl'eshness longe_: Moisture sensitive foods
such as fl'esh fl'uit, salads, rice, etc., can now
be stored on open sheh'es without excessive
moistm'e loss. Due to the higher humidiW
in the reflJgerator, )_)tl may on occasion
expeiJence fog or small alllOtlnts of
moistm'e in the refl-igerator compartment.
This is nomml and may colne and go as
different food loads and enviromnental
conditions change. Wipe city with a paper
towel if desired.
The separate airflow s):stem minimizes
the mixing of air between the two
coml)artments, which reduces fl'esh food
odor transfer to improve the taste of ice.
The ClimateKeeper2s}stem also reduces
the nmnl)er of defl'osting cycles in the
fl'eezer eval)orato_; thereby re(luring
fl'eezer burn.
_FreezerakisusedlhtheCustomCoolfeature.
_Testing showsa h/gherlevelof humidityin
the FreshFoodsection in ClimateKeeper2
refrigeratorsversusconvenflona/units.

AboutCustomCoolT(onsome models) ge.com
How it Works
Tile CustomCoolT_fl_atux'e is used to quickly
chill itelns, thaw items or hold tile pan at a
specific telnl)erature. This teature is a
svstenl ot dalnl)ei_ ,a lira, a telnl)erature
thermistor and a heateI:
Tile pan is dghfly sealed to prevent
temperature fluctuations ill the rest ot the
refl{gerat(n; The controls fin" this pan are
located at tile top of tile reflJgerator with
tile telnperature controls, or oil tile
dispenser with tile telnl)eramre controls.
How to Use
Empty tile pan Place Chill/Thaw
O,. tile
tra) in tile pan. Place tile itelns on tile
tra) and close tile pan coml)letely,
0LCDModels:
Access by: Home > Options >
Refligerator Options > CustomCoolPan
ExpressThaw'_ Non-LCD Models:
ExpressChilY_
Select tile ExpressThaw_, ExpressChill_
or SelectTemp_ pad. Tile displa)and
SETlight will come on. Tap tile pad
until the light appeax_ next to the
desired setting.
Use the fi)lh)wing chart to detex_nine
tile best setting to use.
!i_: On some models, Expressghill has
onl_ ()ne 45 ininute setting.
iJi::To stop a feature befi)re it is finished:
ForLCDModels:
(;o into that feature's inenu and press
tile OFFbutton.
ForNon-LCDModels:
Tap that teature's pad until no
options are selected and tile displa)
is off.
Durhlg ExpressThaw and
ExpressChill,tile display on tile
controls will count down tile time
ill tile cycle (on solne Inodels).
_dter tile ExpressThaw cycle is
cotnl)lete , tile pan will reset to tile
MEATsetting (32°F [0°C]) to hel I)
i)reserve thawed itelns until thev are
used,
Tile displayed actual telnl)eramre _ff
tile CustomCoolpan may wm' slightly
fl'oln tile SETtelnl)erature based on
usage and oi)erating environlnent.
NOTE."Forfoodsafetyreasons,it isrecommended
thatfoodsbewrappedinplasticwrapwhenusing
ExpressTha_ Thiswi//helpcontainmeatjuices
andimprovethawingperformance.
How to Remove and Replace the Drawer
Toremove:
O Pull tile drawer out to tile stop position.
Rotate all four swing locks to tile unlock
position.
O I,ift tile fl'ont oI tile drawer tl I) and Otlt.
Toreplace:
Make sure all fbur sxfing locks are ill tile
unlock position.
@ Place tile sides of tile drmver into tile
(lraxver SUl)ports, nlaking sure tile swing
locks fit on the drawer slots.
I,ock all film" sxfing locks b) rotating
them to the lock position.
7
I
,,,><,,,,,,,,,,,,,,,,,,
i_::iiii3iYi_iiiiii_iiii
ii!iiiiii_i_ii{iiii{iiiii
w
g
N"
i
H

About CustomCoo/iM (on some models)
CustomCoo/TMChart
NOTE:Resultsmay vary depending on packaging, starting temperature and other food traits.
0.5 Lb. (4 hours)
iJii Haml)u_ger Patties (0.5 lb)
_: Individually _]'alTlTed
Filet Mignon (0.5 117)
1.0 Lb. (6 hours)
}_t Chicken Breasts (l.0117)
_: Ground Beef (l.0 117)
::Ji::Steak (1.0 lb)
2.0 Lbs. (10 hours)
?_: Chicken Breasts (9.0 lbs)
iJi; Grotmd Beef (9.0 lbs)
?_: Steak (9.0 lbs)
3.0 Lbs. (12 hours)
::J?Chicken Breasts (3.0 lbs)
}_t Grotmd Beef (3.0 lbs)
?_: Steak (3.0 lbs)
15 Minutes
iJii 1 Beverage Can (12 oz)
_: 2 Small,Juice Boxes (6-8 oz each)
30 Minutes
iJii 2 to 6 Beverage Cans (12 oz each)
_: 2 Plastic 20 oz Bottles of Beverage
::Ji::4 to 6 Small,Juice Boxes
(6-8 oz each)
iJii 3 Foil Juice Packets
_: Wine (750 Inl bottle)
45 Minutes
!_:i 2 IJter of Beverage
_: 1/2 Gallon of Juice
::Ji::Gelatin-1 package
Citrus Setting (43°F 16°C1)
::Ji::Oranges, I,emons, limes,
Pineapple, (_antaloupe
_: Beans, (2ucumbe_, Tomatoes,
PelTlTe_, Eggplant, Squash
Produce Setting (35°F [2°C1)
_: Strawberries, ]_.aspberries, Kiwifl'uit,
Petal, Cherries, Blackberries,
Grapes, Plums, Nectarines, Apples
::Ji::Asparagus, Broccoli, (_orn,
Mushrooms, Spinach, CaulNowe_;
Kale, Green Onion, Beets, Onions
Meat Set_lg (32°F ]0°C1)
::Ji::]law Meat, Ash and Poultry
How to Use the Beverage Center
Some CustomCoolmodels featm'e a beverage
center: It is designed to store beverages at
colder temperatures. Select this featm'e if
you like to keep extra-chilled refl'eshments
on hand.
LCDModels:
Access by: Home > Options > Refi_igerator
Options > Beverage Center
Activate by: Pressing ON.
Deactivate by: Pressing OFF.
Non-LCD Models:
_ Select the Beverage Centerpad. The set
light will come on and the featm'e will
operate as required.
_To turn off the featm'e, press Beverage
Center pad and set light will turn (>ft.
NOTE:Unlessturnedoffasabove,featurewi//
remainactiveforsixmonths.PresstheBeverage
Centerpadtorestart.
DairyBin
8
How to Remove and Replace the Beverage Center
Toremove:
Remove (lai_3 bin fi_t. Holding the
bottom of the (lai_ bin, lift the fl'ont
straight up, then lift up and out.
0 Holding left and right side of beverage
center; lift straight up and out.
I,eave adapter in place.
Toreplace:
Engage backside of beverage center in
molded supports on a(lapte_; Then
push down on the sides of the beverage
center; The beverage center will lock
into place,
Replace &riD' bin.
Center
Adapter

About QuickFreeze.TM(onsome models) ge.com
Plate
The QuickFmeze i)L_te is only to be
used with the OuickFreeze fe_ma'e.
Use OuickFmeze to f_'eeze items tipster
to enhance fi_od preservation.
How to Use
Place fi>od (wrapped in plastic wrap) on
OuickFreeze plate. Turn the feature on via
the I,CD controls.
LCOModels'.
Access By: Home > Options > Freezer
Options > Q,tfickFreeze
Activate By'.Llsing the arrows to select the
time and pressing Enter.
Deactivate By: Pressing OFF.
NOTE:While the OuickEreeze featme is
enabled, the actual fi'eezer temperature may
drop as low as -3°F (-19°C). This is hernial.
Aboutthe water filter.
Cartridg_
Holder _,_
Place the roe of the cartrrage up
inside the cartridge holder and
slowly turn it to theright.
Filter
Bypass,t__J 1
Plug/,U
SmartWater
WaterFilterCartridge
The _ter filter cartridge is h)(ated in the
back upper fight corner of the reti-lgerator
COlt}paTti i |eIt 1.
WhentoReplacetheFilter
LCDModels:
A pop-up screen will appear on die I;CD s(l_en
to l_mind you to replace the _ter filtel: _bu can
check die status of the _mer fiher manualh.
Access Bit:Home > Options > Dispenser Options
> Reset _hter Filter
Non-LCDModels:
There is a l_placement indicator light ior the
_Jter filter cartridge on the dispenser Tiffs light
will turn enrage to tell mu that you need to
l_place the filter soon."
The filter cartridge should be replaced \_ben die
l_l)lacement indicator light uu'ns led or if the
flo_ of _imr to the dispenser or icemaker
decreases.
RemovingtheFilterCartridge
Ityou _Jrel_plaeing the cartridge, first retrieve
the old one b} slo\@ turning it to the left. Do not
pull (lo_m ()it the cartridge. A sit/all amount of
_iter ma} drip (to_/.
InstallingtheFilterCartridge
0
0
@
There is an adapter attached to the top of
the new filter cartridge.
The adapter it/liSt be remoxed befi)re
installing the cartridge. To remoxe the
atlaptel; ttlrn it to the left abotlt 1/4 turn.
Fill the replacement cartridge with _ater
ti'om the tap to allow tar better flow ti'om
the dispenser immediately after installation.
i,ine up the ,'u'row on the camidge> and the
cartridge holder. Place the top of the new
cartridge up inside the boldei; Doeat push
it up into the holdei;
O Slowly turn it to the fight until the filter
cartridge stops. DONor OVERr/OHTEN.X_
you turn the cartridge, it _ill auton-latic_Jllv
raise itself into position. The cartridge _ili
rotate about 1/2 turn.
O Rmt water ti'om the dispenser for 5 minutes
to clear.... the system,,and })re_ent -Is)uttelJng.
_LCDModels:
PressFILTERREPLACEDbreton
to eonfirrri repl_teerrient.
Non-LCDModels:
Pressand hold the RESETFILTERp;_d
(on sorrie rriodels) on the dispenser tar
3 seconds.
NOTE:Anewlyinstalledwaterfiltercartridgemaycause
water tospurt fran thedispenser
FilterBypassPlug
Ym must use the filter bypass plug \d_en a
l_i)lacement filter cartridge is not m'_dl_d)le.
The dispenser and the icerrlaker will not operam
without the filmr or filter bypass plug.
ReplacementFilters:
ToorderadditionalfiltercartridgesintheUnited
States,visitourWebs#e,ge.com,or callGEParts
andAccessories,800.626.2002.
MSWF
Suggested Retail $36.95-$41.95 USD
Custon/eI_ in Canada should consult
the yelh)w pages for the nearest Mabe Selaice
(]entei;
I
i
i_iiiiD_iiT_iiiiiiiiiii
li!iiiiii_i_iiiiiiiiiiiii
w
g
N"
i
i
i

Abouttheshelvesandbins.
Not all features are on all models.
Refrigerator Door Bins and Freezer Door Tilt-Out Bins
Bins
Refrigerator bin
Freezer tilt-out bin
The linger reti-igerator door bins and
freezer tilt-out door bins are ac!justable.
Toremove: Lift the ti'ont of the bin straight
up, then lift up and out.
To replace er relecate: Engage the back side
of the bin in the molded supports on the
dora; Then push down on the fl'ont of the
bin. Bin will lock in place,
Thesnugger helps prevent tipping, spilling
or sliding of small items stored on the door
shelf. Place a finger on either side (ff the
snugger near the rear and move it back
and fl)rth to fit your needs.
TopFreezerBins
Donotblock
Topfreezerbin
II
D0n0tbl0ck
Topfreezer bin (on some models)
CAUTION:
Becarefulwhen
placingitemsinthe
topbin.Makesure
thatitemsdonot
blockor failinto
theicechute.
CAUTION:
Partmustbein
placeasshown
forproperice
dispensing.Food
cannotbestored
in thislocation.
Presstab andpullshelfforward
toremove
Slide-Out Spillproof Shelf
The slide-out spillproof shelf allows ,you
to reach items stored behind othe_s. The
special edges are designed to hel I) pre',ent
spills ti'om dripping to lower shelxes.
Toremove:
Slide the shelf out tmtil it reaches the stop,
then press down on the tab and slide the
shelf straight out.
Toreplace or relocate:
Line the shelf up with the supports and
slide it into place. The shelf can be
reposifioned when the door is at 90 ° or
more. To reposition the shelf, slide the shelf
past the stops and angle downward. Slide
sheff down to the desired position, line up
with the supports and slide into place.
Make sure you push the shelves all the way back
in before you close the door
10
OuickSpace TM Sheff
This shelf splits in half and slides trader
itself tot storage ot roll items on the shelf
below.
This shelf can be removed and replaced
or relocamdj ust like Slide-Out Spillproof
Shelves.
On some models, this shelf cannot be used
in the lowest position,

ge.com
Not all features are on all models.
Freezer Baskets
Toremove, push the basket all the way to the
back oI the fl'eezex: Lift up until the back
pins are disengaged, i,ifl the entire basket
up and pull out.
Makesureyoupushthebasketsall thewayback
in beforeyouclosethedoo_
i) ¸ : j): j Slide-Out Freezer Shelves
To remove, slide ()tit to tile stop position,
lift the front past the stop position and
slide out.
Makesureyoupushtheshelvesall thewayback
in beforeyouclosethedoor.
Fixed Freezer Shelves
There are two types of fixed
ti'eezer shelves.
Toremove this type of shelf."
O I,ift the shelf up at the left side.
Bring the shelf Stilt.
Toremove this type ofshelf"
i,ifl up the left side of the shelf and
slide it left into the center of the shelf
supports.
Rotate the fight side of the shelf up
and out of the shelf supports.
NOTEFORDISPENSERMODELS:/nordertotake
furladvantageofthetilt-outicebin,onlystoreitems
ontheshelfbelowtheicebin thatarenotallerthan
the/owestpointonthebin.
Door Wine/Beverage Rack (onsomemodels)
This rack holds up to 5 cans, (tile botde of
wine or one 2-liter bottle of soda.
The rack hangs from the sides of the
dair_ bin.
Toremove:
Emp_ the wine/bmerage rack.
Toreplace:
Reattach the rack to the sides
of the bin.
Engage the back side of the bin in
the molded supports (m the do(n:
Then push down on the ti'ont of the
bin. The bin will lock into place.
_ Holding the bottom of the dairy bin
,- ,y
lift the front strmght up, then lilt up
and out.
_To detach the rack from the dairy bin
pull the racks side wires out of the
holes on each side of the dairy bin.
11
I
,,,><,,,,,,,,,,,,,,,,,,
ii!iiiiii_i_ii{iiii{iiiii
i
w
g
N"
i
H

Abouttherefrigeratordoors.
ii
When the door is only partially open,
it will automatically close.
Beyond flTisstop flTedoor will stay open.
Refrigerator Doors
The reii_igerator (loo_ may teel different
than the ones you are used to. The special
door opening/closing teatuI'e makes sure
the (loo_s ch)se all the way and are securely
sealed.
When opening and closing the door you
will notice a stop position. If the door is
opened past this stop point, the door will
i'elllain open to allow VOII to load and
unload tood more easily. When the door
is only partially open, it will automatically
close.
The resistance you ti_el at the stop
position will be reduced as the door
is loaded with food.
Door Alignment
If (loo_s are unexen, a(!just the refrigerator
dooi-
O Using a 7/16" wrench, turn the door
a(!justing screw to the right to raise the
(loo_; to the left to lower it. (A nylon
plug, imbedded in the threads ot the
pin, prevents the pin from turning
unless a wrench is used.)
O _Mter one or two turns of the wrench,
oi)en.... and close the refrigerator, door
and check the alignment at the top of
the (h)o_s.
/2

Aboutthecrispersandpans. ge.cem
Not all features are on all models.
Fruit and Vegetable Crispers
Excess water that may accunmlate in tile
bottom of tile drawe_ should be wiped (h_':
On some models, tile bottom drawer has
filll extension slides that allow fifll access
to tile (h'awe_:
Hi _LO Adjustable Humidity Crispers
Slide tile control all tile way to tile HIsetting
to provide high humidity recommended fin.
most vegetables.
Slide tile control all tile way to tile LO
settino_ to proxide lower humidly' lexels
recolmnended fi)r inost fl'uits.
Convertible Deli Pan
Tile convertible dell pan has its own cold
air duct to allow a stream of cold air fl'om
the fl'eezer compartment or fl'esh fi)od
compartment to flow to tile pan.
The variable temperature control regulates
tile air flow fl'om tile Climate Keeper:
Set tile control to tile coldest setting to
store fl'esh meats.
Set tile control to coldto convert tile pan
to nomml refl'igerator temperatm'e and
provide extra vegetable storage space, The
cold air duct is turned off. Variable settings
between these extremes can be selected.
Aboutcrisperremoval.
Not all features are on all models.
Crisper Removal
Crispers can easily be removed by pulling
tile drawer straight out and lifting the
drawer up and over tile step location,
If the door pre\w_ts you fl'om taldng out
tile drawers, first tIT to remove tile (loot
bins. If this does not offer enough
clearance, the reflJgerator will need to
be rolled ibrward tmtil tile door opens
enough to slide tile drawers out. In some
cases, when you roll tile retiigerator ()lit,
you will need to move the refl-igerator
to tile left or right as you roll it ()tit.
/3
I
,,,><,,,,,,,,,,,,,,,,,,
ii!iiiiii_i_ii{iiii{iiiii
w
g
N"
i
H

Abouttheautomaticicemaker.
A newly instafled refrigerator may take 12 to 24 hours to begin making ice.
Automatic Icemaker
On dispenser models,
to access ice or reach
the power switch:
oLift thebin, then pull it
forward until the bin stops.
Lower the bin to access ice
or reach the power switch.
NOTE:In order to take full advantage
of the tilt-out ice bin, only store items
on the shelf below the ice bfl7that
are no taller than the Iowest point
on the bhT.
The icemaker will produce seven cubes
per cycle---al)l)roximately ] 00-130 cubes
in a 94-hour period, depending on fl'eezer
COilli)ai'tlllent teillpei'att]i'e_ i'OOill
temperatm'e, nmnber ot door openings
and other use conditions.
If the refl{gerator is operated befi)re the
water connect.ion is made to the icemaket;
set the power switch in the 0 (Off)position.
When the reti-igerator has been com_ected
to the water SUl)pl}; set the power switch to
the I (on) position.
The icemaker will fill with water when it
cools to ]5°F (-10°C), A newly installed
refi_igemtor may take 12 to 24 hems to begin
making ice cubes.
You will hear a buzzing sotmd each time
the icemaker fills with water
Special note about dispenser models:
::Ji::Dispenser models have a tilt-out ice bin.
The bin can be tilted out as shown in the
illustrations, and it will hold itself up
while you take ice out or mrn the
icemaker power switch on and off'. Be
sure to put the bin back in place before
closing the doo_:
::Ji::To restore your ice level from an empty
bucket stage, the following steps are
recommended:
12 hotu_ after the filSt batch of ice
has fidlen into the bin, dispense
3 to 4cubes.
@ _MteI" an additional 6 hom_, dispense
3 to 4 cubes again.
These steps will restore your ice level
in the shortest amount of dine.
Throw awax the first tew batches of ice to Power
allow the water line to clem: Switch
Be sm'e nothing interferes with the sweep Icemaker
of the teeler aml. !
When the bin fills to the level (ff the teeler
am_, the icemaker will stop producing
ice. It is nom_al for several cubes to be
joined together.
If ice is not used ti'equentl); old ice cubes
will become chmdy, taste stale and shrink.
Green
p0werLight FeelerArm
NOTE:/n homes with lower-than-averagewater
pressure,youmayhear the icemakercycle mult/}91e
times whenmaklhg onehatchof ice.
oLift thebin, then pull it
forward until the bin stops.
Removing Ice Bin (dispenser models)
CAUtiON:Theicebin is heavywhenfull.
Set the power switch to the 0(otO position
before removing the bin.
When replacing the bin, be sm'e to press it
firefly into place. ]f it does not go all the
way back, remove it and rotate the drive
mechanism 1/4 ttlFn. Then push the bin
back again. Drive
Mechanism
Dispenser Models on v
oLift andpull forward again
to remove the bin.
14

About the ice and water dispenser.(onsomemodels) ge.com
SpillShelf
ToUse the Dispenser
Select CUBED,CRUSHEDor WATER.
Press die gl_ss gently _lg_dnstthe top oJ the
dispenser cnldle.
The spill shelf is not self-dr_fining, li_ reduce
water spotting, the shelf and its grille should be
cleaned regularl?.
Ifnowaterisdispensedwhentherefrigeratorisfirst
instal/eft,there,maybeairin thewaterlinesystem.Press
thedispenserarmfor atleasttwo minutestoremove
trappedairfromthewaterlineandtofill thewater
system.Toflushoutimpuritiesin thewaterline,throw
awaythefirstsixglassfulsofwater.
CAUtiON: Neverputfingersoranyotherobjectsinto
theicecrusherdischargeopening.
LockingtheDispenser
Press the LOCKp;ld Jbr 3 seconds to lock the
dispenser and control panel. _1_)tmlock, p_ss
and hold tile pad ag_fin Jbr 3 seconds.
OispenserLight
_le LIOBrpad rams the tdghtlightin tile
dispenser on and oJil Tile lig_lt also comes on
_q_en tile dispenser cradle is pressed. On some
models, if this light bums out, it should be
_placed with a 6 watt 12V m_lximum bulb.
OoorAlerm
Use DoorAlafitl _osound ii either door isopen
Jor more than 3 minutes. The _d;mnwill stop
once the door is dosed. For I,CD models, _
l)Ol>Ul) screen will ;ippea_: The _d;mn cml be
silenced by touching the ][,CD screen.
LCDModels:
Access By:Home > Opfion:_ > InJ6m_;_fion ;rod
Settings > Setting._ > Door Al_wm
Access By:Pressing ON.
Deactivate By'.Pressing OFF.
Non-LCDModels:
Press the DOORALARMpad m/til the indicator
light comes on.
Quick Ice
When _ou need w speed up ice production, use
the QuickIce feature. \_]dle this feature is turned
on, the fi'eezer tim runs continuous b Jor 48 hou_,
or until the teatux_ is turned OFE During this
period, ice pro(hmtion will incx_ase up to 40%.
Models with the inmgramd ice Jeature s}smm
requix_ at F]I_STUSE at least h_dfan 8 oz. glass
of ice to be dispensed e\'ex}'6 to 12 hours. This
will help the icemaker Jillthe bucket propedy
so that dispensing is bettor
How toUse
LCDModels:
Accessbit:Home > Options > ffl_ezer Options >
Quick Ice
Activatebit:Px_ssing ON.
Deactivatebit:P_ssing OFF.
Nou-LCDModels:
Press the QUICKICElx_dto turn the Jeature ON.
Press the pad ag'ain to turn the Jeature OFE
Precise Fill (onsomemodels)
This _ter dispenser is equipped with a teatu_e
called "precise Jill." This Jeature _dlo_tsyou to
choose a p_cise amount of _ter (cups or
ounces) that you _)uld like dispensed. Pints
and i,iters are also m;dlaNe tor I,(;D models.
LCDModels
AccessBit:Home > Options > Dispenser
Options > Precise Fill > Set Amount
ActivateBit:LIsing the al_'Cm buttons to select
the desired amount. Press MOREUNITS to select
bemeen CUPS, OUNCES, PINTS or lITERS.
Non-LCDModels
Press tile WATERp_d.
Press the CUPSor OUNCESpad.
O Select the precise mnount of water you
would like dispensed.
Ifitouselected OUNCES,press tile arro_
pads on either side of the displ@' to
select the nm-nber of ounces you
_ mid like to hme dispensed "bet\_een
1-99 ounces.
IfitouselectedCUPS,press tile arrow
pads on the lett of the displ@' to select
the \q_ole cups (1-16 cups) and/or
the arro_ pads on the right side of the
(fispla} to select tractions of a cup
(1/44/4 cups).
Press the cup ag_ainst the cradle and _ater
will begin dispensing. It _dll automaticall}
stop \_hen the mnount set has been
dispensed. Tile displa?' will sho_ there
is no _ter leJt to dispense, then reset.
NOTE:Donotleavethedispenserunattendedwhen
waterisbeingdispenser
]Jvou would like to stop dispensing water
before the specitied amount has been
dispensed, just rernove the cup fi'om the
cradle. The displa} will show the amount
leJt to dispense.
15
I
iiiiiiii_iYi_iiiiiiiiiii
ii!iiiiii_i_iiiiiiiiiiiii
w
g
N"
i
H

Aboutthe ice and water dispenser.(onsome models)
Important Facts About Your Dispenser
::Ji::Do not add ice fi'om trays or 1)ags to
the storage drawer. It may not c_ush or
dispense well.
_: Avoid overfilling glass with ice and use
of narrow glasses. Backed-up ice can
jam the chute or cause the door in the
chute to freeze shut. If ice is blocking
the chute, poke it through with a
wooden Sl)OOn.
_: Beverages and ti)ods should not be
quick-chilled in the ice storage drawer.
Cans, bottles or food packages in the
storage drawer may cause the icemaker
or auger to jam.
_: To kee I) dispensed ice from missing
the glass, put the glass close to, but not
touching, the dispenser opening.
::Ji::Some ctushed ice mav be dispensed
even though you selected CUBED.
This hal)pens occasionally when a fi_w
cubes accidentally get directed to
the cHlsher.
_: After cHlshed ice is dispensed, some
water may drip from the chute.
_: Sometimes a small motmd of snow
will titan on the door in the ice chute.
This condition is normal and usually
occurs when you have dispensed
Clushed ice repeatedly. The snow
will eventually evaporate.
Careand cleaning oftherefrigerator.
Dispenserdriparea.
Cleaning the Outside
The dispenser drip area, beneath the grille,
should be _I)e(l (h'_, _._Ker left in this area
may lea_e deposits. Remo_e the deposits by
adding undiluted vinegar to the well. Soak
tmtil the deposits disappear or become
loose eno/igh to iJnse _l_';iv,
The dispenser cradle. Beli n'e cleaning, lock
the dispenser by pressing and holding the
LOCKpad for 3 seconds. Clean with w;mn
water and baking soda solution--about a
tablespoon (15 ml) oI baking soda to a
quart (l liter) of water Rinse thoroughly
and wipe dry.
The doorhandles and trim. Clean with
a cloth dampened with soapy _te_:
Dry with a soft cloth.
The stainless steel panels and door handles
(on some models) can be cleaned with
a commercially available stainless steel
cleanex: A si)ra):on stainless steel cleaner
works best.
Do not use appliance wax or polish
on the stainless steel.
Keep tile o_side clean. Wipe with a clean
cloth lightly dampened with kitchen
appliance wax or mild liquid dish detergent.
Dry and polish with a clean, soft cloth.
Donot wipetherefrigeratorwith a soileddish
cloth orwet towel.Thesemayleavearesidue
thatcanerodethepainLDonotusescouring
pads,powderedcleaners,bleachor cleaners
containingbleachbecausetheseproductscan
scratchandweakenthepaintfinish.
16
Cleaning the Inside
Tohelp prevent odors,leave an open box of
1)eking soda in the ti'esh toed and fl'eezer
COIIII)}I i'tl/lents.
Unplug the refrigerator before cleaning. If this
is not practical, w_ing excess moisture ()tit
of sponge or cloth when cleaning around
switches, lights or controls.
Use w;mn water and baking soda solution--
about a tablespoon (15 ml) oI baking soda
to a quart (1 liter) of water: This 1)oth
cleans and neutralizes odo_5. Rinse and
wipe (lr_;
Useof any cleaning solution other than that
which isrecommended, especially those that
contain petroleum distillates, can crack or
damage the interior of the refrigerator.
Avoid cleaning co/c/glass shelves with hot water
because the extreme temperature difference
may cause them to break. Hand& g/ass shelves
carefufljz Bumping tempered g/ass can cause
it to shatter
Donot washanyplasticrefngeratorparts
in thedishwasher
Thechill/thaw trayis dishwashersafe.

ge.com
Behind the Refrigerator
Be careflll when moving the reti_igerator
away fl'om the wall. _dl types of floor
coverings can be damaged, particularly
cushioned coverings and those with
elilbossed S/llS[;ices.
Pull the refl_igerator straight out and return
it m position by pushing it straight in.
Moving the refl_igerator in a side direction
may result in damage to the floor covering
or refl_igerato_:
Whenpushingtherefrigeratorback,makesure
youdon't roll overthepowercordor icemaker
supplyline.
Preparing for Vacation
For long ;;ications or absences, relllOve
load and uI_plug the reliigerato_: Clean the
intelior with a baking soda sohltion of one
tablespoon (l 5 ml) of baking soda to one
quart (1 liter) of water: i,eave the (loo_
open.
Set the icemaker power switch to the 0 (off)
position and shut off the water supply to
the refl_igerato_:
If the temperature can drop below fl'eezing,
have a qualified servicer drain the water
supply s)'stem to prevent serious propert},
damage due to flooding.
Preparing to Move
Secure all loose items such as shelves and
drawers by taping them securely in place
to prevent damage.
_4]_en using a hand truck to move the
refligerato_; do not rest the fl'ont or back
_ffthe retiigerator against the hand truck.
This could damage the refrigerator. Handle
only ti'om the sides of the retiiger;mn:
Be sure the refn)erator stays in an upright
position during moving.
/7
I
,,,><,,,,,,,,,,,,,,,,,,
ii!iiiiii_i_ii{iiii{iiiii
i
w
g
N"
i
H

Replacingthe lightbulbs.
Setting the controls to OFFdoes not remove power to the light circuit.
Not all features are on all models.
Yourlight shield will look like
one of the following.
Tabs
OR
Pocket
Refrigerator Compartment--Upper Light
Unplug the refrigerator.
O The bulbs are locamd at the top ot the
compartment, inside the light shield.
On some models, a screw at the fl'ont of
the light shield will have m be _emoved.
On other models, the screw is located
in the pocket located at the back of the
light shield.
To relno;e the light shieM, on solne O
models, press in on the tabs on the
sides of the shield and slide forward
and out. On other models,just slide
the shield fin'ward and out.
_Mter replacing the bulb with an
appliance bulb of the same or lower
wattage, replace the light shield and
sci'e_:s (on SOlne Inodels). When
replacing the light shield, make sure
that the tabs at the back ot the shield
fit into the slots at the back of the light
shield housing.
Plug the refl_igerator back in.
Refrigerator Compartment--Lower Light
This h_?htis located above the top drawer
O UnI)lug the refrigerator
O Remoxe the comertible meat drawer
control knob b} pulling straight ()tit.
i.ifi the light shield up and pull it out.
@ _Mter tel)lacing, the bulb xdth an
appliance bulb of the Salne or lower
wattage, replace the shield and
the knob.
0 Plug the refrigerator back in.
Freezer Compartment
O UnI_lug the refligerator
O Remo;e the shelf just abo;e the light
shield. (The shelf will be easier to
remoxe if it is emptied first.) On some
models, a screw at the top of the light
shield will need to be remoxed.
To remoxe the light shield, press in
on the sides, and lift up and out.
@Replace the bulb with an appliance
bulb of the same or lower wattage,
and reinstall the light shield. When
reinstalling the light shield, make
sure the top tabs snap securelv
into place. Replace the screw
(on SOlne Inodels).
Reinstall the shelf and plug the
refrigerator back in.
Dispenser (onsomemodels)
O Unl)lug the reli_igerat(n:
The bulb is located on the dispenser
trader the control panel.
Remove the light bulb by turning
it cotmterclockwise.
O Replace the bulb with a bulb of the
saI/le size and watta<*e
I eli 1 *el
Plug the " "% qtor back in
18

Trimkits anddecoratorpanels.
For CustomStyM °'models
Read theseinstructionscompletely and carefully.
BeforeYouBegin
Some models are equipped with trim kits that aflow you to install door panels. You can order
pre-cut black, white, bisque or stainless steel decorator panels from GE Parts and Accessories,
800.626.2002,or you can add wood panels to match your kitchen cabinets.
Panels less than 1/4" (6 mm) thick
When installing wood panels less than l/4" (6 ram) thick, you need to create a filler panel, such as 1/8"
cardboard, that Mll fit 1)etween the ti_ce of the door and the wood panel. If you are installing the i)re-cut
decorator panels, i)re-cut filler panels are included in the kit. The combined thickness of the decorator
or wood panel and the filler panel should be 1/4" (6 ram).
Panels1/4" thickorless
1/4"max
3/4" (19 mm) or Raised Panel
A raised panel design screwed or glued to a 1/4" (6 ram) " " o- "(, thick backing, o_ a 3/4 (l .) ram) routed board
can be used. The _ise(1 i)ortion of the panel must be tid)ricated to i)e_nit clearances of at least 2" (5. lcm)
from the handle side fin" fingertip clearance.
Panels thicker than 1/4" (6 ram), u I) to 3/4" ( 19 ram) max, will require that the outer :3/16" (8 ram) of
panel perimeter be no thicker than 1/4" (6 ram).
Weightlimitationsfor custompanels:
FreshFood38Ibs.(17kg)max.
FreezerDoor28Ibs.(13kg)max.
Panelsthickerthan1/4"(6mrn) 1/4"(6ram)
ThickBacking
1/4" (6ITllrl)max
Appeara,,c _]l
3/4" (19ram) Panel tor
Door
19

Trimkits anddecoratorpanels.
23"Dimensions for Custom Wood Panels
The areas at the top of the panels need to be cut out (ff the panels.
Freezer Panel Freezer Panel
Without Dispenser With Dispenser FreshFoodPanel
Cutout .-.I I_.- 1/8" (3 mm)
J, ,,
i i
.... / ,
t
5/16"
(Smm)
67%Z'
(170.9 cm)
FRONT
14I%Z'
'(36.8 crn)-'
Cutout "-_I I''- 1/8" (3 rnm)
,,
i i
/Smm,!/
/ 177/¢'
1(46i4cm)
m
FRONT
_L 141%2" _
1(36.8 or'n)
33%"
(85.4 cm)
#
1/8"(3 rnrn)-_,,l I__ Cutout
" "----'J 5/16"
L""i (8 ram)
67%Z'
(170.9 cm)
FRONT
1915/32"
"-(49.5 crn)" "-"
25" CustomStyld MDimensions for Custom Wood Panels
The areas at the top oI the panels need to be cut (mr oI the panels.
Freezer Panel Freezer Panel
Without Dispenser With Dispenser FreshFoodPanel
20
Cutout "-"I I"- 1/8" (3 mm)
''
i !
.... J
t
5/16"
(8 mm)
69"
(175.3 cm)
FRONT
1415/;2"
"(36.8 cm)-"
Cutout "-"-I I"- 1/8" (3 ram)
',
i i
iRONT
141%2"
(36.8 cm)
361/4,',
(92.0 cm)
1/8"(3 rnrn).-_ I I"- Cutout
" "- - --'J' 5/16"
"---1 (8turn)
69"
(175.3cm)
FRONT
19_%2"
" (49.5cm)-
Other manuals for TURBOCOOL 23
19
This manual suits for next models
7
Table of contents
Languages:
Other GE Refrigerator manuals

GE
GE ZIS360NM Reference manual

GE
GE Profile Arctica PSS25NGN User instructions

GE
GE Spacemaker GMR06AAZ Original instructions

GE
GE GCE21XGYAFWW Safety guide

GE
GE Refrigerators Operating instructions

GE
GE GSE23GSESS Assembly instructions

GE
GE 14 User manual

GE
GE TBF72 User manual

GE
GE GSHF5PGX Manual

GE
GE 20 User manual