Geneva GA182-11 User manual

Geneva Aviation, Inc. www.GenevaAviation.com
GA182-11 Rev D P139-HD Digital Audio System 1 of 18
GA182-11
Revision D, 4/23/2014
P139-HD Digital Audio System
Eurocopter EC135 Installation Manual

Geneva Aviation, Inc. www.GenevaAviation.com
GA182-11 Rev D P139-HD Digital Audio System 2 of 18
1.0 INTRODUCTION
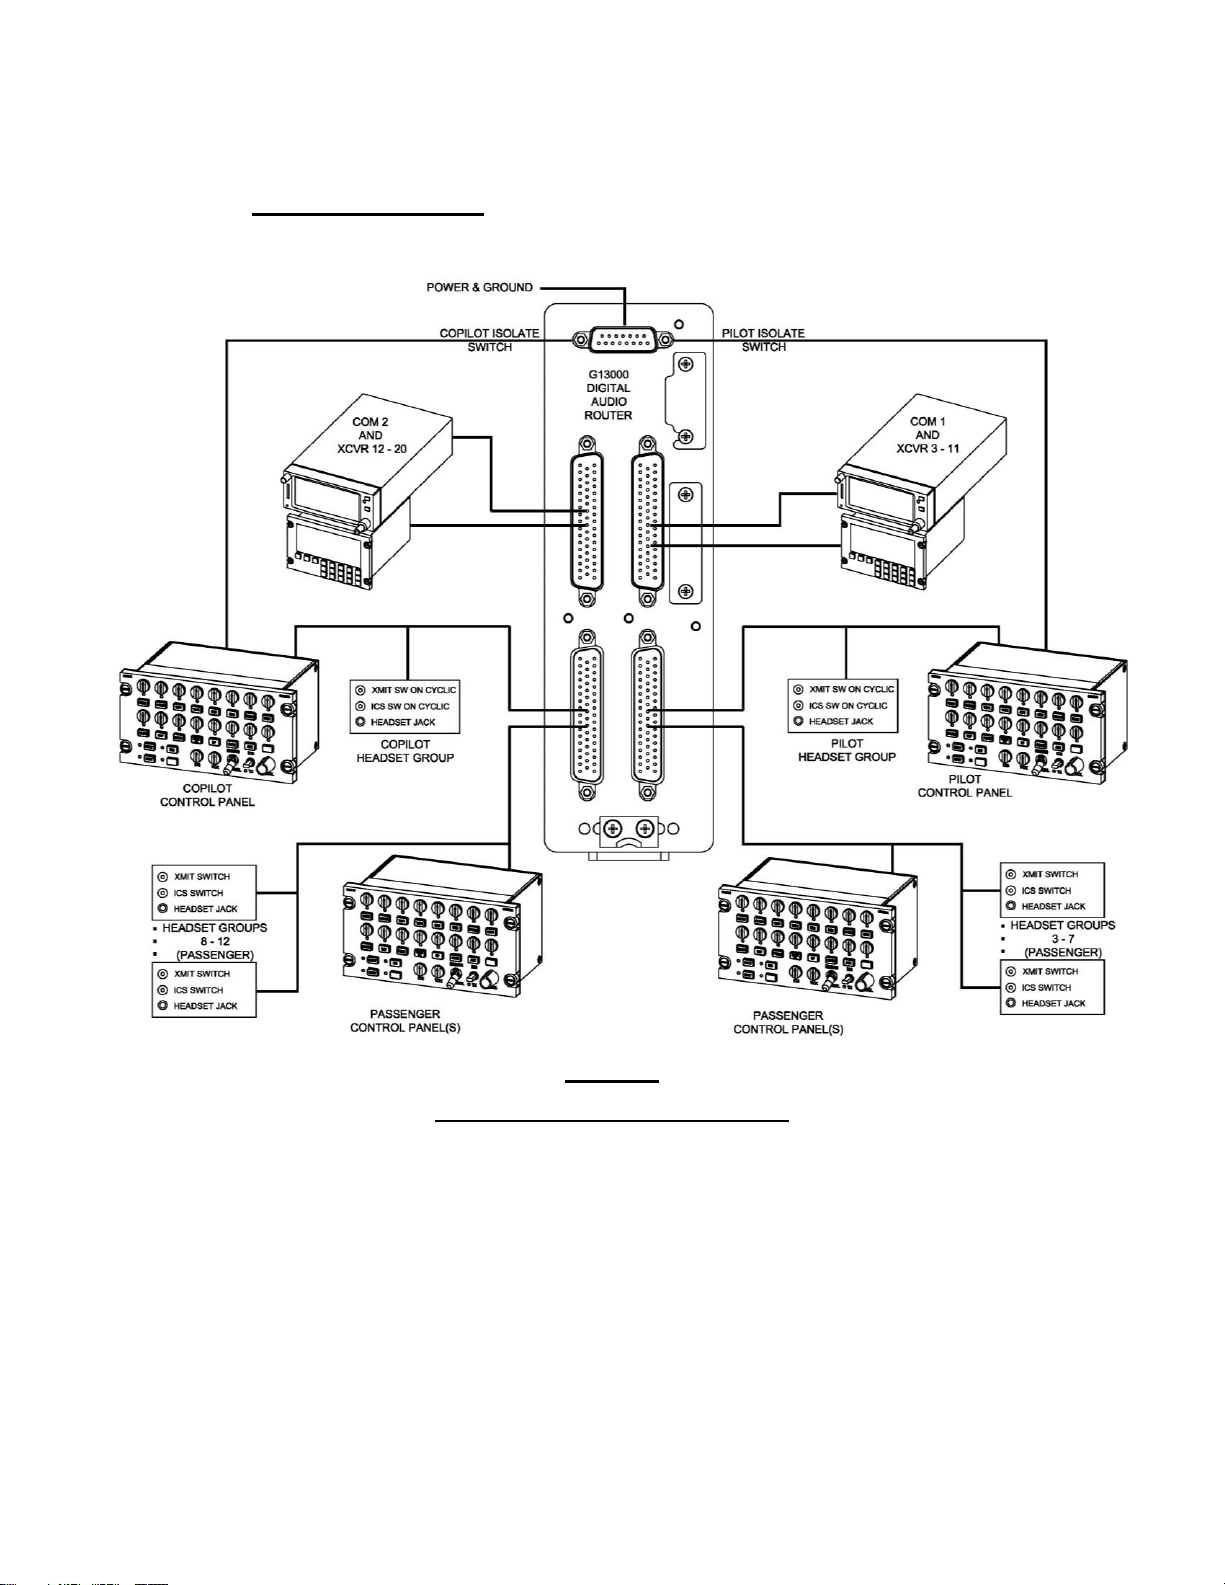
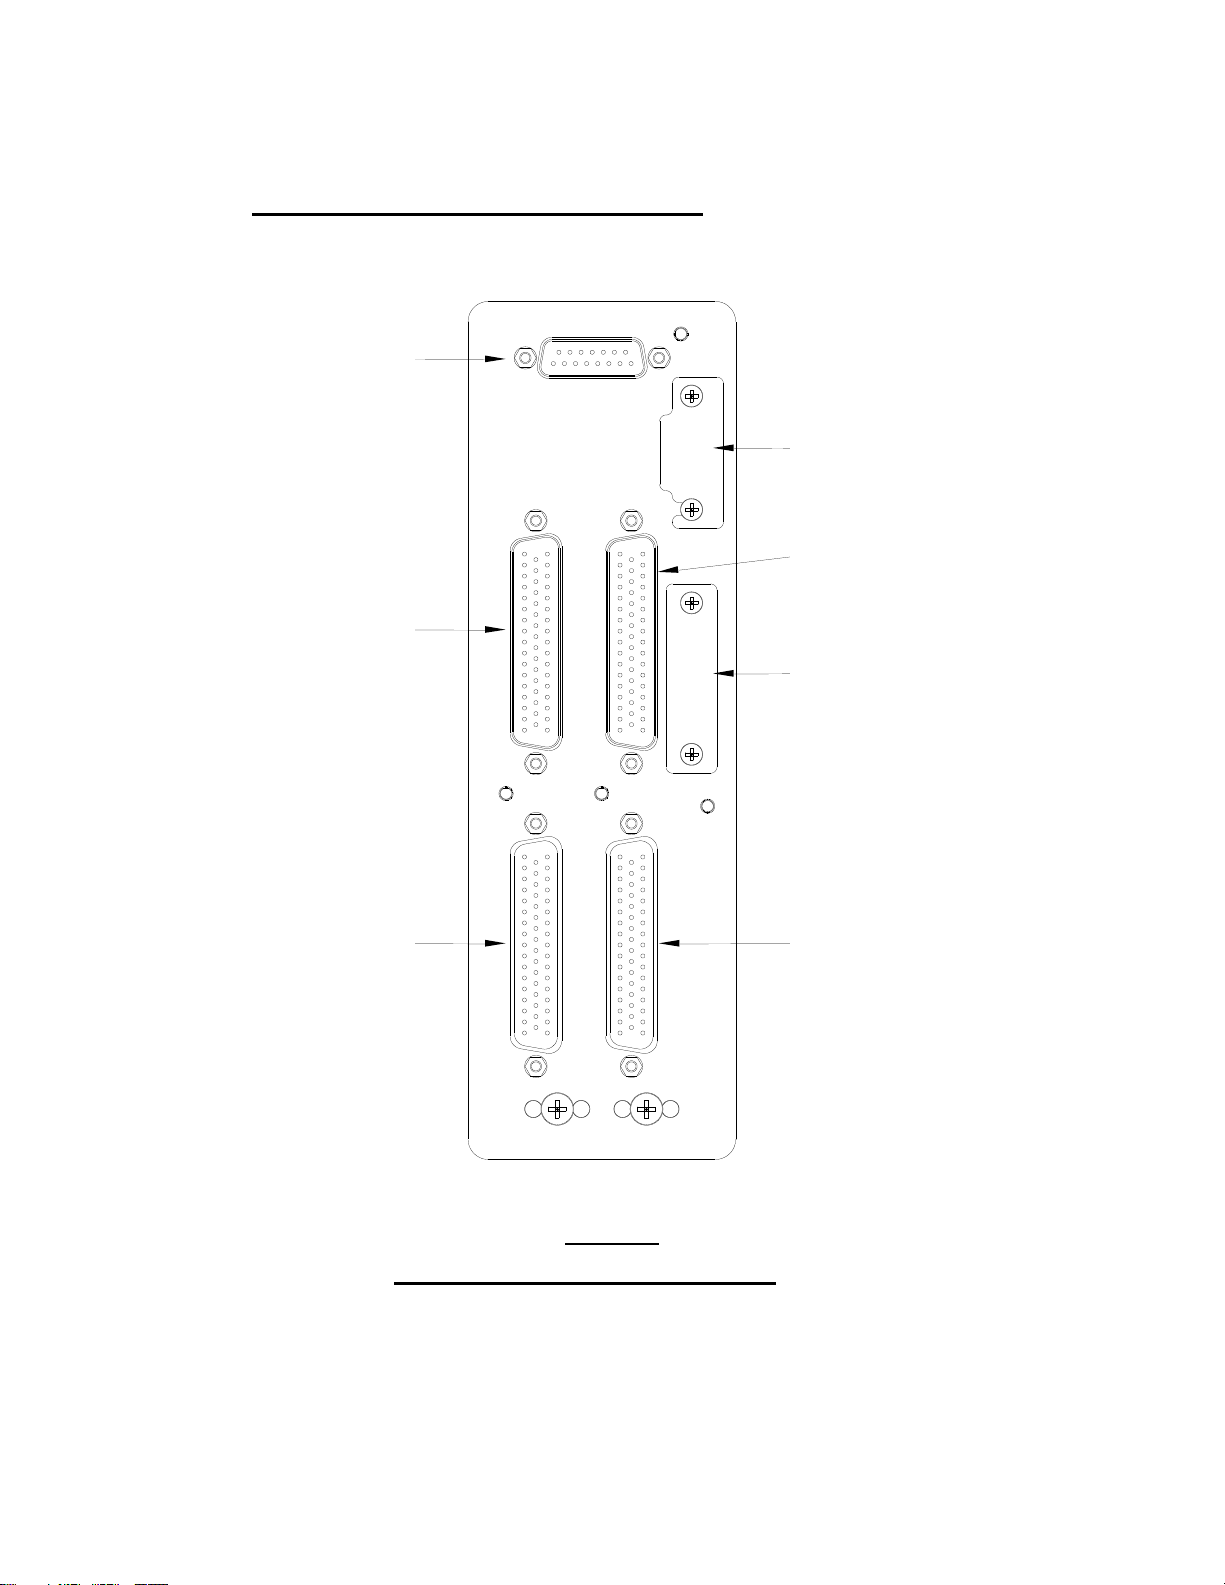
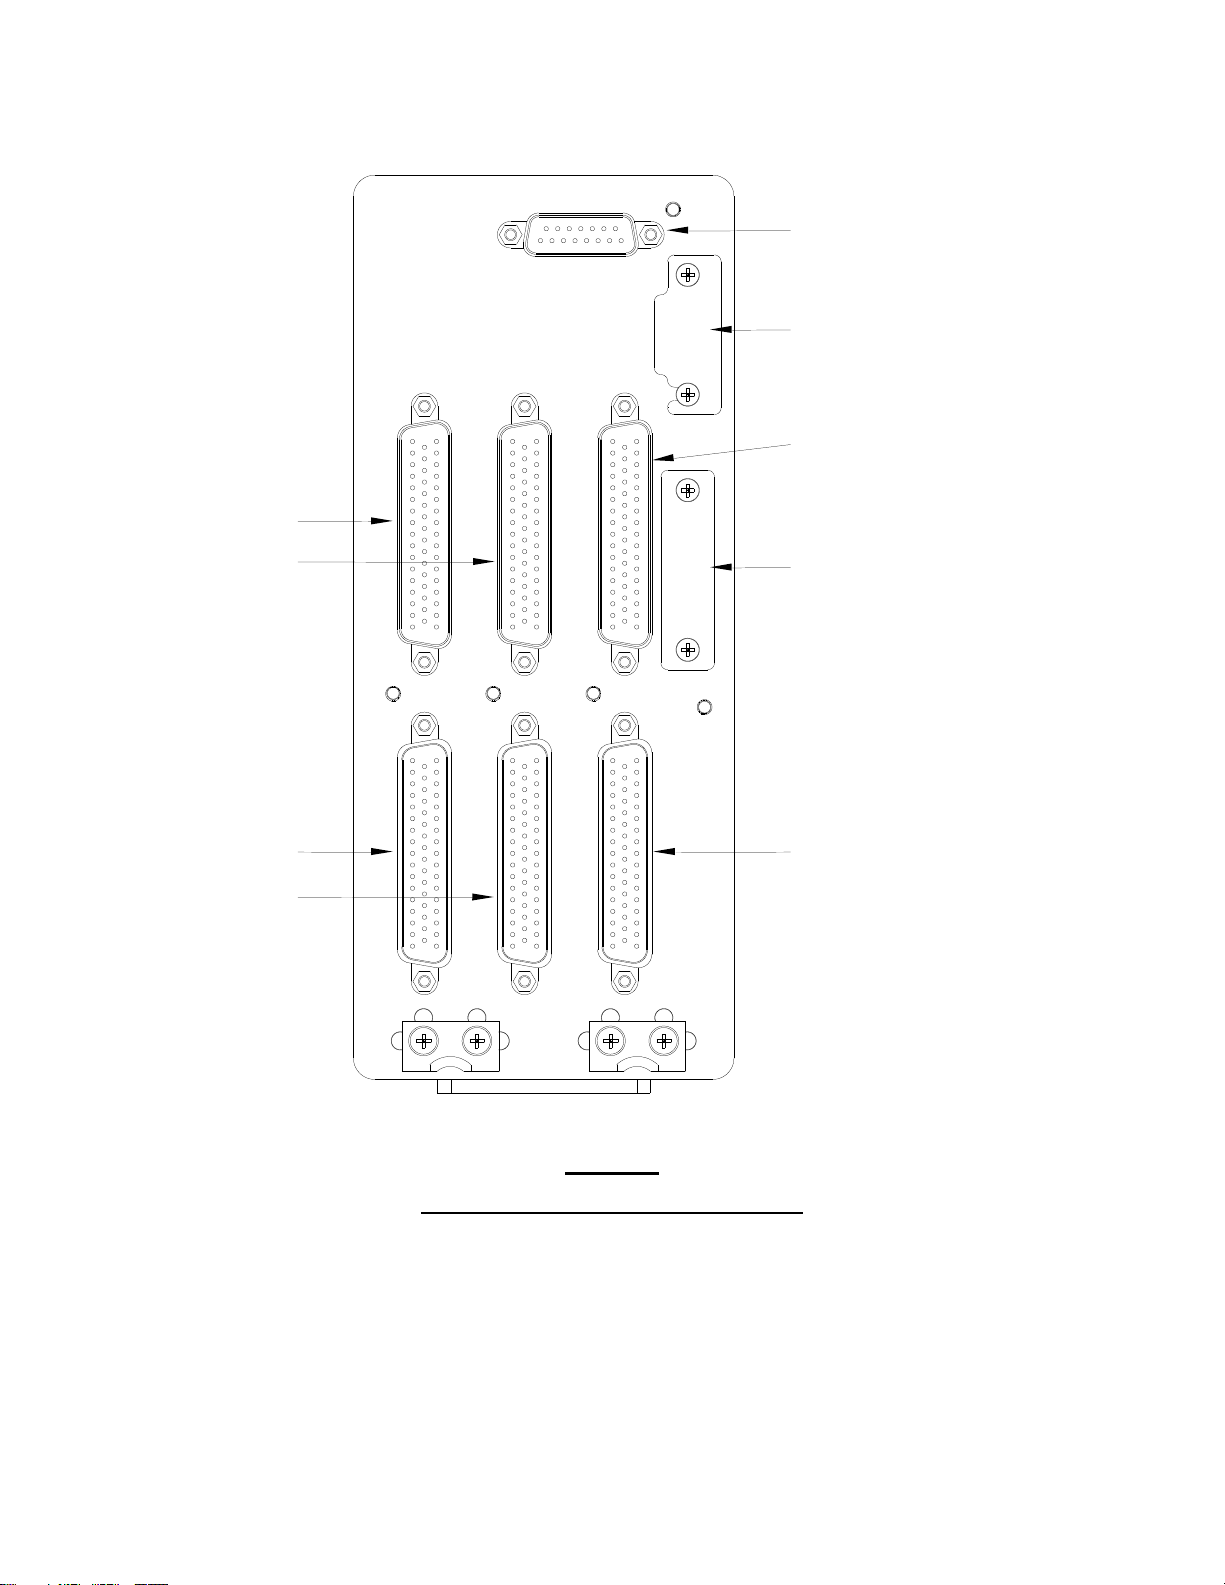
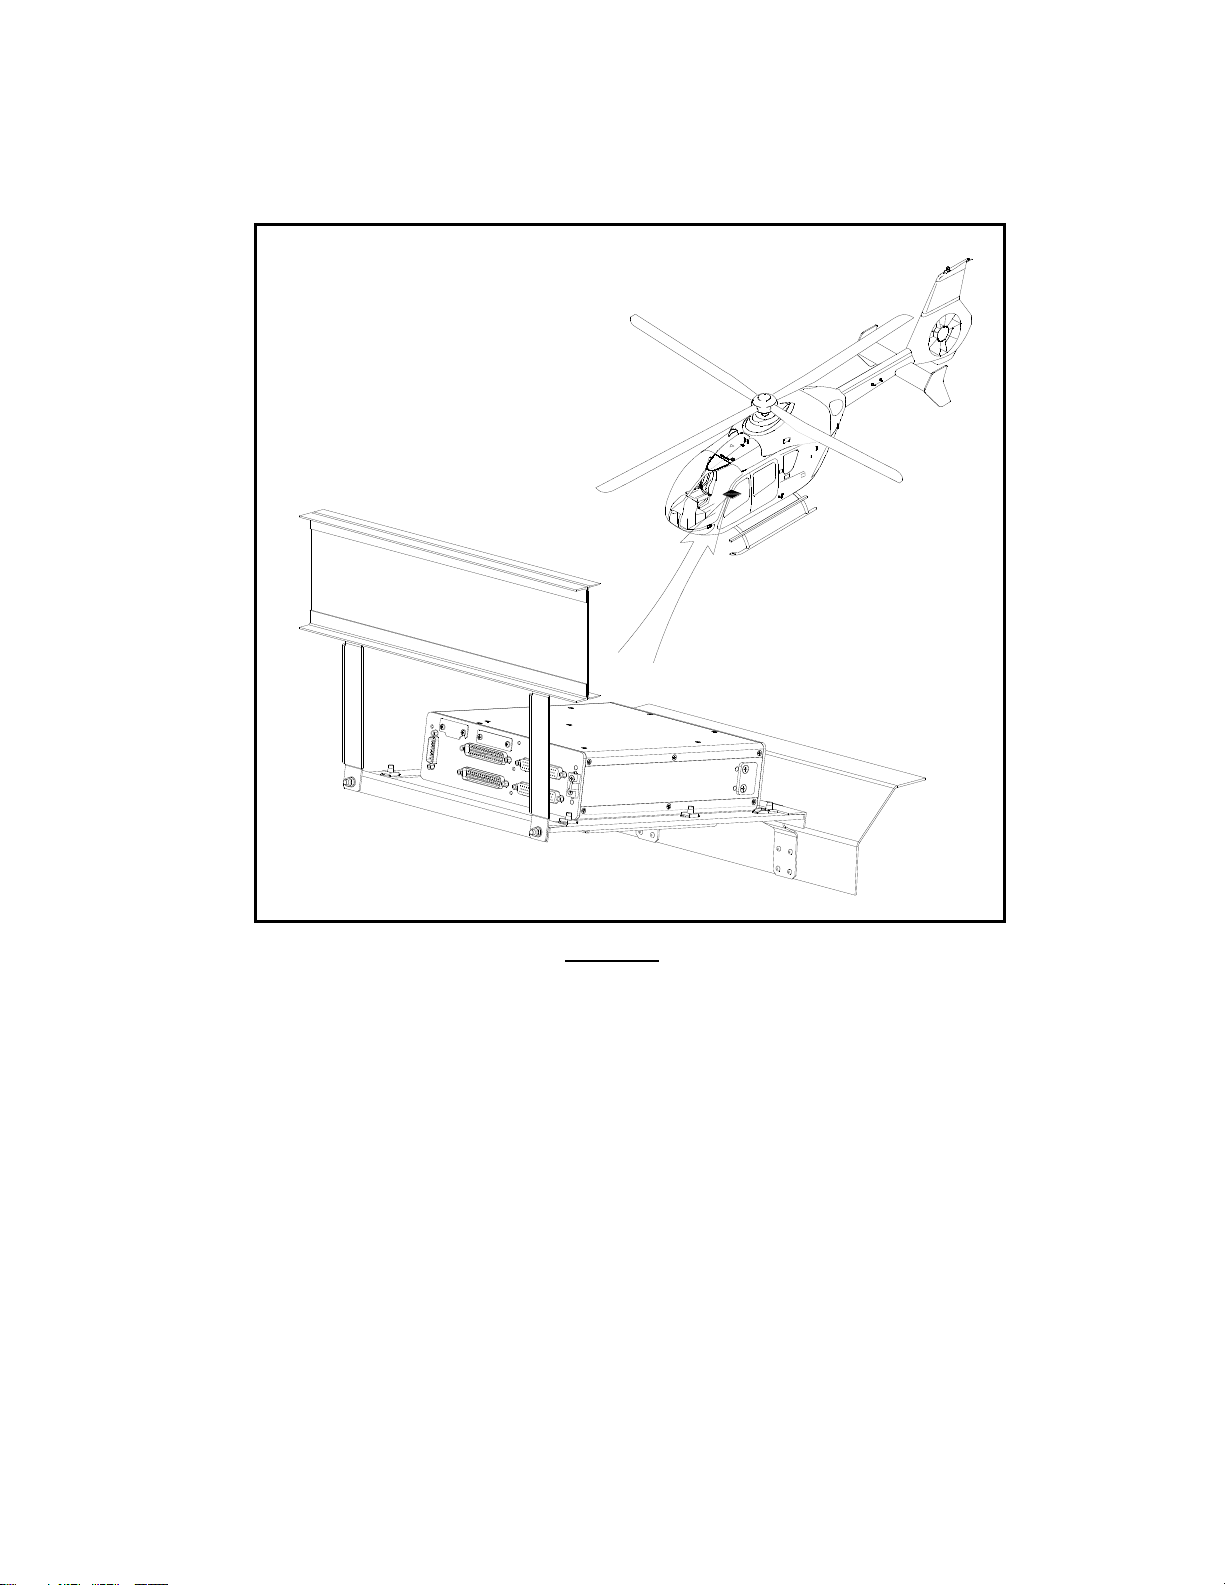
1.1. This document provides general information and instructions for the
installation of the Geneva P139-HD Digital Audio System, under STC
SR00521SE.
1.2. Installation is to be accomplished in accordance with Geneva Aviation
instructions. Throughout the installation of this product it is necessary to
utilize proper aviation practices. Be sure that the installation of this product
is in compliance with the aircraft manufacturer’s limitations and also that it
is done in accordance FAA publication, AC 43.13-1B, Acceptable Methods,
Techniques and Practices, Aircraft Inspection and Repair. These rules
from the AC apply :
A. All wire to be 22 AWG unless otherwise specified.
B. Unshielded wire per MIL-W-22759/16; Shielded wire per MIL-
M27500-xxTGxT14 ; xx- indicates wire gauge, x- indicates
number of conductors.
C. Route and support wiring harness IAW AC 43.13-1b, Chapter
11 Section 8, Paragraph 11-96.
D. Clamp wiring harness IAW AC 43.13-1b, Chapter 11, Section
11, Paragraph 11-146.
E. Clamp and route wiring harness around movable controls IAW
AC 43.13-1b, Chapter 11, Section 9, Paragraph 11-125.
F. Wiring and harness to be separated IAW AC 43.13-1b,
Chapter 11, Section 8, Paragraph a 11-105 & 11-106.
G. Install service loops at harness terminations IAW AC 43.13-1b,
Chapter 11, Section 9, Paragraph 11-139.
H. Install grounding connections and bonding IAW AC 43.13-1b,
Chapter 11, Section 15, Paragraph 11-186 & 11-189.
Before installing any of the components, first read through all of the
documentation to become familiar with the installation requirements. This
installation requires a completed FAA Form 337 and appropriate log book
entries.
Prior to installing each component, record weight and mounting location in the
aircraft’s weight and balance record.
This product is provided with an FAA STC for certain aircraft models. If your
installation is not covered by one of the models listed on the STC, then you may
need to obtain a field approval from your local FAA Flight Standards District
Office (FSDO).

Geneva Aviation, Inc. www.GenevaAviation.com
GA182-11 Rev D P139-HD Digital Audio System 3 of 18
The P139-HD Digital Audio Router contains no user serviceable internal
components. Do not disassemble router or the factory warranty will be voided.
For service, return the unit to Geneva Aviation.
1.3. There are three types of P139-HD Audio Systems that the installer may
choose to install at their discretion.
1.3.1. P139-HD (D) Uses Router G13000 in a “Dual-board” configuration
and is shown in the diagrams and is the router used throughout the
instructions.
1.3.2. P139-HD (S) Uses Router G13000 in a “Single-board” configuration
that uses the same case as the dual-board router, but with only one
audio board installed. These two routers share the same installation
and wiring drawings.
1.3.3. P139-HD (T) uses Router G13160 and is a “Three board”router.
This installation replaces wiring drawing G13004 with drawing
G13162. Installation of this router is performed the in the same
manner as the other two routers with slight changes in the mounting
hardware as noted in the instructions.
1.4. Prior to installation of this system, it is the responsibility of the installer to
confirm by analysis, that the additional power requirement will not exceed
the capacity of the Essential Buses or the aircraft’s electrical system.
Power consumption for this audio system is 5 amps maximum at 28 volts.
The system is designed to use redundant power sources, from 28 VDC
Essential Bus #1, and from 28 VDC Essential Bus #2. For each supply
line, use a separate 5 amp circuit breaker and separate ground lines to two
separate ground points. Refer to G13004 for wire harness details. The
system will support supply voltages of 14 –32 VDC.
1.5. The internal power supply of the router is sufficient to power six audio
control panels. If the installation calls for more than six panels, the
additional panels must be powered from a separate circuit breaker to the
Router. Refer to G13004 sheet 12 for more information.
1.6. The FAA requirement regarding the securing of wire bundles using
nonmetallic clamps is addressed by the use of nylon cable ties. The part
numbers and description of these ties is as follows:
Following the guidelines in AC43.13-1B, cable ties are attached at a
maximum of 4” spacing and ties are attached to nylon cable tie anchors, as
necessary.

Geneva Aviation, Inc. www.GenevaAviation.com
GA182-11 Rev D P139-HD Digital Audio System 4 of 18
Cat.
No.
UPC
Body
Width
In.
Length
In.
Max.
Wire
Bundle
Dia. In.
Military
Standard
Part No.
Tensile
Strength
Lb.
TY23M
82436
.091
3.62
.625
MS3367-4
18
TY24M
82447
.140
5.50
1.125
MS3367-5
40
TY25M
82457
.184
7.31
1.750
MS3367-1
50
1.7. The aircraft into which this product will be installed may be a new aircraft or
an aircraft that has been in service. The configuration of the wiring and
cabling will vary from aircraft to aircraft. The installation of the Geneva
Aviation Audio System should use existing wire and cable runs when
possible as it will not interfere with the existing aircraft wiring.
1.8. These instructions call out cables by reference to the drawing that defines
the cable construction details. The installer may, at the installer’s
discretion, substitute connectors, wire type, and connection details, so long
as the final installations operate correctly and meets FAA standards.
1.9. The Router features a COM1 Isolate mode that automatically connects the
pilot’s headset and mic switches directly to COM1 in the event of power
loss or failure of the Audio Router. The pilot may also activate the COM1
Direct mode using the EMERG/NORMAL switch on the G13115 and
G13116 control panels. This feature may also be set up for the Copilot to
activate a COM2 Isolate mode using the EMERG/NORMAL switch on the
copilot control panel.
1.10. For Non-Pilot positions, Control Panels G13115NS or G13116NS may be
used. The panels do not have an internal COM1, COM2 isolate switch.
For these panels, do not connect to the COM1 or COM2 circuits shown in
wiring diagrams G13004.

Geneva Aviation, Inc. www.GenevaAviation.com
GA182-11 Rev D P139-HD Digital Audio System 5 of 18
2.0 System Overview
Figure 1
Digital Audio System Overview
2.1. The schematic shown in Figure 1 is a typical system. The installer may, at
the installer’s discretion, add or remove radios, control panels, headset
groups, or ICS and Transmit PTT switches as needed.
2.2. Control Panels G13115 and G13116 may be used interchangeably,
depending on the control functions desired and number of radios installed.
2.3. It is the installer’s responsibility to document the system configuration as
installed for maintenance purposes.

Geneva Aviation, Inc. www.GenevaAviation.com
GA182-11 Rev D P139-HD Digital Audio System 6 of 18
3.0 Component Installation & Hookup
J6 NETWORK PORT
J7 MEMORY PORT
J3
J1
J4
J2
J5
Figure 2
G13000 Router Connector Layout

Geneva Aviation, Inc. www.GenevaAviation.com
GA182-11 Rev D P139-HD Digital Audio System 7 of 18
3.1. G13000 Router Connections (see Figure 2)
3.1.1. J1 is used to connect COM1 and radios XCVR3 –XCVR11.
3.1.2. J2 is used to connect COM2 and radios XCVR12 –XCVR20.
3.1.3. J3 is used to connect the Pilot’s control panel, Pilot’s headset group,
headset groups 3 –7 and passenger control panels.
3.1.4. J4 is used to connect the Copilot’s control panel, Copilot’s headset
group, headset groups 8 –12 and additional passenger control
panels.
3.1.5. J5 is used to connect power, ground, Pilot’s COM1 Isolate, and
Copilot’s COM2 Isolate.
3.1.6. J6 is a network port used for system configuration adjustment.
3.1.7. J7 is a memory card slot used for storing system configuration data
onto removable media.
3.1.8. The Router contains no user serviceable internal components. Do
not disassemble router or the factory warranty will be voided.
Return the unit to Geneva Aviation for service.

Geneva Aviation, Inc. www.GenevaAviation.com
GA182-11 Rev D P139-HD Digital Audio System 8 of 18
J8 NETWORK PORT
J9 MEMORY PORT
J6
J5
J2
J1
J7
J3
J4
Figure 3
G13160 Router Connector Layout

Geneva Aviation, Inc. www.GenevaAviation.com
GA182-11 Rev D P139-HD Digital Audio System 9 of 18
3.2. G13160 Router Connections (see Figure 3)
3.2.1. J1 is used to connect radios COM1 and radios XCVR3 –XCVR11.
3.2.2. J2 is used to connect the Pilot’s control panel, Pilot’s headset group,
headset groups 3 –7 and passenger control panels.
3.2.3. J3 is used to connect radios COM2 and radios XCVR12 –XCVR20.
3.2.4. J4 is used to connect the Copilot’s control panel, Copilot’s headset
group, headset groups 8 –12 and additional passenger control
panels.
3.2.5. J5 is used to connect radios XCVR21 –XCVR30.
3.2.6. J6 is used to connect headset groups 13 –18 and additional
passenger control panels.
3.2.7. J7 is used to connect power, ground, Pilot’s COM1 Isolate, and
Copilot’s COM2 Isolate.
3.2.8. J8 is a network port used for system configuration adjustment.
3.2.9. J9 is a memory card slot used for storing system configuration data
onto removable media.
3.2.10. The Router contains no user serviceable internal components. Do
not disassemble router or the factory warranty will be voided.
Return the unit to Geneva Aviation for service.

Geneva Aviation, Inc. www.GenevaAviation.com
GA182-11 Rev D P139-HD Digital Audio System 10 of 18
3.3. Component Installation & Hookup
Figure 4
Router Installation
3.3.1. The preferred location is under the cabin floor behind the FWD Belly
Panel as shown in Figure 4 and drawing G13130. This installation
also provides an option (at the installer’s discretion) for mounting an
AA35-100 Audio Mixer (MUX) or the Geneva G13045 Audio Mixing
Amp (AMA). Router G13000 is shown in drawing G13130 and in the
Figure 4. Router G13160 may be installed in place of G13000 using
the same methods and hardware defined in drawing G13130.

Geneva Aviation, Inc. www.GenevaAviation.com
GA182-11 Rev D P139-HD Digital Audio System 11 of 18
Figure 5
Router Installation on Avionics Shelf
3.3.2. Optionally the installer may, at the installer’s discretion, install the
router in the Aft Avionics Bay shelf as shown in Figure 5. The exact
placement is dependent on other pre-existing equipment installed. It
is the installer’s responsibility to make sure this installation does not
interfere with other installed equipment and that the installation does
not exceed the shelf’s rated load limit.
Using Tray G13009 as a guide, layout and install (4) #10-32 potted
inserts, NAS1832-3-3 into shelf in accordance with Eurocopter
maintenance manual. Maintain 2 e/d edge margin for all mounting
holes. Mount tray to shelf using (2) shims G13009-3 and (4)
MS24693S276 #10 x 1.0 flat head screws. Slide Router into tray
until clip on bottom engages the tray securely. Secure router to tray
by tightening finger nut onto the front support hook.
3.3.3. Note: for the G13160 Router replace in Figure 5 the following items:
G13009 with G13161; G13009-3 with G13161-3; G13006-2 with
G13161-4 and use (3) MS24693S51 screws to install; use (2)
NAS622CE2 Support Hooks.

Geneva Aviation, Inc. www.GenevaAviation.com
GA182-11 Rev D P139-HD Digital Audio System 12 of 18
3.3.4. For Router G13000, refer to drawing G13004 for the detailed wiring
schematic used in this installation. For Router G13160, refer to
drawing G13162 for the detailed wiring schematic used in this
installation.
3.3.5. Be sure to carefully document the Radios and Control panels as
installed and their related connections for future maintenance and
troubleshooting purposes.

Geneva Aviation, Inc. www.GenevaAviation.com
GA182-11 Rev D P139-HD Digital Audio System 13 of 18
3.4. Control Panels
3.4.1. The Control Panels mount onto standard DZUS rails and should be
mounted in locations designed for standard avionics mounting. The
control panels connect to the router via the 4-wire GNET bus.
3.4.2. There can be more than one of these control panels in any
combination connected to the system. Each audio board has two
GNET ports giving 2, 4, 6 GNET ports for the P139 (S)/(D)/(T)
routers respectively. If the configuration calls for more control
panels than there are available GNET ports on the router, connect
J1 of each control panel to a GNET port in parallel for pins 1 –4.
Pins 5 –9 will be unique ID for each control panel connector. See
G13004 sheet 9 for details.
3.4.3. The pilot control panel also controls the COM1 Isolate function.
Optionally the copilot control panel controls the COM2 isolate
function. See Section 1.8 for more information.
3.5. Control Panels G13115 & G13115NS
3.5.1. The G13115 & G13115NS Control panels provide separate transmit,
receive and volume controls for up to 16 radios or other devices, as
well as crew intercom functions and optionally installer-defined
special functions. The G13115NS version does not have an
EMERG/NORMAL switch and must not be used as a pilot or copilot
primary panel.

Geneva Aviation, Inc. www.GenevaAviation.com
GA182-11 Rev D P139-HD Digital Audio System 14 of 18
3.6. Control Panels G13116 & G13116NS
3.6.1. The G13116 & G13116NS Control panels provide separate transmit,
receive and volume controls for up to 8 radios or other devices, as
well as crew intercom functions and optionally installer-defined
special functions. The G13116NS version does not have an
EMERG/NORMAL switch and must not be used as a pilot or copilot
primary panel.
3.7. Headset Ports
3.7.1. The Pilot and Copilot Headset Group consists of the headset jack,
ICS switch and transmit switches on the cyclic and/or foot switches.
3.7.2. For each passenger, a unique Passenger Headset Group is needed.
The Passenger Headset Group consists of the passenger’s headset
jack, an ICS switch and a transmit switch.

Geneva Aviation, Inc. www.GenevaAviation.com
GA182-11 Rev D P139-HD Digital Audio System 15 of 18
3.8. COM1, COM2 and other radio ports
3.8.1. The G13000 digital audio router
supports up to 20 radios and the
G13160 router supports up to 30
radios. Each radio should be
installed in accordance with the
manufacturer’s instructions.
3.8.2. For the G13000 the following
connections are available:
3.8.2.1. The COM1 radio connects to J1 on the Router along with
radios XCVR3 - XCVR11 (refer to G13004 sheet 4).
3.8.2.2. The COM2 radio connects to J2 on the router along with
radios XCVR12 - XCVR20 (refer to G13004 sheet 5).
3.8.3. For the G13160 the following connections are available:
3.8.3.1. The COM1 radio connects to J1 on the Router along with
radios XCVR3 - XCVR11 (refer to G13162 sheet 5).
3.8.3.2. The COM2 radio connects to J3 on the router along with radio
ports XCVR12 - XCVR20 (refer to G13162 sheet 6).
3.8.3.3. Radios XCVR21 - XCVR30 connect to J5 on the router (refer
to G13162 sheet 7).
3.8.4. While the term radio is used throughout this document, any type of
audio device can be connected, such as tape recorders, scanners,
telephones, hand-held radios, etc.
There is normally no need for any type of universal radio adapter
between an audio device and the router.

Geneva Aviation, Inc. www.GenevaAviation.com
GA182-11 Rev D P139-HD Digital Audio System 16 of 18
4.0 Functional Check
4.1. Perform a check of all power and ground leads to confirm they are
connected properly before applying power to the system. Incorrect wiring
may cause damage to the units.
4.2. Connect headset adapter cables, headsets and switches. Apply power to
audio system, radios and related accessories. Activate ICS and confirm
proper operation. Place ‘PILOT EMERG/NORMAL’ switch in ‘EMERG’
position. Key transmit switch and confirm proper operation of COM1.
4.3. Place the ‘PILOT EMERG/NORMAL’ switch in ‘NORMAL’ position and
check all transceivers, receivers and audio devices.
4.4. If the system is equipped with a ‘COPILOT EMERG/NORMAL’ switch,
repeat the steps in sections 4.2 and 4.3 for Copilot position and COM2
respectively.
4.5. Check all pilot, copilot and passenger audio control panels for proper audio
levels and operation. Should adjustments be required, follow the
instructions in document GA063-3.

Geneva Aviation, Inc. www.GenevaAviation.com
GA182-11 Rev D P139-HD Digital Audio System 17 of 18
5.0 Load Analysis
5.1. At the completion of the installation of the audio system, the installer shall
perform a load analysis test of the electrical branch circuit that powers the
audio system, and also the entire aircraft electrical load, to confirm that the
addition of the audio system will not cause an overload to the electrical
branch circuit or the aircraft generator.
5.2. The current shall be measured using a properly calibrated ammeter. A
clamp-on amp meter, such as Amprobe Instrument model number ACDC-
600A, or equivalent will make this job easier.
5.3. Perform the branch circuit load analysis test by powering up all equipment
that is intended to be operated at the same time on the branch circuit that
the audio system is connected to. Additionally, key the three highest power
communication transmitters at the same time, if possible, while the current
measurements are being taken.
5.4. Measure the current of the branch circuit powering the audio system, by
clamping the meter around the branch circuit wire near its origin. Confirm
that the current draw during the above described test conditions is less
than the current limiter (fuse or circuit breaker) rating for that branch circuit.
5.5. If the current draw is greater than the current limiter rating, it becomes the
installer's responsibility to re-distribute some of the other equipment
powered by this branch circuit to another suitable branch circuit, in order to
reduce the load on the audio system's branch circuit to less than the
current limiter rating.
5.6. Once the branch circuit loads are within limits, test the current load for the
entire aircraft while all power for the aircraft is being supplied by the aircraft
generator, battery, or external power source. Perform this load analysis test
by powering up all equipment on the aircraft that is intended to be operated
at the same time as the audio system. Additionally, key the three highest
power communication transmitters at the same time, if possible, while the
current measurements are being taken. Clamp the ammeter around the
power source. Confirm that the current draw during the above described
test is less than the generator rating.
5.7. Upon satisfactory completion of these load analysis tests, make an aircraft
logbook entry that these tests have been performed satisfactorily in
accordance with this STC.

Geneva Aviation, Inc. www.GenevaAviation.com
GA182-11 Rev D P139-HD Digital Audio System 18 of 18
6.0 Interference Test Procedure
6.1. Perform electrical interference test using GA1-2TP test procedure.
7.0 Final Inspection
7.1. Perform final inspection of installation confirming:
7.1.1. There are no chaffing issues.
7.1.2. There are no mechanical interference issues.
7.1.3. Security of fasteners.
7.1.4. Removal of all tools.
7.1.5. Chips, shavings and other debris are removed.
7.1.6. Proper reassembly of aircraft.
7.1.7. Aircraft is airworthy prior to returning to service.
8.0 FAA Requirements
8.1. Amend the weight and balance records and make the necessary log book
entry. Complete an FAA form 337 showing the installation of this
equipment in accordance with the STC instructions and submit one copy to
the FAA and one copy to the aircraft owner. File all data and a copy of the
STC with the aircraft records.
LOG OF REVISIONS
REVISION
LEVEL
DATE OF
REVISION
PAGES
DESCRIPTION OF CHANGE
APPROVAL
--
5/13/12
All Pages
Initial Release
CLB
A
6/25/12
ALL
Updated 3.3 for G13115 &
G13116
CLB
B
10/15/12
3, 8
Added 1.8; Added G13115NS
and G13116NS to 3.3
CLB
C
6/13/13
All
Removed EC145 from manual
CLB
D
4/23/14
ALL
Added G13160 3-Board Router
CLB
This manual suits for next models
2
Table of contents
Popular Avionic Display manuals by other brands

FLYelectronics
FLYelectronics MotoMonitor quick start guide

Aspen Avionics
Aspen Avionics AT300 Operating procedures

AeroVonics
AeroVonics AV-30 installation manual

Levil Technology
Levil Technology iLevil 2 SW instruction manual

LZ design
LZ design FES LCD Display Flight manual

Aspen Avionics
Aspen Avionics Evolution EFD1000 PFD pilot's guide