Genius DV5131 User manual

English
-1-
WEEE Warning Message
Symbol for Separate Collection in European Countries
This symbol indicates that this product is to be collected
separately.
The following apply only to users in European countries:
zThis product is designated for separate collection at an
appropriate collection point. Do not dispose of as
household waste.
zFor more information, contact the retailer or the local
authorities in charge of waste management.
FCC STATEMENT
This device complies with Part 15 of the FCC Rules. Operation is subject to the
following two conditions:
(1). This device may not cause harmful interference, and
(2). This device must accept any interference received, including interference that
may cause undesired operation.
Note:
This equipment has been tested and found to comply with the limits for Class B digital
devices, pursuant to Part 15 of the FCC rules. These limits are designed to provide
reasonable protection against harmful interference in a residential installation. This
equipment generates uses and can radiate radio frequency energy and, if not installed
and used in accordance with the instructions, may cause harmful interference to radio
communications.
However, there is no guarantee that interference will not occur in a particular
installation. If this equipment does cause harmful interference to radio or television
reception, which can be determined by turning the equipment off and on, the user is
encouraged to try to correct the interference by one or more of the following
measures:
Reorient or relocate the receiving antenna
Increase the separation between the equipment and receiver
Connect the equipment into an outlet on a circuit different from that to which the
receiver is connected

English
-2-
Use of shielded cable is required to comply with Class B limits in Subpart B of Part 15
of the FCC rules.
Do not make any changes or modifications to the equipment unless otherwise
specified in the manual. If such changes or modifications should be made, you could
be required to stop operation of the equipment.
Product Information
1. Product design and specifications are subject to change without notice. This
includes primary product specifications, software, software drivers, and user’s
manual. This User Manual is a general reference guide for the product.
2. The product and accessories that come with your camera may be different from
those described in this manual. This is due to the fact that different retailers often
specify slightly different product inclusions and accessories to suit their market
requirements, customer demographics, and geographical preferences. Products
very often vary between retailers especially with accessories such as batteries,
memory cards, cables, carrying cases/pouches, and language support.
Occasionally a retailer will specify a unique product color, appearance, and internal
memory capacity. Contact your dealer for precise product definition and included
accessories.
3. The illustrations in this manual are for the purpose of explanation and may differ
from the actual design of your camera.
4. The manufacturer assumes no liability for any errors or discrepancies in this user
manual.
5. For driver updates, you can check the “Download” section of our website,
www.geniusnet.com
SAFETY INSTRUCTIONS
Read and understand all Warnings and Cautions before using this product.
Warnings
If foreign objects or water have entered the camera, turn the power
OFF and remove the batteries.
Continued use in this state might cause fire or electric shock. Consult the
store of purchase.
If the camera has fallen or its case has been damaged, turn the
power OFF and remove the batteries.
Continued use in this state might cause fire or electric shock. Consult the

English
-3-
store of purchase
Do not disassemble, change or repair the camera.
This might cause fire or electric shock. For repair or internal inspection,
ask the store of purchase.
Do not use the camera in areas near water.
This might cause fire or electric shock. Take special care during rain,
snow, on the beach, or near the shore.
Do not place the camera on inclined or unstable surfaces.
This might cause the camera to fall or tilt over, causing injury.
Keep the batteries out of the reach of children.
Swallowing batteries might cause poisoning. If the battery is accidentally
swallowed, immediately consult a physician.
Do not use the camera while you are walking, driving or riding a
motorcycle.
This might cause you to fall over or result in traffic accident.
Cautions
Insert the batteries paying careful attention to the polarity (+ or –) of
the terminals.
Inserting the batteries with its polarities inverted might cause fire and injury,
or damage to the surrounding areas due to the battery rupturing or leaking.
Do not fire the flash close to anyone’s eyes.
This might cause damage to the person’s eyesight.
Do not subject the LCD monitor to impact.
This might damage the glass on the screen or cause the internal fluid to
leak. If the internal fluid enters your eyes or comes into contact with your
body or clothes, rinse with fresh water.
If the internal fluid has entered your eyes, consult a physician to receive
treatment.
A camera is a precision instrument. Do not drop it, strike it or use
excessive force when handling the camera.
This might cause damage to the camera.
Do not use the camera in humid, steamy, smoky, or dusty places.
This might cause fire or electric shock.
Do not remove the battery immediately after long period of continuous
use.
The battery becomes hot during use. Touching a hot battery might cause
burns.
Do not wrap the camera or place it in cloth or blankets.
This might cause heat to build up and deform the case, resulting in fire. Use
the camera in a well-ventilated place.
Do not leave the camera in places where the temperature may rise
significantly, such as inside a car.

English
-4-
This might adversely affect the case or the parts inside, resulting in fire.
Before you move the camera, disconnect cords and cables.
Failure to do this might damage cords and cables, resulting in fire and
electric shock.
Notes on Battery Usage
Ao utilizar as baterias, leia cuidadosamente e observe atentamente as Instruções de
segurança e as notas descritas abaixo:
Use somente as baterias especificadas (AA).
Evite usar as baterias em ambientes extremamente frios, pois as baixas
temperaturas podem diminuir a vida das baterias e reduzir a performance da
câmera.
As baterias poderão esquentar durante a utilização da câmera por um longo
período ou do flash de forma contínua. Isso é normal e não caracteriza mau
funcionamento.
A câmera poderá esquentar durante a utilização contínua ou por um longo
período. Isso é normal e não caracteriza mau funcionamento.
Se não for utilizar as baterias por um longo período, retire-as da câmera para
evitar vazamento ou corrosão.
Se a bateria não for utilizada por um longo período, guarde-a após estar
descarregada. Se a bateria for guardada com carga por um longo período, sua
performance pode ser comprometida.
Mantenha os terminais sempre limpos.
Jamais utilize baterias de manganês.
Haverá risco de explosão caso as baterias sejam substituídas por um tipo
incorreto.
Descarte as baterias de acordo com as instruções.

English
-5-
CONTENTS
GETTING TO KNOW YOUR CAMERA_______________________________7
OVERVIEW ____________________________________________________7
STANDARD ACCESSORIES _________________________________________7
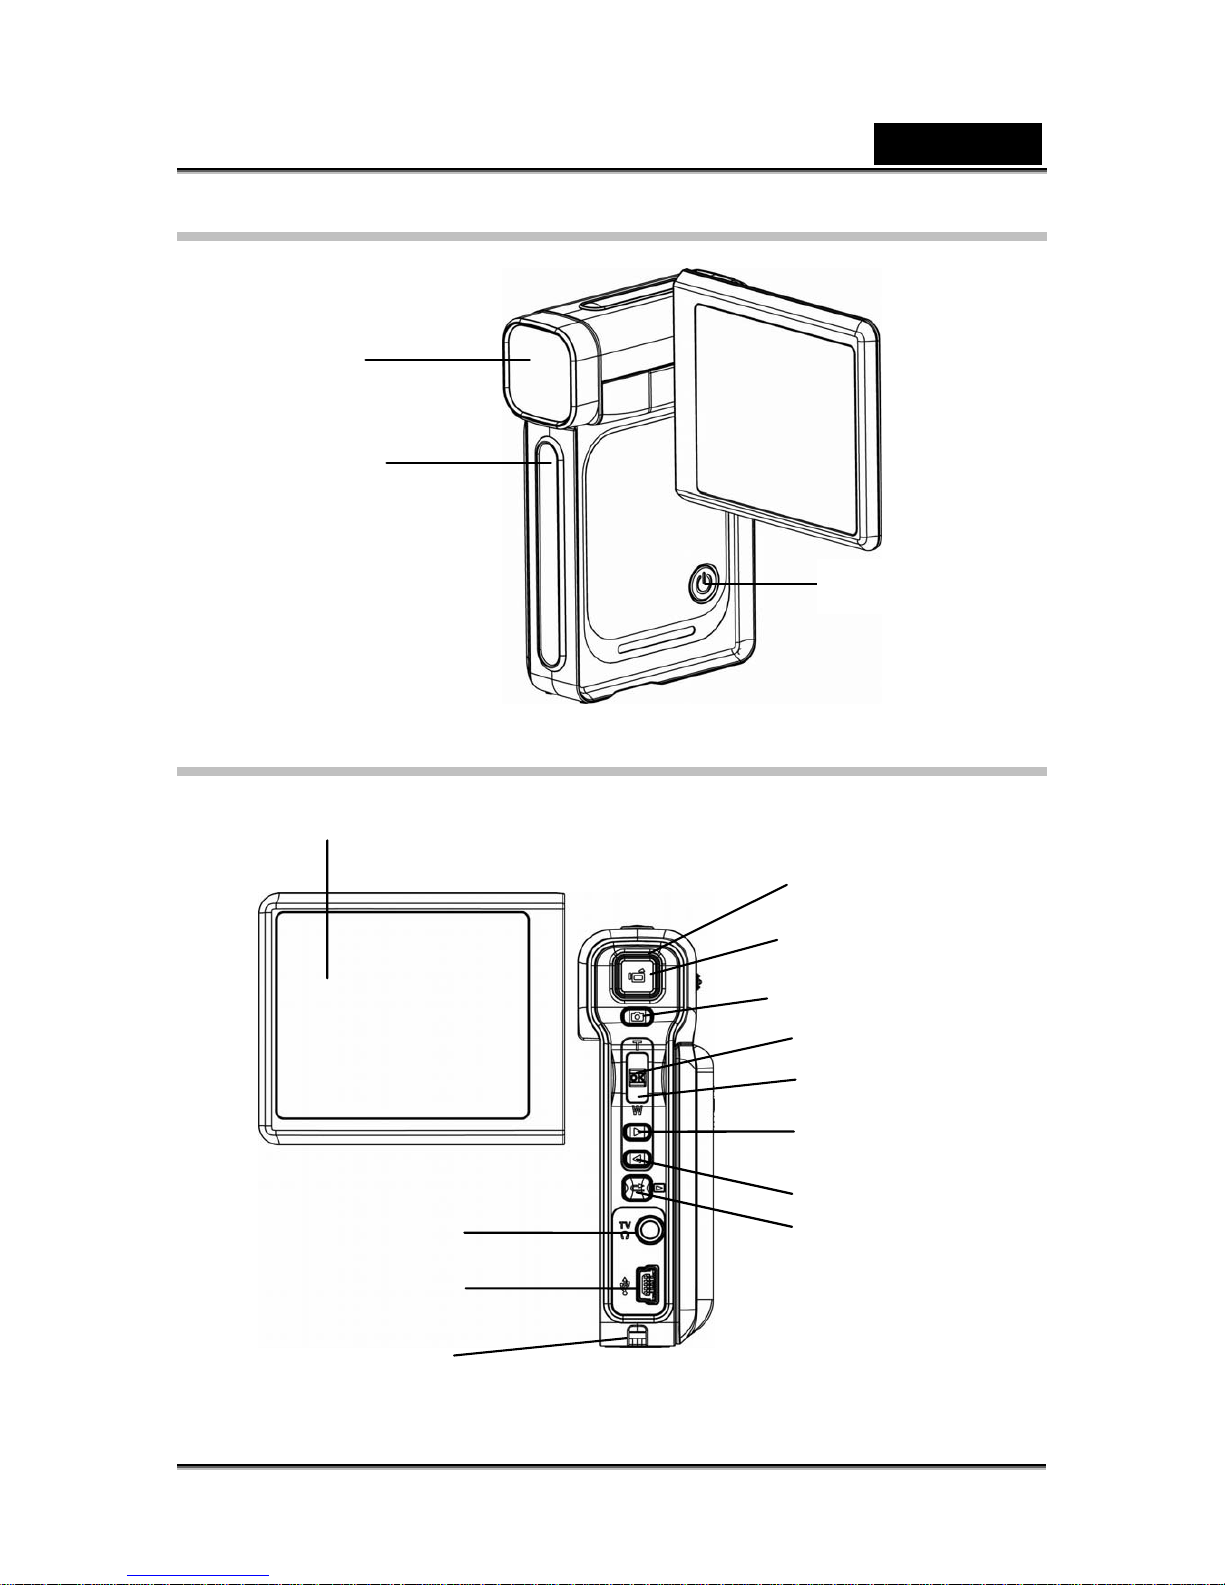
FRONT VIEW ___________________________________________________8
KEYPAD ILLUSTRATION____________________________________________8
SIDE VIEW_____________________________________________________9
GETTING STARTED ____________________________________________10
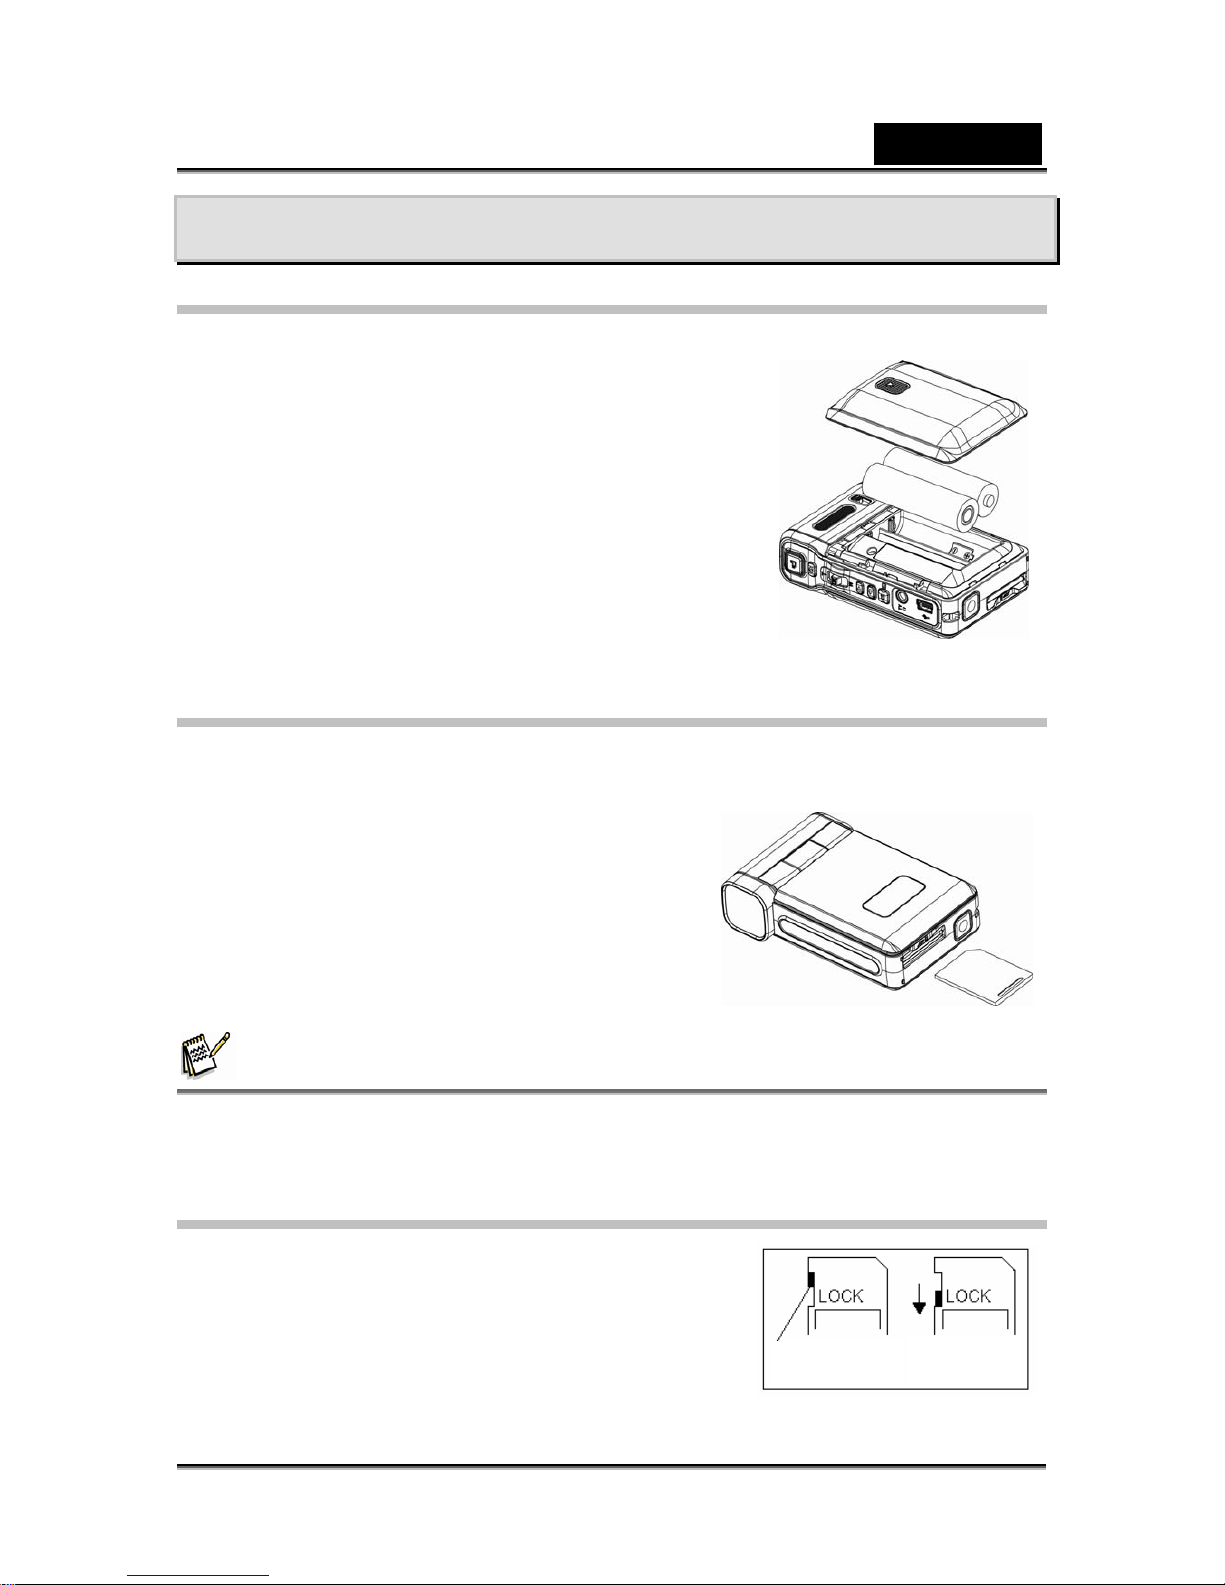
LOADING THE BATTERY __________________________________________10
INSERTING AND REMOVING AN SD CARD _____________________________10
PROTECTING DATA ON AN SD CARD_________________________________10
TURNING THE CAMERA ON AND GETTING STARTED ______________________ 11
TURNING THE CAMERA OFF _______________________________________ 11
RECORD MODE _______________________________________________12
BUTTON FUNCTION _____________________________________________12
LCD MONITOR INFORMATION______________________________________12
MOVIE RECORDING _____________________________________________14
PICTURE RECORDING ___________________________________________14
USING DIGITAL ZOOM____________________________________________14
OPTIONS FOR RECORD MODE _____________________________________15
OPERATIONS FOR RECORD MODE __________________________________15
DEFAULT SETTING AND VALIDATION _________________________________16
MOVIE MODE SETTING___________________________________________16
Movie Resolution ____________________________________________16
Possible recording time / sec (video clip) __________________________17
Exposure___________________________________________________17
Light ______________________________________________________18
Sharpness__________________________________________________19
White Balance_______________________________________________19
Motion Detection_____________________________________________20
Night Mode _________________________________________________21
CAMERA MODE SETTING _________________________________________21
Picture Resolution____________________________________________21
Possible number of shots (still image) ____________________________22
Exposure___________________________________________________22
Two in One (Camera Mode Only)________________________________22
Photo Frame (Camera Mode Only) ______________________________23
Flash______________________________________________________24
Self-timer (Camera Mode Only) _________________________________25
Sharpness__________________________________________________25
White Balance_______________________________________________26
Multi-Snap (Camera Mode Only) ________________________________26
Backlight (Camera Mode Only)__________________________________27
Date Printing (Camera Mode Only) ______________________________27
Night Mode _________________________________________________28
VOICE MODE __________________________________________________29

English
-6-
EFFECT SETTING_______________________________________________29
SETTING MENU ________________________________________________30
Sound _____________________________________________________30
Start-up Screen______________________________________________30
Time Setting ________________________________________________31
Format Memory______________________________________________32
TV System _________________________________________________32
Selecting Interface Language___________________________________32
Default Setting ______________________________________________33
PLAYBACK MODE _____________________________________________34
BUTTON FUNCTIONS ____________________________________________34
LCD Monitor Information_______________________________________35
MOVIE PLAYBACK ______________________________________________36
Delete Movies_______________________________________________37
Thumbnail Function __________________________________________37
Lock Movies ________________________________________________38
Repeat Movies ______________________________________________39
PICTURE PLAYBACK_____________________________________________40
Delete Picture _______________________________________________40
Thumbnail Function __________________________________________41
Lock Pictures _______________________________________________42
Slide Show _________________________________________________42
VOICE PLAYBACK_______________________________________________43
Tele/Wide and Right/Left Buttons Function_________________________43
LISTENING TO MP3 MUSIC______________________________________45
TRANSFER MP3 MUSIC TO THE CAMERA______________________________45
LISTEN TO MP3 MUSIC __________________________________________45
Listen to MP3 Music with earphone ______________________________45
VIEWING MOVIE ON PC_________________________________________46
MOTION JPEG MOVIE ___________________________________________46
VIEW MOTION JPEG MOVIE ON PC _________________________________46
SHARE MOTION JPEGMOVIE _____________________________________46
VIEWING PICTURES AND MOVIES ON A TV ________________________46
SYSTEM REQUIREMENT________________________________________47
TRANSFERRING DATA TO A COMPUTER __________________________47
INSTALLING THE DIGITAL CAMERA DRIVER_____________________________47
CONNECTING YOUR CAMERA TO A COMPUTER _________________________47
Mass Storage Device Mode ____________________________________48
Web Camera Mode___________________________________________48
INSTALLING BUNDLED SOFTWARE___________________________________48
BURNING THE RECORDED CLIP INTO DVD ________________________49
SPECIFICATIONS ______________________________________________51
TROUBLESHOOTING___________________________________________52

English
-7-
Getting to Know Your Camera
Overview
Thank you for purchasing the new digital video camera!
This multi-function digital video camera with a 5.2 Mega Pixel CMOS sensor can take
up to 11 mega pixel still images by interpolation. It also can take video in Motion JPEG
format in VGA and QVGA resolution. Other features provided by this camera include
the following:
True 5.0 Mega pixels CMOS sensor
Motion JPEG Digital Video Camera
Voice Recorder
Music Player
Security Motion Detect
Web Camera
8X Digital Zoom
2.4” TFT LCD
Supports up to 2GB SD Card
Night Mode, LED light and backlight
Photo frame
Standard Accessories
Unpack the package and make sure all standard accessories listed are included:
Digital Video Camera
USB Cable
AV out Cable
CD-ROM ( Driver, Arcsoft Software and User Manual)
Quick Guide
2 x “AA” Alkaline batteries
Earphone
Pouch
Strap
Warranty card

English
-8-
Front View
KeyPad illustration
LCD Panel
TV Out /ear Phone Port
Enter Button
Right Button
Left Button
Record/Play Button
Strap hole
Mini USB 2.0 port
Tele/Wide Button
Green /Red LED
Movie Shutter Button
Picture Shutter Button
LED light
Lens
Power Button

English
-9-
Side View
Speaker
Batter
y
cover
Focus setting
Microphone

English
-10-
Writeable position Write-Protected
Position
Writeable position Write-Protected
Position
Getting Started
Loading the Battery
Before using the camera, you must load two AA
(Alkaline) batteries.
1. Follow the arrow direction to slide open the battery
cover.
2. Insert the batteries according to the correct polarity
marks ( + or -)
3. Close the battery cover firmly.
Inserting and Removing an SD Card
The camera comes with internal memory (64MB) which allows you to store pictures,
movies, recorded voice and music. You can expand the memory capacity by using an
optional SD memory card up to 2GB. To insert a
memory card:
1. Insert the memory card into the correct
position.
2. To remove an installed SD card, press the
card inwards to release it.
3. When the card pops out, gently remove it
from its slot.
NOTE
zWhen a memory card is being used, movies and pictures are saved on the card rather
than on the built-in memory.
Protecting Data on an SD Card
SD card is read-only by locking the SD card. No
pictures, movies and voice can be recorded when the
SD card is locked. Make sure the lock is in writeable
position before recording any media.

English
-11-
Turning the Camera On and Getting Started
To turn on the camera:
1. Flip out the LCD panel and the camera will turn on automatically.
2. Or you can press the Power Button for one second to turn it on.
To take a movie, press the Movie Shutter Button ( ).
To take a picture, press the Picture Shutter Button ( ).
To record voice, press the Enter Button and Right/Left Button for voice
recording.
To view stored movies, pictures or listen to Voice recordings and Music,
press the RECORD/PLAY button once to switch to Playback Mode. Press
it a second time to return to Record Mode.
Turning the Camera Off
To turn off the Camera, you can either press the Power Button for one second, or you
can place the LCD panel back to its original position.

English
-12-
Record Mode
Button Function
Power Button: Press down for one second to turn on or turn
off the camera.
Movie Shutter Button:
1. Start to take a movie, or record voice.
2. To stop recording, press it again.
Picture Shutter Button:
Take a picture
Tele/Wide Button: Digital Zoom in and out.
OK Button: Menu ON
Right Button : Flash ON/OFF/Red-Eye Reduction/Light
ON/Auto
Left Button: Self-Timer ON/OFF
RECORD/PLAY Button functions:
1. Switch between Record/Playback Mode.
2. Return to the previous page.
LCD Monitor Information
The indicators below will display on the LCD when movies and pictures are recorded:

English
-13-
(1) Record Mode
Movie Record Mode
Picture Record Mode
Voice Record Mode
Night Mode
Multi-Snap Mode
Backlight Mode
(2) Resolution
Movie : High / Standard/ Low
Picture: High / Standard/ Low
(3) Number of images or recording time of movie that can still be taken at
current resolution.
(4) SD card inserted
(5) Macro Position Focusing
(6) White Balance
(7)
Battery indicator: full power, medium power
low power, no power
Flash on
Flash Off
Red Eye Reduction
(8)
LED On
(9) Self-timer enabled

English
-14-
(10) 8X digital zoom
Date: YYYY/MM/DD
(11)
Time: HH:MM:SEC
(12) Motion Detection
Movie Recording
Press Movie Shutter button ( ) to start recording. When a movie is recording, a
time indicator will display on the LCD monitor. To stop recording, press Movie Shutter
Button ( ) again. Press RECORD/PLAY Button to view the recorded movie.
Three resolution settings are available:
Quality
High Quality
Standard Quality
Low Quality
Picture Recording
Press the Picture Shutter Button ( ) to take a picture.
Press RECORD/PLAY Button to view the picture.
Three resolution settings are available:
Quality
High Quality
Standard Quality
Low Quality
Using Digital Zoom
The digital zoom magnifies the images when recording movies or taking pictures.
1. To zoom in/out, press the Tele/Wide Button.
2. The digital zoom can be set from 1x to 8x and the magnification ratio is shown on
the LCD monitor.

English
-15-
Options for Record Mode
Movie Mode Camera Mode Voice Effect Set
zResolution
zExposure
zLight
zSharpness
zWhite Balance
zMotion Detect
zNight Mode
zExit
zResolution
zExposure
zTwo in One
zPhoto Frame
zFlash
zSelf-timer
zSharpness
zWhite Balance
zMulti-snap
zBacklight
zDate printing
zNight Mode
zExit
zEnter
zExit
zNormal
zB/W
zClassic
zNegative
zExit
zSound
zStart-up Screen
zTime Setting
zFormat memory
zTV System
zLanguage
zDefault Setting
zExit
Operations for Record Mode
Operation Screen
1. Press Enter when in Movie/Picture
Record Mode.
2. Use Right/Left Buttons to move
between main menu options, which
are Movie Mode, Camera Mode,
Voice Mode, Effect, and Setting
Mode. The submenu will appear
when you move to each main option.
3. Press Enter to validate the sub
option you select.
4. Select Exit option to exit submenu.
Enter Button

English
-16-
Default Setting and Validation
The following table indicates the camera’s default setting as well as its validation.
Always: The settings always stay valid.
One Time: The setting is only valid once or till camera power is off.
Validation Default Factory Setting
Resolution Always High for Movie
Standard for Picture
Exposure One Time 0EV
Light One Time Off
Sharpness One Time Level 5
White Balance One Time Auto
Motion Detect One Time Off
Night Mode One Time Off
Two in One One Time Off
Photo Frame One Time Off
Flash Always Off
Self-Timer One Time Off
Multi-Snap One Time Off
Backlight Mode One Time Off
Date Printing Always Off
Effect One Time Normal
Sound Always On
Format memory One Time Off
Language Always English
Volume Always Level 6
Movie Mode Setting
Record main menu includes camera setting and other advanced settings. You can
use Right/Left Buttons to move between the options and press Enter to validate the
setting.
Movie Resolution
To change Movie Resolution:
1. In Movie/Picture Record Mode, press Enter to switch to record menu screen.
2. Use Right/Left Buttons to select Movie Mode. The submenu of Movie Mode will
appear on the screen.

English
-17-
3. Use Tele/Wide Button to select Resolution then press Enter to switch to Resolution
submenu.
4. Use Tele/Wide Button to move between three settings.
5. Press Enter to validate the setting and exit.
Display screen Video Resolution Option
Possible recording time / sec (video clip)
SD memory Card capacity
Quality 64 MB internal
memory 1GB 2GB
High 50 sec. 25 min. 50 min.
Standard 1 min. 33 min. 66 min.
Low 1 min. 30 sec. 48 min. 96 min.
Exposure
The camera adjusts image exposure automatically. In certain circumstances you may
wish to adjust the exposure compensation setting.
To change Exposure setting:
1. In Movie/Picture Record Mode, press Enter to switch to record menu screen.
2. Use Right/Left Buttons to select Movie Mode. The submenu of Movie Mode will
appear on the screen.
3. Use Tele/Wide Button to move to Exposure Option. Press Enter and then the
Exposure Submenu will pop out on the screen.
4. Use Tele/Wide Button to choose preferred EV value. The change can be
previewed immediately.
5. Press Enter to validate the setting and exit.
Enter Button

English
-18-
Display screen Exposure Option
Light
There are two flash settings under Movie. To change flash settings, press the hot key
(Right Button) or select from the option menu.
On ( ): The LED will be turned on and provides light in a low light environment.
Off: The LED is turned off.
To change the Light setting from the option menu:
1. In Movie/Picture Record Mode, press Enter to switch to record menu screen.
2. Use Right/Left Buttons to select Movie Mode. The submenu of Movie Mode will
appear on the screen.
3. Use Tele/Wide Button to move to Light Option. Press Enter and the Exposure
submenu will appear on the screen.
4. Use Tele/Wide Button to move between the two settings.
5. Press Enter to validate the setting and exit.
NOTE
zThe flash will be disabled automatically when battery power is low ( )
Display screen Light Option
Enter Button
Enter Button

English
-19-
Sharpness
You can soften and sharpen images to achieve different effects.
To change Sharpness setting:
1. In Movie/Picture Record Mode, press Enter to switch to record menu screen.
2. Use Right/Left Buttons to select Movie Mode. The submenu of Movie Mode will
appear on the screen.
3. Use Tele/Wide Button to select Sharpness then press Enter to switch to the
Sharpness submenu.
4. Use Tele/Wide Button to move between the nine levels. The change can be
previewed immediately.
5. Press Enter to validate the setting and exit.
Display screen Sharpness Option
White Balance
The camera adjusts the color balance of images automatically. Three manual white
balance settings are available:
1. Auto (Default): The camera automatically adjusts white balance.
2. Daylight: Outdoors.
3. Fluorescent: Under fluorescent light condition.
4. Tungsten: Under tungsten light condition.
To change White Balance Setting:
1. In Movie/Picture Record Mode, press Enter to switch to record menu screen.
2. Use Right/Left Buttons to select Movie Mode. The submenu of Movie Mode will
appear on the screen.
3. Use Tele/Wide Button to select White Balance, then press Enter to switch to the
White Balance submenu.
4. Use Tele/Wide Button to move between the four settings. The change can be
previewed immediately.
5. Press Enter to validate the setting and exit.
Enter Button

English
-20-
Display screen W/B Option
Motion Detection
To enable Motion Detection:
1. In Movie/Picture Record Mode, press Enter to switch to record menu screen.
2. Use Right/Left Buttons to select Movie Mode. The submenu of Movie Mode will
appear on the screen.
3. Use Tele/Wide Button to select Motion Detect then press Enter to switch to the
Motion Detect submenu.
4. Use Tele/Wide Button to choose ON or OFF.
5. Press Enter to validate the setting and exit.
6. The camera will start to record video at once if there is movement for three
consecutive seconds. It will stop recording if there is no movement for three
seconds.
Display screen Motion Detect Option
Enter Button
Enter Button
Table of contents
Other Genius Camcorder manuals

Genius
Genius G-SHOT DV511 User manual

Genius
Genius VIDEOCAM EXPRESSII User manual

Genius
Genius DV1112 User manual

Genius
Genius DVR-FHD560 User manual

Genius
Genius DV5133 User manual

Genius
Genius G-Shot HD585T User manual

Genius
Genius G-Shot HD520 User manual

Genius
Genius DV210 User manual

Genius
Genius DV601 User manual

Genius
Genius DV510 User manual

Genius
Genius DV600 User manual

Genius
Genius DV1110 User manual

Genius
Genius PALM DV310 User manual

Genius
Genius DV505 User manual

Genius
Genius DV611 User manual

Genius
Genius DV5122 User manual

Genius
Genius HD550T User manual

Genius
Genius HD500 User manual

Genius
Genius DV410 User manual

Genius
Genius G-Shot DV815z User manual