GEONAUTE On channel 100 User manual

OXYLANE
4 Boulevard de Mons – BP 299
59665 Villeneuve d’Ascq cedex – France
Owner's manual ref. 1615.371
ENHU FRRU ESRO DESK ITCSAR NLSV PTBG PLTR

On channel 100
On channel 300

1
EN
EN TABLE OF CONTENTS
1 PRECAUTIONS FOR USE.......................................................................................2
2 DESCRIPTION .......................................................................................................3
3 GETTING STARTED...............................................................................................5
3.1 Using the batteries (On channel 100) ................................................................................................5
3.2 Using the batteries (On channel 300)................................................................................................6
3.2.1 Inserting the batteries.....................................................................................................................................6
3.2.2 Charging the batteries ....................................................................................................................................6
3.3 Recycling the batteries .......................................................................................................................7
3.4 Installing / removing the belt clip ......................................................................................................7
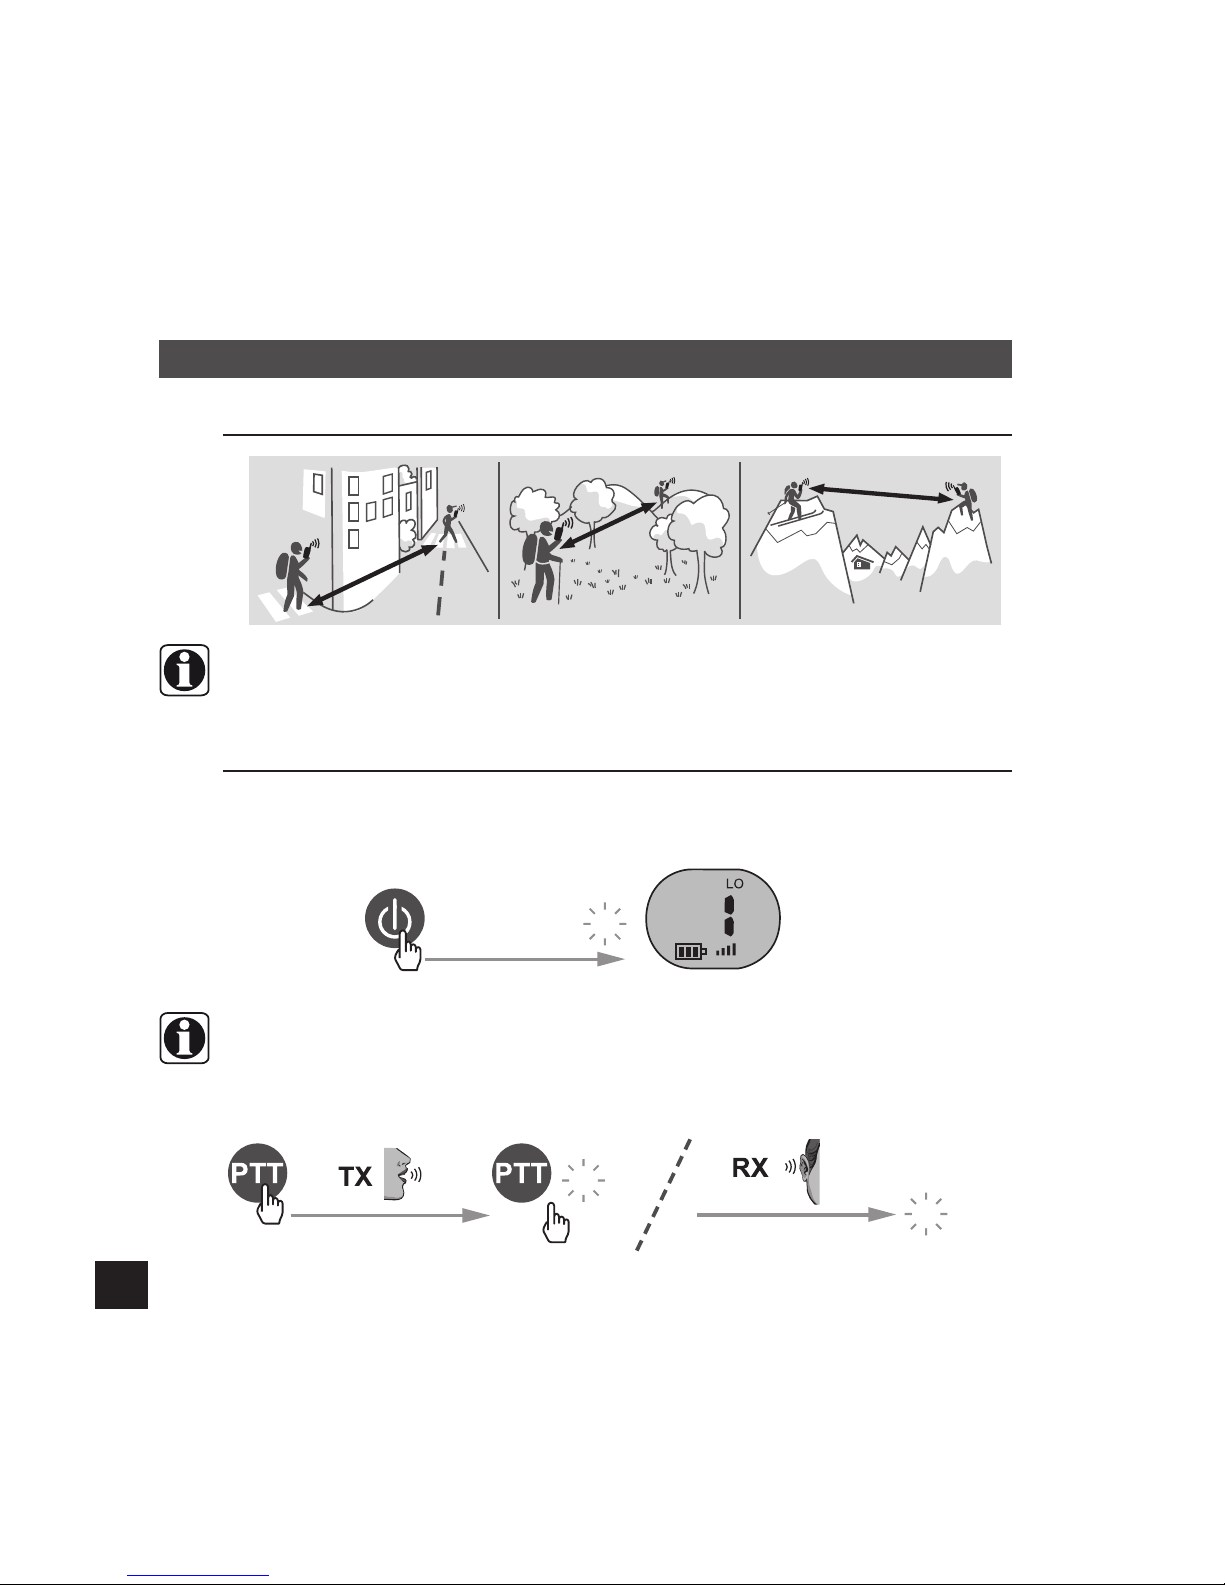
4 TRANSMITTING AND RECEIVING ........................................................................8
4.1 Transmission range.............................................................................................................................8
4.2 Switching on the device......................................................................................................................8
4.3 Signal transmission power (On channel 100) ..................................................................................9
4.4 Conguringthechannel .....................................................................................................................9
4.4.1 Setting the channel.........................................................................................................................................9
4.4.2 Channel monitoring.........................................................................................................................................9
4.4.3 Scan function: channel scanning..................................................................................................................10
4.5 Listeningandringervolume ............................................................................................................ 10
4.6 Lock / Unlock...................................................................................................................................... 10
4.7 Callfunction ....................................................................................................................................... 11
4.8 Switching the device off .................................................................................................................. 11
5 USING THE LIGHT (ON CHANNEL 100).............................................................. 11
6 TECHNICAL CHARACTERISTICS ....................................................................... 12
6.1 Specications .................................................................................................................................... 12
6.2 Channelfrequencytable................................................................................................................... 12
7 CE DECLARATION OF CONFORMITY ................................................................. 12
8 WARRANTY .........................................................................................................13
9 CONTACT US.......................................................................................................13

2
1 PRECAUTIONS FOR USE
• Please read the owner's manual carefully before use. Please keep the owner's manual for the entire
life of the product.
• To reduce radio frequency exposure when using the device, keep it at least 5 cm away from your face.
• Do not allow babies or young children to get near the devices.
• Never use a walkie-talkie with a damaged antenna. If the antenna is in contact with the skin, mild burns
may result.
•
When using the device in a vehicle, do not leave it in the area above an airbag or in the airbag deployment
area because it can be propelled with great force and cause serious injury to the vehicle occupants if
the airbag is deployed.
• The devices are designed to be used in temperatures ranging from -10°C to +50°C inclusive.
• If the devices are used in low temperatures, you must use batteries capable of standing up well to low
temperatures. Preferably use lithium or NiMH rechargeable batteries as alkaline and zinc batteries
perform very badly in low temperatures.
• Do not use the devices or change the batteries in an explosive atmosphere. The antenna or batteries
can produce micro-sparks or static electricity which can set off explosions causing serious injury and
even death.
• Never use the device outside during a storm.
• Do not use the device in the rain.
• If the device gets wet, switch it off and remove the battery. Dry the battery compartment and leave the
cover open for a few hours. Do not use the device until it is completely dry.
•
Do not dismantle the product. This will void the warranty and could cause damage or loss of watertightness.
• Clean the product with a soft, moist cloth or a compressed air canister. Never use detergents as they
could cause damage to the materials. Do not rub the screen with anything that might scratch it.
• Remove the batteries before storing the device for a prolonged period.

3
EN
2 DESCRIPTION
Antenna
PTT button
(Push-To-Talk)
(see p. 8)
TORCH on/off button
(see p. 11)
Call button
(see p. 11)
Minus button
Microphone
ON/OFF button
(see p. 8 et 11)
MENU button
SCAN button
(see p. 10)
PLUS button
LCD screen
Signal reception
diode
Torch light
Loudspeaker
HI LO
Scan function
activated
Channel Number
Battery charge level
Signal received
Transmission power
Signal transmitted
Sound volume level
Keypad locked
On channel 100

4
Jacks: Charger
(see p. 6)
Call
Antenna
PTT button
(Push-To-Talk)
(see P. 8)
MINUS button
ON/OFF button
(see p. 8 et 11)
Microphone
CALL button
(see p. 11)
MENU button
PLUS button
LCD screen
Loudspeaker
Scan function
activated
Channel Number
Battery charge level
Signal received
Signal transmitted
Sound volume level
Keypad locked
On channel 300

5
EN
3 GETTING STARTED
3.1 Using the batteries (On channel 100)
• Usethebatteriesprovidedintheoriginalpack.Ifthebatterieshavetobechanged,use1.5VAAA
(LR03)typeAlkalinebatteries.
• Nevermixalkalineandrechargeablebatteries.
• Donotattempttorechargenon-rechargeablebatteries.
Battery charge level
High battery
charge level
Medium battery
charge level
Low battery charge
level
bip
bip Battery charged
down
If the belt clip is installed,
remove it (see p. 7)
clic
1
2
Observe the correct direction when inserting
thebatteries.Incorrectpolaritycandamagethe
batteriesandthedevice.

6
3.2 Using the batteries (On channel 300)
Thebatteriescomereadyinstalledwhentheproductispurchased.Removetheprotectivestriplocated
onthebackofthedevicetofreeupthebatterycontacts.
If the belt clip is installed,
remove it (see p. 7)
Observe the correct direction when inserting
thebatteries.Incorrectpolaritycandamagethe
batteriesandthedevice.
•
Whenchargingthedevice,usetherechargeablebatteriessuppliedwiththeoriginalpack.Ifthe
batterieshavetobechanged,use1.2V,600mAhNiMHAAA(LR06)typebatteries.
• Donotattempttorechargenon-rechargeablebatteries.
• Makesurethatthebatterycompartmentiscorrectlyinplacebeforechargingthebatteries.
3.2.1 Inserting the batteries
3.2.2 Charging the batteries
Battery charge level (displayed when the device is switched on)
High Low
bip
bip

7
EN
•
Youcancharge2devicesatthesametime.Batterychargingtimeisapproximately12hours.We
recommendthatyouchargethebatteriesfullybeforeusingthemforthersttime.
• Whenthedeviceischarging,nocommunicationispossible.
• Toextendthetimebetweenrechargesandprolongthelifeofthebatteries,theyshouldbedischarged
completely,thenfullyrechargedonceamonth.
Turn the device off (see p. 11).
3.3 Recycling the batteries
Do not leave spent batteries in the device as they may leak and cause damage to device's internal circuits.
The 'crossed-out dustbin' symbol indicates that this product and the batteries it contains cannot be disposed of with
householdwaste.Theyaresubjecttospecicsorting.Theproductandbatteriesmustberecycled
at a collection point at end of life. Recycling your electronic waste protects the environment and your
health.
3.4 Installing / removing the belt clip
The batteries must only be charged with the battery charger provided.
clic
1
2
INSERTING REMOVING

8
4 TRANSMITTING AND RECEIVING
4.1 Transmission range
1 KM
300 M
5 KM
4.2 Switching on the device
With the On channel 100 / 300, you can communicate with another On channel 100 / 300 unit or any other PMR
446 standard transmitter / receiver. In conference mode, you can also communicate with an unlimited number of
PMR 446 devices.
• Tooptimisethetransmissionrange,thereshouldbeasfewobstaclesaspossible(includingusers)in
theimaginarylinedrawnbetweenthetwodevices.
• Interferencecanoccurifyouusethedeviceslessthan1.5mapart.
• Allthedevicesmustbesettothesamechannelforthemtocommunicatewitheachother(seep.9).
•
Communication takes place in alternate mode: if another device is
transmitting,youmustwaitfortheendofitstransmissionbeforetransmitting.Similarly,communications
cannotbereceivedduringtransmissionorwhentheCallfunctionisactive(seep.11).
bip
bip
Press and hold
bip
Press and hold Standby screen
The signalreception
diodelightsuponthe
Onchannel100.

9
EN
Choose 1 to 8
or
Ifnobuttonsarepressedfor8secondswhenconguringthedevice,thestandbyscreenwillbedisplayed
automaticallyandanychangesmadewillbesaved.
HI
x2
Choose On or Of
or or
When the transmission power is high (H), the signal emitted is strong. This is especially useful when the correspondents
are close to maximum transmission range. When the transmission power is low (L), the signal emitted is less powerful
but there is less risk of interference and the sound quality of the communication is higher.
4.3 Signal transmission power (On channel 100)
4.4.2 Channel monitoring
and
simultaneously
Activate
With this function you can listen to all signals (even
the weakest) on the channel that you are using.
Deactivate
4.4 Conguring the channel
The On channel 100 / 300 can communicate over one of 8 available channels.
4.4.1 Setting the channel

10
Press and hold
for 3 seconds
Press and hold
for 3 seconds
4.4.3 Scanfunction:channelscanning
This function allows you to scan all 8 channels to identify which one is being used by your correspondents.
Activate Activate
Deactivate Deactivate
bip bip
•
Whenthedevicedetectsasignal,scanningstopsandtheunitcommunicatesonthechannelinquestion.
• Scanningisautomaticallyrestartedafewsecondsaftersignalreceptionstops.
On channel 100
On channel 100
On channel 300
On channel 300
or
oror
Press and hold
for 3 seconds
and
simultaneously
Increase Reduce
4.5 Listening and ringer volume
4.6 Lock / Unlock

11
EN
The CALL button rings all the devices using the same channel for 2 seconds.
4.8 Switching the device off
bip
Press and hold
Werecommendthatyouswitchoffthedevicewhennotinusetopreventthebatteriesfromrunningdown
completely.
Thelightwillworkevenifthedeviceisswitchedoff.
5 USING THE LIGHT (ON CHANNEL 100)
Pressandholdtoturnon
Releasetoturnoff
4.7 Call function

12
6 TECHNICAL CHARACTERISTICS
6.1 Specications
Available channels 8 channels
Outputpower(TX) 0.5 W
Range Up to 5 Km
7 CE DECLARATION OF CONFORMITY
• Oxylane hereby declares that the On channel 100 device complies with the essential requirements and other
relevant provisions of Directive 1999/5/CE
• Oxylane hereby declares that the On channel 300 device complies with the essential requirements and other
relevant provisions of Directive 1999/5/CE
• Oxylane hereby declares that the On channel 300 device complies with the essential requirements and other
relevant provisions of Directive 2006/95/CE.
Compliance with these required conditions is expressed by the marking:
The CE declaration of conformity is available via the following link:
https://www.geonaute.com/en/ec-declaration-conformity
6.2 Channel frequency table
Channel Frequency(MHz)
1446.00625
2446.01875
3446.03125
4446.04375
Channel Frequency(MHz)
5446.05625
6446.06875
7446.08125
8446.09375

13
EN
8 WARRANTY
Oxylane guarantees to the initial purchaser of this product that it is free from material or manufacturing defects.
This product is guaranteed for two years from the date of purchase. Please ensure that you keep the invoice as
proof of purchase.
The guarantee does not cover:
• Damage resulting from misuse, from a failure to respect the precautions for use, from accidents, from
improper maintenance or from commercial use of the product.
• Damage resulting from repairs carried out by persons not authorised by Oxylane.
• Batteries or casings which are cracked or broken or which show signs of impacts.
During the warranty period, the item will either be repaired free of charge by an authorised repair service or replaced
free of charge (depending on the distributor).
9 CONTACT US
We would like to hear your views on the quality, features and use of our products at: www.geonaute.com
We will reply as soon as possible.

OXYLANE
4 Boulevard de Mons – BP 299
59665 Villeneuve d’Ascq cedex – France
Other manuals for On channel 100
1
This manual suits for next models
1
Table of contents
Other GEONAUTE Radio manuals