GeoRipper GR16 User manual

FOUR ASHES MACHINERY LTD
1
www.georipper.co.uk
Operator’s Safety and Operation Manual
GeoRipper Mini Trencher
Models GR16, GR20 and GR27
Options M, H or S
These are the original English instructions. IMPORTANT: read this instruction manual carefully before operating the
GeoRipper© Trencher and strictly observe the safety regulations. Keep this instruction manual!
March 2020
Original Version 1.4

FOUR ASHES MACHINERY LTD
2
www.georipper.co.uk
1PREFACE
1.1 Description of the User and Intended Use
The GeoRipper© Mini Trencher is intended to cut narrow trenches in most types of soil for laying pipes, cables,
drainage system, root pruning, root barrier and any other applications where the cutting of a trench in the soil is
required. It is not intended for cutting into solid ground like tarmac or concrete paths, or solid objects such as stones
or tree roots over 7cm in diameter. The user must be an adult 18+ and wear the required Personal Protective
Equipment (PPE) including gloves, eye protection, face shield, ear protection, steel toe-cap footwear, and in some
instances, shin pads. The user is required to know about the safe operation and maintenance of the GeoRipper©
and have read, understood and followed the information detailed in this manual. Persons unfamiliar with the
Instruction Manual, children, persons under 18 and persons under the influence of alcohol, drugs or medication
must not operate the GeoRipper©
This document is intended solely for the authorised user of the GeoRipper© and is an essential part of the machine.
This document is intended to help familiarise the user with the operation and safe handling of the GeoRipper©.
1.2 Explanation of Safety Warnings and Symbols
ISO 3864 and ANSI Z535 Safety Signals
Danger indicates a hazard with a high level of risk which, if not avoided, will result in death or serious injury
Warning indicates a hazard with a medium level of risk which, if not avoided, could result in death or serious injury.
Caution indicates a hazard with a low level of risk which, if not avoided, could result in minor or moderate injury.
Indicates information considered important, but not hazard-related.

FOUR ASHES MACHINERY LTD
3
www.georipper.co.uk
1.3 Retaining Instructions
Read and understand this manual and its safety instructions before using this product. Failure to do so can result in
serious injury or death. Follow all the instructions. This will avoid fire, explosions, electric shocks or other hazards
that may result in damage to property and/or severe or fatal injuries. The product shall only be used by persons who
have fully read and understand the contents of this user manual. Employers have a responsibility to ensure that each
person who uses the product has read these warnings and instructions and follows them. Keep all safety information
and instructions for future reference and pass them on to subsequent users of the product. The manufacturer is not
liable for cases of material damage or personal injury caused by incorrect handling or non-compliance with the
safety instructions. In such cases, the warranty will be void.
Recycling
Electrical danger
Fuel and oil mixture
Particular care and caution
Direction of chain rotation
Wear dust mask
Wear steel toe caps footwear No smoking or naked flame
Stop the engine
Wear ear protection
Danger, risk of kickback
Wear eyes protection
Risk of hand injury
Wear protective gloves
Read the Instruction Manual Foot injury risk

FOUR ASHES MACHINERY LTD
40
www.georipper.co.uk
2Description of the GeoRipper©
2.1 Intended Use and Reasonably Foreseeable Misuse
The GeoRipper© is intended to be used as an outdoor landscaping power tool for trenching purposes in suitable
ground conditions as described in this manual. The GeoRipper© can be used hand held or mounted on its EZ Kart©
and must always be coupled to an approved drive unit. The user must have read and understood the instruction
manual and wear the appropriate recommended Personal Protective Equipment (PPE) before operating the
GeoRipper©. Failure to wear the recommended PPE is considered improper use. Failure to read and understand this
manual is considered improper use.
The GeoRipper© shall not be used as a forestry tool to cut or fell trees or branches. The GeoRipper© must not be
used in extremely stony grounds, solid rocks, tarmac, concrete or any other unsuitable ground conditions which do
not allow trenching. Do not use in contaminated ground. The GeoRipper© must not be used underground, indoor or
in any other enclosed areas. The GeoRipper© must only be operated by one user and the operation of the
GeoRipper© by two or more users is not permitted and considered improper use.
Failure to follow the instructions provided in this manual regarding operation, maintenance and servicing is
considered improper use and will void the warranty. Four Ashes Machinery Ltd. will not be liable for any accidents or
damages resulting from improper use of the GeoRipper©.
The GeoRipper© shall be used with the following original and model dependents accessories and components only:
•GR16 400mm bar
•GR20 500mm bar
•GR27 700mm bar
•GR-M (Makita© EK6101, EK7650H and EK8100)
•GR-H (Husqvarna© K770 and K970)
•GR-S (Stihl© TS700)
•EZ Kart universal trolley with model variations
2.2 Product Overview
The GeoRipper© mini trencher consists of an adaptor plate supporting a trenching bar and chain, and mounted on a
petrol powered cut off saw. The Georipper© is available in a combination of model variations that includes different
bar lengths: 400mm, 500mm, 700mm, petrol engine types: 2-Stroke, 4-Stroke and 2-Stroke HD, and a selection of
power head brands: Makita©, Husqvarna© or Stihl©. This Instruction Manual is intended to cover all available
models and variations, but for individual complementary information, please refer to the power head
manufacturer’s instructions. The GeoRipper© can be used handheld or mounted on its universal trolley, the EZ
Kart©.
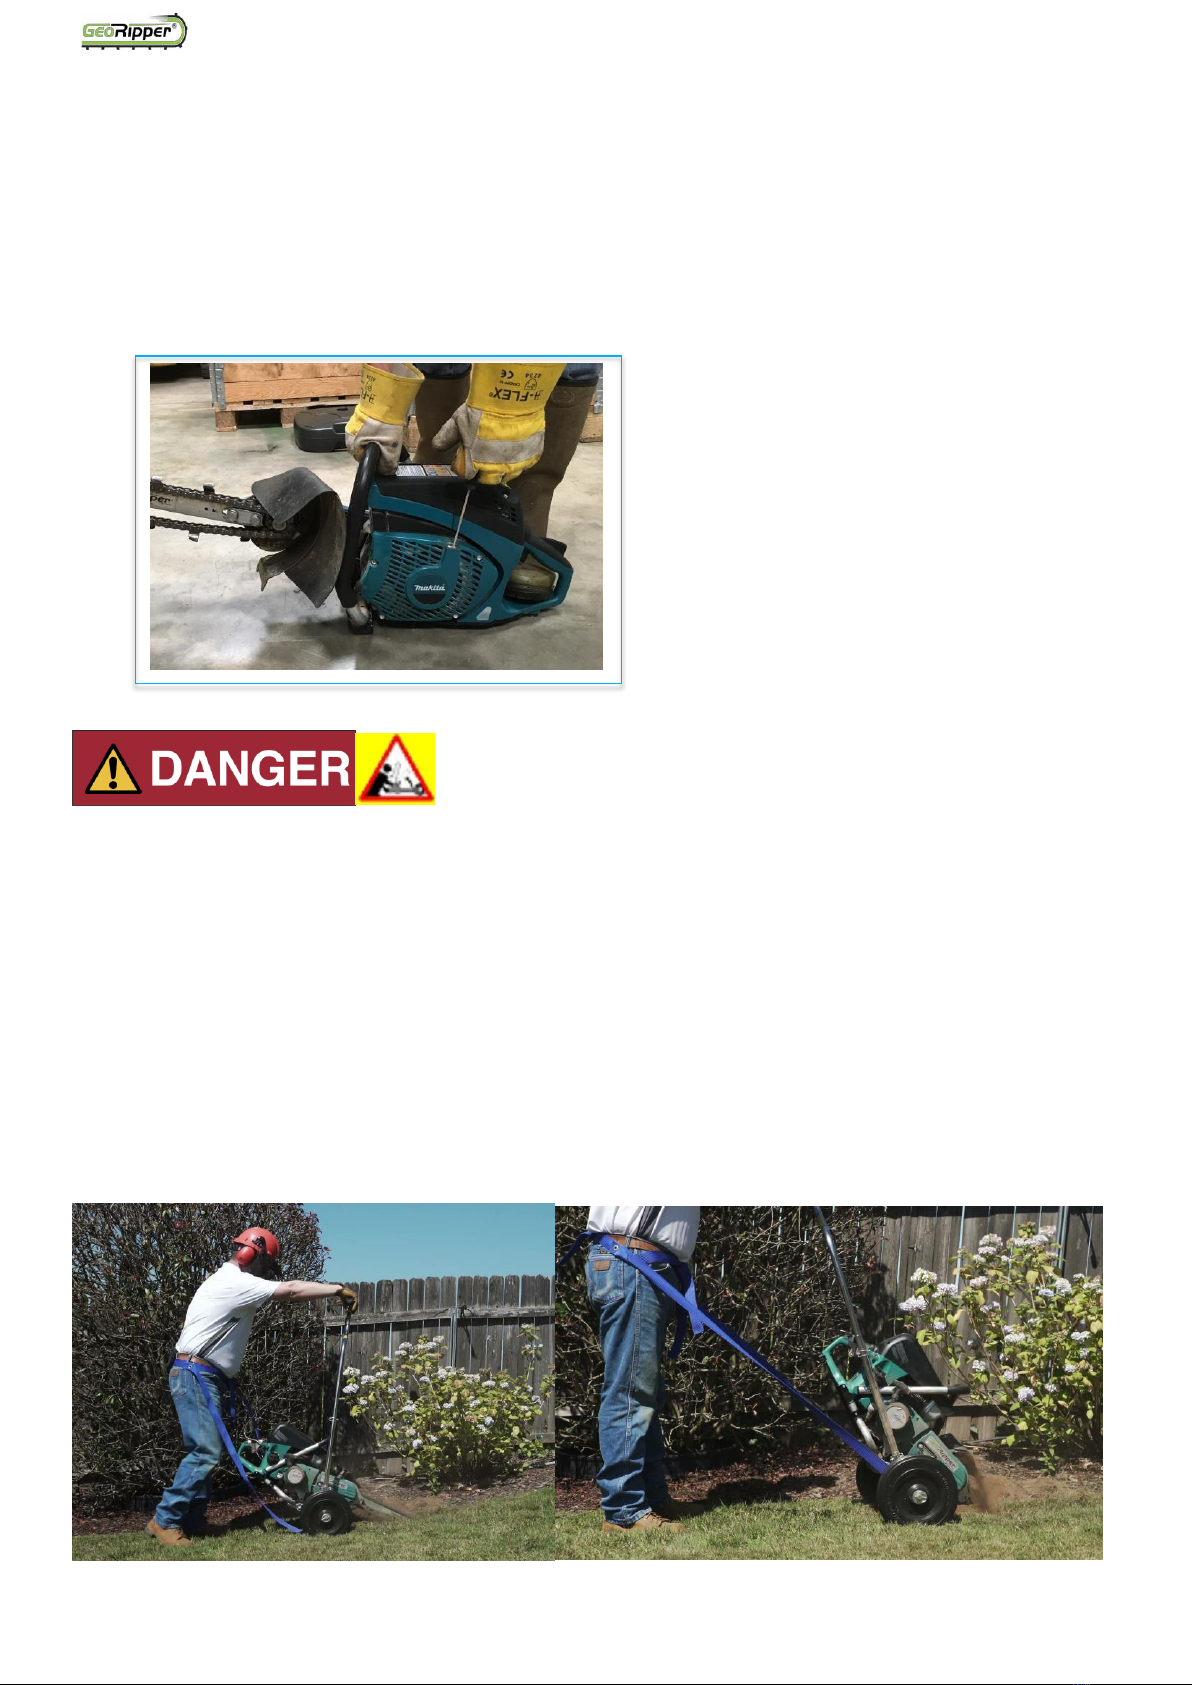
2.3 Lifting and Transporting
The GeoRipper© can be lifted by its tubular front handle (6 Fig.1) and always carried with the engine switch off and
the trenching bar facing backwards. Ensure that the fuel cap is properly closed. Do not touch the exhaust whilst
transporting as it may be hot. When used with the EZ Kart©, the mini trencher must not be lifted or carried, but only
transported by pushing or pulling the EZ Kart© on its wheels. When transported inside a vehicle, the GeoRipper©
must be standing upright to avoid fuel / oil spillage and be suitably strapped down inside the vehicle with the bar
and chain guard removed and stored securely.

FOUR ASHES MACHINERY LTD
41
www.georipper.co.uk
3Safety Instructions
Read and understand this manual and its safety instructions before using this product.
Failure to do so can result in serious injury or death.
3.1 How to Use the Product Safely
When operating according to the instructions in this manual, the GeoRipper© mini trencher is a safe tool to use.
However, even after using all precautionary measures, the following residual risks remain:
•Burns from electricity arcing
•Burns from hot exhaust
•Cuts form the chain
•Stone projections
•Electrocution
•Exposure to dust and fumes
•Injuries resulting from poor maintenance and inspection or inappropriate use
•Fire risk when re-fueling
•Injuries when lifting and transporting
•Injuries from moving parts
•Hand and Arms Vibrations syndrome
•Damaged hearing
•Other injuries when operating
It is essential that all users read and understand this manual before operating the machine in order to reduce these
risks.
3.1.1 Safety information for vulnerable people in the workplace
Employers have a responsibility to ensure that vulnerable people have been suitably trained to operate the
GeoRipper© and that a suitable assessment process has been established.
3.1.2 Technical life span
The GeoRipper© is made of wear parts which can be replaced as many times as required. The machine will come to
the end of its lifespan when it is judged no longer economically viable to repair the power unit.
3.1.3 Safety information related to the intended use and reasonably foreseeable misuse
The GeoRipper© is engineered and built following recognized safety requirements however risk may occur if not
used in accordance to these instructions.
•Only use for trenching in suitably assessed ground conditions such as soil and softground
•Check before you start trenching for cables, pipes or other utilities buried in the ground. If in doubt do not
trench
•Always start the trench with the machine on the ground with the cutting bar parallel to the ground

FOUR ASHES MACHINERY LTD
42
www.georipper.co.uk
•Do not start the trench with the chain rotating at high speed: risk of kickbacks
•Do not start the engine with the bar and chain touching the ground
•When possible always use the EZ Kart©
•Always stand downhill of the mini trencher and behind the machine at all times
•When working parallel to a slope ensure that the discharge chute is facing downhill
•Respect a safety zone of 10 meters radius. If people or animals enter the safety zone stop work
•Do not operate alone
•Hold the trencher firmly with both hands and keep firm footing
•Switch the engine off prior to removing debris around the chain, discharge chute areas or the trench and
wear gloves
•Switch the engine off as soon as stopping trenching
•Avoid wet or icy ground
•Do not operate in poor visibility
•Always wear the recommended PPE
•Do not remove the chain guard bar when engine is switched on and wait until the chain has stopped rotating
3.1.4 Personal Protective Equipment
•Wear eye protection EN166 1B
•Wear suitably rated ear defenders EN352-1 SNR36DB
•Wear steel toe-cap footwear EN20345 SB
•Wear suitable work gloves EN420 and EN10819
•In dry ground conditions wear a face mask EN149 FFP1 NR. If particularly dusty wear breathingequipment
•In very stony ground condition the use of shin pads is recommended
3.1.5 Product limitations and restrictions
•Do not use the GeoRipper© in extremely rocky ground, tarmac or concrete
•Do not use in contaminated ground
•Do not attempt to cut tree roots larger than 7cm diameter
•Do not plunge the bar into the ground
•Not suitable for cutting branches
3.1.6 Installation safety information
•Switch engine off before doing any work on the machine and let the engine cool down
•Read the instruction manual chapter 5 before assembly
•Wear gloves when handling the chain

FOUR ASHES MACHINERY LTD
43
www.georipper.co.uk
3.1.7 Safety information regarding the use
•Do not operate for long periods of time
•Do not use if the plastic / rubber stone guard and chain bar guard are not present (Fig.1 item 5 and Fig.1B
item 12)
•When possible always use the GeoRipper© mounted on the EZ Kart© to limit exposure tovibration
•Do not operate if feeling tired or if under the influence of substances
•Do not use if any of the warning stickers are missing or damaged. Contact you dealer for a replacement
•Never operate on your own. Ensure that another person is present nearby in case ofemergency
3.1.8 Maintenance safety information
•Switch engine off and wait for the chain to stop before doing any work on the machine
•Read the instruction manual chapter 4 before assembly
•Wear gloves when handling the chain
•Read the manufacturer’s manual for the power head before starting maintenance on themachine
•Always check that bolts are tight before using the machine
•Keep the chain in good condition and check regularly for damage
3.1.9 Safe Disposal
•Ensure that all packaging is disposed of accordingly. The cardboard box can be recycled
•Wear parts such as chains, sprockets and bars can be recycled under the metal parts recyclingfacility
•At the end of its life, the power head can disposed of in the small engine recycling facility of your local waste
disposal center
Progressive Failure or wear parts
Check regularly and replace all wear parts including the chain, drive and idler sprockets, the bar, nose bearing an
retainer plates.
3.2 Potential Health Consequences
Failing to wear the recommended PPE my cause serious injury. Hand Arm Vibration syndrome HAVs may result after
long periods using the GeoRipper©. To reduce the risk of HAVs always use the mini trencher mounted on its EZ
Kart© or limit the daily usage per operator. Individuals with poor circulation who are exposed to excessive vibration
may experience injury to blood vessels or the nervous system. Vibration may cause the following symptoms to occur
in the fingers, hands or wrists: Falling asleep (numbness), tingling, pain, stabbing sensation, alteration of skin colour.
If any of these symptoms occur, seek medical assistance.
4Operation
4.1 How to Transport and Store the GeoRipper
Always turn off the GeoRipper© when transporting or moving from place to place on
work site. Always carry by the centre tubular handle with the bar facing backward. Never
carry with the engine on or with the chain turning and wait for the engine to cool down

FOUR ASHES MACHINERY LTD
44
www.georipper.co.uk
4.1.1 Lifting, handling and transporting the GeoRipper©
Carry the GeoRipper© by the centre tubular handle with the engine switched off and the bar pointing behind you
(Fig.26). Never touch the exhaust and wait for machine to cool down. When carrying for a long distance use a
wheelbarrow.
Fig.27
Do not attempt to lift the GeoRipper© when mounted on the EZ Kart©. Simply use the handle of the cart to pull or
push the machine. When transporting in a vehicle ensure that the machine is upright, securely tied down and that
the petrol cap is properly closed so no fuel can leak out. Secure against shocks and always remove the bar and chain
when transporting in a vehicle.
4.1.2 Storing the GeoRipper©
Do not leave outside, always store the GeoRipper© in a dry place. Do not store in temperature below -10°C and over
40°C. Avoid extreme temperatures and keep away from children. Before storing, clean and dry the machine, remove
all residual soil from the chain using a wire brush and spray with light oil WD40 or similar. When storing for a long
period of time, empty the petrol tank and run the machine dry. Remove the chain and soak in light oil. Always check
that all the components are in good condition before using again.
4.2 Commissioning and Starting the GeoRipper©
4.2.1 Commissioning
Read the instruction manual and ensure that the bar and chain have been mounted correctly as per section 4, that
all bolts are tight and that there is a suitable chain slack for the ground condition.
4.2.2 Fuelling
2-STROKE FUEL & LUBRICATION INFORMATION
•Use a 50:1 fuel mixture. To ensure a correct fuel mix, use a shelf-stable pre-mixed 2-strokefuel.
•Use high quality, air-cooled, two-stroke oil. Preferably synthetic. Husqvarna© or Makita© two-stroke engine oil is
also recommended.
DO NOT USE TWO-STROKE ENGINE OIL FOR OUTBOARD MARINE OR WATER-COOLED ENGINES! IT IS NOT THE
SAME!
•Use 90+ octane gasoline. Avoid bio fuels, ethanol or octane boosters, if possible.
•Use freshly-mixed fuel.

FOUR ASHES MACHINERY LTD
45
www.georipper.co.uk
•Keep fuel container out of direct sunlight.
•Mix enough fuel only for the job at hand.
•Use a quality fuel stabilizer if using gas withethanol.
FUELS WITH MORE THAN 10% ETHANOL ARE NOT APPROVED FOR USE IN GEORIPPER 2-STROKE AND 4-STROKE
ENGINES! Use of alternative fuels, such as E-20 (20% ethanol), E-85 (85% ethanol) or any fuels not meeting GR
MANUFACTURING, LTD requirements are not approved for use in GEORIPPER© MINITRENCHERS!
USE OF ALTERNATIVE FUELS CAN CAUSE THE FOLLOWING PROBLEMS:
Poor performance, loss of power, overheating, fuel vapour lock, improper clutch engagement, premature
deterioration of fuel lines, premature deterioration of gaskets, premature deterioration of carburetors.
USING ALTERNATIVE FUELS AND/OR 2-STROKE OILS NOT ACCORDING TO JASO FC OR
ISO-L-EGD IN GEORIPPER© MINITRENCHER 2-STROKE ENGINES WILL VOID YOUR ENGINE WARRANTY!
4-STROKE FUEL & LUBRICATION INFORMATION
•Use 90+ octane gasoline. Avoid bio fuels, ethanol or octane boosters if possible.
•
•Use 10W30 motor oil in crankcase –high-grade, synthetic recommended.
•Change engine oil after first 20 hours of operation. After initial change, change oil every 30-40 hours.
When refueling with the GeoRipper© mounted on the EZ Kart©, do not tip the machine onto its side. Refuel with the
machine level on the ground, using an appropriate spout mounted on the fuel can.
For further information on fueling, consult the power head manufacturer’s instruction manual specific to your
GeoRipper© model
4.3 How to Use the GeoRipper©
4.3.1 Before your start trenching
1. Visually inspect the mini trencher to ensure there are no defects
2. Check that bolts are tight and that the stone guard and chain guard bar are present
3. Asses the ground conditions and remove any possible hazards
4. Carry out all safety precautions listed in chapter 2
5. Cut grass before trenching to help recover spoils
6. Establish a safety perimeter of a minimum of 10m
7. Dig a pilot hole by hand a depth equivalent to the bar length
8. Only start trenching if you are satisfied that there are NO cables, pipes or other utilities buried. If in
doubt, do not trench!

FOUR ASHES MACHINERY LTD
46
www.georipper.co.uk
4.3.2 Starting the machine
Place the machine on solid ground with one foot on the rear handle, one hand on the tubular handle and the other
hand used for pulling the starting cord (Fig.29)
For cold start, prime the fuel pump if applicable and move the combination switch to the choke position and pull the
starting cord smoothly and evenly. As soon as the engine starts press the throttle trigger so the engine returns to idle
speed. Some models are equipped with a decompression system, refer to the power head manufacturer’s
instruction manual specific to your GeoRipper© model.
For warm start, the operation is as described above but without the use of choke.
Fig.29
Always ensure that the chain is not in contact with the ground when starting your
GeoRipper©.
4.3.3 Using the EZ Kart©
The EZ Kart© is provided as standard with all G27 models and is an optional extra for GR16 and GR20 models. Secure
the GeoRipper© on the EZ Kart© and start the machine as described in paragraphs 4.2.2 and 5.3.2. Fit the belt
around the waist and adjust accordingly. Start trenching at mid-range speed and slowly push the handle until a
desired depth of trench is achieved (Fig.30). The tubular section of the handle is connected to the axle on a ratchet
mechanism. Each position of the ratchet incline the trencher to achieve the desired depth depending on the bar
length (Fig.31). The GeoRipper© can be used vertically only when mounted on the EZ Kart© to achieve the
maximum trench depth.
Fig.30 & 31

FOUR ASHES MACHINERY LTD
47
www.georipper.co.uk
The EZ Kart© is recommended for longer trenches to reduce strain on the operator and give better line accuracy and
depth control. The EZ Kart© has also been shown in tests to reduce vibrations. Optional side walls can be mounted
on the axle of the EZ Kart© to reduce side projections and minimise back fill. (Part number GRPEZ-28)
4.3.4 Trenching with the GeoRipper© hand held
1. Place the GeoRipper© on the ground and slowly engage the bar into the soil as parallel as possible and
using mid-range engine speed. Hold the machine firmly as some manageable kick back may be
experienced. Keep the angle of the digging bar at 25-30-degree angle from vertical for comfortable
operation. In lighter soils, it may be necessary to make second pass through the trench to clear out any
spoils that fell back in
2. Do not use the trencher in a vertical position and do not straddle: risk of injury
3. Most powerheads are designed to operate best and develop maximum power near 3/4 throttle.
Depending on soil type, best operating speeds will be from 3/4 to full throttle. For greater control at
shallow depths [8 inches (200 mm) or less] a 1/2 to 3/4 throttle will improve trenchingsafety
4. When trenching without an EZ Kart in difficult soils, a sawing motion is recommended
5. If you strike solid obstacles (large rocks, concrete, or large roots or buried timber) remove the obstacle
before continuing. The GeoRipper© mini trencher is designed to dig earth, not large stones or tree roots
over 3 inches (70mm) in diameter
6. For wider trenches [2-3 inches (50 –80mm)], rotate blade along the long axis of the blade while
trenching. For anything over 3 inches (80mm), make a second trenching cut at the outside of the desired
width and remove the soil between the two trenches
7. Regular checking/adjustment of digging chains will extend chain life
8. At the end of the job, and periodically during the project, brush the loose dirt off the digging chain and
around the digging sprocket. Inspect the digging teeth for any damage. Always switch the engine off and
wait that the chain to stop
9. To trench down an incline, always stand downhill of the trencher
10. To trench laterally across an incline, always direct the discharge chute downhill. This will keep the spoils
from falling downhill back into the trench
11. In very rocky soils, use an EZ Kart© with side walls, or rock shield (Part numberGRPEZ-28)
Fig.32

FOUR ASHES MACHINERY LTD
48
www.georipper.co.uk
DO NOT ALLOW DIGGING CHAIN TO JAM OR SLOW TO A STOP WHILE HOLDING THE THROTTLE ON. TURN OFF
ENGINE, DISCONTINUE OPERATION AND INVESTIGATE. RUNNING ENGINE AT MORE THAN IDLE WITH CHAIN
JAMMED WILL CAUSE SEVERE CLUTCH AND/OR BELT DAMAGE.
If GeoRipper© mini trencher has an adjustment screw for the belt tension, the tension must be readjusted after
the first hour of operation to prolong belt life. See power head Operator’s Manual for further instruction on belt
tensioning.
4.3.5 Ground condition and tips
Check along the desired trench line, clearing any obstructions, branches, large stones and other obstructions that
could cause the operator to slip or loose footing. If a long continuous trench is planned, consider using the EZ Kart©.
Special situation:
1. The GeoRipper© mini trencher is not designed to trench in solid rock
2. For digging in light or sandy soils containing fine, hard stones, GeoRipper© mini trenchers should be at full
speed prior to contact the ground. When trenching is complete, lift the digging bar and chain clear of the
trench prior to throttling down. This will greatly reduce the occurrence of stone jamming the chain.
Decreasing tension on the chain will also improve trenching in these conditions
3. When digging at full depth in difficult, wet, pliable clays, it is recommended to make two half-depth passes
in opposite directions. This will reduce operator fatigue, reduce engine strain, and reduce the possibility of
jamming the digging chain with mud
4. When cutting curves or radiuses, it is advisable to use several shallow passes rather than a single, full-depth
cut
5. When trenching across a roadway, it is recommended to first loosen the compacted gravel/stones along the
desired line. Removing larger rocks before trenching will also increase productivity and avoid damaging the
digging chain
6. If digging chain is slowing or stopping because of excessive soil buildup, periodically stop the machine and
clear the material from the chain, sprockets and discharge chute. Some soil will build-up on the sprocket and
add tension to the chain. Loosening the chain can help. Keeping engine speed sufficiently high and constant
can also help.
7. Cut the grass before starting to avoid long grass being caught around the drive sprocket. This will also
facilitate back filling
8. If a large stone jams the chain –between the chain and bar –switch the machine off and hit the chain with
a wooden mallet in the opposite direction of travel to dislodge the stone (Fig.32) check the chain is moving
freely before re-starting
9. Keep a good slack on the chain (refer to paragraph 4.1.2)
Fig.33
4.3.6 Vibration information for portable hand-held and hand-guided machinery

FOUR ASHES MACHINERY LTD
49
www.georipper.co.uk
Hand Arm Vibration syndrome HAV may result after long periods using the GeoRipper©.
To reduce the risk of HAV always use the mini trencher mounted on its EZ Kart©, limit the
daily usage per operator, keep warm and wear gloves. Attention: the measurement of the
vibration total value to which the hand-arm system is subjected exceeds 2.5 m/s².
GRM on Makita EK6101 with EZ Kart© 4.65m/s² (Uncertainty factor K=2)
GRM on Makita EK7651H with EZ Kart© 4.15m/s² (Uncertainty factor K=2)
GRM on Makita EK8100 with EZ Kart© 6.02m/s² (Uncertainty factor K=2)
GRH on Husqvarna K770 with EZ Kart© 4.05m/s² (Uncertainty factor K=2)
GRH on Husqvarna K970 with EZ Kart© 4.95m/s² (Uncertainty factor K=2)
GRH on Stihl TS700 with EZ Kart© 5.93m/s² (Uncertainty factor K=2)
All measurements calculated following BS EN 12096 1997 and measured on the EZ Kart© handle. Subject to
variations in soil condition. An example measurement taken using model GR20M 2-stroke GeoRipper© trenching of
top soil 3-6” with light sandy soil beneath. Variation in soil condition would alter this reading, and in stony soil
condition, the reading is likely to be higher.
—GeoRipper© handheld: time of operation before reaching ELV of 5m/s² is 25mns
—GeoRipper© mounted on its EZ Kart©: time of operation before reaching ELV of 5m/s² is6h16mns
4.3.7 Stopping the GeoRipper©
Ensure that the chain can rotate freely after stopping the engine and wait until the chain
stop moving before handling
Stop the machine by moving the Start / Stop lever to the Stop position. Move to the right side position for Husqvarna
models and push down to the bottom position for Makita models. Refer to the operation manual of the
manufacturer of the power head model for further informati
This manual suits for next models
2
Table of contents
Other GeoRipper Power Tools manuals
Popular Power Tools manuals by other brands

SMC Networks
SMC Networks MSQB1 Operation manual

Makita
Makita HM1202 instruction manual

ATIKA
ATIKA RW 1800 Twin Original instructions, safety instructions, spare parts

Parkside
Parkside PMSA 12 B2 Translation of the original instructions

Kärcher
Kärcher ST 120 manual

Hitachi Koki
Hitachi Koki WR 18DHL Handling instructions