gfm PVS7989 User manual

User Manual
PVS7989
8 in. Dual Screen Mobile DVD Player

GB - 1
SAFETY PRECAUTIONS
CAUTION
INVISIBLE LASER RADIATION WHEN
OPEN AND INTERLOCKS DEFEATED.
AVOID EXPOSURE TO BEAM.
The lightning flash with an arrowhead
symbol, within the equilateral triangle, is
intended to alert the user to the presence
of uninsulated “dangerous voltage”
within the product’s enclosure that may
be of sufficient magnitude to cause an
electric shock.
The exclamation point within the
equilateral triangle is intended to alert
the user to the presence of important
operating and maintenance (servicing)
instructions in this owner’s manual.
WARNING
TO REDUCE THE RISK OF ELECTRIC SHOCK, DO NOT REMOVE
COVER (OR BACK). NO USER-SERVICEABLE PARTS INSIDE. REFER
SERVICING TO QUALIFIED SERVICE PERSONNEL.
TO PREVENT FIRE OR SHOCK HAZARD, DO NOT EXPOSE THIS
APPLIANCE TO RAIN OR MOISTURE. DO NOT PLACE OBJECTS
FILLED WITH LIQUIDS ON OR NEAR THIS UNIT.
CAUTION
USE OF CONTROLS OR ADJUSTMENTS OR PERFORMANCE OF
PROCEDURES OTHER THAN THOSE SPECIFIED MAY RESULT IN
HAZARDOUS RADIATION EXPOSURE.
DANGER OF EXPLOSION IF BATTERY IS INCORRECTLY REPLACED.
REPLACE ONLY WITH THE SAME OR EQUIVALENT TYPE.
TO PREVENT ELECTRIC SHOCK, MATCH WIDE BLADE OF PLUG TO
WIDE SLOT OF POWER OUTLET,THEN FULLY INSERT.
THIS CLASS B DIGITAL APPARATUS COMPLIES WITH CANADIAN
ICES-003.
* SEE BOTTOM OF UNIT FOR GRAPHIC
SYMBOLS*
On Placement
• Donotusetheunitinplacesthatareextremelyhot,cold,dusty,orhumid,useitinmoderateclimates.
• Donotrestricttheventilationopeningsoftheunitbycoveringitwithitemssuchasnewspaper,tablecloths,
curtains, etc.
On Safety
• WhenconnectingordisconnectingtheACadapter,griptheplugandnotthecorditself.Pullingthecordmay
damage it and create a hazard.
• Whenyouarenotgoingtousetheunitforalongperiodoftime,disconnecttheACadapter.
• Noun-coveredamesourcessuchaslightedcandlesshouldbeplacedontheACadapterortheunit.
On Condensation
• Whenleftinaheatedroomwhereitiswarmanddamp,waterdropletsorcondensationmayforminsidethe
unit.When there is condensation inside the unit,the unit may not function normally.Let the unit stand for 1 to
2 hours before turning the power on,or gradually heat the room and let the unit dry before use.
Rating Plate Location
• Theratingplateislocatedonthebottomofunit.
FCC Statements
NOTE:This equipment has been tested and found to comply with the limits for a Class B digital device,pursuant to
Part 15 of the FCC Rules.These limits are designed to provide reasonable protection against harmful interference
in a residential installation. This equipment generates, uses and can radiate radio frequency energy and, if not
installed and used in accordance with the instructions, may cause harmful interference to radio communications.
However, there is no guarantee that interference will not occur in a particular installation. If this equipment does
cause harmful interference to radio or television reception, which can be determined by turning the equipment
off and on, the user is encouraged to try to correct the interference by one or more of the following measures:
This product contains a
low power laser device.

GB - 2
SAFETY PRECAUTIONS
• Should any trouble occur, disconnect the AC adapter and refer servicing to a qualied
technician.
• Noobjectslledwithliquids,suchasvases,shallbeplacedontheunit.
• TheACadapterisusedasthedisconnectdeviceanditshallremainreadilyoperableandshould
not be obstructed during intended use. In order to disconnect the apparatus from the supply
mains, the AC adapter should be disconnected from the mains socket outlet.
WARNING
Notes on Copyright
It is forbidden by law to copy, broadcast, show, broadcast on cable, play in public, or rent copyrighted material
without permission.
Apparatus Claims of U.S. Patent Nos. 6,836,549; 6,381,747; 7,050,698; 6,516,132; and 5,583,936 licensed for limited
viewing uses only.
This product incorporates copyright protection technology that is protected by U.S.patents and other intellectual
property rights. Use of this copyright protection technology must be authorized by Macrovision, and is intended
for home and other limited viewing uses only unless otherwise authorized by Macrovision. Reverse engineering
or disassembly is prohibited.
1. Read these instructions.
2. Keep these instructions.
3. Heed all warnings.
4. Follow all instructions.
5. Do not use this apparatus near water.
6. Clean only with a dry cloth.
7. Do not block any of the ventilation openings. Install in accordance with the manufacturer’s instructions.
8. Do not install near any heat sources such as radiators, heat registers, stoves, or other apparatus (including
amplifiers) that produce heat.
9. Do not defeat the safety purpose of the polarized or grounding - type plug. A polarized plug has two blades
with one wider than the other. A grounding type plug has two blades and a third grounding prong. The wide
blade or the third prong is provided for your safety. When the provided plug does not fit into your AC power
outlet, consult an electrician for replacement of the obsolete outlet.
10. Protect the AC power cord from being walked on or pinched particularly at plugs,
convenience receptacles,and the point where they exit from the apparatus.
11. Only use attachments/accessories specified by the manufacturer.
12. Use only with a cart, stand, tripod, bracket, or table specified by the manufacturer,
or sold with the apparatus. When a cart is used, use caution when moving the cart/
apparatuscombinationtoavoidinjuryfromtip-over.
13. Unplug this apparatus during lightning storms or when unused for long periods of
time.
14. Refer all servicing to qualified service personnel. Servicing is required when the
apparatus has been damaged in any way, such as the AC power cord or plug is damaged, liquid has spilled or
objectshavefallenintotheapparatus,theapparatushasbeenexposedtorainormoisture,doesnotoperate
normally, or has been dropped.
IMPORTANT SAFETY INSTRUCTIONS
– Reorient or relocate the receiving antenna.
– Increase the separation between the equipment and receiver.
– Connect the equipment into an outlet on a circuit different from that to which the receiver is connected.
– Consult the dealer or an experienced radio/TV technician for help.
Warning: Changes or modifications to this unit not expressly approved by the party responsible for compliance
could void the user’s authority to operate the equipment.
Portable Cart Warning

GB - 3
TABLE OF CONTENTS
SAFETY PRECAUTIONS...................................... 1
IMPORTANT SAFETY
INSTRUCTIONS .................................................... 2
TABLE OF CONTENTS......................................... 3
DISC FORMATS .................................................... 4
ACCESSORIES ....................................................... 5
USING THE REMOTE CONTROL...................... 5
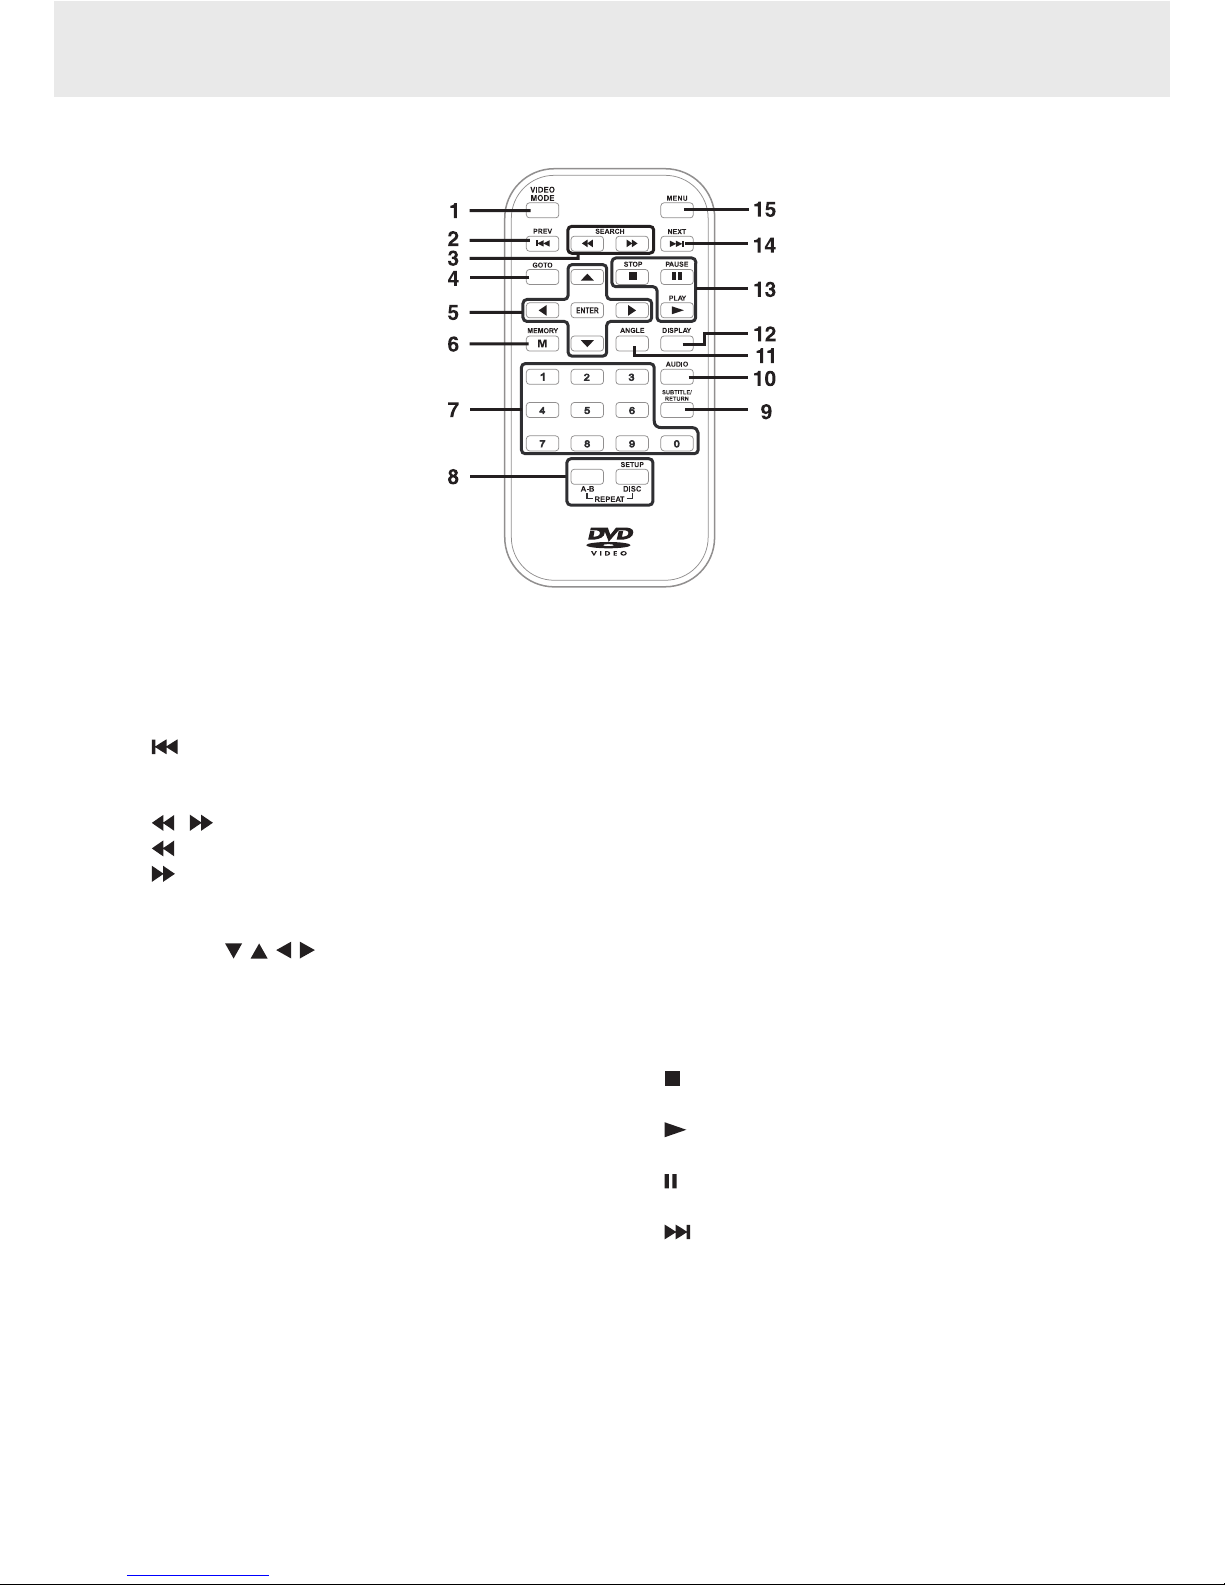
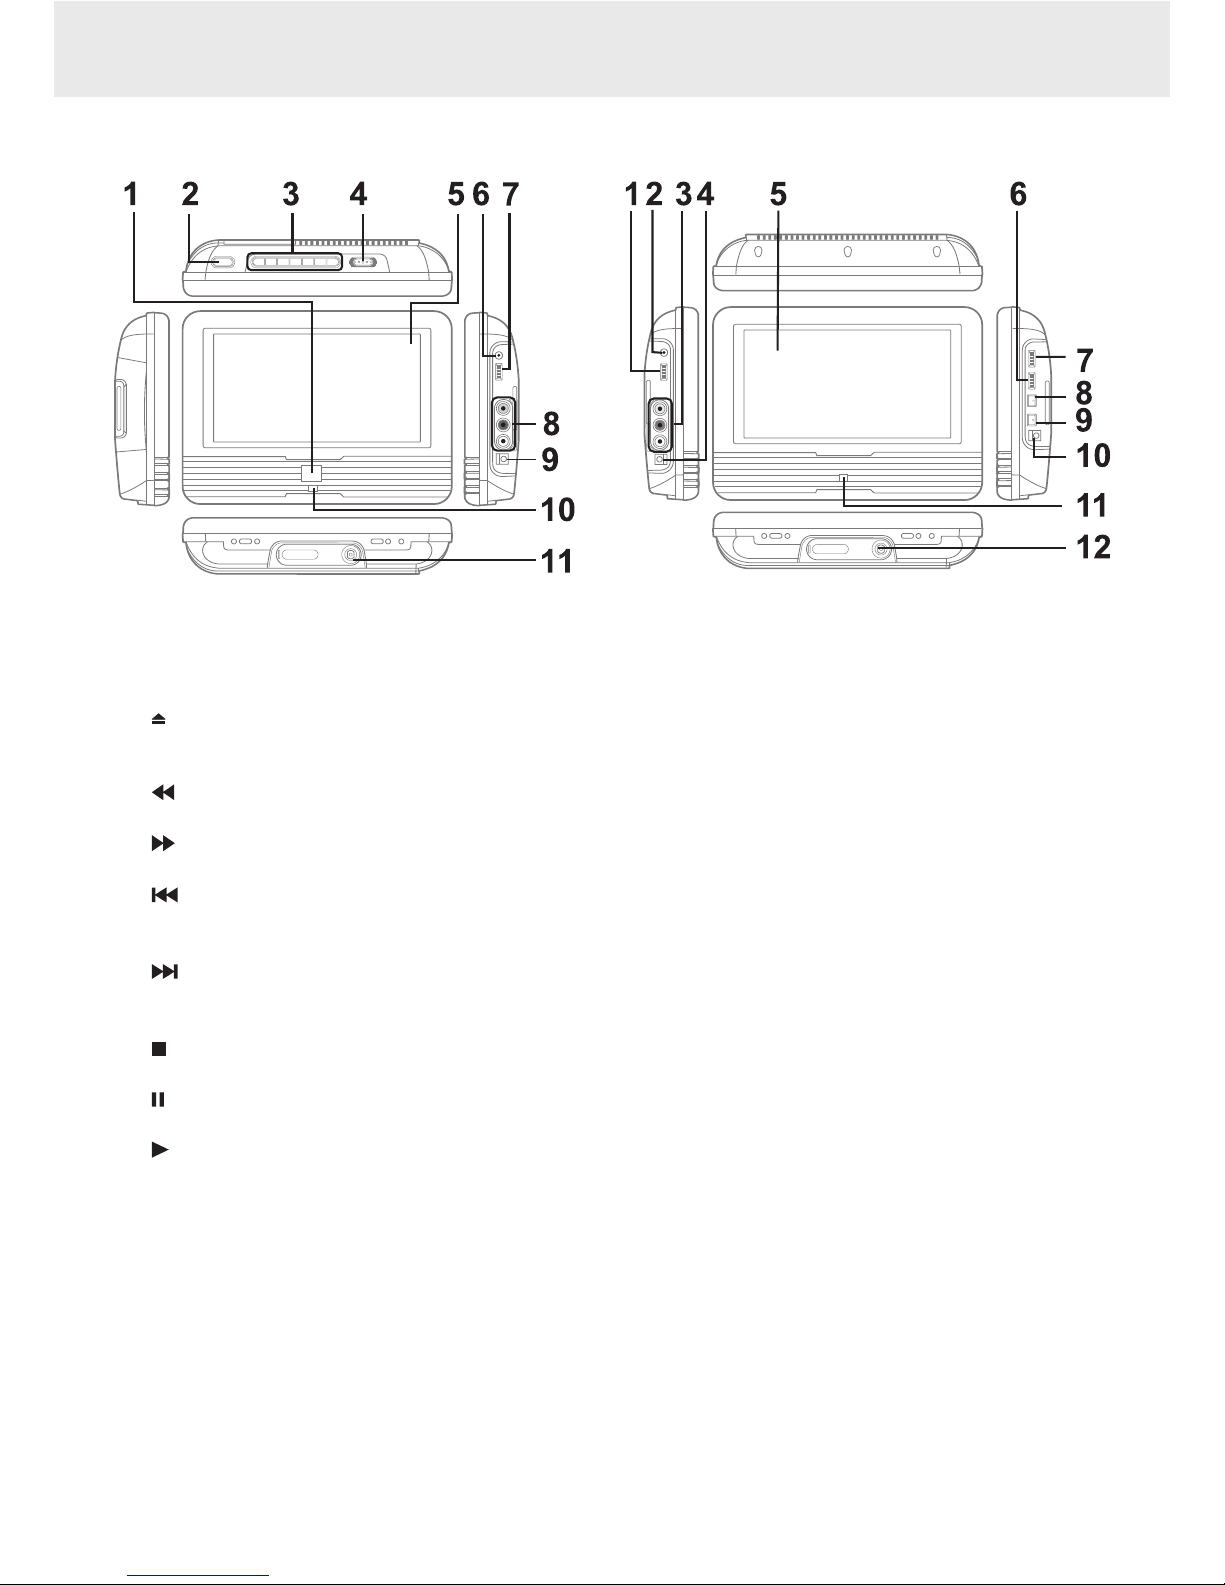
CONTROL REFERENCE GUIDE......................... 6
Remote Control .........................................................................6
DVD UNIT / MONITOR..............................................................7
POWER SUPPLY ................................................... 8
A. Using the AC Power Adapter............................................ 8
B. Using the Car Power Adapter...........................................9
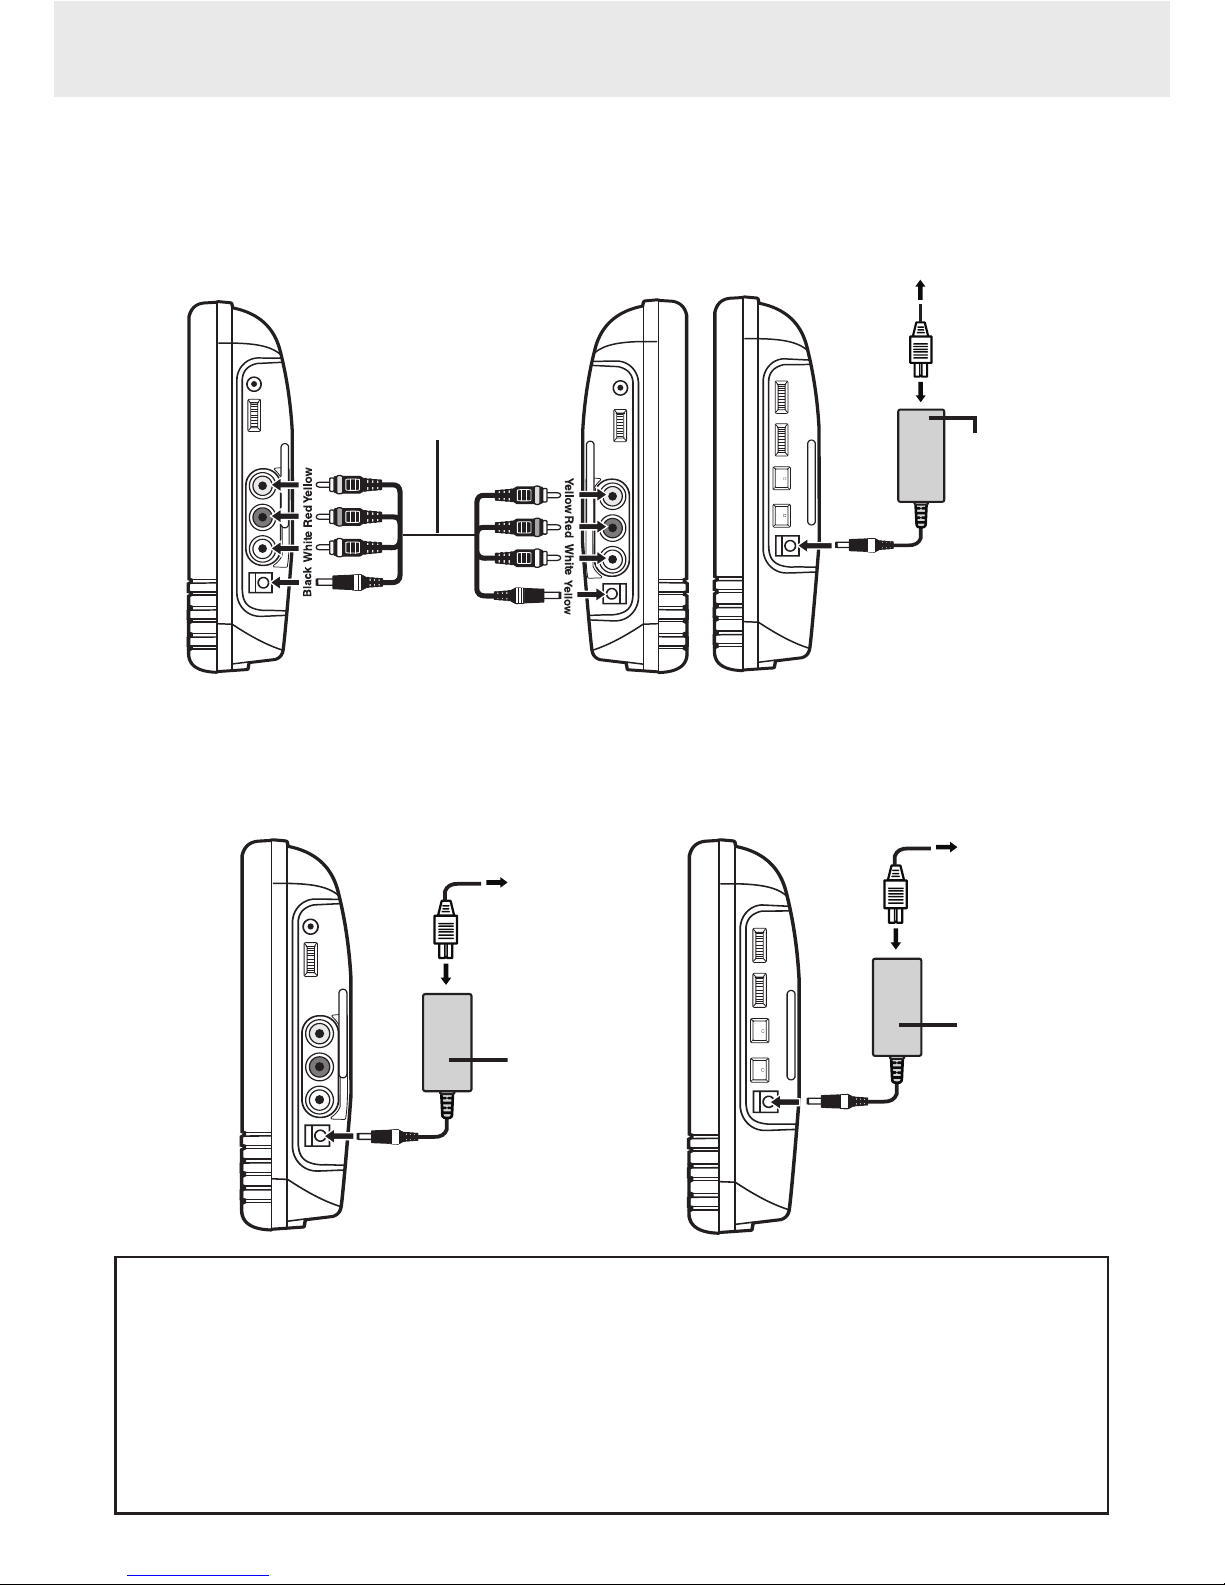
CONNECTIONS...................................................10
A.Watching a DVD on the Main Unit and
the Monitor..........................................................................10
B. Connecting a TV (for the Main Unit Only)..................10
C. Listening a Stereo Receiver or Amplifier
on Main unit ........................................................................11
D. Connecting Game Systems/Video Equipment (for
the Monitor Only)..............................................................11
E. Using the Monitor with Other Equipment
while Playing DVD on the Main Unit..........................12
F. Using Headphones/Earphones ......................................12
PLACEMENT........................................................13
A. Mounting in the Vehicle...................................................13
B. Using the Stand...................................................................13
SOUND SYSTEM ...............................................14
UNIT OPERATION ..............................................14
PLAYING A DISC.................................................15
Playing a Disc............................................................................15
Pausing Playback (Still Mode).............................................15
Stopping Playback..................................................................15
Fast Forward / Fast Reverse ................................................15
Skip (Forward / Reverse).......................................................15
Audio Selection .......................................................................15
Subtitle Selection....................................................................16
Angle Selection........................................................................16
Display Function......................................................................16
AdjusttheLCDScreen...........................................................16
LOCATING A DESIRED SECTION...................17
Locating a Specific Title ........................................................17
Locating a Specific Chapter.................................................17
Locating a Specific Time.......................................................17
DVD PROGRAMMABLE MEMORY................18
REPEAT PLAYBACK ...........................................18
Repeating a Chapter/Title ...................................................18
Repeating a Single Track/ Whole Disc .............................18
Repeating a Specific Section ..............................................18
VIEWING JPG FILES ..........................................19
PLAY MODES FOR CD OR JPEG
DISC.......................................................................19
CUSTOMIZING THE FUNCTION
SETTINGS.............................................................20
Language setup.......................................................................20
Video setup ...............................................................................21
Misc setup..................................................................................21
MAINTENANCE..................................................22
Cleaning the Disc....................................................................22
Cleaning the Unit....................................................................22
Important Note........................................................................22
TROUBLESHOOTING GUIDE..........................22

GB - 4
DISC FORMATS
This unit can playback discs bearing any of the following marks:
Region Management Information
Region Management Information:This unit is designed and manufactured to respond to the Region Management
Information that is encoded on DVDs.If the region number printed on the DVD does not correspond to the region
number of this unit, this unit cannot play that disc.
The region number of this unit is 1.
Disc Function or Operation that is Not Available
When the symbol appears on the TV screen, it indicates that the function or operation attempted is not available
at that time.This occurs because the DVD manufacturer determines the specific functions. Certain functions may
not be available on some discs. Be sure to read the documentation provided with the disc.
Title, Chapter and Tracks
• DVDsaredividedinto“titles” and “chapters”. If the disc
has more than one movie on it, each movie would be a
separate“title”.“Chapters”are sections of titles.
• Audio CDs are divided into “tracks”. A “track” is usually
one song on an Audio CD.
Note:
• Numbersidentifyeachtitle,chapter,andtrackonadisc.Mostdiscshavethesenumbersrecordedonthem,but
some do not.
Icons Used on DVDs
Sample lcons
Note:
• WhenplayingbackaCD-G(Graphics)orCDEXTRA disc,theaudioportion will be played, butthegraphic
images will not be shown.
Notes on Unauthorized Discs
You may not be able to play back some DVDs on this unit if they were purchased from outside your geographic
area or made for business purposes.
DVDs
[8cm(3")/12cm(5") disc]
Audio CDs
[8cm(3")12cm(5") disc]
Compatible
Language selections for audio
Language selections for subtitles
Screen aspect ratio
Multiple camera angles
Region code indicator

GB - 5
Please check and identify the supplied accessories.
Remote Control (with battery)..................................................................................................................................................... x 1
AC Power Adapter ............................................................................................................................................................................ x 1
Car Power Adapter .......................................................................................................................................................................... x 1
DC-AV cable ........................................................................................................................................................................................ x 1
Straps .................................................................................................................................................................................................... x 2
ACCESSORIES
REMOTE CONTROL
Using the Remote Control
• Point the remote control at the REMOTE SENSOR
located on the unit.
• When there is a strong ambient light source, the
performance of the infrared REMOTE SENSOR may be
degraded,causing unreliable operation.
• The recommended effective distance for remote
operation is about 16 feet (5 meters).
To Change Remote Battery
1. Open the battery door.
Take out the PVC sheet before operating the
Remote Control.
2. Insert one CR2025 (3V) size battery.
BATTERY REPLACEMENT
When battery becomes weak,the operating distance of the Remote Control will greatly reduced and you will need
to replace the battery.
Note:
• IftheRemoteControlisnottobeusedforalongtime,removethebatterytoavoiddamagecausedbybattery
leakage corrosion.
CAUTION
Danger of explosion if the battery is incorrectly replaced. Replace only with the same or equivalent
type.
WARNING
Do not dispose of battery in fire, battery may explode or leak.
Battery shall not be exposed to excessive heat such as sunshine, fire or the like.

GB - 6
CONTROL REFERENCE GUIDE
1) Video Mode button
AdjustsBrightness,Contrastor Colour of the LCD
screen.
2) PREV button
Moves back through titles, chapters or tracks on a
disc.
3) / SEARCH buttons
SEARCH: Fast reverse playback.
SEARCH: Fast forward playback.
4) GOTO button
Skips directly to a location on a DVD.
5) Cursor ( , , , ) buttons
Use to move between selections on a menu screen
andadjustcertainsettings.
ENTER button
Confirms selections on a menu screen.
6) MEMORY button
In STOP mode, sets titles/chapters in a favourite
order.
7) Number (0 - 9) buttons
Use when creating programs, entering parental
control password or locating a title/chapter/track
or specific time.
8) REPEAT A-B button
Performs point-to-point repeat playback on a DVD
or CD.
REPEAT DISC button
Repeats a DVD chapter or title.
Repeats a CD track or the entire disc.
SETUP button
When a DVD is stopped,brings up the unit’s SETUP
menu.
9) SUBTITLE button
Selects one of the subtitle languages programmed
on a DVD (if available).
RETURN button
Returns to normal operation after using the SETUP
menu of a DVD.
10) AUDIO button
Selects one of the audio sound tracks on a DVD
(if more than one is available) or select the audio
output mode on a CD.
11) ANGLE button
Switches between multiple camera angles when
the DVD you are playing has been programmed
with multiple camera angles.
12) DISPLAY button
Shows status information on the screen.
13) STOP button
Stops playing a disc.
PLAY button
Starts or resumes playback of a disc.
PAUSE button
Pause playback and frame advance.
14) NEXT button
Moves forward through titles, chapters or tracks on
a disc.
15) MENU button
Enters and exits the main DVD menu.
Remote Control

GB - 7
CONTROL REFERENCE GUIDE
1) Remote Sensor
Receives the remote control signal.
2) Button
Press the button and hold the front panel to open
the disc door.
3) SEARCH Button
Press to perform fast reverse playback.
SEARCH Button
Press to perform fast forward playback.
PREV Button
Press to select previous chapters or tracks on a
disc.
NEXT Button
Press to select next title, chapters or tracks on a
disc.
STOP Button
Stops playing a disc.
PAUSE Button
Pauses playback of a disc and frame advance.
PLAY Button
Starts or resumes playback of a disc.
DC IN 9-12V Jack
4) STANDBY(power off) / ON Switch
5) LCD Screen
6) Headphone Jack
7) VOLUME Control
Adjuststhevolume.
8) AUDIO/VIDEO OUT jacks
9) DC IN 9V-12V jack
10) POWER ON Indicator
When the STANDBY / ON switch is in the ON
position, the green light will illuminate.
11) Stand
1) VOLUME Control
Adjuststhevolume.
2) Headphone Jack
3) AUDIO/VIDEO IN jacks
4) DC IN 9V-12V jack
5) LCD Screen
6) COLOR Control
Adjuststhecolorintensity.
7) BRIGHTNESS Control
Adjusts the relative lightness or darkness of a
screen.
8) Screen Switch:
WIDE:Wide Screen
NORMAL: Pan Scan
9) ON/OFF Switch
10) DC IN 9V-12V jack
11) POWER ON Indicator
When the STANDBY / ON switch is in the ON
position, the green light will illuminate.
12) Stand
DVD UNIT MONITOR

GB - 8
POWER SUPPLY
A. Using the AC Power Adapter
The supplied AC power adapter operates on AC between 100V and 240V.
Using the Main unit and the monitor together
Cautions:
• TheACpoweradapterincludedwiththisunitisfor
its use only. Do not use it with other equipment.
• When the unit is not going to be used for long
time, disconnect the AC power adapter from the
AC power outlet.
• TurnofftheunitbeforeunpluggingtheACpower
adapter from the unit to avoid the unit being
damaged.
• When the AC power adapter is plugged in, the
apparatus is not completely disconnected from
the main power supply, even when the power is
turned off.
• Be sure to use it near the wall outlet and easily
accessible.If a malfunction occurs, disconnect the
plug from the wall outlet at once.
Using the Main unit or the monitor separately
UNIT - right side
DC-AV cable
(included)
MONITOR -
left side right side
AC ADAPTER
TO A/V OUT &
DC IN 9V-12V
jacks
1
TO A/V IN &
DC OUT 9V-
12V jacks
2
TO DC IN 9V-12V jack
3
TO AC outlet
4
AC ADAPTER
AC ADAPTER
TO AC outlet
2
TO AC outlet
2
UNIT - right side MONITOR - right side
DC IN 9V-12V
jack
1
DC IN 9V-12V
jack
1

GB - 9
WARNING:
Disconnect the car power adapter when
not in use. Not for use in 24V vehicles.
POWER SUPPLY
B. Using the Car Power Adapter
The 12V car power adapter allows the unit to be used with vehicles that have a 12V, negative ground electrical
system.
Using the Main unit and the Monitor together
Cautions:
• Usetheprovided12Vcarpoweradapteronly.Use
with other car power adapters could damage the
unit.
• The 12V car power adapter included with this
unit is for its use only. Do not use it with other
equipment.
• Intheinterestoftrafcsafety,donotoperatethis
unit or view videos while driving a vehicle.
• Makesuretheunitissecurelyfastenedtoprevent
it from falling or flying through the air in the event
of an accident.
• When the inside of the cigarette lighter socket
is dirty with ashes or dust, the plug section may
become hot due to poor contact. Be sure to clean
the cigarette lighter socket before use.
• Afteruse,disconnectthe12Vcarpoweradapter
from both the unit and cigarette lighter socket.
UNIT - right side
DC-AV cable
(included)
MONITOR -
left side right side
CAR POWER
ADAPTER
TO A/V OUT &
DC IN 9V-12V
jacks
1
TO A/V IN &
DC OUT 9V-
12V jacks
2
TO DC IN 9V-12V jack
3
To the
cigarette
lighter socket
4
2
UNIT - right side MONITOR - right side
DC IN 9V-12V
jack
1
DC IN 9V-12V
jack
1
CAR POWER
ADAPTER
CAR POWER
ADAPTER
To the
cigarette
lighter socket
Using the Main unit or the monitor separately
IMPORTANT
This car adapter is for use with 12 volt
batteries only.
2
To the
cigarette
lighter socket

GB - 10
CONNECTIONS
Watching a DVD on your TV
1. Connect your TV to the main unit using a standard AV cable (not included).
2.Turn on the main unit.
3. Turn on the TV and follow the instructions included with it to play the DVD.
Notes:
• MakesuretousethecorrectAudio/Videocable.Connectingtheplugsincorrectlymaycauseaweaksignal.
• IfyourTVdoesnothaveAudio/Videoinputs,youwillneedtopurchaseanRFmodulator(soldseparately)and
follow the instructions included with it to connect the unit to your TV.
B. Connecting a TV (for the Main Unit Only)
If your TV has Audio/Video inputs, you can connect the main unit to your TV using a standard AV cable (not
included).
A.Watching a DVD on the Main Unit and the Monitor
You can watch the same DVD on the main unit and the monitor.
Watching on the Main Unit and the Monitor
1. Connect the main unit and the monitor using the included DC-AV Cable.
2. Turn on the main unit and the monitor.
3. Play a DVD on the main unit; the monitor will play at the same time by AV IN.
Note:You can also use the included AC power adaptor to supply power.
UNIT - right side
DC-AV cable
(included)
MONITOR -
left side right side
TO A/V OUT
& DC IN 9V-
12V jacks
TO A/V IN &
DC OUT 9V-
12V jacks
UNIT - right side
AV cable
(not included)
TO A/V OUT
jacks
TO A/V IN
jacks
TV

GB - 11
CONNECTIONS
D. Connecting Game Systems/Video Equipment (for the Monitor Only)
You can connect game systems or other video equipment for playback through the monitor only. You cannot
connect these systems to the main unit.
Watching video equipment
1. Connect the other equipment to the monitor using a standard AV Cable (not included).
2. Turn on the monitor.
3. Turn on the video equipment and follow the instructions provided with it to playback.
Notes:
• MakesuretousethecorrectAudio/Videocable.Connectingtheplugsincorrectlymaycauseaweaksignal.
• IfyouhaveamonoVCR,thevolumelevelfromthespeakerswillbelow.
C. Listening a Stereo Receiver or Amplifier on Main unit
The main unit can play two channels Dolby Digital.
Listening on External Audio Equipment
1.Connectthemainunittotheleft/rightAudioInjacksontheotherequipmentusingastandardAudiocable(not
included).
2.Turn on the main unit.
3. Turn on your audio equipment and follow the instructions provided with it to select the AUDIO IN function.
Notes:
• MakesuretousethecorrectAudiocable.Connecting
the plugs incorrectly may cause a weak signal.
• If you have a stereo VCR, make sure you set it to
stereo mode.
• Duetocopyrightprotection,DVDmoviescannotbe
copied. If you copy a DVD movie onto a videotape,
the resulting copy will be unclear, with poor sound
quality. This is NOT caused by a defective DVD
system.
UNIT - right side
Audio cable
(not included)
TO A/V OUT
jacks
TO A/V IN
jacks
Stereo Receiver
/ Amplifier
MONITOR -
left side right side
AV cable
(not included)
TO A/V OUT
jacks
TO A/V IN
jacks
Game System /
Video equipment

GB - 12
CONNECTIONS
E. Using the Monitor with Other Equipment while Playing DVD on the Main Unit
You can use a game console or other video equipment on the monitor while playing a DVD on the main unit.
Watching Video Equipment on the Monitor while Playing DVD on the Main Unit
1. Connect only the power connector between the main unit and the monitor. Do not connect the Audio/Video
portion of the DC-AV cable.
2. Connect the monitor to the other equipment using a standard AV cable (not included).
3. Turn on the main unit, the monitor and the other equipment.
4. Play a DVD on the main unit.
5. Use the monitor for the other equipment.
Notes:
• YoucanalsousetheincludedACpoweradaptortosupplypower.
• MakesuretousethecorrectAudio/Videocable.Connectingtheplugsincorrectlymaycauseaweaksignal.
• IfyouhaveamonoVCR,thevolumelevelfromthespeakerswillbelow.
F. Using Headphones/Earphones
Turn down the volume before connecting the
headphones/earphones.Slowly raise the volume with the
headphones/earphones on until you reach your desired
volume. When headphones/earphones are connected,
the speaker is automatically disabled.
Caution:
Avoid listening to sound at excessive levels which
could be harmful to your ears.
UNIT - right side
DC-AV cable
(included)
MONITOR -
left side right side
TO DC IN
9V-12V
jacks
TO DC OUT 9V-12V jack
TO AV IN
jacks
AV cable
(not included)
TO AV OUT
jacks
Game system/
Video equipment
UNIT - right sideMONITOR - left side
Headphones/Earphones
(1/8" (3.5mm) diameter
plug)

GB - 13
PLACEMENT
A. Mounting in the Vehicle
Use the supplied mounting strap to install the main unit and monitor on the back of the vehicle's headrests.Tightly
wrap the mounting strap around the headrest.
Mounting the Main unit Mounting the Monitor
SAFETY WARNING!
• Thisunitshouldneverbeusedbythevehicle'sdriverorleftunsecuredinthevehiclewhiledriving.
• Ifthisunitisbeingusedinyourvehicle,besurethatitissecuredorheldsafely,anddoesnotobstructany
safety device,including air bags or seat belts.
• Allpassengersshouldwearseatbelotswhenusingthisunitinamovingvehicle.
• Ifindoubt,pleasecontactyourvehiclemanufacturerforfurtheradvice.
B. Using the Stand
You can stand the main unit/monitor up on a desk or
table using the stand on the back.

GB - 14
Dolby Digital
Dolby Digital is a technology developed by Dolby Laboratories. Soundtracks encoded in Dolby Digital can
reproduce from one to 5.1 discrete channels of excellent quality audio.
The unit automatically recognizes the Dolby Digital bitstream and provides a downmix suitable for two-
channel listening. An additional Dolby Digital decoder is required for reproduction of the discrete multi-channel
soundtracks available on many DVDs.
Manufactured under license from Dolby Laboratories.
'Dolby' and the double-D symbol are trademarks of Dolby Laboratories.
UNIT OPERATION
Turning on the unit
1. Slide the STANDBY / ON switch of the main unit and ON / OFF switch on the
monitor to the ON position.
2. The DVD logo (start-up picture) will appear on the screen.
3. After use, slide the STANDBY / ON switch to the STANDBY (power off ) position of
the main unit and ON / OFF switch to the OFF position of the monitor.
SOUND SYSTEM

GB - 15
This owner’s manual explains the basic instructions
for operating this unit. Some DVDs are produced in
a manner that allows specific or limited operation
during playback.Therefore, this unit may not respond
to all operating commands. THIS IS NOT A DEFECT.
Please refer to the instructions accompanying the
specific DVD in question for more information about
the options available on that DVD.
“ ” may appear on the screen during operation. A “
”means that the desired operation is not permitted
by the unit or disc.
PLAYING A DISC
Basic playback
Playing a Disc
1. Slide the STANDBY / ON switch to the ON position.
(Slide the ON / OFF switch on the monitor to the ON
position.)
See CUSTOMIZING THE FUNCTION SETTINGS before
proceeding to step 2.
2. Press the OPEN button and hold the front panel to
open the disc door.
3. Hold the disc by its sides and gently push it onto the
spindle with label side facing towards you until you
hear a“click”.
4. Gently push the disc door closed. It takes a short
while for your unit to load the disc. After loading,
for most DVDs, the unit will automatically take you
main menu or start playing. If the unit does not
automatically start playing the DVD, press the
PLAY button.
Pausing Playback (Still Mode)
Press the PAUSE button. To resume normal playback,
press the PLAY button.
Each time you press the PAUSE button, the picture
advances one frame.
Stopping Playback
Press the STOP button at the location where you
want to interrupt playback. To resume playback at the
position where the disc was stopped, press the PLAY
button.
If you press the STOP button twice,the unit’s memory
will be cleared and pressing the PLAY button will
reset the disc to the beginning.
Fast Forward / Fast Reverse
1. Press the SEARCH or SEARCH button when a
disc is playing. Each time you press the SEARCH
or SEARCH button, the playback speed changes
in the following sequence:
2. Press the PLAY button when you reach the desired
point to resume normal playback.
Notes:
• The DVD player mutes sound and subtitles during
reverse and forward scan of DVDs.
• The fast playback speed may differ depending on
the disc.
Skip (Forward / Reverse)
• Pressthe PREV button to go back to current or
previous chapters/tracks.
• Press the NEXT button to advance chapters/
tracks.
• For audio CDs, use the number buttons on the
remotecontroltojumpimmediatelytothedesired
track number.
Audio Selection
On some DVDs, the sound is recorded in two or more
formats. Follow the directions below to select the
preferred language and sound system.
1. While a disc is playing, press the AUDIO button to
show the current audio format number.
2. Press the AUDIO button repeatedly to select the
desired audio format.
Notes:
• IfonlyoneaudioformatisrecordedontheDVD,the
number does not change.
• Some DVDs allow you to change audio selections
only via the disc menu. If this is the case, press the
MENU button and choose the appropriate language
on the disc menu.
• Youcanselectdifferentaudiochannels(Stereo,Left
or Right) on an Audio CD by pressing the AUDIO
button repeatedly.

GB - 16
PLAYING A DISC
Basic playback
Subtitle Selection
1. While a DVD is playing, press the SUBTITLE button to
display the current language setting, as shown in the
example.
2. Press the SUBTITLE button repeatedly to select the
desired subtitle language. You can turn subtitles off
by pressing the SUBTITLE button repeatedly until
the“ ”is displayed.
Notes:
• SomeDVDsaresettodisplaysubtitlesautomatically,
and you cannot turn them off even if you set the
subtitle function to off.
• During some scenes, the subtitles may not appear
immediately after you select your desired scene.
• The number of subtitle languages recorded differs
depending on the disc. If only one language is
recorded, the language does not change.
• This function can only be used for discs on which
subtitles have been recorded in multiple languages.
• Some DVDs allowyou to change subtitles only via
the disc menu. If this is the case, press the MENU
button and choose the appropriate subtitle on the
disc menu.
Angle Selection
Some DVDs contain scenes which have been shot
from a number of different angles. For these discs, the
same scene can be viewed from each of these different
angles.
1. While you are playing a DVD with different angles
recorded, press the ANGLE button to view the
number of current angles available.
2. Press the ANGLE button repeatedly to change the
scene to the next recorded angle.
• After approx. two seconds, playback will continue
from the new angle you selected.
• Ifnobuttonispressedwithin10seconds,playback
continues without changing the current angle.
Notes:
• This function can only be used for discs on which
scenes shot from multiple angles have been
recorded.
• Ifonlyoneangleisrecorded,“ ”is displayed.
Display Function
While the disc is playing, press the DISPLAY button
repeatedly to display information on operation status.
Elapsed Time: Elapsed time from the beginning of
the title which is currently playing.
Remain Time: Remaining time of the title which is
currently playing.
AdjusttheLCDScreen
You can adjust Brightness, Contrast or Colour of the
LCD screen.
1. Press the VIDEO MODE button.
2. Press the / button to select Brightness, Contrast
or Colour.
3. Then press the / button to change the setting.
4. Press the VIDEO MODE button again to exit the
menu.
Note:
For the monitor, you can adjust the LCD screen by
the BRIGHTNESS control, COLOUR control and Screen
(WIDE / NORMAL) switch on the monitor.
Sequence of angle shots
(Example)

GB - 17
Locating a Specific Title
If a DVD contains title numbers, you can locate a specific title by directly selecting its title number.
1. Press the GOTO button.
2. Press the corresponding number button(s) for the title you want.
3. Press the ENTER button to confirm. Playback starts from the selected section.
Notes:
• IfthetitlenumbersyouenteredisnotpermitedbytheDVD,afteryoupresstheENTERbutton,itwillrestoreto---.
You should re-enter correct numbers.
• Somediscsmaynotrespondtothisprocess.
• ThismethodoflocatingatitleisavailableonlyonaDVDthatcontainstitlenumbers.
Locating a Specific Chapter
If you know the chapter number for the chapter that you want to play, you can locate it by directly selecting that
number.
1. Press the GOTO button.
2. Press or button to display Chapter and press the corresponding number button(s) for the chapter you
want.
3. Press the ENTER button to confirm. Playback starts from the selected section.
Notes:
• IfthechapternumbersyouenteredisnotpermitedbytheDVD,afteryoupresstheENTERbutton,itwillrestore
to - - -.You should re-enter correct numbers.
• Somediscsmaynotrespondtothisprocess.
• ThismethodoflocatingachapterisavailableonlyonaDVDthatcontainschapternumbers.
Locating a Specific Time
You can move to a specific location by entering its corresponding time (hours, minutes, seconds).
1. Press the GOTO button.
2. Press or button to display Time and press the corresponding number buttons for the setting point you
want.
3. Press the ENTER button to confirm. Playback starts from the selected section.
Notes:
• IfthetimenumbersyouenteredisnotpermitedbytheDVD,afteryoupresstheENTERbutton,itwillrestoreto
- - : - - : - -.You should re-enter correct numbers.
• Somediscsmaynotrespondtothisprocess.
• Somescenesmaynotbelocatedaspreciselyasyouspecied.
• ThismethodforaccessingspeciclocationsisavailableonlywithinthecurrenttitleoftheDVD.
LOCATING A DESIRED SECTION

GB - 18
Playing TItles/Chapters in a Favourite Order
You can combine your favourite titles/chapters and
play them in the order you determine.
1. When a DVD is stopped, press the MEMORY button,
the following display appears.
2. Select the items in the order you want by pressing
the number buttons.Each time you press the Cursor
buttons ( , , , ), the space is highlighted.
Highlight where you want to enter, then press the
corresponding number buttons.
3. Press the Cursor buttons ( , , , ) to move the
highlighted bar to Play Memory,then press the ENTER
button.The DVD player starts memory playback.
4. To resume normal playback from memory playback
1).Press the MEMORY button in stop mode.
2).Press the Cursor buttons ( , , , ) to move the
highlighted bar to“Clear All”, then press the ENTER
button. All the input programs will be cleared.
3).Press the PLAY button to resume normal
playback.
Notes:
• If the title or chapter numbers you entered is not
permited by the DVD, after you press the ENTER
button, it will restore to - - -. You should re-enter
correct numbers.
• Some discs may not permit memory playback
operation.
• If you select repeat during memory playback, the
DVD player repeats the current memory playback.
• If you press theMEMORY button while the display
appears on the TV screen, the display disappears.
• The programmed selections will be cleared when
you open the disc tray or turn off the DVD player.
DVD PROGRAMMABLE MEMORY
REPEAT PLAYBACK
You can play a specific title or chapter repeatedly. (Title
repeat, chapter repeat, A-B repeat)
Repeating a Chapter
1. While the DVD is playing, press the REPEAT DISC
button until the “ ” indicator
displays on the screen.The current chapter is played
repeatedly.
Repeating a Title
2. While the DVD is playing, press the REPEAT DISC
button until the“ ” indicator displays on
the screen.The current title is played repeatedly.
To Resume Normal Playback
3. While the DVD is playing, press the REPEAT DISC
button until the “ ” indicator displays on
the screen.
You can play a single track or the whole disc
repeatedly.
Repeating a Single Track
1. While the CD disc is playing, press the REPEAT DISC
button until the “ ” indicator displays
on the screen.The current track is played repeatedly.
Repeating a Whole Disc
2. While the CD disc is playing, press the REPEAT DISC
button until the “ ” indicator displays on
the screen.The whole disc is played repeatedly.
To Resume Normal Playback
3. Press the REPEAT DISC button until the“
”indicator displays on the screen.
Repeating a Specific Section
You can play a specific section repeatedly.
1. While the disc is playing, press the REPEAT A-B
button at the beginning of the section (“ ”
is displayed) you want to play repeatedly.
2. Press the REPEAT A-B button again at the end of the
section (“ ”is displayed).
3. The Unit will immediately begin replaying your
selection.
To Resume Normal Playback
4. While the disc is playing, press the REPEAT A-B
button until the“ ”indicator displays on
the screen.
Notes:
• SomediscsmaynotpermitA-Brepeatoperation.
• YoucannotsettheA-Brepeatfunctionforasegment
that includes multiple camera angles.
• Youcan specify a segment only within the current
title or track.
• There may be a slight difference between point A
and the location where playback actually resumes
depending on the disc.

GB - 19
VIEWING JPG FILES
This unit can play JPG files recorded on a CD-R or CD-ROM disc (CD-RW is not recommendable).
Viewing JPG Files
1. Open the disc door.
2. Hold a JPG file disc by its edge and gently push it onto the spindle with the label side
facing up until you hear a“click”.
3. Close the disc door.A list of folders/files will appear on the screen.
4. Press the or button to select your desired file,the selected picture will appear at
the lower right corner.Press the PLAY button to start playback.Press the button
to display a folder list.
Notes:
• Youcanpressthe PAUSE button to interrupt playback. Press the PLAY button to resume playback.
• Youcanpressthe STOP button to quit playback.
• Youcanpressthe PREV or NEXT button to change the picture.
• YoucanpresstheANGLEbuttontorotatedirectionofthepictureby90°.
• Somediscsmaynotpermitthisoperation.
When play CD / JPG discs, you can modify the Play Modes through the Toolkit which appears on the right of below
picture on the screen. Press the / button to navigate between the windows and the / button to select
files/tracks or play mode items.Then press the ENTER button.
1. In Stop mode, press the Cursor buttons ( , , , ) to select "Edit mode" then press the ENTER button.
2. Use the Cursor buttons ( , , , ) to select tracks/files shown on the left hand side of the window. Press the
ENTER button to confirm the selected tracks/files." " will appear in front of the selected tracks/files.
3. Select "Add to program", then press the ENTER button. " " will disappear from the screen. It means that the
tracks/files you have selected are added into the "Program view".
4. Select "Program view" to view programmed files.To add more files by "Browser view" follow above steps.
5. Press the PLAY button to start the program playback.
The Toolkit has the following play mode items:
• Repeat(Off/Single/All):
Off: Resumes normal playback.
Single: Repeats the current track/file.
All: Repeats all files on the current folder or all tracks on the disc.
• Mode(Normal/Shufe/Musicintro):
Normal: Resumes normal playback.
Shuffle: Playbacks track/file in random order.
Music intro (for Audio CD only): Only playbacks the first 10 seconds of all the tracks on the current folder/disc.
• Editmode:Programoperationworksonlywhen"Editmode"isselected.
• Program view:To view tracks/les in the "Program view" list. It is disabled when the "Program view" list is
empty.
• Addtoprogram:Addles/trackstothe"Programview"list.Itisdisabledifthe"Editmode"isnotselected.
• Browserview:Toviewles/tracksintheoriginalviewlist.
• Clearprogram:Deletetheles/tracksinthe"Programview"list.
Select a file/track or more you want to delete in complete stop mode (press the STOP button twice)." " will
appear beside the deleted file/track.Select "Clear program" and then press the ENTER button.It is disabled if the
"Edit mode" is not selected.
Note: The program will be deleted if the STOP button is pressed twice, the disc door is opened, or selected files
are deleted by selecting "Clear program".
PLAY MODES FOR CD OR JPEG DISC
Table of contents
Other gfm Portable DVD Player manuals