Gigabyte AirCruiser GN-BR401 User manual

1
The GN-BR401 User s Guide
Table of Contents
1. Product Introduction
1-1.About thisProduct
1-2.Accessories
1-3. Specifications
1-4.LED Status
2. SystemConnection & Installation
2-1. ADSL/CableModem Requirement
2-2. PC Hardware Requirement at CustomerEnd
2-3. ConnectionforEthernet User
2-4. Connectionfor USB Port User
3. Configuration
3-1. Preparation
3-2. Setup at yourPC End
3-3. SettingtheBroadband Router
3-4.Logout
4. Status
5. Change Password
6. Change MAC address
7. Firmware Upgrade
8. Instructionof Using SpecialApplication
8-1. Instructionof Using DMZ
8-2. Instructionof Using Netmeeting
9. Instruction ofUsing VirtualServer
10. Troubleshooting
11. Appendix A. GN-BR401 Functional Diagram
B.USB DriverInstallation
•PDF •••• •••••• PDFhttp://www.fineprint.com

2
1. Product Introduction
1-1 Aboutthis Product
Firstly,thankyou for usingGigabyte GN-BR401 BroadbandRouter. This product has
high-performance transmissionrate, andadditionally integrates simple setup interface to
enable you toeasilycompletebasic setupprocedures innotime before using thisproduct.
1-2 Accessories
- Gigabyte GN-BR401Broadband Router x 1
-Adapter (5V, 2A) x 1
-User s Guide x1
-CD (includingUser s Guide andSoftware) x1
-RJ45 Network Cable (Cross-Over) x 1
1-3 Specifications
GN-BR401
Quantity
Description
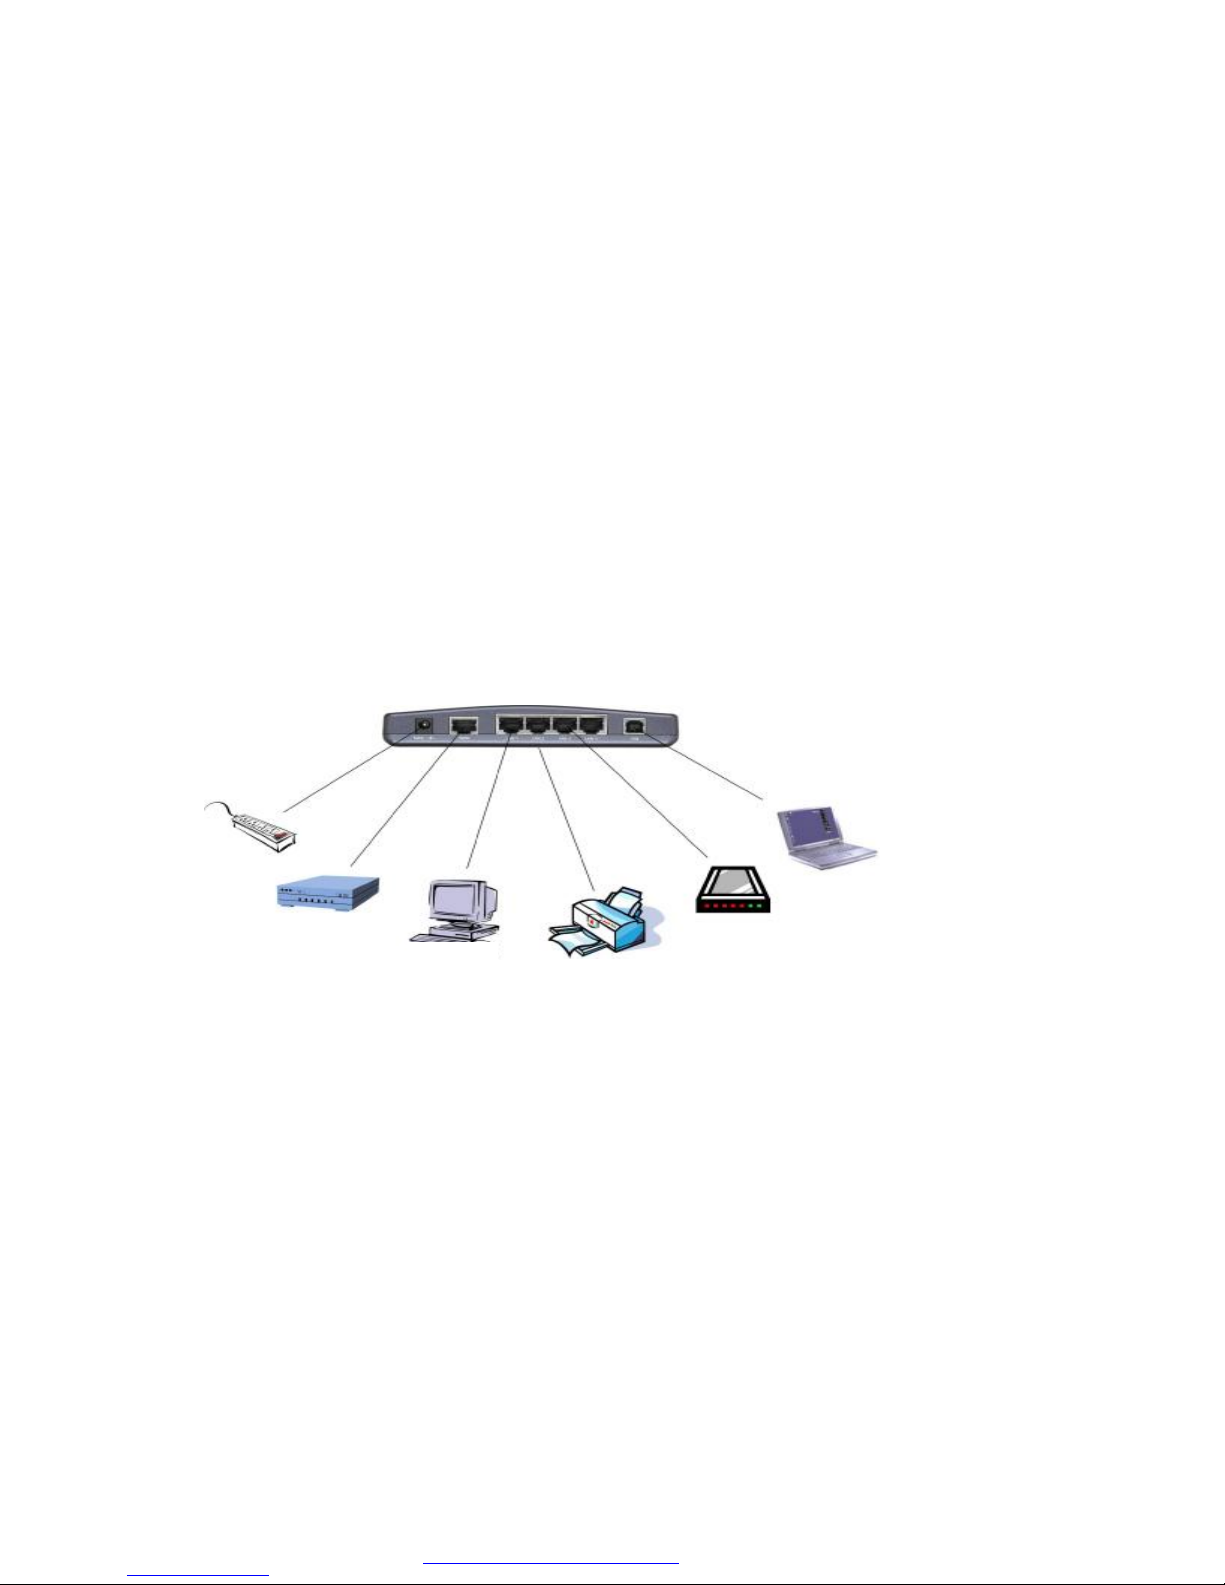
LAN 4 10/100 Mbps, RJ-45 InsertHole
USB 1 USB(B type) Insert Hole
WAN 1 10/100 Mbps, RJ-45 InsertHole
1-4 LED Status
LED Status Indication
Power Lit GreenLight Power on
Status BlinkingRed Light,
and ThenGoingOut The blinkingredlight indicatesthatthe
GN-BR401 is beinginitialized.Whenthe
blinkingredlight goes out, itindicatesthe
completionofthe initialization.
Lit GreenLight ADSL/Cable Modem is connectedto WAN port.
WAN BlinkingGreenLight Transmit orreceive data viathe WAN port.
Lit GreenLight 10/100 Mbps Network Connection
LAN1 BlinkingGreenLight 10/100 Mbps Data TransmissionRate
Lit GreenLight 10/100 Mbps Network Connection
LAN2 BlinkingGreenLight 10/100 Mbps Data TransmissionRate
Lit GreenLight 10/100 Mbps Network Connection
LAN3 BlinkingGreenLight 10/100 Mbps Data TransmissionRate
Lit GreenLight 10/100 Mbps Network Connection
LAN4 BlinkingGreenLight 10/100 Mbps Data TransmissionRate
•PDF •••• •••••• PDFhttp://www.fineprint.com

3
2. System Connection & Installation
- The following lists the requirements for the hardwareinstallation
-
2-1. ADSL/CableModem Requirements
It needs tohave ADSL/Cable Modem with RJ-45 connectors.
2-2. PC HardwareRequirement at thePC End
It needs a PC withEthernetcardconnection, or PC with USBPort.
The DiagramShowingthe Ways of Installing the GN-BR401
ADSL/Cable
Modem
PC
Switch/Hub
Printer
(Having network
connection port)
Power
Socket
USB Port
•PDF •••• •••••• PDFhttp://www.fineprint.com

4
2-3. ConnectionforEthernet User
Step 1.Please prepare an Ethernet cable (RJ- 45) first.
Step 2.Connectthe Ethernet cable totheWAN port of the GN-BR401.
Step 3.Connectanendof the networkcable tothe ADSL/Cable Modem of the Ethernet
connectionport.
Note:Please checkifthe light oftheWANportof the GN-BR401is lit.If not, trytouse
the crossover (RJ- 45) Ethernetcable thatcomes with thisproduct.
Step 4.Connectanyport of the area network LAN1, 2, 3, & 4 of the GN-BR401 to your PC.
Step 5.Connectthe adapter tothe powerconnection slot of the GN-BR401.
Step 6.Insert the adapter tothe power socket.
Step 7.The connectionprocedure iscompleted.
2-4. ConnectionforUSB Port User (If youuseUSB connection, pleaserefer to
this section.)
Please repeat Steps 1~3 of Section 2-3.
Step 4.Connectthe USB transmissioncable tothe USBportof the GN-BR401 and the USB port
atthe PC end.
Step 5.Please installtheUSB driver program bythe CDthat comes withthe GN-BR401.
(Please refer toAppendix B forthe installationofthe USB driver program).
•PDF •••• •••••• PDFhttp://www.fineprint.com

5
3. Configuration
3-1. Preparation
Generally speaking, using theGN-BR401 for Internetconnection needsthe ADSLor Cable
service. Weassumethatyou have already obtained theADSL/Cable servicefrom the local
telephone company or the ISP Company, and get therelated connection dataready.
Such datainclude
a.IP address provided by ISP
b.Subnet mask
c. Defaultgateway IP address
d.Domain Name System (DNS) Server IP address
- The ISP Companyprovides the abovedata.
3-2. Setup at Your PC End
An easy-to-usewebpage setup interface isdesignedon the GN-BR401,andthe usercanperform the
setup by the browser. TheGigabyte GN-BR401BroadbandRouter presets the IP address as
”192.168.1.254 ,and preset asa DHCP server Please follow the stepbelow to perform the setup under
the TCP/IP network environment. PleaseconfirmtheTCP/IP communication protocol is installed in
your computer (Windows 95/98/Me/NT). If you havenot installedtheTCP/IPcommunication protocol,
please installitnow,and then select your operating system for thesetup.
l For Windows 2000,please jump to 3-2-1.
l For Windows 95/98/Me, please jump to 3-2-2.
l For Windows XP, please jump to 3-2-3.
•PDF •••• •••••• PDFhttp://www.fineprint.com

6
3-2-1 The Settings Under Windows2000:
Step 1. Click ”Start„inthe desktopof the Windows toselect ”Settings„, and thenclick ”Control
Panel„.
Step 2. Doubleclickthe ”NetworkandDial-upConnections„.
•PDF •••• •••••• PDFhttp://www.fineprint.com

7
Step 3. Doubleclickthe ”LAN CONNECTION„.
Step 4. Click ”Properties„inthe boxunder LANCONNECTION Status.
•PDF •••• •••••• PDFhttp://www.fineprint.com

8
Step 5. Doubleclick ”InternetProtocol (TCP/IP)„.
Step 6. Please select ”Obtain an IP address automatically„and ”Obtain DNS server address
automatically„, andthenenter ”OK„.
•PDF •••• •••••• PDFhttp://www.fineprint.com

9
Step 7. Click ”Start„at the desktopof the Windows, andthen ”Program„, ”Accessories„, and
”CommandPrompt„insequence.
Step 8. Key inthe command ”ipconfig/release„inDOS mode, and thenenter.
•PDF •••• •••••• PDFhttp://www.fineprint.com

10
Step 9. Keyinthe command ”ipconfig/renew„, and thenenter.
Step 10. Keyin ”exit„,and then enter.
•PDF •••• •••••• PDFhttp://www.fineprint.com

11
Step11. In your ”IE Browser„select ”Internet Options„under ”Tools„.
Step 12. Inthis dialogue box, please click ”Connections„inthe ”LAN Settings„.
•PDF •••• •••••• PDFhttp://www.fineprint.com

12
Step 13.Please DO NOT tick all of the selection boxes. Press ”OKafter finishing with the setup,
and refer to Section 3-3 for setup of broadband router.
Note: If your ISP Company has a designated Proxy setting, keyinthe setting afteryou complete
the GN-BR401 configuration Please jump toSection3-3 to setup broadband
router.
•PDF •••• •••••• PDFhttp://www.fineprint.com

13
3-2-2. Setup Underthe Windows 95/98/Me
Step 1. Click ”Start„at the desktopof the Windows, andselect ”Settings„, andthenthe ”Control
Panel„.
Step 2. Doubleclick ”Network„.
•PDF •••• •••••• PDFhttp://www.fineprint.com

14
Step 3. UnderNetwork, doubleclickthe ”Configuration„, andchoose your appropriate setting
”TCP/IP -> and your network card„below.
Step 4. SelectIPAddress. Please select ”Obtainan IP address automatically„, and thenpress
”OK„.
Please
choose the
TCP/IPand
the name of
your network
card.
•PDF •••• •••••• PDFhttp://www.fineprint.com

15
Step 5. Inthe windowof ”Gateway„,please clear allinstalledgateways anddonot fillanyofthe
blanks, andthenpress ”OK„.
Step 6. Inthe windowof ”DNS Configuration„,please select ”Disable DNS„andthenpress ”OK„.
•PDF •••• •••••• PDFhttp://www.fineprint.com

16
Step 7. Please press ”Yes„, andreset the computer screenasfollows:
Step 8. After bootingthe computer, please click ”Start„andchoose ”Run„.
Step 9. Keyin ”winipcfg„,andpress ”OK„.
•PDF •••• •••••• PDFhttp://www.fineprint.com

17
Step 10. Inthe pulleddown menu,selectyour network card, press ”ReleaseAll„, thenpress ”Renew
All„, and thenpress ”OK„.
Step11. Please select ”InternetOptions„under ”Tools„of your IE Browser.
•PDF •••• •••••• PDFhttp://www.fineprint.com

18
Step 12. Inthisdialogue box,please select ”Connections„inthe ”LANSettings„.
Step 13.Please DO NOT tick all of the selection boxes. Press ”OKafter finishing with the setup,
and refer to Section 3-3 for setup of broadband router.
Note: If your ISP Company has a designated Proxy setting, keyinthe setting afteryou complete
the GN-BR401 configuration Please jump toSection3-3 to setup broadband
router.
•PDF •••• •••••• PDFhttp://www.fineprint.com

19
3-2-3 SetUp Under WindowsXp:
Step 1. Clickthe ”Start„atthedesktopof the Windows, andselectthe ”ControlPanel„.
Step 2. Doubleclickthe ”NetworkandDial-upConnections„.
•PDF •••• •••••• PDFhttp://www.fineprint.com

20
Step 3. Doubleclickthe ”LAN CONNECTION„.
Step 4. Clickthe ”Properties„inthe box under LAN CONNECTION.
•PDF •••• •••••• PDFhttp://www.fineprint.com
Table of contents
Other Gigabyte Wireless Router manuals

Gigabyte
Gigabyte GN-B49G User manual

Gigabyte
Gigabyte GN-B41G User manual

Gigabyte
Gigabyte GN-WMKG User manual

Gigabyte
Gigabyte AirCruiser G GN-BR01G User manual

Gigabyte
Gigabyte AirCruiser GN-BR402 User manual

Gigabyte
Gigabyte GN-B41G User manual

Gigabyte
Gigabyte AirCruiser GN-BR402 User manual

Gigabyte
Gigabyte GN-B46B User manual
Popular Wireless Router manuals by other brands

ZyXEL Communications
ZyXEL Communications NBG318S Series Firmware release notes

LevelOne
LevelOne WBR-6001 Technical specifications

Huawei
Huawei Speed Wi-Fi NEXT W06 Notes of usage

TP-Link
TP-Link Archer C7 Quick installation guide

ESA AUTOMATION
ESA AUTOMATION EW500 manual

TRENDnet
TRENDnet TEW-435BRM - 54MBPS 802.11G Adsl Firewall M Quick installation guide