Ginger Electronic ZXblast User manual

ZXblast
User manual
(C)opyright 2016,2017 by ginger-electronic com
V1 0 02/2017 ZXblast – user manual Seite 1 von 17

Contents
ZXblast.........................................................................................................................1
User manual..........................................................................................................1
Short description............................................................................................................3
Technical data/specification.....................................................................................3
Getting started...............................................................................................................4
Welcome screen.....................................................................................................4
ZXblast basics and concept......................................................................................
Double-shift key.....................................................................................................
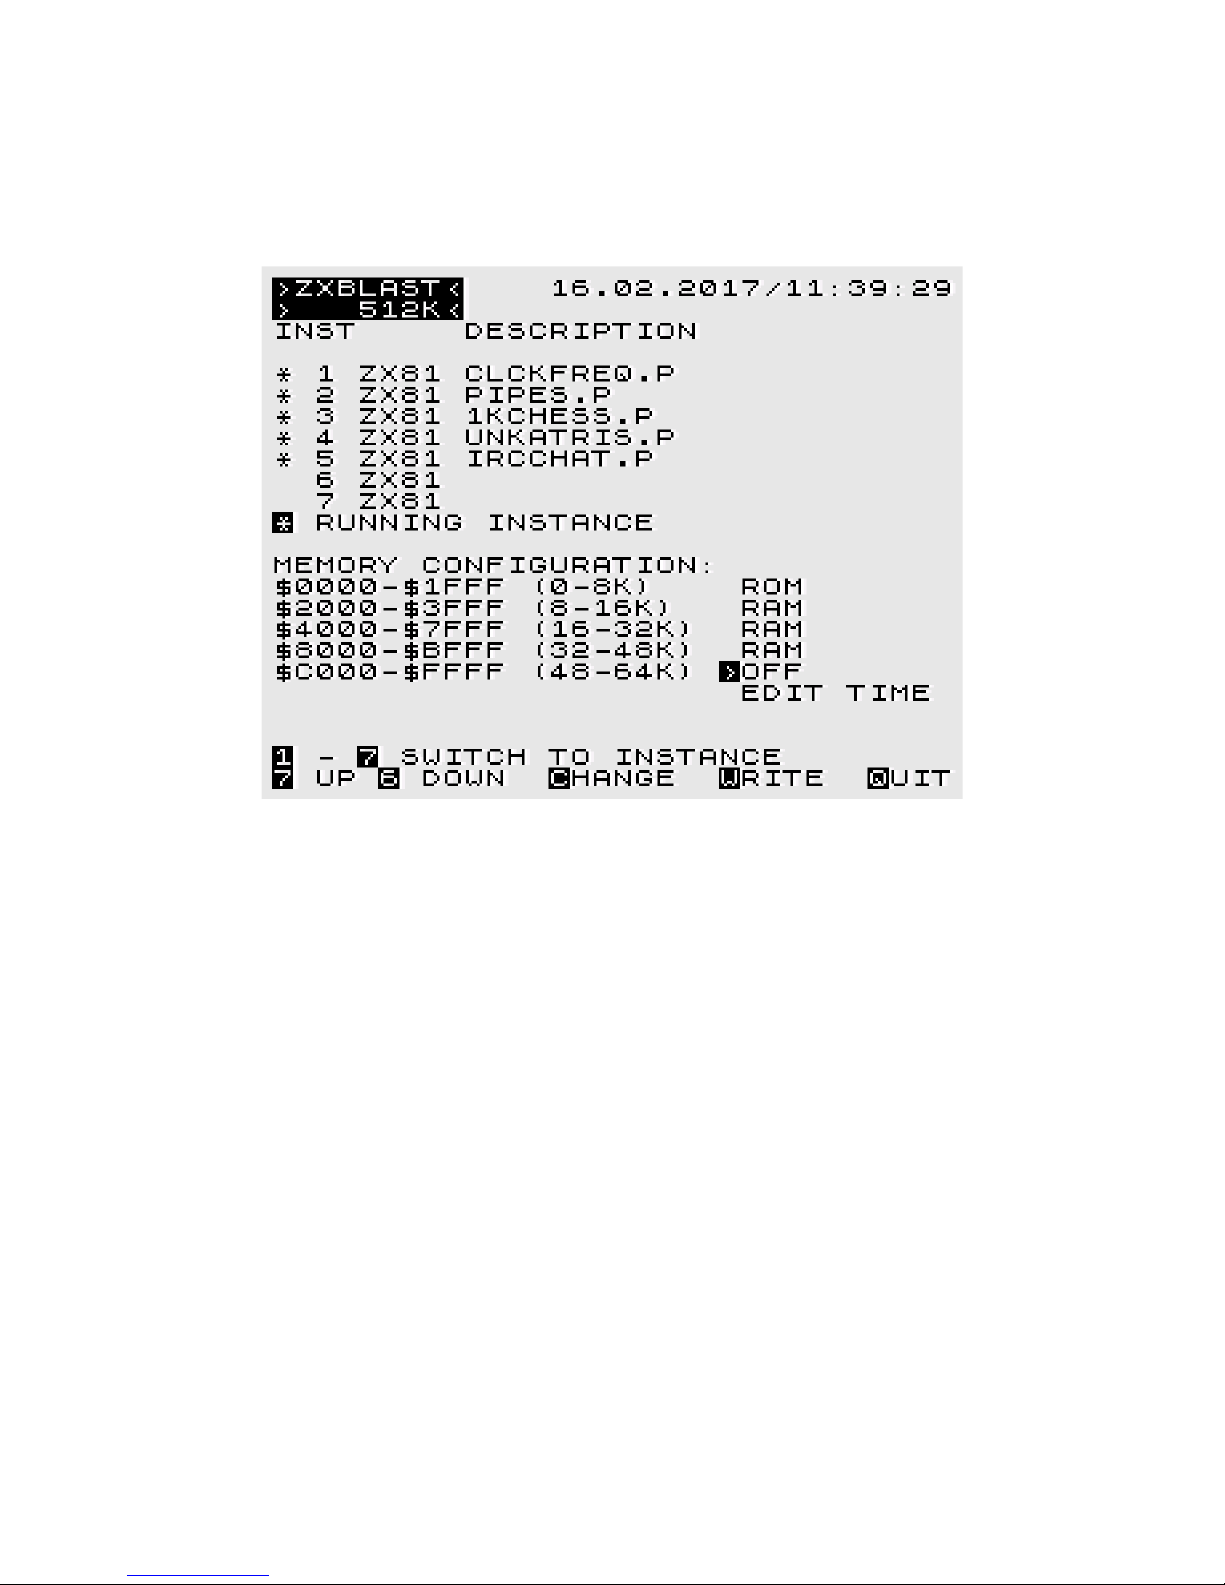
Config screen.........................................................................................................
Starting a ZX81 session..........................................................................................6
Loading a program.................................................................................................6
Configuration tool...........................................................................................................8
Changing memory configuration ..............................................................................8
Setting date and time.............................................................................................9
Tools Menu..................................................................................................................10
Loading...............................................................................................................11
Loading a program................................................................................................12
Loading data into memory.....................................................................................12
Loading data into flash rom....................................................................................12
Using a different/compatible ZX81 rom...................................................................12
Clear USB interface...............................................................................................13
Updating USB driver..............................................................................................13
Debug functions...........................................................................................................14
Debug monitor.....................................................................................................14
Hardcopies and screenshots...................................................................................14
Backup & Restore.........................................................................................................1
Instance backup...................................................................................................1
Instance restore...................................................................................................1
System backup.....................................................................................................1
System restore.....................................................................................................1
Reset system...............................................................................................................16
Reset a single ZX81 instance (by software)..............................................................16
Reset complete ZXblast (by software).....................................................................16
Hardware reset with switch (warm start).................................................................16
Hardware reset with switch (cold start)...................................................................16
Reset USB interface..............................................................................................16
Power-off system..................................................................................................16
Appendix 1 – list of key combinations.............................................................................17
V1 0 02/2017 ZXblast – user manual Seite 2 von 17

Short description
ZXblast is a memory expansion and a USB mass storage interface for the ZX81 and compatible
computers for loading and storing programs and data. It offers 128k or 12k RAM depending
on version and is configurable to enable and disable several memory areas to achieve a
maximum of 6k RAM while the first 8k is used for the ZX81 rom.
ZXblast offers additionally 128k or 12k flash rom for loading different/modified ZX81
compatible ROMs or combined with additional and/or different drivers. The 12k version allows
also to start up to 7 different programs concurrently while only the active or visible is executed
and the others are in halted state. It is possible to switch between the programs (called
instances) with simple keystrokes.
An additional feature is to activate paging with pagesize of 8k or 16k RAM with page window
anywhere in memory. This is mainly a developer feature as there was never a standard for
paging or ram banking and programs using this feature are hard to find at all.
The 128k version allows to start one instance only but with up to 6k RAM and allows to
choose between a custom ROM with additional drivers or the original internal ZX81 rom.
ZXblast has two USB ports. One is used for flash media sticks to load and store programs or
data and a second one for connecting other USB hardware like joysticks, keyboards, or similar.
This is a feature to be used in future. ZXblast has additionally a battery backuped real time
clock (RTC) to provide a correct time stamp when saving programs or datafiles. It takes it's
power from an own voltage regulator from the 9V of the ZX81 to avoid additional heat to the
internals of the ZX81.
The 128k or 12k flash ROM can be programmed with the ZXblast itself and some internal
tools. ZXblast is full compatible to HRG (high resolution graphics by software) and allows
execution of machine code (assembly) in the memory region above 32k but below 48k (called
M1NOT mod).
Technical data/specification
Flash ROM 128k or 12k
RAM 128k or 12k
USB 2 Ports
I/O address bit used A3 (optional A4,A ,A6 or A7)
Power Supply 9V over expansion port
4 mA for ZXblast only
(plus USB devices used)
Memory configurations 16k, 24k, 32k, 40k, 48k, 6k RAM
Extras RTC (real time clock)
paging/banking up to 448kByte
with 8k or 16k window anywhere in memory
Features HRG high resolution graphics from memory
M1NOT (program execution >32k and <48k RAM)
V1 0 02/2017 ZXblast – user manual Seite 3 von 17

Getting started
The ZXblast can be easy attached to the expansion port with the extender board to original
ZX81 systems.
Please remove power always before attaching or removing this module (!)
Please be careful when plugging it into the expansion port with not too much force and slowly
and respect the keyway on ZXblast and ZX81. It should fit easy and with reliable contact. Be
sure there is no wobble when slightly touching the ZXblast. Too bad if programs will crash
during accidently touched with no good electrical contact.
Be sure, that the base address (J6) is jumpered to A3. This can be changed with the ZXblast
update utility only in case of i/o address conflicts.
Welcome screen
When attaching power the welcome screen is shown instead of the standard ZX81 cursor.
The welcome screen prints the software release and date and can be skipped by pressing any
key. Pressing L will try to restore a previous system backup, see section „backup & restore“
for more details.
The welcome screen can be forced by pressing double shift R in configuration screen or by
pressing the reset button while holding the shift key or alternatively power-up the system by
pressing the shift key. See more details in section „reset“.
Whenever the ZXblast is not working after power-up or reset it is recommended to hold the
shift key during power-up or during reset for a complete reset (cold start) while the reset
button tries a partly reset only (warm start).
V1 0 02/2017 ZXblast – user manual Seite 4 von 17

ZXblast basics and concept
ZXblast controls a ZX81 while switching the internal /ROMCS signal and starts with its own
firmware instead of the standard ZX81 basic rom. The internal RAM is switched off totally and
the RAM of ZXblast is used instead. It is possible to configure RAM and ROM configuration
depending on user request with up to 6k RAM if desired.
The 12k flash rom and 12k ram is divided into 8 instances while the first 64k ROM and RAM
is used for ZXblast control functions (instance 0). The rest of ROM and RAM is used for up to 7
instances. There is a full overlap of ROM and RAM while the configuration defines the usage of
ROM or RAM in several address areas. This allows to start up to 7 programs or sessions in
parallel while only the active instance/session is executed and the other halted. The user can
switch from one instance to another instance (session) with a simple key combination.
Double-shift key
To use ZXblast functions from a ZX81 session a special key combination is used, called double-
shift key. For a double-shift key function the shift key has to be pressed twice consecutively,
followed by a third key. To load a program from a ZX81 using the ZXblast USB port the
double-shift L is used. The shift key has to be pressed twice, followed by the letter L. The
pause between this key combination must not exceed one second otherwise the double shift
function is aborted.
This key combination allows control of ZXblast functions from any ZX81 session without
harming programs. The double shift is not used and ignored from the internal keyboard driver.
Functions in ZXblast configuration tool (instance 0) can be used without double shift, this
feature is reserved for controlling functions from ZX81 session only.
Config screen
After pressing „any key“ the config screen is shown with several data fields to see which
instances are started, which programs are loaded and how the memory is configured. The
picture below shows the config screen after system startup. The config screen shows the
memory configuration, running ZX81 instances (sessions) and the last loaded program in the
field description.
V1 0 02/2017 ZXblast – user manual Seite 5 von 17

Starting a ZX81 session
A ZX81 session is started in a specific instance (1-7) with pressing directly the digit 1-7 in the
ZXblast config screen or alternatively using the double-shift combination with 1-7. The double
shift 1-7 can be used for direct switch from one session to another. If a session is not started
yet it will be started automatically with doing the internal RAM test and showing the typical
BASIC input cursor „K“.
The ZX81 session can be used normally while the ZXblast session is always listening in the
background for double-shift key combinations to request several ZXblast functions like loading
or saving a program. The return to ZXblast config screen can be done with double-shift 0.
Loading a program
A program is loaded with double-shift L from the ZX81 session. It switches automatically
temporarily to ZXblast instance, start the loader tool and request the user to enter the
program file to be loaded. After loading the program file the ZXblast switches back to the
specific session and starts the program if it was saved with autostart option (ZX81 BASIC
feature).
Otherwise the loaded program has to be run with RUN from the command line. Be aware that
RUN clears all variables so there are programs which should be started with GOTO 0 instead.
This is depending on the program.
The loader offers additional features which are described in a special section in the manual in
more detail. The next picture shows how the program CLCKFREQ.P is loaded into a ZX81
session.
Be sure that the USB flash media is inserted in the upper USB port as the lower port is used
for peripherals only. If the flash media is not present or file not found a corresponding error
message is shown.
V1 0 02/2017 ZXblast – user manual Seite 6 von 17

After entering the filename and loading the program the ZXblast switches back to the ZX81
session and executes the program loaded to memory before.
Saving a program is done in the same way by pressing double-shift S instead and entering the
filename to be used to save.
V1 0 02/2017 ZXblast – user manual Seite 7 von 17

Configuration tool
The config tool can be reached any time with DS-0 or pressing any key after power-up. This
screen gives information about system status and settings and allow to change settings as
well. In the upper left corner the used version is displayed – either 12k or 128k for the
smaller version of ZXblast. In the right corner the date and time is displayed and below the
available instances and if they are started already (marked with *) and the last loaded
program.
Changing memory configuration
The memory configuration can be changed easily with pressing E (for edit) and a cursor is
displayed to the adress area and can be moved with key up (7) and key down (6). The value
of the cursor can be changed with C (change) and toggles through available values.
In the memory configuration ROM means flash rom is activated or RAM can be activated as
well. There is a third option OFF available to leave a memory area free of use which may be
used from additional interfaces or modules attached to the expansion port.
The memory configuration can be stored for next power-up while pressing W (write) which
stores this information onto a special area in ZXblast flash rom. The memory configuration
affects all instances or sessions, it can not be set individually for specific sessions.
Mostly additional 8k RAM is expected from some programs or games in the area $2000-$3FFF
but it is also possible to program additional drivers here into the flash rom to be used. After
startup a ZX81 session the memory is detected between 16k and 32k and not above 32k.
To use more memory it is recommended to execute following sequence after starting ZX81:
POKE 16389,255
POKE 16388,255
NEW
V1 0 02/2017 ZXblast – user manual Seite 8 von 17

Due to hardware restrictions of ZX81 the area above 48k can be used for data and BASIC stuff
only. This area is typically used for HRG (high resolution graphics data) as well. Machine code
(assembly programs) will usually crash the system as the video display is active in this area.
The area between 32k and 48k can be used for additional drivers in machine code/assembly as
ZXblast offers the M1NOT modification.
Setting date and time
When the ZXblast is build up by yourself from the construction kit it is necessary to set date
and time first. But there may also time settings be necessary as the inbuild real time clock
(RTC) is running from battery when powered off but not highly accurate. Typical a difference
from one second a day could be expected to the offical date/time.
Setting is done in the config screen with pressing E for edit, moving the cursor down to EDIT
TIME and pressing C for change. Now the date and time is displayed with a cursor and can be
entered. There is a simple validation routine which detects nonsense data but it is
recommended to enter a valid date/time.
If the time need to be corrected only you may press just NEWLINE for every digit which moves
the cursor one position to the right and leave the content untouched for example to just set
minutes and seconds. When pressing the last digit the date/time is automatically saved and
the edit tool closed. So for a precise time it is recommended to enter the time a few seconds in
future and press the last digit or NEWLINE while watching the clock and waiting for a manual
sync with the keyboard.
No problem if you missed the wrong time or entered nonsense data – this step can be
repeated as often as desired.
V1 0 02/2017 ZXblast – user manual Seite 9 von 17

Tools Menu
There are different tools provided with ZXblast to control the system in more detail,
programming flash rom, watching RAM contents and different things more. All are available in
the tools menu which is available while pressing T in the config screen of ZXblast instance.
V1 0 02/2017 ZXblast – user manual Seite 10 von 17

Loading
Usually loading data is called directly from an instance (ZX81 session) with pressing DS-L
which switches temporarily to ZXblast instance 0, access the loader, loads a entered program
while reading it from USB flash disk and write it into memory from location $4009 and setting
the system up in the same way the LOAD basic command does. The basic LOAD routine is not
hooked in any way, it is a parallel way to load programs, the audio LOAD function via EAR
(tape) is still exisiting and working.
When the loader is called from an ZX81 instance it's context is saved (instance number) and
automatically loaded at the desired address ($4009) into memory and system setup. If the
loader is called from the tools menu the desired instance and address have to be setup
manually by user with additional parameters. This is more complicate but more powerful on
the other hand also. If several loading steps have to be done manually to setup the session
correctly it can be saved after preparing with the backup mechanism later (see section backup
& restore).
To execute a load command first the filename has to be entered. All filenames have to be in
8.3 format with 8 letters/digits for the filename and followed by 3 letters/digits for the
extension. LFN (long filenames) are not supported by ZXblast firmware. If you copy programs
with long filenames to a USB flash media the filename may have to be shortened first to be
found from ZXblast. ZXblast supports USB flash media with FAT16 or FAT32 only, FAT32 is
recommended.
Special characters may be used as well as long as they are valid for a 8.3 filename.
Allowed chars in filenames are:
A-Z, 0-9, ! # $ % & ' ( ) - @ _ ` { }
A typical program has the extension .P like ZX81DEMO.p – anyway all extensions may be
used for load and save with one exception .BAK this is used for complete instance backups,
see section backup & restore for more details. The extension can be used freely but it is
recommended to use .P to mark it as an executable ZX81 program.
V1 0 02/2017 ZXblast – user manual Seite 11 von 17

Different parameters like address and instance are separated with a double colon. Most
functions can be called from either instance 0 using foreign instance as target or directly from
one instance and specifying a target address.
Loading a program
If just a filename with extension .p is entered from a ZX81 instance then the program is
automatically loaded to address $4009 with it's full size and the system is prepared to start the
program and pointers/system variables are set correctly to execute this program.
ZX81DEMO.P
If the program was stored with AUTOSTART option it will be automatically started, otherwise
has to be started manually. If you start it manually with RUN all eventually stored variables
will be cleared/destroyed. If a program is not running correctly this way you may try to start it
with GOTO 0 instead.
Loading data into memory
To load just a datablock into memory there is a parameter address and optional size needed.
This parameter is separated with double colon to the filename and the size is separated with
colon. If no size is specified the file will be loaded with its full size.
ZX81DATA.BIN:$8000
ZX81DATA.BIN:$8000,$300
or using decimal numbers and specifying instance 2
ZX81DATA.BIN:32768:2
ZX81DATA.BIN:32768,768:2
Loading data into flash rom
All data is loaded into RAM by default. If you want to program a driver into the flash rom, for
example to address $2000 / 8192 directly after the ROM you use following syntax:
DRIVER.BIN:$2000:1*
This will load an additional driver into the flash rom of instance 1 to the specified address and
this is stored permanently in the flash rom until it is overwritten manually. The asterisk at the
end specifies to use flash rom instead of ram.
Using a different/compatible ZX81 rom
By default the ZXblast instances are programmed with the standard ZX81 rom or lets better
say it's open source variant open81.rom. To use a compatible but different rom or an own
modified rom it can be simply flashed to address 0.
SYS.ROM:0:1*
V1 0 02/2017 ZXblast – user manual Seite 12 von 17

Clear USB interface
If the system crashes for any reason, there maybe data waiting at the USB port which is not
completely read and could confuse further USB communication. You could very this with the
version info string, displayed in the first line. It states the release (here 20 for 2.0) and the
date like 01.2017 for january 2017.
If the version info string is corrupted, there is likely some data waiting to be read first. To
solve this situation it is possible to just enter NEWLINE with an empty filename which reads up
waiting data and returns to the caller. Try again to LOAD or SAVE and the version string should
be displayed correctly. You could also power-off the ZX81 for a few seconds. Try to power-on
with pressed shift key for a full reset in that case.
Saving a program
This is comparable to loading a program, it is just initiated with DS-S for SAVE from a running
instance. The simpliest way is to enter just a filename and use .P extension for complete
programs (but this is just a convention). Avoid using extension .BAK as this is used for backup
of complete instance, see backup & restore section for more details.
Saving a datablock
It is also possible to save just a datablock and to specify the start address and the size of the
block like shown in following example:
MEMORY.DAT:$8000,$1000
This will save a 4kB data block ($1000) from address $8000 beginning.
Updating USB driver
It is possible to update the internal USB driver which is referred in the first line of LOAD or
SAVE like
20/01.2017
This means release 2.0 with creation date of 01.2017 is installed currently. This can be
updated while copying a new driver to the USB flash media and use the update command like
shown below. This command can be issued only from instance 0 over the TOOLS menu with
LOAD option.
ZXMUPD21.ROM:U*
Caution: As this is a critical step please follow these safety rules first.
1. Make a complete restart of ZXblast (power-on) and do not start ZX81 sessions
2. Be sure that the hardware is running safely and no wobble effect (all connections are
properly)
3. The message „Try to update USB“ will appear and after it will go back to the config screen
4. Wait at least 30 seconds to let the update utility do it's internal work
. Power-off the system after this time and check the new version string when accessing the
loader again over the TOOLS menu.
V1 0 02/2017 ZXblast – user manual Seite 13 von 17

Debug functions
Debug monitor
There is an internal debug monitor available in the tools menu to inspect memory areas. The
debug monitor allows display of memory contents only in this version, modifying is not
supported by now. All data is displayed hexadecimal (2 6 bytes per screen) and can be paged
forward and backward using the keys 6 and 7.
A new address can be specified by pressing A and entering the new address either decimal or
hexadecimal with a preceeding $ sign.
By default the RAM contents of ZXblast instance 0 is shown. This can be changed with key I for
specifying a new instance (1-7). It is normal that paging down or up results in flickering of the
display as it is necessary to stop the video output shortly.
Inspecting memory contents is mainly a developer function only which might not be useful for
normal users.
Hardcopies and screenshots
This is an experimental feature and helped to write this documentation. Up to 1 screenshots
or hardcopies can be taken with DS-H and stored in memory of instance 0. Calling the function
HARDCOPIES TO DISK will create a ZX81 program with a minimal text viewer and all
screenshots made in memory.
It's main purpose is to be copied onto a computer, loaded into an emulator and make a
hardcopy of the screen to be processed further. There might be more convenient features like
directly generated BMPs in future and support graphics (HRG, high resolution graphics) as well.
For using this feature a framework is needed called ZX81HCOP.DAT and has to be copied to
the USB flash media. The hardcopy file can be stored with any name, probably .P extension
would be most helpful to execute this file directly in an emulator.
V1 0 02/2017 ZXblast – user manual Seite 14 von 17

Backup & Restore
One of the powerful ZXblast features is to backup a single instance file or at least make a
complete system backup to continue the work later at the interrupted point. All CPU registers
are saved and the whole memory content and stack pointer and can be loaded at a later point
of time to continue exactly where the program was interrupted before.
Instance backup
This is done simply with save function (DS-S) from any ZX81 instance and choosing the
extension .BAK for a backup file. This file will be stored then with all context information and
memory from $2000-$FFFF ($E000 size).
MYWORK.BAK
This feature can be used to save a long running program or a played game at a specific level
to be continued later. It can also be used to clone an instance like copy instance 1 to instance
2 or 3 for example. Instance files can be interchanged between different users as well or be
used to find some bugs.
As instance backup has more data to store via USB there is a small flicker and the video screen
will disappear for 1-2 seconds and come back again.
Instance restore
Instances can be restored later simply by loading a .BAK file when calling the USB loader. If
the extension .BAK was found it will be completely copied back to instance ram, restore all
registers and continue at the interrupted position (program counter, PC).
An instance restore takes about 1-2 seconds to be restored as this has to be done with video
screen switched off shortly. The screen may flicker.
System backup
A system backup can be done via the TOOLS menu in instance 0 only. It scans all active
instances (if more than one is started) and saves all instance data in one big file:
ZXBLAST.BAK
Please take note that the system backup may take a longer time with video screen switched
off as there is more data to store. It takes approx. 2 seconds per instance and can reach up to
1 seconds if all 7 instances are backuped.
System restore
A system restore can be done in two ways: Choosing the RESTORE SYSTEM option from the
tools menu manually. Or shorter using the keystroke L when the ZXblast welcome screen is
shown after power-up. The welcome screen can be forced when pressing DS-R in the config
screen without powering off.
Restoring all instances will result in longer periods with no display (switched off temporarily)
and can be calculated with approx. 2 seconds per instance or up to 1 seconds for all
instances.
V1 0 02/2017 ZXblast – user manual Seite 15 von 17

Reset system
There are several ways to reset the system by software and hardware. It is recommended to
try a reset if the system hangs.
Reset a single ZX81 instance (by software)
A software reset can be simply done with key combination DS-R in the currently running
ZX81 instance/session. This will reinitialize the ZX81 session beginning with a RAM test and
cleared display and showing the standard input cursor K. A reset will clear all data of that
instance but leave all other instances untouched.
Reset complete ZXblast (by software)
When DS-R is pressed in the config screen, the ZXblast is resetted by software. This results in
all ZX81 session data lost and start the ZXblast completely new and clearing all data in
memory. In fact not all data is cleared – the ZX81 sessions are still present and the memory of
every instance kept untouched unless ZX81 instances are started/initialized new.
So developer could save important RAM data of instances to some files using the storing
memory block function.
Hardware reset with switch (warm start)
ZXblast has a reset switch which can be used in case of complete system hang. There might be
situations where the double shift keys do not work anymore due to a complex hang up. In this
situation the reset switch can be used to come back to the ZXblast config screen. The last used
ZX81 session is lost as context data like registers, stack pointer or program counter are
unknown. But all halted ZX81 sessions are still accessible because the context information was
stored before when they are interrupted.
Hardware reset with switch (cold start)
There is a simple routine inside of ZXblast to detect if the system was rebooted (warm start)
or new powered-up. RAM contents is checked for this purpose. This is not reliable under all
conditions and there might be situations where a warm start is tried but failed to modified RAM
contents not detected by the firmware.
So there is a way to force a cold start while pressing the shift key and reset switch together or
pressing shift key and power-up at the same time (with pressed shift key). This way should
bring back the system safely if accidently a warm boot is detected but RAM contents partly
lost.
Reset USB interface
There can be also situations of an unclean USB interface with waiting data at the USB port
from a previous aborted USB command due to a system crash. This can be detected easily by
watching the displayed version string on screen when using LOAD or SAVE. The USB interface
can be cleared by entering an empty filename which leds the system read all unread and
waiting data.
It returns after 1 or 2 seconds and the USB interface should be ready again when the USB
functions are accessed again (LOAD/SAVE) with correct version message.
Power-off system
Finally if the system is not easy to bring back to work the power should be disconnected for at
least 10 seconds and powered-up again with pressed shift key to force a cold boot of the
system. If this doesn't help either check the correct seat of the edge connector or try to
remove and reattach the ZXblast interface (with no power of course !).
V1 0 02/2017 ZXblast – user manual Seite 16 von 17

Appendix 1 – list of key combinations
DS stands for double-shift key, please see section Getting started for more details about
entering double-shift key combinations.
DS-0 return to ZXblast master/config program
DS-1 switch to instance 1 (or 2,3,4, ,6,7 alternatively)
DS-L load a program from USB flash media in active instance
DS-S store a program to USB flash media from active instance
DS-R reset instance (complete system reset when pressed in ZXblast instance 0)
DS-H do a screenshot/hardcopy of the currently shown display
(see section Debug functions for more details)
V1 0 02/2017 ZXblast – user manual Seite 17 von 17
Table of contents
Popular Motherboard manuals by other brands

Atmel
Atmel SAM C21 Xplained Pro user guide

Texas Instruments
Texas Instruments DP159RSB user guide

Sapphire Audio
Sapphire Audio IPC-AM3DD785G installation guide

Microchip Technology
Microchip Technology ATBTLC1000 Xplained Pro user guide

ROBBE
ROBBE rocontrol PRO quick start guide

Supermicro
Supermicro Super X6DHR-TG User manual addendum