Ginnys WQP6-3208-US User manual

PORTABLE
COUNTERTOP
DISHWASHER
Instruction Manual
ITEM: 733851
Ginnys.com • 1.800.544.1590

2
Ginnys.com •1.800.544.1590
IMPORTANT SAFEGUARDS
3
TABLE OF CONTENTS
Important Safeguards
3
Specifications
4
Part Names
5-6
Installation
7-8
How to Operate
9-13
Cleaning & Care
13-15
Troubleshooting
16-19
Warranty
20
READ CAREFULLY BEFORE USING & SAVE THESE INSTRUCTIONS
1. Basic safety precautions should always be followed when using your
Countertop Dishwasher, especially when children are present. This
appliance is not intended for use bychildren.
WARNING: To avoid the risk of electrical shock, always make sure the
product is unplugged from the electrical outlet before assembling, disas-
sembling, relocating, servicing or cleaning.
2. Remove and safely discard all packaging material and labels before
first use.
3. Do NOT place any heavy objects on the door, or press down, when
it is open as the appliance could tip forward. The door should not be
left open when it is not inuse.
4. When loading this appliance, you should prevent plastic itemsfrom
coming into contact with the interior walls.
5. Do NOT wash plastic items unless they are marked “dishwasher safe”
or the equivalent.
6. When loading, prevent sharp items from damaging the door seal.
Knives and other utensils with sharp points must be loaded in thecutlery
basket with their pointsdown.
7. Do NOT operate unless all enclosure panels are properly in place.
Open the door very carefully as there is a risk of water squirtingout.
8. Use only detergent and rinse aids designed for an automatic
dishwasher. NEVER use laundry detergent or hand washing soap
in your dishwasher. Keep these products out of the reach of children.
9. If the appliance or power cord is damaged or malfunctions, callthe
Ginny’s toll-free number for replacement or return:800-533-1590.
10. Use this dishwasher only for its intendedpurpose.
11. DO NOT use this applianceoutside.
Thank you for purchasing your Portable Countertop
Dishwasher by Ginny’s. This quality appliance gives
you the luxury of a dishwasher in a portable, compact size for
everyday use. You’ll enjoy its many benefits for years to
come, from saving time and energy to reduced kitchen
clutter, and the easy control panel with multiple settings and
digital display. And perhaps most of all, you’ll savor the peace
of mind that comes with a clean you just can’t get from hand
washing. Enjoy!

SAVE THESE INSTRUCTIONS
No user-serviceable parts inside. A short cord is provided to
reduce the hazards resulting from entanglement or tripping over a
long cord. The cord should not be allowed to drape over thecounter
or tabletop where it can be pulled on by children or trippedover.
SPECIFICATIONS
4
IMPORTANT SAFEGUARDS
Ginnys.com • 1.800.544.1590
5
CONTROL PANEL
1. Power On Light: To come on when Power ON/OFF button is
pressed down.
2. ON/OFF Button: Toturn on/off the power supply.
3. Rinse Aid Warning Light: Tobe on when the rinse aiddispenser
needs to be refilled.
4. Program Indicator Light: When you select washing program, the
corresponding light will display.
5. Program Indicator Button: When you press washing progam
button, the corresponding light will display.
6. Start/Reset Button: Press this button to start or pause the
dishwasher. The indicator light will be blinking when starting.
Model Number:
WQP6-3208-US
Cord Length:
72” (+/- 6”)
Outside Dimensions:
21-1/2”L x 19-1/2”D x 17-1/4”H
Cavity Dimensions:
8.7”H x 13.4”W x 12.6”D
Power Consumption:
120V/60Hz 680W
PART NAMES
FOR HOUSEHOLD USE ONLY

6
Ginnys.com • 1.800.544.1590
INSTALLATION
7
PART NAMES...cont.
FRONT
BACK
INSTALLATION
POSITIONING THE APPLIANCE:
Position the appliance in the desired location. The back should not
rest against the wall behind it. The dishwasher is equipped with
water supply and drain hoses that can be positioned to the right
or the left to facilitate proper installation.
Rear of Dishwasher:
1. Drain Port
2. Power Cord
3. Inlet Port
Your dishwasher comes equipped with a ‘quick connect’ assembly
(includes inlet and drain hose). One of the faucet adapters (5) must be
installed on the faucet before you can connect the dishwasher.
The faucet adapters (5) are compatible with faucets either male (outside)
or female (inside) threaded faucet connections.
Make sure the gasket (6) is seated properly inside the faucet adapter (5).
1. DetergentDispenser
2. Cutlery Basket
3. Filter Assembly
4. Rinse Aid Dispenser/Setting
5. Spray Arms
6. Cup Shelf
7. Basket
8. Drain Pipe Connector
9. Inlet Pipe Connector
Quick Connect Assembly
1. Drain Port connection
2. Quick Connect connection
3. Inlet Port connection
4. Quick Connect connection
5. Faucet Adapters
(internal or external thread)
6. Gasket
7. Pressure Relief Valve
8. Faucet Adapter connection
9. Locking Collar
10. Inlet Hose connection
11.Drain Hose connection
1 2 3

PART NAMES...cont.
8
INSTALLATION
Ginnys.com • 1.800.544.1590
9
Push latch to open
INSTALLATION...cont.
CONNECTING THE DISHWASHER: (Refer to diagrams on page 7)
1. Remove the aerator from the faucet. Thread the Faucet Adapterwith
gasket onto (or into) the faucet tap. If leaks occur, tightenwith
vice-grips, do not over-tighten. Use thread tape if needed.
2. Connect the 6-sided connection of the drain hose (1) to the drain port
connection (1) on the back of the dishwasher cabinet. DoNOT
over-tighten (to avoid damage to the thread).
3. Connect the star-shaped connection of the inlet hose (3) to the inlet
port (3) on the back of the dishwasher cabinet. Do NOTover-tighten
(to avoid damage to the thread).
4. Connect the circular connection of the drain hose onto the longer
(bottom) male connection on the quick connect(11).
5. Connect the circular connection of the inlet hose onto the shorter (top)
male connection on the quick connect (10).
6. Attach the quick connect onto the faucet adapter by pulling down the
outer locking collar on the quick connect while pushing the quick
connect upward onto the faucet adapter.
7. When the quick connect snaps onto the faucet adapter, release the
locking collar. Verify that the connection issecure.
8. Slowly open the hot water line and check for any sign of waterleaks
at all hose connections. If leaks are located, immediately close the
water supply and repair the hoseconnections.
IMPORTANT:
Once you open the water supply line (even if it is closed immediately
thereafter), the inlet hose will be pressurized. To relieve water pressure
from inside the inlet hose (make sure the water line (faucet) is off): press
and hold the red pressure release button on the quick connect until the
flow of water stops.
WARNING:
FAILURE TO RELIEVE WATER PRESSURE BEFORE DISCONNECT-
ING THE QUICK CONNECT FROM THE FAUCET WILL RESULT IN
BACK-PRESSURE OVER-SPRAY. THE TEMPERATURE OF INCOM-
ING WATER CAN BE VERY HOT AND BACK-PRESSURE OVER-
SPRAY COULD CAUSE SEVERE BURNS AND/OR SCALDING.
BEFORE FIRST USE
Check the following before starting the dishwasher:
1. The dishwasher is level and fixed properly.
2. The inlet valve is open.
3. The hose connections on the dishwasher and faucet need to be on
tight to prevent leaking.
4. The inlet and drain hoses are notknotted.
HOW TO OPERATE
Detergent and Rinse Aid Dispensers:
TIP: If Using Detergent Tablets:
Detergent tablets of different brands dissolve at different speeds. Some
tablets cannot dissolve and develop their full cleaning power during short
cycles. Please use long cycles when using detergent tablets.
1. Detergent Dispenser: The dispenser must be filled before the startof
each wash cycle. This dishwasher uses less detergent than a
conventional dishwasher. More heavily soiled items may need more
detergent.Always add the detergent just before starting the dishwasher.
WARNING! Dishwasher detergent is
corrosive. Take care to keep out of
reach of children.
•Filling the Detergent Dispenser:
Push the latch to open. Fill with detergent. Close the lid and press until
it locks in place. Please observe any manufacturer’s warnings and
storage recommendations as stated on the detergent packaging.

10
Ginnys.com • 1.800.544.1590
HOW TO OPERATE
11
HOW TO OPERATE HOW TO OPERATE...cont.
2. Rinse AidDispenser:
The rinse-aid is released during the final rinse to prevent water from
forming droplets on your dishes that can leave spots and streaks.
It also improves drying by allowing water to sheet off the dishes.
Adjust Lever
The rinse aid dispenser has 4 settings. Alwaysstart
with the dispenser set on ‘1’. If spots and poor
drying occur, increase the amount of rinse aid dis-
pensed by removing the dispenser lidand
rotating the dial to the next highest number.
Rinse-Aid Indicator
•Filling the Rinse AidDispenser:
Open the cap and pour rinse-aid into the dispenser until the level
indicator turns completely black. This dishwasher uses less rinse aid
than conventional dishwashers.
NOTE: NEVER fill the rinse aid dispenser with any other substances
(e.g. dishwasher cleaning agent, liquid detergent). This will damage
the appliance.
•Refilling the rinse aid dispenser:
You can judge the amount of rinse aid by the color of the rinse aid
indicator located next to the cap. When the rinse aid container is full,
the whole indicator will be dark. As the rinse aid diminishes, the size of
the dark dot decreases.
TIP: Dishes you shouldn’t wash in the dishwasher:
NOT Suitable
Limited Suitability
Cutlery with wood, horn, china or
mother of pearl handles
Some types of glasses can
become dull after a large number
of washes
Plastic items that are not
heat-resistant
Silver and aluminum parts have a
tendency to discolor during
washing
Older cutlery with glued parts that
are not heat-resistant
Decal and hand painted patterns
may fade when washed in the
dishwasher frequently
Bonded cutlery items or dishes
Pewter or copper items
Crystal
Steel items subject to rusting
Wooden platters
Items made from synthetic fibers
LOADING THE DISHWASHER:
For best performance, follow
these loading guidelines.
1. Scrape off any large
amounts of leftoverfood.
2. Load items such as cups,
glasses, pots/pans, face
down.
3. Curved items, or those
with recesses, should be
loaded at a slant so
that water can run off.
4. All items should be placed
so that the spray arms can
rotate freely
during washing.
NOTE: As everyone’s dishes are different, try to use
10” diameter or smaller plates.

12
HOW TO OPERATE
Ginnys.com • 1.800.544.1590
13
HOW TO OPERATE...cont. HOW TO OPERATE...cont.
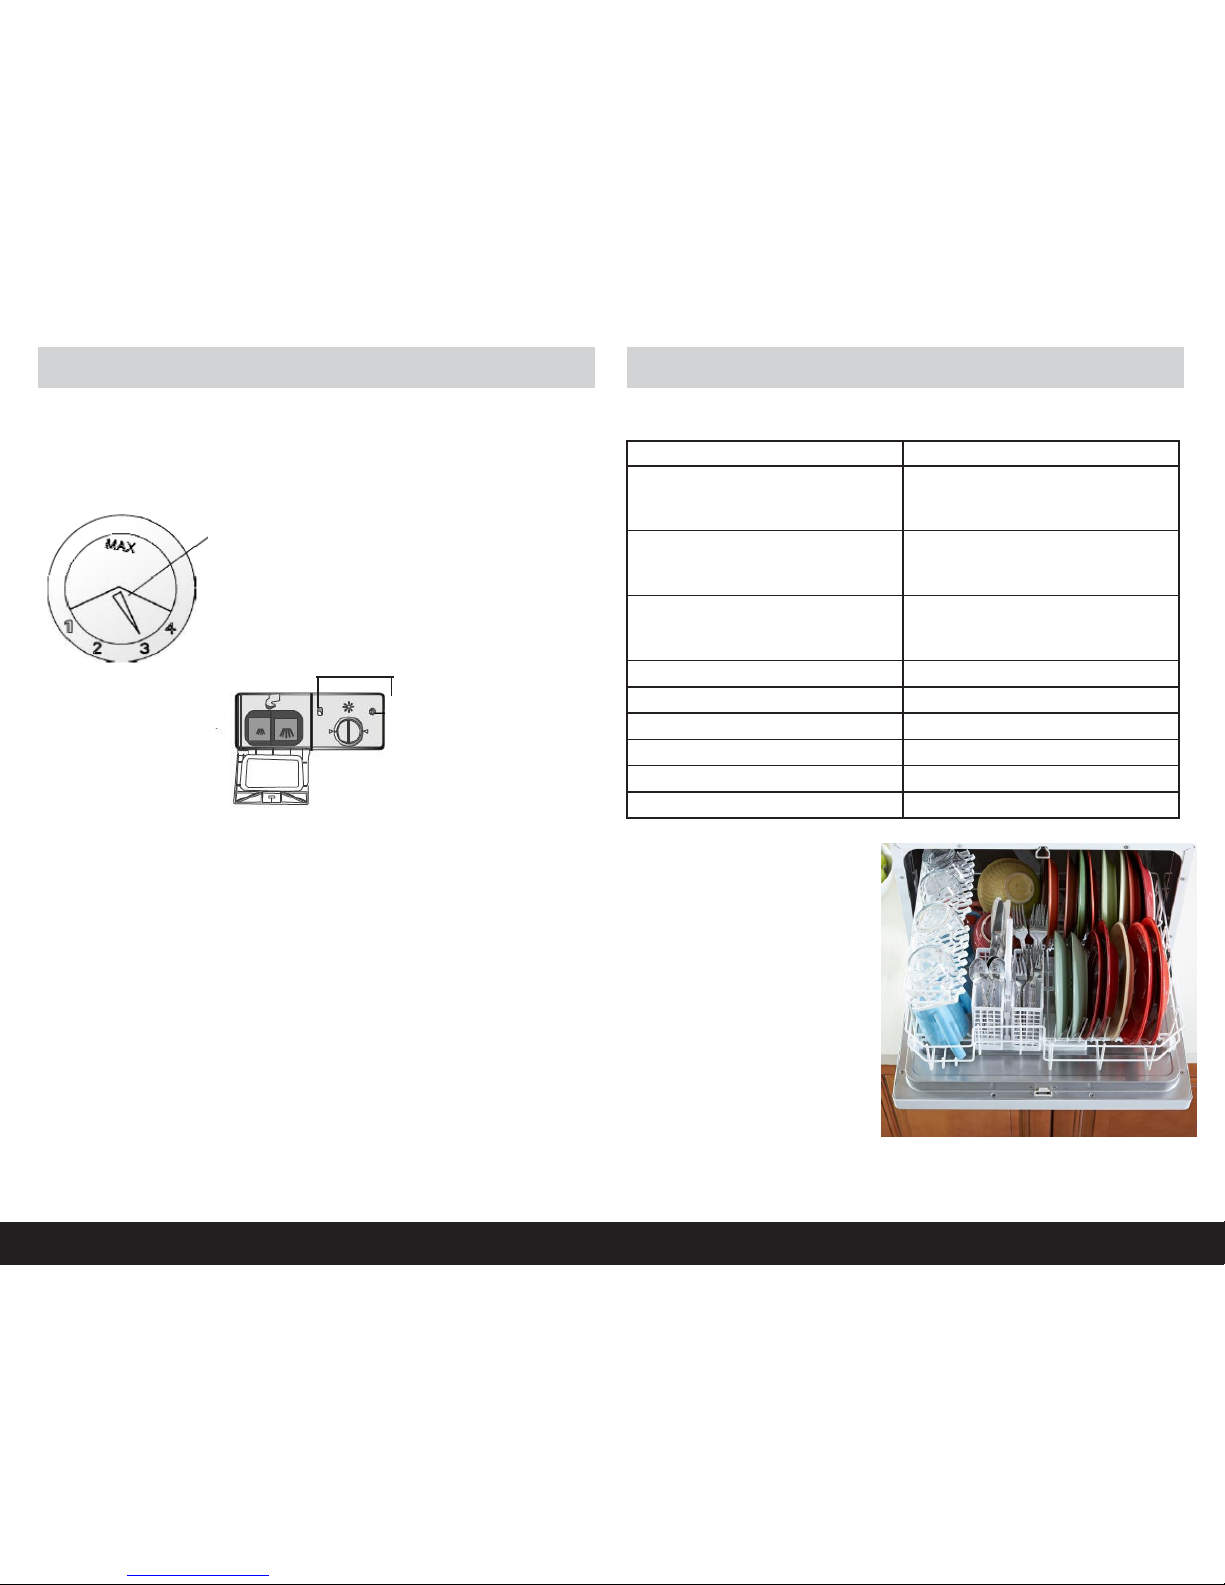
5. Dishes and cutlery must not lie inside one another, or cover eachother.
6. Toavoid damage to glasses, they must not touch.
7. Cutlery should be in the cutlery basket with handles at thebottom.
8. Put long utensils in the horizontal position at the front of the upper basket.
9. Sharp items must be loaded in the cutlery basket with their pointsdown.
10. Please do not overload your dishwasher. This is important for good
results and reasonable energyconsumption
STARTING A WASH CYCLE:
1. Add detergent and rinse aid per instructions on pages 9 & 10.
2. Load dishes per instructions on page11.
3. Plug in yourdishwasher.
4. Connect the quick-disconnect to the faucet adapter. Make sure the hot
water supply is turned on to full pressure.
5. Close the door and press ON/OFF to turn on the powersupply.
6. Select the wash cycle by pressing the Program Indicator Button.
•Heavy (pots & pans)
•Normal (dishes)
•Speed wash (glassware)
7. Then press START/RESET to start the dishwasher.
Note: When you press START/RESET button to pause during washing,
the LED display will stop blinking and the dishwasher will beep every
minute unless you press START/RESET to start.
CHANGING THE CYCLE AFTER THE WASH CYCLE HAS STARTED:
You can modify the washing cycle only if the dishwasher is early in the wash
cycle. Otherwise, the detergent may have already been released and the
dishwasher may have already drained. If this is the case, the detergent
dispenser must be refilled (see p. 9).Press “START/RESET” and hold for 3
seconds until the machine moves into standby mode. Then you can change
the program to the desired cycle setting.
ADDING A DISH AFTER THE WASH CYCLE HAS STARTED:
A forgotten dish can be added any time before the detergent cup opens.
1. Press “START/RESET” to pause
2. Open the door partially to stopwashing
3. After the spray arms stop, open the door completely
4. Add forgotten dish and close the door
5. Press “START/RESET” and the dishwasher will continue its cycleafter
10 seconds
AT THE END OF THE WASH CYCLE:
When the washing cycle has finished, the buzzer of the dishwasher will
sound for 8 seconds, then stop.
1. Turn off the appliance using the ON/OFF button, shut offthe
water supply and open the door of thedishwasher.
2. Wait a few minutes before unloading the dishwasher to avoid
handling the dishes and utensils while they are still hot andmore
susceptible to breakage. They will also drybetter.
3. Unplug thedishwasher.
CLEANING ANDCARE
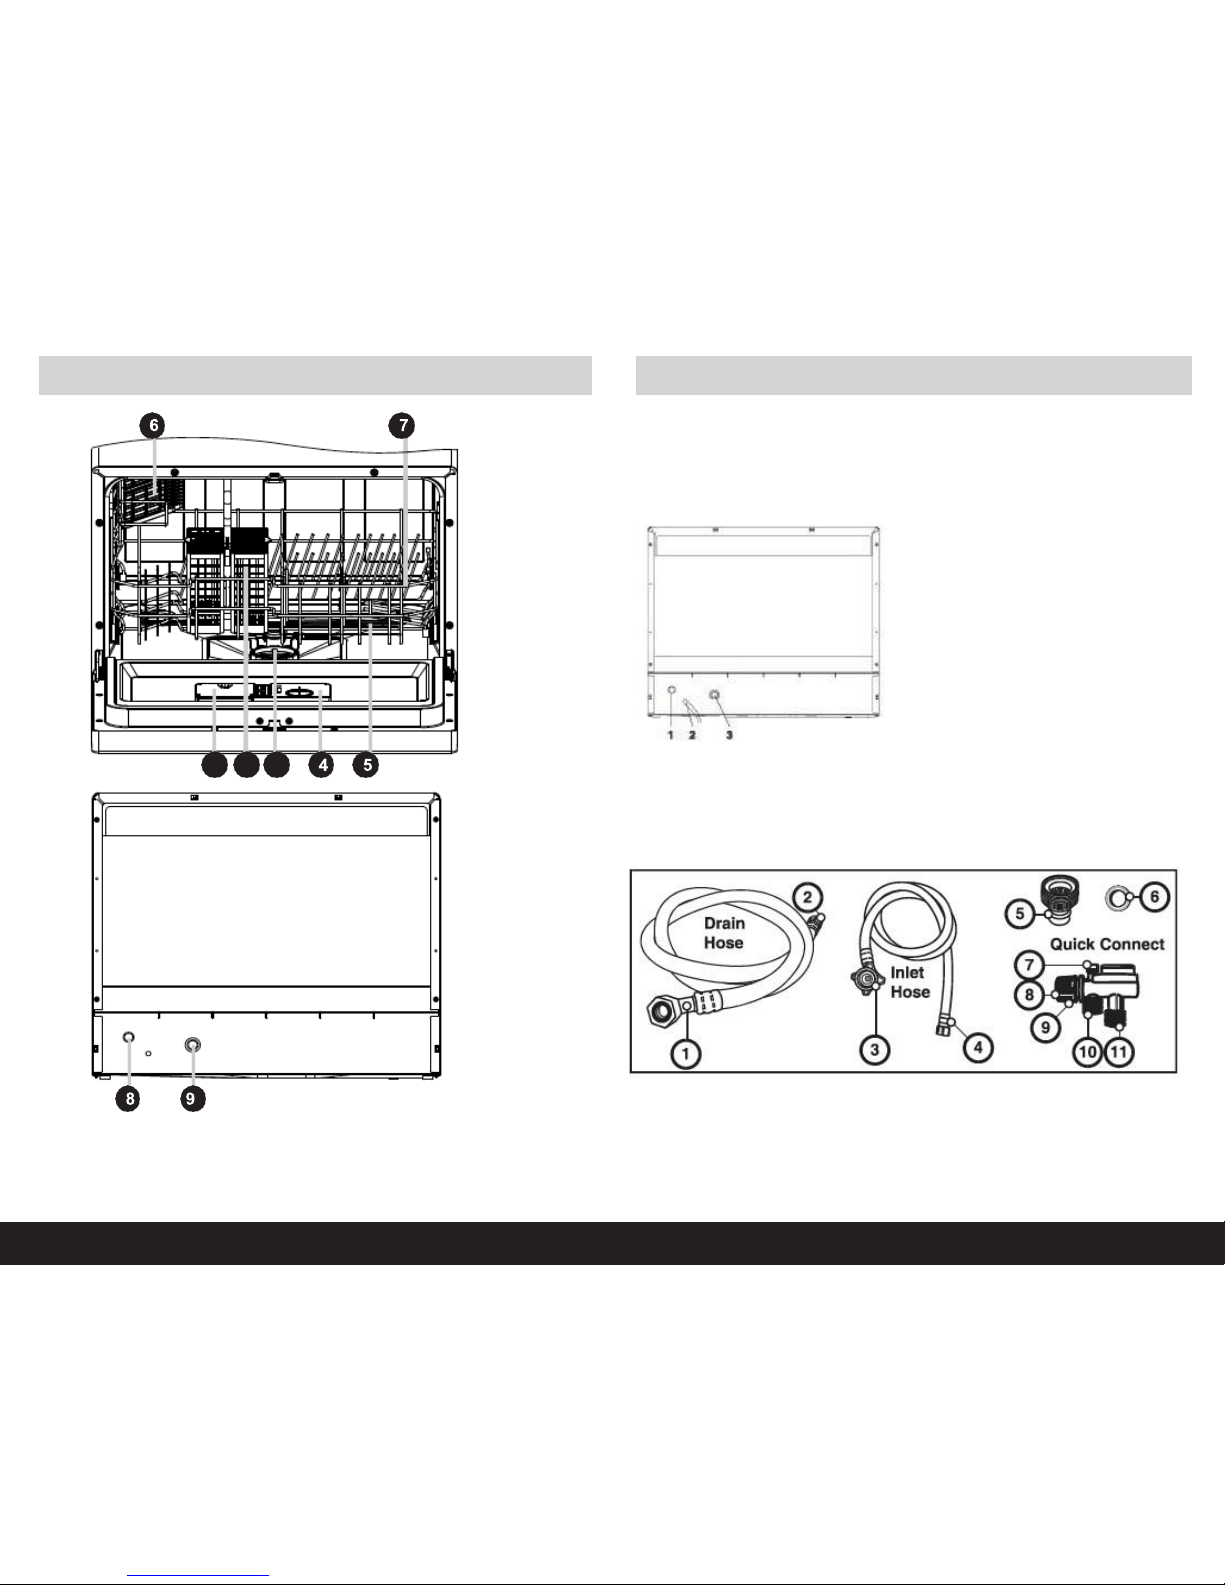
Cleaning the Filter Assembly:
The filter prevents larger remnants of food or other objects from getting
inside the pump. The filtering system consists of a coarse filter, a flat
(main) filter and a fine filter.
1. Main filter
2. Fine filter
3. Coarse filter
TIP: For best performance and results, the filter assembly must be cleaned
regularly. Remove the larger particles trapped in the filter after each
wash cycle.
WARNING:
NEVER RUN THE DISHWASHER WITHOUT THE FILTERS IN PLACE.
IMPROPER REPLACEMENT OF THE FILTERS MAY REDUCE THE
PERFORMANCE LEVEL OF THE APPLIANCE AND DAMAGE DISHES
AND UTENSILS.
By unscrewing the coarse filter, you can remove the filter system.
Remove any food remnants and clean the filters under running water.
Use a brush to gently clean the filters, if necessary.

14
Ginnys.com • 1.800.544.1590
CLEANING & CARE
15
CLEANING & CARE...cont.
Cleaning the dishwasher exterior:
The control panel exterior can be cleaned by using a lightly dampened
cloth and drying thoroughly.
WARNING:
NEVER use a spray cleaner to clean the door panel as it may
damage the door lock and electrical components.
Abrasive agents and some paper towels should not be used
because ofthe risk of scratching or leaving spots on the surface.
NEVER use sharp objects, scouring pads or harsh cleaners on any
part of the dishwasher.
Cleaning the Spray Arm:
The spray arm should be removed for periodic cleaning of the nozzles to
prevent possible clogging. Wash it under running water and carefully
replace it, checking that its rotary movement is in no way impeded.
Grasp the middle of the spray arm, pull it upwards to remove it. Wash the
arm under a jet of running water and carefully replace it. After reassem-
bly, check that the spray arm turns freely.
TIPS: Dishwasher Maintenance:
•After every wash: Leave the door slightly open so that moisture and
odors are not trappedinside.
•Disconnect from the electrical outlet before performing cleaningor
maintenance.
•When it is not in use for a long period of time: It is recommended that
you run a wash cycle with the dishwasher empty.
•Moving the appliance: If the appliance must be moved, try to keep it in
the vertical position.
•Seals: One of the factors that causes odors to form in the dishwasher
is food that remains trapped in the seals. Periodic cleaning with a damp
sponge will prevent this fromoccurring.
CLEANING & CARE...cont.
NOTE:
Hard water conditions will adversely affect the washing
performance of your dishwasher.
Hard water conditions will also contribute to ‘lime’ (white film substance)
deposits and/or ‘scaling’ on the surface of the dishwasher tub and heating
element (located in the sump underneath the removable filter screen).
To assist in minimizing these conditions, it is recommended to
periodically operate/rinse the inside of the dishwasher (empty) using
1 cup of white vinegar at least once a week.

TROUBLESHOOTING TROUBLESHOOTING...cont.
16
TROUBLESHOOTING
Ginnys.com • 1.800.544.1590
17
Problem
Possible Causes
What to do
Dishwasher doesn’t
start
Blown fuse or the
circuit breaker has
tripped
Replace fuse or reset
breaker. Remove any
other appliances on
the same circuit
Power supply isn’t
turned on
Make sure the dish-
washer is turned on
and the door is closed
securely. Make sure
the power cord is
properly plugged into
the outlet
Door isn’t properly
closed
Close the dishwasher,
making sure the door
latches
Water not pumped
from dishwasher
Kink in drain hose
Check the drain hose
Filter clogged
Check the coarse
filter: page 13
Suds in the tub
Improper detergent
Only use detergent
specifically made for
dishwasher.
If suds occur, open
the door and let suds
evaporate. Add 1 gal.
of cold water to the
tub. Close and latch
the door, then start the
SOAK cycle to drain
out the water
Spilled rinse-aid
Always wipe up spills
immediately
Stained tub interior
Detergent with
colorant was used
Make sure detergent
has no colorant
Problem
Possible Causes
What to do
White film on the
interior
Hard water minerals
See Cleaning & Care
There are rust stains
on cutlery
The affected items are
not corrosion-resistant
Place only corrosion-
resistant cutlery in the
dishwasher
Knocking noise
The spray arm is
knocking against an
item in a basket
Interrupt the cycle and
rearrange the items
Cloudiness on
glassware
Combination of soft
water and too much
detergent
Use less detergent if
you have soft water
and select a shorter
cycle
Black or gray marks
on dishes
Aluminum utensils
have rubbed against
the dishes
Use a mild abrasive
cleaner to eliminate
marks
Detergent left in
dispenser cups
Dishes block
detergent cups
Reload the
dishwasher.
See page 11.

18
Ginnys.com • 1.800.544.1590
TROUBLESHOOTING
19
TROUBLESHOOTING TROUBLESHOOTING...cont.
Error Codes:
When there are certain malfunctions within the dishwasher, the
display will show error codes to warn you:
Code
Meaning
Possible Causes
E1
Longer inlet time
Faucet is not opened or water
intake is restricted or water
pressure is too low.
E4
Overflow
Some element of the
dishwasher has a leak.
Problem
Possible Causes
What to do
Dishes are not clean
Dishes not loaded
correctly
See Loading Dish-
washer: page 11
Cycle not powerful
enough
Select a more
intensive cycle
Not enough detergent
dispensed
Use more detergent or
change detergent
Items are blocking
path of spray arm
Rearrange items so
arm can rotate freely
Filter not clean or in-
correctly assembled
Clean & fit filter
combination. Clean
spray arm: page 14
Dishes are not drying
Improper loading
Load dishwasher:
page 11
Too little rinse aid
Increase amount or
refill rinse aid
Dishes are removed
too soon
Open dishwasher
door, leave ajar for few
minutes
Wrong cycle selection
In short cycles, wash
temperature is lower.
Choose program with
longer cleaning cycle

WARRANTY
Ginny’s warrants this product free from defects in material
and workmanship for one year from provable date of purchase.
Within this warranty period, Ginny’s will repair or replace,
at its option, defective parts at no charge, provided the
product is returned, freight prepaid with proof of
purchase to Ginny’s.
Allow 2-4 weeks for return shipping.
This warranty does not cover improper installation, misuse,
abuse or neglect on part of the owner.
Warranty is also invalid in any case that the
product is taken apart or serviced by an
unauthorized service station.
This warranty gives you specific legal rights
and they may vary from state to state.
THE FOREGOING WARRANTIES ARE IN LIEU
OF ALL OTHER WARRANTIES AND CONDITIONS,
EXPRESS OR IMPLIED,
INCLUDING BUT NOT LIMITED TO THOSE OF
MERCHANTIBILITY OR FITNESS
FOR A PARTICULAR PURPOSE.
Customer Service
Phone: 1•800•544•1590
8:00 am to Midnight, Monday through Friday
20 WARRANTY
Table of contents