Creda IDI60 User manual

Instructions for Installation and Use
Dishwasher
Model IDI60
TotheInstaller:
Beforeinstallationpleasemakeanoteoftheproductdetailsspecifiedonthebackcover
ofthisbook.
Theinformationcanbe found on the ratingplate.
TotheUser:
Youmustreadtheinstructionspriortoinstallingandusingtheappliance
andthenretainthemforfuturereference.

2
DISHWASHER
Contents
Electrical Connection
For Your Safety
Installation
Getting to know your Dishwasher
The Controls
How to use your Dishwasher
Programme Chart
Before Using your Dishwasher
Loading your Dishwasher
Care and Cleaning
Troubleshooting
Information for Test Labs
Key Contacts
3
4
5
6
6
7
8
9-10
11
12
13
14
Back Cover
Retention of this Instruction Book
ThisInstruction Bookmust bekept handyfor referenceas itcontains importantdetails onthe safeand properuse ofthe
appliance.
Ifyou sell or passthe appliance to someone else,or move house and leaveit behind, make surethis Book is also
providedso the new ownercan become familiar with theappliance and safety warnings.
Ifthe Book is lostor damaged a copy maybe obtained from:
GDALTD., MorleyWay, Peterborough,PE2 9JB

3
DISHWASHER
Electrical Connection
Fuses
Yourappliancecomesfittedwithapluganda13Afuse.Ifyouneedto
replacethefuse,onlythoseratedat13AandASTAapprovedto
BS1362shouldbeused.Ifyoulosethefusecover,areplacement
maybeobtainedfromyourlocalauthorisedServiceCentreor
Electricalcompany.Correctreplacementisidentifiedbycolourcoding
orthemarkingonbaseofplug.
WARNING:DONOTusetheplugunlessthefusecoverisfitted.
WARNING:Thedishwashermustnotbeconnectedtotheelectricity
supplywhileinstallationisbeingcarriedout.
WARNING:Thisappliancemustbeearthed.
Changing the Plug
Cutoffanddisposeofthesuppliedplugifitdoesnotfityoursocket.
WARNING:ToavoidashockhazardDONOTinsertthediscardedplug
intoasocketanywhere else.
IMPORTANT:WIRESINTHEMAINSLEADARECOLOUREDIN
ACCORDANCEWITHTHEFOLLOWINGCODE:
Green/Yellow - Earth
Blue - Neutral
Brown - Live
Ifyouchangetheplug,thecolourofthewiresinthemainsleadmay
notcorrespondwiththeterminalmarkingsintheplug,whichifnot
coloured,couldbe:
EARTH ‘E’ or
NEUTRAL ‘N’
LIVE ‘L’
Changing the Mains Lead
AleadcanbeorderedfromCredaService
UK:08709066066or
RepublicofIreland:1850302220
Ifyouhavedamagedtheexistingleadorrequirealongeronea
chargewillbemade. Itisstronglyadvisedthatthisworkiscarriedout
byaqualifiedelectrician.
Ifthedomesticwiringincludesaresidualcurrent-operatedcircuit
breaker,ensurethatitconformstothelatestregulations.
Safety Information
Atthetimeofdelivery...
Allfunctionsofyourdishwasherhavebeenthoroughlytestedatthe
factory. Asmallnumberofwatermarksmayhavebeenleftasa
result,theywilldisappearwhentheapplianceisusedforthefirsttime.
- Thisapplianceshouldonlybeconnectedtoa230/240VAC
source,viaaproperlyinstalledearthedsocket.
- Usethedishwashersolelyinadomesticenvironment.
- DONOTstandorplaceheavyobjectsonthedoorwhenitis
open,thiscoulddamagethedoororcausetheappliancetotip
forward.
If your family includes children...
- DONOTallowchildrentoplaywiththeapplianceortamper
withitscontrols.
- Keepdetergentsandrinseaidsawayfromchildren.Keep
childrenawayfromtheopendoorofadishwasher,therecould
stillbesomedetergentleftinside.
CAUTION:
Thedishwashermeetstherequirementssetoutbytheregulationsin
forceconcerningsafetyandelectricalequipment.
Anytechnicalchecksshouldbeconductedexclusivelybyatrained
andauthorisedtechnician:Repairscarriedoutbyunaithorised
personswillinvalidatetheguarantee,aswellasposingapotential
hazardtotheuser.
Themanufacturerdeclinesallresponsibilityfordamagetopersonsor
propertyresultingfromfailuretoobservetheaboveprecautions,from
tamperingwithevenasinglecomponentorfromtheuseofnon-
originalspareparts.

4
DISHWASHER
For your Safety
Thismanualformsanintegralpartoftheappliance.Itmustalwaysbekepthandyforreference.Readthroughalltheinstructionscontainedinthismanual
beforeusingthedishwasher.
1. Seperate the various
packaging materials and
dispose of safely - DO NOT
leave discarded packaging
materialaroundthehome.
2. Afterremovingthepackaging,
check to make sure your
applianceisintact.Ifindoubt,
contact a qualified
professional.
3. DONOTuse extensionleads
and multiple plugs. If the
electricity supply wire is not
long enough, then have it
replacedwithoneofthecorrect
length and remember that it
should be free of bends or
dangerouskinks.
4. Intheeventofanydamageto
the power cord have it
replaced by a qualified
technician.
5. Themainsplugmustbeeasily
accessibleafterinstallation.
6. Iftheapplianceisnotoperating
properly or if maintenance
operations are necessary,
disconnect the dishwasher
fromthemainspowersupply
(unplugit!).
7. DONOTinstalloutdoors,not
eveniftheareaiscoveredby
a roof: it is extremely
dangeroustoleaveitexposed
torainandthunderstorms.
8. If installed on a carpeted or
coveredfloor,ensurethatthe
openingsontheundersideare
notobstructed.
9. Do not touch the heating
elementduringorstraightafter
awashcycle.
10. Iftheappliancemalfunctions,
turnoffthewaterinlettapand
disconnecttheplugfromthe
wallsocket.Thenreadthe
sectionentitled
"Troubleshooting".Ifyou
cannotresolvetheproblem,
thencallCredaService(see
KEYCONTACTS,back
page).
Installationmustbeperformedbyaqualifiedtechnician,incompliance
withtheregulationsinforce,includingthepreventionandeliminationof
radiofrequencyinterference.
Thedishwasherisdesignedforwashinganddryingdishes,any
otheruseshallbeconsideredimproper.Themanufacturerdeclines
allresponsibilityforusesotherthanthosedescribedabove.
Theratingplate,featuringthe
technicaldata,serialnumber
andmarkings,isvisibly
positionedontheinneredgeof
thedoor.
DONOTremovetheratingplate.
Thedishwasherisintendedforusebyadults.DONOTallowchildren
tocomenearorplaywiththecontrols.
Keepchildrenawayfromdetergentsandclearofthedishwasherdoor
whenopen.
Keepallpackagingmaterialawayfromchildren.
1. DONOT use solvents,such as alcoholor turpentine whichmay
causeanexplosion.
2. DONOTloaddishestowashthataresoiledwithash,waxorpaints.
3. DONOTlean,sitorstandonanypartofthedishwasher-thiscould
causeinjuryand/ordamagetheappliance.
4. DONOTdrinkanywaterresiduesfrominsidethedishwasher.

5
DISHWASHER
Installation
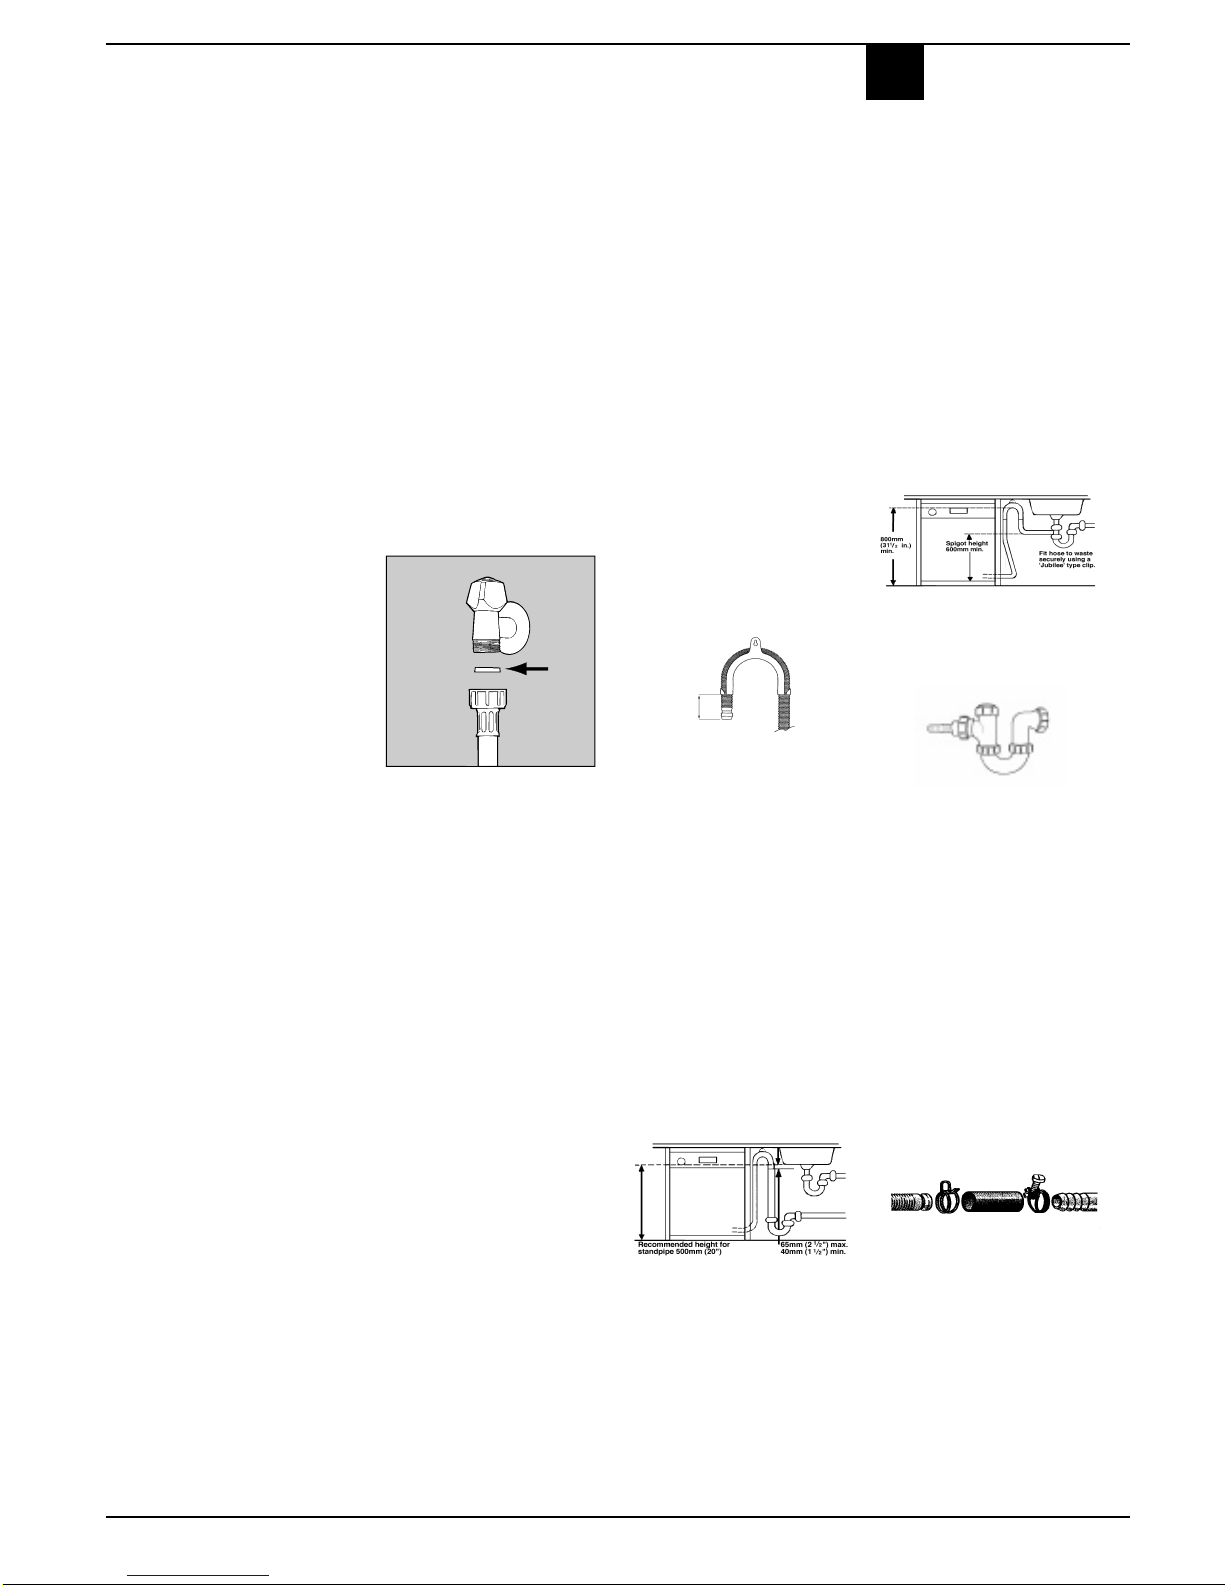
Coldwaterconnection.
Connect the cold water supply
hose, inserting the small filter
suppliedwiththedishwasherand
makingsurethatitisfastenedtightly
inplace(seefigure2).Ifthewater
hosesareneworhavebeenoutof
useforanextendedperiodoftime,
letthewaterruntomakesureitis
clearandfreeofimpuritiesbefore
making the connection. If this
precautionisnottaken,thewater
inlet could get blocked, causing
damagetoyourdishwasher.
Choosewhereyouwanttoinstall
yourdishwasher,youcanplaceit
sothatitssidesorbackpanelare
side by side with furniture or up
againstthewall.Thedishwasheris
providedwithwatersupplyanddrain
hoses, which can be directed
towardstheleftorrighttofacilitate
appropriateinstallation.
Levelling.
Oncetheapplianceispositioned,
adjustthefeetbyscrewingthemin
oroutdependingonhowhighyou
want it and to level it so that it is
horizontal.Makesurethatitisnot
inclinedmorethan2degrees.Ifthe
applianceislevel,itwill helpensure
itscorrectoperation.
HeightAdjustment
Inserttheapplianceintothecutout
andthenadjusttheheightusingthe
screwslocatedonthefrontbottom
part of the machine. Use a
screwdrivertoturn the screws in
the clockwise or anti-clockwise
directiontoincreaseordecrease
theheightrespectively.
Drainhoseconnection.
WARNING: Connect your
dishwasher drain hose to pipes
which connect to the foul drain
system and not to surface water
drains.
IMPORTANT: For the correct
operationofyourdishwasher,itis
essentialtocomplywiththefollowing
information:-
Standpipe:
Ensurethatthehoseisnotpushed
toofardownthestandpipe.
Iftheendofyourdrainhoseisfitted
with‘retainingflaps’,ensuretheyare
insertedfullyintothestandpipe. This
willpreventthepipefromjumping
outduringinstallationanduse.
DO NOT position the standpipe
nearanelectricaloutlet.
ENSUREthatthedrainhoseisnot
kinkedanditisroutedasshownin
thediagram.
Thestandpipeshouldhaveabore
ofatleast38mm(11/2”).Itshould
beinstalledasshown,haveatrap
fittedandmustdischargeintothe
same drain system as your
householdsink.
It MUST NOT be connected to a
surfacewaterdrain.
SinkWasteSystem:
Forundersinkdrainage:
Beforeconnectingthedrainhose,
removeanyinternalrestrictions-
Thiswillpreventabuildupofdebris
whichcouldcauseablockage.
Removeanyrestrictionsfromthe
wastespigotandensure thatthe
sealingbungisremoved.Thehose
should be routed, such that it is
raised to a minimum height of
800mm(31/2”).
NOTE:Ensurethesinkoutlet
pipehasaminimumdiamtereof
32mm.
1.UntietheendoftheGREY
drainagehosefromtherearof
theappliance.
2.Repositionthe‘HookedEnd
Support’asrequiredalongthe
GREYdrainagehose.
3.Iffittinganundersinkwaste
disposalunit,cutoutthe
membrane,bungorblanking
plug.
4.AttachtheGREYdrainage
hosetotheundersinkwaste
disposalunitsecurely,usingthe
clipandrubbertubesupplied.
Ensurethe drain hoseis
securelyattached, toprevent
itcomingawaywhilethe
machineisin use and causing
aflood.
A
Fig.2

6
DISHWASHER
Getting to know your Dishwasher
Technical Characteristics
The Controls
A. ON-OFF Button
Press this button to switch the
applianceon.
B. ON-OFF Indicator light
This light informs you that the
dishwasheris on.
P. WashProgrammeSelector
Eachtimethisbuttonispressed,
one of the cycle indicator lights
“M”willcomeoninsequence.
M. Cycleindicatorlight
Thislightshowsyouwhichcycle
you have selected or the one in
progress.
E. Upperbasket
F. Topsprayarm
G. Basketheightadjuster
H. Lowerbasket
I. Bottomsprayarm
J. Saltcontainercap
K. Washingfilter
L. Detergentandrinseaid
dispenser
LK
I
H
G
E
F
J
PA
B
M
Technical characteristics
Width cm. 59,5
Depth cm. 57
Height cm. 82
Capacity 12 standard place settings
Mains water pressure 20 KPa÷ 1MPa (0,2 ÷10 bar)
Power voltage See data plate
Total absorber power See data plate
Fuse See data plate
Thisdishwasherconformstothe
followingEuropeanCommunity
Directives:
73/23/EECof19/02/73(Low
Voltage)andsubsequent
modifications;
89/336/EECof03/05/89
(Electromagnetic
Compatibility)andsubsequent
modifications;
97/17/CE
(Labelling)

7
DISHWASHER
First of all.
- Turn on the water supply
tapcompletely.
-Addthecorrectamount of
detergent.
- Load the baskets correctly.
- Check that the spray arms
rotatefreely.
-Closethe doorsecurely.
-
Press the ON-OFF button "A":
indicatorlight"B"comeson.Your
applianceisnowonandawaiting
instructions.
Select the wash cycle.
Selectthewashcyclebypressing
button"P".Eachtimethisbuttonis
pressed,oneoftheindicatorlights
“M”willcomeoninsequence.Select
thewashcyclemostsuitableforthe
typeofdishesto wash(see‘Pro-
gramme Chart’).
Closethedoorandafterafewsec-
onds,youwillhearashortbeep:the
washcyclehasstarted.
Modifying a wash cycle in
progress.
Ifyouhavechosenthewrongcycle
-Youcanmodifythewashcyclein
progress,ifithasonlyjuststarted.
Openthedoorcarefully, toavoid
anyhotwatersplashes.Thenkeep
button"P"pressedinfroapproxi-
mately5seconds,untilyou hear3
shortbeeps.
Indicatorlight"M"willgoouttoshow
allthesettingswillhavebeencan-
celled.Youarenowfreetore-set
thecorrectwashcycle.
You've left out a dish?
Interruptthewashcyclebyopening
thedoor,carefully,theninsertthe
dishyouhadforgotten.
Whenyoushutthedoorthecycle
willstartupfromwhereyouinter-
ruptedit.
Cycle end
Theendofthewashcycleisindi-
cated by 2 short beeps and the
flashing ofthewashcycleindicator
light“M”.
Openthedishwasherdoor.
Turntheapplianceoffbypressing
theON-OFFbutton“A”,thusswitch-
ingofftheelectricitysupply.
Turnoffthewatertap.
Waitafewminutesbeforeunload-
ingthedishes:theyareveryhot!If
youwaitalittlewhile,theydrybetter
due tothesteam.
Emptythelowerbasketfirst.
There's been a power
failure or you opened the
dishwasherdoor
The wash cycle stops and then
restartswhentheelectricitycomes
backonorwhenyouclosethedoor.
How to use your Dishwasher

8
DISHWASHER
Programme Chart
Selectthemost suitable programmefor the typeofdishes and howdirty they are.Toselect the washprogramme see the chartbelow:
To optimise wash performance and save on energy, try yo use the dishwasher with a full wash load. If it takes some time to fill
your dishwasher, use the soak cycle to avoid caked on food and build up of bad odours.
R
3URJUDPPH :KHQ3URJUDPPH
VKRXOGEHXVHG
3URJUDPPH'HVFULSWLRQ $PRXQWRI
GHWHUJHQWIRU
SUHZDVK
ZDVK
5LQVH
$LG
+HDY\'XW\
9HU\GLUW\GLVKHVDQGSDQV
QRWWREHXVHGIRUGHOLFDWH
LWHPV
3UHZDVKZLWKFROGZDWHU
3UHZDVKZLWKKRWZDWHUDW&
([WHQGHGZDVKDW&
5LQVHZLWKFROGZDWHU
5LQVHZLWKKRWZDWHUDW&
'U\LQJ
JU
'DLO\F\FOH
1RUPDOO\GLUW\SDQVDQG
GLVKHV6WDQGDUGGDLO\
F\FOH
SUHZDVKHVZLWKFROGZDWHU
([WHQGHGZDVKDW&
5LQVHZLWKKRWZDWHUDW&
'U\LQJ JU
5DSLG
(FRQRP\DQGIDVWF\FOHWR
EHXVHGIRUVOLJKWO\GLUW\
GLVKHV
5XQF\FOHLPPHGLDWHO\
DIWHUXVH1RGU\LQJ
6KRUWZDVKDW&
&ROGULQVH JU
6RDN
3UHOLPLQDU\ZDVKF\FOHIRU
GLVKHVDQGSDQVDZDLWLQJ
FRPSOHWLRQRIWKHORDGZLWK
WKHGLVKHVIURPWKHQH[W
PHDO
6KRUWFROGZDVKWRSUHYHQWIRRG
IURPGU\LQJRQWRWKHGLVKHV

9
DISHWASHER
Before Using your Dishwasher
Adjusting the water softener.
Yourdishwashercanadjustitssalt
consumptionaccordingtothehard-
ness of the water in your home.
This way, you can optimise and
customiseyourdishwasher'ssalt
consumption.
Toadjustsaltconsumption,doas
follows:
1.Unscrewthesaltcontainercap
2. There is an arrow on the neck
ofthecontainer(see figure):if
necessary,turnthearrowanti-
clockwise from the "-" setting
to the "+" setting.
Select the arrow position
depending on the water
hardness,referringtothetable.
To prevent rust from forming,
load the salt just before
beginning a wash cycle.
Water Hardness
Clarke
degrees °fH mmol/l Selector
position
Salt
consu-
mption
(grams/-
cycle)
Autono-
my
(cycles\2-
kg)
0 - 14 0 - 17 0 -1,7 / 0 /
14 - 36 18 - 44 1,8 - 4,4 "-" 20 60
36 - 71 45 - 89 4,5 - 8,9 MED 40 40
>71 >89 > 8,9 "+" 60 25
Fillingthe salt container.
Alwaysusesaltwhichisintended
fordishwasheruse.
The salt container is situated
underneaththelowerbasket,fillit
upasfollows:
1.Pull out the lower basket
completely, unscrew and
removethecontainercap
2. If it is the first time you add the
salt,firstfillthecontainerupwith
water(youwon'thavetodothis
againnexttime)
3.Putthedishwasherfunnelonthe
holeandpourinapproximately
twokilosofsalt.Itisnormalthat
some water comes out of the
container.
4. Screw the cap back in place
carefully.
Low Salt indicator
Thisgreendeviceislocatedatthe
centreofthecapforthedecalcifica-
tioncartridgeanditindicateswhether
thecontainerisfull.
Whentheindicatorisnotvisibleit
meansthatyouneedtoaddsalt.
Salt
You don't know how hard
the water in your home
is? Ask the company that
supplies water in your
area.

10
DISHWASHER
Rinse aid.
Rinse aid makes dishes sparkle
moreasitimprovestheirdrying.The
rinseaidcontainerissituatedonthe
insideof theappliance door,you
shouldrefillitwhenlight “D”indicates
thatitisempty.
(Ifyourdishwasherisfittedwitha
“lowrinseaid”indicatorlight,fillthe
containerupwhentheindicatorlight
flashesorlightsup).
Addingrinseaid.
Toopenthedispenser,turncapC
anticlockwise.Takecarewhenyou
pour in the rinse aid to avoid it
overflowing.Youcanregulatethe
amount of rinse aid used by the
dishwasher,movetheadjusterF
whichyouwillfindunderlidC.
The detergent
Addingdetergent
ToopenlidA,pressbuttonB.
Thedetergentshouldbeputintothe
twocontainersCandD.
Ifusingatablet,putitincontainer
"D".
Nowyoucanclosethelid:pressit
downuntilyouhearitclick.
Ifit won't close
Check whether there is any
detergentresidueontheedgesof
thedispenser.Removetheexcess.
You can choose from six different positions.
It is normally set to 4.
Before Using your Dishwasher
-Theamount of rinse aid
needstobeincreasedifthe
dishesappeardull or you can
seecircularstains.
-Theamount of rinse aid
needstobereducedifthe
dishesare sticky oryoucan
seewhitestreaks.
*Ifyoulive in an areaparticularly
prone to very hard water ( 35
°
f)
GlistandCredarecommendthat
youcontinue to keep your
dishwashersalttoppedup.
•Use the right amount of
detergent (see programme
chart).
•Storeyourdetergentandrinse
aidinacool,dry place,safely
awayfromchildren.
25 gr
.
5 gr.
C
D
B
A
F
D
C
WerecommendGlist3in1foruseinallCredadishwashers...
BrilliantcleaningisguaranteedwithGlist3in1.
CredaonlyrecommendsGlist3in1Dishwashertabletstogiveoutstandingcleaningandcare.
Itis important to usedetergent specially designed fordomestic dishwashers. (Always followthe
manufacturersinstructions.)
Glist3in1advanceddishwashertabletswithactiveenzymesaretheidealwaytoprotectandcarefor
yourdishwasher,whilegettingyourdishesandglassessparkingclean.
SofterWater:
Builtinsaltactionsoftenswater,helpingtopreventthebuildupoflimescaleinthedishwasherand
improvethecleaningresult*.
CleanerDishes:
WithuniqueactiveenzymesinthecleaningphaseGlist 3 in 1 breaksdowneventhehard toshift
foodstuffsandgrease,leavingthedishesspotlessandthedishwashercleantoo.
SparklingResults:
Thebuilt-inGlistrinseagentensuresthedishesandglassesarefreefromwatermarksandsmears.
IfyouhaveanyquestionsregardingGlist3in1, pleasecontactthehotlineon0800216730.

11
DISHWASHER
Loading your Dishwasher
First of all.
Beforeplacingdishesinthebaskets,
removeallcoursefoodremains.This
avoids blocking the filter, which
wouldreducetheefficiencyofthe
wash.
Ifsaucepansandfryingpansare
verydirty,allowthemtosoakbefore
beingwashed.
Tomakeiteasiertoloadyourdishes,
pullthebasketsout.
What goes into the lower
basket?
Werecommendyouplacethemost
difficultdishestowashintothelower
basket: saucepans, lids, soup
dishesandplates(aloadexample
isshowninthephoto).
• Servingdishesandlargelids:
placethemonthesidesofthe
basket.
• Saucepans,saladbowls:must
alwaysbeplacedupsidedown
• Verydeepdishes:placethem
obliquely,thusallowingwaterto
run down them and cleaning
thembetter
Placethecutlerywiththehandlesat
thebottom;ifthebasketistheone
withsideinserts,theninsertthetea
spoonsonebyoneintotheslots.
Itisbestifyouplacelongerutensils
horizontallyatthefrontoftheupper
basket.
lowerbasket
Afterloadingthedishes,remember
tocheckthatthe sprayarmscan
turnfreelywithouthittingagainstany
dishes.
What goes into the upper
basket?
Placedelicateandlightweightdishes
inthe upperbasket:glasses, tea
cupsandcoffeecups,saucersand
plates-shallowsaladbowls,slightly
dirtyfryingpansandshallowpans.
Positionlightweightdishesinsuch
aswayastoavoidtheirbeingmoved
bythesprayofwater.
How to adjust the upper
basket.
Theupperbasketcanbesetinhigh
or low position to enable you to
organiseyourdisheseffortlessly.
Loadexamples
upperbasket
lowerbasket
upperbasket
Opentherailstopflapsandpull
thebasketoutcompletely.Now
placeitinhighorlowposition,
thenslideitalongtheguiderails
untilthefrontwheelsalsogoin.
Nowclosetherailstop flaps.
Followthesequenceofactions
illustratedinfigure"F".
What can I Wash
Items not suitable for the dishwasher:
•Cutleryandtablewaremadefromwoodorpartwood-Theymaybecomefadedandunsightlyinappearance.
•Avoidwashinghornhandledandbronzecutleryinthemachine.
•Delicate/decorativeglasswareandvases,specialantiqueorirreplaceablechina-thedecorativepatterns
printedontheseitemswillnotbedishwasherproof.
•Plasticobjectsthatarenotresistanttohotwater.
•CopperandPewterutensils.AluminiumandSliverobjects.
•Sometypesofglasscanbecomeopaqueinappearanceaftertheyhavebeenwashedtoomanytimesina
dishwasher.
•Highlyabsorbentmaterialssuchasspongesandtowelsshouldneverbeplacedinadishwasher.
• Ifinanydoubt,checkwiththemanufactureronitemssuitabilityfordishwasher’s.
WARNING:Dishesorcutlerysoiledwithtobaccoash,wax,lubricatinggreaseorpaintshouldnotbeput
inthedishwasher.
Ourrecommendation:Infuture,onlypurchasetableorkitchenwarethathasbeenconfirmed-dishwasherproof.
12
3
4
Fig.F

12
DISHWASHER
Care and Cleaning
Thefilterassembly
• Ifyouwantconsistentgoodresults
fromyourdishwasher,youneedto
cleanthefilterassembly.
•Removethelargerfoodparticles
trappedinsidethecup“C”andthe
semi-circular filter Aafter each
wash;pullthecuphandleupwards
toremovethem.Justrinsethem
underrunningwater.
•Theentirefilterassemblyshould
becleanedthoroughlyonceamonth:
cup C + semi-circular filter A +
cylindricalfilterB.Rotatefilter“B”
anticlockwisetoremoveit.
Forcleaning,useanonmetallic
brush.
Reassemblethefilterparts(as
showninthefigure)andreinsertthe
whole assembly into the
dishwasher. Position it into its
housingandpressdownwards.
Thedishwasherisnottobeused
withoutfilters.Improperreplacement
of the filters may reduce the
efficiencyofthewashandeven
damageyourdishwasher.
Cleaningthe spray arms.
Food residue may become
encrustedontothesprayarmsand
blocktheholeswherewatercomes
out.Checkthesprayarmsregularly
andcleanthemonceinawhile.
DONOTusesolventsorabrasives
tocleantheexteriorandrubberparts
of your appliance, do not use
solvents or abrasive cleaning
products.Useaclothdampened
withlukewarmsoapywateronly.
Ifthereareanystainsonthesurface
oftheapplianceinterior,useacloth
dampenedwithwaterandalittle
whitevinegar,oracleaningproduct
specificallymadefordishwashers.
1
2A
B
C
Cleaning the Water Inlet
Filter
Periodicallycleanthewaterinletfilter
(seefigure2under"Installation")
locatedontheoutletofthewater
supplytap.Afterturningoffthewater
tap,unscrewtheendofthewater
supplyhose,removethefilterand
cleanitcarefullyunderrunningwater.
Then,returnthefiltertoitsplaceand
tightenthewatersupplyhoseback
intoposition.
Unplugthe appliance.
Beforecarryingoutanycleaningor
maintenanceonthedishwasher,
alwaysremovetheplugfromthe
electricitysocket.
After every wash.
Whenthewashcyclehasended,
alwaysremembertoturnoffthe
watersupplytapandtoleavethe
appliance door ajar. This way,
moistureandbadodourswillnotbe
trappedinside.
Theseals.
One of the factors that cause
unpleasantodourstoforminsidethe
dishwasherisfoodthatremains
trapped in the seals. Periodic
cleaningusingadampspongewill
preventthisfromoccurring.
Goingaway
Ifthedishwasherisnotgoingtobe
usedforsometime,carryoutthe
following:
•runacyclewiththedishwasher
empty.
•switchoffattheelectricalsocket
andunplug.
•turn off the water supply tap,
disconnecttheinlethoseand
allowtodrain.
•filltherinseaiddispenser.
•leavethedoorajar,topreventthe
buildupofunpleasantodours
insidethedishwasher.
Beforeusingthedishwasheraftera
longbreak,pluginandswitchonat
theelectricalsocket.Reconnectthe
inlethoseandturnonthewater
supplytap.Checkthereareno
depositsofrustinsidethewater
pipe,ifthereareallowwatertorun
from the supply tap for a few
minutes.
Movingtheappliance.
Drainwaterfromthedishwasher.
Secure all loose parts. Only
transportinanuprightposition.
•Ifnotkeptuprightduringtransport,
anywaterremaininginsidemay
seepintothecontrolmoduleand
causesubsequenterrorswith
programmefunctions.
Disconnectingthedishwasher.
Whendisconnectingthedishwasher
itisimportantthattasksarecarried
outinthecorrectsequence.
•switchoffatthemainsandremove
theplugfromthesocket.
•turnoffthewatersupply.
•disconnectdrainandwaterinlet
hose.
•pulloutthedishwasher,carefully,
withdrawinghosesatthesame
time.

13
DISHWASHER
Caution
- Do not forget that repairs should only be carried out by a qualified specialist. Improper repairs can lead to considerable
equipment damage, as well as danger to the user.
- The dishwasher must first be disconnected from the electricity supply before any repairs or other work can be carried out.
Switch off at the mains socket and water supply and remove the plug.
If the dishwasher won't
start, check...
■Isthedishwasherpluggedinat
the electricity socket and
switchedon?
■Isthereapowerfailure,check
otherappliances.
■Checkthefuse.
■Isthewatersupplytapturned
on?
■Isthewaterinlethoseconnected
properly?
■Is the pressure of the water
supplysufficient?
■Istheinlethosekinked?
■Isthefilteronthewatersupply
hoseblocked?
■Isthedishwasherdoornotclosed
properly?
If water remains inside the
dishwasher,check...
■thedrainhoseisnotkinked.
■the drain syphon is not
obstructed.
■thedishwasherfiltersarenot
clogged.
If the dishes are not being
cleaned properly, check...
■thecorrectamountofdetergent
hasbeenadded.
■thereisregeneratingsaltinthe
saltcontainer.
■thedisheshavebeenloaded
correctly.
■the selected programme is
suitableforthetypeofdishesand
thedegreeofsoiling.
■allfiltersarecleanandpositioned
correctly.
■thesprayarmnozzlesarenot
obstructed.
■thereisnothingobstructingthe
rotationofthesprayarms.
If the dishes fail to dry or
remaindirty,check...
■thereisrinseaidinsidetherinse
aidcontainer.
■therinseaiddispensersettingis
correct.
■thedetergentbeingusedisof
goodqualityandhasnotlostits
effectiveness (for example,
throughincorrectstorage,with
theboxleftopen).
If the dishes show signs of
streaking,staining etc.
check...
■therinseaiddispensersettingis
notsettoohigh.
If there are visible traces
of rust inside the tank,
check...
■thecapoffthesaltcontaineris
securelyclosedandthatthe
watersoftnersettingiscorrect.
■thecorrectamountofdetergent
isbeingused.Certaindetergents
can be more corrosive than
others.
■thetankismadeofsteeland
thereforeanyrustmarksaredue
toexternalelements(fragments
ofrustfromthetankpipes,pots,
cutleryetc.)Specialproductsare
commerciallyavailabletoremove
suchmarks.
Error messages
Yourdishwasherisequippedwitha
safetysystemwhichisabletode-
tectoperatingfaults.
Thesefaultsarereportedbyoneor
twocycleindicatorlights"M"flash-
ingrapidly.Takeanoteofwhichlights
areflashing,turntheapplianceoff
andcallCredaServicefortechnical
assistance.
Tapoff alarm
Ifyouhaveforgottentoturnthewa-
tertapon,yourappliancewillre-
mindyouofthisbysoundingafew
shortbeepsforafewminutes.Turn
thetaponandyourappliancewill
startupagainafterafewminutes.
Wereyoutobeabsentwhenthese
beepsaresounded,theappliance
willbeblockedautomaticallyand
cycle2and3indicatorlights(daily
and rapidcycle)willflashrapidly.
TurntheapplianceoffattheON-
OFFbutton,turnonthewatertap
andwaitapproximately20seconds
beforeturningtheapplianceback
on.
Re-selectthewashcycleandthe
appliancewillstartupagain.
If after all the checks, the appli-
ancestilldoesnotoperateorthe
problempersists,callCredaServ-
ice(seeKEYCONTACTS,back
page)andinformthemof:
-thetypeofproblem
-theabbreviationofthemodel name
(Mod.)andtherelativenumbers
(S/N)writtenontheratingplate
locatedon the inner edgeof
thedoor.
Switchoffatthemainssocket
and remove the plug. Turn
offthe water supply.
Troubleshooting
Resolving minor problems yourself.
Experience has shown that you can resolve most problems that arise during normal daily usage yourself, without having
to call out a service engineer. Not only does this save costs but it also means the appliance is available for use again
that much sooner. The following list of common occurences and their remedies should help you identify the causes of
most problems.

14
DISHWASHER
Detergent
Detergent specifically intended for use with dishwashers
must be used. The dispenser must be refilled before the
startof each wash cycle followingthe instructions provided
in the "Programme Chart". The detergent dispenser is
located on the inside panel of the door.
Loading the detergent
To open lid "A", press button "B". The cleaning detergent
shouldbe introduced into the three containers "1", “2”and
“3”. "(see table at the end of the page)
Afterpouringin thedetergent,replacethelid, pressingdown
until it clicks.
The rinse aid
This product makes dishes sparkle more as it improves
theirdrying. Therinse aidcontainer issituated onthe inside
ofthe door, you should refill it when light “D” indicates that
it is empty.
(If your dishwasher is fitted with a “low rinse aid” indicator
light,fill the container up whenthe indicator light flashes or
lights up).
Loading the Rinse Aid
Toopenthedispenser,turnthe"C" capinthe anti-clockwise
direction and then pour in the rinse aid, making sure not to
overfill.The amount ofrinse aid used foreach cycle canbe
regulatedby turningthe doseadjuster ‘F’which youwill find
underlid ‘C’.
Thereare 6 different settings; thenormal dosage is setting
5.
To use the Normal or daily wash cycles (See Programm Chart in the instruction booklet)
Load for 12 Standard Settings tests (upper rack at top position)
INFORMATION FOR TEST LABS
EN 50242
IEC/ DIN
Cycle
See booklet
See booklet
Total detergent
30 gr.
30 gr.
Comp.1 Comp.2 Comp.3
25 5
10 20
B
A
Comp1 Comp2 Comp3
C
F
D

15
DISHWASHER
Notes

January 2003 Part no. FP187 - 01
Over 1200 trained specialists, directly employed by us, ensure that you can have complete
confidence in both the appliances and services we offer.
Repair Service and Information Desk
UK: 08709 066 066
(Open 8 to 8 Mon - Fri, 8 to 6 Sat, 10 to 4 Sun & Bank Holidays)
www.theservicecentre.co.uk
Republic of Ireland: 1850 302 200
Note: Our operators will require the following information:
Model number:
Serial number:
Extended Warranties
UK: 08709 088 088
(Open 8 to 8 Mon - Sun)
www.theservicecentre.co.uk
Republic of Ireland: 1850 502 200
Genuine Parts and Accessories
UK: 08709 077 077
(Open 8-30 to 5-30 Mon - Fri & 9 to 12 Sat)
www.theservicecentre.co.uk
Republic of Ireland: (01) 842 6836
General Domestic Appliances Limited, Morley Way, Peterborough, PE2 9JB.
Key Contacts
After Sales Service
195.036.728.00
Table of contents
Other Creda Dishwasher manuals
Popular Dishwasher manuals by other brands

Ariston
Ariston LV 625 A Instruction booklet

Siemens
Siemens IQ300 SN23HW60CG Quick reference guide

Parmco
Parmco PD45-SLIM-SS Installation and operating instructions

Technika
Technika Bellissimo TBD4SS-5 instruction manual

Samsung
Samsung DW60H9970 Series user manual

Electrolux
Electrolux ESL 67040 user manual