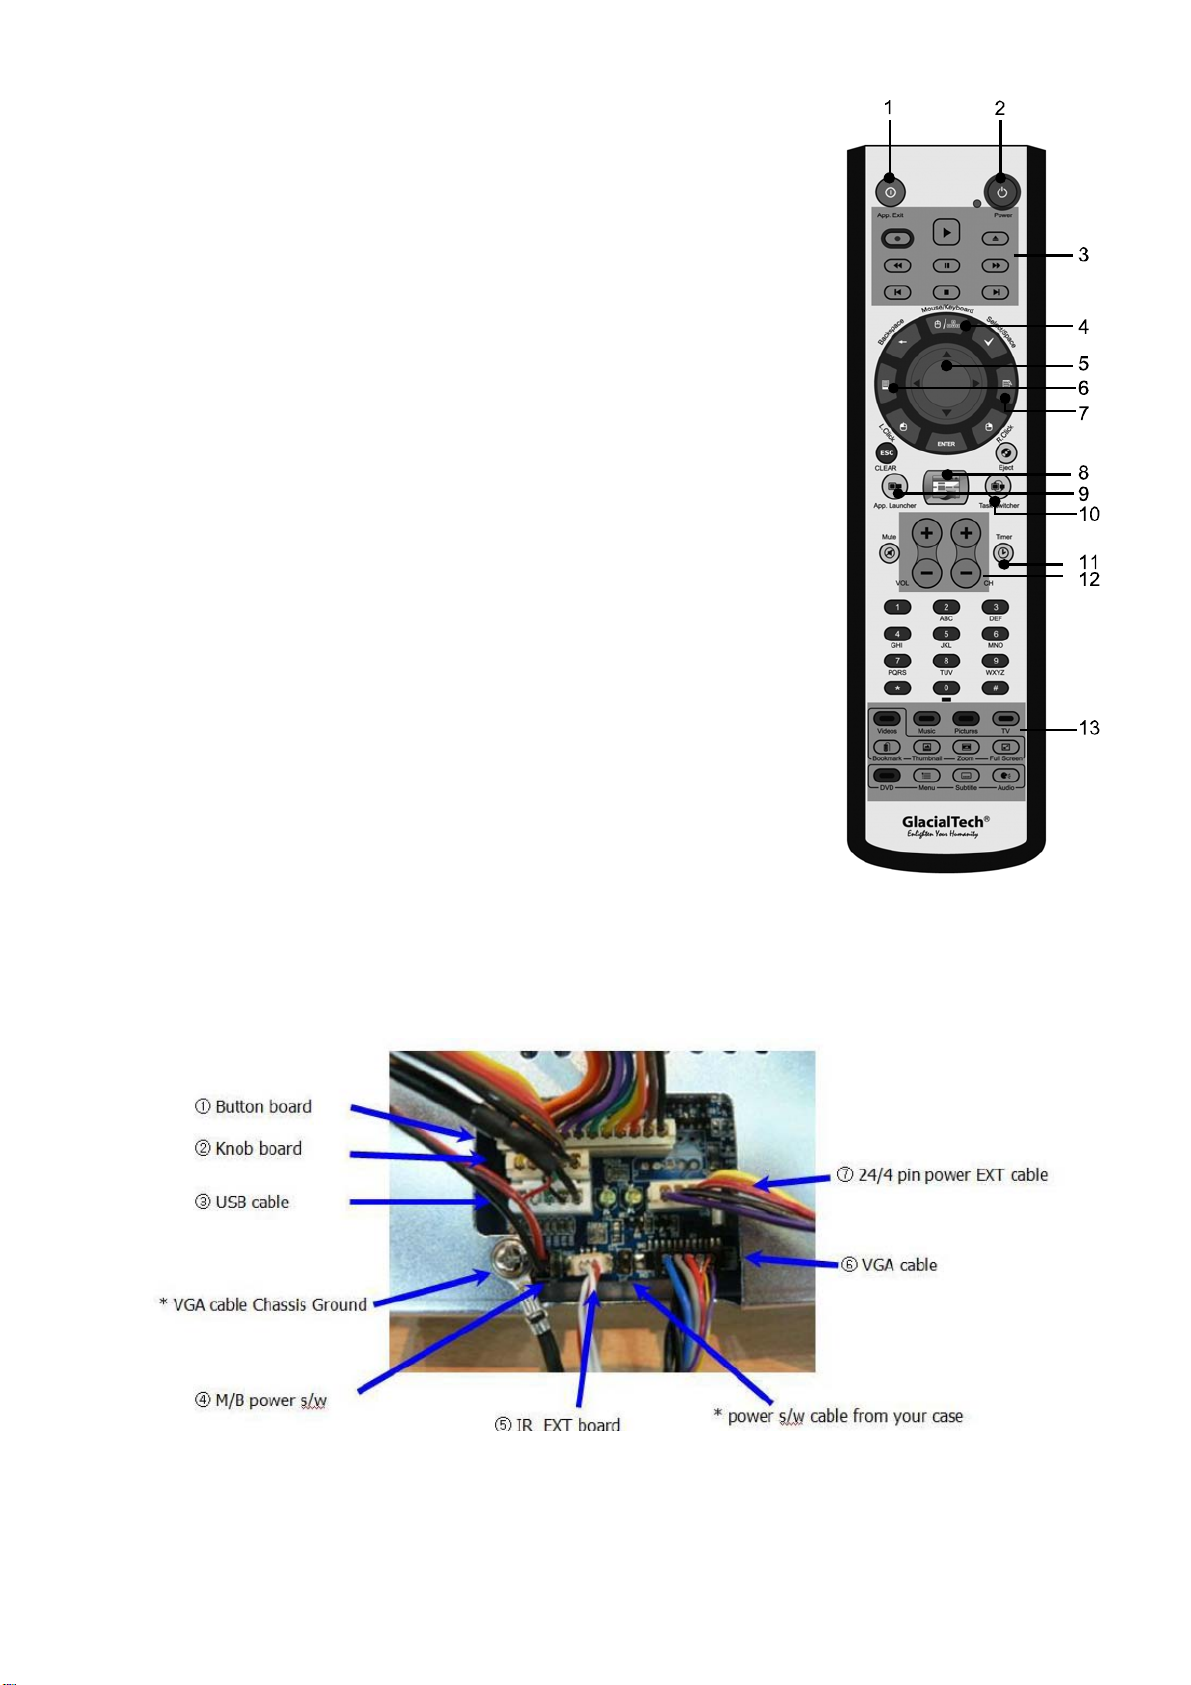
GlacialTech Altair A381 Series User manual

Color Black and Silver
Type A381 Standard,A381 VFD, A381 iMON, A381 LCD
Dimension W 430 X H 100 X D 405 (mm)
Weight Standard
Net Weight:7.6 Kg, Gross Weight: 8.6 Kg
VFD
Net Weight:7.6 Kg, Gross Weight: 8.6 Kg
iMON
Net Weight:7.0 Kg, Gross Weight: 8.6 Kg
LCD
Net Weight:8.0 Kg, Gross Weight: 9.0 Kg
Form Factor Micro-ATX/ATX/E-ATX
5.25” Drive Bays 1 Exposed
3.5” Drive Bays 2 Hidden
Expansion slots 4 low profiles
2 standard PCI with riser card
Cooling system Dual 6 cm blue LED fan, 1500 rpm, 19dBA
I/O panel USB 2.0 X 2, MIC X 1, Audio X 1, Card reader X 1, IR X 1
Power supply Flex-ATX 270 W
Option Bluetooth & Wireless board, Bluetooth & WirelessAntenna
zProduction specifications are subject to change without notice.
Specification

1.1Diagram
1.2Part list
Item Parts Name Q’ty
1 Casing 1
2 Top cover 1
3 Front panel 1
4 I/O cover 1
5 CD-ROM holder 1
6 HDD holder 1
7 Case fan 2
8 Power supply 1
9 DVD plate 1
10 Media hot keys > 6
11 Vfd or iMON or LCD 1

1.3Accessory
Figure Parts Name Q’ty Used for
#6-32 screws 18 M/B tray, HDD tray
M3 screws 8 CD-ROM
DVD plate with EVA plate 1 CD-ROM plate
Remote control (Vista MCE or iMON) 1 Control HTPC
AAAA Batteries 2 Remote control
IR Blaster with bracket 1 IR learning
Altair A381 Quick Guide 1 User quick manual
3 pins PWR EXT cable 1 For iMON module
M/B PWR SW cable 1 For iMON module
USB cable 1 For iMON module
CD (Driver for VFD or iMON) 1 For FVD or iMON
2.1 Front Connector Installation Guide
zPlease refer to the illustration in this section of USB2.0, card reader, PWR, HDD LED, and Audio connector
from the motherboard manual. Please select the motherboard which uses the same USB2.0, AC’97, HD Audio,
standard as below; otherwise it will cause damages to device(s).
zThe following illustration is a diagram showing the front panel I/O connectors.
zOn some motherboards, the connectors for USB2.0, Audio are not the same as the drawing below. Please
check with your motherboard manual before installing.
MotherBoard Case Connector
Front panel USB connector USB connector
Front panel LED connector LED connector

AC’97 AC’97 connector
Azalia (Intel High Definition Audio) HD connector
Front panel USB connector Card reader connector
2.2 MCE Remote Controller Guide (A381 standard, A381 VFD version)
Your remote controller has five types of buttons:
zNavigation buttons, to move between items on the screen. (for example, up arrow or enter)
zPlayback buttons, to control your media (for example, pause or stop)
zAudio-visual (AV) and power buttons, to change channels and adjust volume. (for example, channel up or
mute)
zShortcut buttons, to provide a quick way for users to access key media experiences in Windows Media Center
zNumeric keypad buttons, to enter alphanumeric characters or TV channels.
z[if available] Teletext buttons to access Teletext functionality. For more information, see “Teletext Buttons”
later in this User Manual.
(Note: This Remote Controoler only support Vista O/S which has MCE version)
2.2.1 Navigation buttons
Use the navigation buttons on the remote control to move between items on the screen in Media Center.

Command Task Icon
START Takes the user to the Windows Media Center Start menu
UP Moves the focus point up one position
DOWN Moves the focus point down one position
LEFT Moves the focus point to the left one position
RIGHT Moves the focus point to the right one position
OK Performs the action at the focus point
BACK Moves back one position in the user interface stack
MORE Provides information for the focus point
2.2.2 Playback buttons
Playback buttons in Media Center behave just like similar controls on common home electronic devices, such as CD
or DVD players. Playback buttons are used to control the playback or display of your media – music, pictures, video,
and radio.
Command Task Icon
PLAY Starts playing media at the current position. If play back is paused,
pressing this button begins playback from the current position.
PAUSE Pauses media playback at the current position
STOP Stops playing media at the current position and moves the pointer to the
starting point of the digital media file
RECORD Record the TV show to disk. If pressed while live TV is on, record the
current show. If pressed from the Electronic Programming Guide, record
a TV show or TV series to disk. (for Windows Media Center computers
that include TV tuner hardware)
FAST
Forward
Speeds up the time base of the digital media file to the first fast forward
value (3X). If a slide show is currently playing, the next picture is
displayed when this button is pressed.
REWIND Reverses direction of the digital media stream and speeds up the time
base to the first rewind value (3X). If a slide show is currently playing, the
previous picture is displayed when this button is pressed.
SKIP
FORWARD
Skips forward one increment when this button is pressed. The meaning
of an increment depends on the type of media that is playing:
• If a CD or playlist is playing, the next song is played.
• If a DVD is playing, the next chapter is played.
• If a slide show is playing, the next picture is displayed.
• If a recorded TV show is playing, playback skips ahead 29 seconds.
SKIP
BACK
Skips backward one increment when this button is pressed. The meaning
of an increment depends on the type of media that is playing:
• If a CD or playlist is playing, the previous song is played.
• If a DVD is playing, the previous chapter is played.
• If a slide show is playing, the previous picture is displayed.
• If a recorded TV show is playing, playback skips backward 7 seconds.

2.2.3 Audio-visual and power buttons
Use the AV and power buttons to change channels, adjust volume, access a DVD menu, or to put Media Center in
standby mode.
Command Task Icon
PC POWER
(STANDBY)
Puts the Windows Media Center computer into standby mode if the
computer is running. If the computer is in standby mode, the computer
wakes from standby mode.
TV POWER [if available] By default, the TV button has no command assigned to it.
This button can “learn” to turn on the TV. For more information, see
“Using the Remote Control Learning Functionality” later in this User
Manual.
VOLUME
UP
Increases the current volume by one unit. If the audio is currently muted
when this button is pressed, muting is disabled and the volume increases
by one unit.
VOLUME
DOWN
Decreases the current volume by one unit. If the audio is currently muted
when this button is pressed, muting is disabled and the volume
decreases by one unit.
CHANNEL
UP
Increases the current channel number by one. If Windows Media
Center is in a list view when this button is pressed, the focus point moves
forward one page in the list.
CHANNEL
DOWN
Decreases the current channel number by one. If Windows Media
Center is in a list view when this button is pressed, the focus point moves
backward one page in the list.
MUTE Mutes the computer audio
2.2.4 Shortcut buttons
These buttons provide a quick way for users to access key media experiences in Windows Media Center.
Command Task Icon
GUIDE Displays the Guide in Windows Media Center.
LIVE TV Shows live TV on the currently selected channel.
RECORD TV Displays the Recorded TV page in Windows Media Center.
MUSIC Displays the Music Library in Windows Media Center.
PICTURES Displays the Picture Library in Windows Media Center.
VIDEOS Displays the Video Library in Windows Media Center.
RADIO Displays the main Radio page in Windows Media Center.
DVD MENU Displays the DVD menu.
ZOOM [if available] Toggles between various aspect modes in TV.
2.2.5 Numeric key pads buttons
The numeric keypad consists of numbers from 0 through 9 and two other keys: ENTER and CLEAR. You can use
the numeric keypad to type alphanumeric characters anywhere in Media Center that you can enter text. If you want

to delete characters you have typed, press CLEAR; press ENTER to submit the characters you have typed. You can
also use the numeric keypad to enter TV channels.
2.3 VFD Installation Guide (A381 VFD version)
Please connect your VFD module to USB2.0 port on the motherboard and also connect power to VFD device as
showing below. After connecting USB2.0 and power to your VFD module please installing the driver. (Note: This
module only support Vista O/S which has MCE version)
2.4 IR, IR Bluster Installation Guide (A381 standard, A381 VFD version)
Please connect your IR receiver to USB2.0 port on the motherboard. The IR receivers no need to install the driver
but only support Vista O/S which has MCE version. If you want to use IR blaster to learn your other Media devices’
Remote controller, please connect the IR blaster device with your IR receiver. Followings are the learning guide of
MCE remote controller,
The TV Power, VOL+, VOL-, Numeric keypads (0 through 9), CH+, CH-, and Mute buttons on the remote control for
Media Center PC and “learn” IR commands from other remote controls. This feature lets you use the Media Center
Remote Control sends commands to your TV or another device, such as an audio receiver or home stereo set.
※Important:
zBy default, the VOL+, VOL-, Numeric keypads (0 through 9), CH+, CH-, and Mute buttons on the remote
control for Media Center PC control the system volume and channel on your computer, and the TV button
has no command assigned to it until it “learns” one.
zDo not perform this procedure in bright natural or artificial light.
To program buttons on the remote control by using the learning feature
1. Place the remote control for Media Center PC head to head (approximately 5cm apart) with the remote control
from which it is learning.
2. On the remote control for Media Center PC, press and hold the DVD MENU button and then press OK button,
and right after you release both buttons you will see the Green LED turns on for 5 seconds.
The remote is now in learning setup mode.
IR Bluster

3. On the remote control for Media Center PC, press and release the TV Power, VOL+, VOL-, Numeric keypads (0
through 9), CH+, CH-, or Mute button, depending on which command you want it to learn.
The remote control for Media Center PC Green LED blinks once to confirm the selection.
In the learning setup mode, Red LED blinks quickly four times when two conditions occurring: (Try again, repeat
steps 1 to 3)
zIf you press other buttons than TV Power, VOL+, VOL-, Numeric keypads (0 through 9), CH+, CH-, and
Mute buttons
zIf you do not press any button in 5 seconds.
4. On the remote control that is teaching the command, press and hold the button that you want the corresponding
button on the remote control for Media Center PC to learn
Before you release to hold this button, the remote control for Media Center PC Green LED blinks twice to confirm
the selection.
If the remote did not learn the command, the Red LED blinks quickly four times. To try again, repeat steps 1 through
4.
5. Repeat steps 1 through 4 for the other buttons that can learn commands.
2.5 iMON Module Quick Guide (A381 iMON version)
1. S/W Installation
Insert “iMON CD” to your CD-ROM, and install iMON software and Multi-Median according to the auto running
S/W installation process.
2. H/W (IR Receiver) Installation
The additional feature of internal type iMON IR receiver is that you can power on your PC system using the
power button of the remote controller. After turn off your PC system, open the PC case and connect the cables
to its proper pin refer to the following picture. Internal IR receiver is connected to mainboard with two cables, PC
case with one cable, Power Supply with another cable. You should be careful to connect these four cables refer
to your mainboard manual. If you connect the iMON IR Receiver before the S/W installation, then assign the
H/W driver according to the ‘Found New H/W Wizard’. Select CD ROM drive for searching H/W driver which has
the installation CD inside.

The names of the additional USB port pins on the Motherboard manual are different with the manufacture.
Please refer to the following table to connect the USB cable
After all the connection finished, turn on your system. You may see the “Found New H/W Wizard” when
Windows starts. Assign the CD ROM drive for searching H/W driver.

1. Application Exit :
Closing the active window or Closing Multi Median. <ALT+F4>
2. Power : Turn On/OFF the system.
3. Media Control Button group 1.
Play/Pause/Open/Prev./Next/Rew./F.Fwd/Stop
4. Mouse/Keyboard button : Switching the usage of PAD
controller between mouse and keyboard 4 way arrow keys.
5. PAD controller : Mouse cursor control & 4 arrow Keys
6. Windows Button
7. Menu Button
8. iMEDIAN : Running ’iMEDIAN‘
9. Application Launcher : Running Application Launcher,
Easiest way to run the assigned applications.
10. Task Switcher : Running Task Switcher, select the application
window among the running applications. <ALT +TAB>
11. iMON Timer : Running iMON Timer, management of
power on/off and alarm schedule.
12. VOL/CH Button : Control of Volume and TV channel
13. Media Control Button Group 2.
* Short-cut buttons to move to my Movie, Music,
Photo,TV in running iMEDIAN.
* Movie Tip : Use Aspect Ratio and Full Screen Button.
2.6 Touch LCD Installation Guide (A381 LCD version)
2.6.1 Hardware Installation
*VGA cable chassis ground is provided along with VGA cable, to make touch LCD earthed.
*Power S/W cable is connected to turn on computer with iMON remote controller.

2.6.2 Dual Monitor Setting for Frontview
In order to use iMON OEM Touch LCD and FrontView application properly, please make setting of your display
as like below before you install the iMON/iMEDIAN software installation.
1. Connect VGA cable of iMON OEM Touch LCD to secondary VGA port on your computer.
2. Set iMON OEM Touch LCD display as your secondary monitor using Extended Desktop.
3. Set screen resolution of secondary monitor as 800*600.
4. Set refresh rate of secondary monitor as 60Hz.
After you finish the dual monitor setting as like above, please install the iMON/iMEDIAN software as like below.
2.7 Wireless and Bluetooth Board Installation Guide (option)
Please connect your Wireless and Bluetooth module to USB2.0 on your motherboard. After connecting the
wireless and Bluetooth module please install the Antenna (2 set) linking wireless and Bluetooth board to the
bottom of chassis. Then please install the driver for wireless and Bluetooth from CD.
Document No. 081001
This manual suits for next models
4
Table of contents