Glacier GLC-GS-CHR-T3 User manual

Dodge Journey, Charger & Chrysler 300
PUSH TO START
GLC-GS-CHR-T3
Installation Guide
START
STOP
ENGINE
FORTIN FLASHLINK
UPDATER 2 REQUIRED.
(Not included in this kit)

GS-CHR-T3
1 and 2-way LED Remote Starter Page 1
FM
2-W
Valet
Switch
Cut Yellow
Loop when
installing on
an automatic
transmission
EVO-ALL
Pink - Ignition(+)
Data-Link Cable
White/Brown
Parking Lights
Green/Red
Mux Parking Light
Pink/Black
RAP Shutdown
Light Blue Light Blue
Light Blue/Black
Light Blue/Black
Purple
RAP - Door Pin
EVO-ALL 6 Pin
Red Connector
EVO-ALL 5 Pin
White Connector
CAN Low(~) - Yellow
CAN High(~) - Brown
Gray Gray/Black
BCM behind
glove box,
Connector F.
Antenna
Journey:
Harness in driver kick panel
300, Charger:
Harness in passenger kick panel
Parking Light
Switch
Connector
T-Harness
Yellow - Ignition (+)
EVO-ALL 20 Pin
White Connector
PUSH
START
1A Diode
Ignition(+) - Pink/White

GS-CHR-T3
1 and 2-way LED Remote Starter Page 2
EVO-ALL
Programming
Programming the EVO-ALL The EVO-ALL must be programmed before the Glacier Start transmitters can be programmed.
Step 2
Step 4
Step 1
Step 3
Step 5 Step 6
Step 7 Step 8 Step 9
Press and hold
the programming
button.
Press and release
the programming
button four times.
4x x2
x1 x1
x1
Off ON
ACC
4x
PAUSE
Insert the remaining
connectors
Remove the valet key from the rst OEM
remote.
Remove the battery from the rst OEM
remote.
Keep all other OEM remotes away from
the vehicle. Minimum 10 feet.
EVO-ALL
EVO-ALL
Insert the 4 Pin
Data Link
Connector
The LED will
alternate between
BLUE, YELLOW
and RED.
The LED will
alternate between
4x ashes and a
pause.
EVO-ALL
Release the
programming
button when the
LED is YELLOW.
If the LED is not
solid YELLOW,
disconnect the
4 Pin Data Link
Connector and go
back to step 1.
Wait until the
YELLOW LED
comes on solid.
The RED LED
turns on.
EVO-ALL
PANIC
PANIC
+10’
PANIC
Place the OEM
remote(no battery)
close to the front of
START/STOP button
as shown.
Press the START/
STOP button twice
with the OEM
remote(no battery)
to turn ON the
ignition.
Press and Release
the START/STOP
button once with
your nger to shut
OFF the ignition.
Press and Release
the START/STOP
button once with
your nger to turn
ON the ignition.
Press the START/
STOP button once
with the OEM
remote(no battery)
to turn ON the
ACCESSORY.
The RED and
BLUE LED will
turn ON.
RED will shut
off and BLUE
will remain
solid.
The BLUE LED
ashes rapidly.
PANIC
PANIC
PANIC

Disconnect all
connectors.
EVO-ALL
Reconnect all connectors.
Connect the 4 Pin Data-
Link connector last.
Reconnect
last.
EVO-ALL
The BLUE LED
continues to
ashes rapidly.
The BLUE
LED will ash
SLOWLY.
x1
OFF
Press and Release
the START/STOP
button once with
your nger to turn
OFF the ignition.
Reinsert the battery
in the OEM remote.
Unlock the doors with
the OEM remote.
Page 3
GS-CHR-T3
1 and 2-way LED Remote Starter
Step 10 Step 11 Step 12
Connect the module to the FLASH LINK UPDATER 2
and visit the DCryptor menu in the Flash-Link Manager.
PANIC
Programming
Programming the EVO-ALL The EVO-ALL must be programmed before the Glacier Start transmitters can be programmed.
Module is now
programmed.
Test remote starter
functionality.
EVO-ALL
FLASH LINK
UPDATER 2
FLASH LINK
UPDATER 2
D
TECHNOLOGY
EVO-ALL
FLASH LINK MANAGER
SOFTWARE
www.ifar.ca/en/products/flashlink.html
Parts Required (not included) Step 13

Page 4
Programming
Programming Remote Transmitter(s)
GS-CHR-T3
1 and 2-way LED Remote Starter
1 2 3 4
The System can learn up to a maximum of 4 transmitters. A single
transmitter can be stored in more than 1 memory slot. When a 5th
transmitter is learned the 1st remote is erased.
I G N
Step
1
Step
2
Turn Ignition On. O F F
Place unit into Valet Mode before programming transmitters See bottom of page for instructions.
Press and hold valet
switch until antenna
LED ashes rapidly.
Step
3
1x
Press and release the
valet switch once.
Step
4
Press and release
the brake pedal
once.
Step
5
Press the LOCK
button on each
transmitter that you
want programmed.
Step
6
Press and release
the brake pedal once.
Turn Ignition off.
A.
B.
Programming
Ready Mode - For Manual Transmission
12 3
4 5 6
&
1 2 3 4 5 6
O F F
Ensure all doors are
closed and the vehicle is
in neutral.
While the engine is
running, engage the
Parking Brake.
Release the Brake Pedal Press the START button. The
parking lights will ash once
and then stay on.
Turn the ignition off and
remove the key.
Exit the vehicle and
close all the doors. The
engine will shut off once
all the doors are closed.
Programming
To Disable Ready Mode
STANDARD
• Open any door(s)
• Open the hood
• Disengage the parking brake
With Neutral Safety Switch
• Transmission not in neutral position
• Open the hood
• Disengage the parking brake
Note: If the parking lights
ash 3 times when remote
starting, Ready Mode is not
enabled.
Programming
Enter/Exit Valet Mode
I G N
Turn Ignition On.
A. B.
C.
Insert the
key and
turn it to
the ignition
Within 10
seconds
press and
release the
Valet switch 3
times.
The LED
will turn ON
solid blue
and remain
ON.
Programming
Cold Start Mode
To Enable
Press UNLOCK
and START buttons
simultaneously for 1
second until the park
lights ash once.
To Disable
- Press UNLOCK and START simultaneously
- Put the Remote Starter into Valet Mode
- Remote Start the vehicle
- Open the hood
- Press the brake pedal
- Turn the key to the ignition position
- Disable Ready Mode (manual transmission)
Programming
Remote Start / Alarm Diagnostics
Remote Starter Diagnostics
Parking Light Flashes - Before Starting
3x - Ready Mode is disabled
4x - Valet Mode Activated (The LED on the
antenna is on)
5x - Hood open
Parking Light Flashes - After Starting
1x - Normal Stop (Park brake, Brake)
3x - Runtime expired or shut down by remote
4x - No tachometer signal
5x - Hood open
6x - Over crank threshold (8 seconds)
Alarm Diagnostics
Parking Light Flashes - After Disarm
3x - Door open
4x - Shock sensor
5x - Hood open
6x - Trunk open
7x - Auxilliary IN
8x - Tilt Sensor
9x - Ignition
D.
O F F
Turn Ignition off.
3x
12 3
4 5 6
&

Page 5
Programming
Programming Options
GS-CHR-T3
1 and 2-way LED Remote Starter
Options in BOLD RED are default settings.
I G N
Turn Ignition On.
1 2 3 4 5 6
Press and hold valet
switch until antenna
LED ashes rapidly.
Press and release the
valet switch 1-37 times
for the desired channel.
Press and release
the brake pedal
once.
Press Lock(1), Unlock(2),
Trunk(3), or Start(4) on a
programmed remote to
select the mode.
1 2
3 4 O F F
Turn Ignition off.
The Channel will reset.
Functions
1
2
3
4
5
6
Add Remote
Ignion Conguraon
Tachless Sensivity
Run Time
Alarm Opons
Door Lock Before And Aer
Remote Start
Mode 1
Button 1
Program Driver 1
Ignion
Increase Crank Time
Gas: 15 Minutes
Diesel: 30 Minutes
Sets Funcons #7, #9,
#14 & #15 as default
Disabled
7
8
9
10
11
12
Safety Locks
Unlock Pulse Time
Acve or Passive Alarm
& Starter Kill
Starter Kill Output
Mode 2
Button 2
Program Driver
Mode 3
Button 3
Mulvehicle Programming
Accessory
+++++
Gas: 7 Minutes
Diesel: 14 Minutes
Enables Funcons #7, #9,
#14 & #15 at mode 2
Start(Default)
++++(Default)
Gas: 3 Minutes
Diesel: 6 Minutes
Unlock before remote start
& Lock aer remote start Lock aer remote start
Disabled
Unlock and relock aer
shut down
Mode 4
Button 4
+++
Mode 5
Button 1 & 2
++
Relock 10 seconds aer
shut down
Lock aer foot brake & un-
lock aer key is turned o Unlock aer key is turned o
Single 0.25 sec. Double 0.25 sec. Single 4.0 sec. Single 2.5 sec. Single 1.5 sec.
Conrmaon
Acve - Press Lock
to acvate the Alarm
and Starter Kill
Passive(Lock Disabled)
Arm alarm & acvate
starter kill 30 seconds
aer door is closed
Passive(Lock Enabled)
Arm alarm, acvate
starter kill & lock door
when the door is closed
Starter kill & An grind An Grind only Relay normally open
1st Lock/Unlock - Silent
2nd Lock/Unlock - Sound
----------------------------------
Antenna LED Acve
Lock/Unlock
Sound Always
Antenna LED
Disabled
Antenna LED
Disabled with
ignion
13
14
Sound Conrmaon
Conrmaon Pulse
Horn Only
Long Short
Alarm & Starter Opons Alarm disabled
Remote starter enabled
Alarm & Remote starter
enabled
Alarm enabled, Remote
starter disabled
Disabled
(Unlock Signal)
Automacally Lock and
rearm alarm if door(s) are
not opened aer 30 seconds
15 Smart Door Lock
Relocking and Alarm
Rearming
Lock when starter kill arms Arm pulse only when the
alarm is disarmed
16 Cold Start Timer 3 hours/Runme 1.5 hours/Runme 3 hours/5 Minutes 1.5 hours/5 minutes Cold Time O
17 Domelight Delay Disabled
Enable-Ignore door trigger
(dome light) when arming or
Remote Starng
18 Diesel Mode Disabled
Enable (20 seconds)
Delay between Ignion
power up and Starter crank
Enable (10 seconds)
Delay between Ignion
power up and Starter crank
19 Turbo Timer Disabled Run 2 minutes Run 4 minutes
20
Engine Supervision:
-Tachless-
-Analog Tach-
-Tach Data-Link-
Tachless on crank and super-
vision Tach Data-Link
or Analogic aer.
Tachless Only
(automac transmission only)
Start (crank) 8 sec on
tachless
(automac transmission
only)
Start (Crank) 8 sec +
Supervision by Data-Link
Tach
(Data interface required)
Single 0.75 sec.
21 Start Aempts 2
Tach Data-Link only
(Data interface
required)
1 3
22
23
Transmier Start/Stop
Funcon
Start(buon 4) 1 sec.
Stop(AUX-buon 4) 1 sec
Start(buon 4) 3 sec.
Stop(AUX-buon 4) 1 sec
Opon alarm acve
2-way remote Baery saver
Start(AUX-buon 4) 1 sec.
Stop(buon 4) 1 sec.
Master Reset Rest All Opons to
Default
Mode 6
Button 3 & 4

Programming
Page 6
Programming Options Continued
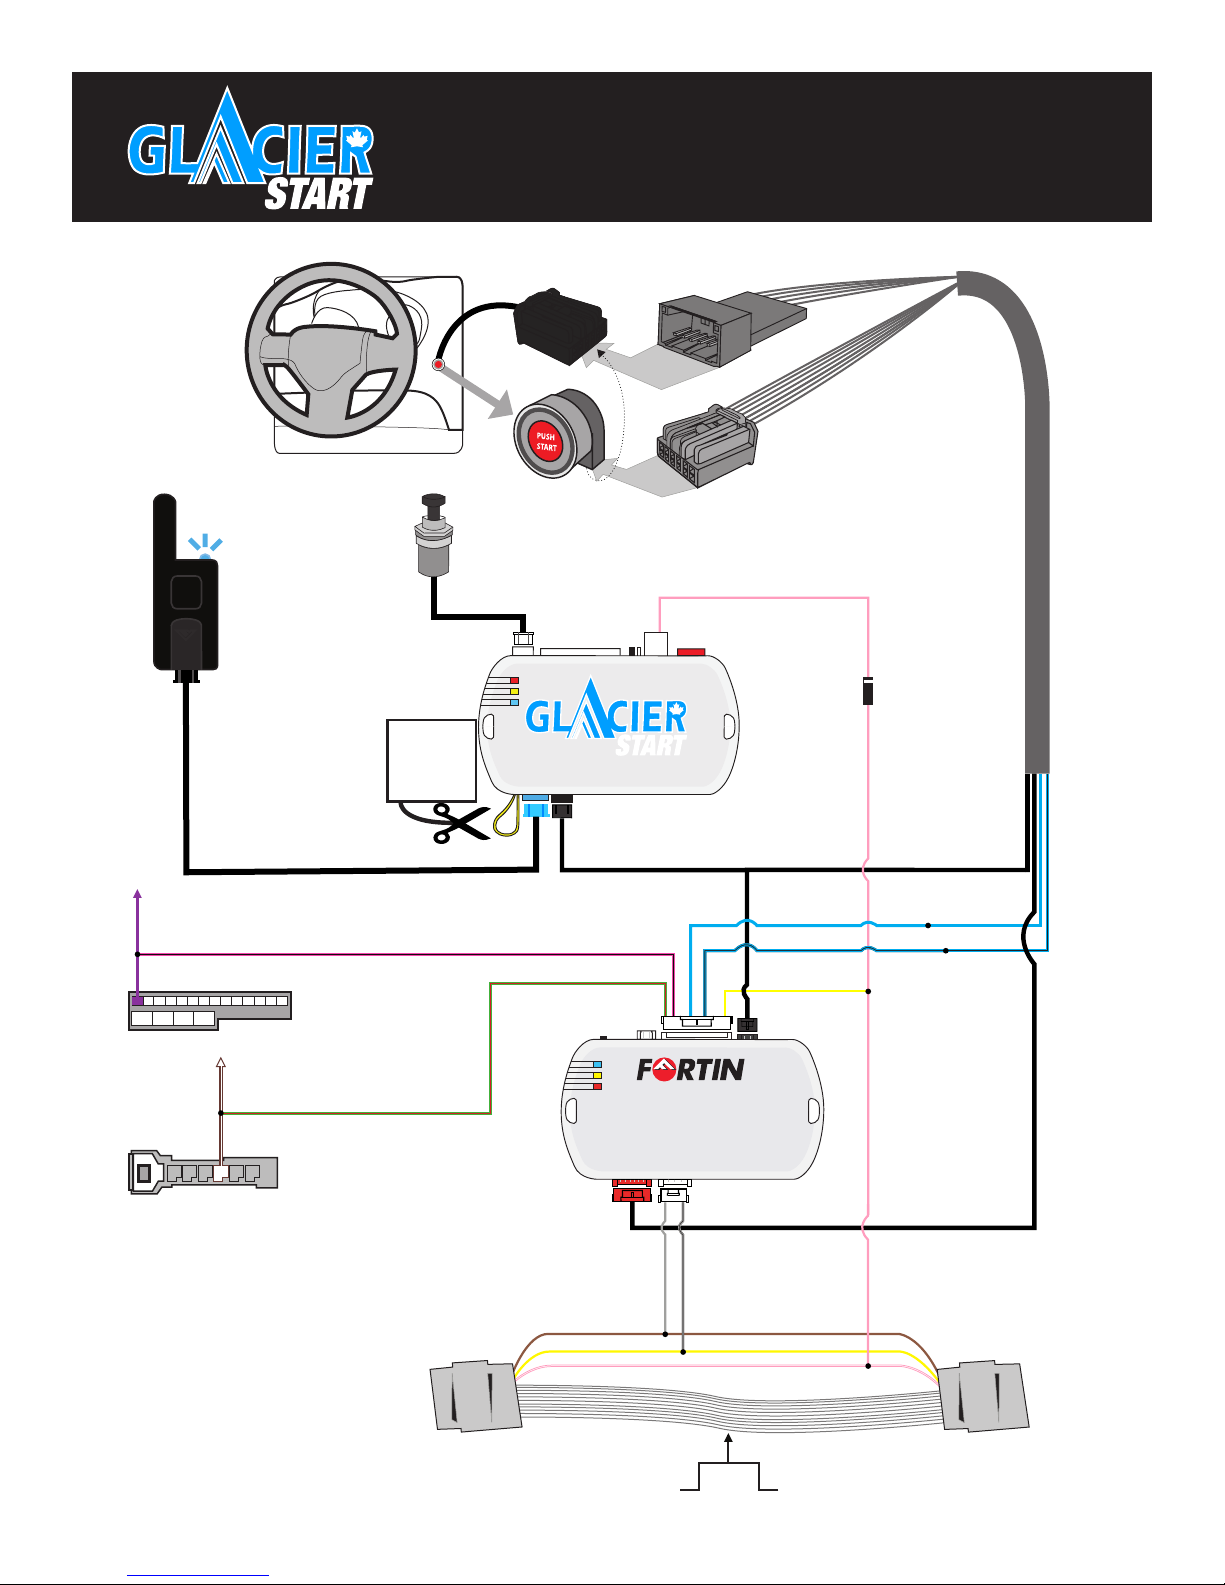
GS-CHR-T3
1 and 2-way LED Remote Starter
Options in BOLD RED are default settings.
Functions
Push To Start
Conguraon
Auxilliary 1 Output
(AUX-LOCK)
Hybrid Mode
Auxilliary 1 Output
(AUX-UNLOCK)
Not Supported
Alarm Duraon
Mode 1
Button 1
Disabled
Sliding Doors
Data Link Only
Gas/Diesel Vehicle
30 Seconds
Valet Code
Not Supported
Mode 2
Button 2
Applicaon 1
Mode 3
Button 3
Applicaon 2, Turn OFF the
engine when the door is
open. See www.ifar.ca for
the installaon guide
Hybrid Vehicle
60 Seconds 120 Seconds
Ignion ON, Valet
buon x3 mes
Mode 4
Button 4
Mode 5
Button 1 & 2
Ignion ON, Valet buon x3
mes and x1 me 3 seconds
36
35
34
33
32
31
30
29
28
27
26
25
24
37
Applicaon 3, Turn OFF the
engine when the foot brake
is pressed
Sliding Doors
Data Link Only
Ignion ON, Valet buon x4
mes and x1 me 3 seconds
Ignion ON, Valet buon x5
mes and x1 me 3 seconds
Ignion ON, Valet buon x6
mes and x1 me 3 seconds
Ignion ON, Valet buon x7
mes and x1 me 3 seconds
Ground Out Shut down 1 second aer
remote start runme
Shut down 3 seconds aer
remote start runme
Manual Transmission
Ready Mode Acvaon
Acvated by the remote
starter remote
Automacally acvated
by hand brake and foot
brake(ON). Not funconal
on tachless. Tach must be
connected
Trunk Output Pulse 0.5 seconds Pulse 2.5 seconds Unlock before trunk pulse
0.5 sec
Door unlock Special
Applicaon No Special Applicaon Acvate vehicle ignion
at Unlock
Acvate vehicle ignion and
accessory at Unlock
Valet Mode
Conguraon
By remote: Lock &
Unlock or valet buon
By remote: AUX-Lock &
Unlock or valet buon By valet buon only
Security Conguraon No Special Applicaon
Security ON: Shutdown
Engine if the door is opened
before Unlock is pressed.
(Door trigger required)
Mode 6
Button 3 & 4
The information on this sheet is provided on an (as is) basis with no representation or warranty of accuracy whatsoever. It is the sole
responsibility of the installer to check and verify any circuit before connecting to it. Only a computer safe logic probe or digital multime-
ter should be used. GRANDWEST ENTERPRISES INCORPORATED assumes no liability or responsibility whatsoever pertaining to
the accuracy or currency of the information supplied. The installation in every case is the sole responsibility of the installer performing
the work and GRANDWEST ENTERPRISES INCORPORATED assumes no liability or responsibility whatsoever resulting from any
type of installation, whether performed properly, improperly or any other way. Neither the manufacturer or distributor of this module is
responsible of damages of any kind indirectly or directly caused by these modules, except for the replacement of this module in case
of manufacturing defects. These modules must be installed by a qualied technician. The information supplied is a guide only. This
instruction guide may change without notice. Call Grandwest Enterprises Incorporated at 1-800-563-7755 to get the latest version.
Table of contents
Popular Remote Starter manuals by other brands

Code Alarm
Code Alarm ca6154 Professional Series installation guide

Autostart
Autostart AS-2272 user guide

Starkpower
Starkpower JUMPBOX FLEET PRO 1500D manual

Directed Electronics
Directed Electronics CLIFFORD 1.3X owner's guide

Mazda
Mazda C960 V7 620 User instructions

Ultra Start
Ultra Start 45xx Series owner's guide