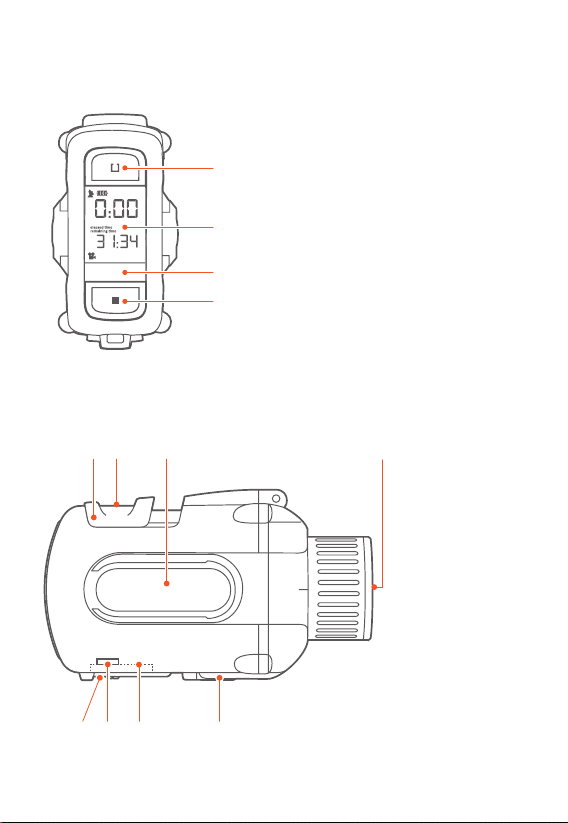
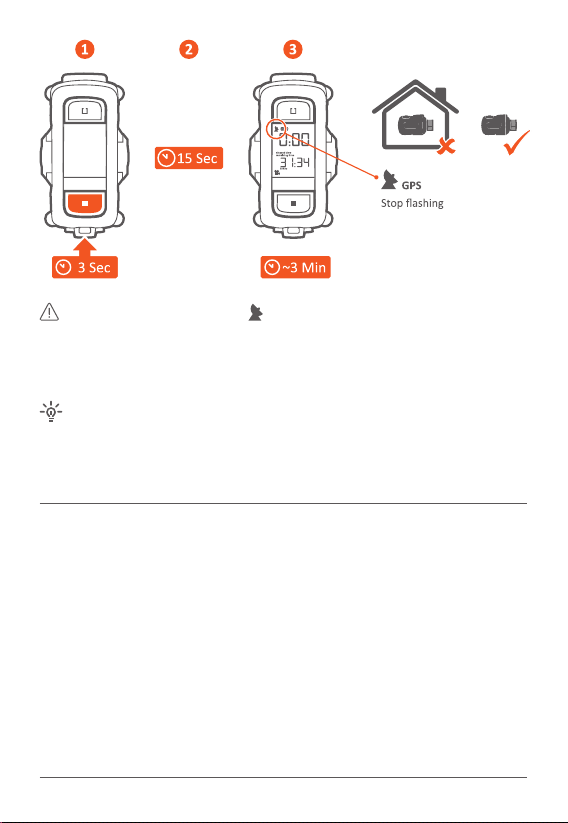
gobandit LIVE GBZ0500 User manual

1
USER MANUAL
ENGLISH
How to get the best out of your gobandit camera
Model name:gobandit LIVE GBZ0500
Model name:gobandit RACE GBZ0300

2
ABOUT THE CAMERA
1
2
3
4
1080p
56 78
91011 12
1.
2. Status Display
3. Status LED
4.
5.
6.
7.
8.
9.
10.
11.
12.

DISPLAY
1.
when charging segments scrolling
2.
blinking = searching
solid = GPS available
3.
4.
elapsed me/remaining me
5.
6. (only gobandit LIVE camera)
7.
8.
9.
10.
11. (ashing)
12. in km/h or mph
13. average and max speed
14. in m or
15.
16.
17. (only gobandit LIVE camera)
13.
14.
15.
16.
17.
18.
13
14
15
16
17 18
1
1080p
HD
wiFi
AVg
MAX
SD
211
12
14
15
13
3
4
5
6
7
8
9 17
16
10

4
· Open the front door of the camera by pulling the clamp at the boom of
the camera.
1
2
3
· Pull the isolaon stripe labeled with “REMOVE” - if stripe can not re-
moved easily, take out the baery for this purpose: open baery latch and
take out baery
· Insert the baery in the compartment with “ ” aligned.
· Make sure baery latch snapped in again to x baery.

5
Your camera requires a microSD-Card for recording video/photos.
To insert the microSD-Card insert the microSD card unl it clicks
Camera accepts up to 32GB microSD.
Use High Speed cards – at least class 6 SDHC cards.
For a list of compable microSD cards visit
Always turn camera o before removing microSD card and/or baery.
If you have problems with your microSD card, format the card using the
Sengs menu: SET > toggle to DEL > select FMT (see page 18).
AnTI FOg InSERTS DEPARTMEnT
Camera has a an fog inserts department to oponally insert an an fog
insert (a desiccant strip) to absorb/adsorb, moisture and extract water va-

6
por from within the camera especially from lens. If you detect condensed
water / fog in the lens, you can replace the insert (desiccant strip) in the
an fog inserts department.
For further detail see An Fog Inserts user guide supplement.
Please visit for purchasing an fog inserts.
MOUnTIng YOUR CAMERA
Mount your camera using the Flat surface mount, Goggle mount or the
Universal mount:
When you are downhill skiing, snowboarding or motocrossing, you can
mount the camera on a goggle strap:
push
place back
pull out
goggle strap
You can mount the camera to the top or side of your helmet, or directly
onto your motorcycle or race car. For best results make sure to clean the
surface of your gear (e.g. your helmet) with the alcohol pad, and mount
at room temperature. If possible, aach the mount to your gear 12 hours
before use. You can easily rotate the posion of your camera by unfasten-

7
ing the mounng screw with the edge of a coin.
You can mount the camera using any mount e.g. a tripod or RAM mounts
supporng a 1/4” diameter, 20 threads per inch (1/4-20) screw using the
universal mount.
MOUnT RAILS
Once the mount is xed, slide the camera on the mount rails unl
completely forward:
mount rails
camera rails
Please visit for purchasing further
mounts, e.g. handle bar mount.
BEFORE USING THE CAMERA WITH ANY MOUNT IN YOUR ACTIVITIES,
DETERMINE IF THE HOLDING POWER OF THE MOUNT IS APPROPRIATE
AND SAFE. THE CAMERA COULD CAUSE INJURY OR HARM IN THE EVENT
THAT IT COMES LOOSE FROM THE MOUNT. GOBANDIT DOES NOT
WARRANTEE LOST OR DAMAGED CAMERAS.
SAFETY LEASH
You can addionally use the Safety leash to secure the camera, in case it
comes loose from the mount.

8
safety leash
· Unclip leash
· Loop one end of leash through side hole of camera, then out the back
· Aach other end of leash to e.g. the handle bar
· Clip leash together
DO NOT ATTACH THE LEASH TO THE CAMERA WHEN THE CAMERA IS
MOUNTED ON HELMET OR GOGGLES, WHEN THE CAMERA WILL BE
USED IN HIGH WINDS OR AT HIGH VELOCITIES OR IN ANY OTHER
CIRCUMSTANCES WHERE BY THE CAMERA COULD CAUSE INJURY OR HARM
IN THE EVENT THAT IT COMES LOOSE FORM THE MOUNT AND REMAINS
TETHERED BY THE LEASH. BY ATTACHING THE LEASH YOU AGREE TO WAVE
ANY CLAIMS AGAINST GOBANDIT GMBH AND ANY OF ITS AFFILIATES,
AGENTS, EMPLOYEES, OFFICERS OR DIRECTORS ARISING FROM THE USE OF
THE LEASH.
LEnS ALIgnMEnT
The front lens of the camera is designed for opcal rotaon (90° to the
right and 90° to the le).
Align the opcs to capture a level landscape image even if the camera is
not mounted level. Adjusts vercally or horizontally.

9
The GPS performance is beer when GPS antenna (underneath
Record switch) looks towards the sky.
POwER On
· Press and hold the buon for a minimum of 3 seconds.
· Display shows GO and counng up while starng
· Camera beeps once and the rear LED blinks in green when ready.
· Display shows: and is in Video Mode ( ) - in the last used
video resoluon, frame rate and eld of view.
You are ready to record a video.
· If your last mode was Picture mode, display shows
You are ready to take picture sequences in the last used mer sengs

10
rear LED will go solid, stops ashing and Camera beeps once,
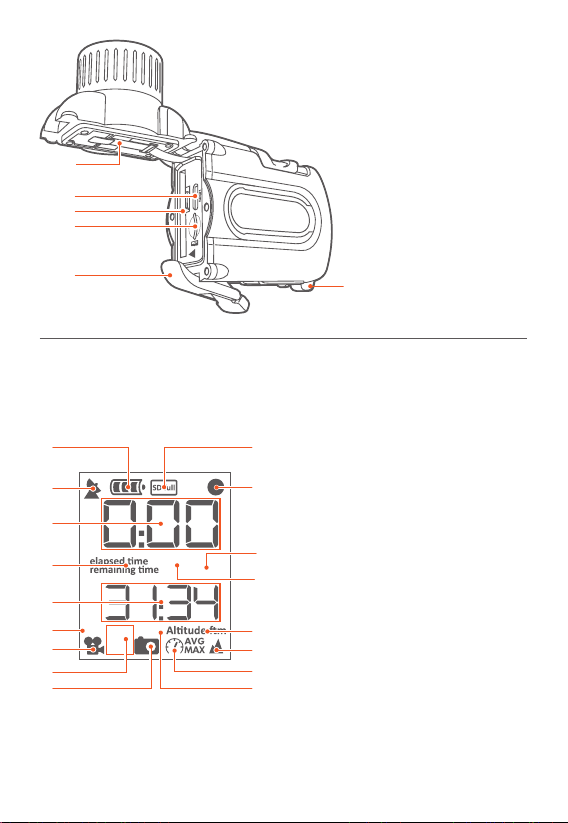
once a GPS x acquired (GPS available / GPS recepon).
Make sure you are outdoors and be aware that it can take some me
(especially aer rst startup and with rst use) to acquire a GPS x.
GPS x is faster when top of the camera is poinng towards the sky
i.e. camera is mounted in a vercal posion. Further, the more open the sky
is the faster will be the GPS x and beer will be the GPS recepon and ac-
curacy, i.e. you may/will have no GPS x indoors, in urban canyons ...
CAMERA FIRMwARE
The Camera rware is the operang soware of your gobandit Camera.
We are connuously improving the Camera rmware. New versions are
available free of charge.
We recommend that you regularly check for updates and make use of
the latest available version. Visit to download
gobandit STUDIO soware for Windows PC or Mac. Connect the camera
using the USB cable. gobandit STUDIO will recognize when a new rmware
for your camera is available and will update your camera’s rmware if
available.

11
RECORDIng
· Slide the “Record” switch forward.
· The rear LED turns blue or red, depending on camera model
(GPS x solid, otherwise ashing)
· Camera beeps as soon as recording starts:
once if GPS x is acquired, or twice if not
· In the upper right of the display the dot ( ) starts ashing.
· If there is an error, the / ashes
· Further, if there is an error, the beeper sound connously,
the rear LED ashes very fast in blue or red
(depending on camera model) and
the error is shown in display – while “Record” switch forward
- microSD card is full ( SD FULL),
- microSD card is not available ( No SD)
- microSD card needs formang ( SD ERR)
· You will see recording/elapsed me in upper display and remaining me
in lower display

12
Camera defaults to video mode 1080p: 1920x1080 @ 30fps.
Camera will sll record video even if camera has not obtained a GPS x.
Video will then not allow showing posion on the map.
Your camera also records the GPS data the enre me your
camera is powered on, e.g. to share your GPS track– even while not
recording a video. You can retrieve the GPS track from the Camera to your
Computer using gobandit STUDIO – as well as switch o this feature if you
don’t require this.
· Slide “Record” switch back, to OFF.
· Camera beeps twice as soon as video recording has stopped.
· The rear LED turns green.
· In the upper right of the display the dot ( ) disappears
POwER / RECHARgE
· Connect camera to a computer with USB cable:
open door of Mini-USB port at the boom.
· If the camera is turned on, baery level indicator segments will scroll
while charging:
· If camera is turned o, rear LED turns green while charging and turns
o when full
· The charge is complete when baery level indicator segments stop
scrolling or, when the camera is switched o, the rear LED light turns
o (aer about 4 hours).

21
Alternavely you can use the oponal gobandit Car Charger or
the gobandit Wall Charger – or charge your baery outside the camera
using the oponal gobandit Baery Charger.
Please visit for purchasing chargers and extra
baeries.
camera baery charges faster when camera is switched o while
charging
· Press and hold the buon for a minimum of 3 seconds.
· Display shows OFF OK?
· Release the buon and press once more to conrm turning o the
camera
· Camera beeps twice and the rear LED turns o.
· Display shows OFF while powering o and saving les.
· Baery level is indicated in the display while camera is turned on:
The more segments displayed, the more power is in the baery.
Always turn camera o before removing baery and/or
microSD-Card.
Camera is automacally powered o when the front door of the
camera is opened by pulling the clamp at the boom.

14
MODE BUTTOn / DISPLAY MODES
Push the Mode buon ( ) shortly to toggle trough the available display
modes:
· Elapsed me and remaining me / Picture mode
· Sengs Menu (SET)
· Current Speed / altude
· Average and max speed
The buon also works as a power buon when held down for
a minimum of 3 seconds.
If you have linked gobandit cered ANT+® accessories, like a Heart Rate
belt to a gobandit LIVE camera, further display modes may be displayed,
e.g. showing bpm (beats per minute).
· Make sure display mode shows / Picture mode
otherwise push the buon shortly and toggle trough the available
display modes
· Push the buon quickly and toggle trough the available modes:
• Video Mode ( ) – default mode
• Picture Mode ( )

15
SETTIngS
· Push the buon shortly to toggle through the available display modes
unl display shows: SET
· Press the buon shortly to enter sengs mode – the rst sengs
funcon is blinking in the display: VID
· Push the buon quickly to toggle through the available sengs unl
you see the desired seng funcon blinking in the display
· Press the buon shortly to select desired sengs funcon
· Sengs changes have to be conrmed by pushing the buon shortly –
display shows:
Your gobandit camera can shoot videos at various resoluons and at vari-
ous frame rates. The most used frame rate is 30 frames per second (fps),
however you can also choose e.g. 60 or 120 fps for a slow moon playback.
· Select the sengs menu SET– toggle to VID:
· Press the buon shortly
· Push the buon shortly to toggle through the available video formats:
display indicated frame rate (e.g. 30F = 30 frames per second) and

16
resoluon (e.g. 1080p for full HD)
· Press the buon shortly to select desired video format
· Conrm your choice by pushing the buon shortly – display shows:
While in Video Mode ( ) and in display mode you
can select the most important video formats: Press and hold the buon
for a minimum of 3 seconds and toggle trough the most important video
formats.
Selected video format is stored on camera – even aer power
o.
In the following table, you can read the consumed le size per minute and
the video me that can be recorded on a 16GB or 32 GB microSD card. Due
to le system limitaons, the maximum le size is ~2GB (2 billion bytes). If
you take a video that exceeds this le size limit, the video will be split into 2
or more les.
1080p 30fps xxMB x hrs xx min x hrs. xx min xx minutes
720p 30fps xxMB x hrs xx min x hrs. xx min xx minutes
720p 60fps xxMB x hrs xx min x hrs. xx min xx minutes
In addion to shoong videos, your gobandit camera can shoot sll
pictures. While the Record switch is slid forward, the camera takes a
sequence of pictures unl you switch back the Record switch. The Picture
mer determines, how many pictures are taken, i.e. in which mer interval
the pictures are taken:
· Select the sengs menu SET – toggle to PIC:

17
· Press the buon shortly
· Push the buon quickly to toggle through the available picture mers:
1, 2, 5, 10, 30 or 60 SEC – for a picture every 1, 2, 5, 10, 30 or 60 seconds -
or 10 /SEC for 10 pictures per second – default is a picture mer of 2
seconds
· Press the buon shortly to select desired picture mer
· Conrm your choice by pushing the buon shortly – display shows:
While in Picture Mode ( ) and in display mode “pic-
tures”: Press and hold the buon for a minimum of 3 seconds and toggle
trough the available picture mers
Picture mer is stored on camera – even aer the power is o.
In display mode , you can see your average and maximum speed –
like on a tachometer.
· Select the sengs menu SET – toggle to RST:
· Press the buon shortly
· Make sure display mode shows:
otherwise push the buon shortly and toggle trough the available
display modes
· Press and hold the buon for a minimum of 3 seconds
maximum and minimum values in the video (skin) are
reset/deleted every me, you start recording a new video.
By selecng the right image preset, you can enhance the video/picture
quality for e.g. cloudy weather or snow.
· Select the sengs menu SET – toggle to IMG:
· Press the buon shortly

18
· Push the buon quickly and toggle through the available image
presets: Everyday Outdoor (Day), Cloudy (Cld), Snow (Sno), User
Sengs (Usr1 or USR2)
· Press the buon shortly to select desired image preset
· Conrm your choice by pushing the buon shortly – display shows:
User Sengs can be congured through gobandit STUDIO or
gobandit MOBILE. To congure using gobandit STUDIO connect the camera
to your PC/Mac using the USB cable. To congure using gobandit MOBILE
connect the gobandit LIVE camera to your iPhone / Smartphone using
Wi-Fi®.
· Select the sengs menu SET – toggle to UNIT:
· Press the buon shortly
· Push the buon quickly and toggle between km/h and m – or mph and
· Press the buon shortly to select desired eld of view
· Conrm your choice by pushing the buon shortly – display shows:
· Make sure display mode shows:
otherwise push the buon shortly and toggle trough the available
display modes
· Press and hold the buon for a minimum of 3 seconds to toggle
between km/h and m – or mph and
Depending on your sports acvity it may be that the default, i.e. maximum
eld of view is too wide –
. To make it more narrow, you can
select 150°, 120° or 90°, depending on video resoluon and frame rate.
· Select the sengs menu SET – toggle to FOV:

19
· Press the buon shortly
· Push the buon quickly and toggle through the available eld of view’s.
· Press the buon shortly to select desired eld of view
· Conrm your choice by pushing the buon shortly – display shows:
In Full HD (1080p) resoluon, only 170° and 150° is possible - in
HD (720p) 170°, 150° and 120° - in other resoluons in addion 90°.
You can delete the last recorded video le or format your microSD card in
your camera.
· Select the sengs menu SET – toggle to DEL:
· Press the buon shortly
· Push the buon quickly and toggle through the available acons:
LST (deleng last video le)
or FORM (format microSD card and delete all les)
· Press the buon shortly to select desired acon
· Conrm your choice by pushing the buon shortly – display shows:
Formang the microSD card deletes all les (i.e. videos,
pictures, GPS tracks) on your microSD card.
You can set the beeping sound to be silent for stealth or courtesy.
· Select the sengs menu SET – toggle to BEEP:
· Press and hold the buon for a minimum of 3 seconds
· Push the buon quickly and toggle between: 0N and OFF.
· Press the buon shortly to select desired mode (on or o)
· Conrm your choice by pushing the buon shortly – display shows:

20
PHOnE COnnECTIOn
The gobandit LIVE Camera has Wi-Fi® onboard. Using a mobile device
(iPhone or other Smartphones) and the gobandit mobile app “gobandit
MOBILE”, you can preview what the camera sees (viewnder), play videos
stored on the camera’s microSD card, transfer videos from the gobandit
camera to your mobile phone and then upload videos through your mobile
phone’s network connecon or a Wi-Fi hotspot to facebook, YouTube and
the gobandit COMMUNITY. Further you can use your mobile phone as a remote
control and congure your camera sengs using gobandit MOBILE.
This manual suits for next models
1
Table of contents