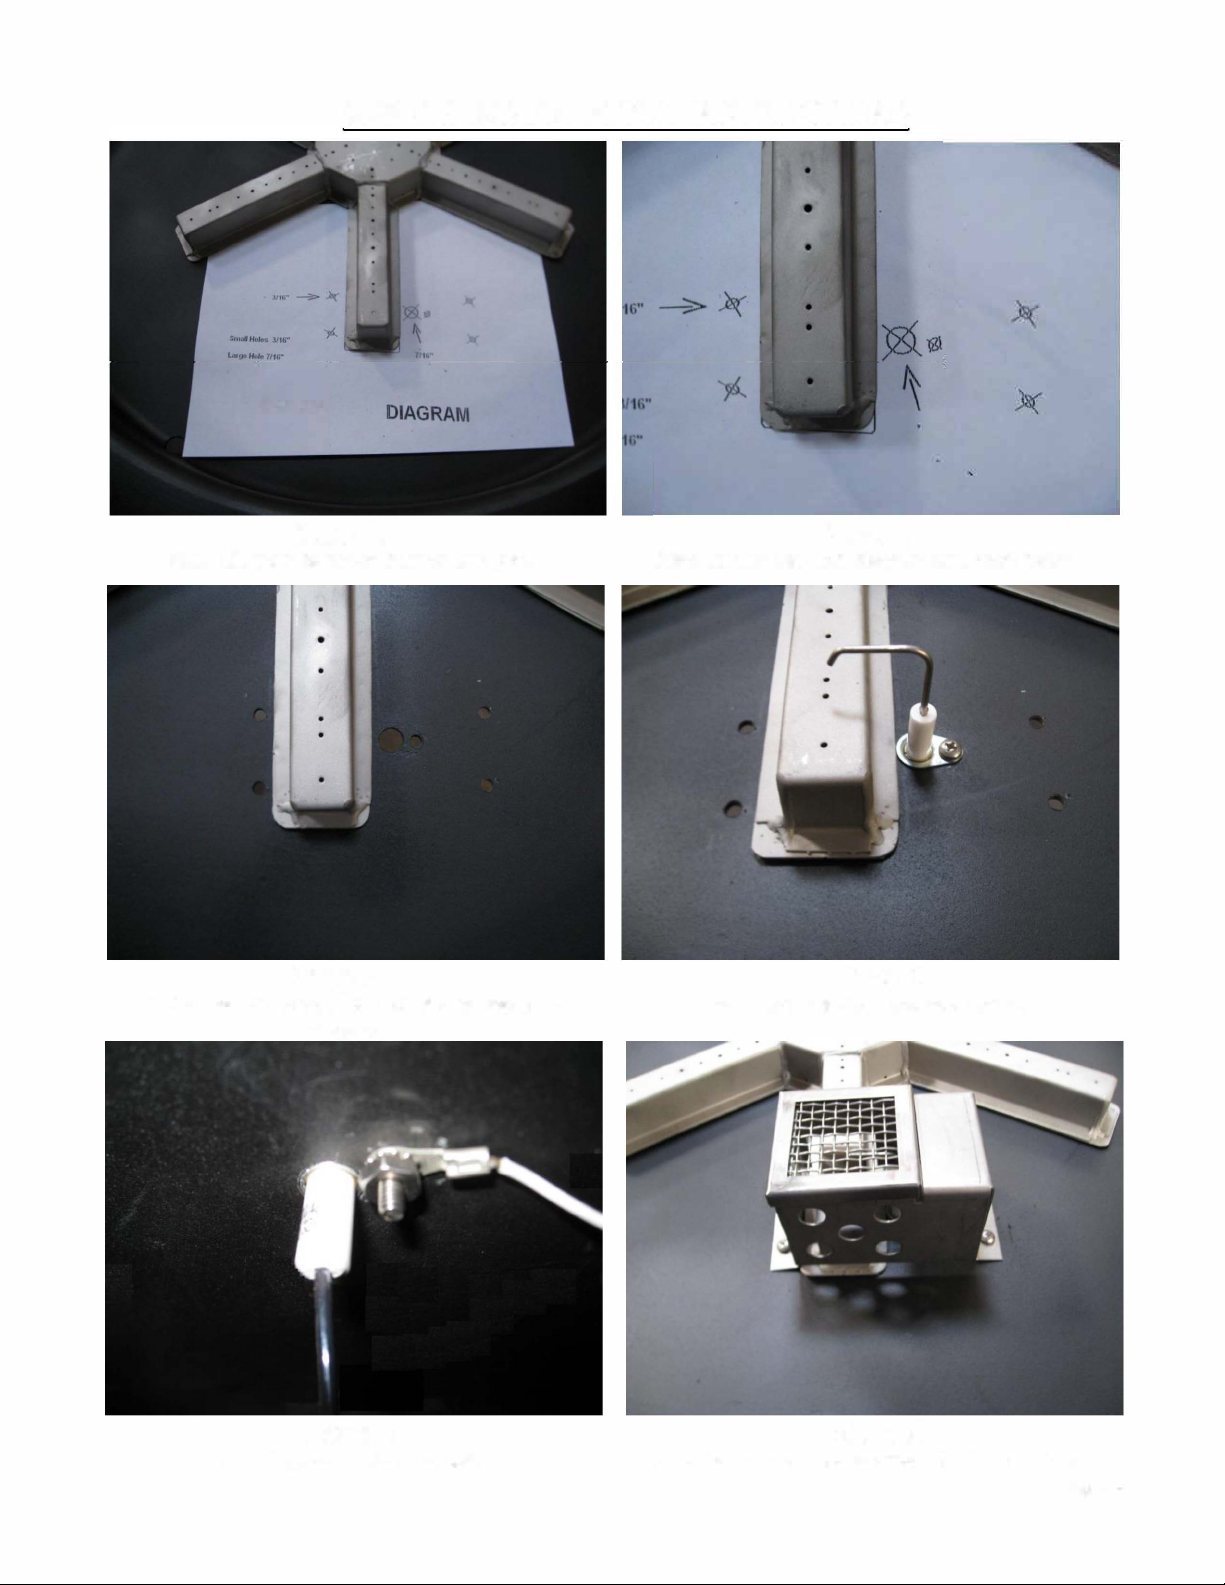
Golden Blount GFP-24 User manual

Outdoor Match Light
Continuous Spark Fire Pit Components
Installation and Operating Instructions
IF YOU CANNOT READ OR UNDERSTAND THESE INSTALLATION INSTRUCTIONS DO
NOT ATTEMPT TO INSTALL OR OPERATE THIS APPLIANCE
Warning: For Outdoor Use Only
PLEASE RETAIN THIS MANUAL FOR FUTURE REFERENCE
INSTALLATION PRECAUTION:
This re pit requires a minimum 18-square inches (per side) of cross ventilation.
Failure to provide proper ventilation can void the warranty.
GB-GFP 4/2020
FOR NATURAL GAS USE ONLY

Golden Blount inc.
!! !!!"#$%&!
!
"#!$%&!'()**!+,'-!
!
1. Shut off gas to the appliance.
2. Extinguish any open flame.
3. If odor continues, keep away
from the appliance and
immediately call your gas
supplier or fire department.
!!'"&#(#$!
!
.%!/%0!'0%1)!%1!&')!+,'%*2/)!%1!%03)1!
#*,((,4*)!5,6%1'!,/7!*28&27'!2/!03)!
5292/20$!%#!032'!%1!%03)1!,66*2,/9):!
!
!!!"#$%&! ! ! )"&*+#,-+#+.(!%,/"00"&!,
,
1234,56673589:,958,6;<=>9:,95;?<8,@<8<A3=:,
B2392,254,8<,<=<;C,
,
D438E,3F,38,58,:897<4:=,4659:,958,G377,H<>C,
,
#:I:;,>4:,F234,56673589:,38,58,:897<4:=,4659:,
4>92,54,5,95@6:;J,F:8FJ,95;,<;,2<@:C,
!
'"&#(#$-!!"#!03)!2/#%1(,02%/!2/!03)')!2/'01&902%/'!2'!/%0!#%**%?)7!)@,90*$A!,!#21)!%1!
)@6*%'2%/!(,$!1)'&*0!9,&'2/+!61%6)10$!7,(,+)A!6)1'%/,*!2/B&1$!%1!7),03:!
!
K+&,L+D&,M"K%1L,
.%!/%!'0%1)!%1!&')!+,'%*2/)!%1!%03)1!#*,((,4*)!5,6%1'!,/7!*28&27'!2/!03)!5292/20$!%#!
032'!%1!,/%03)1!,66*2,/9):!
!! !!'"&#(#$!
"(61%6)1!2/'0,**,02%/A!,7B&'0()/0A!
,*0)1,02%/A!')1529)!%1!(,2/0)/,/9)!9,/!
9,&')!2/B&1$!%1!61%6)10$!7,(,+):!!C),7!
03)!2/'0,**,02%/A!%6)1,02/+!,/7!
(,2/0)/,/9)!2/'01&902%/'!03%1%&+3*$!
4)#%1)!2/'0,**2/+!%1!')15292/+!032'!
)8&26()/0!!!!!!
'"&#(#$,
.%!/%0!*),5)!&/,00)/7)7!7&12/+!&'):!
.%!/%0!&')!#%1!9%%D2/+:!
E%**%?!,**!+,'!*),D!61%9)7&1)'!2/!032'!
(,/&,*!612%1!0%!%6)1,02%/:!
REV. 4-06-2020 Page 2
WARNING: If this fire pit is exposed to rain,snow,ice or water it must be
fully dried out before next operation. !

SPECIFICATIONS
Table1. Fire Pit Dimensions
36”
A
B
C
.875 TYP. (usable flat lip)
*
*D
Ground Level
Figure 1. Fire Pit dimensions; refer to Table 1.
Figure 2. Clearance to Combustibles
(Not to be used in an enclosed space)
Page 3
Model Btu’s
Natural Gas
SPOKE-14 80,000 Btu’s
SPOKE-+20 160,000 Btu’s
Table 2. Btu Specications
NG
Min..
Inlet
5.0”WC
Max.
Inlet
10.5”WC
Table 3. Gas Pressures
Model A
Pan Depth
B Min./Max
Install Opening
C
Inside Pan
D
Ground Level
GFP-24-PAN-CSI 2.5” 24.5"/29" 24”8”
GFP-36-PAN-CSI 436.5"/41" 36” 8”
Note: Fire pits are rated at maximum Btu’s which is dependent upon proper gas pipe sizing. Flex line size also affects
Btu’s. As a result your Btu’s may vary from Table 2 specications listed above.
PLEASE NOTE:
If you purchased a spoke burner only without the re pit pan, the burner must still be installed into a
non-combustible structure following the same requirements throughout this installation manual.

WARNING: Proper clearances from combustible, construction and materials must be maintained from all sides, top
and bottom of this appliance. This appliance should never be placed on any combustible surface. This appliance
should never be placed closer than 36-inches from any side to any combustible construction or materials.
PREPARING A NON-COMBUSTIBLE STRUCTURE
1. Turn OFF gas supply system. NOTE: All gas connections (except for brass to brass) require the following. Clean pipe
threads using either a wire brush or steel wool. Apply Teon tape or pipe sealant to the steel ttings before making any
connection. BE CAREFUL! Ensure all gas connections are snug, but not over tighten!
2. Extend the gas supply system using minimum of 1/2” black iron pipe or an approved exible gas line from existing
house supply. This can be accomplished by teeing off or tapping into a convenient gas line connection. Install necessary
pipe for the distance required and then install a manual shut-off valve at the exterior house wall. If pipe is to pass through
a foundation or house wall, make sure to re-seal the area around the pipe with weather sealant.
3. From manual valve, extend gas pipe to the Fire Pit location. NOTE: If pipe is to be placed in an underground trench,
check with local codes for required depth and materials needed.
4. Install a ¾” female x ½” male ared brass tting to the end of the ¾” black iron pipe. Be sure to clean the pipe threads
and use Teon tape or pipe sealant.
5. Connect the ½” female ared ex connector from the Fire Pit to the ½” male ared brass tting secured to the black iron
pipe. Note: Flare to are connections do not require Teon tape or pipe sealant.
IMPORTANT
The appliance and its manual shutoff valve must be disconnected from the gas supply piping system during any
pressure testing of the system at test pressure testing of the system at test pressures in excess of ½ psig (3.5kPa).
This appliance must be isolated from the gas supply piping system by closing its manual shutoff valve during any
pressure testing of the gas supply piping system at test pressures equal to or less than ½ psig (3.5kPa)
Enclousure
2”x3”
Examples of Cross Ventilation
3 - 2”x3” Slots Per Side or
2- 1” x 9” Slots Per Side
Cross Flow Ventilation
(Min. 18 Sq. In. Per Side)
Figure 3. Cross Ventilation Example
VENTILATION FOR NON-COMBUSTIBLE ENCLOSURE
Fire pits are subjected to many outdoor elements such as
rain, snow, wind, heat or cold. A minimum of 18 square
inches of cross ventilation (2 sides) is required to keep the
components in good working order. Use gure 3 as guide
to assist to incorporate proper ventilation. NOTE: Ventilation is
not required at the bottom and may also be incorporated in the
upper portion of an enclosure.
The Fire Pan is to be installed on a flat, stable surface, away from any combustible materials. Install Fire Pit on any level,
outdoor non-combustible surface. NOTE: Do not place fire pan directly on grass, dirt, or rocks this may prevent proper
ventilation.
HARD PIPING TO FIRE PIT WITHOUT GAS PROXIMITY
NOTE: We recommend using 1/"2 or 3/4” black iron pipe however please refer to the NFPA54 (National Fuel Gas Code)
for proper pipe sizing when exceeding 20-feet in length for fire pits rated above 100,000 Btu's
Installation of Natural gas should be done by a qualified installer, service agency or gas supplier.
Fire Pan
Fire Pan
Page 4

REQUIREMENTS
INSTALLING KEY VALVE AND PIEZO IGNITOR
A separately purchased key valve,1- key valve, 1- key and 1- ange. (See gure 4). The valve requires a 1 1/4” round
clearance hole in the non-combustible enclosure wall. See the instructions supplied with the key valve for more
specic details. Note: Be sure to leak test all tting before operation. Figure 5 shows an example of a typical
installation.
After the fire pit pan is installed run the piezo igniter wires into the electrical junction box. Piezio wires are 24-inches in
length, ensure your installation does not exceed the wire length for proper connection.
Primary Gas
Supply
ON
OFF
Fig. 4 Key valve components.
1. Only non-combustible materials should come in direct contact with any part of the Fire Pan. Underneath area should be
non-combustible as well.
2. Only use ¾” gas supply line to the Fire Pan. Based on the selection of the fire pan size, the proper brass fittings should
be used to ensure a proper installation.
3. Determine the size of the round or square Fire Pit you are preparing to install (Refer to page 4).
4. You must provide a round or square opening out to place the fire pan into the non-combustible enclosure surround. Do
not exceed the maximum opening from Table 1, dimension B.
5. Follow the local code requirements for the gas type being used. This Fire Pan should be installed in accordance with
local codes and ordinances or in the absence of local codes, with the latest National Fuel Gas Code, ANSI Z223.1
NFPA54.
6. Fire Pits create high temperatures, it is very important to have any combustibles at a safe distance.
7. CAUTION: A minimum of 18 square inches of cross ventilation (per side) is required to keep the enclosure dry.
8. These products are designed for outdoor use only. Not approved for any indoor use.
9. This Fire Pan is designed to have Lava Rock/Media completely covering the spoke burner, so that the burner is
invisible. Do not cover more than 2” above the top of the covered burner. When purchasing Lava Rock it is
recommended to use minimum of 1" diameter as a base to fill the burner pan. Decorative glass covering may be loosely
scattered on top of the rock if desired or non-combustible logs may be added for a campfire look. If logs are chosen, do
not place on decorative glass base, use only Lava Rock as the base.
10. Gas lines and ttings must be installed in to the non-combustible structure. All gas connections must be leak tested
before installation of the re pit. Soapy water leak detection is required before regular use of the re pit.
11. Do not use material that will absorb moisture over time and will not release this moisture quickly. Moisture can boil in this
material and can rapidly break apart and cause damage or personal injury.
12. Never leave any other combustible material on top of the fire pan. This could cause unsafe operation of this system and
damage to the component that will not be covered under our warranty.
13. Cover the complete burner with lava or decorative Rock material (min. 1-inch diameter). Completely cover the spoke
burner, no more than 2-inches above the spoke burner.
INSTALLATION OF FIRE PAN INTO AN APPROVED ENCLOSURE
Page 5

Page 6
Manual Spark
Piezo Ignitor
Key Valve
Gas Supply
Fire Pit Pan
Non-Combustible
Fire Pit Enclousure
Shut-O
Key Valve Flange
Non-
Combustible
Wall Material
Non-
Combustible
Wall Material
Key Valve
Primary Gas
Supply
K
e
y
V
a
l
v
e
S
i
d
e
V
i
e
w
D
e
t
a
i
l
Non-
Combustible
Wall Material
Non-
Combustible
Wall Material
Securing Tab
Securing Tab
Self-Securing
Junction Box
Piezo Ignitor
Mounting Plate
Piezo Wires
P
i
e
z
o
I
g
n
i
t
o
r
S
i
d
e
V
i
e
w
D
e
t
a
i
l
Fig. 5 Typical installation.
NOTE: Gas supply shut-off and ex
line to the key valve are not supplied.

GFP-CSI
Step 1
Place diagram between burner and pan.
Step 3
Drill holes with proper drill bit size as listed on
diagram.
Step 5
Attach ground wire and nut.
7/16"
Step 2
Align burner leg with diagram and mark holes.
Step 4
Insert spark igniter and add screw.
Step 6
Cover with housing and attach leads to igniter.
Page
7

0
()
@ @
8

OPERATION
PAGE
9

0
This manual suits for next models
1
Table of contents
Popular Outdoor Fireplace manuals by other brands

BlueRhino
BlueRhino Uniflame WAF830SP owner's manual

RealFlame
RealFlame Round Propane Fire Table owner's manual

HAMPTON BAY
HAMPTON BAY FT-61689 Use and care guide

RealFlame
RealFlame Sedona C11810LP owner's manual

FLORABEST
FLORABEST 297427 Instructions for use

HAMPTON BAY
HAMPTON BAY REDWOOD VALLEY FSS60428RST Use and care guide

OW Lee
OW Lee CASUAL FIRESIDE 5110-2647O manual

OW Lee
OW Lee CASUAL FIRESIDE 5110-36RDO-E owner's manual

RealFlame
RealFlame 910 Alderwood Assembly instructions

HAMPTON BAY
HAMPTON BAY S5-BRH00800 Use and care guide

BlueRhino
BlueRhino UniFlame WAD653S owner's manual

Classic Flame
Classic Flame FP35091 manual