Goodmans G-SHOT 5011CC User manual

2
Specifications
ImageSensor:5MegapixelCMOSsensor(2592x1944pixels)
DigitalCameraResolution:
-2592 x1944 [5MegaPixel]
-2432 x1824 [4MegaPixel]
-2048 x1536 [3MegaPixel]
-1600 x1200 [2MegaPixel]
-640 x480 [VGA-0.3Megapixel]
ImageQualityOption:SuperFine;Fine;Normal
DigitalCamcorderResolutionoptions:
-VGA:640 x480 at28fps
-QVGA:320x240 at30fps
LCDDisplay:2.0"TFT LCD(HighresolutionLTPS typeat130Kpixel)
InternalMemory:64MBFlash
HandShakeStabilizer:pre-setincamerasprogram
ExternalStorage:SDCard(MMCcompatible)up to512MB
Shutter:Electrical
MovieFileFormat:AVI(MPEG4),withsound
StillImageFileFormat:JPEG
VoiceFileFormat:WAV
WhiteBalance:Auto/Manual(Sunny, cloudy,Fluorescent, Tungsten)
FlashModes:Anti-RedEye, Automatic, On, Off
Microphone:Built-in
DigitalZoom:8XDigitalZoom
Rangeoffocus:1.2mtoInfinity
Self-timer:10 seconddelay
TVoutput:PAL/NTSC
USBconnectivity:version2.0

3
InternalStorage:64MBInternalFlashMemory
Numberofimagesstoredin64MB(typical):
Mode Condition Approx. capacity
VGA(640x480) ~5mins20sec
DigitalVideo(DV)
QVGA(320x240) ~14min
SuperFine
25
Fine 55
5MegaPixel:2592x1944
Normal 105
SuperFine
30
Fine 45
4MegaPixel:2432x1824
Normal 140
SuperFine
43
Fine 92
3MegaPixel:2048x1536
Normal 225
SuperFine
68
Fine 145
2MegaPixel:1600x1200
Normal 520
SuperFine
350
Fine 740
Camera
0.3MegaPixel(VGA):640 x480
Normal 1200
Voice Recording(VR)
-- ~56min
NOTE:
•Theabovefiguresareonlyestimates. Theactualnumberswill varydepending onscene(image)
complexity.
•CompatibilitywithallSD/MMCmemorycardsisNOT guaranteed.
Power:NP6ORechargeableLi-ionbattery
PowerSource :IndividualCharger(throughUSBorPowerAdapter)
Dimensions:38 x100 x70 mm
Weight:About130g (withoutbatteries)
Note
WhenplayinganMPEG4movieonPCforthefirsttime,
pleaseinstall Mpeg4
Movie Driver(includedinCDROM)before connectingtoPC

4
SystemRequirements
Theminimumsystemrequirementsforthedigitalcameraareasthefollowing:
SystemRequirement
OSWindows98SE/Me/2000/XP
CPUPentiumMMX ‘CeleronorAMDAthlon®orhigher
RAM64 MB
CD-ROM4Xorabove
HDD Harddrivewith500MBfree diskspace
Colordisplay:16-bit
USBport

5
TABLEOFCONTENTS
TABLE OFCONTENTS.................................................................................................................................5
1. PACKAGECONTENTS.............................................................................................................................6
2. INSTALLINGSOFTWAREDRIVER........................................................................................................7
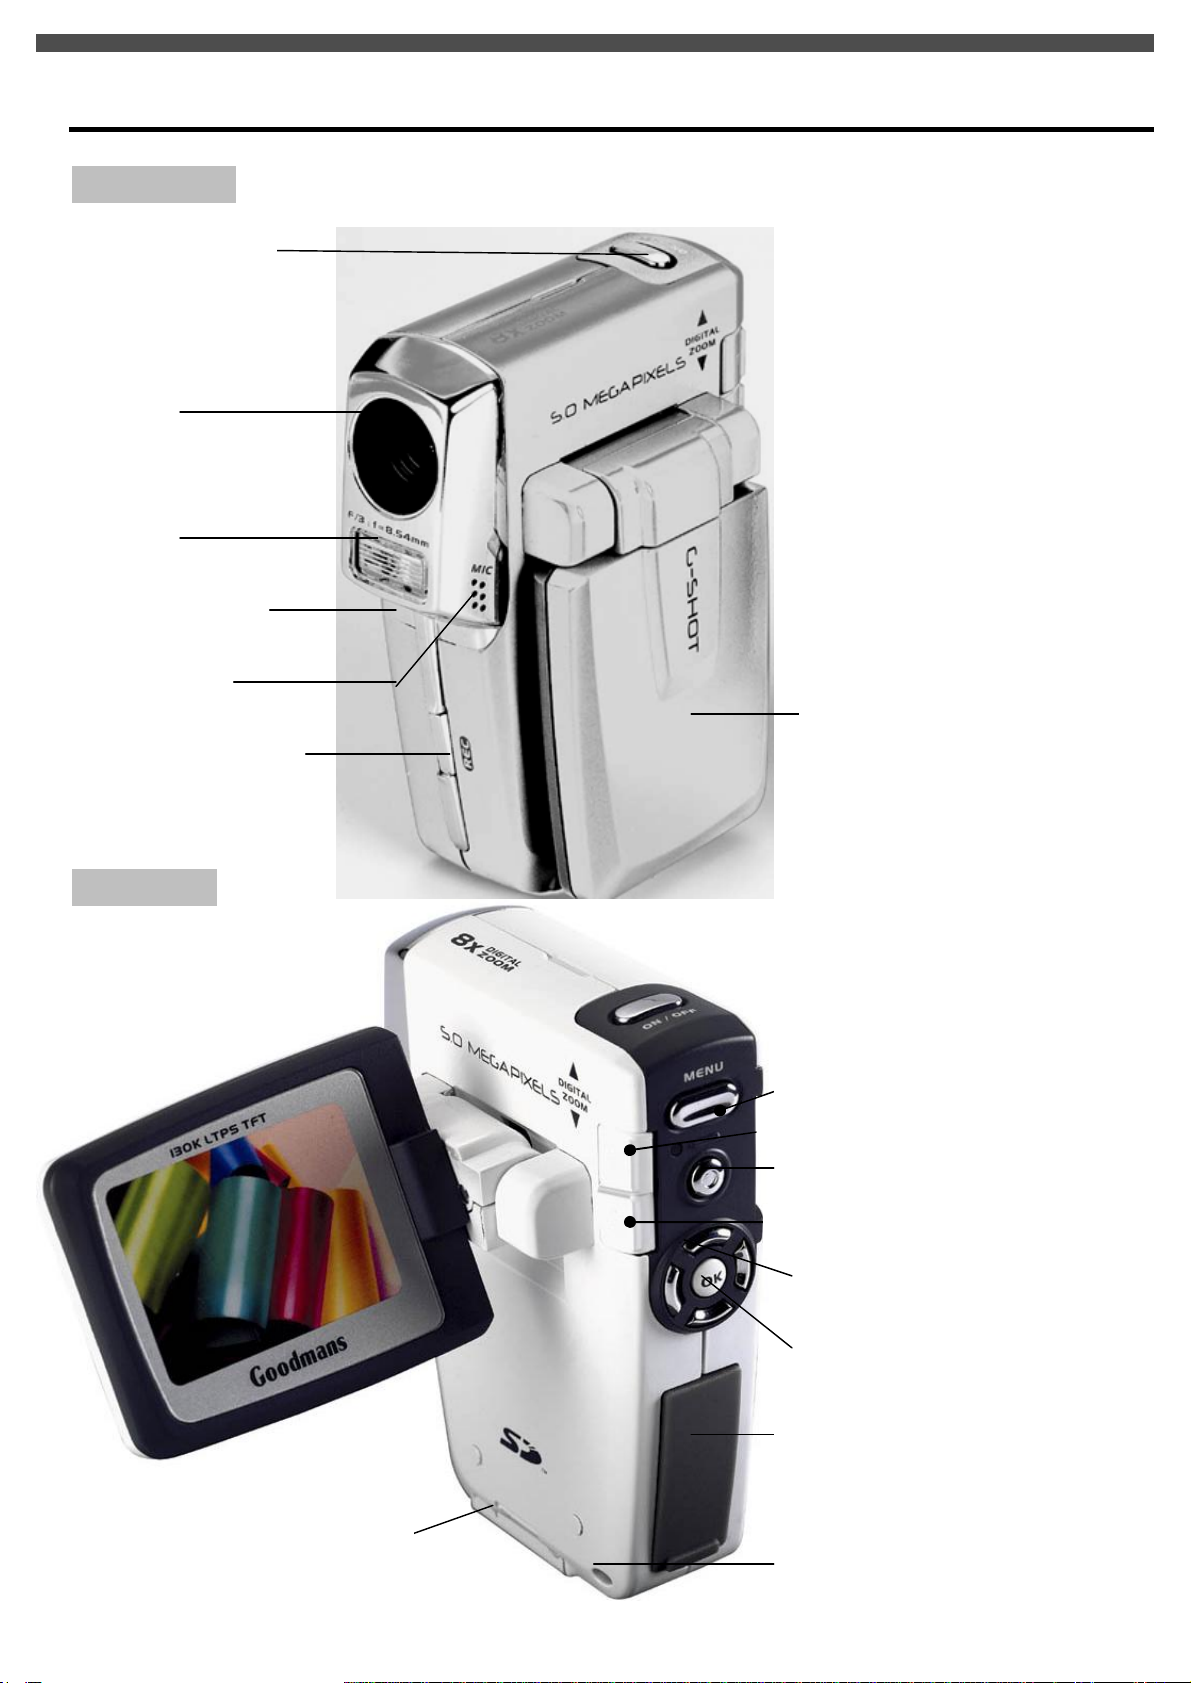
3. IDENTIFYINGTHEPARTS......................................................................................................................9
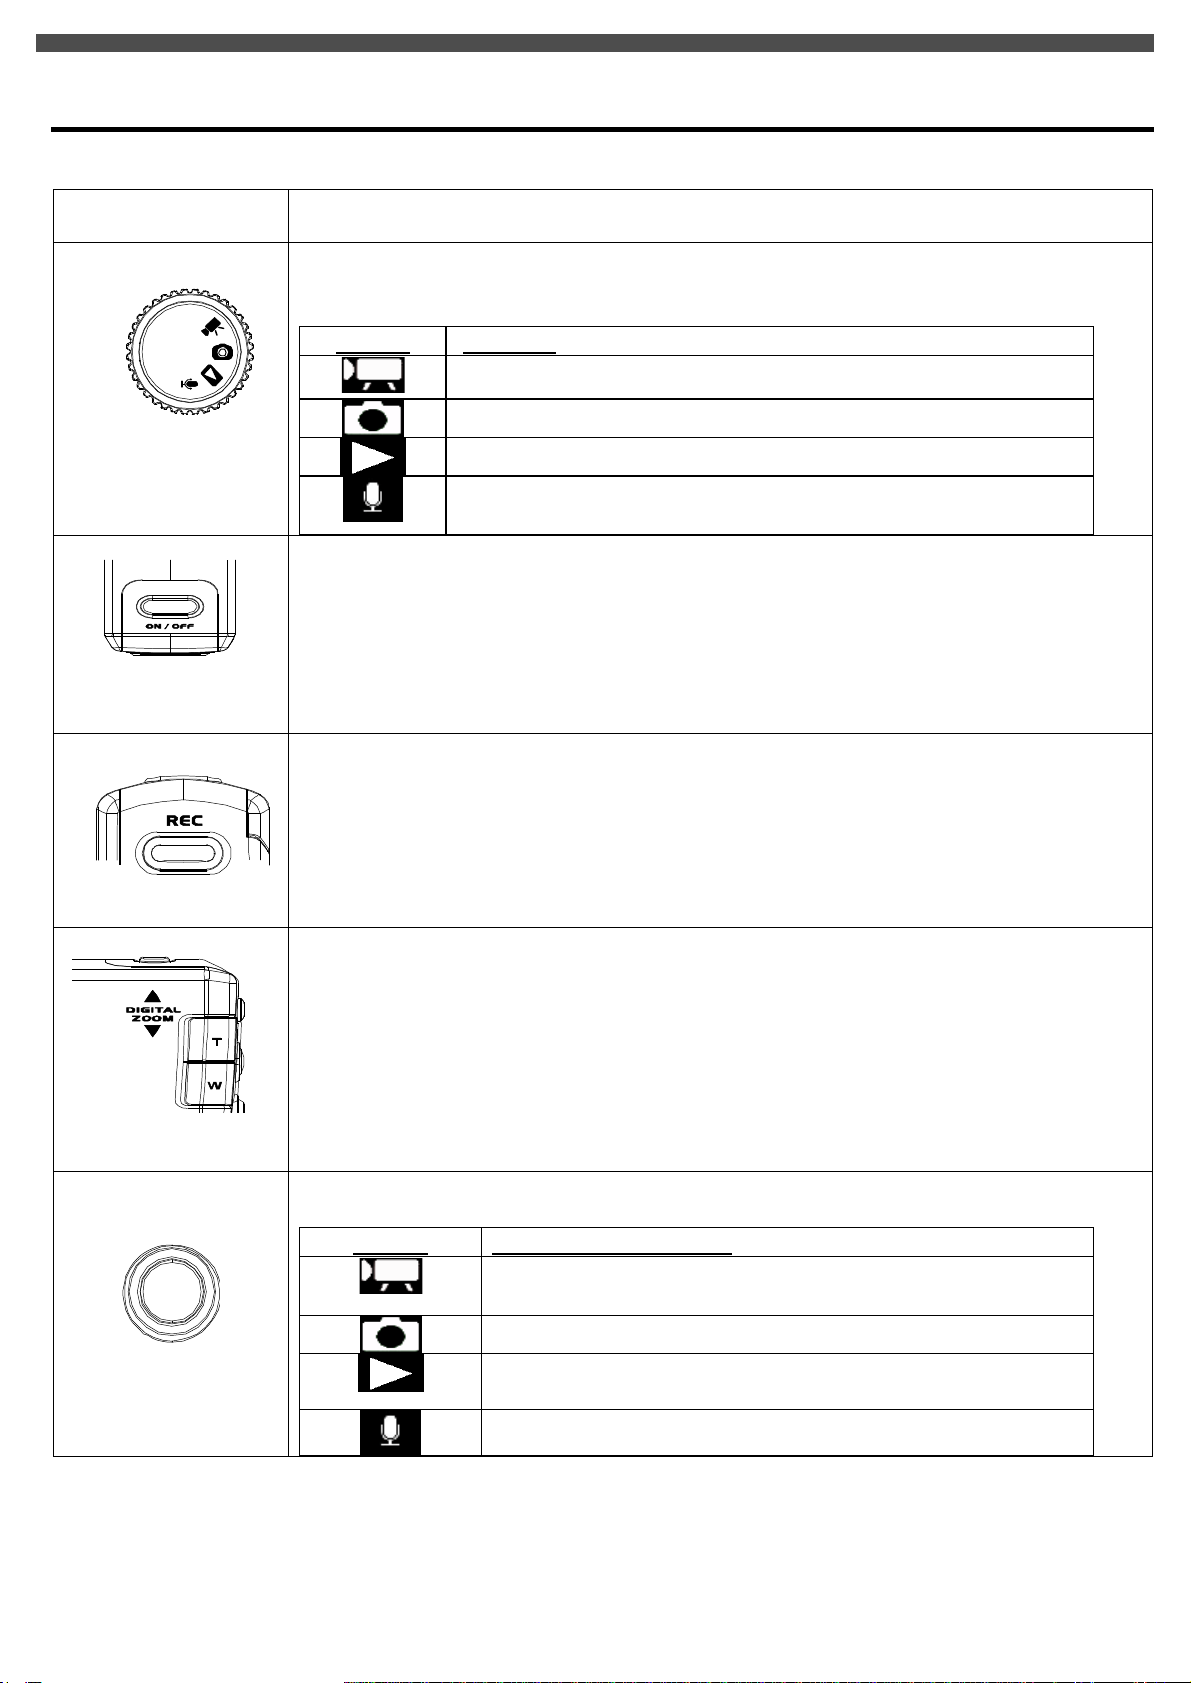
4. CONTROLBUTTONFUNCTIONS........................................................................................................10
5.PREPARATION.......................................................................................................................................12
LoadingtheBatteryintotheCamera........................................................................................................12
InsertingandRemoving anSDCard(NotSupplied)................................................................................12
ProtectingDataonanSDCard................................................................................................................13
AttachingtheStrap..................................................................................................................................14
Chargingthebattery................................................................................................................................15
LoadingtheBatteryintoBatterycradle....................................................................................................15
(A)Charging itbyUSBcable..........................................................................................................15
(B)ChargingitbypowerAdaptor....................................................................................................16
6. GETTINGSTARTED...............................................................................................................................17
TurningtheCameraOn...........................................................................................................................17
TurningtheCameraOff...........................................................................................................................17
Checking BatteryPower..........................................................................................................................17
7.MONITORSCREENCONTENTS.........................................................................................................18
DIGITALVIDEO MODE............................................................................................................18
DIGITALCAMERA MODE..........................................................................................................19
8.SETTINGTHEDEFAULT(Setup Mode)................................................................................................20
MENU.....................................................................................................................................................20
SETUPMODE........................................................................................................................................20
9.TAKINGAMOVIE(DVMODE).............................................................................................................23
MenuSettings(DV Mode).....................................................................................................................23
Changingresolution(DV Mode)..............................................................................................................23
ChangingZoomLevel(DV Mode)..........................................................................................................24
Changing“EV”ExposureCompensation(DV Mode)............................................................................24
OtherVideoRecordingSettings...............................................................................................................24
10.TAKINGPHOTO(CAMERAMODE)...................................................................................................27
MenuSettings(CameraMode ).........................................................................................................27
Changingresolution(CameraMode).......................................................................................................27
PhotoQuality(CameraMode).................................................................................................................28
Changing “EV”ExposureCompensation.................................................................................................28
UsingtheFlash(CameraMode)...............................................................................................................28
ChangingZoomLevel.............................................................................................................................28
OtherCameraSettings.............................................................................................................................29
11. PLAYBACK(PLAYBACKMODE)......................................................................................................32
Playing Movie .................................................................................................................................32
Playing Photos .................................................................................................................................33
Viewing PicturesandMoviesonaTV.....................................................................................................34
OtherSettings(Playbackmode)..............................................................................................................35
12. DELETINGFILES(PLAYBACKMODE)...........................................................................................36
13.VIEWINGMPEG4MOVIEONPC.......................................................................................................37
MPEG4Movie........................................................................................................................................37
ShareMPEG4Movie...............................................................................................................................37
14.TRANSFERRINGFILES.......................................................................................................................38
ConnectingtoPC.....................................................................................................................................38
Copying filestoPC..................................................................................................................................39
15. REMOVINGTHECAMERA.................................................................................................................41

6
1.PACKAGE CONTENTS
•DigitalVideoCamera
•PowerAdaptor(forbatterycharger)
•Charger
•NP6ORechargeableLi-ionBattery
•USBcable
•AVcable
•Earphone
•HandStrap
•Pouch
•InstallationCD(User’sManual, cameradrivers)
•User’sManual
•QuickStartGuide
G
-
Shot 5011cc
Charger
Power Adaptor
NP60 Battery
USBCable
AVCable
Ear Phone
Pouch
HandStrap
CDROM
User Manual
QuickGuide

7
2. INSTALLINGSOFTWAREDRIVER
Beforeconnectingthiscameratoacomputerforthefirsttime,youshouldinstall adriveronthecomputer.The
driverisontheCD-ROMdiscprovidedinthepackage. Toinstallthedriver:
1. InsertinstallerCDintotheCD-ROMdrive
2. ClosetheCD-ROMdrive. Aninstallerwizardwillautomaticallylaunch.
Iftheinstallerwizarddoesnotappear, then
3. Youcanclick Start intheWindowsTaskbar. Then, select Run tocontinue
4. ClickBrowsetosearchthefilepath, andselect “autorun.exe”inyourCD-ROMdrive
5. ClickOpen, andthenclickOK.
uFollowtheon-screeninstructions tocompletedriverinstallation
Afterthedriverinstallationiscompleted,the
Xvid(Mpeg4 Moviedriver) SetupWizard
willpromptyoutoinstall Mpeg4 Movie
driverforMovieplayback.
w
x
u
+
v

8
Click “Iaccepttheagreement”
to
install
Mpeg4 Moviedriverfor
Movieplayback.
And,clickon Next tocontinuethe
installation.
Clickon
F
inish
tocompletethe
installation.
TheInstallShieldWizardwillthen
appear.Pleaseclickon Install
to
continuetheinstallation.
Afterthe
installationiscompleted,
youmayneedto
restartyour
computerforthedrivertotakeeffect.
Press OK tore-bootthePC

9
3. IDENTIFYINGTHE PARTS
FrontView
RearView
PowerButton
Microphone TFTLCDPanel
Lens
FrontShutter
Flash
Self-timerLED
(T)ZoomOut
OKButton
AV&USBconnector
Cover
MenuButton
DirectionButtons
StrapEyelet
(W)Zoomin
SD/MMC
Cardcover
ShutterButton

10
4. CONTROLBUTTONFUNCTIONS
FunctionalButtons
ITEM
STEPS
[MODE]
MODE DIAL:RotatetheMODE switchtochange4differentoperationmodes:
MODE STATUS
MovieRecordingMode
PhotoTakingMode
PlaybackMode:[Movie/Photo/Voice]
Voice RecordingMode
[ON/OFF]
.
Powerbutton:Press downforonesecondtoturnonorturnoffthecamera
[MENU ]
Menubutton:Press MENU todisplayamenuforselectedmode.
[T]/[W]
.
Tele-WideSlidebutton:DigitalZoominandout
Thedigitalzoomcanbesetfrom1xto8xandthemagnificationratioisshownonthe
LCDmonitor.
[REC ]
Functionof[REC]invariousmodes:
MODE FUNCTIONOF[REC]
Starttakingmovie/Stoptakingmove
Starttakingphoto
Startplaying movie/voice file
Stopplaying movie/voice file
Startvoice recording/Stopvoicerecording

11
[ Direction/OK]
BUTTON
[MOVIEMODE]
[PHOTOMODE]
[PLAYBACK
MODE]
[VOICE
RECORDING]
▲Movie
resolution
(VGA/QVGA )
PhotoResolution
(5M/M/3M/2M/VGA)
Toggle
display
betweenAV
out/LCD
(see
page34)
TV
preview?
LCD
preview?
--
▼-- PhotoQuality
(SuperFine/Fine/
Normal)
Nine-
image
display
--
▶AdjustEV
ExposureValue
(-2.0to+2.0)
AdjustEV
ExposureValue
(-2.0to+2.0)
Next--
◀-- TogglebetweenFlash
mode
Off /Red-Eye
Reduction/Auto/On
Previous --
OK Hide screen
icons/info
Showscreen
icons/info
Hide screen
icons/info
Showscreen
icons/info
Hide
screen
icons/info
Show
screen
icons/info
--
--Unavailbale

12
5.PREPARATION
LoadingtheBatteryintotheCamera
PleaseloadtheNP60 batterypackintothebatterycompartmentaccordingtofollowing steps:
1.Slidethebatterycompartmentcoveropeninthedirectionasindicated
2. Face thebatteryup withlettersideupward.Followthebatteryinjectiondirection
accordingtothecorrect
polaritymarks(+or-)andplug thebatteryintocamera
3. Afterthebatteryisproperlyinstalled, closethebatterycompartmentdoorfirmly
Note:
uPleasefullychargeLi-ionbatterypack foratleastthree hours beforeusing camera.
uIfyou remove thebatteryfromthecamera,you willneedtosetthedateandtimeagainthenexttimeyou
reinsertthebatteryand usethecamera.
Inserting and RemovinganSDCard(NotSupplied)
Thevideocameracomeswith64 MBpre-buildmemorywhichallowsyoutostorepictures, movies, recorded
voice. YoucanexpandthememorycapacitybyusinganoptionalSDorMMCmemorycardup to512MB. To
insertamemorycard, refertothefigureaboveand:

13
1.OpentheSDcardcover
2.Insertthememorycarduntil itlocksintoposition
ToremoveaninstalledSDcard, press thecardinwardstoreleaseit. Whenthecardpops out, gentlyremoveit
fromitsslot.
Note:
lDonotremovetheSD/MMCcardwhilethecameraisprocessingdata(whentheLEDisflashing).
Whenamemorycardisfitted, moviesandpicturesaresavedoncardratherthanonthebuilt-in
memory.And, theSDcardicon willbeshownonLDCdisplay.
lItmaybenecessarytoformattheSDcardthefirsttimeitisused;especiallyifthecardhasbeen
usedindevicesotherthanyourcamera. Toformat,see [Format] inSETUPMODE (see page19).
lIftheBuilt-inmemory/SDcardisfull, theLCDdisplaywillshow"MEMORYFULL"flashing in
redcolor.IftheSDcardiswrite-protected,theSDcardiconwillchangeinredcolor.
ProtectingData onanSDCard
TheSDcardcomeswithawrite-protectswitch.Whenthewrite-protect
switchissettotheLockposition,thecardwillbecomenon-writable.To
ensurethatthecameracanoperatenormally,you shouldsetthewrite-
protectswitchtotheUnlockpositionbeforeinsertingtheSDcard.
Ifyouinsertawrite-protectedcard, themediaicon ontheLCDdisplaywillbecomered.

14
Listedbelowistheapproximatenumberofimagesthatcanbestoredcardsin64MBbuilt-inmemory. Actual
capacitymayvary(up to+5%)dependingontheenvironmentandcolorcondition.
Mode Condition Approx. capacity
VGA(640x480) ~5mins20sec
DigitalVideo(DV)
QVGA(320x240) ~14min
SuperFine
25
Fine 55
5MegaPixel:2592x1944
Normal 105
SuperFine
30
Fine 45
4MegaPixel:2432x1824
Normal 140
SuperFine
43
Fine 923MegaPixel:2048x1536
Normal 225
SuperFine
68
Fine 145
2MegaPixel:1600x1200
Normal 520
SuperFine
350
Fine 740
Camera
0.3MegaPixel(VGA):640 x480
Normal 1200
Voice Recording(VR)
-- ~56min
AttachingtheStrap
1. Threadthestrapthroughthecamerastrapeyeletasshown
2. Threadtheotherendofstrapthroughtheloop
u
v

15
Chargingthebattery
ØBeforeyouusethevideocameraforthefirsttime,
pleasefullychargetheNP60 batterywithbatterycradlefor
atleastthree hours.
LoadingtheBatteryintoBatterycradle
LoadNP60batteryintothebatterycradlebyfollowingstep:
ØFace thebatteryup (withthecharger’sgraphic)side
upward,thenslidethebatteryintochargeaccordingtothe
correctpolaritymarks.(+or -).ThecautionLED(red)
lightsduringcharging.
(A) Charging it byUSB cable
1. ConnectthebatterycradleandthecomputerwithUSBcable
2. I
ttakesaboutthree hourstoachieveafull charge.Actualcharging timedependsoncurrentbattery
capacityandcharging conditions.ThecautionLED(red)lightsduringcharging andgoesoffafterroughly
3hours.
Chargeby
USB
(USBport)
ChargebyPower
Adaptor (DC In port)
BatteryCradle

16
(B) Charging it bypower Adaptor
1. ConnectthePowerAdapter(5V,400mA)tothe DC in jackandahouseholdpoweroutlet.
2. I
ttakesaboutthree hourstoachieveafullcharge.Actualcharging timedependsoncurrentbattery
capacityandcharging conditions.ThecautionLED(red)lightsduringchargingandgoesblinking
after
roughly2hours,atwhichpointthebatterypackis90%charged.Leaving
theACadapterconnectedfor
approximatelyonehourmorechargesthebatterypackuntiltheLEDgoes off.
Note:
lThepoweradapterprovidesan outputvoltageof3.7VDCat400milliampsandisintendedforuse
only
withthebatterycharger. DO NOTATTACHTHEPOWER ADAPTER DIRECTLYTOTHE
G-SHOT3003CC CAMERA UNIT.

17
6. GETTINGSTARTED
TurningtheCameraOn
(1)FlipouttheLCDpanel; thecamerawillturnonautomatically.
(2)Orpress powerbuttonforonesecondtoturnonit.
TurningtheCameraOff
ToturnofftheCamera,youcaneitherpress andholdthepowerbuttonforonesecond, oryoucanplace the
panelbacktoitsoriginalposition.
CheckingBatteryPower
Whenthecameraison, youwill seethebatterypowerindicatoronthebottomleftcorneroftheLCDmonitor
screen. Itshowsyouthebatterypowerlevel.

18
7.MONITORSCREENCONTENTS
DIGITALVIDEO MODE
Themonitorscreenusesvariousindicatorsandiconstokeepyouinformedofthestatus ofundervideomode.
(1)MODEStatusIndicator
MovieRecording Mode
PhotoTaking Mode
PlaybackMode à[Movie/Photo/Voice]
Voice Recording Mode
(2)WhiteBalance Indicator
Auto/ Sunny/ Cloudy/
Fluorescent/Light bulb
(3)MovieQuality
640 x480Pixels (30fps)
320 x240Pixels (30fps)
(Hints:You can press [ ]key totogglearound above
qualitysettingforquick access!.)
(4)Recording StatusIndicator
MovieRecording inprogress
(Noicon) :MovieRecording Standby
(5)Recording time
Elapsed time(hh:mm:ss):Whilemovierecording
inprogress
Remaining recording time(hh:mm:ss):Whilein
standbystatus
(6)DigitalZoomLevel
Digitalzoomratiometer:1xto8x
(8)BatteryLevelIndicator
(8)StorageMediaType
: memorycard (SD/MMC)isusing
(iconturnsred): memorycardiswrite
protected.
(1)
(2)
(3)
(5)
(6)
(7)
(8)
(4)

19
DIGITALCAMERA MODE
Themonitorscreenusesvariousindicatorsandiconstokeepyouinformedofthestatus ofundercameramode.
(1)MODEStatusIndicator
MovieRecording Mode
PhotoTaking Mode
PlaybackMode à[Movie/Photo/Voice]
Voice Recording Mode
(2)WhiteBalance Indicator
Auto/ Sunny/ Cloudy/
Fluorescent/Light bulb
(3)PhotoResolution
5M : 2592 x1944pixels
4M :2432 x1824pixels
3M :2048 x1536pixels
2M :1600 x1200pixels
VGA:640 x480pixels
(Hints:You canpress[ ]key totogglearoundabove
resolution-modesforquick access!)
(4)PhotoQuality
SF :SUPERFINE
F:FINE
N:NORMAL
(Hints:You can press [
]key totogglearoundabove
qualitysettingforquick access!.)
(5)FlashMode
Red-Eye/ Auto/ Fill-in/ Off
(6)SelfTimer
(Timer-OFF)/ (5sec )/ (10sec )
(7)PhotoCounter
No. ofPictures/Remaining Shots
(8)DigitalZoomLevel
Digitalzoomratiometer:1xto8x
(6)
(5)
(4)
(3)
(1)
(2)
(7)
(8)

20
8.SETTINGTHE DEFAULT(Setup Mode)
MENU
DifferentmenusareavailableforMovie, Photo,Playback, andVoicerecordingmode.
Toaccess themenu:
1. Press theMENU buttontoopenthemainmenuunderdifferentmode.
TheselectedmodemenuisdisplayedontheLCDscreen.
2. Usethe 3/4buttontonavigatethroughfunctionitems.
3. Usethe [OK] buttontoentertospecificfunctionitem.
(Theselectedfunction/option ishighlightedwithcolor.)
4. Press [OK] toconfirmtheselection,
Or, press theMENU buttontwice toexitthemodemenu.
SETUPMODE
Youcancustomize thecamerasettingsforyourownuse, aswell asforshooting-relatedfunctions. Press the
[MENU] buttontodisplayamenufortheselectedmode. (TheSetupmenuisdisplayedinallmodes.)
1. Poweronthecamera.
2. Press [MENU] button, andusethe
3/4buttontonavigateto Setup icon.
3. Usethe [OK] buttontoenterto SetupMode.
4. Use4-wayarrowbuttontonavigatethroughtheavailablefunction
(Theselectedfunction/option ishighlightedwithcolor.)
MENU inMovieMode
MENU inPhotoMode
MENU inPlaybackMode
Table of contents
Other Goodmans Camcorder manuals