goodnature A24 User manual

QUICK START GUIDE
A24 Trap
Trapping made easy

STRIKER
TRAP BODY
YOUR TRAP – A24
SHROUD CAP
AUTOMATIC LURE PUMP
LEAF TRIGGER
YOUR CONSTANT CONTROL SYSTEM
Congratulations! You are now the owner of the world’s
most advanced pest control technology. Goodnature’s
self-resetting trapping system is designed so that
your trap waits for the pest to activate it, instead of
waiting for you to clear and re-lure it after each strike.
We call this a constant control system – one that
suppresses the existing pest population and is always
available to manage the inevitable reinvasion.
Powered using compressed CO²gas, Goodnature
technology combines superb design engineering
principles and behavioural science with the highest
manufacturing standards to deliver a trap that will kill
up to 24 times per Gas Canister.
Our lures are developed to be long life to ensure
optimal field performance for minimal maintenance
eort. Because they are toxin-free there is no risk of
secondary poisoning to non-target species such as
wildlife, pets, livestock and working animals. The Leaf
Trigger and the Strike mechanism gives the Goodnature
A24 its certified A-Class humane status.
This quick start guide has been developed to help you
get the best results you can and we hope you enjoy it.
Furthermore we appreciate any feedback you’d like to
give us. Go to our website for more information.
Happy trapping!
DIGITAL STRIKE
COUNTER
GAS CANISTER
BLACK TABS
SHROUD ENTRANCE
TREE MOUNT
SCREWS

3 x DETECTOR CARDS
(for rats & mice)
SNIFF SNIFF
Targeted long life lure
attracts rodents into
the trap.
KAPOW!
Rodent moves the
trigger to get to the
lure, firing the trap.
A24 TRAP AUTOMATIC LURE PUMP 2 x GAS CANISTERS
DIGITAL STRIKE COUNTER
(optional)
AUTO-RESET
The trap clears and
resets immediately
after an A-Class
humane kill.
SNIFF SNIFF...
The long life lure
continues to attract
rodents for constant
control.
SCAVENGED
Dierent species
scavenge the dead
carcasses from
below the trap.
IN THE BOX
HOW IT WORKS

FIND THE BEST TRAPPING LOCATION
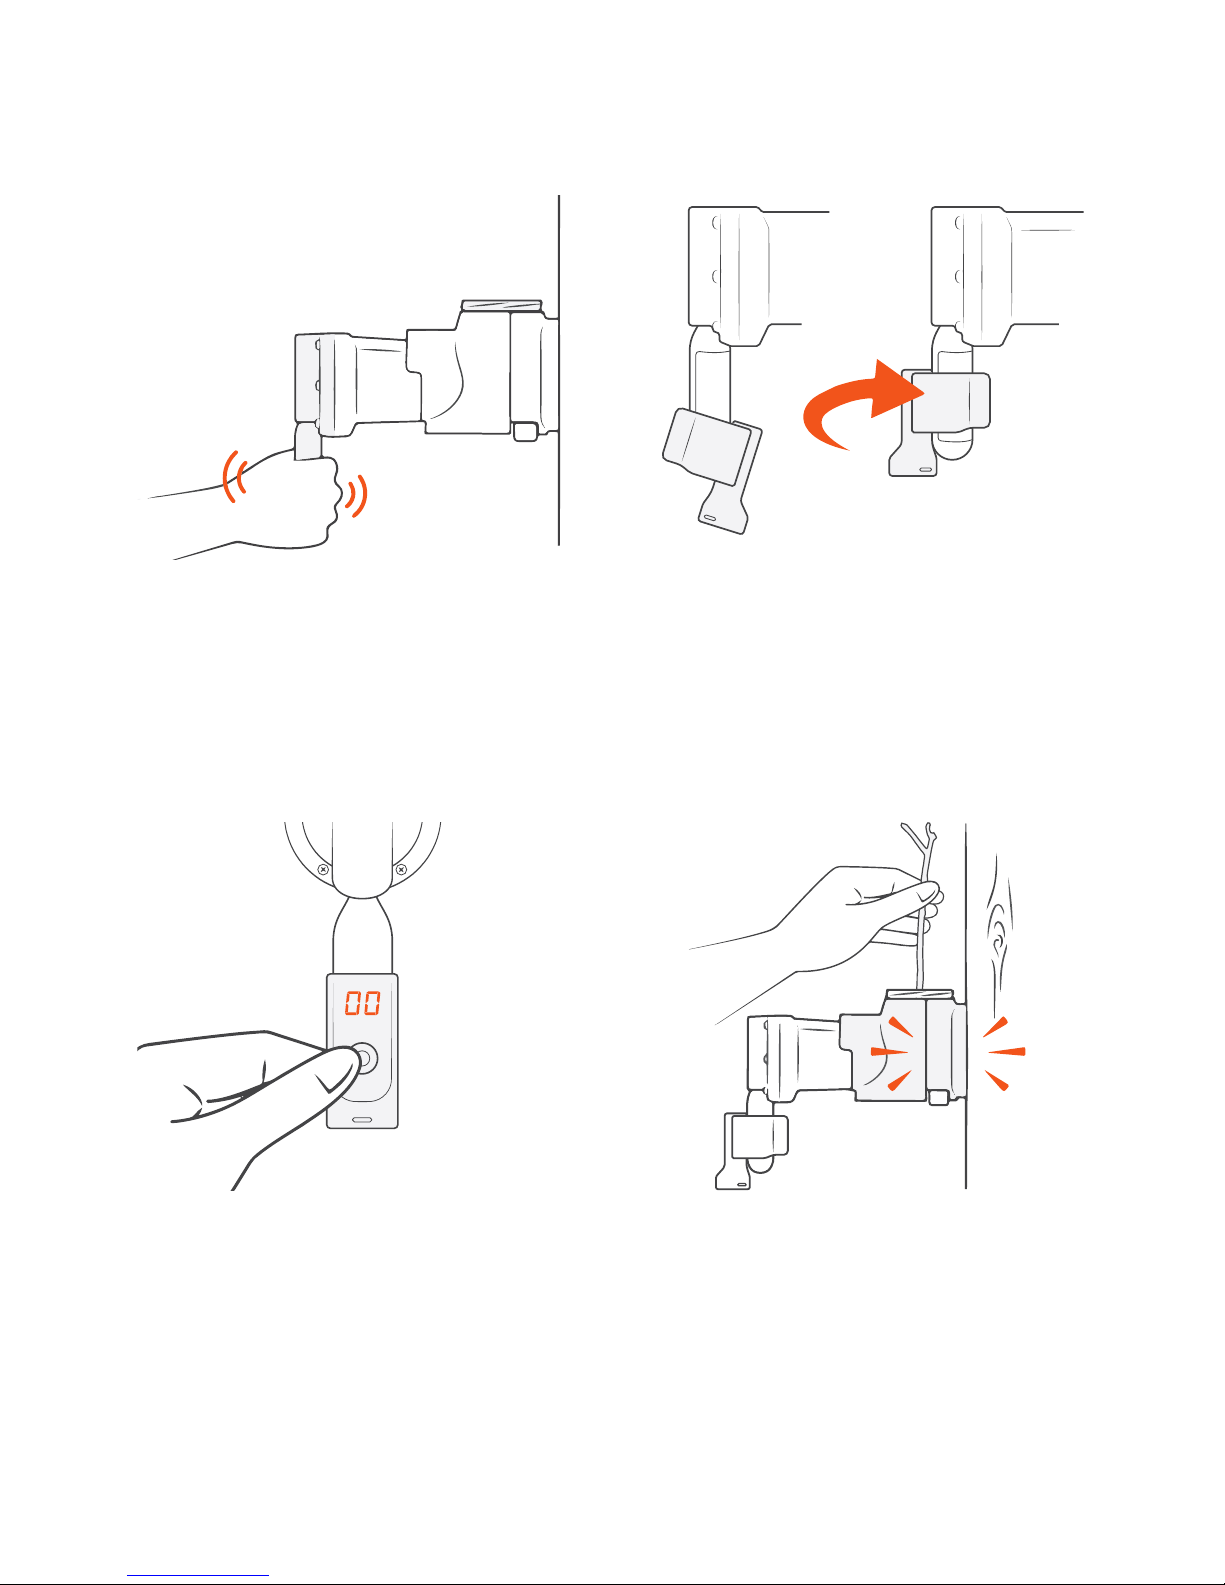
DETECT FOR 3 NIGHTS
Leave your Detector Cards in place for three nights
before analysing. If you have rodents that are
interacting with the Detector Card you will see teeth
marks on the Detection surface.
Set your Goodnature A24 at the same sites where
rodent interaction has been positively detected.
Now you’ve found the best sites to set your traps.
SETTING YOUR DETECTOR CARDS
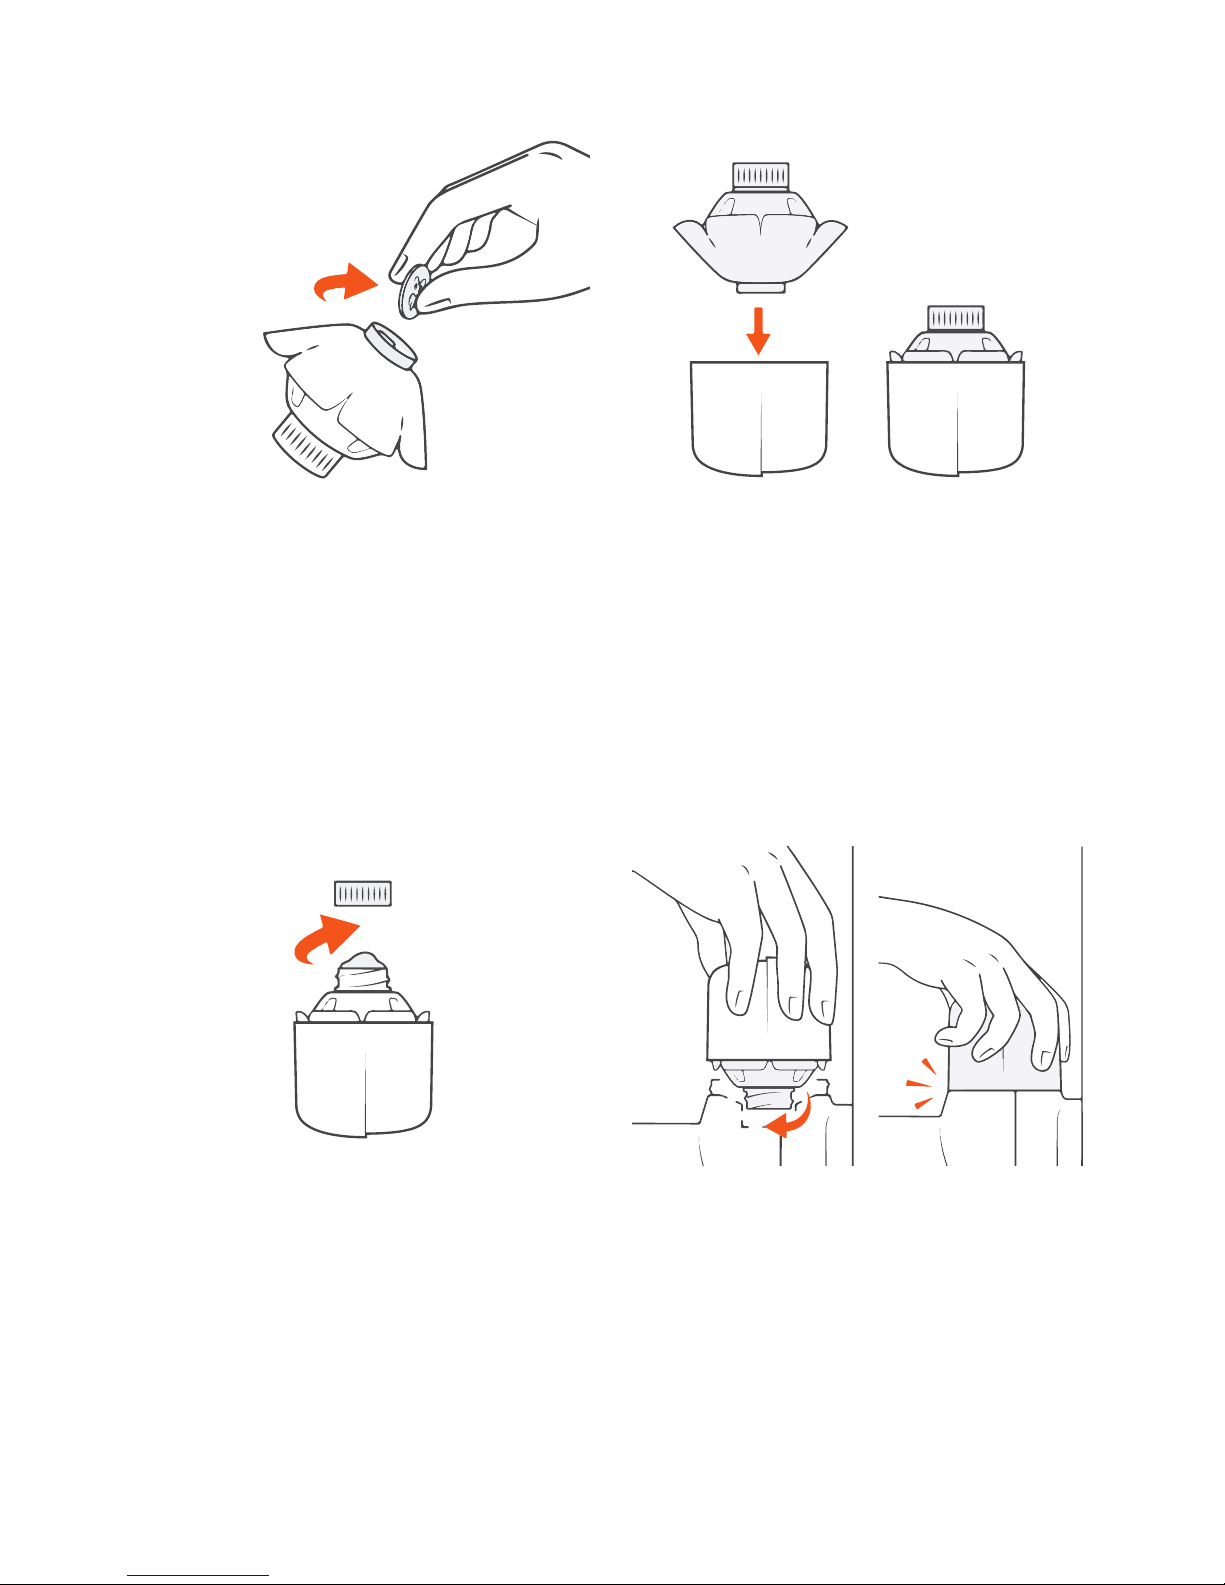
First, fold the Detector Card in half with the orange
triangular Detection surface facing out. You should
see the lure squeeze out below the orange triangular
Detection surface. The Detector Card is now primed
and ready to install.
Position the Detector Card so the bottom edge is
fist height (roughly 8 cm) o the ground. The orange
triangle Detection surface should be facing out.
Drive the supplied screw through both holes in the card
and into the tree, post or wall. The screw should be in
firmly but take care not to force the card flat against the
tree. If necessary pull the bottom edge of the Detector
Card a few millimetres away from the tree or post. This
allows rodents to get their mouths around the card and
leave bite marks on the Detection surface.
USE DETECTOR CARDS BEFORE INSTALLING
YOUR TRAPS
Goodnature’s Rodent Detector Cards tell you the best
place to install your A24 traps. Screw them around your
backyard, shed etc. and the rodents will gnaw on them,
showing you a place where they are more interested in
and can be trapped faster.
WHY GOODNATURE DETECTOR CARDS WORK
Although you may see signs of rodents such as
droppings, diggings or even seeing them scuttling
in places; these are not always locations where a
rodent will enter a trap. Rodents will investigate food,
and therefore a trap, in places where they feel safe.
Goodnature’s Detector Cards contain toxin-free lure,
which also helps to pre-feed your sites.
DETECTION
SURFACE

IDENTIFYING BITE MARKS
HOW TO IDENTIFY RODENT BITE MARKS
Goodnature Detector Cards identify rodents by their
unique bite marks.
Both rats and mice are meticulous nibblers. They will
often focus on one area, occasionally removing some
plastic. A longer jaw length allows rats to make marks
further into the Detection surface from the edge than
mice can.
The key dierence between a rat and mouse bite
mark is that mice have small teeth and jaws that leave
very fine marks with a neat finish. Conversely, rats
leave a rougher finish and you may see confetti-like
litter beneath the card on the ground. Rats can also
completely destroy the card with their gnawing.
LIGHT INTERACTION
LIGHT INTERACTION
HEAVY INTERACTION
HEAVY INTERACTION
Rough finshBig bite marks
Small bite marks Fine finish
NO RODENT INTERACTION?
Either rodents are not present at this site or it is located
where they will not interact with the lure and device.
Try waiting a few more days or moving the card to a
dierent location.
OTHER BITE MARKS YOU MIGHT SEE
We know that what we are trying to control in one
country is often protected and loved in other countries.
If you are unable to identify the markings on a Detector
Card, read the ‘Identifying bite marks’ document on our
website support section to help determine what species
is present.
MOUSE
RAT

SEPARATE TREE MOUNT FROM THE TRAP BODY
Using your forefinger and thumb, press the Black Tabs
inwards and ease the orange Tree Mount along and o
the Trap Body.
INSTALL YOUR DETECTOR CARDS
To determine the best location for your trap, set out
your Detector Cards and leave in place for three days.
Install your trap where rodent interaction has been
positively detected (see previous page).
ATTACH THE TREE MOUNT
Using a screwdriver, screw in the orange Tree Mount
12 cm above the ground onto a straight tree or post.
Do not overtighten.
ATTACH THE TRAP BODY TO THE TREE MOUNT
Tilt the Trap Body backwards slightly and lower it onto
the top locking tab of the Tree Mount. As you press
downwards the Trap Body will be guided in toward the
Tree Mount and lock in with a click.
INSTALLING YOUR TRAP
2.
4.
1.
3.

ATTACH THE DIGITAL STRIKE COUNTER
If you purchased a Counter with your A24, wet the
inside of the rubber strap for lubrication and rotate the
Counter anti clockwise as you ease it up the canister.
The Counter display must face directly away from
the tree.
ZERO THE COUNTER
Zero the Counter by pressing the button and holding it
down until the display shows ‘00’. The Counter goes to
sleep a few seconds after the button is released.
TEST FIRE YOUR TRAP
To test fire the trap, reach a pen or twig down through
the top of the trap and push sideways on the Leaf
Trigger. The Striker will discharge with a bang and then
retract. Keep your hands clear of the Shroud Entrance
and always treat the trap as live.
POWER/PRESSURISE THE TRAP
Take the Gas Canister and remove the black cap.
Be careful to keep the screw thread clean and
free of debris. Screw in the canister until firmly
sealed. Hand tighten only.
5.
7.
6.
8.

NEST ALP INTO SHROUD CAP
With the ALP activated, use your thumbs and
forefingers to shape the ALP into the Shroud Cap’s
form. It will be a tight fit. Be careful not to push it in too
far. Align the ALP so that the skirting sits about 3 mm
proud of the Shroud Cap rim so it can screw into the
Lure Cradle thread.
SCREW & SECURE THE SHROUD CAP & ALP
Lightly place the Shroud Cap with the ALP into the
Lure Cradle and partially screw the ALP into the
internal thread of the Lure Cradle. Once the ALP is
engaged into the Lure Cradle, secure the Shroud Cap
onto the trap. The ALP is now set and active!
REMOVE ALP LID
Now remove the ALP Lid. A small amount of lure may
be forced out, that’s fine – there’s still enough lure
for 6 months. Use the excess lure as pre-feed by
wiping it below the trap to immediately attract any
passing pests.
9.
11.
10.
12.
ACTIVATE THE ALP
Remove the 10c coin from the top of the ALP just before
you put it into the Shroud Cap. This activates the ALP
technology which will last for 6 months. Do not remove
the ALP Lid yet. It is vital you remove the coin or the
ALP will not activate.

CHECKING THE COUNTER
To check the tally on the Counter, quickly press
and release the button. The display will show the
number killed. Pressing and holding the button
down zeroes the Counter.
RECORD INSTALLATION DATE
Your ALP will need replacing in 6 months time. Record
the installation date to remind you. After 6 months,
replenish your traps’ gas and lure. You’d be surprised
how many people will forget. There’s no need to handle
the ALP until it needs replacing.
REPLACE GAS & LURE EVERY 6 MONTHS
Remember, Goodnature traps are about constant
control. Make sure you stick to the 6 monthly
maintenance regime of replacing your gas and lure
(ALP). 6 months will pass soon enough, so make sure
you have gas and lure on-hand for ongoing success.
A24 TRAP STAND
The A24 Trap Stand is an accessory that gives you
flexibility to target a greater range of areas and the
ability to fine tune your network by being able to shift
your trap easily.
14.13.
15. 16.

REPLACE THE GAS & LURE EVERY 6 MONTHS
Every 6 months, change the lure (ALP) and replace
the Gas Canister, regardless of how many kills you’ve
counted. This ensures your trap is attractive to pests,
pressurised and always available.
Remember, any quality, humane pest control device
is only as eective as the quality of the lure used to
attract the pest. It is the lure that motivates the target
pest to enter and activate the trap.
MAINTAINING YOUR TRAP
E.g.
Trap 1
Trap 2
Trap 3
Date
Installed
6TH Month
Replacement
Trap
Location
03/09 09/03 Back of Garden Shed
WARNING
To safely remove the Gas Canister follow steps 1–3
on the opposite page. Although the Gas Canister has
been removed the trap may still be live with one charge
remaining in its chamber. Once you have de-pressurised
the trap, it is safe to replace the Gas Canister.
Keep a record so you know when you need to replace
the gas and lure. Use the table below, put a note in your
calendar or set an alarm on your phone.

CONSTANT CONTROL
Rather than move your traps, it is better to add to the
trapping network and increase your pest free area.
However, if you need to move your trap or have found a
better location for it, then it is very important that you
follow the instructions below.
Goodnature develops products for the constant control
of invasive pests. This is achieved by establishing a
permanent network of traps to knock down target
populations and then be ready for the inevitable
reinvasion. Build your network.
HOW TO DO IT SAFELY
To move the trap, first de-couple the Counter and
then de-gas the trap by unscrewing the current Gas
Canister from the trap. You may experience the noise of
the remaining gas in the canister escaping, which may
cause the canister to freeze rapidly. Be careful when
handling frozen canisters.
MOVING YOUR TRAP
DE-GAS
DE-PRESSURISE DETACH
DE-COUPLE
WARNING
Although the Gas Canister has been removed the
trap may still be live (pressurised) with one charge
remaining in its chamber. To de-pressurise the trap,
firstly remove the Shroud Cap and the ALP, then reach a
pen or twig down through the top of the trap and push
sideways on the Leaf Trigger. The Striker will discharge
with a bang and then retract.
Always treat the trap as live until you have
de-gassed and de-pressurised it. If the trap doesn’t
fire when triggered, the trap has successfully
been de-pressurised.
With the trap de-pressurised, your trap is now safe to
detach from the Tree Mount. Place your palm beneath
the Shroud Entrance and using your thumb and
forefinger, squeeze the Black Tabs and with upward
pressure pull the trap up and o the Tree Mount.
Always keep fingers clear of the Shroud Entrance.
2.
4.
1.
3.

Please recycle after use. This material has been printed using vegetable
oil-based/mineral oil-free inks. Printed on uncoated woodfree paper produced
from eucalyptus fibres and sourced from sustainable forests.
33-004_REV-17
– Videos
– Frequently Asked Questions
– Case Studies
– Trapping Networks
– Complex Sites
For troubleshooting, trapping tips and other
technical support, visit our website.
Other manuals for A24
6
Table of contents
Other goodnature Computer Accessories manuals