goodnature A24 User manual

QUICK START GUIDE
A24 rat & mouse trap
goodnature.co

2
STRIKER
TRAP BODY
YOUR TRAP – A24
AUTOMATIC
LURE PUMP
LURE CRADLE
TRIGGER
SHROUD CAP
DIGITAL STRIKE
COUNTER (OPTIONAL)
GAS CANISTER
BLACK TABS
SHROUD ENTRANCE
TOP SLOT
LOCKING TAB
TRAP STAND

3
DOING THINGS DIFFERENTLY IS IN
OUR NATURE
We started Goodnature for good reason: to see
endangered wildlife around the world flourish again.
This means getting on top of a bunch of pests - rats
and mice for starters. We also want to go about it
kindly, without using nasty toxins.
That’s why we develop humane traps that automatically
reset and are easy and safe to use in living spaces
through to wild places. Not only have we created a
world-first, we started a revolution.
YOUR CONSTANT CONTROL SYSTEM
Congratulations! You’re now the owner of the world’s
most advanced pest control technology. Goodnature’s
automatic resetting trapping system gives you
constant control against pest reinvasion. Powered using
compressed CO2gas, Goodnature technology combines
design engineering principles and animal behavioural
science with the highest manufacturing standards to
deliver a trap that will kill 24 times per gas canister.
Our lures are developed to be long life to minimize
maintenance eort and maximize freshness to remain
highly attractive to pests. As our lures are toxin-free
there is no risk of secondary poisoning to wildlife, pets,
livestock and working animals. Our unique Trigger
and Strike mechanism gives the Goodnature A24 its
certified A-Class humane status.
This Quick Start Guide has been developed to help
you get the best results from your trap. Your success is
everyone’s success so if you have any questions or need
any tips, get in touch!
WE’RE HERE TO HELP
Drop us an email or pick up the phone - we’d love to
help you get rid of your rodents.
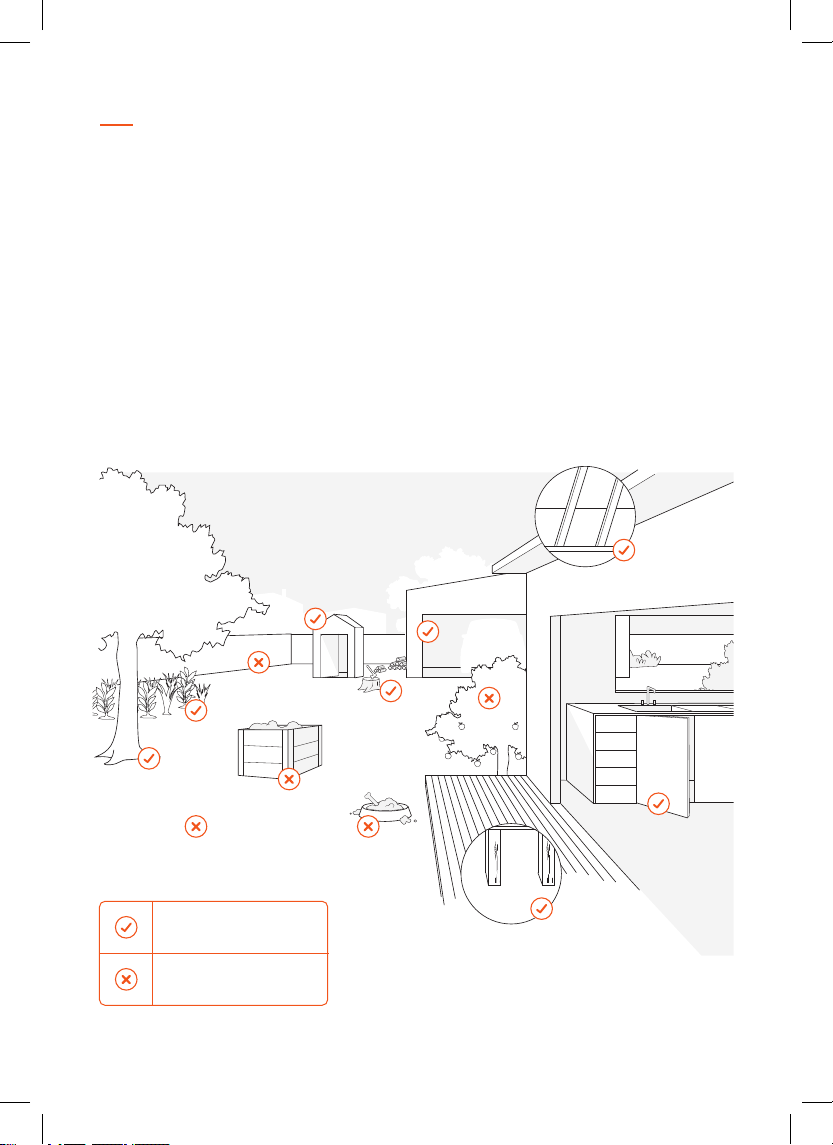
TRAP SAFELY
We’ve designed our traps to target specific pests only.
To avoid injuring or killing protected wildlife or any
other animal that’s good for nature, it’s important you
follow the installation instructions and our safety advice
to set up your trap correctly. For trapping safety advice,
tips to maximize success and support biodiversity in
your own backyard visit goodnature.co
Big thanks for joining us. Happy trapping!
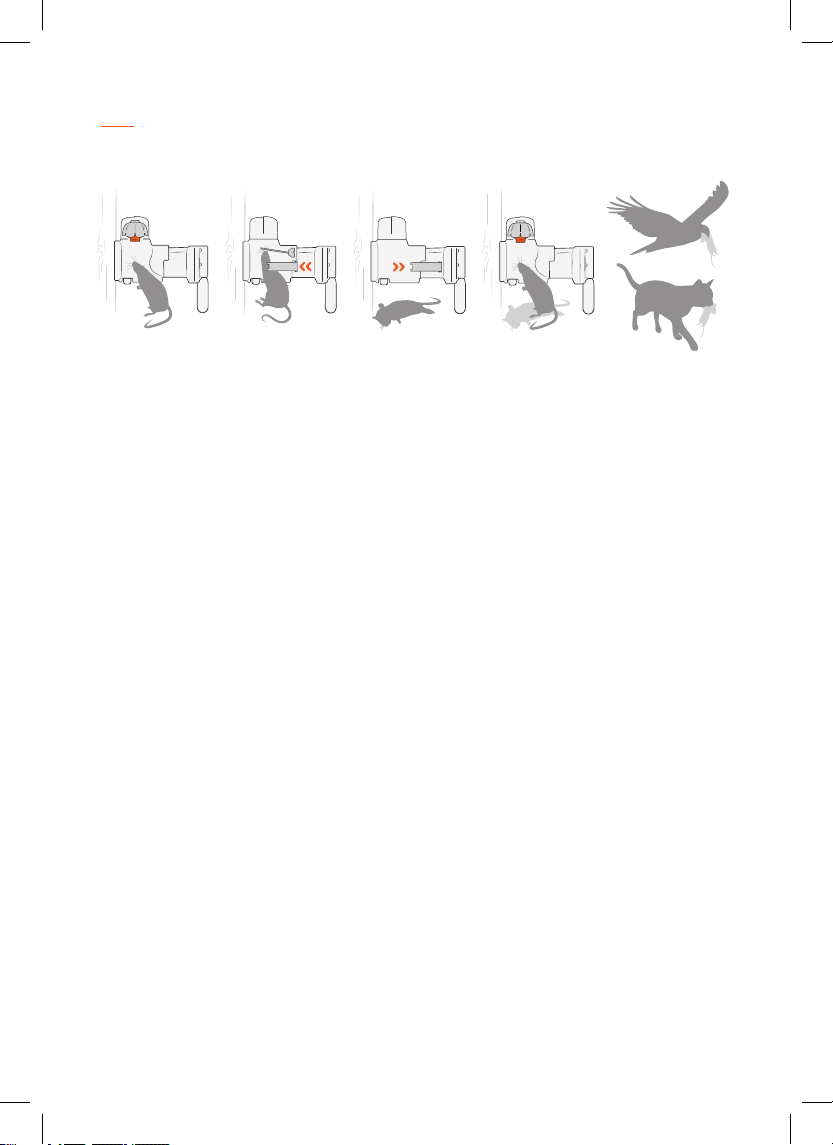
SNIFF SNIFF
Targeted long life lure
attracts rodents into
the trap.
KAPOW!
Rodent moves the
trigger to get to the
lure, firing the trap.
AUTO-RESET
The trap clears and
resets immediately
after a humane kill.
SNIFF SNIFF...
The long life lure
continues to attract
rodents for constant
control.
SCAVENGED
Dierent species
scavenge the dead
pests from below
the trap.
HOW IT WORKS

4
HOW TO CATCH YOUR RODENTS
TO CATCH YOUR RODENTS
FOLLOW THESE SIMPLE STEPS
Once you’ve assembled your trap...
1. PUT YOUR A24 TRAP & LURE TASTERS OUT
The Lure Tasters give your local rats and mice a taste
of the lure in your trap. Rodents love our lure, so they’ll
go looking for more… and find it in your trap!
Place the trap where you’ve seen rodents, or evidence
of them, at your place.
2. IF AT FIRST YOU DON’T SUCCEED…
MOVE YOUR TRAP.
Moving your trap regularly helps catch all your rats
and mice, as there’s never just one. We recommend
moving traps to a new spot weekly until you hit on a
rodent hotspot.
If you’ve seen your Lure Tasters have been nibbled
on, this is a great place to try your trap.

5
FIND THE BEST TRAP LOCATION
MOVING YOUR TRAP HELPS CATCH ‘EM ALL
It can sometimes takes a few attempts to find the best
location for rodent trapping success.
If you don’t catch anything in the first couple of days -
simply move your trap to a new location.
Moving your trap regularly helps catch all your rats and
mice, as there’s never just one!
If you’ve seen your Lure Tasters have been nibbled on,
this is a great place to try your trap.
We recommend moving traps to a new spot weekly until
you find a rodent hotspot.
TIPS FOR WHERE TO PUT YOUR TRAP
The best place is where a rodent feels safe to eat
- choose a spot where they’re hidden from predators.
Good places to try your trap are in your roof, the corner
of your garage or basement, in a kitchen cupboard
- nice sheltered locations.
If you place your trap along a wall or fence line, make
sure the trap stand is parallel to the wall.
Finding the most eective location to catch your
rats and mice might take a few attempts. Be patient.
Everyone’s rodent hotspot is dierent!
Covered, sheltered and safe
Open, exposed, unsafe
or food competition
Garage
Under deck
and house
Ceiling space
Kitchen
cupboards
Exposed
wall, fence
Open area
Fruit or
nut tree
Garden
Sheltered trunk
Dog food
Wood pile
Shed
Compost bin

6
PUT OUT YOUR LURE TASTERS
USING THE LURE TASTERS IS EASY
Choose a few locations around your property to install
your lure tasters.
Choose spots near where you have your trap - up to
about 20 ft / 10 m away works well. 1.
Fold the Lure Taster in half with the orange triangular
surface facing out. You should see the lure squeeze out
along the fold. It’s now ready to install.
2.
Position the Lure Taster so the bottom edge, with lure,
is a hand width height (roughly 12 cm / 5 inches) o the
ground. The orange side should be facing out.
3.
Use the pins to secure the card to a post, wall, fence in
the areas you’ve chosen.
LURE TASTERS
BITE MARKS
SHOWING
RODENT ACTIVITY

7
CLICK THE TRAP BODY INTO THE TRAP MOUNT
Tilt the Trap Body backwards slightly and lower it onto
the top locking tab of the Trap Mount. As you press
downwards the Trap Body will be guided in toward the
Trap Mount and lock in with a click.
INSTALLING YOUR TRAP
4.
ATTACH TRAP TO THE STAND
Guide the top slot at the rear of the A24Trap onto the
black locking tab of the stand. Once these are coupled,
gently ease the trap into the stand by pressing down on
the Trap Body. It will click into place. It is easiest done
when you don’t force it.
SECURING THE STAND
There are two peg holes at either end of the stand that
you can use to keep the trap upright if placing it on an
uneven surface.
IF USING A TRAP MOUNT
Using a screwdriver, screw in the orange Trap Mount
12cm / 5 inches (about a hand width) above the
ground onto a straight tree or post. Do not overtighten
the screws.
1. 2.
3.

8
ATTACH THE DIGITAL STRIKE COUNTER
(OPTIONAL)
If you purchased a Counter with your A24, slightly wet
the inside of the rubber strap for lubrication and rotate
the Counter counter-clockwise as you ease it up the
canister. The Counter display must face directly away
from the trap.
6.
ZEROING & CHECKING THE COUNTER
Zero the Counter by pressing the button and holding it
down until the display shows ‘00’. The Counter goes to
sleep a few seconds after the button is released.
To check the tally on the Counter, quickly press and
release the button. The display will show the
number killed.
7.
TEST-FIRE YOUR TRAP
To test fire the trap, reach a pen or twig down through
the top of the trap and push the Trigger gently to the
side. The Striker will fire with a bang and then retract.
Always keep your hands clear of trap entrances and
always treat the trap as live.
8.
POWER UP YOUR TRAP
Remove the black cap from the gas canister. Be careful
to keep the screw thread clean and free of debris. Screw
the canister firmly into the trap. Hand tighten only.
5.

9
NEST AUTOMATIC LURE PUMP INTO SHROUD CAP
With the ALP activated, gently squeeze and shape
the ALP into the Shroud Cap. It will be a tight fit.
Push the ALP into the Shroud Cap until its skirted edge
sits aligned with the edge of the Shroud Cap rim. It will
then easily screw into the Lure Cradle. Now remove the
ALP Screw Cap. A small amount of lure may be forced
out, that’s fine – there’s still enough lure for 6 months.
Wipe this excess lure below the entrance to your trap to
start attracting pests.
REPLACE THE GAS & LURE EVERY 6 MONTHS
Your ALP will last for up to 6 months. Make a note of
when you’ll need to replace your lure. This keeps your
lure fresh and attractive to pests. It’s a good idea to
replace your gas canister at the same time, so your
trap is always powered and ready to strike.
SCREW & SECURE THE SHROUD CAP & ALP
Place the Shroud Cap with the ALP into the Lure
Cradle and screw into the internal thread with a few
turns. Once the ALP is screwed into the Lure Cradle,
secure the Shroud Cap onto the trap by pushing down
and clicking into place with another turn. The ALP is
now set and active!
12.
10.
11.
9.
ACTIVATE THE AUTOMATIC LURE PUMP
Remove the 10c coin from the top of the Automatic Lure
Pump (ALP) just before you put it into the Shroud Cap.
This activates the technology which will dispense lure
for up to 6 months.
If you prefer to check your trap regularly, you can leave
the coin in place and instead give the ALP a gentle
squeeze every few days to dispense fresh lure.

10
HOW TO MOVE TRAPS SAFELY
If your trap is in a trap stand, you can move your trap
safely at any time.
If you have your trap installed on a Trap Mount, follow
these steps to de-gas the trap and move it safely.
• First remove the Counter.
• Holding the gas canister with a cloth to protect your
hands, unscrew the gas canister. You may hear any
remaining gas in the canister escaping. This may cause
the canister to freeze rapidly.
WARNING: gas canisters can freeze quickly! Always
have fabric between your hand and the gas canister
when unscrewing them.
MOVING YOUR TRAP SAFELY
UNSCREW GAS
TEST FIRE DETACH TRAP FROM MOUNT
REMOVE COUNTER
WARNING - REMOVE FINAL CHARGE FROM
THE TRAP
Although the gas canister has been removed, the
trap may still be live with one charge remaining in its
chamber. Safely test fire your trap by removing the
Shroud Cap and the ALP, and using a pen/twig reach
down through the top of the trap and push the Trigger
to one side. If there is still gas in the trap, the orange
Striker will be triggered, if nothing happens, all gas has
been flushed out and the trap is safe to move.
Always treat the trap as live until you have de-gassed
and test fired it. If the trap doesn’t fire when triggered,
the trap has successfully been de-gassed.
With the trap de-gassed, your trap is now safe to detach
from the Trap Mount. Using your thumb and forefinger,
squeeze the Black Tabs and with upward pressure pull
the trap up and o the Trap Mount.
Always keep fingers clear of trap entrances.
2.
4.
1.
3.

11
WARNINGS & DECLARATIONS
• USE ONLY Goodnature CO2Canisters. Use of other
canisters will void warranty
• NEVER use a petroleum-based lubricant in your trap
• ALWAYS store CO2Canisters below 49°C
• NEVER leave CO2Canisters in a vehicle on a hot day
• ALWAYS dispose of used CO2Canisters responsibly
• NEVER crush CO2Canisters or put in a fire
• NEVER allow children to play with or around traps
• NEVER submerse your trap
• NEVER use a damaged trap
• NEVER modify your trap
• ALWAYS act responsibly
• USE ONLY as recommended in this quick start guide
• ALWAYS wear appropriate safety gear when setting
and firing a trap
• DO NOT install the CO2Canister until the trap is
correctly mounted
• ONLY test fire your trap as directed: see section:
Moving Your Trap
• ALWAYS treat your trap as LIVE
• ALWAYS remove the CO2Canister and test-fire to
remove final charge before removing the trap from
its mounted position
• ALWAYS remove the CO2Canister and test-fire to
remove final charge before moving the trap
EC DECLARATION OF CONFORMITY OF
MACHINERY (ORIGINAL)
This declaration relates exclusively to the machinery
in the state in which it was placed on the market,
and excludes components which are added and/or
operations carried out subsequently by the final user.
Product: Rat and Stoat Trap / Rat and Mouse Trap, A24;
including trap mount kit and blocker accessories.
Manufacturer: Goodnature Limited, 8 Horner Street,
Newtown, Wellington 6021, NEW ZEALAND
Technical File Authorised owner: Craig Bond, 8 Horner
Street, Newtown, Wellington 6021, NEW ZEALAND
WARNINGS
• ALWAYS test-fire to remove final charge from the
trap after removing the CO2Canister and before
removing it from the trap mount: see section: Moving
Your Trap
• ONLY set traps at the height recommended in this
guide and be considerate of others when choosing
the traps location
• NEVER put hands or objects in the entrance of
the trap
• NEVER fire and re-fire the trap in quick succession
• Contains gas under pressure; may explode if heated
• Protect from sunlight. Store in a well-ventilated
place
• UN2037 / EN16509
• Carbon Dioxide CO2, CAS: 124-38-9, 16g
This product fulfils all relevant provisions of the
Machinery Directive. Signed for an on behalf of:
Goodnature Limited, Wellington
Place and date of Issue:
Goodnature Limited, 8 Horner Street, Newtown,
Wellington 6021, NEW ZEALAND, 10th January - 2020
Craig R. Bond, Director

– Videos
– Frequently Asked Questions
– Case Studies
– Web Shop
For troubleshooting, trapping-tips and other
technical support, visit our website.
goodnature.co
Please recycle after use. This material has been printed using vegetable
oil-based/mineral oil-free inks. Printed on recycled paper and sourced from
sustainable forests.
US_Quick-Start-Guide_REV-01
Other manuals for A24
6
Table of contents
Other goodnature Computer Accessories manuals