Gorgy Timing LEDI PILOT Box User manual

MDE-LEDI-PILOT-Box-5099V2.2
1
LEDI®PILOT Box
Programmer
USER GUIDE

2
MDE-LEDI-PILOT-Box-5099V2.2
WARNING! The following section provides the safety instructions for installation.
Please read it carefully before installing your device.
To protect your device, plug it into a grounded outlet.
The device must be connected to an electrical installation which is in accordance with
the NF C15-100 standard.
The wiring installation must include an easily accessible breaking device (circuit
breaker or disconnecting switch). This device must withstand the nominal voltage and
current values indicated on the device.
In Europe: in accordance with European regulations on the protection of individuals
and the environment, it is your responsibility to dispose of this equipment at a collection
site designed for this purpose (separately from household waste). For further
information, contact your reseller, your collection site or the relevant local authorities.
Any modification or opening of the product without the consent from the Customer
service department will void the warranty.
LEDI®PILOT Box must only be installed, maintained and handled by competent and
knowledgeable persons
All maintenance operations must be carried out with the power off, including for
systems connected to any relay outputs.
As a general rule, to avoid any interferences, the power (230V supply) and signal (time
information) cables must not be too close to each other. (keep a few centimetres apart)
CAUTION! After unplugging the LEDI®PILOT Box, there is a risk of electric shock from
the power connector/plug socket for up to 2 seconds.
To avoid the risk of electrical interference, position the LEDI® PILOT Box as far as
possible from sources of radiation (Loudspeakers, antennas, high-frequency
equipment, electromagnetic alarms…).
Gorgy Timing disclaims all liability in the event of accident or damage caused by
improper use of LEDI® PILOT Box.
The equipment is protected by a protective ground.
All GORGY TIMING products comply with the following standards: CE, EN62368,
EN55022, EN50034.
IMPORTANT SAFETY INSTRUCTIONS

MDE-LEDI-PILOT-Box-5099V2.2
3
FRANCAIS
General hazard –there is a risk of damage to the product if instructions are not followed
Electrical hazard –there is a risk of electrocution or personal injury if instructions are not
followed.
Fully protected by double insulation
Warnings
Please follow the precautions and instructions indicated below in order to ensure the safety of you and
your environment, and to prevent any potential damage to your device.
WARNING: An isolating switch in compliance with EN60947 standards is used as a
disconnecting device. It must be easily accessible and installed close to the power supply. It
must disconnect all active poles.
LEDI® PILOT Box is intended for indoor use only, at an altitude of less than 2000 metres.
Éliminationdes déchets par les utilisateursdans les ménages privés au sein de l'Union
Européenne
Waste disposal by users in private households within the European Union
This symbol on the product or its packaging indicates the product must not be disposed of with
your general household waste. Instead, it is your responsibility to dispose of your waste by
taking it to a designated collectionpoint for the recycling of electrical and electronic appliances.
The separate collection and recycling of your waste contributes to the conservation of natural
resources and helps to ensure that recycling is environmentally and health friendly. For more
information about your nearest recycling centre, please contact the shop where you purchased
your device, the household waste disposal services or your local authorities
Technical features LEDI®PILOT Box itemcode92234
Power supply
PoE standard (PoE + compatible)
IEEE 802.3af
Dimensions
Length
220 mm
Width
144 mm
Height
47mm
Operating
conditions
Operating Temperature
0°C to +50°C
Storage Temperature
-20°C to 70°C
Humidity (non condensed)
90 %
EXPLANATION OF SAFETY SIGNS ON THE PRODUCT

4
MDE-LEDI-PILOT-Box-5099V2.2
CONTENTS
CONTENTS..........................................................................................................................4
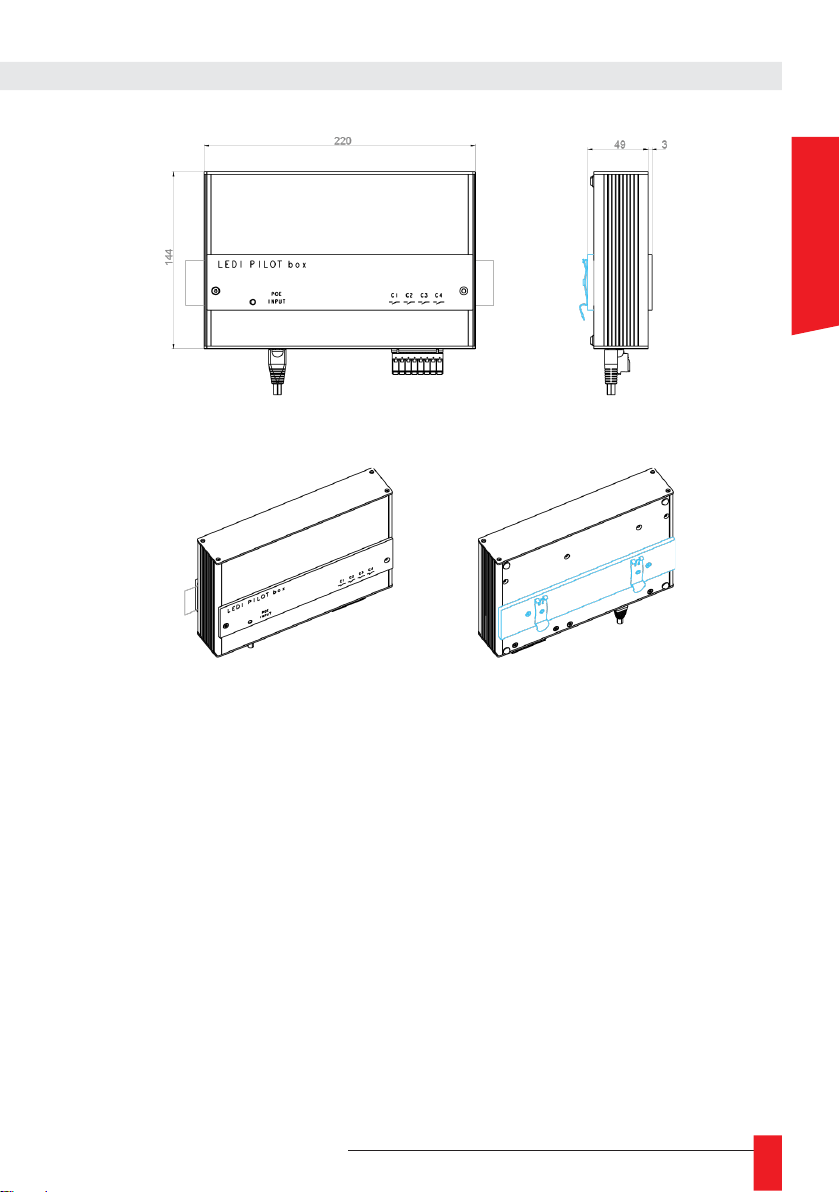
1. TECHNICAL FEATURES..........................................................................................6
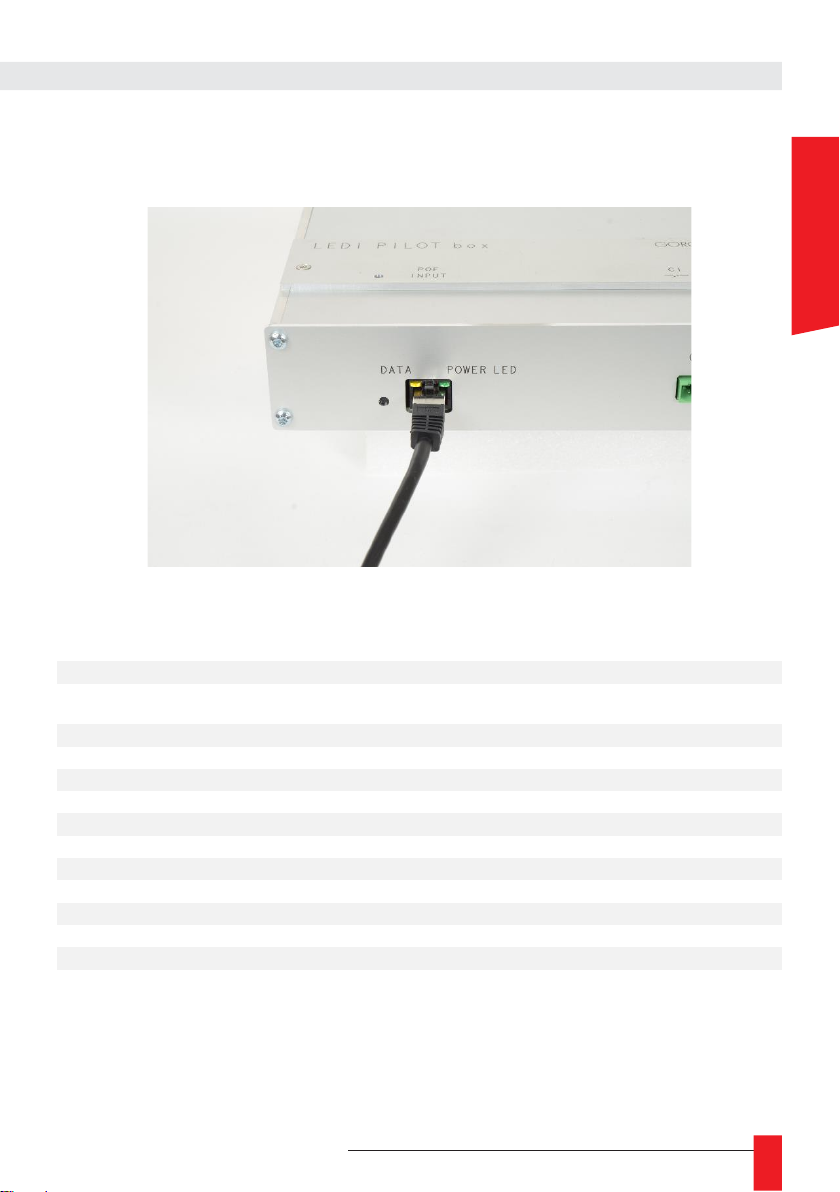
2. CONNECTION.........................................................................................................10
2.2. PRODUCT CONNECTION..............................................................................................10
2.3. NETWORKCONFIGURATION .........................................................................................10
2.3.1. By default configuration........................................................................................10
2.3.2. Change network parameters...............................................................................11
2.3.3. Integration in your network...................................................................................12
3. CONFIGURATION BY WEB PAGE ........................................................................13
3.1. MAIN WEB PAGE ...........................................................................................................13
3.2. ETHERNET NETWORK WEB PAGE..............................................................................15
3.3. SECURITY WEB PAGE ..................................................................................................16
3.3.1. Secure Shell (for advanced users) .......................................................................16
A. SSH access.....................................................................................................16
B. Main command................................................................................................16
3.4. TIME INPUT WEB PAGE................................................................................................17
3.4.1. NTP configuration options....................................................................................18
3.5. SNMP SETTINGS WEB PAGE .......................................................................................20
3.6. FIRMWARE UPDATE WEB PAGE..................................................................................21
3.7. FIRMWARE UPDATE BY FTP........................................................................................21
3.7.1. With Windows command prompt..........................................................................21
3.7.2. With FTP Filezilla Client.......................................................................................23
3.8. FACTORY DEFAULT WEB PAGE ..................................................................................23
3.9. WEB PAGE.....................................................................................................................24
3.10. RELAYS SETTINGS WEB PAGE..................................................................................25
4. GT PILOT BOX........................................................................................................27
4.1. PRE-REQUISITES..........................................................................................................27
4.2. INSTALLATION...............................................................................................................27
4.3. GLOSSAIRY....................................................................................................................27
4.4. GT PILOT BOX PREPARATION .....................................................................................27
4.4.1. Adding products...................................................................................................27
4.4.2. Calendar Edition...................................................................................................29

MDE-LEDI-PILOT-Box-5099V2.2
5
FRANCAIS
4.5. EVENT PLANNING.........................................................................................................30
4.6. RECURRENCE MODIFICATION.....................................................................................31
4.7. HOLIDAY PLANNING / HOLIDAYS / EXCEPTIONS.......................................................32
5. SAVING AND RESTORING CALENDARS.............................................................33
5.1. SAVE...............................................................................................................................33
5.2. RESTORE.......................................................................................................................33
6. APPENDIX A –NOTES...........................................................................................34
6.1. INSTALLATION VIEW.....................................................................................................34

6
MDE-LEDI-PILOT-Box-5099V2.2
1. TECHNICAL FEATURES
LEDI® PILOT Box is a programmer connected to the computer network.
It can be configured and supervised by Ethernet network. It can manage relays for ringing, lighting, etc.
SUPERVISION
►Communication over Ethernet network, easy configuration via web page
►Protocol integrated SNMP V1, V2.c et V3 supervision
SECURITY
►Time memory by electrical capacity
►Saving configuration settings to flash memory
►Encrypted and/or disable network features
FEATURES
►Automatic time setting at power-up (according to NTP configuration)
►Automatic summer/winter time changeover for relays
►Calendar programmable relays
►Scheduling of national holidays and public holidays
►TCXO crystal oscillator, time base accuracy of 1sec/day from 0°C to 40°C
KEY POINTS
►Configuration via webpage
►Compact product
►Exception management, ON/OFF or timer operation.
►Supervision via http, SNMP
►Program security provided by saving parameters in flash memory
SYNCHRONISATION INPUT
►NTP on Ethernet 10/100Base T (RJ45 port).
POWER SUPPLY
►PoE (Power over Ethernet)
PROGRAMMER
►LEDI® PILOT Box allows the programming of 4 relays. Exceptions can be added for national
holidays and public holidays. It operates in time-delayed mode or in ON/OFF mode.
►Simplified programming by calendar
►4 independent relays, voltage free output, 250 volts breaking capacity
►8 A or 12 A in option
PORT
►NTP PoE by Ethernet
►The relay output(s) are 8pts Phoenix connectors

MDE-LEDI-PILOT-Box-5099V2.2
7
FRANCAIS
OPERATION OF LEDs or indicators
►LED POWER LED remains lit when power is applied.
►LED DATA and PoE input flash at start-up and during network communications
SPECIFICATIONS
Power supply
PoE (Power over Ethernet)
Certifications
CE, EN 60950 (safety), EN 55022 (EMC emission), EN
55024 (EMC immunity)
Maximum consumption
2,5W + 0,2W per closed relay
IP
IP40 –IK9
MTBF
40 000h
MTTR
5mn
Weight
0,6kg
Dimensions
L 220 X H 144 X D 47mm
Casing
Aluminium
Display
LED operation indicator
Operating temperature
0° to 50°C
Storage temperature
-20° to 70°C
GT pilot box software
Windows XP SP3, Server 2003 SP1, Vista, 7, 8 or 10

8
MDE-LEDI-PILOT-Box-5099V2.2
DIMENSIONS
Table top mounting
Wall mounting

MDE-LEDI-PILOT-Box-5099V2.2
9
FRANCAIS
Mounting for electrical cabinet

10
MDE-LEDI-PILOT-Box-5099V2.2
2. CONNECTION
2.2. PRODUCT CONNECTION
It is strongly recommended that the serial number (on the identification label), location and
a brief description of the device be noted separately. This can be done using the table in
Annexe A –6.1. Installation view.
►Connect the Ethernet cable to the RJ45 port on the front panel.
2.3. NETWORKCONFIGURATION
By default, the system is configured to obtain its IPv4 and IPv6 addresses by DHCP
server. If such a server is present on the network, the server is immediately
accessible.
Gorgy Timing advises you to make a note of the location of each device (e.g. "Server Room
1"). This is possible using the GT Network Manager 2 utility. It is also possible to use GT
Network Manager 2 to detect the product on the network and know its IP address.
If you have several devices to install, it is highly recommended to use the attached document
in Annexe A –6.1. Installation view to record the serial number and physical location of
each device during installation for future reference.
2.3.1. By default configuration
LEDI® PILOT Box is configured to automatically retrieve an IP address from a DHCP server.
At start-up, the product issues DHCP requests to obtain an IP address: it sends requests to
obtain IPv4 and IPv6 addresses. These requests can contain a DHCP name that allows the
server to remember the name/IP address combination.

MDE-LEDI-PILOT-Box-5099V2.2
11
FRANCAIS
Two possible cases:
►If a DHCP server is installed on the network, it returns an IP address. LEDI® PILOT Box
starts working with this address.
►If no DHCP server is installed, LEDI® PILOT Box automatically uses a random IPv4
address in the range 169.254.xy (where x and y are between 0 and 255) and an IPv6
address calculated from its MAC address.
The default SNMP name of the product (visible from an SNMP file or a web browser) is LEDI
NET
2.3.2. Change network parameters
Use GTNetworkManager 2 to configure:
►1 / Download and start the GTNetworkManager 2 tool from the GORGY TIMING
website: www.gorgy-timing.fr/172-logiciels.htm
►2/ GTNetworkManager 2 automatically displays the Gorgy Timing products installed on
your network. Each line contains information about a connected product as shown
below:
►
3/ Double-click on the line associated with the product to be configured. The following
panel is displayed:

12
MDE-LEDI-PILOT-Box-5099V2.2
►Set the network and physical location parameters and click OK.
2.3.3. Integration in your network
A static IP address must be set if there is no DHCP server on the network or if there is no IP
address available for the product.
Some DHCP servers have the ability to register the device in the DNS. In this case, the
registered name is the DHCP ID. You can then access the device from any web browser or
SNMP with its DHCP ID. For example, if the DHCP name ntpsrv1 is assigned toLEDI® PILOT
Box,simply enter "ntpsrv1" in the address field of the web browser.
If you have more than one product to install on your installation, it is highly recommended to
follow the following steps:
With PC with GTNetworkManager 2 connected to the same network where the products
started, all GT products should appear with their serial numbers. Define the network setting
and location using the document filled in the previous step.

MDE-LEDI-PILOT-Box-5099V2.2
13
FRANCAIS
3. CONFIGURATIONBY WEB PAGE
3.1. MAIN WEB PAGE
Many product parameters can be configured through the product's built-in web interface. Forclock group
configurations, you can also use the dedicated GTNetConfig program (see GTNetConfig User Manual
for more information)
►To access the embedded web page, open your web browser (Firefox, Chrome, Internet Explorer...),
and enter the IP address of the product.
NB: By default, the product will request an IP address from a DHCP server. It always keeps an Auto-IP
address (169.254.x.y/16) and a Link-Local IPv6 address (fe80::/64).
To easily detect the GORGY-TIMING products in your network, you can use the GTNetworkManager2
program.
►When you enter the product's IP address in a web browser, you are asked for a username and
password.
Upper and lower case letters are taken into account.
By default, the identifiers are:
Login: root
Password: gtmt

14
MDE-LEDI-PILOT-Box-5099V2.2
The main web page displays generic product information including:
►Product Name and Serial Number: to identify the GORGY-TIMING product and its options.
►Operating time and internal time: how long the product has been running and its current time
(UTC and local time (according to the time zone of the web browser)).
►IP Addresses: The product can have up to 4 IP addresses: 1 Auto-IP, 1 IPv4 (DHCP/Static IP), 1
IPv6 Link Local and 1 Global IPv6 (DHCP/SLAAC/Static IP) displayed with their subnet mask in
CIDR notation.
►MAC Address: MAC address of the product's network interface.
►Ethernet Network state Synchronisation state: shows how long the product has beenconnected
to the network and/or synchronised.
►
Firmware Version and Change Log:
the software version of the product and a history of software
changes and improvements that can be viewed directly from the product.
To configure the product, navigate with the tabs on the left side of the product.
It is possible to change the language of the web interface at any time by clicking on the flag.

MDE-LEDI-PILOT-Box-5099V2.2
15
FRANCAIS
3.2. ETHERNET NETWORK WEB PAGE
This page allows you to change the network configuration of the product. The automatic
configuration by DHCP is used by default but it is also possible to specify a static IP address
(manual IP settings option) together with the subnet mask and the gateway. In Static mode,
a gateway and DNS server must be specified. If the network does not have these machines,
the main time server address can be used.
The product supports IPv4, IPv6 or both.
The ENDMI protocol allows the discovery of Gorgy-Timing clocks and servers on the
network. The protocol support can be disabled on this page. The product will then no longer
be seen by the GTNetworkManager software.

16
MDE-LEDI-PILOT-Box-5099V2.2
3.3. SECURITY WEB PAGE
his page allows you to adjust the security level of your GORGY-TIMING product.
►You can set the web page access protocol to HTTPS only, change the web or system credentials
(FTP,SSH) or disable/enable FTP or SSH access.
►You can also set up the Syslog report to be saved on a Syslog server or just read the report saved
in the product.
3.3.1. Secure Shell (for advanced users)
A. SSH access
Pour activer l'accès SSH, on doit cocher la case correspondante dans la Page Web Sécurité.
To enable SSH access, check the corresponding box in the Security Web Page
The default password is the same as the FTP password: GT_Tablet / gtandroid. It can also be
changed on the Security web page.
B. Main command
The product is based on an optimised version of the Linux Kernel. It uses a large number of tools
classically present in a POSIX environment.
So for more information on the commands and options available, please turn to the POSIX
command man page or try using the --help argument after the command.

MDE-LEDI-PILOT-Box-5099V2.2
17
FRANCAIS
►busybox: As in many embedded systems, in order to reduce memory usage, some basic
applications are replaced by equivalents stripped of the least used functionalities. Busybox thus
makes it possible to provide basic POSIX functions without using too much memory space.
►date: displays the system time (in UTC).
►get_sysv_info: displays information about the configuration blocks used by the product and the
status of the write/read permissions on these blocks (mutex).
►hostname: displays the full product name: product type + serial number.
►ip address: command to display all IP address configurations present on the product.
►ip route: command to display all IP routing configurations present in the product including gateway
information.
►nslookup <nom DNS>: allows you to test the DNS name resolution by the product.
►ntpq: allows to communicate with the NTP daemon used by the product. The ntpq -p command
can be used to display a list of the NTP servers currently configured in the product and a lot of
information about the quality of the synchronisation. See ntpq --help for more information.
►ping <adresse IP>: allows you to do a network communication test to see if the clock can
communicate with a device on the network.
►
ping6 <adresse IP>:
the same functionality as ping but with the IPv6 protocol.
►ps: displays the list of processes currently running in the product.
►top: displays information about the use of system resources (CPU, RAM) and processes currently
running on the product.
►uptime: time since product start-up.
►users: lists the users who have logged on to the product.
In a generic way, the applications present in the /usr/bin folder (except for the programs
implemented by Busybox) are specific programs for the GORGY-TIMING product.
In order to avoid any problems resulting from the misuse of these programs which could lead
to errors in functionality or, in the worst case, system corruption, we strongly advise against
using any application not documented above.
3.4. TIME INPUT WEB PAGE
is page allows the NTP client to be configured to receive time information from one to four NTP servers.
IP addresses and server names (requires the use of a DNS server) can be used. MD5 authentication is
also available to authenticate NTP packets.
A log file of the NTP synchronisation since the start of the product is available in text format.
In addition, the NTP client can be disabled to set the time and date manually (stand-alone operation).
N.B: Please note that the product only deals with times in UTC,
(international reference time).
In France, in summer time, legal time is 2 hours ahead of UTC.
in winter time, legal time is one hour ahead of UTC.

18
MDE-LEDI-PILOT-Box-5099V2.2
3.4.1. NTP configuration options
►Polling rate: If the default value is auto, the frequency of NTP requests is calculated automatically
to ensure good synchronisation while limiting network traffic.
It is possible to manually specify the rate at which queries are sent from one query per minute to
one query every 16 minutes.
►Grouped requests (burst): When enabled by default, the product sends multiple packets at the
same time rather than one at a time in order to have a greater tolerance to network latency
variations. This option also allows you to exclude extreme values from NTP packets. Leave this
option enabled unless you have network congestion problems.
►Respect de servers list orders: activated by default, the NTP client chooses the first server in the
list that responds correctly to its requests.
To do this, the NTP client sends NTP packets to all list servers to monitor the integrity of the
received time. If the option is not enabled, the NTP client will automatically elect a time server
based on the Stratum, offset, jitter and delay data. In this case, changes to the timing source may
occur, as each server may be elected in turn.
►Force synchronization on the first enabled server in case they differ: disabled by default.
Enabling this option will force the synchronisation to the first server in the list, even if it is out of
sync with the other servers.
In the case of twosynchronisation servers, if the times received are different, the NTP client cannot
elect a server. If the option is disabled, the product will reject both servers, preferring not to
synchronise rather than retrieve the wrong time information. If the option is enabled, the first server
is elected as the synchronisation source. Only enable this option if the first server is a known
reliable time source.
►Get NTP servers from DHCP: activated by default. The DHCP in addition to providing the basic
configuration of the network (IP address, Mask, Gateway, DNS server...) can also provide
automatically the list of NTP servers of the site (IPv4, IPv6 or domainname). For this, it uses option
42 available on many DHCP servers (Windows Server, Linux dnsmasq or ISC DHCP...). Once this
option is configured in the DHCP server, the clocks in DHCP with this option activated will be
configured automatically and will synchronise themselves, thus facilitating commissioning and also
maintenance (modification of an NTP server only on the DHCP server which will propagate the
information to the products).

MDE-LEDI-PILOT-Box-5099V2.2
19
FRANCAIS
When the product's NTP configuration is enabled with this option checked, the product will make a
DHCP request to retrieve information from DHCP servers. This option will of course only work if the
DHCP option is enabled on the product in the "Network" page.
N.B: To fill in the IP addresses of the NTP servers manually, you must disable this option, which will
make the fields appear on the web page.
►Disable timegap security (SNTP): by default. The classic NTP client NTPv4 performs time
corrections by progressive sliding. Enablingthis option changes the protocol used by the NTPclient
(it is no longer NTPv4 but SNTP). SNTP is less accurate but more tolerant of NTP servers that are
inaccurate or prone to disruption (e.g. Windows Server or pool.ntp.org) or only support SNTP. This
will force a period between requests of 4 minutes, without burst requests and respecting the order
of the servers.
At the bottom of the page you will find more detailed information about the NTP servers and the
synchronisation process.
To indicate the status of a time server, there may be different symbols preceding its IP address:
►*: The asterisk before the IP address indicates that this server has been chosen as the
synchronisation source by the NTP client.
►x: the 'x' before the IP address indicates that this server is excluded from the list of available
servers.
►+: the '+' before the IP address indicates that this server has been chosen as a secondary
(backup) synchronisation source by the NTP client and can therefore be used as soon as the
main source becomes inaccessible.
►" ": The space beforethe IP address indicates that the server is in the list of availableservers
(so NTP packets are sent to it) but that it has not been chosen as thesynchronisation source.
►refid: acronym from 0 to 4 letters meaning "Reference Identifier", it identifies the source of
the time server synchronisation (GPS, IP address of another NTP server, PPS, DCF...)
►st: "Stratum", is a step that indicates whether the timeserver isclose to an atomic time source.
The values vary from 1 (connected directly to an atomic clock) to 16. A value of 16 usually
indicates a server that is not accessible or has synchronisation problems.
►t: "Type" of NTP packets used by the product. GORGY TIMING products use unicast ('u')
mode, other modes are broadcast ('b') or multicast ('m').
►when: indicates the time in seconds since the last NTP packet was sent.
►poll: stands for ‘Polling Rate’, this is the period between each NTP request.
►reach: status in left-shifted octal notation indicating whether an NTP packet has been lost.
When all packets have been successfully transmitted, the value is 377.
►delay: The round-trip delay in milliseconds of the exchange of an NTP packet between the
server and the NTP client. (similar to ping)
►offset: is the difference in milliseconds between the internal system time and the NTP server
time.
►jitter: variation of the time information delivered by the time server. A low jitter corresponds
to a very stable and accurate synchronisation.

20
MDE-LEDI-PILOT-Box-5099V2.2
3.5. SNMP SETTINGS WEB PAGE
This page allows you to configure the settings of the SNMP (Simple Network Management Protocol)
monitoring server).
►System information:
The fields "Product name", "Contact", and "Product location" are used for product identification.
N.B.: The value "LEDI NET" in the "Product description" field is necessary for compatibility with
Gorgy-Timing software. Do not modify it if you use the latter.
►SNMP v1/v2c Id:
You can indicate the community name of the product. This acts as a password (transmitted in clear
text). Only devices indicating this community name can communicate with the product using
SNMPv1 or SNMPv2c protocol.
►SNMP v3 Id:
►The product supports the SNMPv3 protocol allowing authentication and/or encryption of
SNMP packets. A user name must then be specified (transmitted in clear text).
SNMPv3 packet authentication is enabled by filling in the "MD5 Authentication Password"
field. An SNMPv3 client must then know this password to send authenticated requests.
N.B: The Authentication password must contain at least 8 characters.
►The encryption (AES-128) of SNMPv3 packets is enabled by filling in the "AES Encryption
Password" field. This password allows to make the SNMPv3 packets circulating on the
network unreadable.
N.B: The encryption password must contain at least 8 characters.
►Traps generation:
The product can spontaneously send information to an SNMP Trap server to alert on certain
events. The list of alarms is available by consulting the product MIB file downloadable from this
page.
Table of contents