GQF HOVA-BATOR 2362E User manual

ELECTRONIC THERMOSTAT
CIRCULATED AIR
MODEL 2362E
PARTS Unpack the incubator from box. Check
for the components listed below.
Top with heat element, fan,
pilot light, thermostat, &
vent plugs installed.
Hova-Bator Bottom
Wire Floor
Plastic Liner
Owl Clips x 4
HOVA-BATOR
Owl Clip
Owl Clip
Slide clips over
wire fl oor & under
plastic liner
Notch
Unpack the incubator from the box
and set aside the thermometer
and wire floor. Remove the top
half from the bottom.
Attach Wire
Floor to Plastic Liner with Owl
Clips then place oor and liner in
Hova-Bator Bottom. Arrange the
plastic floor as shown using the
water troughs and turner power
cord notch as reference.
In most
climates, ll trough #1 (highlighted
in yellow) with water. Surface area,
not depth, determines humidity;
re ll trough as necessary to prevent
it from drying out.
NOTICE: Humidity troughs should be lled with cool tap water. Careful to avoid spilling
excess water outside of trough as it will eff ect humidity. Humidity should be between
45 and 55% for SETTING and 55 to 65% for HATCHING. Setting the humidity above
65% is not recommended as it may cause condensation to form on the windows and
can decrease hatch percentage.
Plug the cord set into the appropriate wall socket. The fan should then run and the
small heat indicator light on the thermostat box should be lit. Allow the incubator
to warm up for one hour. When the light begins blinking regularly, the incubator
is nearing its set point.
SETUP
1825 Thermometer
MADE IN USA

OPERATION
Warm eggs to room temperature (70°F. to 75°F.) and place
them on wire oor. Let them lay in a natural manner, which
is on their sides with the small end slightly down. Turn eggs
2 to 3 times a day. With a pencil, mark an X on one side and
an O on the opposite side of the egg. Turn all eggs so that
X’s appear face up. Next turning period turn all O’s face up.
Alternate this routine each turning until 3 days before eggs
are due to hatch.
& HAND TURNING EGGS
NOTE: It is recommended that you
operate the incubator with a small
quantity of inexpensive eggs to be
assured of your operating procedure
and the performance of the incubator,
before attempting to hatch large
quantities of eggs or expensive eggs.
Keep Reptile eggs protected from
moving air. (See Warranty on Page 4).
TEMPERATURE
Reference the thermometer inside the incubator. If you desire more heat, (warmer) then
turn the dial counter-clockwise (to the left). If you desire less heat, (cooler) then turn the dial
clockwise (to the right). Note: Turn the dial in small increments to “ ne tune” the temperature
inside the incubator. It is a good idea to monitor the temperature frequently to ensure you’re
maintaining the desired temperature.
LOW RANGE SELECTOR SWITCH — Use a small screwdriver or similar tool to move switch in
order to operate in the 82o to 92oF range. (Not used for bird eggs)
Add water every few days to trough #1 only. Usually twice weekly is suffi cient. The
amount of moisture in the incubator is determined by the surface area of water. Under
high humidity conditions and for some types of eggs, less humidity is required.
Humidity may be reduced by covering over a portion of a trough with aluminum
foil or switching to one of the smaller troughs. Humidity for eggs has a broad range,
but if there are doubts about humidity, less is usually better than more, except for the
last 2 days. 2 to 3 days before the hatch, stop turning the eggs, and fi ll both trough
#1 and #2 with water.
PIace top on the incubator and do not remove until hatch is complete* or 24 hours.
Remove dry chicks as soon as possible to a brooder that has food and water and
temperatures of about 95oF to 100oF. Chicks can survive up to 48 hours after hatch
without food or water, but feed and water them as soon as possible to avoid stress.
Some cases may require moving chicks to brooder to dry.
The liner tray has 4 troughs to allow more options for humidity. Trough 1 is the largest
and trough 4 is the smallest. IN MOST CLIMATES USE #1 FOR SETTING AND BOTH
#1 and #2 DURING THE HATCH PERIOD.
In HIGH humidity climates it may be necessary to use smaller troughs for setting and
hatching. For instance #2 for setting then #2 and #3 at the end of the hatch.
In extreme LOW humidity climates a combination of troughs may be used to reach the
desired setting. Filling troughs #1 and #4 during the setting period for example.
In testing, when trough #1 was lled completely it lasted 3 days before needing
re lling (room humidity at 40%).
* After hatch pull red vent plugs to help dry chicks.
HUMIDITY & HATCHING
1 2 3 4
An Incubator is designed to bring normal room temperature to the desired temperature. Room temperture of 60°F. or below will reduce the temperature
in the incubator. Room temperature change of 10°F. or more will change temperature in incubator & is more pronounced below a temperature of 70°F.
The location of the machine is important to successful operation. A room temperature from 70° to 80°F. is ideal, and fresh air without drafts is necessary.
Be sure no direct sunlight strikes the incubator and that it sets level. A consistant room temperature within a few degrees is best.
LOCATION
Read temperature of 100oF. (for most eggs) with the
thermometer resting on top of the eggs or turner. Do
not put thermometer on wire oor as reading will not
be as accurate for egg level.

The purpose of supplying moisture in
and incubator is to prevent excessive
drying of the natural moisture from
within the eggs. The correct amount
of humidity can be determined by the
size of the air sack when candled, or
by weighing the egg to gauge percent
of weight loss. Both methods require
knowledge and experience that rst time
operators usually do not have. The Hova-
Bator is designed for simplicity in this
matter, and works well for most species.
MOISTURE
VENT PLUG
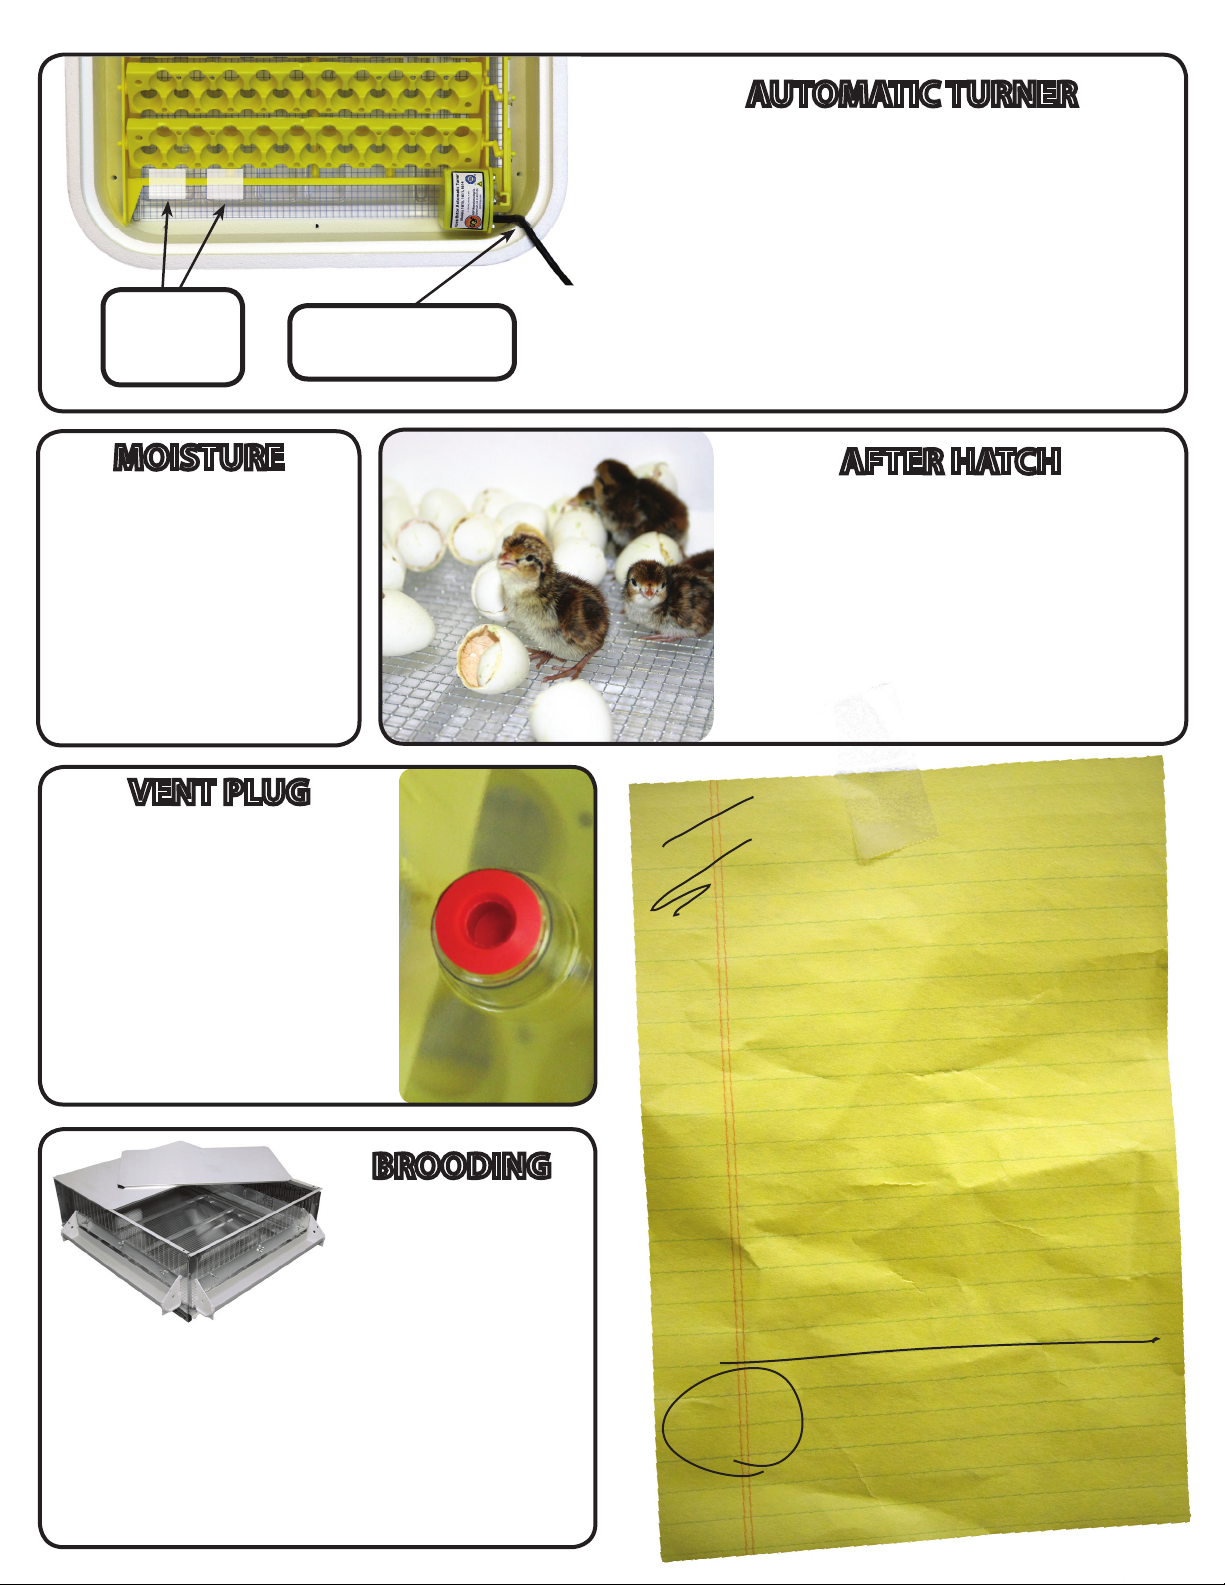
A red vent plug is located on the top of the
incubator. This should be removed when the
incubator is used at altitudes greater than 6000
feet above sea level. The plug may also be
removed after the hatch is complete if water
drops appear on the window due to high
humidity. This will help to dry the chicks and
the incubator. If removing the plug does not
reduce the humidity enough, it may be necessary
to prop up the top slightly, to facilitate drying.
If so, be sure to maintain proper temperature.
Alternately, the top may be removed quickly, and
moisture wiped from the windows to aid drying.
Replace the plug after chicks are removed.
Chicks may be removed 24 hours after they start to hatch.
Extremely wet chicks should be left in incubator to dry. If
they don’t dry in eight or more hours, remove them to a
brooder or heat lamp, with temperatures of 95oF to 100oF
Plan to remove chicks once a day, as every time incubator
is opened, warm moist air escapes. Avoid chilling of wet
chicks. Some chicks may be late in hatching, so you can
leave remaining unhatched eggs up to 2 days longer.
Clean your incubator after the hatch with soap and water
only. The plastic liner for the Hova-Bator bottom can be
cleaned using detergents or disinfectants.
When chicks are removed
from the incubator they must
have a place that is warm and
dry. A brooder should have
one section that is heated,
with a temperature of 100
degrees (for the rst week)
and an unheated section
for exercise. Food and water should be partially in heated area.
Temperature should be reduced 5 degrees each week until it is
down to 70 degrees. Some types of chicks need a temperature
around 70 degrees until they are nearly grown.
The incubator top is not satisfactory as a brooder, as there is not
suffi cient heat and the chicks may peck it to pieces. Feed and
water chicks at once. Check with a local feed dealer for the proper
feed for type of chicks you have hatched.
AFTER HATCH
BROODING
Great
Hatch Recipe
- Do not bother the thermostat unless it
is absolutely necessary. The working
of the machine may be affected if the
thermostat is tampered with excessively.
- Do not over crowd the eggs.
- Keep the eggs clean. Perspiration from
the hands or any sort of grease is
injurous because it stops up the pores of
the shells.
- After each temperature adjustment, allow
ample time for temperature to stabilize.
-Avoid opening the lid during hatch.
Hatching
Time
Chicken—21 days.
Quail—23 days.
Cortunix—17 to 18
Pheasant—23 days.
Chukar—23 days.
Turkey—28 days.
Swan—30 to 37 days.
Goose—28 to 30 days.
Duck—28 to 33 days.
Parakeet— 18 days.
Parrots—28 days.
Dove—14 days.
Mynah—14 days.
Finch—14 days.
Button Quail—16 days.
Valley Quail—21 to 22 days.
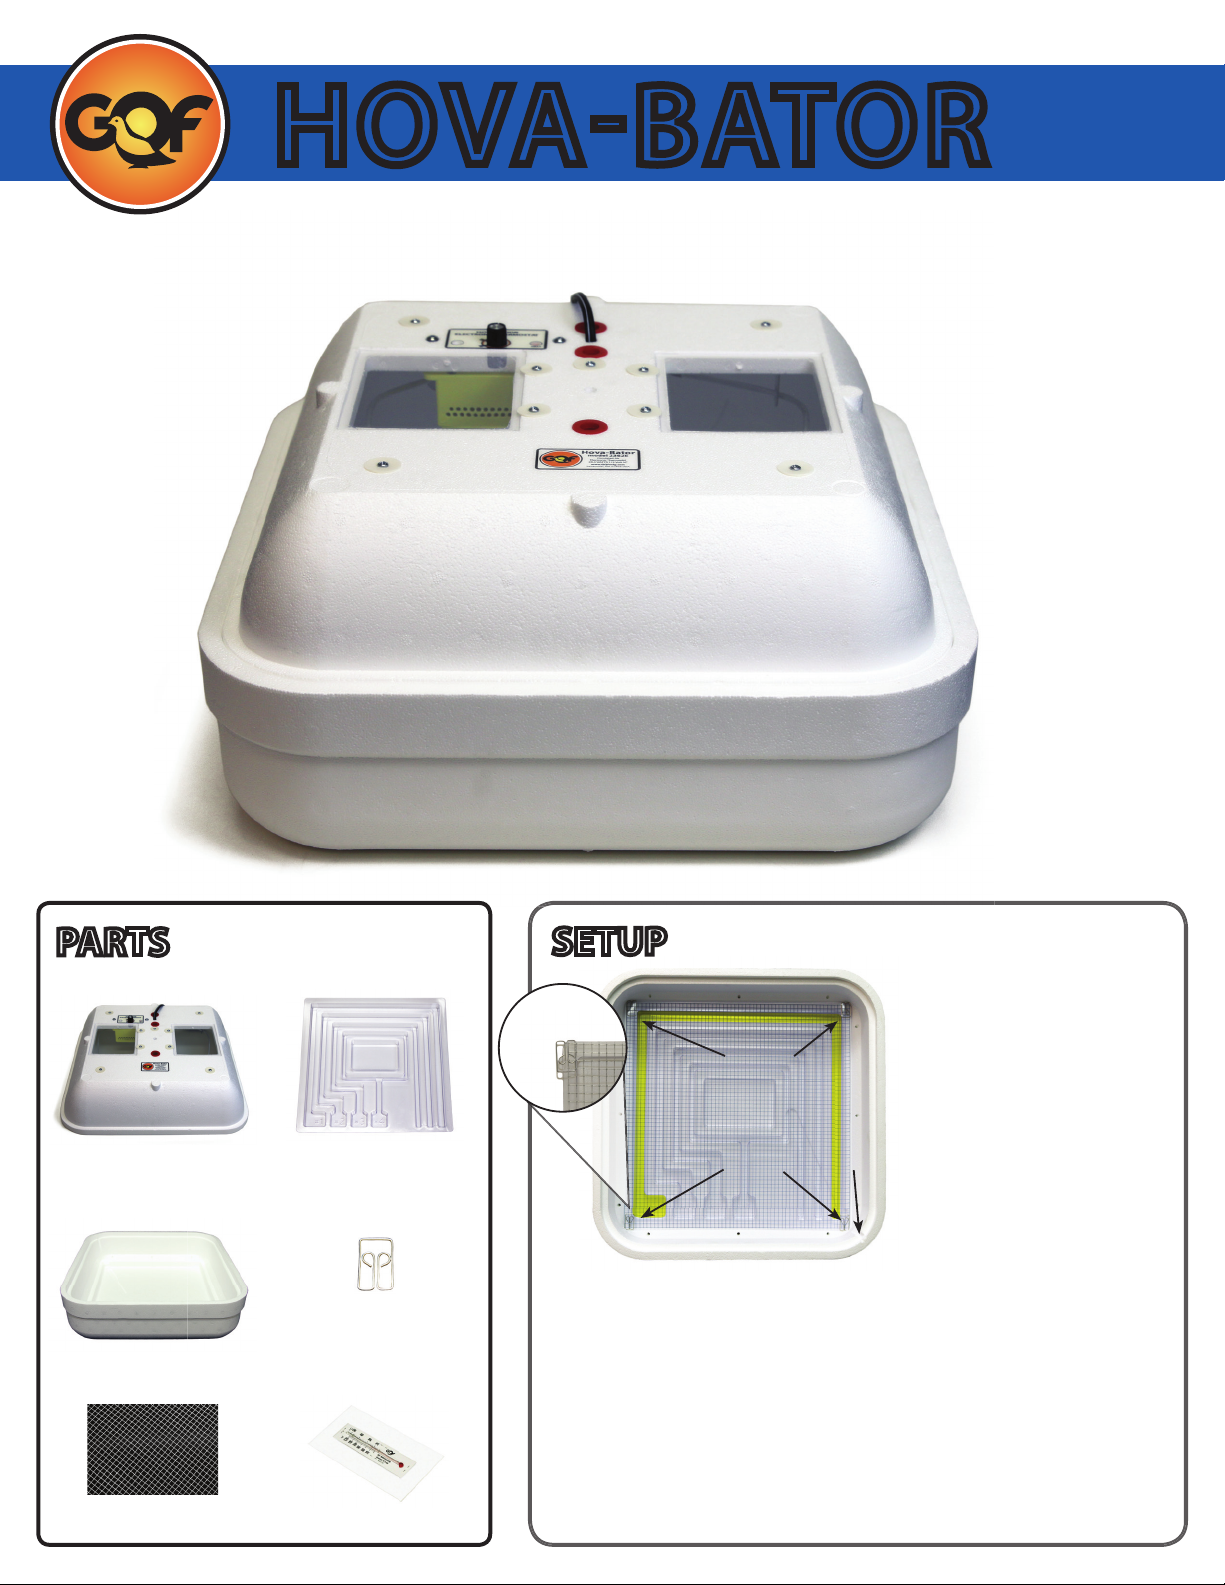
Place Turner so power
cord exits through notch
in corner
Water can be
lled through
gap without
moving turner
Set up incubator as shown on page 1. If you are using the automatic egg
turner, place it on the wire oor in the bottom of the incubator. The turner
motor uses metal gears for additional strength when turning heavy loads.
These gears can emit noise during normal operation.
Three days before eggs are to hatch remove eggs from turner, lay them on their
side on wire oor in their natural unsupported position. Add water according
to instructions. Do not attemp to hatch eggs while turner is in the incubator
as the slow turning motor could crush the chicks.When turner is removed for
hatching, maintain temperature by placing thermometer on top of eggs.
The tuner operates very slowly. You should not expect to see movement upon
installation. Proper operation is detected by noting rack angle over time.
AUTOMATIC TURNER

POOR HATCH
There are many factors involved with the hatching process and any one can hamper or stop chick development. Old eggs, infertile eggs, damaged
or dirty eggs, poor ock health, and eggs not properly turned during incubation are some of the factors. Some chicks may only partially emerge
from the shell. These chicks after time may be assisted out of the shell but due to their weak condition often do not survive. It is not unusual in a
large batch of eggs to have a few of these even with good hatches.
Check the unhatched eggs. Take note of the exact number of days it took to hatch any eggs (counting the day they were set as day one) or
note the number of days for any eggs to pip the shell. Check unhatched eggs for chick development and note the number of these eggs in the
batch. If all or most of the eggs have no development (clear inside) then the microscopic embryo had died before or at time of incubation or the egg
was never fertile. If over 70% of the developed eggs hatched then there is little adjustment that can be done with humidity or temperature
to improve this. If many of the unhatched eggs are developed or partially developed into chicks and if eggs were of good quality and properly
handled then perhaps adjustments in temperature or humidity may be required.
If eggs hatched on time, then begin any adjustments with the humidity rst. Review the section under MOISTURE for adjustments. Make only
one adjustment and then test it on a setting of eggs before making any other adjustments.
If eggs have been determined to hatch late or pip late (one day or more), rst check for too much humidity then look for too low of a temperature
setting. If eggs pip or hatch early (one day or more) then look for too high of a temperature. Eggs hatching early or late due to temperature are
probably within one degree of the proper temperature setting.
LIMITED WARRANTY
GQF Manufacturing Co., Inc. guarantees against defect for a period of 1 year from date of purchase. This warrantee is void for product more than 3 years old when not
sold direct from GQF to the consumer. Notify GQF Mfg. Co. of any defective items, giving catalogue number and name of item and what is wrong with item. Send copy
of invoice showing date of purchase. GQF Mfg. Co. will send replacement, or replacement parts, or notify regarding return. Shipping charges for express shipping or
shipments outside of the continental USA are to be paid by the customer. Product being used outside of the continental USA may need to be returned to GQF at user’s
expense for warrantee work. Returning of items without written permission will be at owner’s expense.
Whereas GQF Mfg. Co. has no control over usage of equipment and product supplied, it assumes no responsibility for losses or damage from the equipment or product
other than replacement of defective parts. No guarantee on hatchability of eggs. GQF assumes no responsibility for losses due to shipping damage, late shipment or
arrival of product.
Do not expose electrical parts to water. Installation of electrical parts should be done by a qualied electrician. Use of replacement parts other than intended by GQF Mfg.
Co. is not permitted. GQF not responsible if product does not comply with local product codes or codes outside of the USA.
* % Weight loss: Total weight loss from beginning to end of Incubation should be 12%-16%.
% Weight Loss = Original wt. - Present wt.
Original wt.
Average Daily Wt. = Original wt. X .14 (Based on 14% total loss)
Loss Required Incubation Period
INCUBATION PERIODS FOR SEVERAL SPECIES OF BIRDS
Pheasant Peafowl Chicken,
Bantam
23-24 17 42-48 43-50 35-40 28 35-37 28-34 28 23-28 28-30 21 28 23-24 25 17
Requirements
Incubation period (days)
Ostrich Emu Rheas Duck
Bobwhite
Quail
Cotumix
Quail
Muscovy
Duck
Goose Guinea Turkey Chukar
Partridge
Grouse Pigeon
For help or comments contact our technical support at:
Ph 912-236-0651 / Fax 912-234-9978 / e-mail: sales@GQFmfg.com or mail to:
GQF Manufacturing Co., Inc.
PO Box 1552
Savannah, GA 31402-1552 P/N H2362E
Popular Thermostat manuals by other brands

GENERAL LIFE
GENERAL LIFE MITRA 110S user manual

Honeywell
Honeywell CM67 user guide

Condair
Condair RCC Installation and operating manual

Full Gauge Controls
Full Gauge Controls Microsol RST Advanced c-o-n-n-e-c-t manual

White Rodgers
White Rodgers M100 installation instructions

Herz
Herz H7990-08 Series manual

Amana
Amana MMW-2 installation manual

Honeywell
Honeywell WebStat T7350 user guide

Fondital
Fondital SPOT SMART THERMOSTAT Original instructions

Etaluma
Etaluma Lumascope 500 Startup guide

Painless Performance Products
Painless Performance Products 30112 installation instructions

Venstar
Venstar ACC0434 user manual