Green Brook HDM2400 User manual

INSTRUCTION MANUAL
HDM2400 AUTOMATIC HAND DRYER
OPERATION INSTRUCTIONS
FUNCTIONS INSTRUCTIONS
MAINTENANCE
SPECIFICATIONS
USAGE
• Th nk you for purch sing our HDM2400 Autom tic H nd Dryer
• Ple se re d this instruction m nu l c refully nd keep for
future reference.
Appro ch your h nds below the hot ir outlet of ppli nce within 12cm, djust the dis-
t nce between the ir outlet nd our h nds when the ppli nce oper tes nd rub h nds
until they re dry.
The ppli nce only needs regul r cle ning on the outside.
Before you cle n the unit, isol te from supply nd w it until the ppli nce cools
down.Use slightly d mp cloth or sponge to wipe the ppli nce enclosure nd grill.
Keep the two lenses of sensor cle n.
Never use w ter, detergents nd br sive cle ning liquids or chemic l gents ( lcohol,
g soline etc) to cle n the unit.
Suit ble for industri l nd commerci l pplic tions.
Power supply : 220 -240V ~ 50Hz
Power Consumption : 2400W
Insul tion cl ss :I
Degree of protection : IPX1
Net weight : 4.8kg
1. The ppli nce utom tic lly turns on nd delivers w rm ir when h nds
ppro ch the underside of the unit within 12cm. The power will be cut off
within 2seconds fter the h nds le ve the ir outlet.
2. The sensor oper tes with 0.5 second del y to void objects p ssing through,
m king the sensor st rt-up mist kenly.
3. The ppli nce will cut power off when continuously oper ted for over 1minute to
void ctiv tion by unw nted objects.
4. Built-in s fety devices cut off the circuit of ppli nce to void h z rd when the
temper ture of ppli nce is overhe ting.
5. The ppli nce dries your h nds within 30s.
WEST ROAD . HARLOW
ESSEX . CM20 2BG . UK
s l e s @ g r e e n b r o o k . c o . u k
WWW.GREENBROOK.CO.UK
Issue no: 701496
SAFETY PRECAUTIONS
INSTALLATION OF THE UNIT
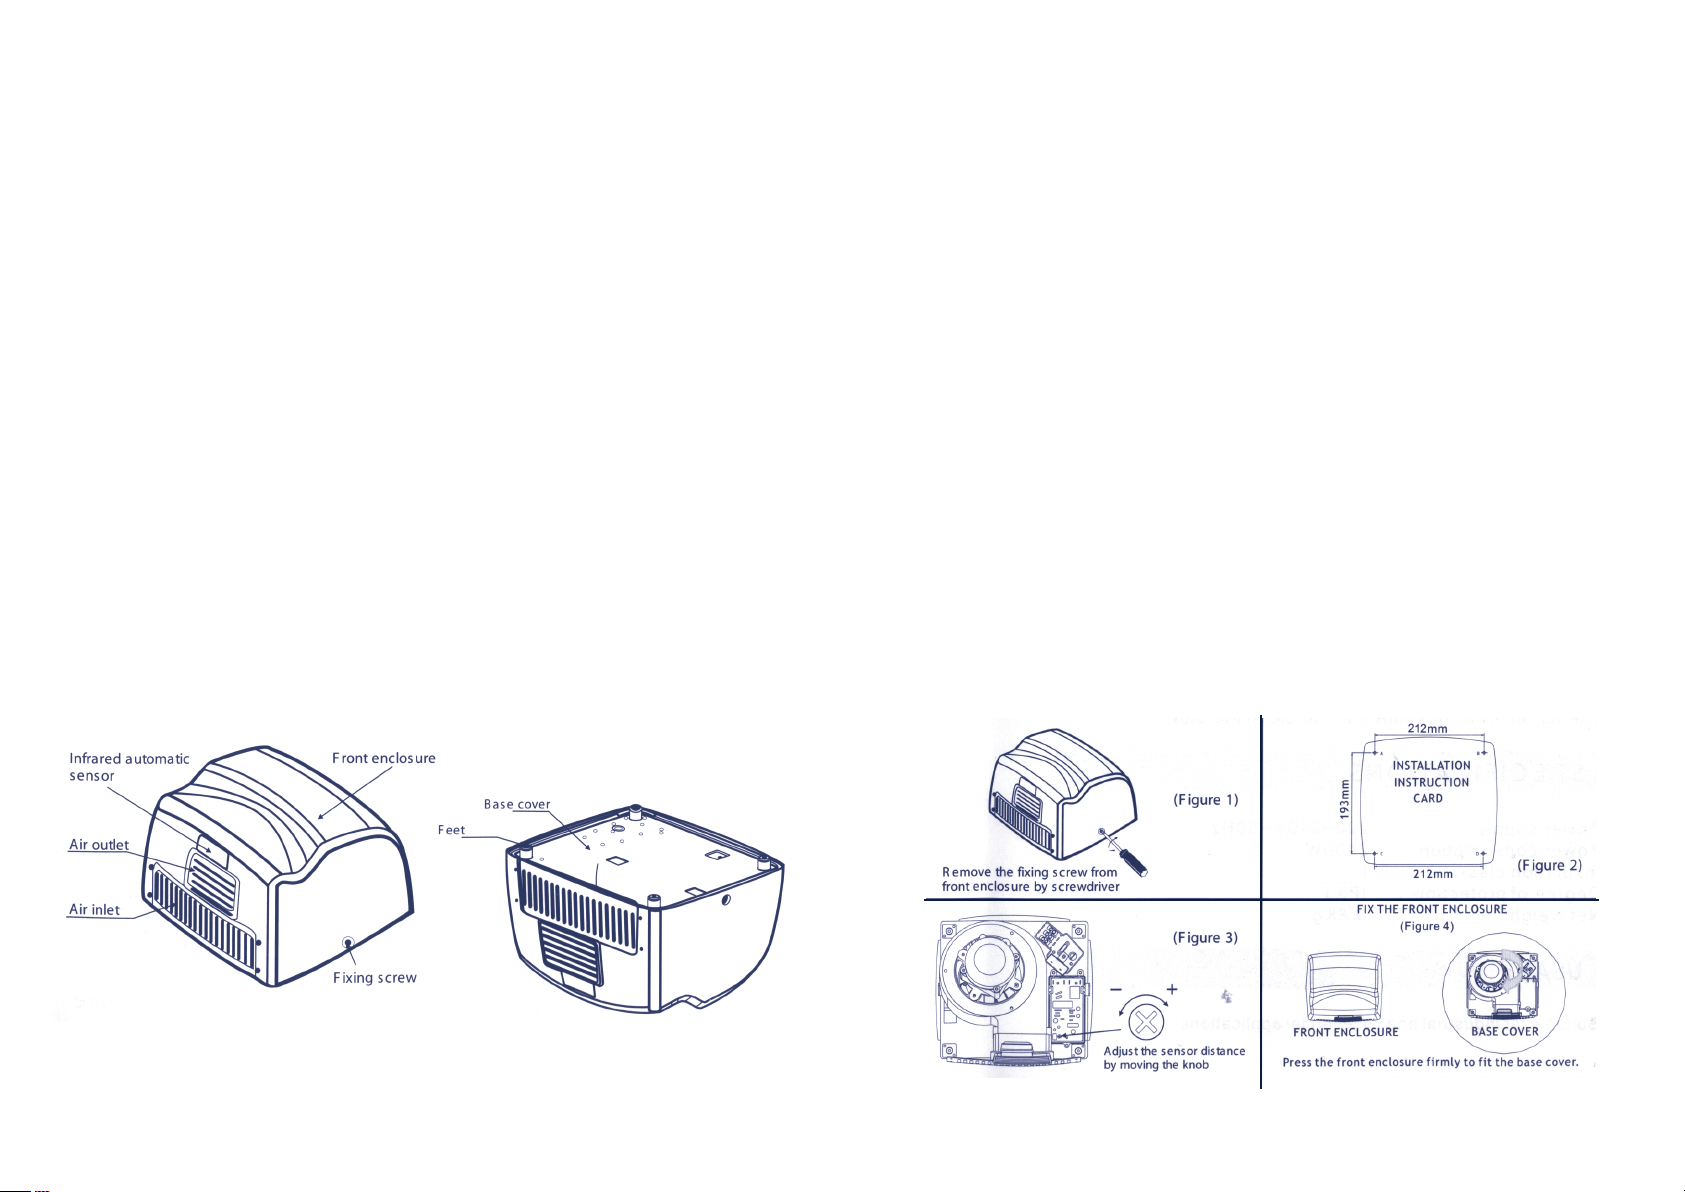
PARTS DESCRIPTION
1. Re d ll the instructions c refully before using the ppli nce.
2. Remove the p ck ges nd ensure th t the ppli nce is und m ged.
In c se of doubt do not use the ppli nce nd cont ct your supplier.
3. Do not let children pl y with p rts of the p ck ges (such s pl stic b gs).
4. Do not inst ll the utom tic h nd dryer on wooden or pl stic w lls.
5. Do not inst ll the ppli nce within r nge of people using b ths or showers.
6. Before inst lling the unit, check th t the electric l volt ge of your m in
supply corresponds to the volt ge m rked on the r ting l bel of the ppli nce.
7. Before inst lling the ppli nce, check th t there re no obstructions within
50cm of the sensor.
8. Do not inst ll in pl ces where there re g s, p int or other infl mm ble objects.
In c se of m lfunction or bnorm l oper tion, turn off, unplug it from the socket-
outlet nd send the ppli nce to the service centre for rep ir nd inspection.
9. Before m inten nce or rep ir, m ke sure th t the unit is unplugged.
10. Do not insert ny objects into the ppli nce.
11. Prevent w ter from getting into the housing of the ppli nce during oper tion or
in stor ge. H z rd of electric shock, lw ys store in dry re with no moisture.
12. Do not use outdoors
13. The ppli nce is not intended for use by young children or infirm persons
without supervision.
14. Young children should be supervised to ensure th t they do not pl y with
the ppli nce.
1. Any servicing other th n cle ning nd user m inten nce should be performed by
uthorised service represent tive.
2. Do not spl sh the unit with w ter. To reduce the risk of fire or electric shock,
do not remove the housing. No user service ble p rts inside.
Only uthorised service personnel sh ll h ndle rep ir work.
3. If the supply cord is d m ged, it must be repl ced by speci l cord or
ssembly v il ble from the m nuf cturer or its service gent.
•The utom tic h nd dryer must only be inst lled by qu lified electrici n in
compli nce with l test regul tions.
•After inst ll tion or servicing, units must be checked nd only left where
electric lly nd mech nic lly s fe.
1. Remove the fixing screw from front enclosure by screwdriver (Fig 1) nd t ke out
the front enclosure.
2. Stick the inst ll tion instruction c rd (Fig 2) to the w ll where you w nt to
fix the unit, then drill four holes with di meter 6.5mm through the instruction
c rd.
3. Insert r wl plugs provided into the holes nd knock them in with h mmer,
then remove the instruction c rd.
4. M ke sure th t the ir outlet is f cing downw rds nd fix the b se of ppli nce to
the w ll with fixing screws provided.
5. Remove the P.C.B upper cover nd djust the sensor to required setting (Fig 3).
6. Repl ce the front enclosure to the b se of the unit with the fixing screw removed
t the beginning (Fig 4).
7. Wire the unit into suit ble power supply vi fused RCD spur unit. The h nd
dryer is now re d to use.
CAUTION
Other Green Brook Dryer manuals


Popular Dryer manuals by other brands


Miele
Miele T 1570C CONDENSER DRYER Operation manual

Beko
Beko DCY 9402 GXB1 user manual

GE
GE DMCD330GJWC Dimensions and installation information

Electrolux
Electrolux EIMED6CJSS installation instructions

VANITY PLANET
VANITY PLANET PRO DRY quick start guide

Bosch
Bosch WTWH761BY Installation and operating instructions