Green Dot N8102T User manual


1. Be sure to read
this user’s manual
before starting your
operation.
2. Never open the
cover. It is very dan-
gerous to touch the
inside of the unit due
to possible electric
shock.
3. In lightning storm
weather, or when
this unit is not in use
for a long time,
pleasepull the power
cord from the outlet.
Never use a dam-
aged power cord.
Please connect to an
power socket with an
all-pole mains
switch in buildings.
4. Do not touch the
power with a wet
hand. If there is liq-
uid flowing into the
unit, pull out the
power cord immedi-
ately because it may
cause fire or electric
shock.
5. Place the unit in a
well ventilated and
no heat environment.
6.Install the unit
horizontally. Unbal-
anced installation may
cause the unit to be
damaged.
9. Do not put heavy ob-
jects on top of the unit
and power cord.
8. Install the unit in a
place with:
suitable temperature
no direct sunrays
low humidity
low vibration influence
7. When the unit is sud-
denly moved from a hot
area to a cold area, turn
it off for 1 to 2 hours.
IMPORTANT SAFETY INSTRUCTION

This symbol alerts user to the presence of uninsulated "danger-
ous voltage" in product enclosure that sufficient magnitude will
constitute risk to person.
This symbol reminds user of presence of important operation and
maintenance instructions in literature accompanying this receiver.
WARNING MARK:
This mark appears on the rear panel of the receiver, painted prominently in contrasting
color to the background.
Warning: To reduce the risk of electric shock, don't remove the cover (or back). Equipment
service and maintenance should be undertaken by qualified personnel.

1
Contents
I. General Information .....................................................................................................2
1. Preface ................................................................................................................... 2
2. Feature ................................................................................................................... 2
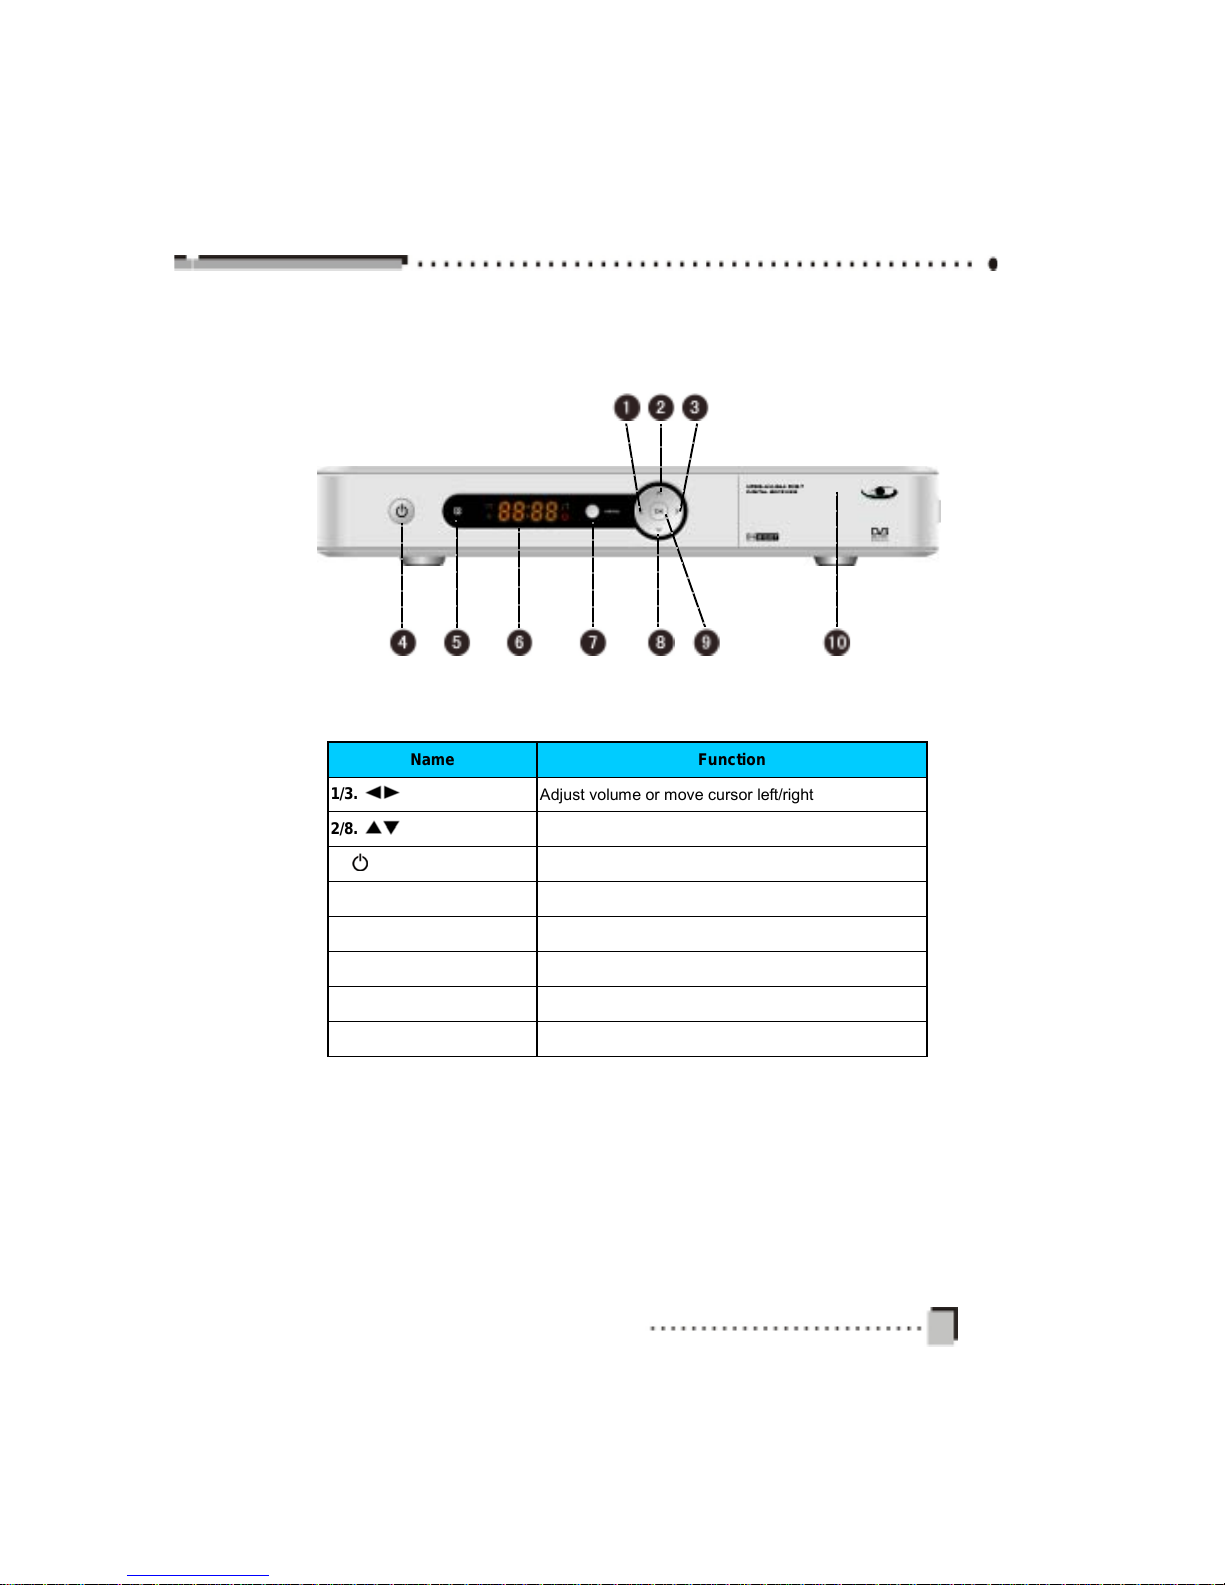
3. Front Panel ............................................................................................................. 3
4. Rear Panel ............................................................................................................. 4
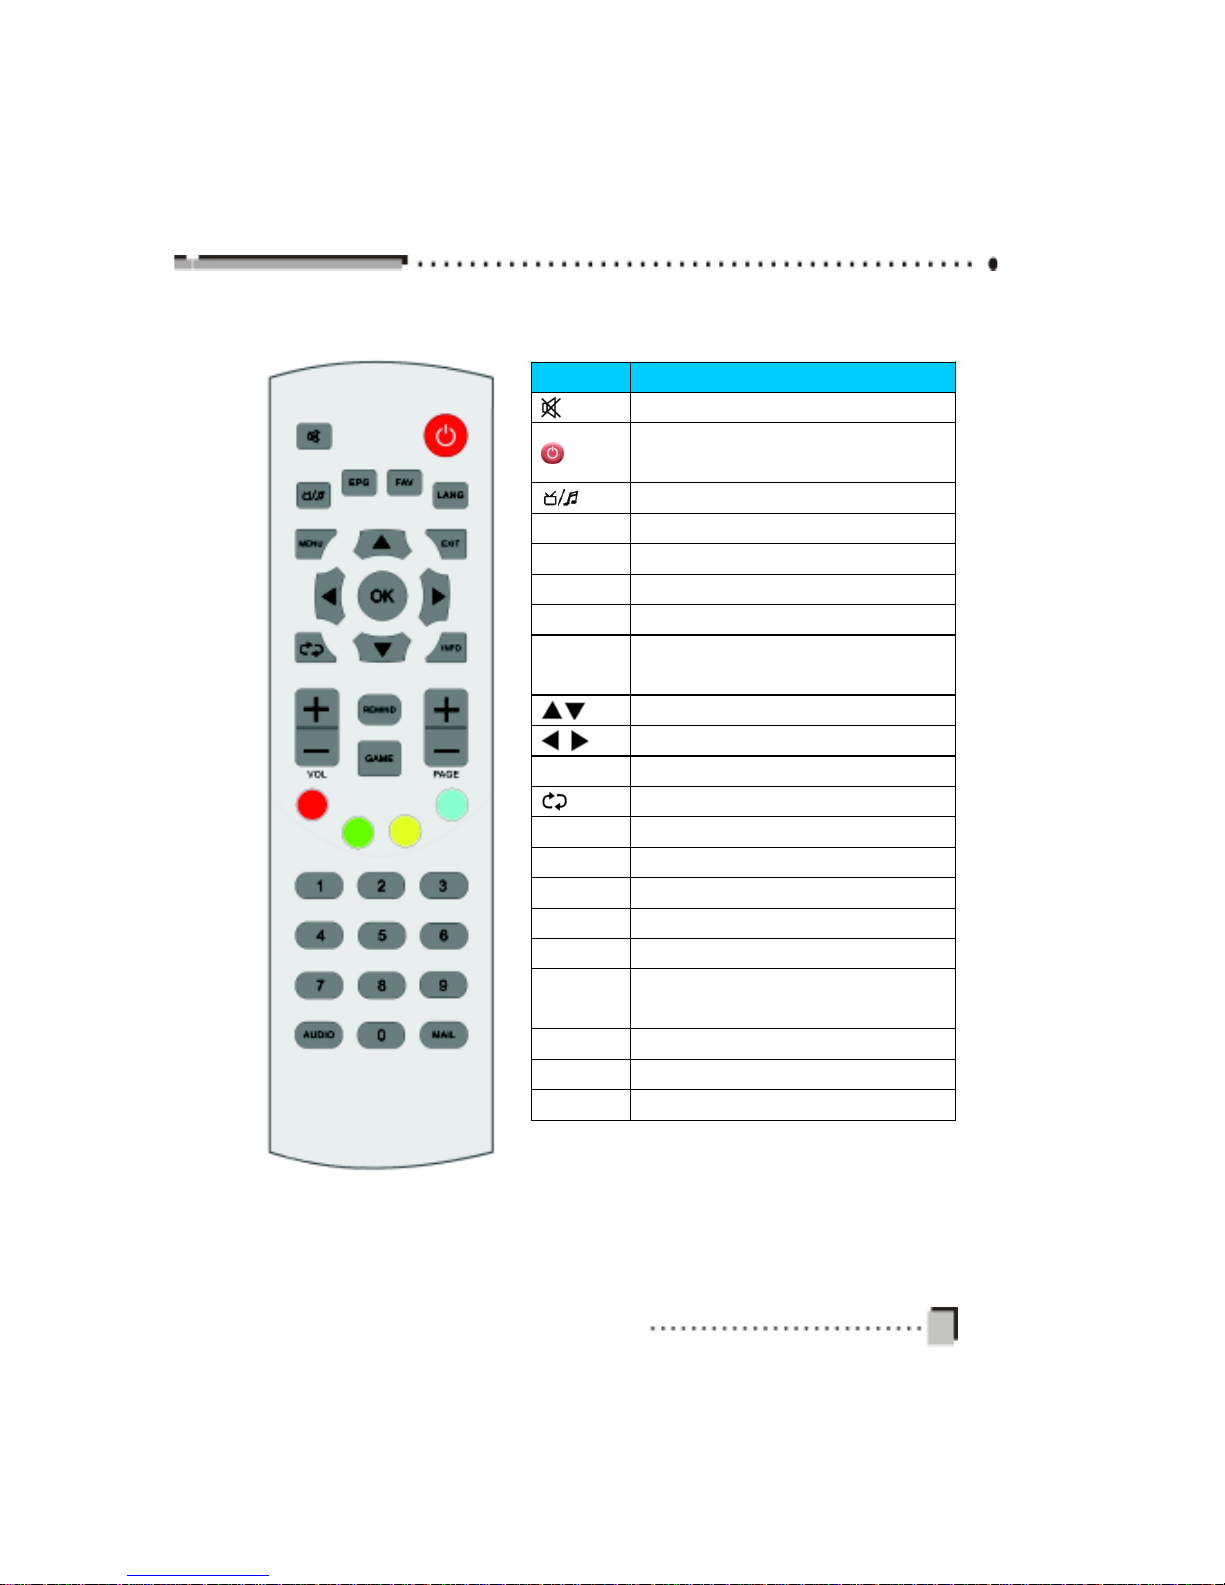
5. Remote Control Unit .............................................................................................. 5
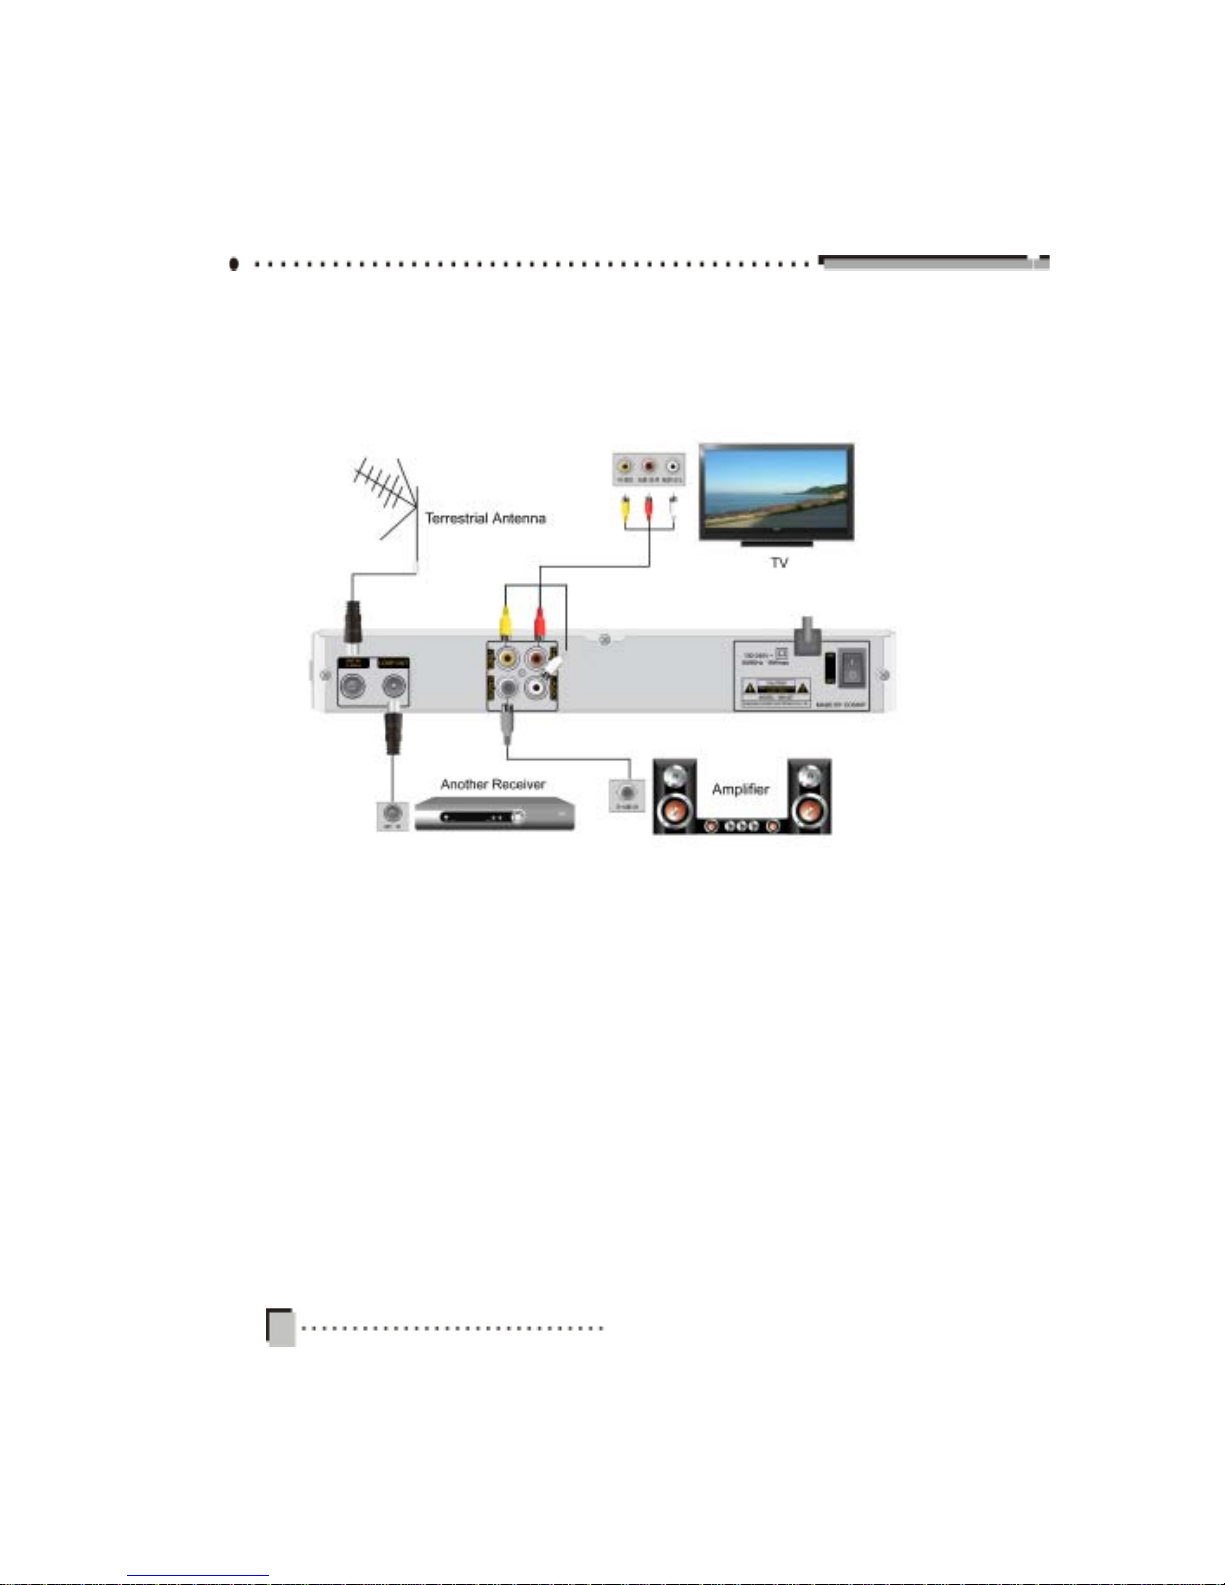
6. System Connection ............................................................................................... 6
II. Quick Installation ........................................................................................................7
III. Main Menu ..................................................................................................................8
1. Installation .............................................................................................................. 8
1.1 Auto Search .................................................................................................... 8
1.2 Manual Search ............................................................................................... 8
1.3 Upgrade Software .......................................................................................... 9
2. Manage Channel ................................................................................................... 9
2.1 Channel Favourite .......................................................................................... 9
2.2 Channel Information ...................................................................................... 9
3. User Setup ........................................................................................................... 10
3.1 System Lock .................................................................................................10
3.2 General Setting ............................................................................................ 10
3.3 Factory Default ............................................................................................. 11
4. Information ........................................................................................................... 11
4.1 CA Information .............................................................................................. 11
4.2 Mail Information ............................................................................................ 11
4.3 System Information ...................................................................................... 11
5. Games ................................................................................................................. 11
6. Shortcut Key Function .......................................................................................... 12
6.1 EPG ..............................................................................................................12
6.2 Channel List .................................................................................................12
6.3 Channel Information .................................................................................... 12
6.4 Volume Control ............................................................................................. 13
6.5 Schedule Manage ........................................................................................ 13
6.6 Subtitle ......................................................................................................... 13
6.7 Audio Selection ............................................................................................. 13
IV. Technical Specification...........................................................................................14
V. Trouble Shooting ......................................................................................................15

2
I.GeneralInformation
1. Preface
Thank you for purchasing N8102T Digital Terrestrial Receiver. It is able to transform
digital signal into high quality video and audio signal for entertainment.
Please read this user’s manual carefully to safely install, use and maintain the receiver
at maximum performance. Please keep this user’s manual next to your receiver for
future reference.
Note: The information in this user's manual is subject to change without notice. The
photo and function explanations in the manual are for reference. If any discrepancy
exists, please refer to the entity.
2. Feature
Support MPEG-4 video and audio decoding
DVB-T tuner
Convenient NIT (Network Information Table) search
Video output: 4:3 / 6:9
OTA (Over the Air) upgrade supported
Support stereo analog audio output and digital audio output
English OSD (On Screen Display)

3
3. Front Panel
○○○○○○○
○○○○○○○
○○○○○○
○○○○○○
○○○○○○○○
○○○○
○○○○○○○○○
○○○○○○
○○○○○○○
○○○○○○
Name Function
1/3. Adjust volume or move cursor left/right
2/8. Switch channel or move cursor up/down
4. Switch between operation and standby modes
5. IR Remote receiver
6. LED DISPLAY Display status
7. MENU Display/exit from main menu
9. OK Display channel list or confirm operation
10. SMART CARD SLOT Open the cover to insert smart card

4
4. Rear Panel
○○○○○○
○○○○○
○○○○○
○○○○○
○○○
○○○○○
○○○○○○
Name Function
1. ANT IN Connect to a terrestrial antenna
2. LOOP OUT Loop output RF signal to another receiver
3. VIDEO Output video signal to TV
4. D-AUDIO Output digital audio signal to amplifier
5/6. R/L-AUDIO Output right/left audio signal to TV or amplifier
7. 100-240V ~ Power supply
8. ON/OFF Power switch
○○○○○○

5
5. Remote Control Unit
Name Function
Mute/restore sound
Switch between operation and standby
modes
Switch between TV and radio modes
EPG Display EPG Guider
FAV Display channel favourite window
LANG Display subtitle window
MENU Display/exit from menu mode
EXIT Back to previous menu or exit from
operation
Switch channel or move cursor up/down
Adjust volume or move cursor left/right
OK Display channel list or confirm operation
Back to previous channel
INFO Display channel information bar
VOL+/- Adjust volume
REMIND Display schedule manage window
GAME Display games window
PAGE+/- Up/down pages
COLOR
KEYS
Functions depend on specific
applications
0-9 Number keys
AUDIO Display audio selection window
MAIL Reserved
Note: The keys mentioned in the main menu refer to that on RCU (Remote Control
Unit), except for special explanations.

6
6. System Connection
The following figure shows connections required for TV and other related electric devices.
If you encounter any problem, please contact your local dealer.
1. Connect ANT IN port to a terrestrial antenna with an RF cable.
2. Connect LOOP OUT port to ANT IN port on another receiver with an RF cable.
3. Connect VIDEO and R/L-AUDIO ports on receiver to corresponding ports on TV with
an RCA cable.
4. Connect D-AUDIO port on receiver to a corresponding port on amplifier with an D-
AUDIO cable.

7
II.QuickInstallation
Step 1: Check the system connection.
Check and make sure your related devices are correctly connected as instructed in 6.
System Connection.
Step 2: Insert the smart card released by your local dealer.
1. Open the right hand cover on front panel of the receiver.
2. Face the side with electronic chip downwards and insert the smart card into corre-
sponding slot horizontally according to arrow direction.
Note: Don't attempt to remove or insert the smart card while the receiver is on.
Step 3: Turn on your TV and switch it to AV mode.
Step 4: Power on the receiver.
Turn on the receiver, system initializes and start-up OSD is shown on TV screen.
Step 5: Search channels.
1. If there are some channels stored in the receiver, the channel number is shown on
LED DISPLAY.
2. If there is no channel stored in the receiver, system will search channels automatically.
For more details, please refer to 1. Installation.
Step 6: Play program
When watching TV, you can select channel with keys.

8
III.MainMenu
In non-menu mode, press MENU key to display main menu
that consists of following items:
Installation
Manage Channel
User Setup
Information
Games
Select items with keys, and then press key to acti-
vate sub-menu. In the sub-menu, press keys to se-
lect a item and press OK key to enter, or press key to
back to main menu.
Note: Please operate according to key instructions at
the bottom of window.
1. Installation
Installation consists of Auto Search, Manual Search and
Upgrade Software.
1.1 Auto Search
For beginners, auto search is the best choice. System will
search channels according to default parameters. Up-
dated TV and Radio channels will be sorted automatically.
Note: Do not interrupt the searching to avoid data loss.
1.2 Manual Search
If you are familiar with relevant parameters, you can select
a channel or set its parameters to search channels.
Press keys to switch among items.
Press keys to switch among options.
Press number keys to input desired values.
Select “Start Search” and press OK key to search.
Updated TV and Radio channels will be sorted
automatically.

9
Note: This function should be performed by qualified
personnel.
1.3 Upgrade Software
If there is upgrade stream from the front end, Upgrade
Software will be activated. After entering this item, a mes-
sage box pops up for confirmation. Press OK key to up-
grade or press EXIT key to cancel the operation.
2. Manage Channel
Manage Channel consists of Channel Favourite and Chan-
nel Information.
2.1 Channel Favourite
You can press FAV key to display this window directly in
non-menu mode.
This window consists of channel list and favourite chan-
nel list.
keys: Switch between channel list and favourite chan-
nel list
keys: Browse the list
How to add a favourite channel
1. Switch to channel list and select a channel.
2. Press OK key to confirm this setting, and the selected
channel appears in favorite channel list.
How to delete a favourite channel
1. Switch to favourite channel list and select a channel.
2. Press OK key to confirm this setting, and the selected
channel disappears in favorite channel list.
2.2 Channel Information
This window displays information about current channel,
such as PID values, frequency and bandwidth, etc.

10
3. User Setup
User Setup consists of System Lock, General Setting and
Factory Default.
3.1 System Lock
You can set parental level for programs and change STB
password.
Correct STB password is needed to activate the setting.
The default value is 0000.
Parental Level: Press keys to select a parental level
from No Lock, All Lock, 13, 15 and 18. Input correct STB
password to view program beyond set level. If No Lock is
selected, there is no restriction to view all programs.
New Password: Press number keys to input new
password. (If necessary)
Confirm New Password: Input the new password again.
After setting, press EXIT key to save and exit.
Note: Don't forget STB password. Once forget it, please
ask you local operator for help.
3.2 General Setting
Menu Language: Default is English.
Menu Opacity: Press keys to select transparency level
from 65% to 100%.
TV Mode: Press keys to select PAL-BDG, NTSC or
AUTO.
Aspect Mode: Press keys to select Letter Box,
Panscan or AUTO.
Aspect Ratio: Press keys to select AUTO, 4:3 or 16:9.
(4:3 for normal TV , 16:9 for wide screen TV).
Audio Mode: Press keys to select Stereo, Left or Right.
Time Out: Set OSD duration of information bar and chan-
nel list. Press keys to select 2s, 3s, 4s, 5s or 10s.
Time Zone: Set your local time zone. Press keys to
select one from -12:00 to +12:00.
After setting, press EXIT key to save and exit.

11
3.3 Factory Default
Warning: This function will restore system settings to
factory default.
After entering this item, a warning box pops up for
confirmation. Press OK key to continue or EXIT key to can-
cel the operation.
4. Information
Information consists of CA Information, Mail Information
and System Information.
4.1 CA Information
This function is reserved.
4.2 Mail Information
This function is reserved.
4.3 System Information
This window displays information about the receiver, such
as hardware version, software version, etc.
5. Games
You can press GAME key to enter directly in non-menu
mode.
System offers two games for entertainment: Gobang &
Tetris. According to instructions displayed on screen, you
can play games with and OK keys.
Note: For your health, please do not keep playing games
for long time.

12
6. Shortcut Key Function
6.1 EPG
Press EPG key to display EPG Guide. It includes channel
list, date bar, event list of highlighted channel and current
program preview window. You can select current program
to play and schedule future programs.
RED key: Switch between channel list and program list
keys: Select date in a week.
When channel list is highlighted:
Press keys to select a channel, and press OK key to
play current program in full screen.
When program list is highlighted:
Press INFO key to display detailed program information.
Press keys to select a channel, and press OK key to
schedule future programs. The scheduled program is
marked with a , and system will remind you near the
play time. If you want to cancel the schedule, press OK key
again.
All the scheduled programs are listed in schedule man-
age window.
6.2 Channel List
Press OK key to display channel list.
Press keys to switch among different channel lists.
Press keys to select a channel.
Press OK key to play it in full screen.
6.3 Channel Information
Press INFO key to display channel information bar, show-
ing brief program information of current channel. Before
channel information bar disappears, press INFO key again
to display detailed information of current program.

13
6.4 Volume Control
Press keys to adjust volume.
Press key to mute/restore sound.
6.5 Schedule Manage
Press REMIND key to display schedule manage window.
Press keys to select schedules.
Press OK key to cancel/restore schedule.
6.6 Subtitle
Press LANG keys to display subtitle window.
Press keys to select a language and press OK key to
confirm. The subtitle is displayed at the bottom of screen.
Select "001 Close Subtitle" to switch subtitle off.
6.7 Audio Selection
Press AUDIO key to display audio selection window.
Press keys to select a language.
Note: This function needs your local operator support.

14
IV.TechnicalSpecification
Tuner
Input Frequency 174 ~ 230 MHz /474 ~ 858 MHz
Loop output Frequency 174 ~ 230 MHz /474 ~ 858 MHz
Input Level 32dBuV ~ 90dBuV
Input Impedance 75Ω
Channel Decoding
Demodulation COFDM
FEC 1/2,2/3,3/4,5/6,7/8, Automatic
Guard Internal 1/4, 1/8, 1/16, 1/32
Mode 2K, 8K
Demultiplexer
Standard ISO/IEC 13818-1
Video Decoding
Standard ISO-IEC13818-2, H.264 AVC MPEG-2 MP@ML
Aspect Ratio 4:3, 16:9, AUTO
Video Format PAL-BDG, NTSC, AUTO
Video Resolution 720×576 (PAL), 720×480 (NTSC)
Audio Decoding
Standard ISO-IEC 13818-3
Decoding MPEG-1 & MPEG-2 layer 1 and 2
Audio output Mode Stereo, Left, Right, D-Audio
Audio output Level 32 Level
Power Supply
Input Voltage 100 - 240V ~ 50/60Hz
Power Consumption 18W max.
Ambient
Operation Temperature 0℃~ 40℃
Dimension 280 mm x 185 mm x 40 mm
Relative Humidity 5% ~ 80% <38 deg C wet bulb
Weight 1.5 kg (unpacked)

15
V. Trouble Shooting
Problem Possible Causes What to Do
LED DISPLAY on
front panel is off Power cord is not connected Check and make sure the power
cord is plugged into power socket
No sound and no
picture The receiver is in standby mode Press key to switch to
operation mode
The signal cable is disconnected Connect the signal cable securely
Program parameters are set
incorrectly Set correct parameters
No signal
No signal from the operator Try again when signal is available
Audio cable is not connected
securely Connect the audio cable securely
System is in mute mode Press key to restore the sound
Volume is set to minimum Increase the volume to suitable
level
No sound
Audio parameter is set wrongly Select a proper audio mode
Video cable is not connected
securely Connect the video cable securely
No picture
System is in radio mode Normal
Video and audio
mismatch, or
abnormal sound
Audio channel is set incorrectly Select a proper audio channel
Smart card is plugged
incorrectly Insert the card correctly
Program cannot be
played Smart card can not decrypt this
kind of program Normal
Picture is still or
mosaic Signal is too weak
Check and make sure that the
signal cord has been connected
securely
RCU is not aimed at the remote
receiver on front panel
Aim RCU at the remote receiver
on front panel
RCU does not work
No power in batteries of RCU Replace batteries
Note: If you cannot solve problems after referring to the above trouble shooting,
please contact the local operator.
Table of contents