GREENMAN GHG190-M800 User manual

Greenman Golf & Turf Solutions • 1028 4th St. SW, Bldg. A •Auburn, Washington 98001 •GreenmanGolfTurf.com
19” Hover Mower
OPERATOR’S MANUAL
Model
GHG190-M800
Powered By

HOVER MOWER OPERATOR’S MANUAL
Greenman Golf & Turf Solutions • 1028 4th St. SW, Bldg. A •Auburn, Washington 98001 •GreenmanGolfTurf.com Page 2
Introduction
Read this information carefully to learn how to operate
and maintain your product properly and to avoid injury
and product damage. You are responsible for operating
the product properly and safely.
Important: This engine is not equipped with a spark
arrester muffler. It is a violation of California Public
Resource Code Section 4442 to use or operate the
engine on any forest-covered, brush-covered, or grass-
covered land. Other states or federal areas may have
similar laws. This spark ignition system complies with
Canadian ICES-002.
The enclosed Engine Owner's Manual is supplied for
information regarding the US Environmental Protection
Agency (EPA) and the California Emission Control
Regulation of emission systems, maintenance, and
warranty. Replacements may be ordered through the
engine manufacturer.
You may contact Greenman Golf & Turf Solutions
directly for product and accessory information, help
finding a dealer, or to register your product. Whenever
you need service, genuine Greenman parts, or additional
information, please contact an our Customer Service
and have the model and serial numbers of your product
ready. They are located on the decal on the rear of the
unit as shown in this photo:
Write the numbers in the following space provided.
Model Number: ____________________________
Serial Number: ____________________________
You may complete and mail the enclosed product
registration card, or you can register on-line at:
GreenmanGolfTurf.com
Should you require warranty service, take a copy of your
sales receipt and a copy of your product registration card
to your servicing dealer.
Carton Contents
- Greenman Hover Mower
- Greenman Product Registration Card
- Engine Owner’s Manual / Emission System Warranty
- Lower Handle Assembly (with handle stand)
- Upper Handle Assembly (including throttle cable,
engine stop lever, and on/off switch)
Key Components
The image below identifies key components of the Hover
Mower so take the time to familiarize yourself with them
and their function.
Assembly & Set-up
The unit has been carefully pre-assembled with
adjustments and quality inspections performed by a
team of trained technicians who take great pride in their
work. For packaging and shipment, there are
components that need installation. When instructions
refer to the left or right side of the unit, it means as
standing behind at the normal operation position.
Tools Required
Regular or needle-nose pliers, medium adjustable
wrench, and 1/2" wrench (for adjusting cutting height
and replacing blades –see page 7).

HOVER MOWER OPERATOR’S MANUAL
Greenman Golf & Turf Solutions • 1028 4th St. SW, Bldg. A •Auburn, Washington 98001 •GreenmanGolfTurf.com Page 3
Assembly & Set-up (continued)
1. Insert the lower handle section into the mounting
brackets on each side of the deck –noting that the
handle stand lever will be on the right side of the unit
as shown in the photos below:
2. Secure the handle inserting the pins on each side and
install the cotter pins with the washer placed beneath,
then bend as shown to secure in place:
1. Attach the upper handle section to the lower handle
section –with the stop lever facing forward –using
the bolts and knobs as shown:
2. Verify the engine stop lever is properly installed, so it
pivots upward completely against the handle when
squeezed and returns downward when released:
3. Install the on/off switch on to the RIGHT side of the
handle (in the SECOND hole below the stop lever):
Right Side
Left Side

HOVER MOWER OPERATOR’S MANUAL
Greenman Golf & Turf Solutions • 1028 4th St. SW, Bldg. A •Auburn, Washington 98001 •GreenmanGolfTurf.com Page 4
Assembly & Set-up (continued)
4. Attach the throttle spring to the hole of the stop lever
on the LEFT side of the handle, then install the cable
adjust bracket onto the handle using the SECOND
hole below the stop lever:
5. Add the plastic tubing to cover the on / off switch
wires before connecting the ends, then to the handles
using the tie straps included:
Safety Instructions
The following safety alert symbols are use in these
instructions in conjunction with important safety
messages related to the operation of the unit and
potential hazards. As you familiarize yourself with
the various features and functionality of this mower,
please take note of the subjects and specific
instructions that include these images…
…WILL cause serious or fatal injury if the
instructions are not followed.
…CAN cause serious or fatal injury if the
instructions are not followed.
Safety Labels
On the unit itself, there are additional labels that identify
important safety issues. The following one refers to the
hazards of the cutting blades:
The following label identifies important instructions
related to the operation of the mower:
Safety Precautions & Training
Understand the operation of all controls and learn
how to stop the engine and mower quickly in case of
emergency. Make sure the operator receives
adequate instruction before operating this unit.
When instructions refer to the left or right side of the
unit, it means as standing behind at the normal
operation position.

HOVER MOWER OPERATOR’S MANUAL
Greenman Golf & Turf Solutions • 1028 4th St. SW, Bldg. A •Auburn, Washington 98001 •GreenmanGolfTurf.com Page 5
Safety Precautions & Training
1. Read all information contained in this manual and
the engine manual carefully. Be thoroughly familiar
with the controls and proper use of the equipment.
2. Never allow children to operate mower.
3. Never operate this unit when you are tired, ill or
under the influence of alcohol, drugs or medication.
4. Never try to mow across excessively steep terrain.
On inclines, keep the unit in front / below and
maneuver in a pendulum motion.
5. Keep area of operation clear of all persons,
particularly small children and pets.
6. Never operate the mower without proper guards /
shields in place.
7. Thoroughly train anyone using the mower. Make
sure all mower operators know the safety, operating
and maintenance procedures.
8. Never leave the mower unattended with the engine
running.
9. Mow only in daylight or in good artificial light.
10. Always be sure of your footing. Keep a firm hold on
the handle and never run with the unit.
11. Do not operate mower when barefoot or wearing
open sandals. Always wear substantial footwear,
and pants or slacks that cover your legs when
operating mower.
12. Material may ricochet back toward the operator. Do
not operate over gravel surfaces.
Preparation & Inspection
1. Thoroughly inspect the area where mower is to be
used, and remove all stones, sticks, wire, bones and
other foreign objects which might be thrown. Never
operate the unit over gravel.
2. Check fuel before starting engine. Do not fill
gasoline tank indoors, or when engine is running.
Wait until engine has been allowed to cool for
several minutes. Clean off any spilled gasoline
before starting engine.
3. Make the unit is on a flat level surface before
starting engine.
4. Inspect the unit to verify the controls, safety switches
and handles are assembled properly. Do not operate
unless they are functioning properly.
5. If the machine should start to vibrate abnormally,
stop the engine and check for the cause
immediately.
6. Use care when loading or unloading the machine
into a trailer or truck.
7. Never operate machine in an enclosed area.
8. Keep all nuts and bolts tight to be sure the
equipment is in safe working condition.
9. Never tamper with safety devices. Check their
proper operation regularly.
10. Keep machine free of grass, leaves, or other debris
build-up –especially the recoil starter area of the
engine. Clean up oil or fuel spillage and remove any
fuel-soaked debris. Allow machine to cool before
storing in an enclosed space.
11. Never make any adjustments or repairs with the
engine running. Disconnect the spark plug wire to
prevent unintended starting.
12. Do not change the engine throttle setting or over-
speed the engine.
13. Maintain or replace safety and instruction labels, as
necessary.
14. If gasoline is spilled, do not attempt to start the
engine but move the machine away from the area of
spillage and avoid creating any source of ignition
until the gasoline vapor has dissipated.
15. Before using, always visually inspect to see that the
blade(s), bolts, and spacers are not worn or
damaged. Replace a worn or damaged blade(s).
16. Stop the engine if the machine must be tilted for
transportation when crossing surfaces other than
grass, and when transporting the machine to and
from the area to be mowed.
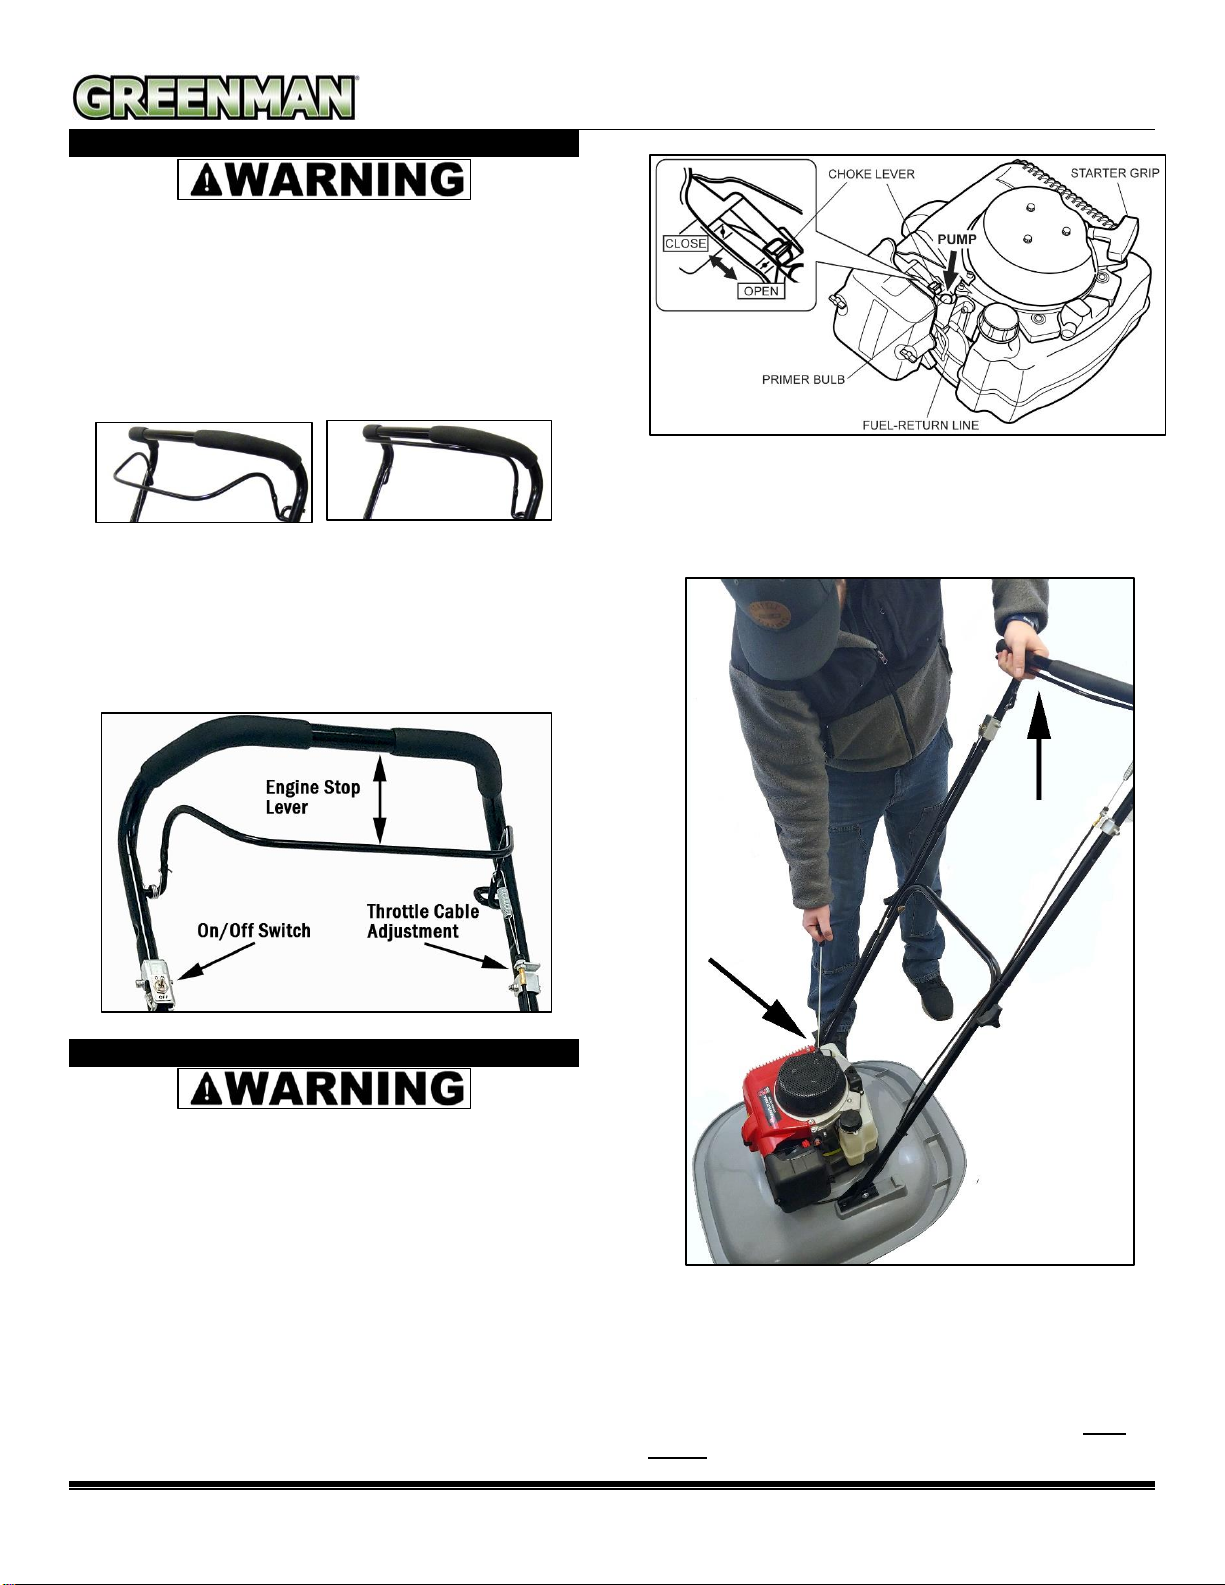
Engine Operation
IMPORTANT –THIS IS A 2-STROKE ENGINE THAT
REQUIRES MIXED FUEL OF GASOLINE AND 2-
STROKE OIL FOMULATED FOR USE IN HIGH-
PERFORMANCE AIR-COOLED ENGINES.
Review the complete
operation and safety
instructions provided
in the Maruyama
engine owner’s
manual –which is
included in the
information packet of
this unit.
Any service, warranty
or replacement parts
issues for the engine
should be directed to
Maruyama Authorized
Service Dealers. More information can be found on
their website at:
Maruayama-us.com

HOVER MOWER OPERATOR’S MANUAL
Greenman Golf & Turf Solutions • 1028 4th St. SW, Bldg. A •Auburn, Washington 98001 •GreenmanGolfTurf.com Page 6
Operating Controls
Make sure the handle sections are properly
tightened in the upright position before starting
engine and do not operate the unit if the engine stop
lever is damaged or not functioning correctly.
1. Engine Stop Lever
This lever allows the engine to start and run at its
optimum speed. It will also stop the engine and the
rotation of the cutting blades when released:
2.Engine On/Off Switch / Throttle Cable
The switch is connected to the ignition system with on
and off positions. The throttle is set up to provide the
optimum engine speed when the stop lever is fully
squeezed against the handle and stop the engine
when released –THIS CAN BE ADJUSTED USING
THE CABLE ADJUSTMENT:
Mower Operation
Make sure the ground is flat and clear of debris and
do not attempt to start on a sloped / inclined surface.
Make sure the fuel tank cap is properly installed and
tightened.
NOTE: FOLLOWING IS A SUMMARY OF THE
ENGINE STARTING PROCEDURES. FOR MORE
DETAILED INFORMATION, REFER TO THE
MARUYAMA ENGINE OPERATOR’S MANUAL.
1. Cold Starting
a. Set the on/off switch to “ON”
b. Press the primer bulb multiple times until fuel can
be see flowing through the return line to the tank
(clear flow with no bubbles).
c. Move the choke lever to the “CLOSED” position
. d. While standing on the right side of the unit, place
your foot on the edge of the deck while
simultaneously gripping the engine starter handle
and the engine stop lever against the handle to
hold the unit before pulling the recoil starter:
Pull the starter rope out slowly about 6-8” before
beginning the full pulling motion and do not pull it all the
way out. After the engine has started, move the choke
lever to the OPEN position, then carefully move behind
the unit while continuing to hold the stop lever against
the handle and adjusting your grip position using both
hands.
STOP
RUN

HOVER MOWER OPERATOR’S MANUAL
Greenman Golf & Turf Solutions • 1028 4th St. SW, Bldg. A •Auburn, Washington 98001 •GreenmanGolfTurf.com Page 7
Mower Operation (continued)
Always maintain a firm grip on the handle and
engine stop lever and keep the unit in front of you.
If the engine does not start after 4-5 pulls, make sure
the on/off switch is on and repeat the priming steps.
If mower should vibrate abnormally, stop the engine
and check for the cause. Vibration is generally a
sign of an issue with the impeller fan or cutting
blade underneath the deck.Make sure the engine
stops completely when releasing the lever.
2. Mowing
Always use both hands when operating the unit.
Steep slopes are a major factor related to slip and
fall accidents, which can result in severe injury.
Operation on all slopes requires extra caution. Avoid
operating the mower at an angle greater than 45
degrees or above your position. If you feel uneasy
on a slope, do not mow it. Do not pull the unit
directly backwards when mowing.
•Always keep the unit below your position moving it
with side-to-side motion like a pendulum. Exercise
extreme caution when changing direction on slopes.
•Watch for holes, ruts, bumps, rocks, or other hidden
objects. Uneven terrain could cause a slip and fall
accident. Tall grass can hide obstacles.
•Do not mow wet grass on excessively steep slopes.
Poor footing could cause a slip and fall accident.
•Take extra caution near drop-offs, ditches, or
embankments. Wear shoes with traction as you
could lose your footing or balance.
•When cutting steeper inclines from the top of the
slope and a longer reach is needed, never tie a rope
to the unit. Use the handle extension kit option
(order #4012561-M):
If striking a foreign object,
stop the engine, remove wire
from spark plug, thoroughly
inspect mower for damage.
Repair damage before
restarting engine. Watch out
for traffic when working near
roadways.
For best performance, install
new blades before the cutting
season begins. Replace the
blades when necessary, with
replacement blades.
Stop the mower and allow the engine to cool before
making inspections or adjustments, and when
transporting. If the engine does not stop, move the
CHOKE lever to the starting (closed) position. Have
the unit immediately inspected by an Authorized
Service Dealer.
3. Cutting Height Adjustment
The unit’s cutting height is adjusted by removing the
cutting blade and placing the spacers on either side:
Tri-Blade Bar Blade**
Loosen and remove center bolt to disassemble the
components. Placing all the spacers above the blade
will provide the lowest cutting height; placing all the
spacers below will provide the highest cutting height.
IMPORTANT! Always install the tri-blade assembly with
flail blade mounting nuts facing upward (toward impeller
/ engine). The mounting components: hub, spacers, tri-
blade assembly / bar blade and flange, must be
installed, aligned, and seated properly before tightening
the bolt.
4. Transporting
An optional wheel kit (order #4041500) is available for
quick and easy transporting:
** Shown with optional Low-Cut Kit #LC-190

HOVER MOWER OPERATOR’S MANUAL
Greenman Golf & Turf Solutions • 1028 4th St. SW, Bldg. A •Auburn, Washington 98001 •GreenmanGolfTurf.com Page 8
Mower Maintenance
The following maintenance topics are general practices
that owners can do to keep the mower in good working
condition. For any service or repair issues beyond these,
it is recommended that the unit be inspected by an
Authorized Greenman Dealer.
IMPORTANT: Avoid damage! Operating in extreme
conditions may require more frequent service
intervals. Engine components may become dirty or
plugged when operating in extreme heat, dust or
other severe conditions.
DAILY INSPECTION FOR COMMERCIAL USE
EVERY 8 HOURS FOR NON-COMMERCIAL USE
1. Check engine and air cleaner per the engine
manufacturer’s instructions.
2. Inspect the cutting blades for damage and
movement –NOTE: the blades are reversible and
use only genuine Greenman replacement parts.
Do not operate the unit without tri-blades or bar
blades properly installed.
3. Remove debris and grass from the engine mounting
base area and the engine air intake –which is part
of the recoil starter.
4. Check the impeller and mower deck for cracks or
damage.
5. Check the tightness of the handle mounts.
6. Clean excess grass buildup from the underside of
the deck.
The parts manual is available for download and
replacement parts are available using the website:
GreenmanGolfTurf.com
LIMITED WARRANTY STATEMENT
Greenman Golf & Turf Solutions hereby warrants Greenman brand products to be free from defects in material or workmanship for a
period two years after purchase for non-commercial / non-rental consumer use. This warranty applies only to non-engine
components and functions. The engine warranty coverage is provided by the respective manufacturer and is subject to their specific
requirements and conditions. If the product is used in a commercial application, the warranty period shall be one year after purchase.
Consumer use under the terms of warranty is defined as operation at a personal home or residence. Commercial application under the
terms of warranty is defined as use in conjunction with an income producing business or commercial, institutional or municipality
grounds maintenance.
This warranty is limited to repair or replacement by Greenman Golf & Turf Solutions or at the premises of Greenman Authorized
Service Dealers, of such parts as appear upon inspection, to be defective in material and/or workmanship. The above warranties are
extended only to the first end user, and no warranty is made nor authorized to be made assignable on resale. Greenman Golf & Turf
Solutions makes no warranty with respect to replacement parts not manufactured or sold by it. Such parts are subject to the warranty
policy of their respective manufacturers. For the name and address of your nearest Authorized Service Dealer, contact Greenman Golf
& Turf Solutions at: 1028 4th Street SW, Building A, Auburn WA 98001, (253) 333-3345 or online at http://greenmangolfturf.com. To
obtain performance of any obligation under this warranty for failure during the applicable warranty period, deliver the product, shipping
prepaid, to Greenman Golf & Turf Solutions, or to the nearest Authorized Service Dealer. Warranty coverage is conditioned upon the
first end user furnishing Greenman Golf & Turf Solutions or its Authorized Service Dealer with adequate written proof of the original
purchase date. Greenman Golf & Turf Solutions reserves the right to inspect the claimed defective part(s) to determine if the
malfunction is the result of a defect covered by this warranty.
This warranty will cover only defects arising under normal usage, and shall not apply, nor will Greenman Golf & Turf Solutions assume
any responsibility, if the failure was caused by the following:
1. Operation of product without proper lubrication.
2. Misuse, abuse, or negligence.
3. Accident or physical damage.
4. Repairs made by unauthorized parties and/or with unauthorized parts.
5. Improper unit set up or altered components.
6. Improper adjustments i.e., blades, drive system, levers, cables, nozzles, pump motors, etc.
7. Operation of engine at speeds above the manufacturer’s recommendations.
8. Failure to operate or maintain the unit in the manner specified by the owner’s manual.
Inspection, service, and adjustments to normal maintenance items such as cables, grease fittings, blades, nozzles, lines, battery,
engagement levers, etc. are not considered the responsibility of Greenman Golf & Turf Solutions under this warranty.

HOVER MOWER OPERATOR’S MANUAL
Greenman Golf & Turf Solutions • 1028 4th St. SW, Bldg. A •Auburn, Washington 98001 •GreenmanGolfTurf.com Page 9
THIS LIMITED WARRANTY IS IN LIEU OF ALL OTHER EXPRESS WARRANTIES, OBLIGATIONS, OR LIABILITIES. ANY IMPLIED
WARRANTIES, OBLIGATIONS, OR LIABILITIES INCLUDING, BUT NOT LIMITED TO, ANY IMPLIED WARRANTY OF
MERCHANTABILITY OR FITNESS FOR A PARTICULAR PURPOSE SHALL BE LIMITED IN DURATION TO THE APPLICABLE
WARRANTY PERIOD FOR THE FIRST END USER (TWO YEARS FOR NON-COMMERCIAL USE; 1 YEAR FOR COMMERCIAL
USE. ANY ACTION FOR BREACH OF ANY WARRANTY HEREUNDER INCLUDING, BUT NOT LIMITED TO, ANY IMPLIED
WARRANTY OF MERCHANTABILITY OR FITNESS FOR A PARTICULAR PURPOSE MUST BE BROUGHT WITHIN A PERIOD OF
SIX MONTHS FROM THE END OF THE APPLICABLE WARRANTY PERIOD.
Some states do not allow limitations on how long an implied warranty lasts, so the previously stated limitations may not apply to you.
No agent, representative, dealer, or employee of Greenman Golf & Turf Solutions has the authority to increase or alter the obligations
of this warranty.
IF THE PRODUCT IS USED PRIMARILY IN A COMMERCIAL APPLICATION, GREENMAN GOLF & TURF SOLUTIONS WILL NOT
BE LIABLE FOR GENERAL DAMAGES INCLUDING BODILY INJURIES, EXCEPT AS SET FORTH ABOVE, OR FOR INCIDENTAL
OR CONSEQUENTIAL DAMAGES INCLUDING, BUT NOT LIMITED TO, LOSS OF USE, LOSS OF PROFITS, LOSS OF
PRODUCTION, EXPENSE OF SUBSTITUTE EQUIPMENT OR OTHER COMMERCIAL LOSS OR DAMAGE. THE SAME
LIMITATIONS SHALL APPLY TO A PRODUCT USED FOR CONSUMER PURPOSES WITH RESPECT TO ALL NON-PERSONAL
INJURY, GENERAL INCIDENTAL AND CONSEQUENTIAL DAMAGES.
Some states do not allow the exclusion or limitation of incidental of consequential damages, so the above limitation or exclusion may
not apply to you. This warranty gives you specific legal rights, and you may also have other rights which vary from state to state.
Table of contents
Other GREENMAN Lawn Mower manuals