Groove Tubes Soul-o Series 75 User manual

9 - There is no particle board in any part of our cabinetry, only
solid core American plywood.
Of course these features and construction details cost more, but
you can really hear the difference!
The Front Panel Features...
The Preamp Stage
The Soul-o Series preamp stage has 5 GT12AX7 dual triodes, each
performing multiple functions in the circuitry. The two channels
are designed with entirely different purposes and therefore have
vastly different gain structures and voicing. You may switch
between Clean and Scream, or combine them as Both for more
really interesting possibilities. These can be switched from the
front panel or by the optional footswitch, in which case the front
panel switch must be in the center, or Both, position. It is also
possible to adapt the footswitch jack to work with most remote
rackswitching devices.
The Clean Channel has the basic 5 controls you’ve likely seen
before: Gain; Bass; Middle; Treble; and Volume plus a Brite switch
for that real “cutting edge” sound. You may want to turn the Brite
switch off if you’ve got a Telecaster. The Clean channel is not
designed to produce heavy distortion, hence it’s name. However,
an increase of Gain and decrease of Volume will produce a gradu-
ally fatter, warmer tone while the opposite will produce the bright-
est sound and most dynamics or headroom.
The design of the tone controls on this channel are passive, as
used on older style amps. Active designed tone controls, most
common in newer amps, have a separate gain section for each
tone band, in effect they act like a series of effects loops which
“suck tone”...so we don’t use them. Our tone controls are more
interactive with your style of playing and are simply more musical.
To get the most out of passive tone controls, start by listening to
the channel with all tone controls at the 12 o’clock position. Then,
if you want more bass, either: 1) crank up the Bass control; or 2)
lower the Treble control, raising the gain to compensate the vol-
ume loss. Passive controls are interactive, so turning any one of
them fully on, or off, diminishes the effect of the others and alters
the gain structure. Experiment with this advice in mind.
The Scream Channel
The Scream Channel also has the same basic 5 controls plus a Fat
switch, which does just what is says. However, since this channel
is designed to produce a wide range of distortion tones from Blues
to Metal...the Gain and Volume ratio are everything! If you want
more distortion, raise the Gain and lower the Volume. This chan-
nels tone controls are also passive, but of a different design than
the other channel. This tone circuit is called a cathode follower
type and changes it’s tone depending on how hard you pick the
string of your guitar. Notice as you push the note harder with your
Congratulations, you’ve just purchase what we believe is the best
amp on the planet! We’d like to welcome you to the growing list
of artists who share our mutual lust for tone. Now, we’d like to
better acquaint you with your Soul-o amp new amp and show you
how to get the most out of this incredible hand built tube amplifier.
Some of our unique construction details:
1 - All components are hand soldered. There are no quick dis-
connects, wire nuts, or dipped connections and over 120 hand
soldered connections on the tubes sockets alone
2 - All transformers are custom designed and made exclusively for
Groove Tubes.
3 - GT amps are designed to use your choice of 6L6, 5881,
European E34Ls or KT88s power tubes. Choose from a total of
13 different tubes which are currently available from our GT cata-
log. Customized your S75 for tone and power from 35 RMS watts
to 95 RMS watts, and the S150 from 80 RMS watts to over 190
RMS watts!
4 - The entire amp chassis for the combo package is shock mount-
ed on rubber isolators to reduce adverse interactive vibrations and
microphonics at higher playing levels.
5 - The critical V1 preamp tube is also shock mounted on a spe-
cial rubber isolator to reduce adverse interactive vibrations and
microphonics at higher playing levels.
7 - We use only double sided, double thick PC boards with double
thick traces and no PC mounted sockets. Instead we use chassis
mount type sockets bolted and hand wired to the PCB. This is the
best of both worlds; PCB and point to point construction.
8 - There are more than 28 hours of hand labor in each Soul-o
Series amp. Each amp is custom to built to order!
SOUL-OSERIES 75/150 OPERATING MANUAL

AC30 used Class A circuitry as did early Tweed
Fenders. More modern Fenders and Marshalls
used the power tubes in a Class A/B circuit
design. Frankly, we liked both designs and
invented a way to switch between them. In addi-
tion, we developed a special output transformer
designed to work with many different types of
power tubes. The combination of these unique power section
designs give the player ultimate flexibility in customizing the tone,
power, and response of his power stage.
The Power Amp Stage
All Soul-o Series stages
are designed to use
many types of power
tubes, up to 13 different
types that are currently
available from our
Groove Tubes catalog at
the time of this writing
(and more are coming in
the near future!) This allows you to “customize” your amp for the style of
music you’re playing, and also to dramatically change the power, tone or
response of your amp when the urge hits. Also, our unique output
design allows the tubes to be used in three basically different circuit
designs which can be manually selected on the rear of your con-
trol panel:
1) Class A/B, commonly referred to as Push/Pull, where the
power tubes work in an alternating system which provides maxi-
mum power and more dynamic range. This design is common to
almost all newer Fender or Marshall type amps and is favored by
modern amp designers because it produces maximum power
from the output tubes....more bang for the buck!
2) Class A Normal which emulates early Fender amp designs (pre
1954) where the power tubes work in unison and so lose about 30%
of possible output power and produce more compression. Another
trait of this Class A design is that the tubes draw full current at all
times and so run hotter (Class A/B draws current only on demand;
no signal from guitar, no power draw and so the tubes run cooler).
3) Class A Gnarly a slightly less efficient form of Class A which
produces about 10% less than the Class A Normal design. This
circuitry emulates the early Vox AC30 amp tone and is even
greasier sounding and more compressed.
Switching between the circuit designs
Located on the rear panel, the the left switch selects “Class A/B in
the up position and Class A in the down position. The right switch
selects between Class A “Normal” and Class A “Gnarly” and is
active only when the first switch is in the Class A position. The
amp does not necessarily need to be put into “standby” mode
before switching between output tube designs, but it is highly rec-
ommended to avoid a loud popping sound in the speakers.
NOTE: Power tubes react in various degrees to these different
circuitry designs. The most dramatic differences between Class
A and Class A/B seem to occur with the 6L6 type tubes, and less
so with the EL34 type tubes.
playing, the tone will brighten up, while softer playing will produce
a rounder fatter tone...that is by design and will give you a truly
touch sensitive channel that will reflect your personality...indulge
yourself and have some fun! Remember, as with all passive type
controls, start with them in the 12 0’clock position and season to
taste from there...don’t just crank them all up and wonder why the
channel sounds mushy!
CAUTION: The Scream channel uses passive tone control circuitry for
the most musicality and also has tremendous available gain because
we do not know if your guitar would have low or high output pickups.
Therefore, we wanted to provide enough gain so that even a very low
output pickup can achieve excellent overdrive distortion and sustain.
However with stronger pickups, and with the Gain or Treble controls
at higher levels, it could be possible to induce self-occilation in the
Scream channel, or make it scream all by itself. If this should occur,
simple lower the gain and/or Treble control to acceptable levels.
Using Both Channels
Another unique feature of this amp is that Both channels can be
used at the same time. Simply select the Both position on the
front panel (and/or the Both position on the optional footswitch)
and Clean with Scream can now be balanced using their separate
Volume controls. I have found that the most useful gig setting is
to simply find my optimum Clean; channel setting, then find my
best Scream channel setting and when I switch into Both, the
sound is perfect for the “second” lead tone or a great third tone
with my guitar volume backed slightly down. It’s a great feeling
playing with the fat, compressed Scream channel coupled with the
edge and full voice of the Clean channel underneath...it’s a great tone!
Note, when using the footswitch: to get back to the alternating
Scream/Clean mode, you must de-select the Both position from
the footswitch. Once the Both position is turned on, it must be
turned off!
The Presence Control
This control is interactive with the power stage, and when you
increase it’s level you are adding more high frequency back into
the feedback loop of the power tube stage. Increasing Presence
will increase the interactive gain and provide more touch and push
in the amp. Normally, I use the same settings for the tone con-
trols and adjust the Presence for the gig I’m playing. More
Presence for an acoustically “dead” room, and less for the “more
lively” rooms. Also, perhaps you might want to use less on a sin-
gle coil guitar and more on a humbucker type.
The Rear Panel Features...
The most unique rear panel feature are the switches that select the
circuitry for using the power tubes. You may select between Class
A/B, Class A Normal, and Class A Gnarly. We developed this
design from 18 years of experience with the many vintage amps
from the GT collection. Some great sounding amps like the Vox

stage of the FX unit and has it’s level greatly reduced so as not to
overload the FX units low energy chip. After the processing is
completed by the chip, the signal strength is returned by a tran-
sistor. So now the nice, fat tube preamp tone is converted to a
thin, wimpy transistor tone. We call this “the tone sucking tran-
sistor FX syndrome”...and we designed a system that cures it!
Our approach is to use two signal paths that are mixed on the rear
panel via the Mix control. Usually, you would mix the dry/wet level
on your FX unit, but for best result with our loop you will now want
to set you FX unit for 100% Wet and 0% Dry. The Send level
would normally be set fully up, unless you are using a low signal
level device such as a foot pedal in which case you might over-
drive the FX unit unless you lowered the send level. Use the
Return jack for the output of the FX device, and the Mix control to
blend in the desired level of FX. The secret is to have the Mix level
set with 98% Dry signal from the internal Soul-o preamp stage
blended with a 2% very Wet FX level (see photo above). This
should give you loads of FX, while letting the original preamp sig-
nal pass unaffected by the transistor tone stage of the FX device.
When using the optional footswitch, you should be able to turn the
Loop off and on without any change in tone...it should be
absolutely transparent when set up in this manner. For some real
flexibility, try inserting a normal foot controlled volume pedal
between the FX return signal path. Now when you increase the vol-
ume controller the FX will gradually come on or off as you like, leave
the loop selector of the footswitch in the “on” mode and simply use
the pedal to turn your FX unit on or off, or anywhere between!
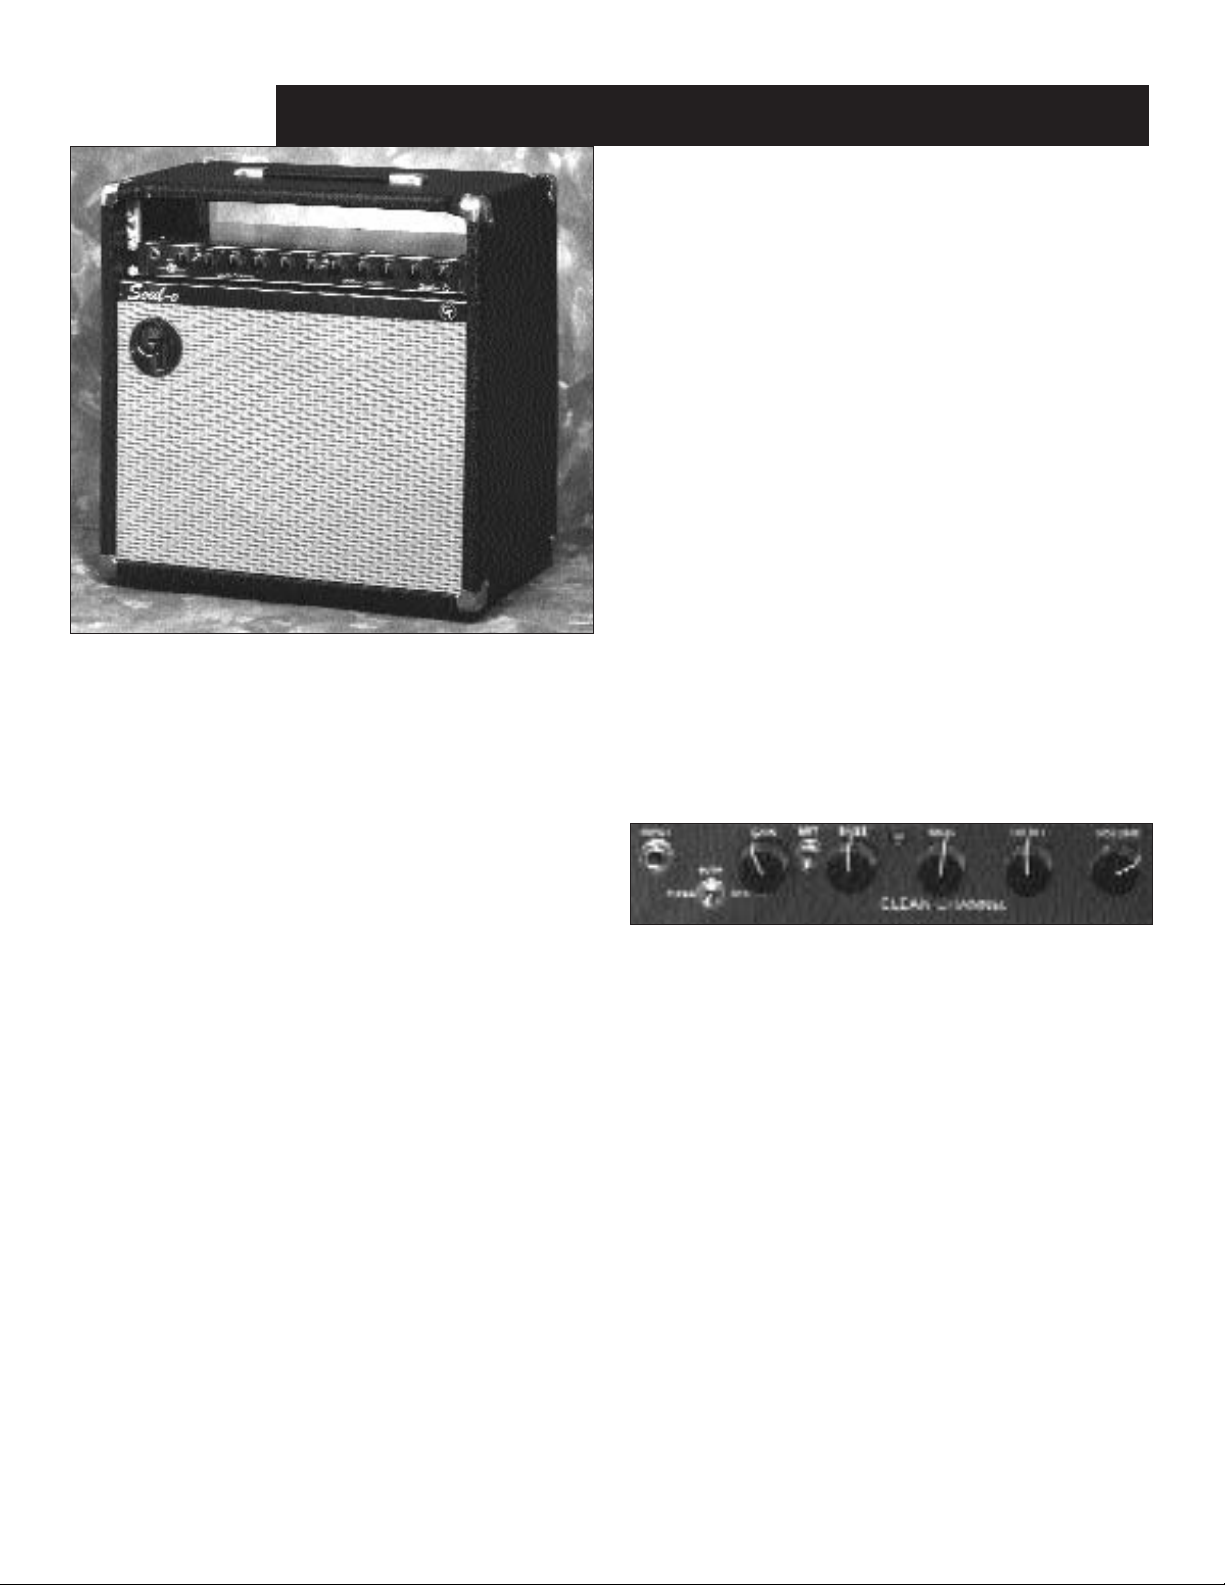
Other Soul-o Series Options
The S75RM and S150 RM (the RM stands for “Rack Mount”) amps
can be inserted directly into your rack system. They may also be
built into various wood cabinets and coupled with various GT speak-
er cabinet to make really great sounding, traditional looking amp.
Here are some of the cabinets and accessories you may want to
consider to customize your Soul-o amp to your specific needs. It
should be noted that all Soul-o cabinets are constructed of inter-
locking lightweight plywood that is braced, power nailed, and
glued. The cabinets are then covered in US made heavy Tolex mate-
rial.
S/FS: A matching footswitch that selects between Clean and
Scream, selects Both (on or off), and turns the Parallel loop on/off.
LED lights indicate the status of the various selections and it
comes with a 25’ cable terminated in a 5 pin Din connector that
connects to the rear panel of the amp.
Cage: A metal cage used to protect the tubes. Commonly used if the
amp is to be freestanding, say on top of a recording console. Strong
enough to have 4 rubber feet attached to the top/bottom of the cage
“Tone Tips” for tubes and output stage options
• Gritty, greasy old AC30 tone, but louder, try using EL34’s in
Class A Gnarly. Estimated power from the S75 ranges from 50 to
55 watts depending on EL34 type used.
• Warm & bouncy round old Tweed tone, try any 6L6 type tube in
the Class A Normal mode. Estimated power output of a S75 ranges
from 45 to 55 watts depending on 6L6 type used.
• Newer, tighter, cleaner Blackface Fender tone, try any of the 6L6
types in the Class A/B mode. Estimated power output of a S75
ranges from 55 to 70 watts depending on 6L6 type used.
• Dynamic Metal punch or crunch tone, try a EL34 type, or better
yet the newly developed, high powered GT E34Ls in the Class A/B
mode. Estimated power output of a S75 ranges from 65 to 75
watts depending on EL34 type used.
• Steel clean, ball peen hammer tone, try the KT88s tubes in the
Class A/B mode and plug in your Telecaster with the bridge pick
up...you’ll think you’ve died and gone to hillbilly heaven! Estimated
power output of a S75 ranges from 80 to 95 watts depending on
KT88/6550 type used.
Note: The S150 amp this can produce over 190 watts RMS...and
can easily damage hearing. So be careful not to stand directly in
front this amp connected to one of our EX412 cabs....you have
been warned!
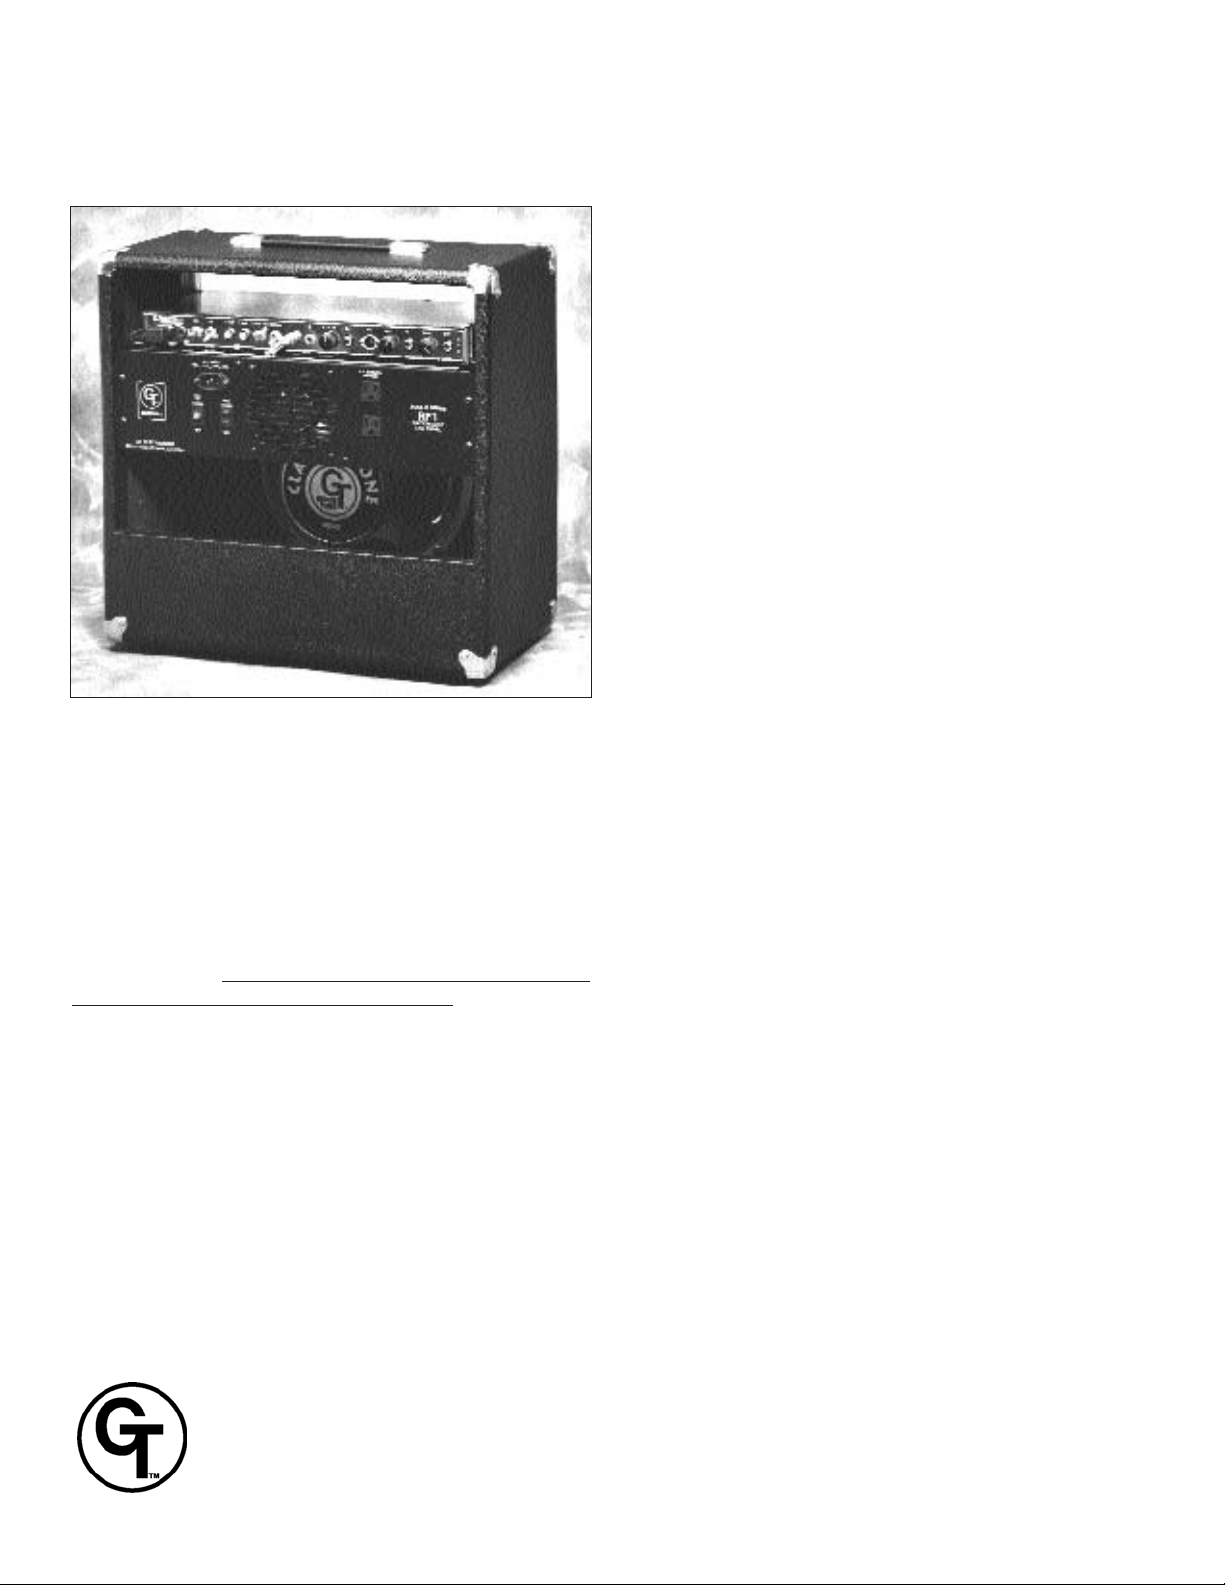
Speaker Impedance Selector
The GT custom designed
output transformers not
only work with many
types of power tubes,
but also have multiple
secondary windings that
allows for selection
between 4, 8, and 16 ohms speaker loads. These features allow
you to customize your amp and speaker combination to emulate
virtually any classic amp example or invent new combinations. We
believe in the philosophy to customize, and not modify, the basic
components of the amp and thereby give the owner the ultimate in
flexibility. As his or her musical tastes and needs change through
the years, the Soul-o Series amp can evolve with them.
CAUTION: Always use the #1 speaker jack. The #2 is only for
adding a second speaker. The #1 jack has shorting circuitry which
turns the amp off if there is no speaker connected. Also, the total
load of one, or both speakers should correspond with the speaker
impedance selector.
The Parallel FX Loop
This is the most tonally transparent FX loop you have ever heard,
IF you learn to operate it correctly. When properly set up, this loop
allows you to use any digital or analog FX unit blended in parallel
with your original dry preamp signal without any sacrifice of
tone...which is the case when using a conventional FX loop. That’s
because most guitar amp FX loops are Series types, so the FX are
placed “in series” between the preamp and power stage. In this
design, a relatively powerful tube preamp signal enters the input

The Separate Speaker Cabinets
Our special designed cabinets are tuned for guitar playing and made
fundamentally different than any other commercially available cabi-
nets on the market. We use a lighter weight 5/8” baffle board and
slant it upward on an angle for better projection.
EX112: A matching cabinet that houses one 12” speaker.
Available unloaded or with our own design Classic Clone 12”
speakers, the CC112/A made in America by Eminence or the
CC112/B made in Britain by Celestion.
EX212: A matching cabinet that houses two 12” speakers.
Available unloaded or with our own design Classic Clone 12”
speakers, the CC112/A made in America by Eminence or the
CC112/B made in Britain by Celestion.
EX410: A matching cabinet that houses four 10” speakers, avail-
able unloaded or with our own design Classic Clone 10” speakers
made in Britain by Celestion.
The Custom Color Options
The standard color for GT cabinets is Black Tolex with Tan grill. Various
other colors are available such as Brown, Cream, Red, Purple, Cowboy
Bob Black (the hand tooled look), Ostrich and Boa. Also, special mater-
ial coverings are available on request such as leather and cowhide.
Specifications:
Input 1/4 “ phone jack
Input Level -10 dB nominally
FX level -10 dB nominally
Preamp tubes (5) GT12AX7 (also GTECC83 & GT7025)
Power Output
S75 amplifier GT6L6A = 60wt, GT6L6S = 70wt
Class A/B mode GT6L6C = 55wt, GT5881A = 65wt
GT KT66R = 62wt, GT6L6R = 55wt
GT EL34R = 70wt, GTEL34C = 70wt
GTE34Ls = 75wt, GT6550C = 75wt,
GT6550R = 80wt, GTKT88C = 75wt
GTKT88s = 95wt
S150 amplifier Roughly double the S75 as shown above
Output design Class A/B = full power output
Class A Normal = 30% less than Class A/B
Class A Gnarly - 35% less than Class A/B
Speaker loads 4, 8, or 16 ohms
AC requirement Wired internally @ 100, 120, 220 or 240 VDC
H.T Fuse 1 Amp Slo-Blo
AC Fuse S75 @100-120VAC = 3Amp Slo-Blo
S75 @ 220-240 VAC = 1.5 or 2 Amp Slo-Blo
Chassis 14 gage welded steel, hard chrome plated
Weight S75RM = 24 lbs.; S150 RM = 27.5 lbs.
S75 Combo Package = 70 lbs.
S75 Top Package = 50 lbs.
RF1: A specially made rack fan panel that locates a two speed fan
adjacent to the power tubes which exits the heat from the tubes
thereby prolonging tube life and reliability. Also has 2 extra AC
sockets for Rack effects. Highly recommended for Class A operation
and is included in both the popular Combo Package and Top Package.
SC112: A combo box with a mounting for a 12” speaker, a rack fan
panel, and room on top of the amp for a single rack FX unit to be
mounted to the amps rack ears via a small piece of rack rail. This
cabinet is designed to hold the Soul-o amp on 4 special rubber
isolators to eliminate interactive microphonic resonances caused
by the speaker at higher playing levels.
NOTE: When you’ve ordered a Combo Package Soul-o amp, we
pack your amp for shipping using two small wood screws into the
side rack mounting rails to stabilize the amp so it will not damage
itself in shipping. You should immediately remove these screws
so the amp can float free on it’s rubber isolators. Also, the power
tubes will be removed and packed in a special material so they will
not become damaged in shipping. Remove these tubes and care-
fully insert them into the tube sockets behind the rack fan panel,
with the GT logos facing outward.
SC112-3: Same as SC112 but has 2 extra rack spaces above the amp.
SB: A simple box housing just the amp and a RF.
SB2: Same as SB but with one rack space above the amp.
Groove Tubes LLC
1543 Truman Street, San Fernando, CA91340, (818) 361-4500, fax 365-9884 www.groovetubes.com
This manual suits for next models
2
Other Groove Tubes Amplifier manuals