GSM Activate VAN001 User manual

GSM PROTECT
ANTI-THEFT ALARM WITH GPS TRACKING &
MOBILE PHONE ALERTS
Remote monitoring & Control using your mobile phone.
www.gsm-activate.co.uk
PAGE 1
MODEL NUMBER VAN001

Page 2
Product Information
The GSM Protect is an anti-theft alarm that incorporates GPS and GSM capabilities and
can be installed in many different applications such as cars, vans, mobile homes, boats,
planes or any vehicle that has a battery. The unit has wireless and wired capabilities which
will enable it to be triggered in a variety of ways. When triggered the unit will alert you
initially via telephone call then by text message as well as emitting an audible alert through
a wired siren.
The unit also has a 10 amp relay output that can be used to switch on and off external
equipment. The unit also has a GPS tracker enabling you to find the location of your
property by simply sending it a text message.
Specification
● 2G GSM Frequency: Quad band frequency 850/900/1800/1900
● 3G Frequency 2100 Mhz. Others frequencies available for other countries.
● Standard Size 2G or 3G Simcard.
● GPS Tracker.
● Power Supply Voltage: 9 - 12 volts DC - 1 Amp Max.
● Current used in standby mode: 50mA Max.
● 1 Positiv e Triggered Input.
● 1 Negative Triggered Input.
● 8 Amp Relay Output.
● No land line required.
● Dimensions - L150 x W90 x H45mm.
● Sim Active Function.
● Operating Temperature: -10...+40°C
● Alarm Armed / disarmed via text message or keyfob.
● Programmed by Text / SMS Message.
● Text for signal strength.
● Call and text alerts to your designated number upon alarm trigger.
● Wireless PIR.
● Wireless Door Contact.

INSTRUCTIONS
IMPORTANT - PLEASE READ
PLEASE MAKE SURE YOU DISCONNECT THE POWER WHEN YOU FIT THE
SIMCARD THEN PLACE THE SIM CARD WITH THE CLIPPED CORNER IN FIRST
Page 3
Simcard
Push and click the simcard into position as shown
Antennas
The GSM Protect comes with three antennas that will need to be installed before you power on the device.
1. GSM Antenna - A three metre cabled antenna with an adhesive back.
2. RF Antenna - A small stub antenna (for remote control)
3. GPS Antenna - A one metre cabled antenna with a magnetic surface
1 2 3
Before Powering On please assemble as below

Page 4
Powering on and Programming
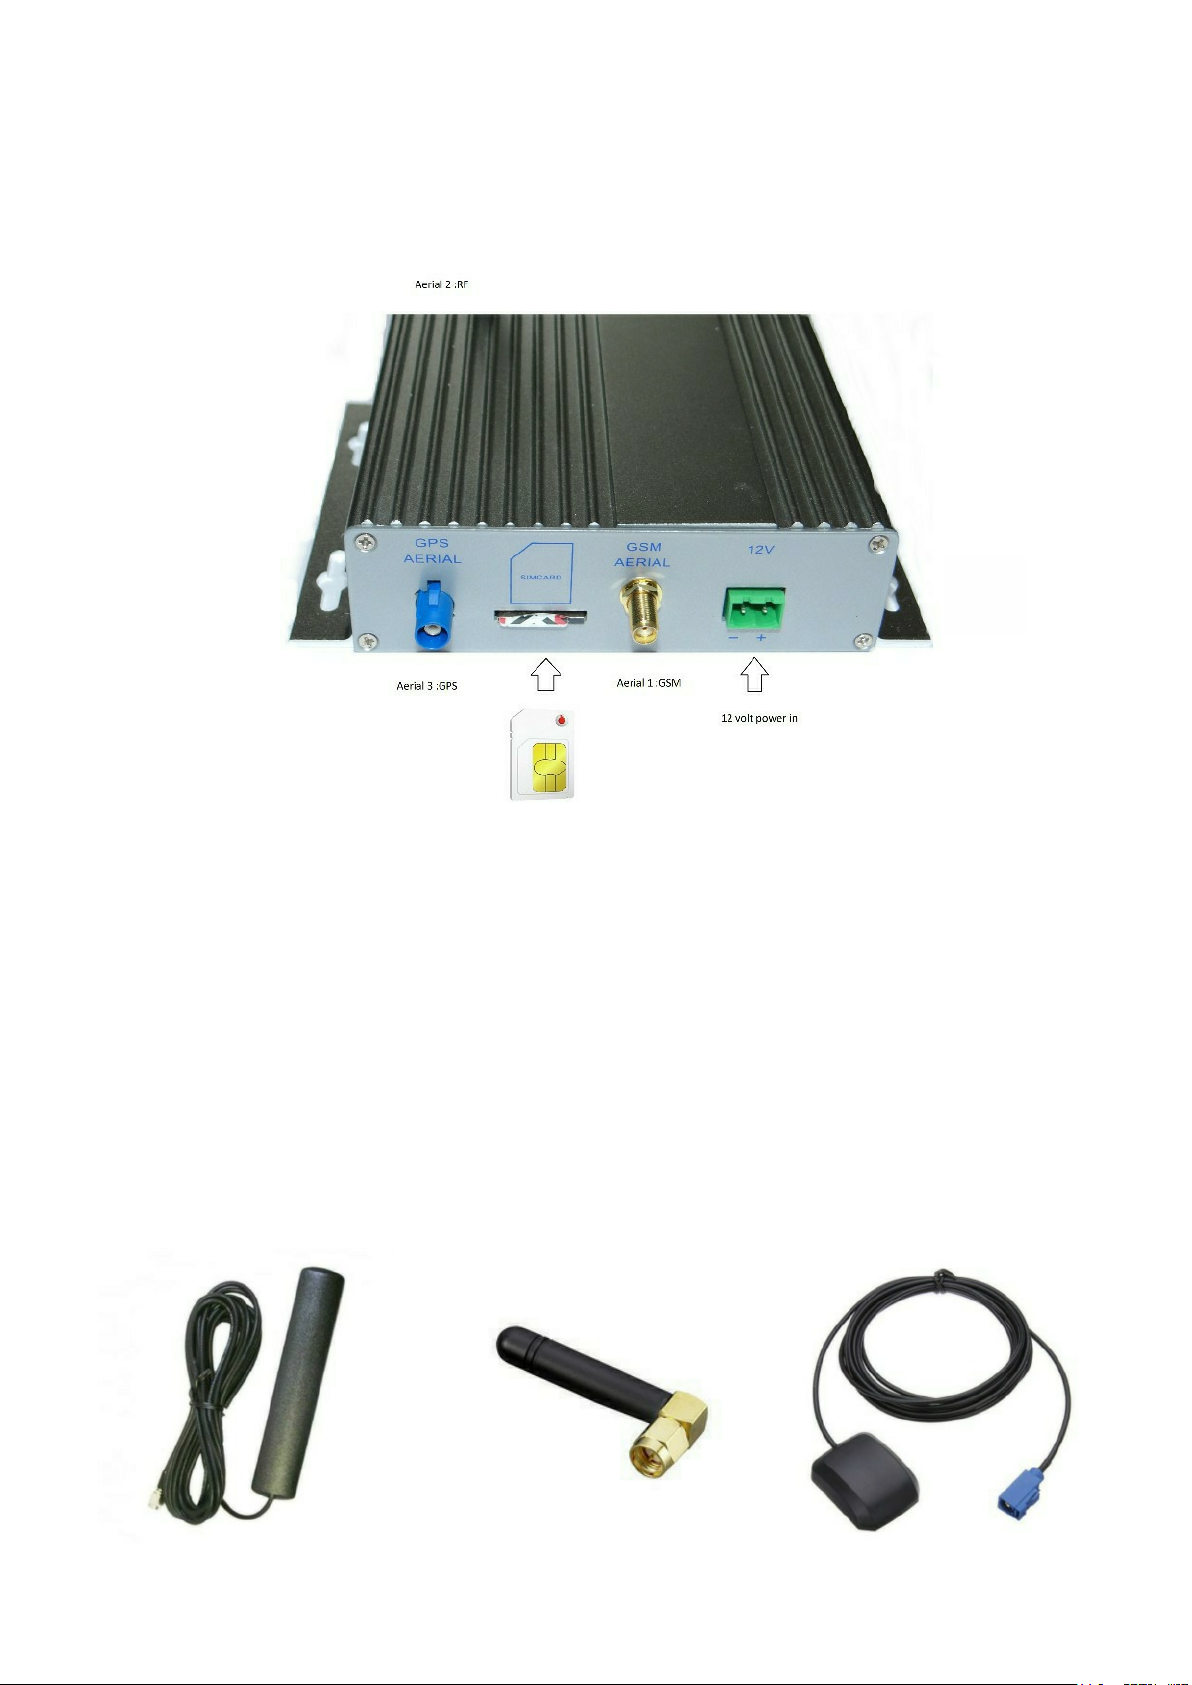
1. Connect the 12 volts dc into the power in plug (refer to page 8)
2. Switch on the unit by pressing the switch towards position 1
3. The RED LED will be illuminated solid while it searches for a signal, when the signal has
been found the LED willchange from solid to flashing every 20 seconds. The unit is now
ready for use.
4. you can now programme your personal contact numbers into the alarm. This number
can be a mobile or landline number.
5. You will need to send an SMS text message as follows (please change the example
number for the number you wish to use)
Example (hash) (NUMB) (equals) (phone number) (hash)
#NUMB=07123456789#
6. The unit will reply back with ‘NUMBER STORED’
7. To change the number please send the text command #RESET# The unit will reply back
with the text acknowledgement ‘RESET COMPLETED’. You can then repeat steps
above to add a new number.
Activating the Alarm
There are two ways to activate the alarm. The first is by using the keyfob, the second is by
text message.
Remote Keyfob
Pressing a) will arm the alarm - the siren will beep twice to acknowledge the command
Pressing b) will disarm the alarm - the siren will beep twice to acknowledge the command.
When the alarm has been triggered, pressing B will stop the siren from sounding. If you
disarm the alsrm within 5 seconds of the alarm being triggered it will also stop the phone
alerts being sent. This is useful for false alarm situations.
Battery life on the keyfob is approximately 2 - 3 years on a button battery.
Text message Activation
Sending the text command
#Alarm=on#
This will arm the alarm. You will receive the text message acknowledgement ‘ALARM=ON’
Sending the text command
#Alarm=off#
This will disarm the alarm. You will receive the text acknowledgement ‘ALARM=OFF’

Page 5
How to Use the 3G GSM PROTECT - Wireless Usage
The GSM Protect has been designed to work in a variety of ways. It comes with a wireless
PIR as well as wireless door contact, but will also allow wired connections which can also
trigger the alarm. Once the unit has been powered ON and your contact number has been
programmed you will be able to position the unit and its sensing devices.
Wireless PIR
The wireless PIR will arm in line with a key fob or text message alarm activation. It can
detect movement upto 25 feet away. When the Sensor detects movement it will send the
phone alerts and sound the siren for upto 2 minutes.
LED Indicator Light
LED flashes frequently: device is in self-checking state.
LED flashes once: device is alarming.
LED flashes twice: device finishes self-check and enters working mode.
LED flashes thrice: low battery indication.
Battery life is approximetely 8 - 12 months on 3 AAA batteries
Door Contact
The Door Contact: this will automatically arm in line
with a keyfob button press, or an sms activation
command. The door contact is made from two
parts, the switch and the magnet. If they separate
by 12mm or more the switch will activate the alarm.
Battery life is approximetely 8 - 12 months on the
button battery

How to Use the 3G GSM PROTECT - Standard Usage
Siren
Once an alarm trigger has taken place the siren will sound for 2 minutes followed by the
alarm turning itself off. It is now waiting for a new alarm activation command.
Please Note:
The GPS does take time to warm up, the longer the alarm has been on for the more
accurate the reading will be.
Once you have selected copy, you
can then open a web browser or
maps app and again hold down in
the search button and press paste
It will then show you the real time
location of your unit and property.
The alarm has a built in GPS
tracking system. With the unit
powered ON you can send a text
command #GPS# and the alarm
will reply back with its location
address by text message. You can
then copy and paste this into
Google maps to view the exact
location of your property
To Copy and Paste simply open
the text message and hold down
on the message. Depending on
your phone a menu will show and
you need to choose the option
“copy”
How to Use GPS Tracking
Page 6

How to Use the 3G GSM PROTECT - Hard Wired Usage
For advanced users there are auxiliary and alarm inputs that can be used to enhance the
security of your alarm by adding extra external hardware.
Relay Output - Positins 1 2 3
The GSM Protect has a relay output that can be used to switch on external electrical
devices such as lighting and additional sirens etc. For some applications such as boats,
you can also disenable the engine if it is wired to the ignition. The Output Relay is
independent and can be activated by sms text message.
By texting the unit you can turn the relay ON or OFF individually. Below are examples on
how to do this.
#RELAY=ON# - This will turn ON the relay output.
#RELAY=OFF# - This will turn OFF the relay output.
After each operation the unit will reply with a status report REL ON/OFF
Wired Sensing Devices and Enable Trigger - positions 4 5 6 7
You can also add in extra sensors, switches etc into these positions as follows:
4 - Ground:
5 - +12v Auxiliary output, maximum current is 1 amp.
6 - Negative input trigger.
7 - Positive Input Trigger.
Wired Siren - positions 8 9
The alarm comes with a wired high decibel siren. This plugs into position 8 (plus 12v) and 9
(ground)
Page 7

Page 8
Quick Reference
If the GPS is not warmed up. The antenna will be picking up a signal and will reply with the
error message - “Waiting for valid GPS signal. Please Try Later”
If there was a mistake when typing a text command a response will be “invalid command”
For more technical support please browse the FAQ’s on our website www.gsm-
activate.co.uk Alternatively email our technical support team at technical@gsm-
activate.co.uk and we will do our best to reply within 24 hours Monday - Friday.
03/04/19 GD
Table of contents
Other GSM Activate Car Alarm manuals
Popular Car Alarm manuals by other brands

Python
Python 875XP owner's guide

Cobra
Cobra 4600 CAN/PLIP installation manual

Freedom
Freedom Freedom 411atv Owner's manual & wiring instructions

Audiovox
Audiovox Auto Security AA-931 Installation guide & owner's manual

Avital
Avital AVISTART 4000 owner's guide

Clifford
Clifford AvantGuard 2 installation guide

Directed Electronics
Directed Electronics 2102T installation guide

Mazda
Mazda 2007 CX-9 installation instructions

Viper
Viper 500 ESP installation guide

Directed Electronics
Directed Electronics 1090 owner's guide

Code Alarm
Code Alarm ca6355E owner's guide

TriMark
TriMark e-FOB Full-Function Installation Manual