GT-Lite GT-LTP-3 User manual

CAUTION WARNING
PRODUCT SPECIFICATIONS:
- When using product, basic precautions should always be followed.
- Read and follow these instructions and observe all warnings.
- Carefully read and understand the information given in this manual
before beginning installation. Failure to do so could lead to electric
shock, fire, or other injuries which could be hazardous or even fatal.
- Save these instructions and warnings.
WARNING
-Warning: This tape light may present a shock or fire hazard if the
installation instructions are not followed carefully. Please only
install in locations that follow current electrical codes and adhere
to National Electric Code standards.
- Do not connect the tape light to power prior to installation.
- This GT-Lite tape light is connectible up to 28 feet.
- Please follow precise instructions on extending the tape light on
Page 2 and 3 under Installation Instructions.
- The power supply provided can hold a load of 22.4 watts (1.9A at 12V) or 1.4 watts per foot.
- Do not run this tape light off of any power supply other than the one provided in this packaging.
- Do not install this tape light on outlet connected to dimmer switch of any kind.
- Never place power supply or receiver in locations exposed to moisture.
- This item is rated for dry use only. NEVER submerge this product in water!
16ft LED TAPE LIGHT
800 LM
23W
RGBW
4ft 12V DC Adapter
Brightness (Lumen)
Power (Watts)
LED (Light)
Power Supply
Assembly & Installation: GT-LTP-3 | 16ft LED Color Tape Light
Complete LED Lighting Solutions
WARNING:
TO AVOID RISK OF ELECTRICAL SHOCK,
SHUT OFF POWER BEFORE
INSTALLING OR SERVICING THIS FIXTURE
PAGE 1

F
1. Clean the surface the tape light will be mounted to in advance to help the tape adhere
securely to desired surface.
2. Measure and ensure that there is enough room for the lead wires to be attached to
where the tape light will be installed. Do not pinch the wires in any way.
3. When extending the tape light, find the best cutting line (metallic bars running through
the tape light every 6-9/16”) for the ideal length of the tape light. (Figure 1)
BEFORE BEGINNING INSTALLATION: PARTS LIST
INSTALLATION INSTRUCTIONS:
Make sure that all parts in parts list
are present and undamaged. If any
parts are damaged, do not attempt
installation -- call Customer Service.
(A) 16ft LED Tape Light
(B) Color Remote
(C) 12V DC Power Supply
(D) RGBW Control Box
(E) Mounting Brackets/Screws
(F) Connectors (2pcs)
(G) 12” Whip Connector
• DO NOT fold the tape light.
• DO NOT bend past a radius of 1”.
• DO NOT light the tape while coiled on reel.
(This damages the adhesive.)
• DO NOT install tape light on dimmer switch.
G
Assembly & Installation: GT-LTP-3 | 16ft LED Color Tape Light
PAGE 2

4. Using strong scissors or other cutters, cut directly along the chosen cutting line on the
tape light. A clean cut will insure prolonged life of the product.
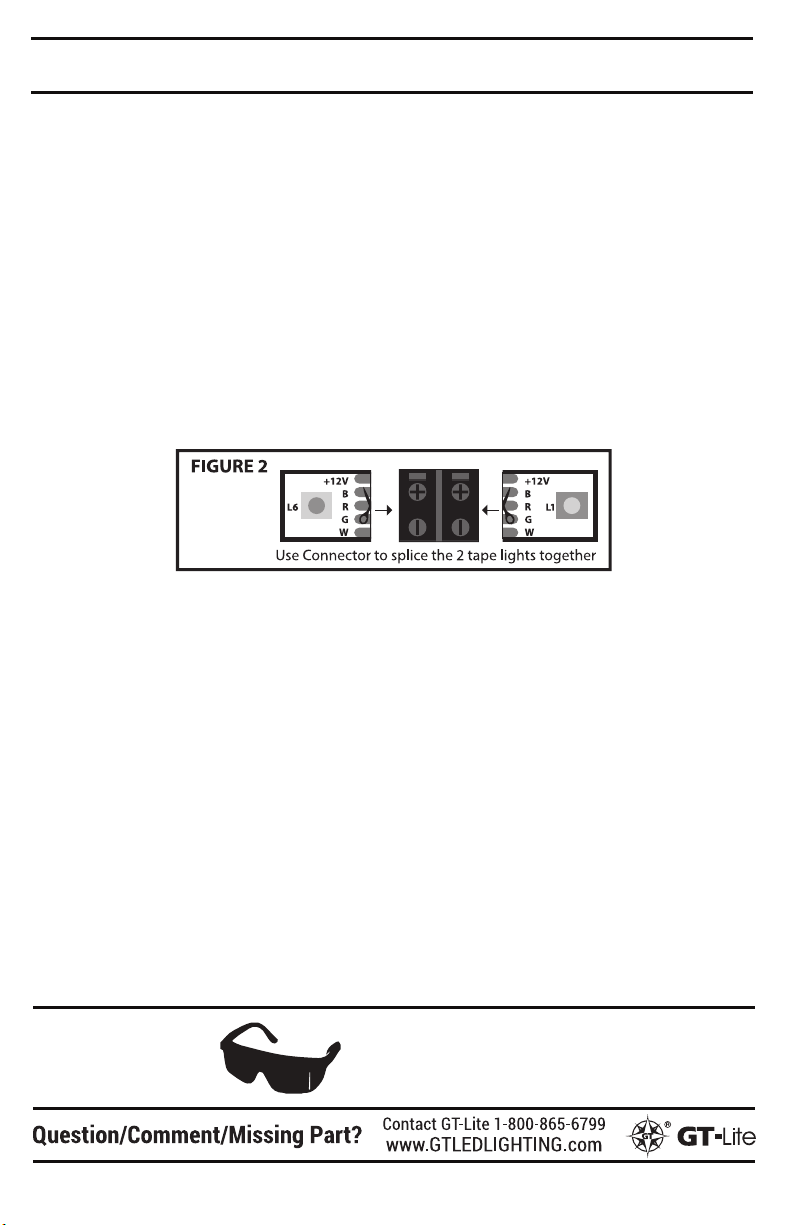
5. Once cut, the tape can be connected to another section of tape light using provided
connectors (Part F or Part G) in this pack to achieve desired length for your space.
• (Part F) Should be used in instances where a straight connection is needed.
• (Part G) Should be used where there is a large corner, bend, or other obstacle.
• The extension section of tape should be measured from the end of the spool
(the side without the five-prong plug) and connected while aligned with the RGBW
markings matching the RGBW marks on the extending tape. (Figure 2)
• Test to make sure this connection works before hanging the lights.
6. For best results with 3M® tape, do not remove or reposition the tape once the
adhesive is placed onto the mounting surface. For best results, wait 24 hours before
using the light to let the adhesive cure. It is recommended to use guide marks to plan
the path of your tape light to get it positioned correctly the first time.
• If necessary, use screws and mounting brackets. (Part E, Optional.)
7. Connect the 5-pin connector on tape light (A) to 5-pin receptor on the Control Box (D).
8. Connect the Control Box (D) to the Power Supply (C). Plug Power Supply into outlet.
9. Using Color Remote (B), turn to back side and release battery compartment cover.
10. Remove the plastic protector tag from the battery compartment of Remote (B).
11. Check to make sure the Lithium Metal CR2025 battery is in place and slide closed.
12. Aim Color Remote (B) towards the RGBW Control Box (D) and Power ON tape light.
• SEE PAGE 4 FOR MORE REMOTE INFORMATION.
13. Change to desired settings and enjoy!
14. Turn OFF light when no longer in use.
INSTALLATION INSTRUCTIONS CONTINUED:
DO NOT look directly at LED
lights for any length of time!
EYES
Assembly & Installation: GT-LTP-3 | 16ft LED Color Tape Light
PAGE 3

ABOUT THE REMOTE:
• The Remote (Part B) uses an Infrared Signal to change the color of
the tape light via the receiver node on the RGBW Control Box (Part D).
The Remote will only work in line-of-site of the receiver node on the
Control Box
• Please note that the RGB (Upper Section) and Warm White
(Middle Section) control different LED chips on the product.
They can be used simultaneously or independently. Choose one
Warm White light setting and/or one RGB Color setting for the
perfect lighting mix desired.
• ON/OFF buttons and Brightness buttons correspond to their
individual sections of LEDs for your convenience.
• Lighting Effects apply to both sections simultaneously.
This product is guaranteed against failure due to factory defects in
materials or workmanship for one (1) year from the date of purchase.
This warranty is non-transferable and applies only to the original owner.
Proof of purchase required for repair or replacement. This warranty does
not cover normal wear of parts or damage resulting from any misuse of
the product. Misuse of the product includes but is not limited to: using in
extreme weather conditions, opening the housing of the product, or
attempted remodel/alterations made to product.
Assembly & Installation: GT-LTP-3 | 16ft LED Color Tape Light
PAGE 4
Table of contents
Popular Outdoor Light manuals by other brands

ZANEEN
ZANEEN Tetra Parco Installation instruction

BEGA
BEGA 33 592 Instructions for use

Hubbell
Hubbell Kim Lighting KLV Series installation instructions

Würth
Würth WLH 1 Premium Translation of the original operating instructions

BEGA
BEGA 84 730 Instructions for use

Anslut
Anslut 025625 operating instructions