Guytron Gt-100 User manual

THE
GT-100
100 WATT GUITAR AMPLIFIER
Owner’s Manual
Guytron Amplification
586-254-5717
www.guytron.com
PRECAUTIONS

2
NOTE: IT IS VERY IMPORTANT THAT YOU READ THIS SECTION TO HELP
INSURE MANY YEARS OF TROUBLE FREE USE. THIS UNIT REQUIRES CAREFUL
HANDLING.
All warnings on this equipment an in the operating instructions shoul be a here to an
all operating instructions shoul be followe . Do not use this equipment near water! Care
shoul be taken so that objects o not fall an liqui s o not spill into the unit through any
openings. The power cor shoul be unplugge from the outlet when left unuse for long
perio s of time.
Operating temperature: Do not expose the GT-100 to excessive heat. This unit is
esigne to operate between 32F an 104F an 0C an 40 C
DO NOT ATTEMPT TO SERVICE THIS EQUIPMENT YOURSELF!
THIS EQUIPMENT SHOULD BE SERVICED BY QUALIFIED PERSONNEL ONLY.
DO NOT MAKE ANY INTERNAL ADJUSTMENTS OR ADDITIONS TO THIS
EQUIPMENT AT ANY TIME. DO NOT TAMPER WITH INTERNAL ELECTRONIC
COMPONENTS AT ANY TIME. FAILURE TO FOLLOW THESE INSTRUCTIONS MAY
VOID THE WARRANTY OF THIS EQUIPMENT, AS WELL AS CAUSING THE RISK OF
A SEVERE SHOCK HAZARD.
Unpa king:
Before you plug in, inspect your GT-100 amp for any amage. Your amp was inspecte
an soun -teste before shipment, but shipping can sometimes be tough. Check that the
footswitch an power cor have been shippe with the amp. If parts are missing, or if any
amage has occurre , contact your ealer.
Pa king Materials:
We esigne the original box an packing materials to protect your amp uring shipment.
Save them. If you ever nee to sen your amp to us or to anyone else, the original box an
packing materials will ensure safe transit.

3
Before you plug in .
Take a qui k look inside the ba k of your amp and make sure of the following:
• The tubes are securely seate in their sockets.
• A speaker cor is plugge between the Speaker jack on the amp, an the jack on the
speaker cabinet.
• The impe ance selector is set to match the cabinet s impe ance.
• The power cor is plugge in.
• The footswitch is plugge in (this is optional).
Now look at the front to make sure:
• The Master Volume control is set at a low level. (9 O clock is a goo starting point).
• The Power switch is off.
• The Stan by switch is set to stan by mo e.
Plug in!
Now plug the amp into the wall, plug your guitar into the input jack, an set your
controls to one of the Sample settings outline here. Then turn on the Power switch. Wait for
about a minute for the tubes to warm up. Turn on the Stan by switch.
Have Fun Jamming!
After you’ve playe with your GT100 for a while, check out the rest of this manual for
some goo tips on getting the most out of your new GT100 guitar amplifier. An keep an eye on
our web site as well, for soun bite an sample settings to come in the near future, as well as
links to musicians using Guytron.

4
GAIN TONE LEVEL
V
OLUME
INPUT
A
B
FORWARD
Thank you for purchasing the Guytron GT-100. The exclusive patente esign elivers
that "On 10" soun at any volume (without external power attenuators), restoring power amp
istortion an harmonics missing from conventional master volume technology. The GT-100 is a
two channel, 100 watt, pure tube amplifier with vintage tones an mo ern features, all han built
in the U.S.A.
INTRODUCTION
The heart of the tone generation is in the unique foot switchable pre-amp esign that
incorporates two EL84’s running in "Class A" configuration. Class A is the ol est an purest
way of amplifying a signal. Naturally, there are raging isputes among au iophiles as to what is
Class A an what is not, but this section of the amp is Class A, an that is where the feel an
basic tonal character get establishe . The signal oes however make a transition into the Class AB
arena an that is one of the secrets of the Guytron tone.
Channel "A", favoring the 50’s to 60’s stock amp tone, starts out crystal clear at low gain
settings, progressing smoothly up to a ’cranke up’ stock amp type of over rive. The Channel
"A" tone control involves the gain structure an the amp picks up more gain in the treble range as
you turn it clockwise, yiel ing a progressively more "English" tone along the way. Channel A has
become very popular an is known for its unique bran of sparkle, an punch.
Channel "B" takes over where channel "A" leaves off, encompassing most of the favore
tones of the mo e amp era, mi 70’s, to present. The gain control in Channel "B" is a monster,
by utilizing a ual pot it controls two stages of gain simultaneously, allowing a continuous sweep

5
VOLUME TREBLE MIDRANGE BASS EFFECTS PRESENCE
LEVEL
from warm an clear to over the top gain an istortion. The tone control on channel "B" is a
post gain type, an serves as a treble gate to the power amp, it has no effect on the gain
structure, (unlike Channel A). It serves well in setting the relative brightness of the two channels,
ultimately a ing to the versatility an allowing you to get a warm istortion with a variety of
power amp settings.
A master tone section is provi e to shape the final soun before it gets elivere to your
speakers. The master tone section is integral to the 100 watt all tube output section; utilizing four
EL34’s running in class AB2. This configuration can eliver massive amounts of power on
eman . The master tone controls can be use to a just for ifferent rooms, as well as emulate
the tonal characteristics of ifferent amp types, speaker configurations, etc. It is also at this
stage that effects can be blen e in to further enhance the tone.
The tone controls which sometimes seem a bit subtle, are set up for emphasis an
musicality, an not esigne for an exaggerate wi e range of sweep, but to gently a or subtract
emphasis on important musical frequencies, without crossing into a non-musical realm, or
intro ucing excessive phase shift. The amp oes, however, faithfully eliver the usable feel an
soun of all my favorite most popular amps, an oes so at the wi est possible sprea of
listening levels ever available in a single package.
Dual level effects loops are provi e to allow for simultaneous running of ol vintage
gear, an newer rack mount stu io effects. Effects loops are transformer riven with operation
ual levels of both +3 an -10 B, an can be use simultaneously. As a general rule, the LOW
level is for pe al type or ol vintage elays, while the HIGH loop accommo ates more mo ern
"Rack Gear". Typically effects are set to full wet, with no ry soun in the loop, as you woul
with a stu io mixer. A perfect blen between the loop effects an the original ry soun which

6
HIGH
LEVEL
EFFECTS
LOOPS
LOW
LEVEL
SEND RETURN SEND RETURN FOOTSWITCH
never left the amp, can then be quickly achieve quickly via Effects control on the front panel of
the GT100 (above). As a rule, the on boar mixer using the "original" ry soun will provi e a
quicker response with a more irect, natural tone an feel than you sometimes get with most
mixing. The only time this presents a potential problem, is when an effects units Input is out of
phase with its own output. This woul cancel out with the original ry soun in the amp,
because the Guytron’s ry soun is (obviously) in perfect phase with itself. Another option
woul be a phase reversing buffer amp in the loop to return the signal to it’s original phase
relationship, if you have a problem effects unit.
A complete clockwise setting of the Effects control will function exactly like an ol series
effects loop for effects units where external blen ing is the preferre . In either case, the effects
must always be set to unity gain, while the amp is set up as you woul normally be using it.
During the level setup process, the channels "Level" controls can be use as variable "Sen "
controls, an the "MasterVolume" can be consi ere the "Return Level". This comes in han y for
some of the more picky effects you might run across.
The front panel channel selector switch is there for convenience, but is isable while in
the center remote position, to allow for any form of "Latching" remote switching of the channels.
The switch is labele (Center Remote) to suggest that the remote switch coul be any number of
remote switching metho s. Example: Using an effects evice to switch the GT100 as part of an
effects pre-set.
In any case, the front panel switch is set up to overri e any external switching in or er to
accommo ate large stage situations where quick a justments are nee e . Thus eliminating the
nee to run back to the footswitch or whatever while a justing your settings.
The amp is shown in the ouble "ON" position. While set like this, the amp is fully
functional, an rea y to play. During short to me ium breaks 10-20 minutes, or between sets, it’s
best to turn the "Stan by" switch to the "Stan by" position. This will shut own the high
voltage insi e the tubes, thus exten ing tube life, but it also leaves the heaters on for quick

7
startup. If the break is very much longer than that, both switches shoul be in the own position.
If nothing else, just to conserve energy. Tube life is also exten e if the amp is allowe to warm
up at least a minute, before turning the stan by switch to the "On" position. This is less of a
strain on the tubes, as well as the rest of the amp.
As for the Purple pilot light, this is an ol tra ition of mine that ates back to the late
70’s. I use to get a lot of these ol Kustom amps in the shop. You know, the cool pa e ones
you coul sit on uring those long boring practices. (I still think that was a stroke of genius)
They ha the cool purple lights, which also happene to fit my ol Fen er amps perfectly. After
that, every time I i any "Custom" work on a Fen er amp, I woul grace it with a "Kustom"
purple jewel. Some years later on a parts run own in Detroit, I came across several hun re of
them, an that cemente the tra ition. By the time the 90’s rolle aroun , they were once again
popular an back in pro uction, an so there was never any ecision as to which kin of pilot
light we shoul use on the GT-100.
The GT-100 now comes stock with the ability to travel internationally. The back panel is
outfitte with a fuse Primary voltage selector switch, which is built in to the IEC connector. To
a just for ifferent countries, use a small screw river to pry out the square voltage selector cap
(shown below) socket. Simply, install the proper fuse rating for your voltage requirements, an
rotate the cap until the correct voltage lines up to the triangle marker on the right.
There are a total of three user accessible fuses for the GT100 for extra protection and safety.
IMPORTANT!
For omestic USA amps there are two (5 AMP SLO-BLO) fuses, one is un er the
voltage selector cap, an the other is locate in the fuse hol er marke 5 AMP SLO-BLO. BOTH
IMPEDANCE
SELECTOR
8
GUYTRON L.L.C. MADE IN U.S.A MODEL: GT-100
BROOKINGS, OR PATENT PENDING SERIAL:
5 AMP SLO-BLO 1 AMP FAST-BLO
100 120VAC ~ 5.0A SLO-BLO
220 240VAC ~ 2.5A SLO-BLO
50 60 HZ — 650 WATTS
NO USER SERVICABLE PARTS
INSIDE.
!
WARNING! SHOCK HAZARD! SPEAKER
120
Voltage selector cap
(Shown set for 120VAC) Impe ance Selector Switch
(shown set for eight ohms)

8
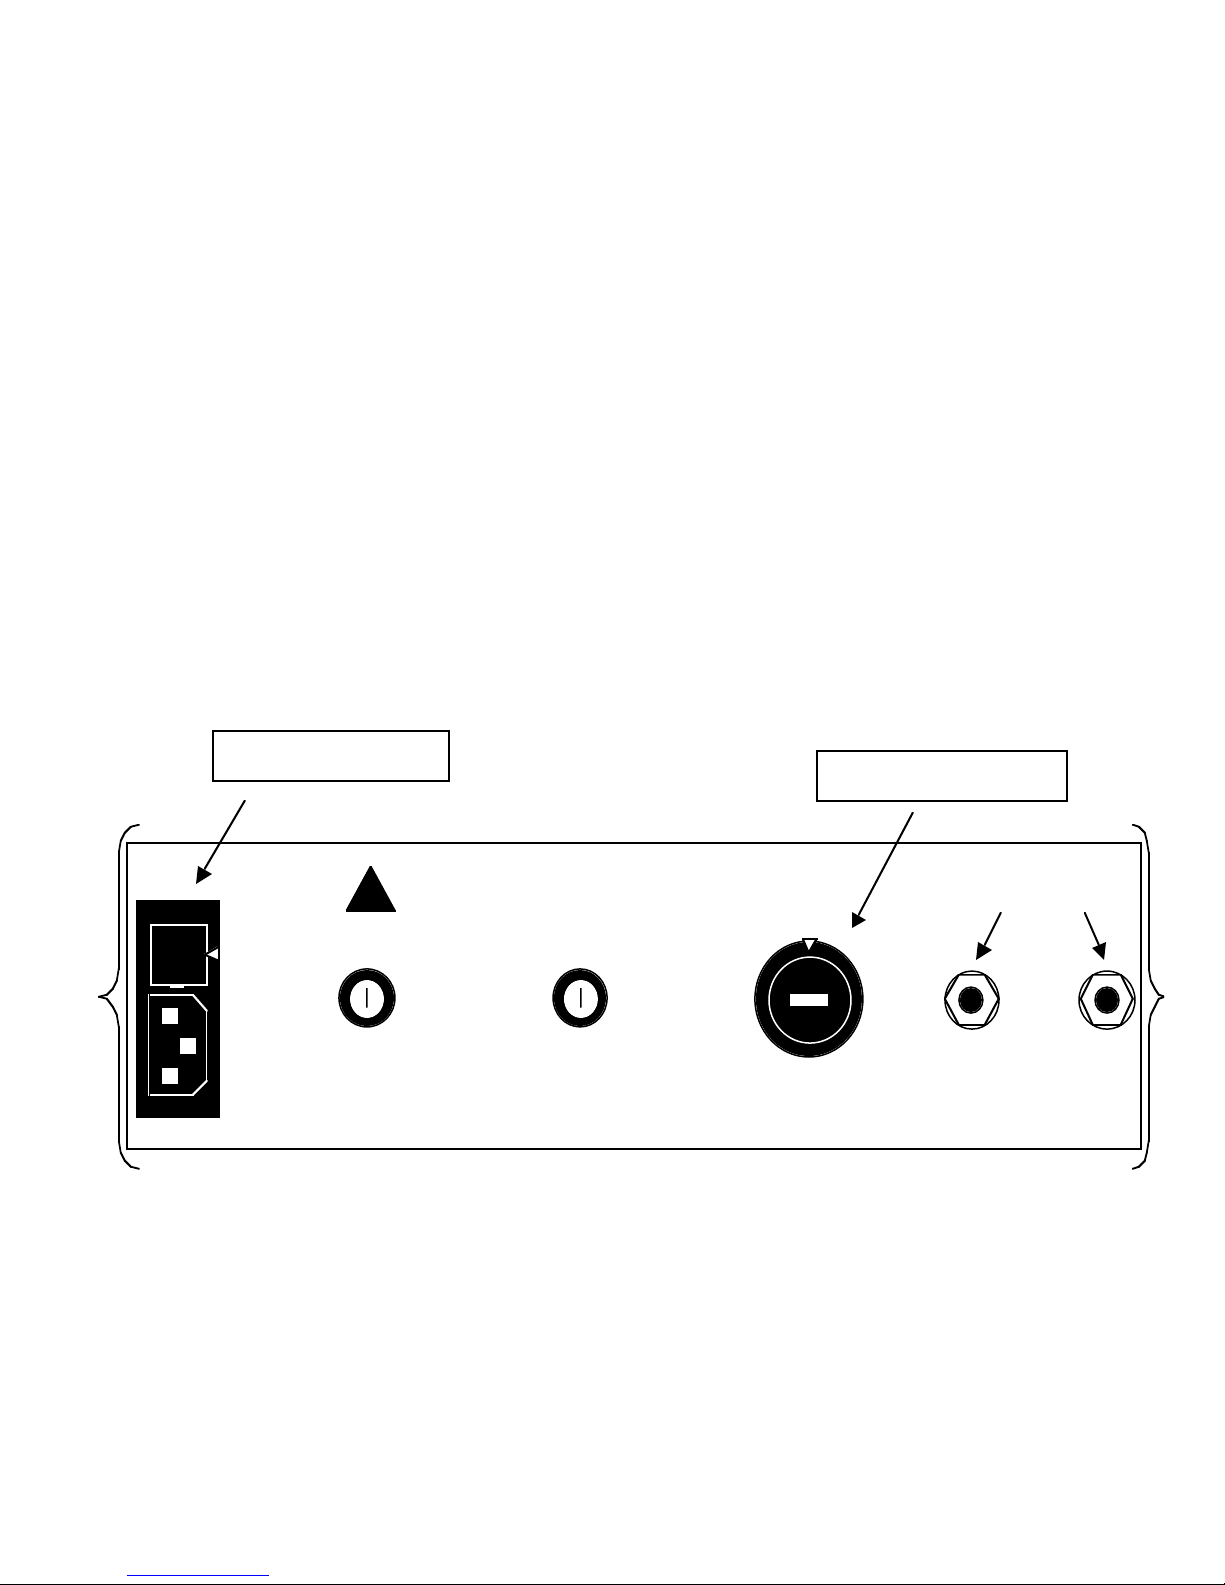
of these two fuses MUST get change to 2 1/2 AMP SLO-BLO for any voltages higher than
120VAC.
The 1 AMP FAST-BLO fu e remain the ame value regardle of input voltage.
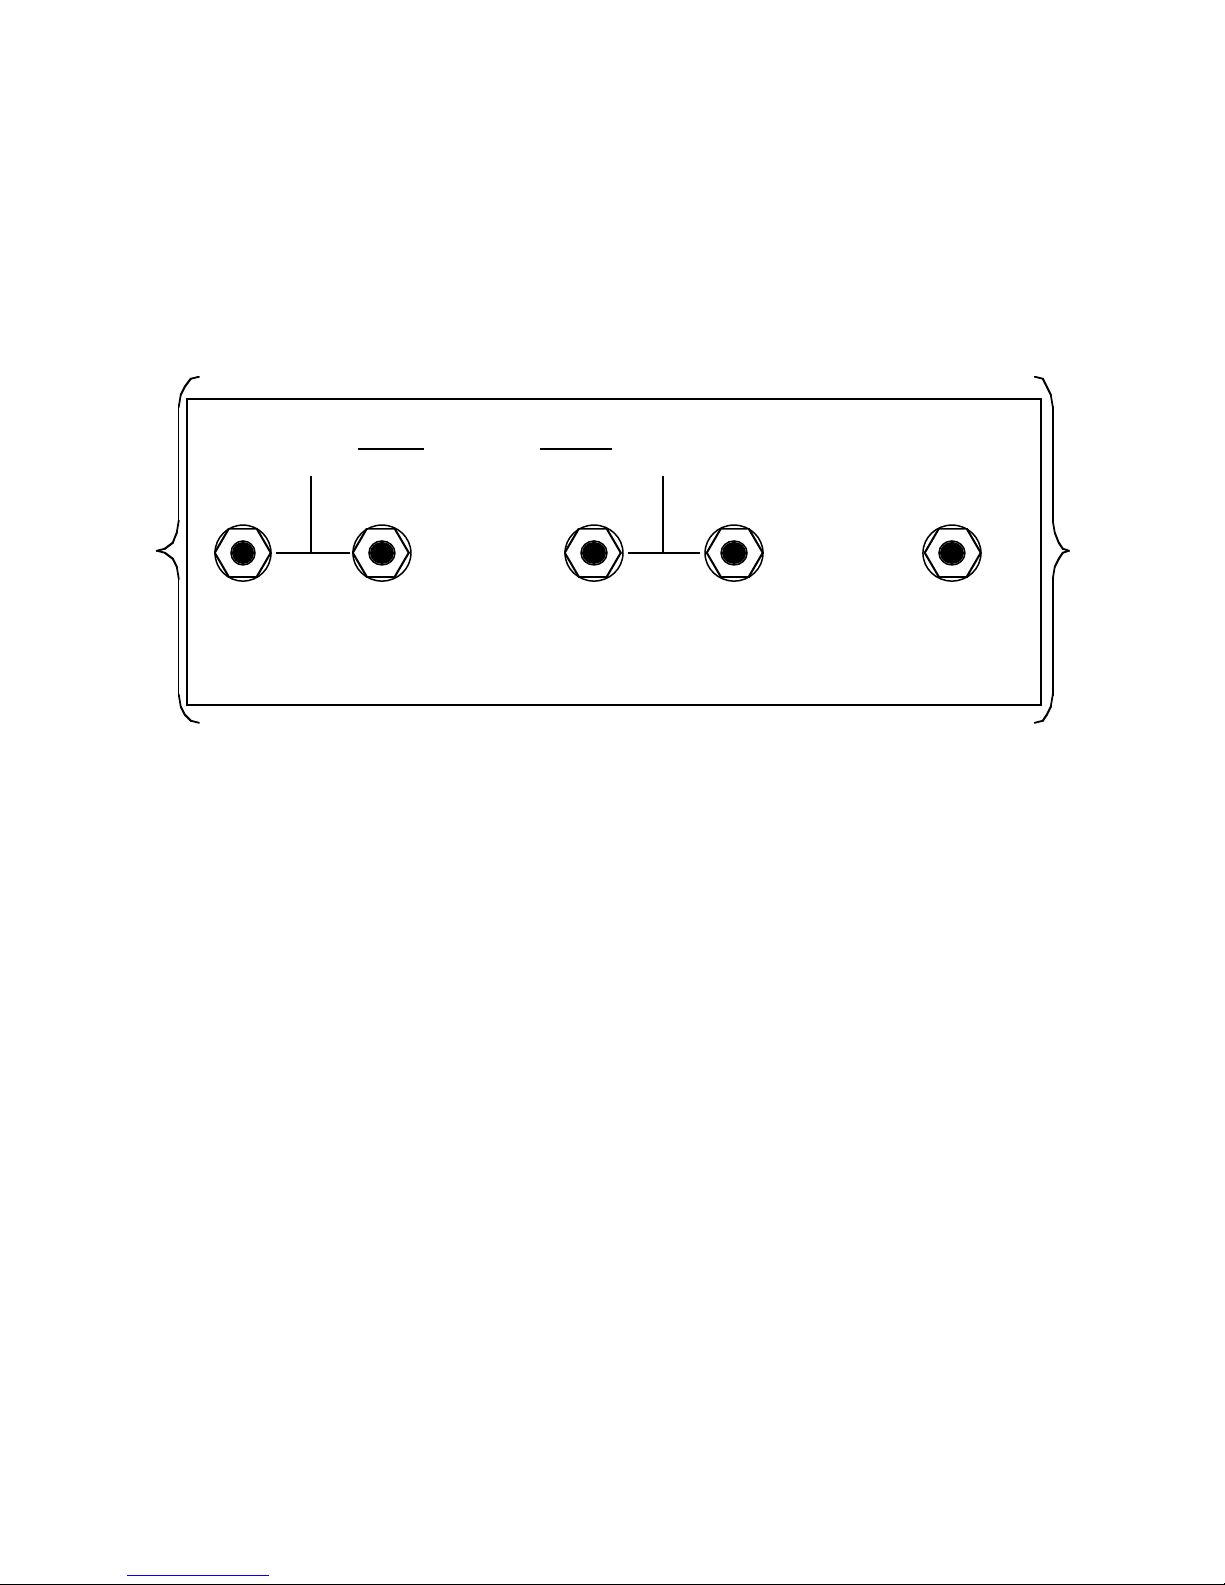
The speaker Impe ance switch is shown a juste for 8 ohms, which the stan ar setting
for a single Guytron GT-212 cabinet. Use a penny to a just it to the correct impe ance for your
application. For (2) Guytron GT-212 cabinets, the correct setting is 4 ohms. The speaker jacks
are in parallel, so the selector shoul reflect the total parallel impe ance for whatever is plugge
into the two speaker jacks. I o know of people eliberately mismatching the amp an cabs, for
tonal reasons. An impe ance mismatch will cause ifferent harmonic overtones in the output
section. It will also lower the power efficiency of the output section. I have en eavore to make
the transformers as tough as possible, an I have not seen any come back blown yet. However, It
is still a practice that woul voi your warranty.
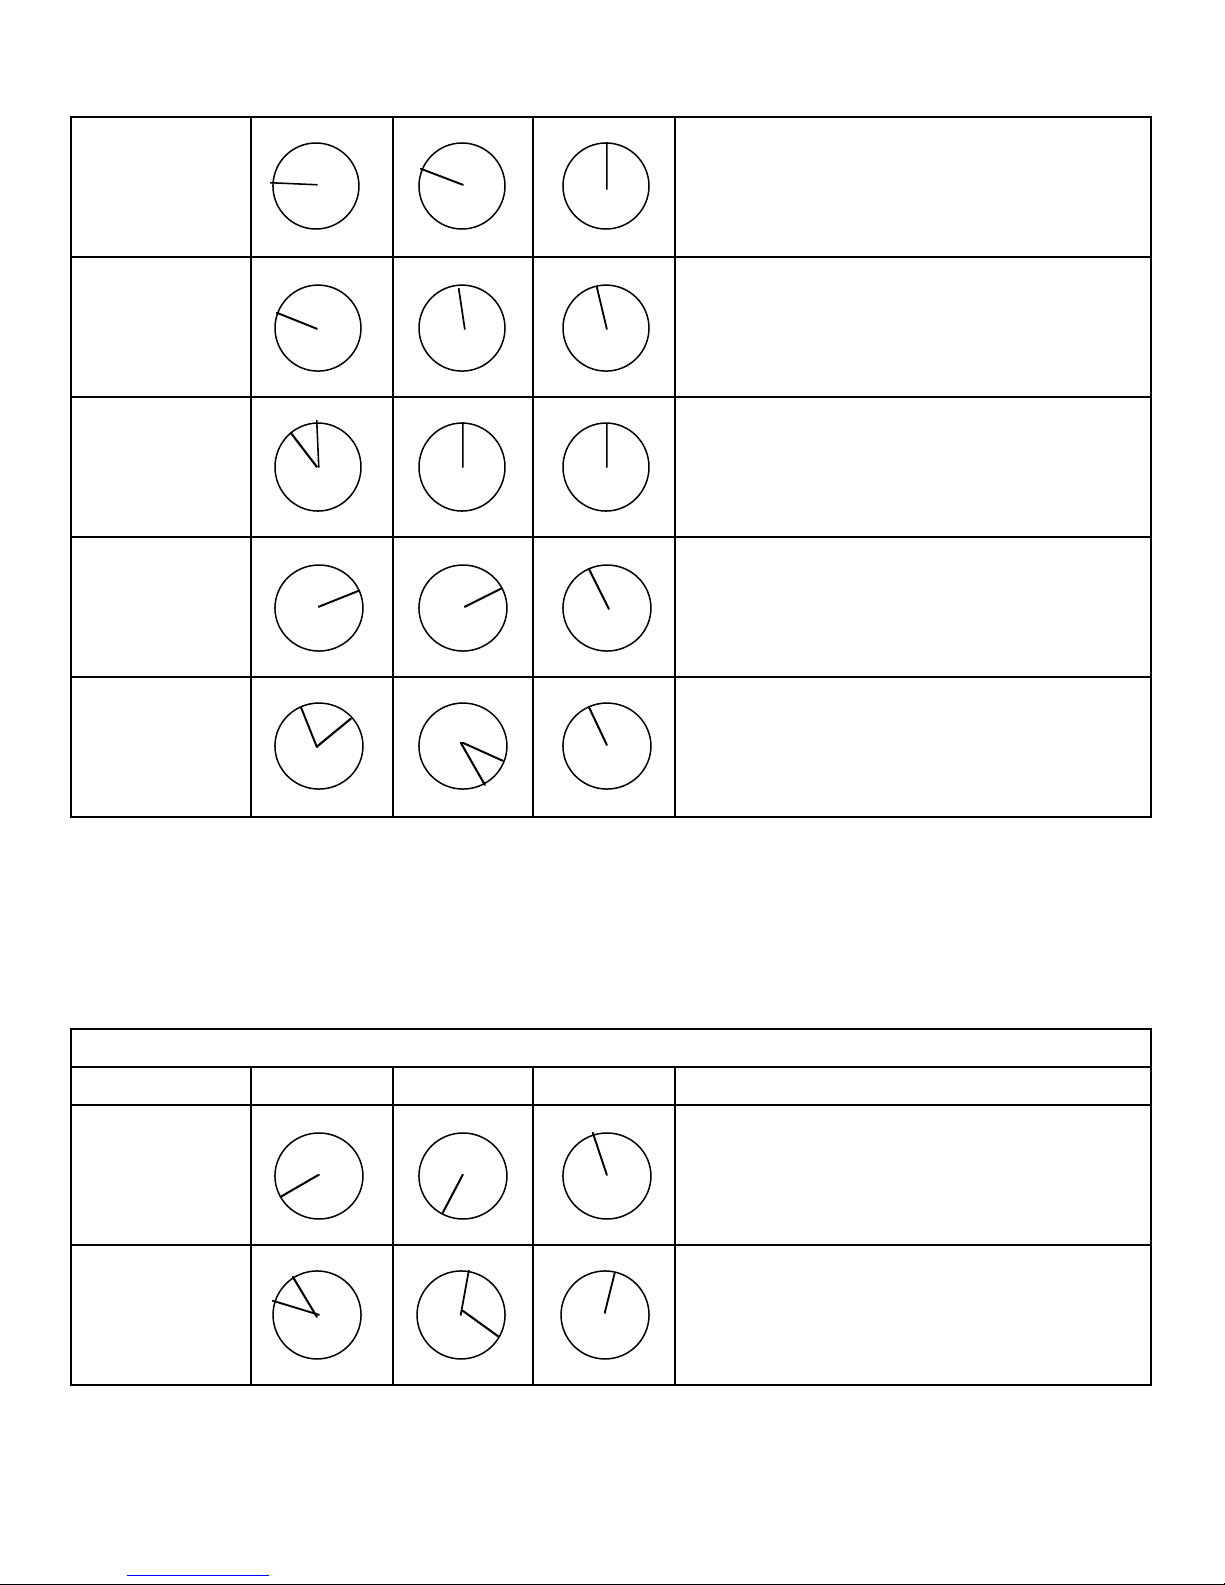
About the Sample Setting :
These sample settings are provi e as a starting point that steers you towar s a certain
character of tone, not as proof an comparison stu y. They were never inten e to be exact
copies, only functional equivalents. In a ition, many things make for an ol amps character, ol
an worn, or even amage parts sometimes a to the uniqueness of tone. That’s what ol amps
are for!
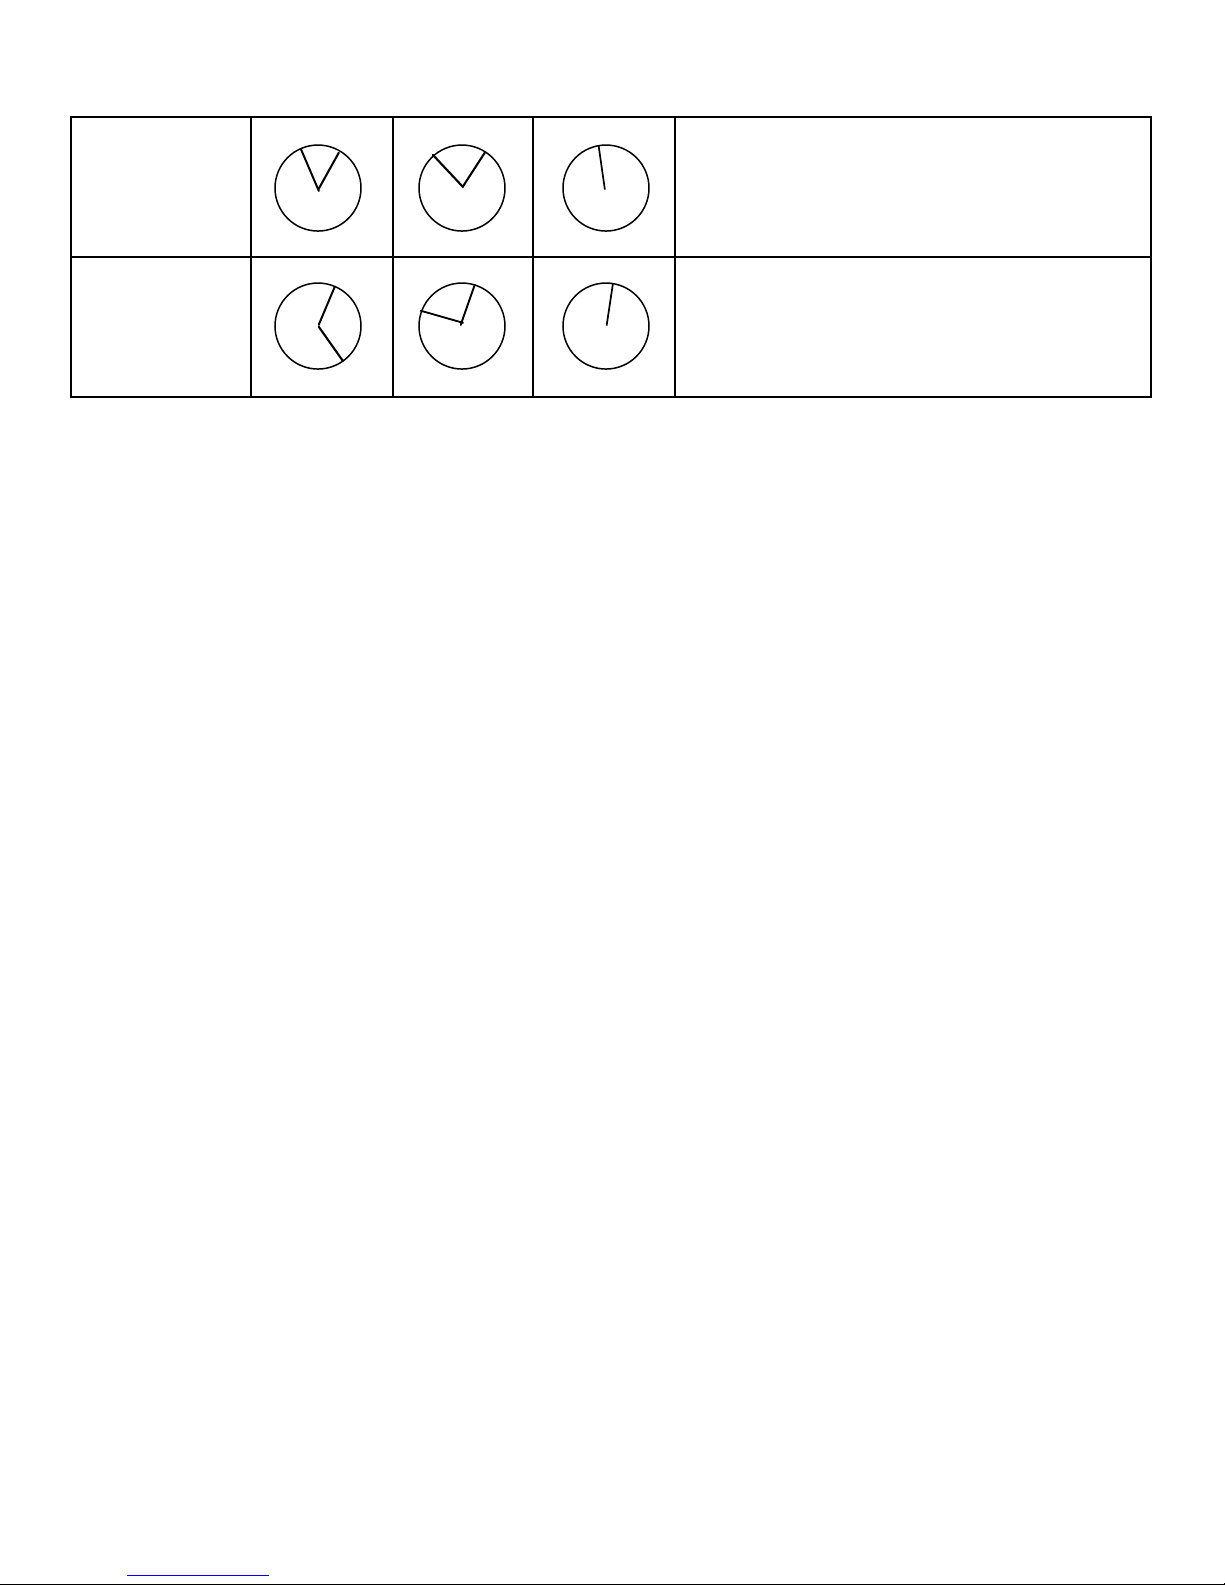
These sample settings were one with a maple neck Telecaster, it was chosen for it’s
excellent blen of clarity an sustain. It has a light ash bo y, stock vintage VanZan t pickups,
stock wiring with volume an tone were kept full up (to eliminate coloration). We also use , .010
gauge GHS boomers, 18.6’ pro-co lifeline guitar cor , an matching Guytron 2 x 12 cabinet. (I
mention all these things because they are important factors, an I have foun that all things
involve influence the pro uction of tone) During the sampling the master tone settings were all
at twelve o’clock an it’s a goo i ea to always start there when looking for your tone. The level
settings are primarily for relative channel levels but o make a slight ifference in tone. The
recommen e starting point is straight up. Obviously, physics ictate that these can only be an
approximation, but in terms of usable tone I believe you’ll fin that it’s like splitting hairs. Only
much more fun!
CHANNEL A SAMPLE SETTINGS
SETTING GAIN TONE LEVEL DESCRIPTION

9
Silver face
Twin Roun & clear with lots of mi coloration
Black face
Twin
Roun & clear with more clarity an a bit
More Presence an rive.
Twee Bassman/
early 60’s Plexi
Lots of clarity rock tone, cleans up well by
turning own guitar volume, starts to grin .
Late 60’s
Plexi
More grin , more upper mi range rive,
Makes Humbuckers more clear soun ing.
Vox AC30 Brilliant highs, cleans up great, warms up
a lot as gain increases, cool soun ing Mi s.
(Sweep Master Treble, Mi , an Bass to taste.)
Note: On the Vox setting you can see the ifferences with using the master tone controls. Some
people think it soun s more like an AC30 with the Mi s cut an the highs an lows booste a
little, but I sometimes like the opposite settings. You have to eci e for yourself, it matters if
your playing clean or irty, lou or quiet, etc.
CHANNEL B SAMPLE SETTINGS
SETTING GAIN TONE LEVEL DESCRIPTION
Ol Valco amps
(see note below) Clean, sort of bor ers on cool e ge, Kin of mu
y
But not really, lots of character.
70’s aluminum
panel
Can you say Kiss? This is a classic type of
Over rive, a must for us!

10
beefy JMP,JCM This is more of what you re rockin for!
Over the top
Hot / ro Tones
Not for the weak of heart at high volumes, but at
very low soun levels it s a great substitute
for moving a lot of air.
A little unsolicite history: the unsung "Valco" was an amplifier company base out of
Chicago. In a ition to the Valco amp line, they also built amps for many other companies well
into the 50’s, like Supro, an other Hawaiian lap steel amps. When Hawaiian music was all the
rage, back in the late 30’s an well into the 40’s an even 50’s. Most "Lap Steel" companies
offere a matching amp with their best Lap Steels. Several smaller Lap Steel companies just ha
Valco make them an put their own name on it. These amps usually ha a ark full soun , never
totally clean, but often beautiful an colorful tones. They were cool soun ing, an certainly one
of my favorites for recor ing, but the speakers were weak! They were almost always blown
when they came in the shop.
Inci entally, Leo Fen er was the exception, starting out in the repair fiel ; he built his
own amps, an use "over-spec" speakers anticipating real life stage abuse. So later on, when the
ki s starte using their parents ol equipment for this new "Rock an Roll", Fen er amps hel
up much better, an went on to become famous guitar amps. To this ay, if you fin an ol Valco
amp, it usually has a blown, amage , or incorrectly replace speaker in it. When you trie to
replace the speaker, the proper kin was never available, so the amp tone change rastically for
the worse. These kin s of observations, as well as many other proven examples witnesse while
running my little repair shop, are the reason Guytron amps will remain "Overbuilt to the Hilt."

11
My GT-100 Sample Setting
Note: You might like to photocopy this page, you may fin it a useful reference. Check
out our web page soon, www.guytron.com , for contact with other GT-100 players to tra e
settings, an exchange goo i eas, etc. It’s also a goo i ea keep a fol er with external notes
sheets, for any external effects, or more escriptive notes, etc.
Example: Effe ts Yes/No =( Y ) Effe ts =( 3 ) See Note # =( 22 )
∗∗
Effects =( ) is for GT100 front panel setting.
SETTING GAIN TONE LEVEL NOTES / DESCRIPTION
Channel A/B ( )
Date:
Master =( ) Treb =( ) Mid =( ) Bass =( ) Pres =( )
Effe ts Yes/No =( ) Effe ts =( ) See Note # =( )
Channel A/B ( )
Date:
Master =( ) Treb =( ) Mid =( ) Bass =( ) Pres =( )
Des ription.
Effe ts Yes/No =( ) Effe ts =( ) See Note # =( )
Channel A/B ( )
Date:
Master =( ) Treb =( ) Mid =( ) Bass =( ) Pres =( )
Des ription.
Effe ts Yes/No =( ) Effe ts =( ) See Note # =( )
Channel A/B ( )
Date:
Master =( ) Treb =( ) Mid =( ) Bass =( ) Pres =( )
Des ription.
Effe ts Yes/No =( ) Effe ts =( ) See Note # =( )

12
A note for the digital generation only!
Settings are most often expresse in terms of ol analog clocks. (Yes, I have ha to
explain this before.) Example: Treble = 12 O’clock means, a straight up knob setting, (⇑).
Therefore, 3 O’clock woul be (⇒), an likewise, 9 O’clock woul be (⇐), etc. Just like the han s
of an ol clock.
Tube Basi s 101-A
What it is to own a tube a p or ore notes for the digital generation, and other new tube users .
Introdu tion:
As a relative "ol timer" in the tube business, I o not get all shook up if I hear a "Pop" or
"Crackle" or some "Extra Hiss" now an then, an neither shoul you. I have however, recently
become aware that something as small as this can sen "Serious Warning" signals to the
uninitiate . One the other han , an for instance, that same inexperience tube user might not
"instinctively know", that a tube is malfunctioning if the plate glows re , as oppose to the
normal glow which comes from the tube’s internal heater operation. This is simply ue to a lack
of exposure on the part of the average new user.
I ha not realize this before because I live an breathe this stuff an take it for grante ,
oops. Therefore what follows is an over ue two page attempt to initiate you to the i ea of basic
tube troubleshooting. There are some "Tube Basics", or basic realities an skills that I believe
every tube amp owner shoul be aware of an comfortable with. Therefore, I will attempt to arm
you with some "Tube Tech" pointers to help you for the next time your tube amp exhibits any
weir or scary behavior. It will happen to you eventually, an you may even be able to skip the
tech fees next time. In a ition, your confi ence in your gear will not be as shaken if you possess
these basic skills.
Remember, tubes were esigne at a time when the average grocery store ha a tube
tester, an people rea ily i this sort of thing with their TV sets an ra ios, after receiving years
of faithful service. Troubleshooting tube problems was as common then as hooking up a printer,
or phone is to ay.
Common Noises:
In general, an occasional "Pop or Crackle" oes not mean much an are usually nothing to
panic about. They can usually be attribute to a irty socket or corro e pin. Each tube requires
a socket which will eventually get irty some ay, if so, o you nee a tech to clean it with

13
spray? Not really. Other symptoms can inclu e increase hiss, signal rop out, gain re uction,
weak, lifeless or unusually istorte soun , an can also be the signs of one or more weakening
tubes. These symptoms apply to both pre-amp an output tubes.
The goo news is that the GT100 was esigne to be really easy on tube life. So once you
get a goo set they shoul last quite a while. I have ma e every possible effort to outfit them
with a great set from the start, with varying levels of success along the way. It’s better than ever
right now.
More Serious Noises:
If the pop is accompanie or followe by a fa e or rop in power, or a new power
supply hum which increases in strength. Then an output tube is most likely failing, an amage is
occurring! Quickly check the output tubes, if a plate is starting to spark, glow re , or worse yet
"turn orange" hit the stan by switch, IMMEDIATELY!
Power supply hum is like the soun of touching the expose en of your guitar cor with
your finger, only not as abrupt, an sometimes with a ifferent pitch.
The plate is the largest gray metal thing insi e the bottle. It has a heater running through
the center of it which is suppose to glow at each en . However, the plate itself shoul never
have any visible glow except some ol Vox’s, (an still it’s not a goo thing)
Tube Basi s 101-B
DANGER! HIGH VOLTAGE!
Output Tube Troubles:
If an output tube oes eci e to go ba , you will know it! They carry the most current,
an will melt or spark, turn orange, blow a fuse, or stink like burnt components, etc. If the amp
smokes, take it to the shop! That’s because, the amp only emits real "smoke" if something has
been amage , so the amp may risk being further amage by continue use. You shoul at least
get it checke out. Thankfully, this has been pretty much unhear of with Guytron amps to ate.
Power tubes nee to be biase properly, or they can be amage !
The GT100 is biased as follows:
EL84’s = 45 to 50 a. Per tube. (That’s right, the s aller tubes run hotter in this case)

14
EL34’s = 28 to 32 a. Per tube.
Any internal repairs shoul only be one by a qualifie tech. This technically inclu es
bias a justment, but it has been one many times by well stu ie amateurs. However, Guytron
assumes no liability what so ever for amages, injuries, ba tones, or otherwise.
Pre-Amp Tubes:
Sometimes the trickiest ones to fin are just pesky pre-amp tubes an the noises they
will make. They are much more sensitive, so the slightest flaw will show up as extraneous noises.
They are also the easiest to fix, as they never nee a justment. An with the GT100 you can
freely exchange 12AX7, 12AT7, 12AU7 tubes, an name bran s, to benefit from the iffering
tone an gain structures to customize your tone without mo ifying the GT100. It you are having
a problem, first you have to fin it, an there are several approaches which you can even o back
stage, if nee be.
Lo alize It:
To fin the culprit, first remove the back. TUBES ARE HOT, SO BE CAREFUL!
Look at the tubes first, remove the metal covers from the 12AX7 tubes, look for whitish color,
burnt appearance, or glowing plates, etc. Then turn the amp on setting all the controls half way
up. An listen for the offen ing noise. Gently wiggle the tube in a small circular motion to test
the contacts. This will sometimes reveal a corro e or irty socket connection which can easily
be solve with cleaning.
Next start to tap the tubes with a pencil eraser. Sometimes this will reveal an intermittent
short or noise that woul otherwise take hours to fin . It can also reveal coming break owns in
output tubes as well, so monitor their tap tones as well. If this is reveals nothing, then,
Substitute tubes!
This is mostly for 12AX7 types which o not require a justment. Sometimes the most
irect way is to swap a given tube with a known goo one of equal value. If the swap makes it
better, then you got it, if not, replace the original an swap the next one. Go own the line until
you have checke each 12AX7. Working with the supplie "Block Diagram", you can begin to
see which tube oes what, an where, tracking own the noise even faster. Block Diagrams can be
a serious helper in locating any problem with any piece of gear.
Stage Kit:

15
I recommen bringing at least the minimum tubes an fuses to get the amp back running in
case of a routine failure, or power surge, rink spillage, etc. To me, it’s like having an extra set of
strings, or a spare tire in the car! The better prepare you are, the less likely it is that you’ll nee
it.
• Phillips Driver #1 & #2
• Pliers
• EL-34 tubes (2 each)
• E-L84 tubes (2 each)
• 12AX7 tubes (2 each)
An the following fuses:
• 5A-SLO
• 2.5A-SLO
• 1A-FAST.
An , an outlet "groun checker" an a can of contact cleaner.
GT-100 Engineering Gui elines:
The GT-100 was esigne for the working musician at any level of success, ecibel level,
or in any size room. The GT-100 en eavors to eliminate the nee for a "library" of ifferent
vintage amps, an the guesswork of which one to use for any particular venue. It has been my
experience that when it comes to guitar, nothing beats the soun of a cranke up vintage tube
amp. (This has been a common experience confirme by most veteran players)
Having owne an use virtually all of the most revere an collecte amps long enough
to get sick of carrying an repairing them, an or ealing with their limitations. I iscovere that
there were enough similarities between my favorites that it just might be possible to buil a
vintage style ’everything’ amp. I simply inclu e everything that I truly nee e , an exclu e
everything that I i n’t nee or want. (Plus I threw in a few ream features like usable channel
switching an ual level effects loops!) All of the soun s are available with an absolute minimum
of knob turning an tweaking. The amp is a true marriage between ol truste tones an new
proven technology an application. Every knob or switch is necessary to a ress a real musical
or functional nee , an even these are kept to a minimum. The i ea is to have simple operation, a
minimum of "Having your back turne to the au ience", an a maximum of musical enjoyment.

16
Also having been an amplifier repairman an mo ifier as well as professional musician for
over 20 years, I esigne the GT-100 from a reliability an usability stan point. Deliberately
overbuilt "to the hilt", an with great attention to etail, the GT-100 esign incorporates han
woun , paper bobbin, interleave transformers, top quality tube sockets, metal shaft pots, an
high quality "over spec." components throughout. All components are selecte with equal
importance lai on tone an urability.
Channel switching is one with ultra fast gol plate relays, an the circuit boar is lai
out for zero cross talk an "planar" signal egra ation. Servicing is ma e simple by easily
removable or accessible circuit boar s, commonly available tubes an fuses, an can be service in
minutes on the roa by a qualifie technician. Hopefully, since every step was taken to avoi
failures, this feature will not be utilize . Nevertheless, all connectors an pots can be accesse
an cleane for basic stan ar maintenance, without removing the circuit boar s. (That was
always a personal pet peeve of mine back when I was oing repairs)
The cabinet an hea are kept separate for a minimum of soun coloration an maximum
tube life, an are equal in weight to facilitate carrying an minimize back strain. The cabinet is a
seale back, 8 ohm, 2 x 12" enclosure with an angle front baffle. It was size , voice , an
configure to pro uce a smooth resonant frequency an a big clear soun not unlike your favorite
4 x 12. The seale back pushes 90% of it’s soun forwar an will soun consistent from room
to room. This is important to remember if a strange room gives you ifficulty hearing yourself on
stage. The recommen e configuration is two of the GT-212 cabinets with one GT-100 hea , this
gets one cabinet up to your ears while the other stays couple to the floor for a big full tone. To
run two cabs, use a penny to set the impe ance selector to 4 ohms.
The en result is a full stack that can be carrie aroun in an economy car an can play
any gig from a we ing ban to a sta ium performance with no compromise in tone. The next
one will be lighter, I promise. As always, I sincerely hope you enjoy playing through this rig as
much as I o.
Warranty
Subject to the Obligations an Exclusions foun below, this GUYTRON pro uct is
warrante against manufacturing efects in material an workmanship for the perio of one (1)
year from the ate of purchase, with the exception of tubes, which carry no warranty, an
lou speaker rivers, which are covere for 90 ays.
The warranty perio commences on the ate of purchase by the original user.
Performance un er this warranty must be obtaine at one of the following: a GUYTRON
Authorize Service Station, by returning the unit to the GUYTRON factory with prior
authorization, or (in countries outsi e of the Unite States) by a representative GUYTRON

17
istributor. A list of GUYTRON Authorize Service Stations can be obtaine from Guytron at
any time.
Obligations
1. This warranty will be honore only on the presentation of the original proof of purchase.
2. Transportation of the pro uct to the service station or GUYTRON factory is the
responsibility of the user unless specifically state otherwise in this warranty. GUYTRON will
pay for return shipping charges if the repairs are covere by the warranty.
Ex lusions
1. This warranty shall not cover a justment of customer-operate controls as explaine in the
appropriate mo el’s instruction manual, or pro ucts that have been altere , replace , or have
missing serial numbers.
2. This warranty shall not apply to the appearance of accessory items inclu ing, but not limite
to, cabinets, cabinet parts, or knobs.
3. This warranty oes not apply to uncrating, setup, installation, or the removal an
reinstallation of pro ucts for repair.
4. This warranty shall not apply to repairs or replacements necessitate by any cause beyon
the control of GUYTRON inclu ing, but not limite to, any malfunction, efects, or failure
cause by or resulting from unauthorize service or parts, amage or broken tubes, incorrect line
voltage, improper maintenance, mo ification or repair for the user, abuse, misuse, neglect,
acci ent, fire, floo , or other Acts of Go .
5. This warranty shall not apply to any lou speaker rivers that have been amage ue to
thermal estruction, or physical estruction such as moisture, rips, tears, shock, or transport.
6. Responsibility for any repair of any GUYTRON pro uct sol outsi e of U.S. boun aries is
borne by the GUYTRON representative in that particular country or territory. Also, the
warranty term an con itions may be ifferent from those state above. Please contact the
GUYTRON istributor or ealer in your country for more information.

18
The foregoing is in lieu of all other expresse warranties, an GUYTRON oes not
authorize any party to assume for it any other obligation or liability. In no event shall
GUYTRON be liable for special or consequential amages arising from the use of this pro uct, or
for any elay in the performance or this warranty ue to causes beyon our control. Some states
o not allow limitations on how long an implie warranty lasts an /or o not allow the exclusion
or limitation of consequential amages, so the above limitations on implie warranty an
consequential amages may not apply to you. This warranty gives you specific legal rights. You
may have other rights that vary from state to state.

19
GUYTRON GT-100 TUBE LAYOUT
REAR PANEL OF AMP
GT-100 TUBE COMPLIMENT:
V10, V11, V12, V13 = 6CA7/ EL-34 -Some modification required, but can be substituted with 6550/ KT-88, 6L6/ KT-66
V6, V7 = 6BQ / EL-84
V1, V2, V3, V4, V , V8, V9 = 12AX7A/ ECC83 - 1 AX7 tubes may be substituted with 1 AU7, 1 AT7 with this circuit
CAUTION: All Tubes, as well as ER-1 and ER- normally rut hot, DO NOT TOUCH until after allowed to cool down!
ER-1 ER-2
TR-1 TR 2
TR-3 V4 TR-4 V 3 V 2 V 1
V13 V12 V11 V10 V9 V8 V7 V6 V5

0
Guytron GT-100 Block Diagram
And Signal Flow Chart
EFFECTS
8
SND
RET
CH-A
LE EL
CH-B
LE EL
SUMMING
MIXER
EXTERNAL
EFFECTS
HI / LO LOOPS
MASTER TONE
NETWORK
PRESENCE
BASS MIDDLE TREBLE
MASTER
OLUME
6
3
7
TR4
EL-84
EL-84
PRE-
DRIVER
1A 51B
INPUT
CHANNEL B
CH-
B
GAIN
CH-B
TONE
2A
2B
SWITCHING
RELAY
CH-
A
GAIN
CHANNEL A
CH-A
TONE
INPUT
BUFFER
INPUT
BUFFER
GAIN
AMP
GAIN
AMP
GAIN
AMP
9
10
11
12
13
TR2SPEAKER
OUT
PHASE
I
NVERTER
EL-34
OUTPUTS
( 4 )
Other manuals for Gt-100
1
Table of contents