GVA GVAPLED22C User manual

Instruction Manual
21.5” (54.6cm)
FHD LED LCD TV Combo
/ GVAPLED22C

2
Contents
Preface 4
Safety Precautions 4
Important Safety Instructions 7
In the Carton 10
Connections and Functions 11
Basic Installation 12
Remote Control 15
Remote Control Setup 21
Using the Remote Control 21
Basic Operation 22
Picture Menu 23
Sound Menu 26
Channel Menu 29
Lock Menu 34
Hotel Mode 36
Setup Menu 37
HDMI CEC Control 39
PVR and Time Shift Operation 40
PVR Setting 40
First Time Setup 40
Reset 40
USB Device Setup 41
Timeshift 42
Instant Recording 43
Time Recorder 43
Playlist 44
EPG (Electronic Program Guide) 45
ATV / HDMI / AV / YPbPr 46
Multimedia Menu Operation 47
Photo 47
Music 48
Movie 48
Text 49

3
Contents
DVD Function 50
Specications 53
Wall Mounting Instructions 54
Care and Maintenance 55
Responsible Disposal 56
FAQs 57

4
Preface
Thank you for building this TV! Please read this manual thoroughly before operating the TV.
Make sure the TV was not damaged in transit. Should the TV is damaged, do not install it and
contact your dealer. Check that you have all the accessories according to the model.
Safety Precautions
4
Preface
Thank you for buying this TV! Please read this manual thoroughly before operating the TV.
Make sure the TV was not damaged in transit. If the TV is damaged, do not install it and
contact your dealer. Check that you have all of the accessories supplied with this unit.
Safety Precautions
Put the TV on a stable surface.
Do not place anything on the TV.
Do not use the TV with xtures other than those provided
or suggested by the manufacturer. Always leave some space
around the appliance, at least a few centimeters.
Do not block or cover the ventilation openings on the TV. If
you have a wall mount, check that it is steady.
Put the TV on a stable surface.
Do not place any material on the TV.
Do not use the TV with xtures other than those provided or
suggested by the manufacturer.
Do not block or cover the ventilation openings on the TV. If
you have a wall mount, check that it is steady.

5
Power cord and cables must be properly routed and protected
to prevent people from stepping on them and causing the TV
to fall.
Keep the TV dry and away from humidity.
Keep the TV away from heat sources.
Unplug the TV before cleaning it. Do not use solvent or liquid
to clean the TV. Once Clean the TV with soft and dry cloth.
Safety Precautions (Cont.)
5
The power cord and cables must be properly inserted and
protected to prevent people from stepping on them or
causing the TV to fall.
Keep the TV dry and away from humidity.
Keep the TV away from heat sources.
Unplug the TV before cleaning it. Do not use solvent or
liquid to clean the TV. Only clean the TV with a soft, dry
cloth.
Safety Precautions (Cont.)

6
In cause of troubleshooting, do not use spare parts
other than those suggested by the manufacturer. Using
inadequate spare parts can lead to electric shocks, short-
circuits re or other incidents.
Unplug the TV during lightening storms or when unused for
long periods of time.
Safety Precautions (Cont.)
6
Do not use spare parts other than those suggested by the
manufacturer. Using inadequate spare parts can lead to
electric shocks, short circuits, re or other incidents.
Unplug the TV during lightning storms or when unused for
long periods of time.
Safety Precautions (Cont.)

7
Important Safety Instructions
Read this manual thoroughly before rst use and keep it in a safe place for future reference,
along with the warranty card, purchase receipt and carton. The safety precautions enclosed
herein reduce the risk of re, electric shock and injury when correctly adhered to.
Usage conditions and restrictions
To prevent any injuries, the following safety precautions should be observed in the
installation, use, servicing and maintenance of equipment. Before operating this equipment,
please read this manual completely, and keep it nearby for future reference.
• Take notice of all the warnings.
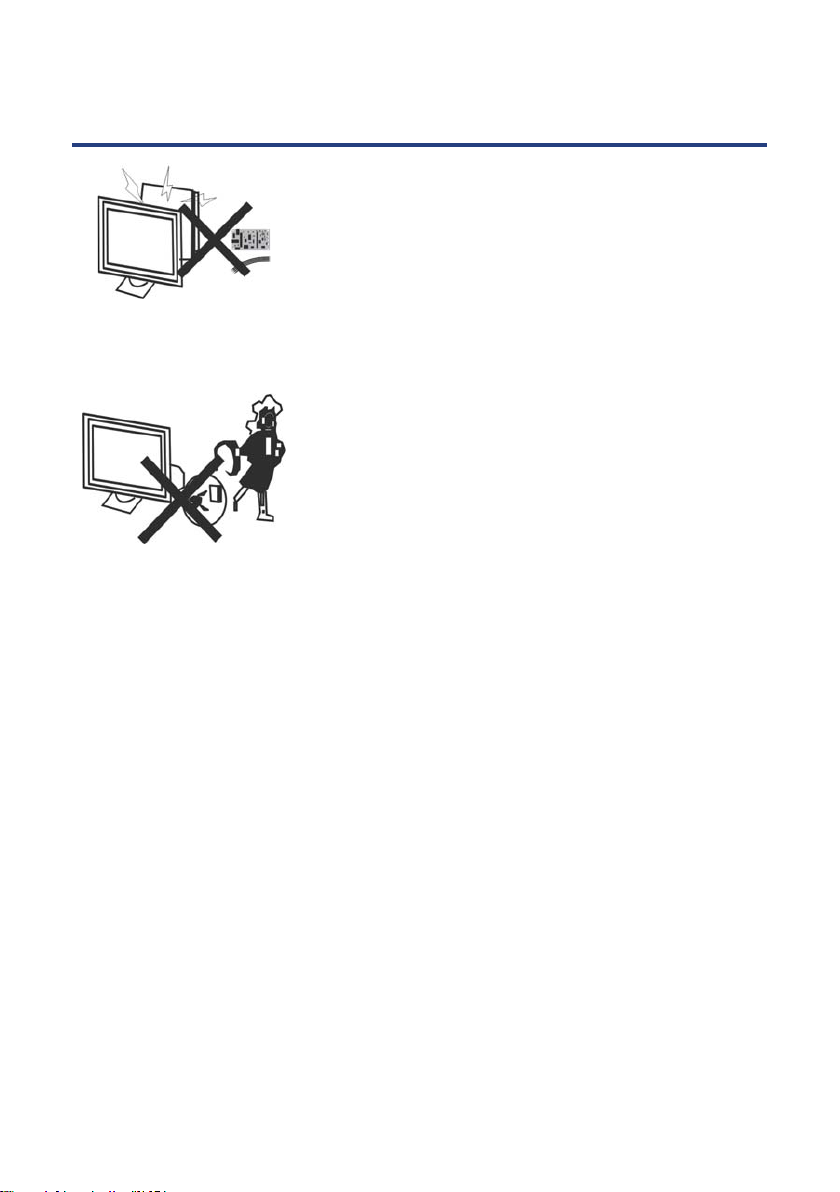
• Do not use this TV near water.
• Clean only with a dry cloth.
• Do not block any of the ventilation openings.
• Install in accordance with the manufacturer’s instructions.
• Do not install near any heat sources such as radiators, heat registers, stoves, or other TV’s
(including ampliers) that produce heat.
• Do not alter the grounding type plug provided with the TV. A grounding type plug has two
blades and a third grounding prong. The third prong is provided for your safety. When the
provided plug does not t into your outlet, consult an electrician for replacement of the
obsolete outlet.
• Protect the power cord from being walked on or pinched particularly at plugs, convenience
receptacles, and the point where they exit from the TV.
• Only use the attachments/accessories specied by the manufacturer.
• Use only with a cart, stand, tripod, bracket, or table specied by the manufacturer, or sold
with the TV.
• Unplug this TV during lightning storms or when unused for long periods of time.
• The appliance is not intended for use by persons (including children) with reduced physical,
sensory or mental capabilities, or lack of experience and knowledge, unless they have been
given supervision or instruction concerning use of the appliance by a person responsible
for their safety.
• Young children should be supervised to ensure they do not play with the appliance.
• Refer all servicing to qualied service personnel. Servicing is required when the TV has been
damaged in any way, such as power supply cord or plug is damaged, liquid has been spilt
or objects have fallen into the TV, the TV has been exposed to rain or moisture, does not
operate normally, or has been dropped.
• If the supply cord is damaged, it must be replaced by the manufacturer, its service agent or
similarly qualied persons in order to avoid a hazard.
NOTE: The TV must not be exposed to dripping or splashing and no objects lled with
liquids, such as vases, should be placed on the TV.

8
Important Safety Instructions
Position
• If a television is not positioned in a suciently stable location, it can be potentially
hazardous due to falling. Many injuries, particularly to children, can be avoided by taking
simple precautions such as:
• Securely attaching the TV to the wall mount fastened on the wall.
• Only using furniture that can safely support the television.
• Ensuring the television is not overhanging the edge of the supporting furniture.
• Educating children about the dangers of climbing on furniture to reach the TV controls.
• Not standing the TV on cloth or other materials placed between the television and
supporting furniture.
• Not placing the television on tall furniture (for example, cupboards or bookcases)
without anchoring both the furniture and the television to a suitable support.
• When deciding on where to put the TV set, make sure the place is:
• Well ventilated.
• Away from damp and cold.
• Protected from overheating and away from direct sunlight.
• Away from moisture drips or splashes.
• Protected from excessive dust.
• Do not install this equipment in a conned space such as a bookcase or similar unit.
• Do not put any objects lled with liquids, such as vases, on top of the TV set.
• Do not place any naked ame sources, such as lighted candles, on top of the TV set.
Cleaning and maintenance
• Dust the TV set by wiping the screen and cabinet with a soft, clean cloth.
Electrical safety, power cord and plug
• Before installing this TV set, make sure your outlet voltage corresponds to the voltage
stated on the appliance rating label.
• To reduce the risk of re or electric shock, do not expose this appliance to rain or moisture.
• Do not overload the power cord or power outlet.
• Do not let the cord hang over the edge of a table or counter, or touch any hot surface.
• Do not allow anything to rest on or roll over the power cord and signal cable.
• Protect the power cord and signal cable from being trampled.
• Do not expose the power cord and signal cable to moisture.

9
Important Safety Instructions
• Do not apply excessive force to the screen when cleaning.
• Do not clean the screen with water or chemical cleaners as this may damage the LED
screen surface.
• Do not dismantle this product by yourself, as this may cause damage. There are no user-
serviceable parts contained in the TV set.
• If your TV set has been damaged, contact the after sales support line for advice or take
it to a local service centre for inspection or repair. No liability can be accepted for any
damage caused by non-compliance with these instructions or any other improper use or
mishandling of appliance.
WARNING:
TO PREVENT DAMAGE WHICH MAY RESULT IN FIRE OR AN ELECTRIC SHOCK HAZARD, DO
NOT EXPOSE THIS APPLIANCETO RAIN OR MOISTURE.
CAUTIONS: • These servicing instructions are for use by qualied service personnel only. To
reduce the risk of electric shock, do not perform any servicing other than that
contained in the operating instructions unless you are qualied to do so.
•Any changes or modications not expressly approved by the party responsible
for compliance could void the user’s authority to operate the equipment.
This symbol indicates that dangerous voltage constituting a risk of
electric shock is present within this unit.
This symbol indicates that there are important operating and
maintenance instructions in the documentation accompanying this unit.
CAUTION: TO PREVENT THE RISK OF ELECTRIC
SHOCK, DO NOT REMOVE COVER (OR BACK).
NO USER SERVICEABLE PARTS INSIDE.
REFER SERVICING TO QUALIFIED SERVICE PERSONNEL

10
In the Carton
10
In the Carton
Screw
POWER SOURCE MENU CH- CH+ VOL- VOL+
11
Connections and Functions
Front and Back Connection of LED TV
Back View and Control Connections
1. Press“POWER”button to turn
2. Press “SOURCE”to select the
input source.
3. Press “MENU”to bring up the
main menu on the screen.
4. Press “CH+” or “CH-” to scan
through channels.
5. Press “VOL+” or “VOL-” to increase
or decrease the volume.
6. REMOTE SENSOR: Infrared sensor
for the remote control.
7. POWER INDICATOR: Show red
in standby mode, show blue
when your TV is switched on.
HDMIANT
VIDEO IN
1. VIDEO: Connect to a DVD player’s VIDEO output
socket. 5.
R/L: Connect to the R/L AUDIO output socket of
a DVD player.
YPbPr: connect to the (component) output
sockets of a DVD player.
2.
4.
3.
ANT: Connection for the antenna plug.
7. AC100-240V: Main power input.
HDMI: Connect to the HDMI output socket of a
DVD player.
6. USB: Connect to a portable USB storage device.
REMOTE SENSOR
POWER INDICATOR
12345
6
7

11
Connections and Functions
1. Video: Connect to a DVD player’s VIDEO output
socket.
2. R/L: Connect the R/L AUDIO output socket of DVD.
3. YPbPr: Connect to the (Component) output socket
of a DVD Player.
4. ANT: Connection for the antenna plug.
5. HDMI: Connect to the HDMI output socket of a
DVD player.
6. USB: Connect to portable USB storage device.
7. AC 100 - 240V: Main power input.
Front and Back Connection of LED TV
Back View and Control Connections
POWER SOURCE MENU CH- CH+ VOL- VOL+
11
Connections and Functions
11
Connections and Functions
11
11
�����������������������
11
Front and Back Connection of LED TV
Back View and Control Connections
Front and Back Connection of LED TV
Back View and Control Connections
Insert the disc with
the mirror side
facing yourself
Play/Pause program.
Connections and Functions
Front and Back Connection of LED LCD TV
Back View and Control Connections
1. Press “STANDBY” button to turn
2. Press “SOURCE” to select the
input source.
3. Press “MENU” to bring up the
main menu on the screen.
4. Press “CH+”or “CH-”to scan
through channels.
5. Press “VOL+” or “VOL-” to increase
or decrease the volume.
6. REMOTE SENSOR: Infrared sensor
for the remote control.
7. POWER INDICATOR: Show red
in standby mode, show green
when your TV is switched on.
8. Play / Pause program.
9. Load / eject DVD disc.
Remote Sensor
Power Indicator
1. Press“POWER” button to turn
2. Press “SOURCE” to select the
input source.
3. Press “MENU” to bring up the
main menu on the screen.
4. Press“CH+”or “CH-” to scan
through channels.
5. Press “VOL+” or “VOL-” to increase
or decrease the volume.
6. REMOTE SENSOR: Infrared sensor
for the remote control.
7. POWER INDICATOR: Show red
in standby mode, show blue
when your TV is switched on.
Front and Back Connec
Back View and Control Connections
Play/Pause program.
Connec Functions
Front and Back Connection of LED LCD TV
Back V
1. Press “STANDBY” button t
2. Press “SOURCE” to select the
input source.
3. Press “MENU”to bring up the
main menu on the screen.
4. Press“CH+” or “CH-”to scan
through channels.
5. Press “VOL+” or “VOL-” to incr
or decrease the volume.
6. REMOTE SENSOR: Infrar
ed sensor
for the remote control.
7. POWER INDICATOR: Show red
in standby mode, show green
when your TV is switched on.
8. Play / Pause program.
9. Load / eject DVD disc.
HDMIANT
VIDEO IN
1. VIDEO: Connect to a DVD player’s VIDEO output
socket. 5.
R/L: Connect to the R/L AUDIO output socket of
a DVD player.
YPbPr: connect to the (component) output
sockets of a DVD player.
2.
4.
3.
ANT: Connection for the antenna plug.
7. AC100-240V: Main power input.
HDMI: Connect to the HDMI output socket of a
DVD player.
6. USB: Connecttoaportable USB storage device.
1.
V
ideo: Connect to a DVD player’s VIDEO output
socke
t
2.
DVD pl
y
3.
Y
PbPr: connect to the (component) output
a
y
er
5.
6.
RF: Connection for the ant
enna plug
.
7.
Headphone: phone
.
HDMI: Connect to the HDMI output socker of a
DVD pl
a
y
er.
USB: Connect to a portable USB stor c
C100-240V: Main power input.
3. YPbPr: connect t
o the (component) output
sockets of a DVD pl
a
y
er.
1. Video: Connect to a DVD player’s
VIDEO output
socket.
UDIO output socket of a
DVD player
1. Video: Connect t
o a DVD pl
a
y
er’s
VIDEO output
socket.
UDIO output socket of a
t) output
.
t.
enna plug.
7. Headphone: Connect earphones.
8. HDMI: Connect t
DVD player.
10. Coax: Connect to an exter
: ow .
3. YPbPr: connect t
o the (component) output
1. Video: Connect t
o a DVD pl
a
y
er’s
VIDEO output
socket.
UDIO output socket of a
DVD pl
ayer.
REMOTE SENSOR
POWER INDICATOR
MIRROR SIDE
TO FRONT
8.
Play / Pause program.
9.
Load / Eject DVD disc.
�
12345
6
7
8
9
1. Press “POWER” button to turn standby
mode On of O.
2. Press “SOURCE” to select the input
source.
3. Press “MENU” to bring up the main
menu on the screen.
4. Press “CH+” or “CH-” to scan through
channels.
5. Press “VOL+” or “VOL-” to increase or
decrease the volume.
6. REMOTE SENSOR: Infrared sensor for
the remote control.
7. POWER INDICATOR: Show red in
standby mode, show blue when your
TV is switched on.
8. Load / Eject DVD disc.
9. Play / Pause program.
POWER SOURCE MENU CH- CH+ VOL- VOL+
11
Connections and Functions
11
Connections and Functions
11
11
�����������������������
11
Front and Back Connection of LED TV
Back View and Control Connections
Front and Back Connection of LED TV
Back View and Control Connections
Insert the disc with
the mirror side
facing yourself
Play/Pause program.
Connections and Functions
Front and Back Connection of LED LCD TV
Back View and Control Connections
1. Press “STANDBY” button to turn
2. Press “SOURCE” to select the
input source.
3. Press “MENU” to bring up the
main menu on the screen.
4. Press “CH+” or “CH-” to scan
through channels.
5. Press “VOL+” or “VOL-” to increase
or decrease the volume.
6. REMOTE SENSOR: Infrared sensor
for the remote control.
7. POWER INDICATOR: Show red
in standby mode, show green
when your TV is switched on.
8. Play / Pause program.
9. Load / eject DVD disc.
Remote Sensor
Power Indicator
1. Press “POWER” button to turn
2. Press “SOURCE” to select the
input source.
3. Press “MENU” to bring up the
main menu on the screen.
4. Press “CH+” or “CH-” to scan
through channels.
5. Press “VOL+” or “VOL-” to increase
or decrease the volume.
6. REMOTE SENSOR: Infrared sensor
for the remote control.
7. POWER INDICATOR: Show red
in standby mode, show blue
when your TV is switched on.
Front and Back Connec
Back View and Control Connections
Play/Pause program.
Connec Functions
Front and Back Connection of LED LCD TV
Back V
1. Press “STANDBY” button t
2. Press “SOURCE” to select the
input source.
3. Press “MENU” to bring up the
main menu on the screen.
4. Press “CH+”or “CH-” to scan
through channels.
5. Press “VOL+” or “VOL-” to incr
or decrease the volume.
6. REMOTE SENSOR: Infrar
ed sensor
for the remote control.
7. POWER INDICATOR: Show red
in standby mode, show green
when your TV is switched on.
8. Play / Pause program.
9. Load / eject DVD disc.
HDMIANT
VIDEO IN
1. VIDEO: Connect to a DVD player’s VIDEO output
socket. 5.
R/L: Connect to the R/L AUDIO output socket of
a DVD player.
YPbPr: connect to the (component) output
sockets of a DVD player.
2.
4.
3.
ANT: Connection for the antenna plug.
7. AC100-240V: Main power input.
HDMI: Connect to the HDMI output socket of a
DVD player.
6. USB: Connecttoaportable USB storage device.
1.
V
ideo: Connect to a DVD player’s VIDEO output
socke
t
2.
DVD pl
y
3.
Y
PbPr: connect to the (component) output
a
y
er
5.
6.
RF: Connection for the ant
enna plug
.
7.
Headphone: phone
.
HDMI: Connect to the HDMI output socker of a
DVD pl
a
y
er.
USB: Connect to a portable USB stor c
C100-240V: Main power input.
3. YPbPr: connect t
o the (component) output
sockets of a DVD pl
a
y
er.
1. Video: Connect to a DVD player’s
VIDEO output
socket.
UDIO output socket of a
DVD player
1. Video: Connect t
o a DVD pl
a
y
er’s
VIDEO output
socket.
UDIO output socket of a
t) output
.
t.
enna plug.
7. Headphone: Connect earphones.
8. HDMI: Connect t
DVD player.
10. Coax: Connect to an exter
: ow .
3. YPbPr: connect t
o the (component) output
1. Video: Connect t
o a DVD pl
a
y
er’s
VIDEO output
socket.
UDIO output socket of a
DVD pl
ayer.
REMOTE SENSOR
POWER INDICATOR
MIRROR SIDE
TO FRONT
8.
Play / Pause program.
9.
Load / Eject DVD disc.
�
12345
6
7
8
9

12
Basic Installation
Power Cord Connection
- Connect the power cord as shown.
- Press the POWER switch of your LED TV to switch the unit on. The power indicator on the
front panel lights up in blue.
12
Basic Installation
Power Cord Connection
- Connect the power cord as shown.
- Press the POWER switch of your LED TV to switch the unit on. The power indicator on the
front panel lights up in blue.
12
Basic Installation
Power Cord Connection
- Connect the power cord as shown.
- Press the POWER switch of your LED TV to switch the unit on. The power indicator on the
front panel lights up in blue.
�����������������
�������������������
�������������������������������������
�������������������������������������������������������������������������
��������������������������
������������������
������������������������������������������������������������������������
������������������������������������������������������������������������
����������������������������������������������������������������������������������
������������������������
Antennas Connection
To ensure good picture and sound, a TV antenna system needs to be installed. The antenna
system as shown can be sourced from TV equipment shops, which will provide service for
correct installation and connections. After installation, insert the 75-OHM antenna plug into
the antenna socket as shown.
�����������������
�������������������
����������������� ����������������
������������������
������������������������������������������������������������������������
������������������������������������������������������������������������
����������������������������������������������������������������������������������
������������������������
12
Antennas Connection
To ensure good picture and sound, a TV antenna system needs to be installed. The antenna
system as shown can be sourced from TV equipment shops, which will provide service for
correct installation and connections. After installation, insert the 75-OHM antenna plug into
the antenna socket as shown.
�����������������
�������������������
�������������������������������������
�������������������������������������������������������������������������
� � ������� �
������������������
������������������������������������������������������������������������
������������������������������������������������������������������������
����������������������������������������������������������������������������������
������������������������
12
V
Antennas Connection
To ensure good picture and sound, a TV antenna system needs to be installed. The antenna
system as shown can be sourced from TV equipment shops, which will provide service for
correct installation and connections. After installation, insert the 75-OHM antenna plug into
the antenna socket as shown.
12
Basic Installation
Power Cord Connection
- Connect the power cord as shown.
- Press the POWER switch of your LED TV to switch the unit on. The power indicator on the
front panel lights up in blue.
12
Basic Installation
Power Cord Connection
- Connect the power cord as shown.
- Press the POWER switch of your LED TV to switch the unit on. The power indicator on the
front panel lights up in blue.
�����������������
�������������������
�������������������������������������
�������������������������������������������������������������������������
��������������������������
������������������
������������������������������������������������������������������������
������������������������������������������������������������������������
����������������������������������������������������������������������������������
������������������������
Antennas Connection
To ensure good picture and sound, a TV antenna system needs to be installed. The antenna
system as shown can be sourced from TV equipment shops, which will provide service for
correct installation and connections. After installation, insert the 75-OHM antenna plug into
the antenna socket as shown.
�����������������
�������������������
����������������� ����������������
������������������
������������������������������������������������������������������������
������������������������������������������������������������������������
����������������������������������������������������������������������������������
������������������������
12
Antennas Connection
To ensure good picture and sound, a TV antenna system needs to be installed. The antenna
system as shown can be sourced from TV equipment shops, which will provide service for
correct installation and connections. After installation, insert the 75-OHM antenna plug into
the antenna socket as shown.
�����������������
�������������������
�������������������������������������
�������������������������������������������������������������������������
� � ������� �
������������������
������������������������������������������������������������������������
������������������������������������������������������������������������
����������������������������������������������������������������������������������
������������������������
12
V

13
Basic Installation (Cont.)
YPbPr Connection
Connect the YPbPr output of the DVD or VCR to the YPbPr input on the TV. The picture quality
is improved compared to connecting a regular VCR to the video input. Connect the Audio
output of the DVD or VCR to the Audio input sockets on the set using the RCA cable. Match
the sockets colours: Y is green, Pb is blue, Pr is red. Audio left is white and Audio right in red.
Select YPbPr input source using the SOURCE button on the remote control.
AV Connection
Connect the VIDEO and AUDIO output sockets of the DVD or VCR to the AV IN sockets on the
TV using the RCA cable (Yellow [video],White and Red [left and right audio]). Select the AV
input source using the SOURCE button on the remote control.
13
HD
13
HDMI1 HDMI3HDMI2
13
HDMIANT
VIDEO IN
HDMIANT
VIDEO IN
13
Basic Installation (Cont.)
YPbPr Connection
Connect the YPbPr output of the DVD or VCR to the YPbPr input on the TV. The picture quality
is improved compared to connecting a regular VCR to the video input. Connect the Audio
output of the DVD or VCR to the Audio input sockets on the set using the RCA cable. Match
the sockets colours: Y is green, Pb is blue, Pr is red. Audio left is white and Audio right in red.
Select YPbPr input source using the SOURCE button on the remote control.
AV Connection
Connect the VIDEO and AUDIO output sockets of the DVD or VCR to the AV IN sockets on the
TV using the RCA cable (Yellow [video],White and Red [left and right audio]). Select the AV
input source using the SOURCE button on the remote control.
13
HD
13
HDMI1 HDMI3HDMI2
13
HDMIANT
VIDEO IN
HDMIANT
VIDEO IN

14
Basic Installation (Cont.)
HDMI Connection
HDMI connection allows the user to transfer both audio and video control signals through
one cable only. These signals are transferred in digital.
USB Connection
A portable USB device can be connected to the USB socket.
14
Basic Installation (Cont.)
HDMI Connection
HDMI connection allows the user to transfer both audio and video control signals through
one cable only. These signals are transferred in digital.
14
14
HDMIANT
VIDEO IN
HDMI1 HDMI3HDMI2 COAX
USB Connection
A portable USB device can be connected to the USB socket.
HDMIANT
VIDEO IN
14
Basic Installation (Cont.)
HDMI Connection
HDMI connection allows the user to transfer both audio and video control signals through
one cable only. These signals are transferred in digital.
14
14
HDMIANT
VIDEO IN
HDMI1 HDMI3HDMI2 COAX
USB Connection
A portable USB device can be connected to the USB socket.
HDMIANT
VIDEO IN

15
Remote Control
The buttons on the remote control and buttons marked similar on the TV unit
performs similar function.
The buttons on the remote control and similarly marked ones on the main unit
perform similar functions.
VOLVOL
DISPLAYSOURCE
CH.CH.
OK
OK
TITLE
HOLD
ZOOM
D.MENU
INPUTP.MODE PMODES.MODE SMODEFREEZE SLEEPDISPLAY
MUTEMUTE
NICAM
ASPECTSLEEP
AUDIO
LANGUAGE
AUTOTV/RADIO
MENUMENU EXIT
FAVEPG EPGSUBTITLE
MEDIA
TEXT/MIX
INDEX
HOLD LANG
SUBTITLE
GOTO
DVD SETUP
ANGLE
REPEAT
A-B
SIZE
FAV
-
-/--
LCD
2
1
3
4
5
7
9
10
11
14
16
*
17
6
8
12
13
15
18
19
Remote Control
1 6
GVAPLED22C

16
Remote Control (Cont.)
TV Control in DTV Mode
1. POWER : Press“POWER” button to turn standby mode on or off.
2. TV/RADIO : Select TV or Radio modes.
3. MUTE : Press to mute the sound. Press again to unmute the TV.
4. NUMBER BUTTONS: Press 0-9 to select a TV channel directly when you are watching
TV. The channel changes after 2 seconds.
5. CHANNEL RETURN : Return to the previous channel viewed.
6. AUDIO / Language: Select audio language. / Select language.
7. CH+/-: Press to change to the next channel.
8. SOURCE: Press to cycle through the input source.
9. NAV / / / : Allows you to navigate the on-screen menus and adjust the system
settings to your preference.
10. OK: Confirm Selection / Enter button.
11. EXIT: Exit the main TV menu.
12. DISPLAY: Press to display the source and channel’s information.
13. HOLD / FREEZE: Hold teletext / freeze picture or current page.
14. SMODE: Press to cycle through the different sound settings.
15. PMODE: Press it to cycle through the available video picture modes.
16. MENU: Brings up the main menu to the screen.
17. VOL+/-: Press to increase/decrease the sound level.
18. SLEEP: Select amount of time. Let your TV turn off automatically.
19. MULTI-DIGITS -/-- : Press this button to enter a program number for multiple program
channel such as 2-1,etc.
D.MENU / EPG: DVD disc menu / Launches the EPG ( Electronic Program Guide) in DTV
mode.
FAV: Press to display your favourite program in DTV mode.
ZOOM / SIZE: Press this button to select the different screen size on your TV.
SUBTITLE: To display subtitle.
MEDIA: Press to select MEDIA mode.

17
Remote Control (Cont.)
The buttons on the remote control and buttons marked similar on the TV unit
performs similar function.
The buttons on the remote control and similarly marked ones on the main unit
perform similar functions.
VOLVOL
DISPLAYSOURCE
CH.CH.
OK
OK
TITLE
HOLD
ZOOM
D.MENU
INPUTP.MODE PMODES.MODE SMODEFREEZE SLEEPDISPLAY
MUTEMUTE
NICAM
ASPECTSLEEP
AUDIO
LANGUAGE
AUTOTV/RADIO
MENUMENU EXIT
FAVEPG EPGSUBTITLE
MEDIA
TEXT/MIX
INDEX
HOLD LANG
SUBTITLE
GOTO
DVD SETUP
ANGLE
REPEAT
A-B
SIZE
FAV
-
-/--
LCD
2
1
3
4
5
7
9
10
11
14
16
*
17
6
8
12
13
15
18
19
Remote Control
1 6
GVAPLED22C

18
Remote Control (Cont.)
: PLAY/PAUSE in TIMESHIFT mode.
: Stop in TIMESHIFT mode or exit the REC mode.
/ : Fast reverse and forward key in TIMESHIFT mode.
/ : Jump to previous and next track or chapter in TIMESHIFT mode.
INDEX: Teletext INDEX display button.
TEXT / MIX: Press to switch between TV and Teletext / Mix mode.
DVD SETUP / : Press to start recording in TIMESHIFT mode.
TV Control in DVD / Media Mode
ANGLE: Press the GREEN button to display the current playback angle; press again to
toggle between different playback angle codes in sequence.
NOTE: Selectable playback angle is only available if DVD has this feature.
ZOOM: Press to zoom in on picture.
AUDIO: Select audio language.
SUBTITLE: To display subtitle.
D.MENU: DVD disc menu.
TITLE: Press to display the title.
: PLAY/PAUSE in DVD / Media mode.
: Stop in DVD / Media mode or exit the REC mode.
/ : Fast reverse and forward key in DVD / Media mode.
/ : Jump to previous and next track or chapter in DVD / Media mode.
GOTO: Press the RED button to activate the on-screen scroll down menu for editing.
REPEAT: Press the YELLOW button to play back a portion automatically (choose between
OFF / CHAPTER / TRACK / REP ALL).
A-B: Press the BLUE button to start the repeat portion from A-B.

19
Remote Control (Cont.)
The buttons on the remote control and buttons marked similar on the TV unit
performs similar function.
The buttons on the remote control and similarly marked ones on the main unit
perform similar functions.
VOLVOL
DISPLAYSOURCE
CH.CH.
OK
OK
TITLE
HOLD
ZOOM
D.MENU
INPUTP.MODE PMODES.MODE SMODEFREEZE SLEEPDISPLAY
MUTEMUTE
NICAM
ASPECTSLEEP
AUDIO
LANGUAGE
AUTOTV/RADIO
MENUMENU EXIT
FAVEPG EPGSUBTITLE
MEDIA
TEXT/MIX
INDEX
HOLD LANG
SUBTITLE
GOTO
DVD SETUP
ANGLE
REPEAT
A-B
SIZE
FAV
-
-/--
LCD
2
1
3
4
5
7
9
10
11
14
16
*
17
6
8
12
13
15
18
19
Remote Control
1 6
GVAPLED22C

20
Remote Control (Cont.)
TV Control for Teletext
TEXT/MIX: Press to switch between TV and Teletext / Mix mode.
HOLD / FREEZE: Hold teletext.
SUBTITLE: To display subtitle.
INDEX: Teletext INDEX display button.
ZOOM / SIZE: Press this button to select the teletext size.
COLOUR BUTTONS : The RED / GREEN / BLUE / YELLOW buttons are used
for quick access to colour-code pages transmitted by FAST TEXT broadcast.
Example: RED button selects city information, GREEN button selects weather information,
BLUE button selects travel information and YELLOW button selects TV programming.
Teletext Function
Teletext or Austext is no longer available, nor is there any plan for a replacement teletext
service in Australia. For more information, please visit the websites of the Australian channel
providers.
However, one teletext option, “closed captions”, is still working on most Australian television
channels. This service allows you to activate subtitles while watching normal television
programs that provide it.
Accessing Closed Captions
To access “closed captions” while watching a program, press the teletext button (TEXT/MIX)
on the remote control, then enter the numbers 801 on the remote control to activate the
subtitles. To exit the subtitles, press the TEXT/MIX button again.
Table of contents
Other GVA TV manuals