Haier LE65S8000UG User manual

72-LE65UG-886Z1
封面+封底:128克铜版纸
内页:80克书纸
封面+封底:彩色印刷
内页:黑白印刷
庞宇明 2019-11-29
说明书
海尔 沙特
H3-65S800D9-AR0
1MS886B1S2A
LE65S8000UG
A5(210x148mm)
安排送样
装订 印刷内容见下页

LE65S8000UG
LE65S8000HQGA
owner's manual

PRECAUTIONS AND REMINDERS. . . . . . . . . . . . . . . . . . . . . . . . . . . . . . . . . . . . . . . . . . . . . . . . . . . . . 2
IMPORTANT SAFETY INSTRUCTIONS . . . . . . . . . . . . . . . . . . . . . . . . . . . . . . . . . . . . . . . . . . . . . . . . . 1
PREPARATION . . . . . . . . . . . . . . . . . . . . . . . . . . . . . . . . . . . . . . . . . . . . . . . . . . . . . . . . . . . . . . . . . . . . . . 4
PERIPHERAL CONNECTION AND CONTROLS . . . . . . . . . . . . . . . . . . . . . . . . . . . . . . . . . . . . . . . . .
MAKING CONNECTIONS. . . . . . . . . . . . . . . . . . . . . . . . . . . . . . . . . . . . . . . . . . . . . . . . . . . . . . . . . . . . .
OPERATING INSTRUCTIONS . . . . . . . . . . . . . . . . . . . . . . . . . . . . . . . . . . . . . . . . . . . . . . . . . . . . . . . . .
PRODUCT SPECIFICATION . . . . . . . . . . . . . . . . . . . . . . . . . . . . . . . . . . . . . . . . . . . . . . . . . . . . . . . . . . .
5
6
7
18
19
TROUBLESHOOTING . . . . . . . . . . . . . . . . . . . . . . . . . . . . . . . . . . . . . . . . . . . . . . . . . . . . . . . . . . . . . . . .
TABLE OF CONTENTS
UNPACKING GUIDE . . . . . . . . . . . . . . . . . . . . . . . . . . . . . . . . . . . . . . . . . . . . . . . . . . . . . . . . . . . . . . . . . 3

IMPORTANT SAFETY INSTRUCTIONS
1

PRECAUTIONS AND REMINDERS
If you are going to clean the product,Unplug the TV,use
soft fabric,no water,never chemicals.
2

UNPACKING GUIDE
3
Remove the carton’s buckle and then take
up carton’s cover.
12
3 4
Remove the item around the TV.
Put the carton on the flat ground.
Carefully follow the picture to place your TV f
acedown on a soft, flat surface to prevent damage
to the TV or scratching to the screen.(Please two
person to lift the TV set.)

PREPARATION
IMPORTANT: Do not apply pressure to the screen display
area which may compromise the integrity of the display.
The manufacturer’s warranty does not cover user abuse
or improper installations.
ATTACHING THE STAND
IMPORTANT: The stand of the TV must be assembled
prior to usage.
1.
(blanket, foam, cloth, etc.) to prevent any damage
to the TV.
PREPARING YOUR LCD TV FOR WALL MOUNTING
We suggest that you keep your TV at least 2.36 inches
(60 mm) from the wall to prevent cable interference.
Before mounting your TV on the wall, you need to
remove the stand.
For your safety, please use only with a UL listed wall
mount bracket with minimum weight of the TV without
stand.
To attach a wall mount bracket to your TV:
1. Remove the screws holding your TV to the stand.
2. Remove the stand from your TV.
3. Secure the wall mount bracket to the back of your TV
using four screws. Follow the instructions of the user
manual that came with the wall mount bracket to
install.
TURNING ON THE TV
1. Install the stand and place the TV on a solid surface.
Ensure that the TV is placed in a position to allow free
back cover.
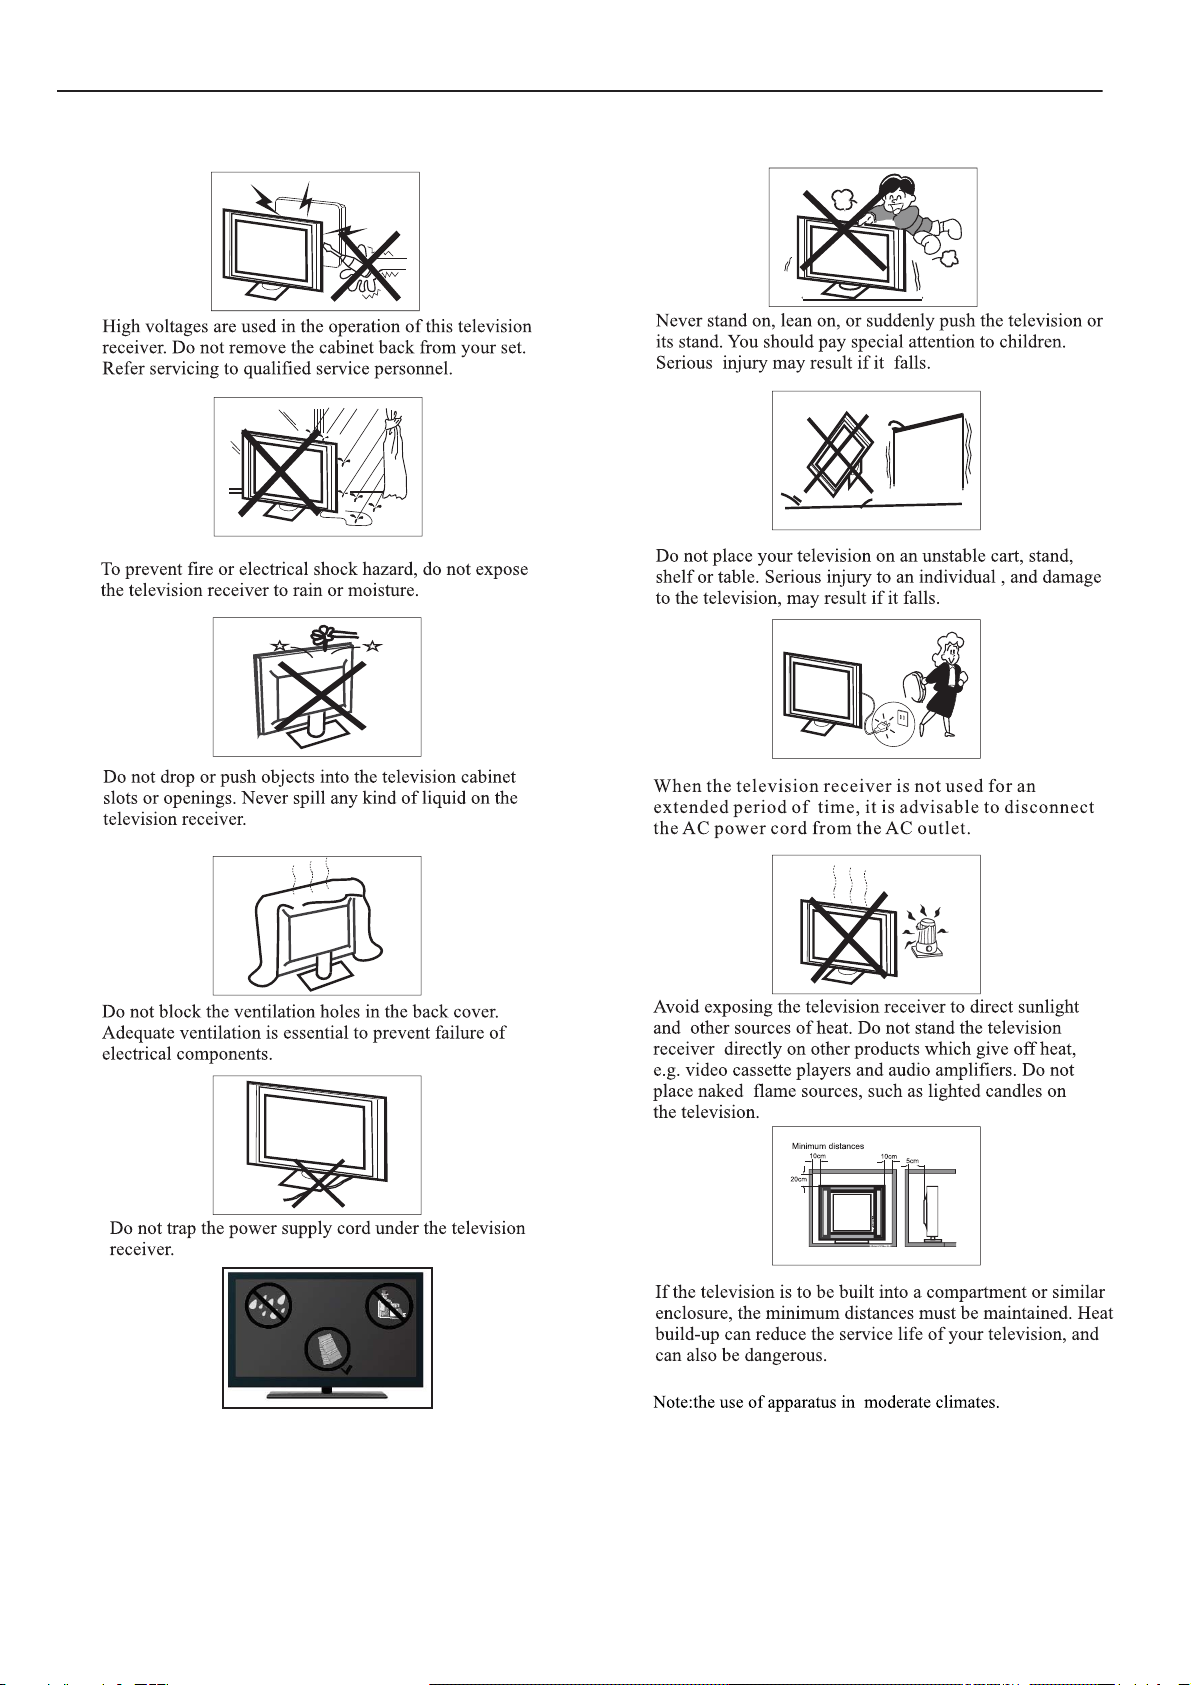
To prevent any unsafe situations, no naked sources,
such as lighted candles, should be placed on or in the
vicinity.
Avoid heat, direct sunlight and exposure to rain or water.
The equipment shall not be exposed to dripping or
splashing.
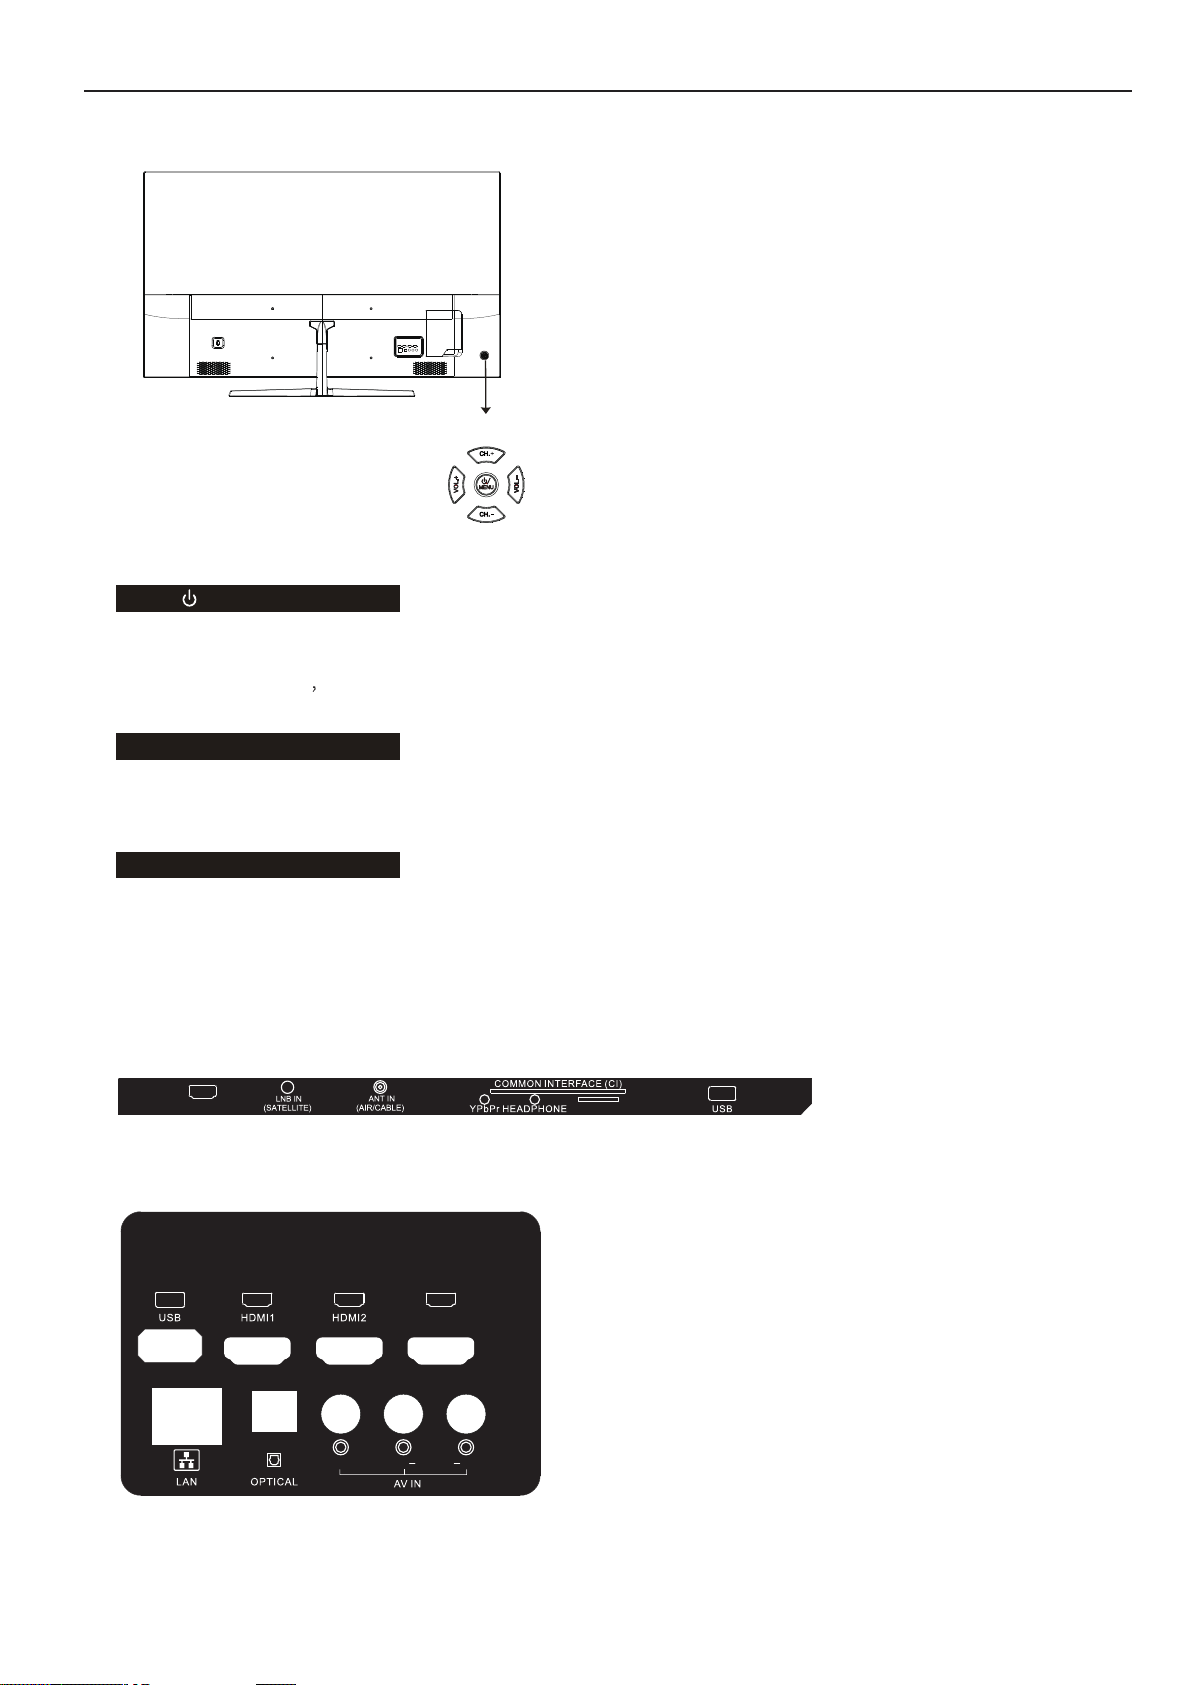
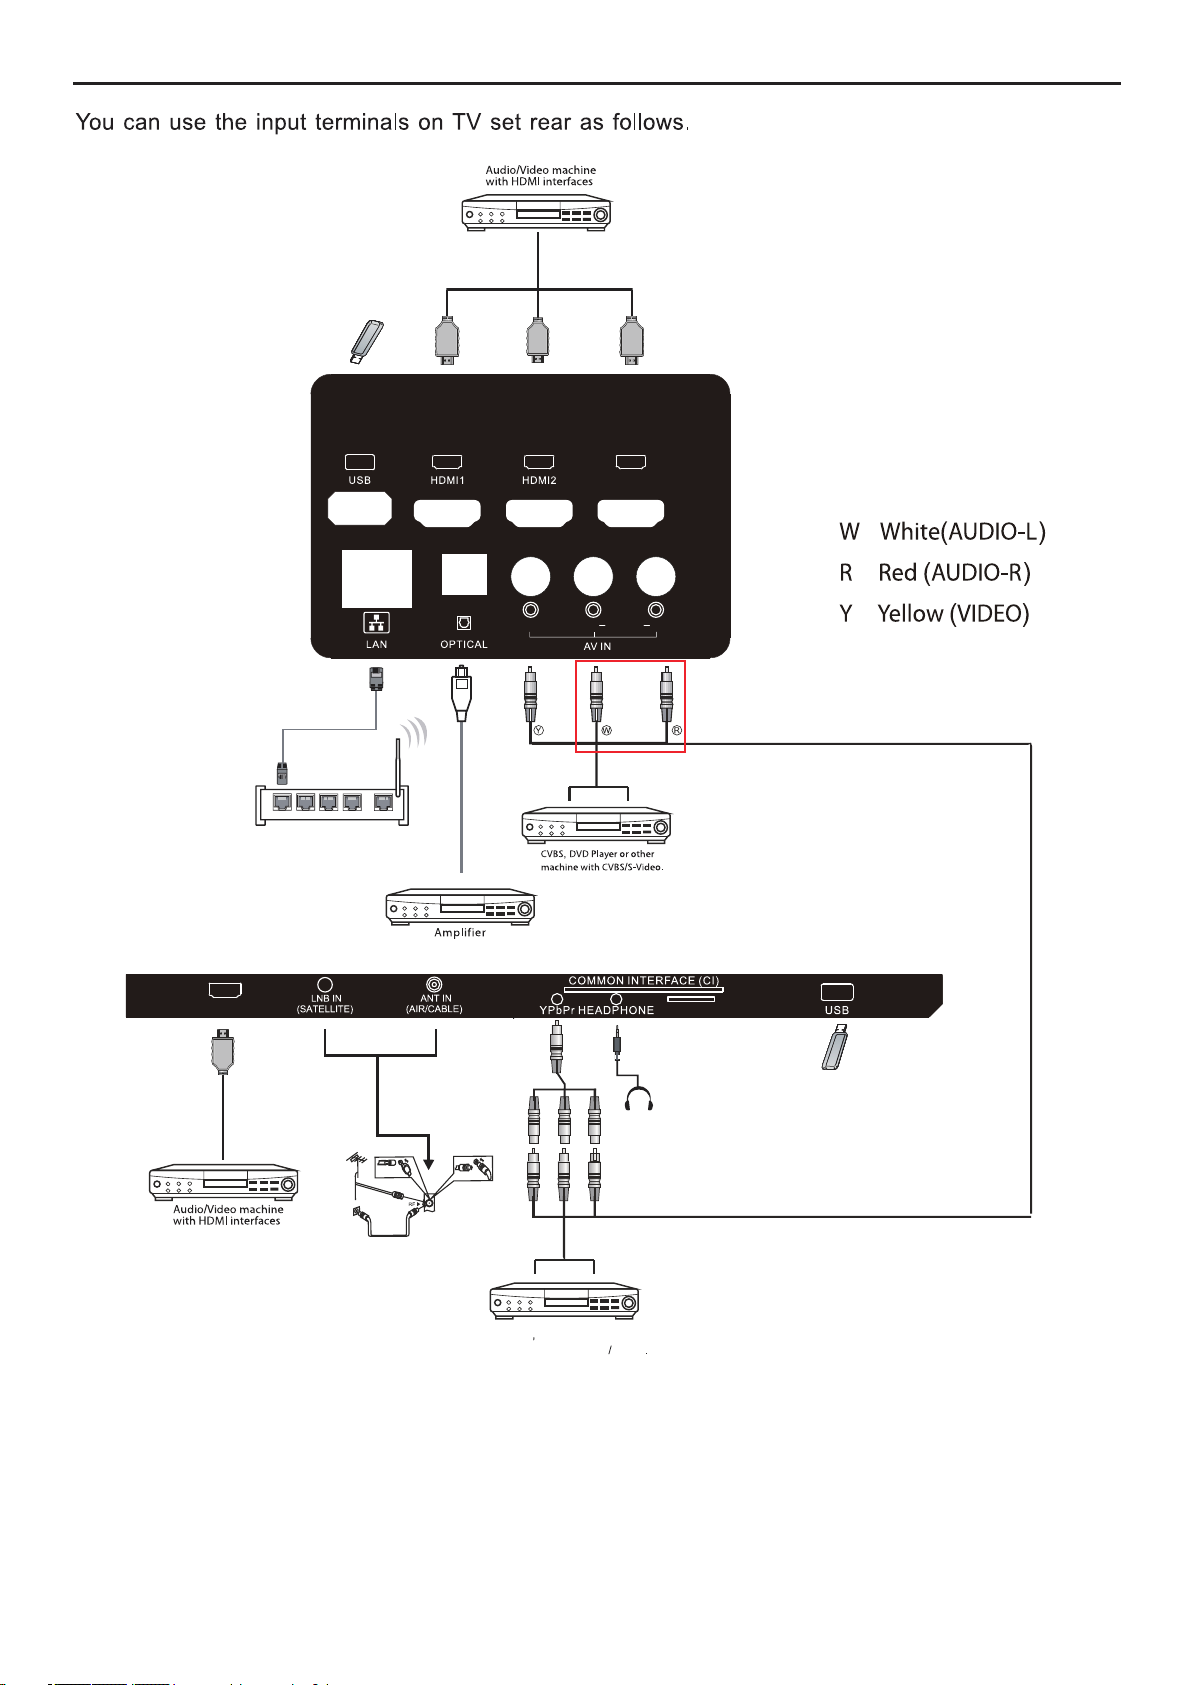
2. Connect the antenna cable or cable TV cable to the
ANT IN aerial socket on the back of the TV set.
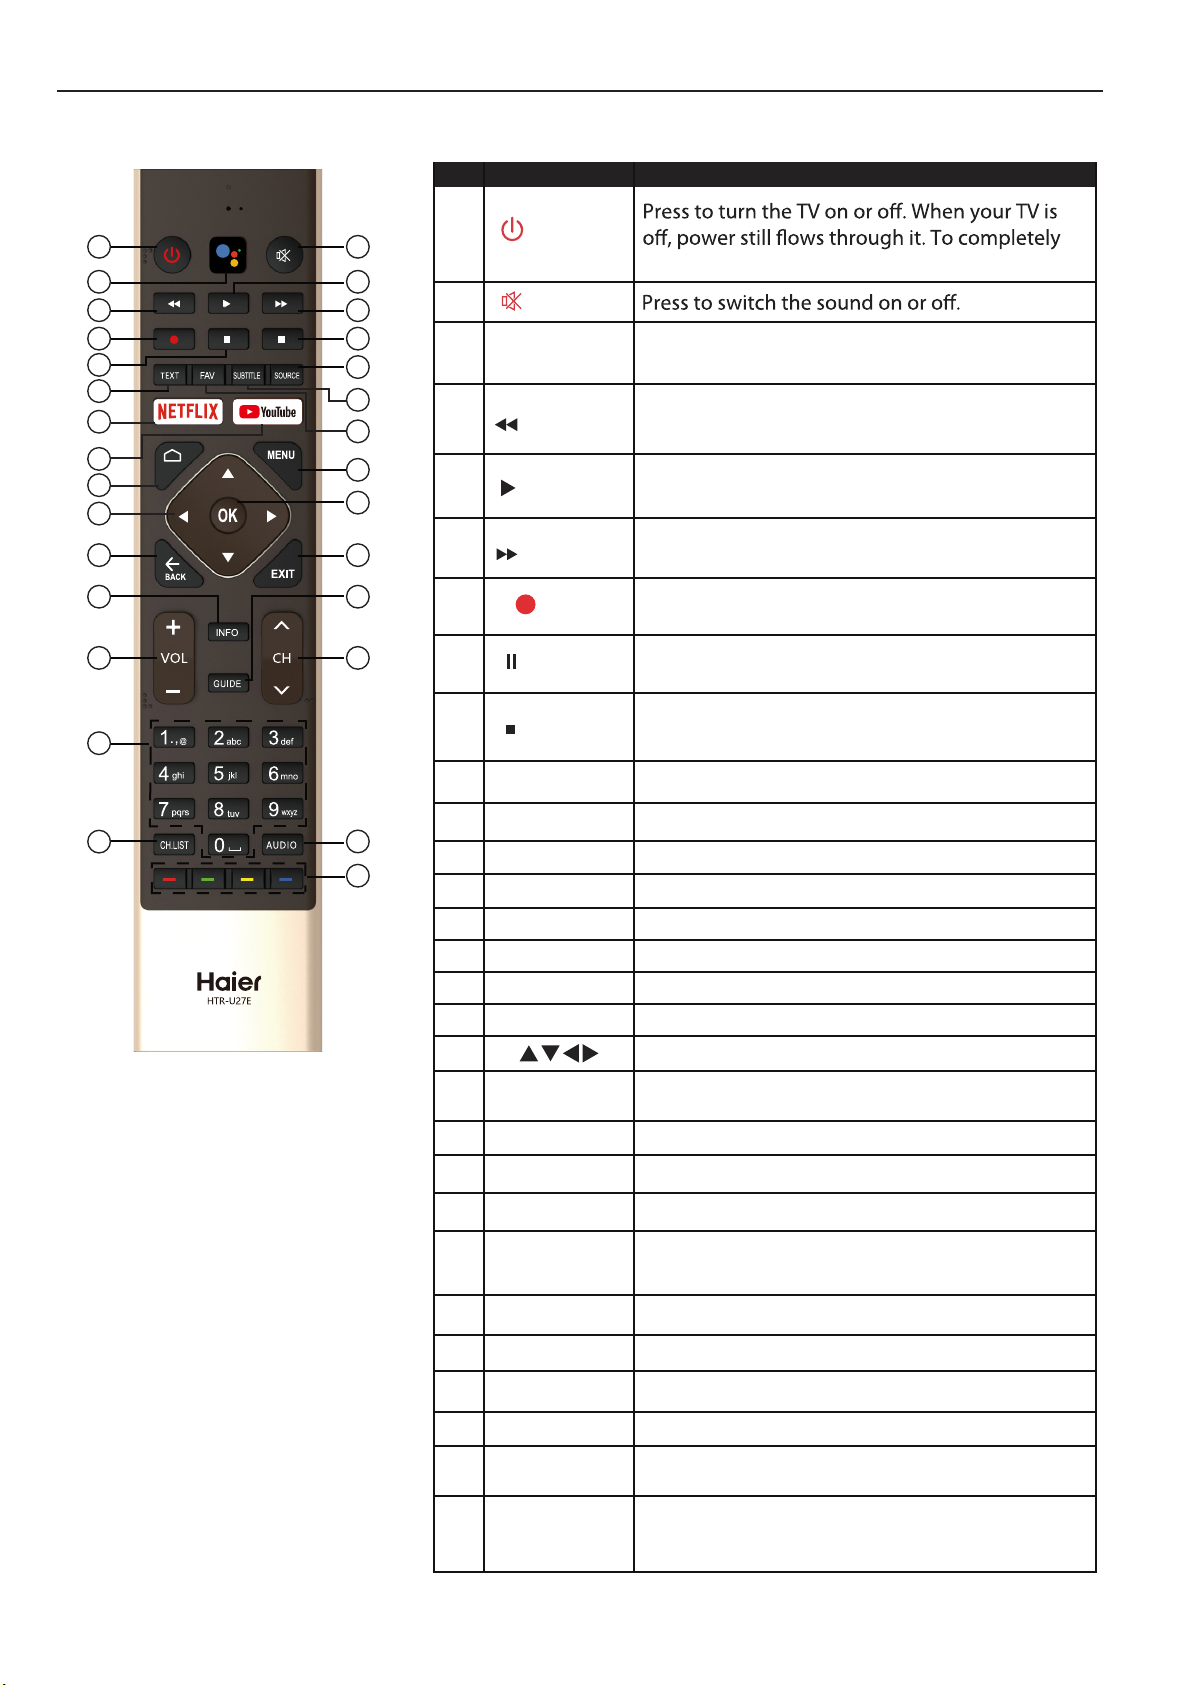
3. Remote control:
Remove the cover of the battery compartment.
Insert the 2 supplied batteries (Type AAA 1.5V).
4. Power:
Plug the cord into a working power outlet.
5. Turn the TV on:
Press on the remote control or POWER button on
the side control panel of the TV.
NOTE
The wall mount bracket are not included.
NOTE
The appearance of the product shall be in kind.
Min
1 m
NOTE
2.
Fix the stand to the bottom of the TV with the six
screws.
4

PERIPHERAL CONNECTION AND CONTROLS
PERIPHERAL CONNECTION
All the terminals are(from left to right):
USB, HDMI1, HDMI2, HDMI3, RJ45, OPTICAL, VIDEO, L, R
All the terminals are(from left to right):
HDMI4, LNB IN(SATELLITE), ANT IN(ANTENNA/CABLE), CI, MINI YPbPr,
EARPHONE, TF, USB.
BUTTON CONTROL ACCESSORIES
BUTTON
Remote Control - 1pc
TV 65”
AAA Battery - 2pcs
User's Manual - 1pc
Quick Start Guide - 1pc
Warranty Card - 1pc
Mini YPbPr Cable - 1pc
Screws - 6pcs
5
/ MENU button
CHANNEL UP/DOWN button
VOLUME UP/DOWN button
HDMI 4(ARC) TF CARD
HDMI 3
VIDEO L AUDIO R
In the standby mode, press the middle button to turn on the TV.
In the boot state, long press the middle button to shut down.
Under the menu page function equivalent to the OK key.
Under the menu page, press the left and right keys to adjust
the volume addition and subtraction.
In the non-menu page, you can adjust the TV channel under the
program addition and subtraction;
Under the menu page, you can move the cursor up and down.

5. AV INPUT: Video input/Audio input.
2. USB: Connect USB device.
1. HDMI: Connect to High-definition multimedia signal resource,add HDMI 4(ARC).
3. YPbPr: Component input terminal.
4. RF: Antennal/close circuit TV
MAKING CONNECTIONS
6
HDMI 4(ARC) TF CARD
CVBS DVD Player or other
machine with YPbPr YCbCr
HDMI 3
VIDEO L AUDIO R
1WAN 2 34
Note:the infterface of red frame is share
with YPbPr Audio.

Power
Google
Assistant
YouTube
0~9 number Press to enter a TV channel number.
Press to record the TV program you are
watching in DTV mode.
Press to open or close the on-screen menu.
Press to navigate the on-screen menu.
CH+/CH - Press CH+ or CH- to change TV channels.
VOL+/VOL- Press VOL+ or VOL- to adjust volume level.
MENU
OK
BACK Return to the previous menu.
EXIT It depends on the actual function
disconnect power, unplug the power cord.
MUTE
# Item
1
2
3
Descriptions
(reverse) Press to reverse playback in multimedia &
Timeshift mode.
Press to play in multimedia mode &Timeshift
mode.
4
(play)
5
Press to fast forward in multimedia &Timeshift
mode.
(forward)
6
7
Press to pause in multimedia mode&Timeshift
mode.
(Pause)
8
Press to stop multimedia playback, REC&
Timeshift mode.
(stop)
9
10 TEXT
SUBTITLE
Press to select the teletext mode.
12
11 FAV Press to select or remove your favorite channel.
13 SOURCE Press to open the input source list.
14 NETFLIX Press to open the NETFLIX.
15 Press to open the YouTube.
Press to open the google assistant or start a
voice search.
HOME
16
17
18
19
20
21
INFO Press to display the channel information.
Press to display electronic programme guide
in TV mode.
GUIDE23
24
25
26
27
22
Press to open the Home Page.
Open or close subtitle.
Enter the selected option or perform the
selected operation.
CH.LIST
AUDIO
28
29 Coloured
buttons
Press to displa
Implement the relevent operations according
to the prompt at the botton of the menu in
the text.
y the Channel List.
(REC)
OPERATING INSTRUCTIONS
USING THE REMOTE CONTROL
Press to select Mono,Nicam,Stereo for ATV
channel,Audio language for DTV channel.
2
6
5
9
21
25
29
28
23
13
17
19
12
11
1
4
3
7
20
24
27
26
22
10
14
15
8
16
18
7

INITIAL SETUP
will guide
Please according to the Text Tip to First Time Setup.
This function is used for the remote control pair code.
After the code is successful, you can use the
Bluetooth remote control to operate the TV.
Agree to Google to get the location information of
your device to get more features, choose “YES” to
accept.
By agreeing to automatically send diagnostic
information to Google to improve discriminative
power, choose “YES” to accept.
Press to select the country of your device and
press OK
Used to set your device's password to ensure security
and privacy.
1.Your device is powered by Android TV and press
the button to select the browsing feature.
2.You can get more apps from Google Play and press
the button to go to the next screen.
3.Transfer photos and other content to the TV via the
built-in chromecast, press OK to complete the browsing.
Press to select the system language and press
OK
Connect your Android phone to your TV, select
“Continue ” to continue the connection, and choose
“Skip” to skip this step.
OK and
successful.
By accepting the Google Terms of Service to improve
the product experience, select “Accept” to accept this
condition.
you through setting up basic settings.
8

Press OK to pop up the soft keyboard, and use the
remote control to enter the 4-digit password auto-
matically jump to the next interface.
Use the remote control to enter the password and
Press up and down to select the time zone you want,
and press OK to select.
complete the password
Press to select whether to search, select “Scan”
to search, select “Skip scan” to skip the search.
Press OK to complete the setup.
For selecting the mode, press key to select Home
mode and press OK
to the previous step.
To select the Tuner mode for searching, press
to select and press OK
9
Press to turn on or o the alway available
features of Chromecast.

NAVIGATING THE ON-SCREEN MENU
1. There are two ways to enter. First, in live TV, press
the menu button to display TV options, press
to select the settings menu and press OK to
key to select the icon of the circular settings
menu, press OK
INPUT SOURCE
1. In the HOME interface, press to select
Open the google assistant or start a voice search.
Among the applications installed on the TV, the
icons for the favourite applications are shown inside
here. (Favourite applications can be added / deleted /
changed its order by users.)
Apps: Click to jump to Apps screen where all the
installed applications are listed.
Inputs: Icon to select an input source.
Network&Interent:
Settings:
For details on the settings, see the next explanation.
the “Inputs” icon, press OK to open the input source
list, then press up to highlight an input and press
OK to switch.
2. Under live TV, press the SOURCE button to display
the list of input sources. You can select the desired
source.
1. Press / button to select what you want set .
2. Press OK button to adjust.
OK button to
save and return to the previous menu.
2.Press button to select what you want set.
3.Press OK to enter setting.
Press BACK to return to the previous menu. If the main
menu is displayed, pressing BACK will close the
onscreen menu.
Network
HOME SCREEN
After completing the wizard Settings, you can watch TV
and go to the home screen.
10
Inputs

Channels –
Display the scan sub-menu based on
Antenna –
Cable –
Preferred Satellite/General Satellite –
Parental controls –
option then press OK button to enter the sub-menu.
– Press button to select the
Audio Channel
option then press OK button to enter the sub-menu.
Open source licenses – Press button to select the
Press button to select the
Set the signal type to antenna. When set to
Antenna,the TV can receive analog and digital (DVBT/T2)
broadcasting signals.
Set the signal type to cable. When set to Cable,
Set the signal
option then press OK button to enter the sub-menu.
type to Satellite. When set to Satellite, the TV can receive
Satellite broadcasting signals.
the TV can receive analog and QAM broadcasting signals
Auto Channel Update – Press OK button to choose ON/OFF.
When selecting ON, the system will automatically scan and
update channels after 5 minutes of standby.
Channel installation mode – Select on-screen display
channel sources. You can select the signal type.
CHANNEL
Antenna
1.Menu->Settings->Channel->Channel Installation Mode
enter, choose Antenna.
2. Enter Menu->Settings->Channel->Channels.
3. Channel Scan directly enters the ATV+DTV
automatic search platform interface of Antenna.
Update Scan: Re-automatically search for frequency
points outside the station.
Analog Manual Scan: Manual ATV search station.
After input the frequency point, you can select up
or down search station.
Single RF Scan: DTV manual search, left and right
after selecting RF Channel, directly OK search.
Cable
1.Menu->Settings->Channel->Channel Installation
Mode, select Cable.
2. Enter Menu->Settings->Channel->Channels.
11

3. Enter Channel Scan, where Akado, Divan TV, Online
and Rostelecom (SPB) are the local operators, and the
default Scan Mode is Advance;Others have Advance,
Quick and Full Scan modes.
Single RF Scan: manual search station.
Satellite
1.Menu->Settings->Channel->Channel Installation Mode,
select Preferred Satellite or General Satellite. Among them,
Preferred Satellite has been preset with corresponding
satellites of NTV+, Tricolor and Telekarta operators. I'm going
to go to General Satellite.
2. Enter Menu->Settings-> channel-> Channels->Satellite
Re-scan.
3. Press OK to enter Satellite parameter Settings,
which include LNB POWER, LNB Frequency,
DiSEqC Set, 22K and other parameters. Then
return to Satellite re-scan and right click to enter
the search menu.Then return to Satellite re-scan
and right click to enter the search menu.
Satellite Add:Add a star broadcast signal.
Satellite Manual Tuning: manually search for
a certain TP, which can be added by Satellite
Add if needed.
12

In this menu, you can set the APP permissions, and read
the app lists
1. Press / button to select what you want set .
2. Press OK button to adjust.
return to the previous menu.
ACCOUNTS & SIGN IN
APPS
In this menu, you can read the information and settings
of TV.
1. Press / button to select what you want set .
2. Press OK button to adjust.
return to the previous menu.
DATE&TIME
DEVICE PREFERENCES
ABOUT
option then press OK button to choose ON/OFF.
– Press button to select the
Use 24-hour format
Manually adjusting date & time settings will automaticall
change the Automatic date & time to OFF .
NOTE
option then press OK button to enter the sub-menu.
– Press button to select the
Automatic date & time
then press OK button to enter the sub-menu.
– Press button to select the option
Set date
then press OK button to enter the sub-menu.
– Press button to select the option
Set time
then press OK button to enter the sub-menu.
– Press button to select the option
Set time zone
TIME
Press / button to select the
option then press OK button to choose ON/OFF/ONCE.
Power On Time Type –
Press / button to select the
option then press OK button to enter the sub-menu.
Auto Power On Time –
Press /button to select the
option then press OK button to enter the sub-menu.
Press / button to select
the option then press OK button to choose ON/OFF/
ONCE.
LANGUAGE
.
then press OK button to enter the select language.
– Press / button to select the option
Language
13
Auto
(This option is valid when the Power On Time Type is
selected as On /ONCE.)
(This option is valid when the Power O Time Type
is selected as On /ONCE.)

KEYBOARD
Press / button to select the
option then press OK button to enter the sub-menu.
Current keyboard –
Press / button to select the
option then press OK button to enter the sub-menu.
Gboard Settings –
Press / button to select the
option then press OK button to enter the sub-menu.
Manage keyboards –
INPUTS
Press / button to select the option then
press OK button to enter the sub-menu.
Inputs –
Press / button to select the
Press / button to select
option then press OK button to choose ON/OFF.
HDMI control –
the option then press OK button to choose ON/OFF.
Press / button to select the
option then press OK button to choose ON/OFF.
TV auto power on –
Press / button to select the
option then press OK button to enter the sub-menu.
CEC Device List –
show EDID version.
HDMI EDID Version –
POWER
Sleep Timer
40 minutes, 50 minutes, 60 minutes, 90 minutes,
120 minutes ).
option then press OK button to choose ON/OFF.
– Press button to select the
option then press OK button to enter the sub-menu.
– Press button to select the
120 minutes, 150 minutes, 180 minutes, 210 minutes,
Press / button to
select the option then press OK button to enter the
15 minutes, 30 minutes, 60 minutes ).
240 minutes )
option then press OK button to enter the sub-menu.
– Press button to select the
PICTURE
button to enter the sub-menu. (Optional: user,Standard,
Press / button to select the option
Picture Mode –
Vivid, Sport, Movie, Game, Energy saving).
Sharpness –
Backlight/Brightness/Contrast/Saturation/HUE/
Press / button to select the option.
Press to decrease the parameter. Press t o increase
the parameter.
Press / button to select the option the press
OK
HDR –
Color Temperature – Press / button to select the
Gamma – Press / button to select the option then
press OK button to enter the sub-menu.(Optional: Dark,
middle,Bright).
option then press OK button to enter the sub-menu.
English
14
Reset to Default – Reset all settings to the factory
defaults.
Advanced Video – Press / button to select the
option then press OK button to enter the sub-menu.

SOUND
Speakers – Press / button to select the option
then press OK button to enter the sub-menu.
(Optional:TV Speaker,External Audio System).
Digital Output – Press / button to select the
option then press OK button to enter the sub-menu.
(Optional:Auto,Bypass,PCM ,Dolby Digital Plus,Dolby
Digital).
SPDIF Delay – Press / button to select the
option. Press to decrease the parameter.
Press to increase the parameter.
)
Balance/ Bass/ Treble – Press / button to select
the option. Press to decrease the parameter.
Press to increase the parameter.
Sound Surround – Press / button to select the
option then press OK button to choose ON/OFF.
Equalizer Detail – Press / button to select the
option then press OK button to enter the sub-menu.
Sound style – Press / button to select the
option then press OK button to enter the sub-menu.
(Optional: user,Standard,Vivid,Sports,M ovie,M usic,
News .
Auto Volume Control – Press / button to select
the option then press OK button to choose ON/OFF.
Downmix M ode– Press / button to select the
option then press OK button to enter the sub-menu.
(Optional:Stereo,Surround).
Reset to Default – Reset all settings to the factory
default
s.
STORAGE
Removable Storage –Press / button to
select the option then press OK button to enter
the sub-menu.( Note:Show external devices if
available)
select the option then press OK button to enter the
sub-menu.
– Press button to
Internal shared storage
HOME SCREEN
3. After nishing your adjustment, Press BACK
button return to the previous menu.
In this menu, you can set channels, apps, open
source licenses.
1. Press / button to select what you want set.
2. Press OK button to adjust.
15
Retail messaging –Press / button to select
the option then press OK button to enter the
sub-menu.( Note:Demo video,e-POP left,e-POP
bottom)
PQ Demo – option
then press OK button to enter the sub-menu.
( Note:OFF,LEFT,RIGHT)
RETAIL MODE
option then press OK button to choose ON/OFF.
– Press button to select the
Press button to select the
Retail mode

In this menu, you can set searchable apps, safe
source
licenses.
1. Press / button to select what you want set.
2. Press OK button to adjust.
button return to the previous menu.
2. Press OK button to adjust.
button return to the previous menu.
In this menu,you can read the information and
settings of Chromecast
CHROMECASTBUILT-IN
GOOGLE
When to Start – Press / button to select the
option then press OK button to enter the sub-menu.
(Optional:5 minutes, 15 minutes, 30 minutes,1 hour,
2 hours,).
option then press OK button to enter the sub-menu.
– Press button to select the
Screen saver
SCREEN SAVER
option then press OK button to enter the sub-menu.
– Press button to select the
Location status
the option then press OK button to choose ON/OFF.
– Press button to select
Usage & diagnostics
USAGE & DIAGNOSTICS
LOCATION
Put device to sleep – Press / button to select
the option then press OK button to enter the
sub-menu. (Optional:30 minutes, 1 hour, 3 hours,
6 hours,12 hours, Never).
Start now – Press / button to select the option
then press OK button to enter screen saver.
16
Reset-Erase everything.
Press OK button to enter the sub-menu.
RESET
ACCESSIBILITY
Audio Description– Press
▲
/ button to select
the option then press OK button to choose ON/OFF.
Visually Impaired – Press ▲
▲
▲
▲
▲
▲
/
button to select the
option then press OKbutton to enter the sub-menu .
(Need:Audio Description ON)
Hearing Impaired – Press ▲/ button to select the
option then press OK button to choose ON/OFF.
Captions – Press ▲/ button to select the option then
press OK button to enter the sub -menu.
High contrast text – Press ▲/ button to select the
option then press OKbutton to choose ON/OFF.
▲

In this menu,you can pair Bluetooth devices.
1.Press the "RED" and "BLUE" buttons at the bottom
of the remote control for 5 seconds.
2.When the LED
send the pairing signal to the TV and
display the information of the remote control on
the right side of the screen.
3.Press the OK button to display the
5.
pairing.
If the paired is displayed, the connection is
successful.
4.If the couldn't pair appears, the connection fails.
Wait 30 seconds and then press the "RED" and
"BLUE" buttons at the bottom of the remote control
for 5 seconds to repeat the previous steps.
Press EXIT or BACK button return to the previous
menu.
REMOTE&ACCESSORIES
17
ADD AND USE OF MULTI MEDIA PLAYER
1. In the HOME interface, select the + icon in the APP
column to add the application, and click OK. Press up
and down to select the MultiMediaPlayer application,
and click OK to add it to the HOME interface.
2. Select OK key to enter Multi Media Player and display
NOTE
The menu/function may be dierent depending on
when you purchased the TV.
This manual suits for next models
1
Table of contents
Languages:
Other Haier LED TV manuals

Haier
Haier 40D2500 User manual

Haier
Haier LE40K5000TF User manual

Haier
Haier LE29F2320 User manual

Haier
Haier LE24C2380a User manual

Haier
Haier 40G2500 User manual

Haier
Haier LE19B13200a User manual

Haier
Haier 24D2000 User manual

Haier
Haier LE39M600SF User manual

Haier
Haier LE19C1320 User manual

Haier
Haier LE49K6500U User manual

Haier
Haier LE39B9000 User manual

Haier
Haier 55DA5550 User manual

Haier
Haier HL22XLT2 User manual

Haier
Haier LE55K5000TFNa User manual

Haier
Haier LE32K5000 User manual

Haier
Haier 50D3505 User manual

Haier
Haier LE29C810C User manual

Haier
Haier 39D3005 User manual

Haier
Haier LE39B9000 User manual

Haier
Haier 24E2000 User manual