Hamilton Beach HBFRF301-C User manual

Safety Precautions..................................................................................... 3
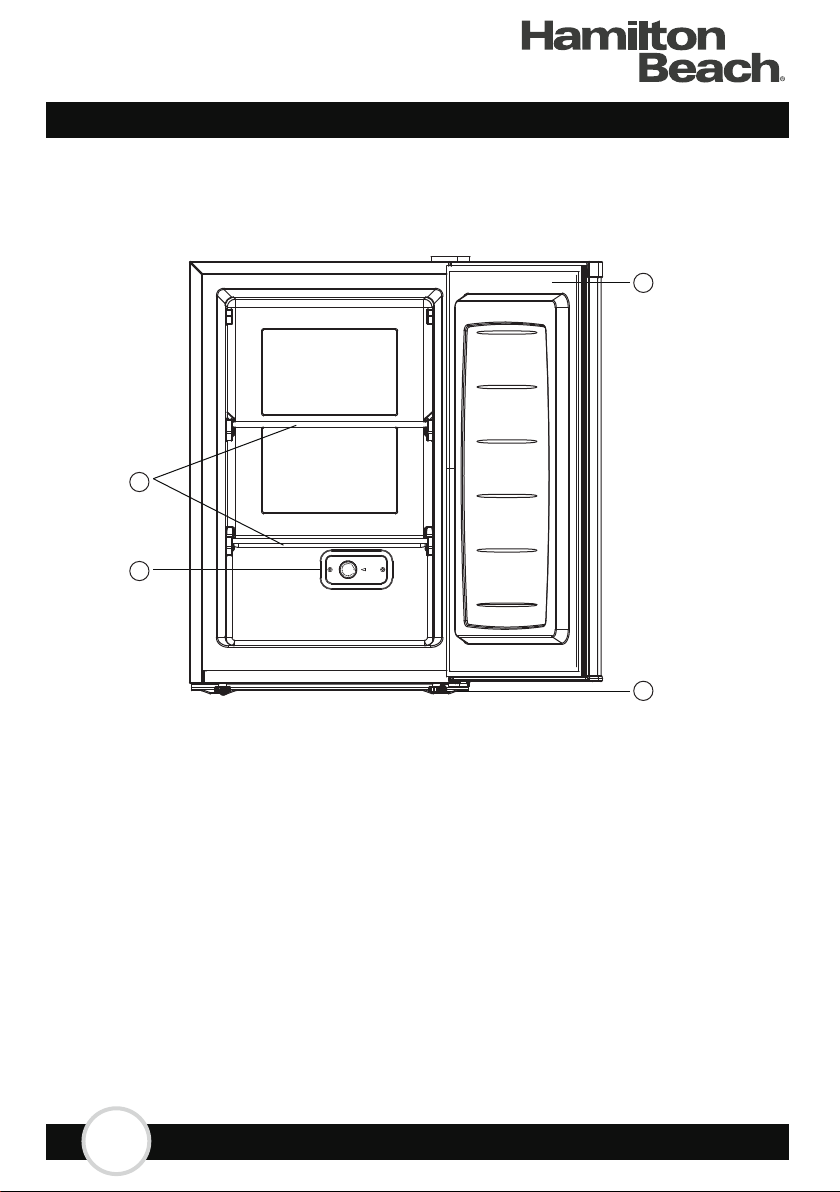
Parts And Features................................................................................... 5
Freezer Features And Use
............................................... 7
Door Alignment
..................................................................................................... 10
Troubleshooting........................................................................................ 12
Manual Defrosting Instructions
................................................................. 11
Installing Your Freezer.............................................................................. 6
Unpacking Your Freezer........................................................................... 6
Adjusting Your Freezer.............................................................................. 6
Proper Air Circulation................................................................................ 6
........................................................................ 7
...........................................................................
.7
..................................................................................... 7
Operating Your Freezer
General Features
Normal Operating Sounds You May Hear
............................................................................... 8
......................................................................................... 8
......................................................................... 9
Leveling Your Freezer
....................................................................... 10
Cleaning and Maintenance
.......................................................... 10
Proper Freezer Care and Cleaning
Food Storage Information
Door Gaskets
General
............................................................................................ 10
Power Interruptions................................................................................... 10
Vacation and Moving Care........................................................................ 11
Congratulations,you have acquired a high-quality Hamilton Beach Upright Freezer
This unit is packed with features that you will find convenient to use.
Please follow the safety precautions and operating instructions provided in this
easy-to-use manual. Please take the time to read it,and save these instructions for
future use. Please also remember to record the series number. The series number
is located on the top of the unit next to the motor. Save your receipt by stapling it
to this manual for convenient access.
Product Specifications .............................................................................. 13
Warranty....................................................................................................
14

3
Safety Precautions
Read all of the instructions before using this appliance. When using this
appliance, always exercise basic safety precautions, including the
following:
1. Use this appliance only for its intended purpose as described in this use
and care guide.
3. Never unplug your freezer by pulling on the power cord. Always grasp
5. Unplug your freezer before cleaning or before making any repairs.
If for any reason this product requires service, we strongly
6. Do not use any electrical device or any sharp instrument in
defrosting your freezer.
7. If your old freezer is not being used, we recommend that you remove
the doors. This will reduce the possibility of danger to children.
8. After your freezer is in operation, do not touch the cold surfaces in the
freezer compartment, particularly when hands are damp or wet. Skin
may adhere to these extremely cold surfaces.
9. Do not refreeze foods, which have been thawed completely. The United
States Department of Agriculture in Home and Garden Bulletin No.69
reads:"...You may safely refreeze frozen foods that have thawed if they
still contain ice crystals or if they are still cold-below 40F".
off-color should not be refrozen and should not be eaten. Thawed ice
cream should be discarded. If the odor or color of any food is poor or
questionable, discard it. The food may be dangerous to eat."
...Even partial thawing and re-freezing reduce the eating quality of
foods, particularly fruits, vegetables, and prepared foods. The eating
quality of red meats is affected less than that of many other foods. Use
refrozen foods as soon as possible, to save as much of its eating quality
as you can.
4. Repair or replace immediately, all electric service cords that have
become frayed or otherwise damaged. Do not use a cord that shows
cracks or abrasion damage along its length, the plug or the connector
end.
2. This freezer must be properly installed in accordance with the
installation instructions before it is used. See grounding instructions in
the installation section.

4
10. This refrigerator should not be recessed or built-in an enclosed
cabinet. It is designed for freestanding installation only.
11. Do not operate your refrigerator in the presence of explosive fumes.
propellant in this appliance.
13. WARNING: keep ventilation openings, in the appliance enclosure or in
the builtin structure, clear of obstruction.
14. WARNING: do not use mechanical devices or other means to accelerate
the defrosting process, other than those recommended by
the manufacturer.
15. WARNING: do not damage the refrigerant circuit.
16. WARNING: do not use electrical appliances inside the food storage
compartments of the appliance, unless they are of the type
recommended by the manufacturer.
Staple your receipt to your manual.
You will need it to obtain warranty service.
DANGER: Risk of child entrapment. Before you throw away your old
refrigerator or freezer:
* Take off the doors.
* Leave the shelves in place so that children may not easily climb inside.
Save These Instructions
For Future Reference Please

5
Parts And Features
2
1. Adjustable Temperature Control
2. Removable shelves
3. Door
4. Leveling Legs
1
3
4

4
6
Unpacking Your Freezer
1. Remove all packaging material. This includes the foam base and
all adhesive tape holding the freezer accessories inside and outside.
2. Inspect and remove any remains of packing, tape or printed materials
before powering on the freezer.
Adjusting Your Freezer
• Your freezer is designed for freestanding installation only. It should
not be recessed or built-in.
• Place the freezer on a surface strong enough to support it fully loaded.
• When moving the freezer, never tilt it more than a 45-degree angle.
This could damage the compressor and the sealed system.
• If the freezer is tilted let it stand in an upright position for at least 24
hours prior to plugging in. This is to allow the refrigerant to settle.
Proper Air Circulation
• To assure your freezer works at the maximum efficiency it was
designed for, you should install it in a location where there is proper
air circulation, plumbing and electrical connections.
• The following are recommended clearances around the freezer:
Sides……………4” (102mm)
Back..................4” (102mm)
Top....................4” (102mm)
Installing Your Freezer

4
7
Operating Your Freezer
• Once the freezer is in its proper place, plug it in an electrical outlet having 115 volts
and 15 amps.
• Set the temperature, on the temperature control knob. “1” being the warmest and
“7” being the coldest. Initially set the temperature on “4”. Place food inside the
freezer. After using the freezer for 24 hours set the freezer to your desired setting.
• In case you unplug your freezer or experience an electrical outage, allow 5 minutes
before plugging it back in.
General Features
Adjustable temperature dial:
Your freezer will automatically maintain the temperature level you select. The
temperature control dial has 7 settings plus OFF. “1” is the warmest, “7” is the
coldest. Turning the dial to OFF stops cooling the freezer. Set the dial to “4” and
allow 24 hours to pass before adjusting the temperature to your needs.
Normal Operating Sounds You May Hear
• Boiling water, gurgling sounds or slight vibrations that are the result of the
refrigerant circulating through the cooling coils.
• The thermostat control will click when it cycles on and off.
NOTE: If the freezer has been placed in a horizontal or tilted position for any period
of time wait 24 hours before plugging the unit in.
Control Panel
Varies by Model

4
8
Leveling Your Freezer
• Your freezer has two leveling legs which are located in the front bottom corners
of your freezer. After properly placing your freezer in its final position, you can
level your freezer.
• Leveling legs can be adjusted by turning them counterclockwise to raise your
freezer or by turning them clockwise to lower your freezer. The freezer door will
close easier when leveling legs are extended.
Door Alignment
1. Remove the top hinge cover using a flat head screw driver. Gently lift from the
rear of the hinge and slide forward.
2. Lossen the top hinge screws using a Phillips head screwdriver.
3. Adjust the door or put a spacer in between and then tighten the screws.
4. Replace the top hinge cover by aligning the rear of the cover with the rear of the
hinge. Press firmly on the front of the cover until it snaps in place.

4
9
Food Storage Information
Frozen Food:
• Wipe containers before storing to avoid needless spills.
• Hot food should be allowed to cool before storing in the freezer. This will prevent
unnecessary energy use.
• When storing meats, keep in the original packaging or rewrap as necessary.
• Proper freezer storage requires correct packaging. All foods must be in packages,
which do not allow the flow of air or moisture in, or out. Improper storage will
result in odor and taste transfer and will result in the drying out of the improperly
packaged food.
• Follow package or container instructions for proper storage.
• Packaging Recommendations:
Plastic containers with air tight lids
Heavy duty aluminum foil
Plastic wrap made from saran film
Self-sealing plastic bags
• Do not refreeze defrosted/thawed foods.
• It is recommended that the freezing date be marked on the packaging.
These are some suggestions for safe storage:
• TV Dinners 3 - 4 Months
• Fresh Shrimp, scallops, crawfish 3 - 6 Months
• Hamburger & stew meats 3 - 4 Months
• Ground Turkey, veal, pork 3 - 4 Months
• Chops 4 - 6 Months
• Steaks 6 - 12 Months
• Chicken or turkey, whole 1 year

4
10
Cleaning And Maintenance
General
• Prepare a cleaning solution of 3-4 tablespoons of baking soda mixed with warm
water. Use sponge or soft cloth, dampened with the cleaning solution, to wipe
down your freezer.
• Rinse with clean warm water and dry with a soft cloth.
• Do not use harsh chemicals, abrasives, ammonia, chlorine bleach,concentrated
detergents, solvents or metal scouring pads. SOME of these chemicals may
dissolve, damage and/or discolor your freezer.
Door Gaskets
• Clean door gaskets every three months according to general instructions.
Gaskets must be kept clean and pliable to assure a proper seal.
• Petroleum jelly applied lightly on the hinge side of gaskets will keep the gasket
pliable and assure a good seal.
Power Interruptions
• Occasionally there may be power interruptions due to thunderstorms or other
causes. Remove the power cord from AC outlet when a power outage occurs.
When power has been restored, replug power cord to AC outlet. If outage is for
a prolonged period, inspect and discard spoiled or thawed food in freezer. Clean
freezer before reusing.
WARNING
To avoid electric shock always unplug your freezer before cleaning.
Ignoring this warning may result in death or injury.
CAUTION
Before using cleaning products, always read and follow manufacturer’s
instructions and warnings to avoid personal injury or product damage.

4
11
Vacation And Moving Care
• For long vacations or absences, empty food from freezer, move the temperature
DIAL to the OFF position and clean the door gaskets according to “General
cleaning” section. Prop doors open, so air can circulate inside. When moving
always move the freezer vertically. Do not move with the unit lying down. Possible
damage to the sealed system could occur.
WARNING
If outage is for a prolonged period, inspect and discard spoiled
or thawed food in freezer. Clean freezer before reusing.
Manual Defrosting Instructions

12
Freezer Has An Odor
• Interior needs cleaning.
• Foods improperly wrapped or sealed are giving off odors.
• Check gasket for proper seal.
• Check to see if doors are completely closed.
• Check freezer compartment for blockage from
frozen food packages, containers, etc.
Freezer Does Not Operate
• Check if thermostat control is not in the “OFF” position.
• Check if freezer is plugged in.
• Check if there is power at the ac outlet, by checking the circuit breaker.
• Wait for 30-40 minutes to see whether freezer will start. Compressor cycle must
be complete to operate.
Food Temperature Appears Too Warm
• Frequent door openings.
• Allow time for recently added warm food to reach freezer temperature.
• Check gaskets for proper seal.
• Clean condenser coils (for models with exposed condenser coils).
• Adjust temperature control to colder setting.
Food Temperature Is Too Cold
• If temperature control setting is too cold, adjust to a warmer setting
and allow several hours for temperature to adjust.
Compressor Runs Too Frequently
• This may be normal to maintain constant temperature during
high temperature and humid days.
• Doors may have been opened frequently or for an extended
period of time.

MODELNO.
CAPACITY OF FRIDGE IN CU FT AND INTERIOR SIZE (IN.) (WxHxD)
SHELF MATERIAL
TEMPERATURE CONTROL TYPE
TEMPERATURE RANGE FRIDGE IN FAHRENHEIT AND CELSIUS
PRODUCT WIDTH (IN.)
PROFONDEUR AVEC PORTE OUVERTE DE 90 DEGRÉS (IN.)
PRODUCT DEPTH (IN.)
PRODUCT HEIGTH (IN.)
POWER CORD LENGTH (IN.)
BPA FREE (YES/NO)
REFRIGERANT TYPE
MAXIMUM POWER CONSUMPTION IN AMPS
OPERATION NOISE dBA
YES
R600a
1.1A
42
EFRF314-C
3.0/14.9X15.7X25.2
GLASS
MECHANICAL TEMPERATURE CONTROL
-4 ~6.8 (-14 ~-20 )
20.3
40
21.5
31.7
71
°F °F °C °C
4
13
PRODUCT SPECIFICATIONS

This product is warranted to be free from defects in material and workmanship for a
period of one (1) year from the date of original purchase. During this period, your
exclusive remedy is repair or replacement of this product or component found to be
defective, at our option; however, you are responsible for all costs associated with
returning the product to us. If the product or component is no longer available, we will
replace with a similar one of equal or greater value. Prior to a replacement being sent,
the product must be rendered inoperable or returned to us.
1 Year warranty
This warranty does not cover glass, filters, wear from normal use, use not in conformity
with the printed directions., or damage to the product resulting from accident,
alteration, abuse, or misuse. This warranty extends only to the original consumer
purchaser or gift recipient. Keep the original sales receipt, as proof of purchase is
required to make a warranty claim. This warranty is void if the product is used for other
than single-family household use or subjected to any voltage and waveform other than
as on the specified rating on the label (e.g., 115V~60Hz).
We exclude all claims for special, incidental, and consequential damages caused by
breach of express or implied warranty. All liability is limited to the amount of the
purchase price. Every implied warranty, including any statutory warranty or condition
of merchantability or fitness for a particular purpose, is disclaimed except to the extent
prohibited by law, in which case such warranty or condition is limited to the duration of
this written warranty. This warranty gives you specific legal rights. You may have other
legal rights that vary depending on where you live. Some states or provinces do not
allow limitations on implied warranties or special, incidental, or consequential damages,
so the foregoing limitations may not apply to you.
ATTACH YOUR PROOF OF PURCHASE HERE, PROOF OF PURCHASE IS REQUIRED
TO OBTAIN WARRANTY SERVICE.
Please have the following information available when you contact the Support Team:
Name, address and telephone number.
Model number and serial number.
A clear, detailed description of the problem.
Proof of purchase including dealer or retailer name, address and date of purchase.
For faster service, locate the model, type, and serial numbers on your appliance.
CURTIS INTERNATIONAL LTD
7045 BECKETT DRIVE, UNIT 15
MISSISSAUGA, ONTARIO
L5S 2A3
414

3.0 cu. ft. Congélateur vertical
Modèle No.
Le manuel du propriétaire
Ce congélateur coffre est destiné
à un usage résidentiel uniquement.
Il n'est pas destiné à être utilisé dans
des environnements commerciaux.
A LIRE AVANT
UTILISATION
HBFRF301-C
utilisé sous licence par Curtis International Ltd.

Felicitaciones,usted ha adquirido un Congélateur vertical de alta
calidad marca Hamilton Beach. Esta unidad está repleta de funciones
convenientes. Por favor,siga las precauciones de seguridad e instrucciones de
funcionamiento de este manual de uso fácil. Tómese el tiempo para leerlo,y
guarde estas instrucciones para uso futuro. Por favor,también recuerde registrar
el número de serie. El número de serie se encuentra en la parte superior de la
unidad junto al motor. Guarde su recibo engrapado a este manual para facilitar el
acceso.
Assurer une Bonne Circulation de L'air ...............................................
Caractéristiques du Congélateur et Utilisation ....................................
Fonctionnement de votre congélateur................................................
Caractéristiques Générales.................................................................
Bruits de fonctionnement normaux que vous pourriez entendre..........
Alignement de la porte.........................................................................
Mise à niveau de votre congélateur.....................................................
Informations sur le Rangement des Aliments......................................
Entretien et Nettoyage du Congélateu.................................................
Cleaning And Maintenance..................................................................
Nettoyage général...............................................................................
Les joints de porte ..............................................................................
Coupures de Courant..........................................................................
Entretien lors des Vacances ou d'un Déménagement.........................
Mesures de Sécurité............................................................................
Pièces et Caractéristiques...................................................................
Installer le Congélateur .......................................................................
Déballer le Congélateur........................................................................
Régler le Congélateur .........................................................................
Guide de Dépannage .........................................................................
Spécifications Du Produit ...................................................................
3
5
10
12
6
6
6
6
7
7
7
7
8
8
9
10
10
10
10
11
Instructions De Dégivrage Manuel...................................................... 11
13
Garantie...............................................................................................
14

3
Lisez toutes les instructions avant d'utiliser cet appareil. Lorsque vous
utilisez cet appareil, respectez les consignes de securite de base y
compris les suivantes:
1. Utilisez cet appareil uniquement pour I'usage auquel il est destine
comme indique dans ce manuel d'utilisation et d'entretien
2. Cet appareil doit etre installe proprement et conformement aux instruc-
tions d'installation avant d'etre utilise. Consultez les instructions de
mise a terre dans la section d'installation.
3. Ne debranchez jamais votre congelateur / refrigerateur convertible en
tirant sur le cordon d'alimentation'. Saisissez la fiche fermement et tirez
tout droit de la prise murale.
4. Reparez ou remplacez immediatement, toutes les cordes electriques qui
sont devenues frangees ou autrement endommagees.N 'utilisez pas un
cable representant des craquelures ou des abrasions a la longueur du
cordon, de la fiche ou de I'extremite du connecteur.
5. Debranchez votre congelateur / refrigerateur avant de le nettoyer ou
avant de le reparer. Note: Si pour n'importe quelle raison cet appareil
exige un service de reparation, nous recommandons avec force qu'un
technicien certifie execute le service.
6. N'utilisez aucun dispositif electrique ou aucun instrument aigu pour
degriver votre congelateur / refrigerateur convertible.
7. Si vous n'utilisez plus votre congelateur /refrigerateur convertible, nous
vous recommandons de retirer les portes. Cela reduira les risques d'ac-
cident aux enfants.
8. Apres avoir mis en marche votre congelateur / refrigerateur, ne
touchez pas aux surfaces froides specialement si vos mains sont
movillees ou humides. La peau peut adherer aux surfaces extreme-
ment froides.
9. Ne congelez pas de nouveau la nourritue qui a ete degelee complete-
ment. Le service des Etats Unis d'Agriculture dans le bulletin de
Maison et Jardin NO 69 lisent ".... ous pouvez sans risque congeler
de nouveau la nourriture degelee si elle contient des cristaux de glace
ou si la temperature est restee froide au dessous de 40degres F.
Instructions de
Securite importantes

4
"La viande hachee, le volaille,ou le poisson degeles, qui ont n'importe
quelle odeur ou couleur ne doivent pas etre congeles de nouveau ou
manges. La glace degelee doit etre jetee. Si I'odeur ou la couleur de
n'importe quelle nourriture est incertaine, jetez la. ll peut etre dan geureux
de manger cette nourriture.
"Meme une decongelation partiale et recongelati peuvent reduire la
qualitee de la nourriture, particulierement, les fuits, les vegetables et les
plats prepares en avance. La qualitee de la viande rouge est moins
affectee que celle que d'autres nourritures. Utilisez la nourriture qui a ete
recongelee au plus tot possible pour garder sa qualite.
10. Ce refrigerateur ne doit pas etre encastre ou incorpore dans un plac-
ard enclos. ll est concu pour une installation sans encastrement.
11. N'operez pas votre unite en presence des fumees explosives.
12. Ne stockez pas de substances explosives telles que des aérosols contenant des
substances inflammables. propulseur dans cet appareil.
Agrafer le ticket de caisse au guide.II devra être présenté pour tout
service après-vente sous garantie.
*Enlevez les portes.
*Laissez les étagères en place de sorte que les enfants ne puissent
pasfacilement s'élever à I'intérieur.
Veuillez conserver ces instructions
DANGER:Risque d'occlusion d'enfant.Avant que vous jetiez votre
vieux réfrigérateur ou congélateur:
13. AVERTISSEMENT: conservez les orifices de ventilation, dans le boîtier de
l'appareil ou dans la cuve intégrée. structure, dégagée de tout obstacle.
14. AVERTISSEMENT: n'utilisez pas d'appareils électriques dans la réserve
de nourriture compartiments de l’appareil, à moins qu’ils ne soient du type
recommandé par le fabricant.
15. AVERTISSEMENT: ne pas endommager le circuit de réfrigérant.
16. AVERTISSEMENT: N'utilisez pas d'appareils mécaniques ou d'autres
moyens pour accélérer la procédé de dégivrage autre que ceux
recommandés par le fabricant.

5
Pieces et caracteristiques
2
1. Contrôle de la température réglable
2. Étagère amovible
3. Porte
4. Pieds de nivellement
1
3
4

4
6
Déballer le congélatuer
1. Retirez tout le matériau d'emballage y compris la base en
mousse et le ruban adhésif retenant les accessoires du
congélateur à I'intérieur
2. Examinez et retirez tous les restes de I'emballage, de la bande
ou des matériaux imprimés avant d'actionner sur le congélateur.
Régler le congélatuer
• Ce congélateur a été conçu en tant qu'appareil autostable.ll ne
doit pas être encastré ni être placé en retrait dans une niche ou un
renfoncement.
• Placez le congélateur sur un sol suffisamment résistant et capable
de le soutenir lorsque ce dernier est complètement rempli.
• Lorsque vous déplacez le congélateur, veillez à ne jamais le pencher
plus de 45 degrés, En effet, vous risquez d'endommager le compresseur
et le dispositif scellé.
• Si le congélateur a été penché, laissez-le debout (en position verticale)
pendant au moins 24 heures avant de le brancher afin qu'il revienne à
son état de fonctionnement normal.
Assurer une bonne circulation de l'air
• Afin de vous assurer que le congélateur fonctionne à plein
rendement, installez-le dans un endroit largement ventilé et où il
existe des prises pour le raccordement électrique et la plomberie.
• Les dimensions suivantes sont les distances recommandées
autour du congélateur:
Côtés.......4 po. (102 mm)
Dessus.....4 po. (102 mm)
Derrière.....4 po. (102 mm)
Installer le congélatuer
This manual suits for next models
1
Table of contents
Languages:
Other Hamilton Beach Freezer manuals

Hamilton Beach
Hamilton Beach HBFRF301-B User manual

Hamilton Beach
Hamilton Beach HBFRF513-B User manual

Hamilton Beach
Hamilton Beach HBMIS4515 User manual

Hamilton Beach
Hamilton Beach HBFRF355 User manual

Hamilton Beach
Hamilton Beach Thermos 840112800 User manual

Hamilton Beach
Hamilton Beach HBFRF1100 User manual

Hamilton Beach
Hamilton Beach HBFRF510 User manual